Are you wondering how to add an about me widget to a WordPress sidebar? Well, it’s a pretty straightforward thing to do and it’s a really nice addition to any site.
In this tutorial, I’ll be showing you step-by-step how to create an about me widget, how to customise it and how to add it to your sidebar.
As an added bonus, if you stay with me till the end, you’ll also get a little HTML coding tutorial while you’re here to help customise your widget so stay with me, I promise it’ll be worth it.
Why Add An About Me Widget To The Sidebar
An about me widget is a great little feature to add to a website because they show readers that there’s a real person behind the site. There’s something nice and authentic about knowing who’s writing the post you’re reading.
It makes it much easier to relate to them when you’ve seen their photo and know a little bit about who they are and the purpose of their site.

People are more likely to trust and engage with a site if they have an idea as to who is behind it Seeing an image and short bio of that person helps them imagine that the person is talking directly to them.
Even if you already have a full about me page on your site, the chances of someone actually looking at it are not particularly high so adding an about me widget to the sidebar means that everyone will see it regardless of what part of your site they’re viewing.
How To Add An About Me Widget To A WordPress Sidebar
To add an about me widget, you’ll first need to build it using a few different blocks and you can do this in two different ways.
You can either build it directly within the widget area or you can create a draft post where you can build it first and then copy it across when it’s finished.
I prefer to build mine directly in the widget area so that I can see exactly how it looks in the area I’m placing it in and reposition or resize it as I go along.
So for the sake of this tutorial, I’ll go through this in the widget area, so to start, hover over or click Appearance in the main WordPress menu on the left of the page, then click Widgets.
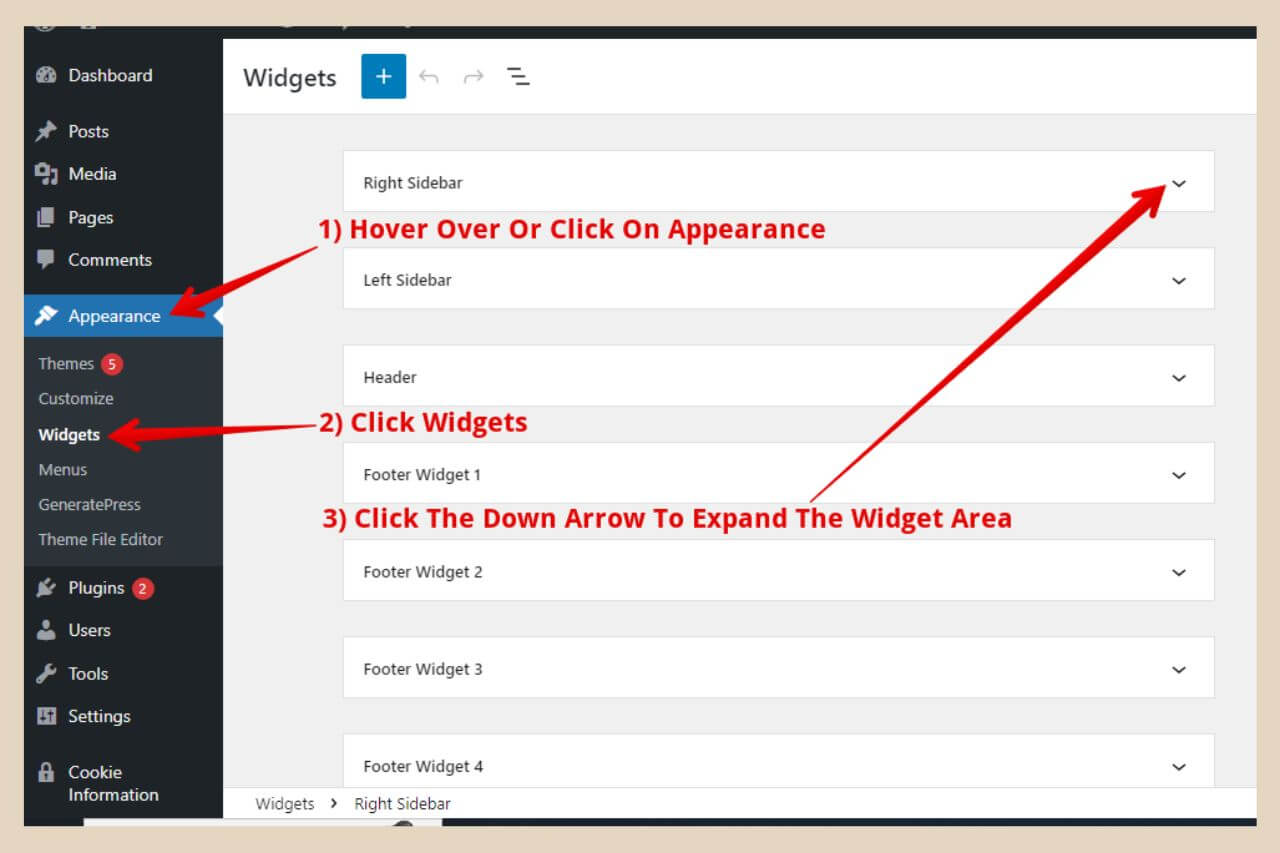
From here select the area where you’d like to place your About Me widget and click the down arrow to expand the area if it isn’t already expanded.
How To Create An About Me Widget
To create an about me widget, you’re going to need to use three different block types to do this. You’ll need a Heading block for the title, an Image block for the picture and a Paragraph block for the short bio.
As the title is going to be at the top of the widget, we’ll start with this one. To add your title, click the + icon to add a new block.
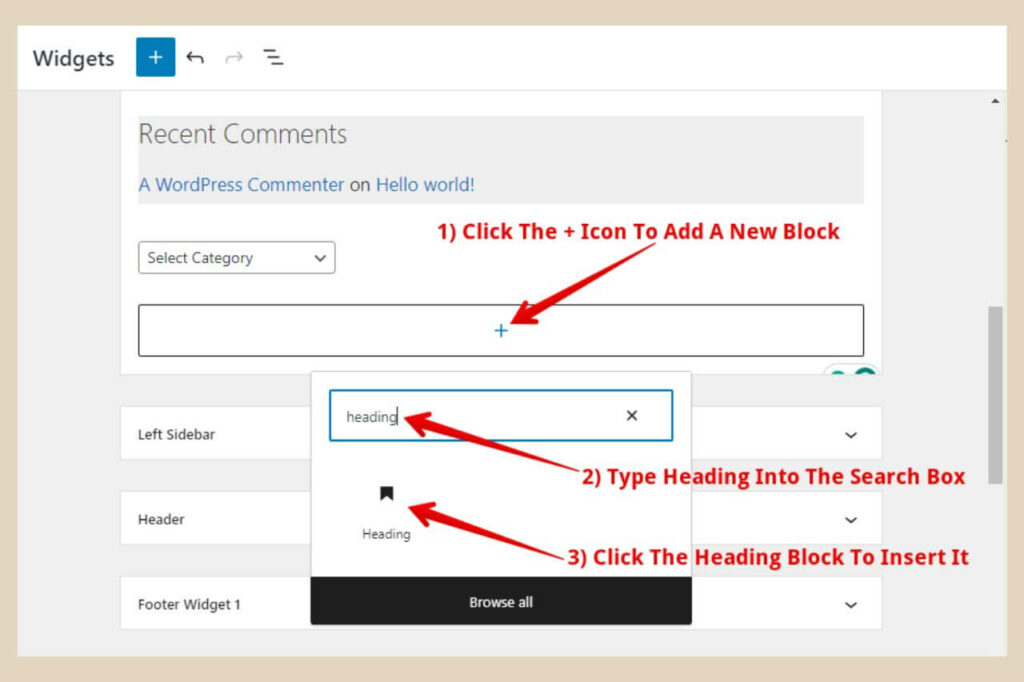
You’ll need a heading block for this so type Heading into the search box and select the block when it appears to add it to the widget area. You can now type in your title of choice and customise it to your own liking.
Customising Your Heading Block
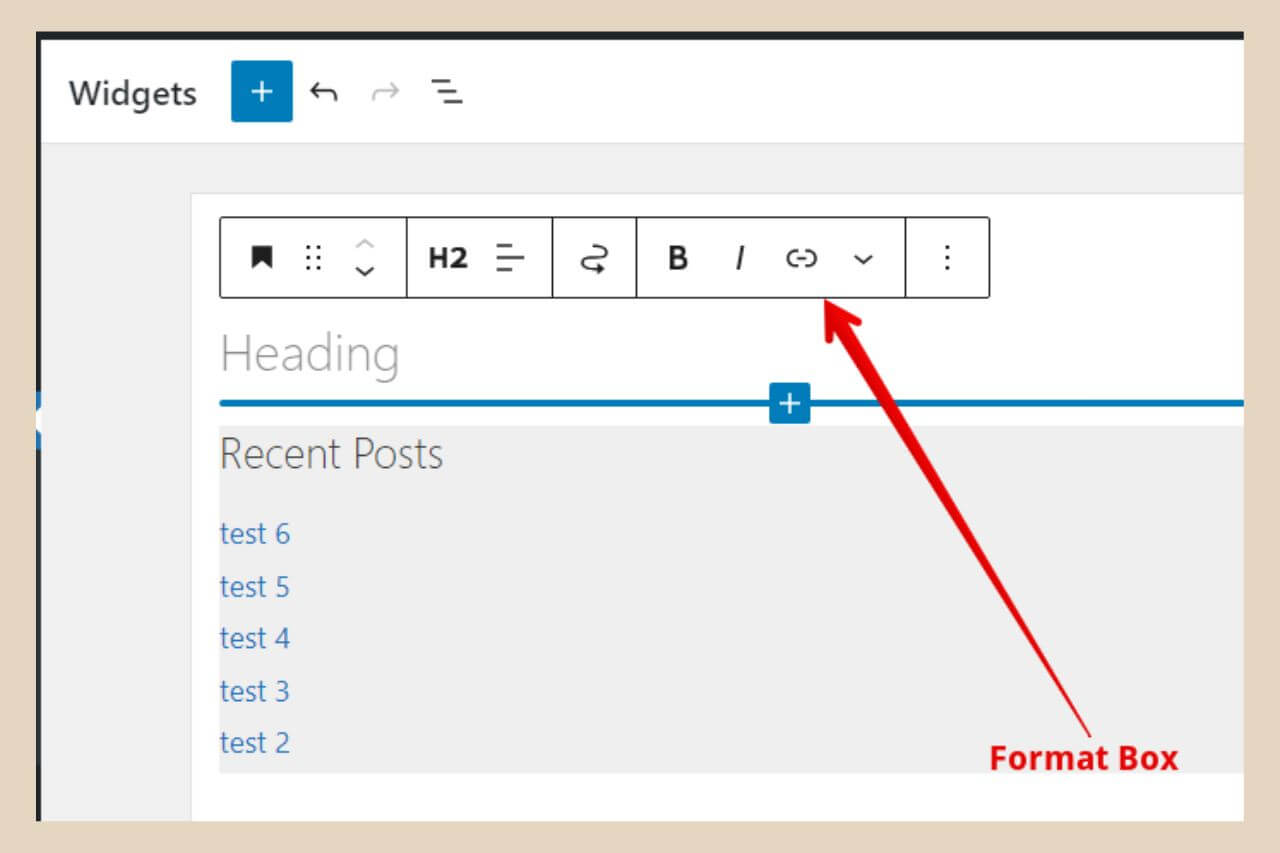
To format it, you can start by using the small format box that appears anytime a block is selected. With this box, you can change things such as the heading size, change the alignment, make the text bold and/or italic, etc.
You can also use the settings on the right-hand side of the page to format the text even further. If you’re not seeing the settings here, simply click the button on the right of the Publish/Update button to show them and make sure that Block is selected at the top.
From here you can make several changes to the text, including changing the text colour and adding a coloured background to it.
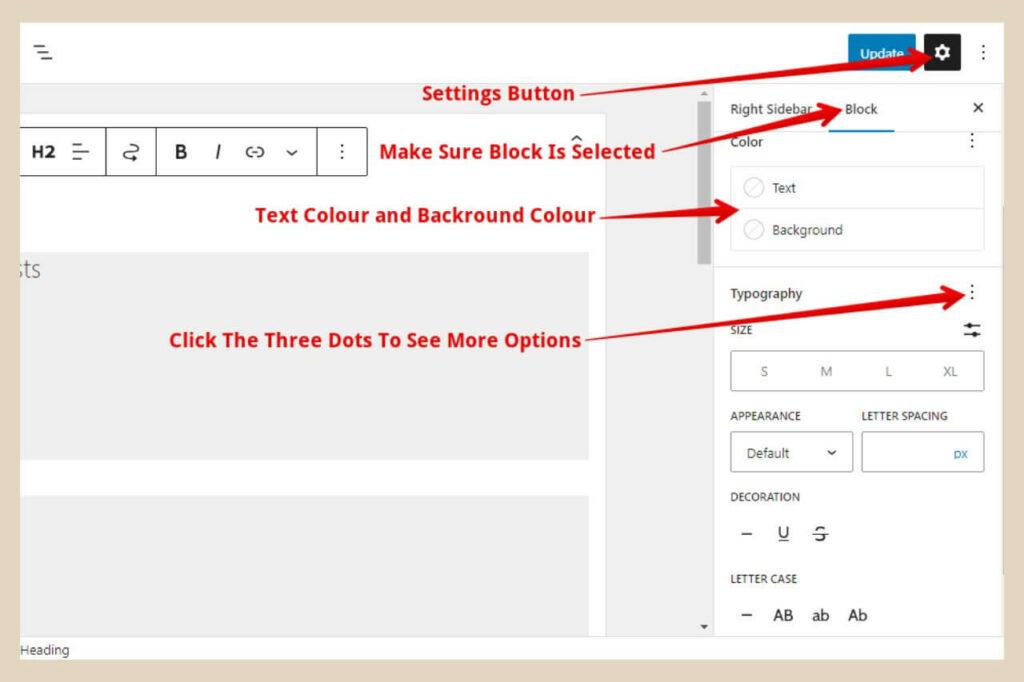
In the Typography section, you can change the font size, the font appearance (thin, light, extra bold, etc), letter spacing, decoration (underlined or strikethrough) and the letter case.
If you’re not seeing all the options here then click on the three dots across from the Typography title and this will show you a small menu where you can click the options you’d like to change.
These extra options will now show up in the typography section where you can now change them to your own liking.
Pro Tip:
To get rid of the small typography menu, click any white space within either the settings section or the block you’re working on and your extra options will be added. If you click away anywhere else, your block will be deselected and the extra typography settings won’t be added.
Adding An About Me Image
Once you’re happy with your title, you can then move on to adding your image so the next step is to add an image block. As before, click the + icon to add a new block and this time search for and add the Image block.
From here, you can either upload or search your media library for your image of choice. Once your image has been added, you can now make a few changes to it.
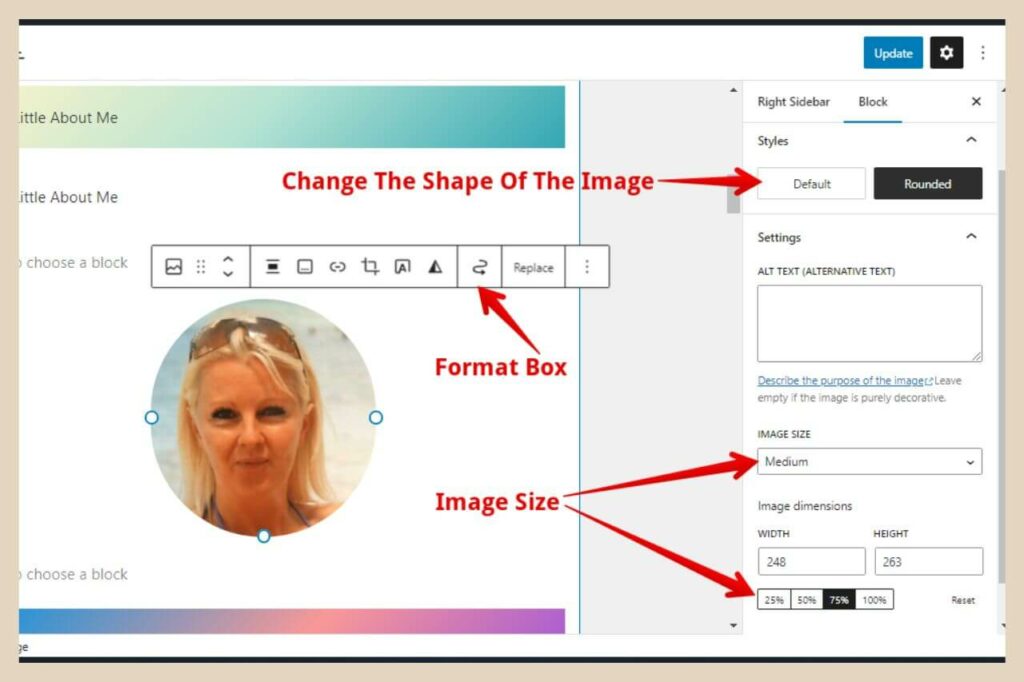
There are a few options that you can change on the small format box including alignment options, adding a link to it, etc. If you hover over each section, some text will appear telling you what the section does.
In the settings area on the right of the page, you can choose to change your image to a rounded image and you can adjust the size of your image by using the drop-down menu and the percentage options to fully customise the size.
Once you’re happy with the image settings, you can move on to the next step which is adding your short bio.
Adding Your Short Bio
To add your short bio to the widget, simply add another block beneath the image. For the short bio, you’ll need a Paragraph block this time so click the + icon to add your final block to the widget.
Once you’ve written your short bio, you can format the text using the same methods as you did for the heading block.
If you have a full About Me page, then it’s a good idea to add an internal link that will link to it from your about me widget and you can do that by simply highlighting a chosen snippet of text and clicking the link button on the small format box.
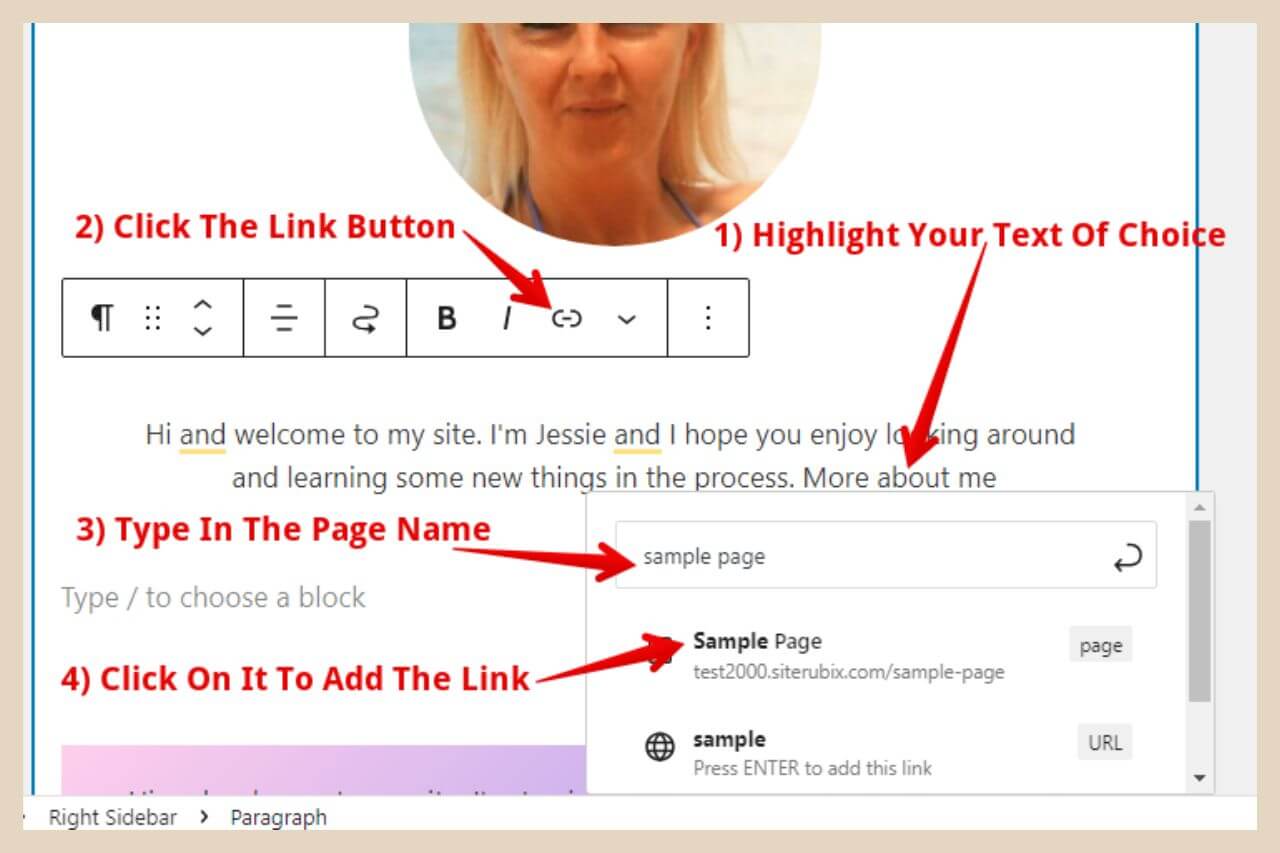
You can then type in the name of your about me page into the search/URL box and a small selection of close matching posts/pages from your site should appear beneath it. Simply click on the one you want to link to and the link will be added to the highlighted text.
It’s not a bad idea to have a dedicated piece of text at the end of your short bio for this purpose. Something like “More about me” or something to that effect works really well here.
Depending on your theme and widget area settings, you may not need to do anything else here and if that’s the case (and you don’t want to make it any fancier) then you can go ahead and click the Update button at the top of the page and your new about me widget will be live on your site.
Sometimes You May Need Some Additional Customising
As I mentioned, depending on your theme and widget settings, you may need to take a few extra steps to finalise your About Me widget.
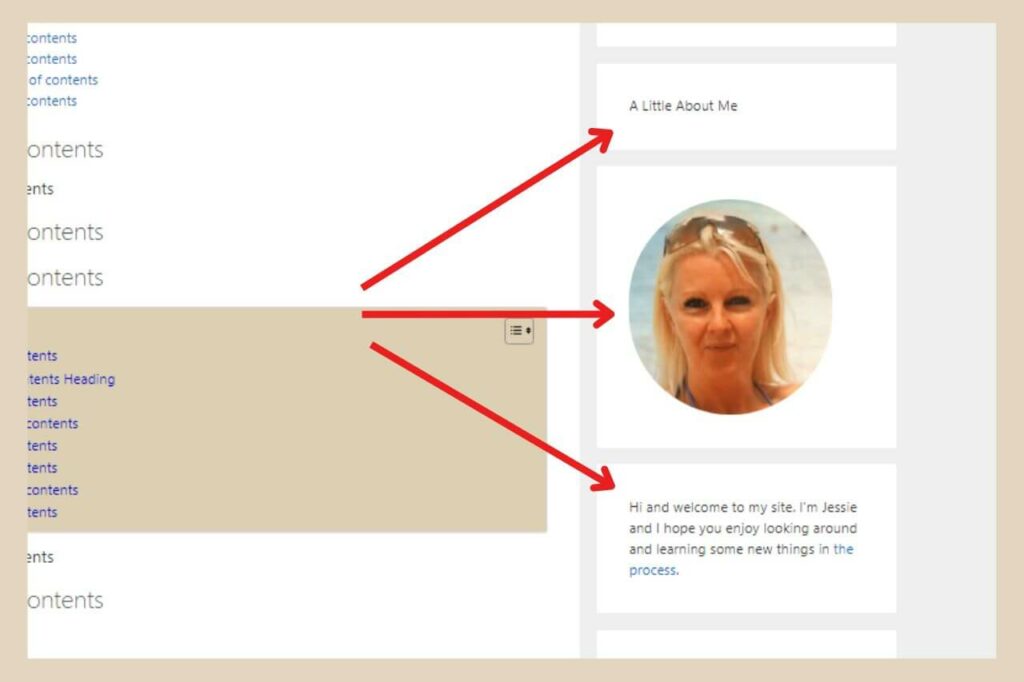
In my particular case, my widgets/blocks are separated into their own boxes so if I leave everything as above, I’ll end up with the three blocks all in separate boxes.
My title will be in one boxed area, the image in another and the short bio also in another boxed area like the image below.
I could change this setting but I like the way they look when they’re contained within their own little boxes but this does open up some issues when you’re trying to use several different blocks within the one area to create one element.
Even if my widgets weren’t boxed like this, with some themes, these three blocks will look too spaced apart from each other which will make them look like they’re completely separate widgets areas.
You may also have an issue if you’re trying to add a background colour to all three blocks because they are separate elements and there will be white space in between them.
So, the only way to fix this is to combine them all together using one of two methods and we’ll start with the first one which is grouping blocks.
Method 1 – Grouping Blocks Together
Grouping blocks together is actually very quick and simple. To do it, you simply need to click on the first block (the heading block) then hold down the shift key on your keyboard, and then click the last block (the paragraph block).
By doing this, both blocks and any block in between them (in this case, the image block) will be selected all at once.
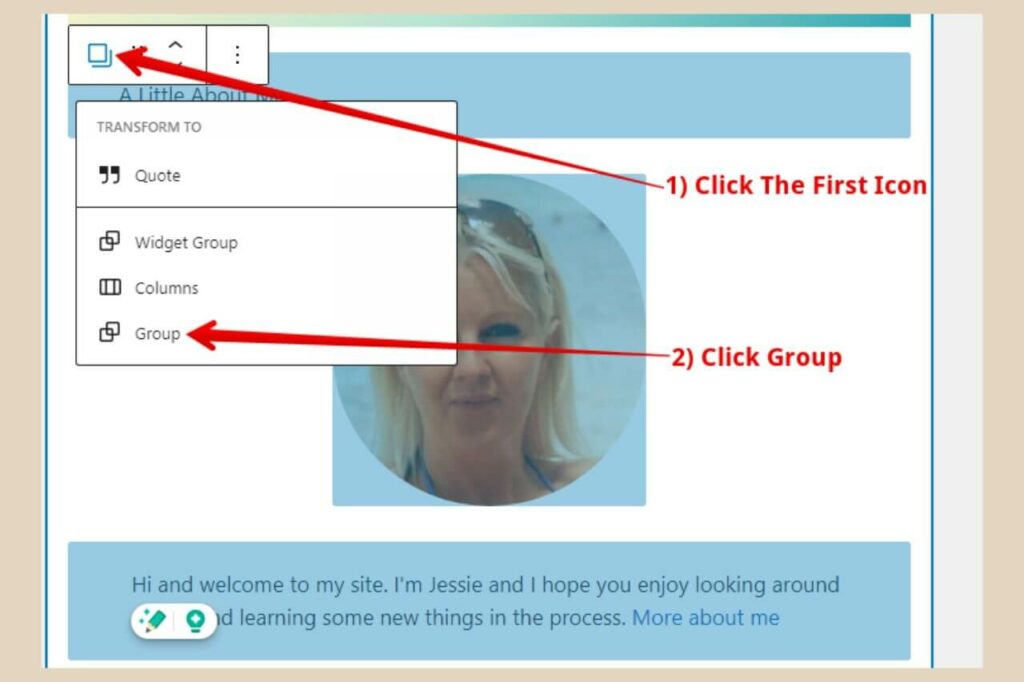
Next, you’ll need to click the first icon on the small format box, then click “Group” from the small list of options that appear. The three blocks will now be grouped together and should look like one unit on your sidebar.
If the three blocks look too close together, you can simply insert an empty block in between them to create a line of space. Any extra blocks you add within the grouped area will become part of the group.
Once the blocks are grouped, if you’re not planning on making any other customisations, you can simply click the Publish/Update button to save your changes.
Making Customisations To Your Grouped Blocks
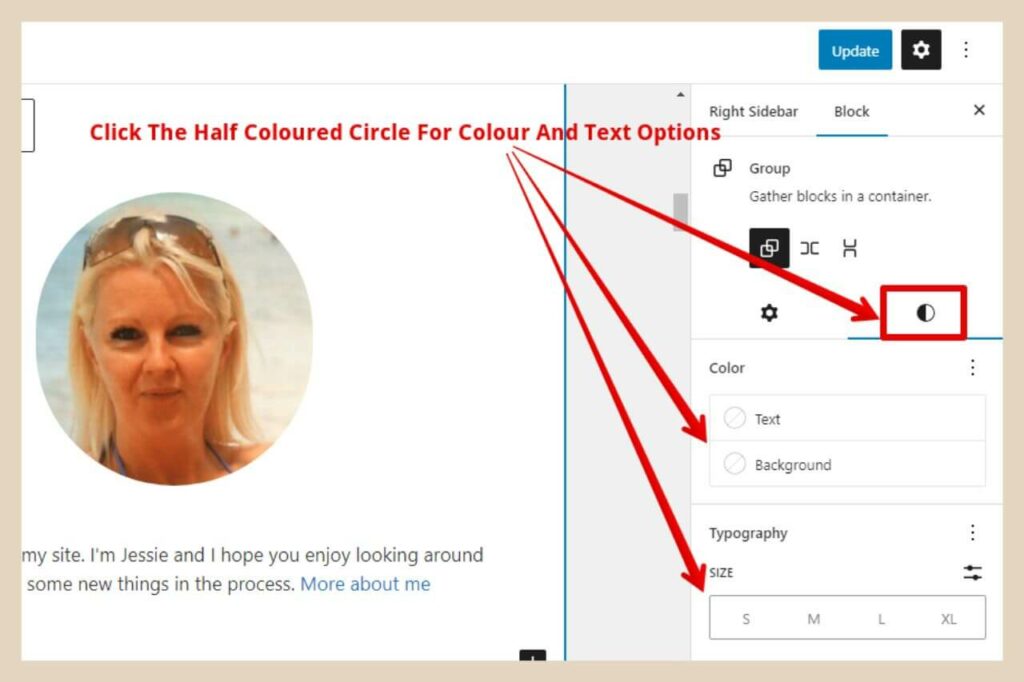
If you want to customise your group blocks further, you can click the first icon again on the small format box and some new settings will appear in the settings section on the right of the page.
The only real thing I would change here is if you want to add a background colour to the entirety of the three blocks.
To do that, click on the half-coloured circle which will bring you to the same settings as before where you can change the typography and add a background colour. This time, however, changes made here will apply to the entire grouped blocks area.
However, there is a downside to this though in that the text will sit right to the edge of the background colour which doesn’t really look the best.
There’s also another thing worth mentioning here and it’s that sometimes blocks will misbehave when you group them together, particularly with certain themes.
One example is that things that may have been aligned one way before grouping may end up slightly out of position afterwards.
Another example is when I recently added a Pinterest widget to my sidebar but any time I tried to group a heading block with it (for my title) it resized and alter the appearance of the Pinterest widget.
For this exact reason, I tend to use a second method which is using a custom HTML block instead.
Method 2 – Copying The HTML Of Each Block Into One Custom HTML Block
Another reason why I prefer to use a custom HTML block is that I can do so much more customisations to it by adding extra snippets of code.
I’ll include all this extra stuff for you at the end if you fancy giving it a try and it’s all super easy. For this method, the first thing you’ll need to do is to add another new block and for this one, you’ll need a custom HTML block.
Once you’ve inserted the HTML block, you can then click on your heading block (your About Me title) and click the three dots on the far right of the small format box.
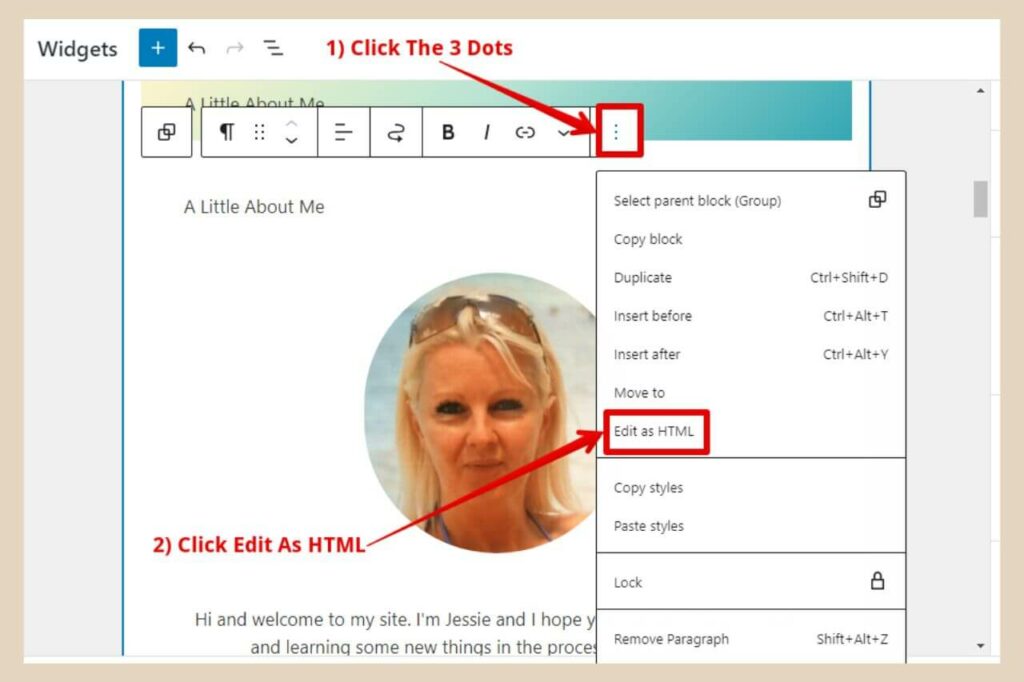
Click “Edit as HTML” from the list of options that appear and your title will be changed into HTML. Copy this HTML and paste it into the Custom HTML block that you just added. To create a line of space after it, simply paste the following snippet of code after the HTML.
<p></p>Repeat this process with the image block and then the paragraph block so that the HTML of all three blocks is now within the custom HTML block and that’s all there is to it. You can now delete the other three individual blocks.
Remember to add the snippet of code above (to create a line of space) between the image and paragraph code otherwise, they will be very close together. You’ve now just created one block that contains all the elements of your About Me Widget.
Pro Tip:
Using the “Edit as HTML” option is a great way of seeing how you’ve previously customised particular elements (especially when you can’t remember what you did) when you want to duplicate them in other areas of your site.
Want To Make It Even Fancier?
If you want to make it even fancier then you can add another little snippet of code to make it look just like mine with the boxed border around the image and bio and some background colour to jazz it up. So stay with me here, I promise, this is very easy.
If you’re wondering why we’re not just using the block settings to add a background here then it’s because custom HTML blocks don’t have the background colour options that normal blocks do so you have to do it manually.
So, add the following snippet of code right before the section that you’d like to customise in this way as per the instruction below. I’ll show you how to change the colour, etc in a moment. Don’t worry, it’s also very easy.
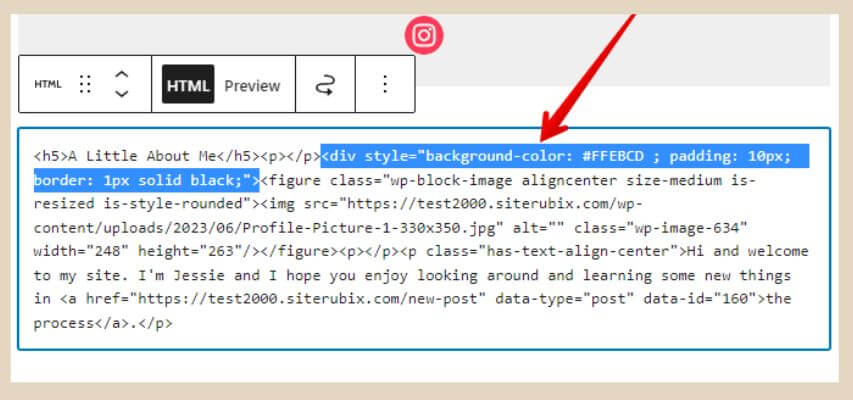
<div style="background-color: #FFEBCD ; padding: 10px; border: 1px solid black;">If you wanted this colour box around the entire thing including the title, you would place this code right at the very beginning before all the other code in the custom HTML block.
I only wanted the image and short bio to be in this box so in that instance, I added this code in between the paragraph space after the title (the <p></p> code) and the image HTML (starts with <figure class=) like the image below.
If you’d like to change the colour or make any other adjustments, you can do that very easily by changing the sections as per the image below.
If you want to play around with this, you can click the preview button next to the HTML button on the small format box to see how it looks as you go along.
Making Changes To The Code
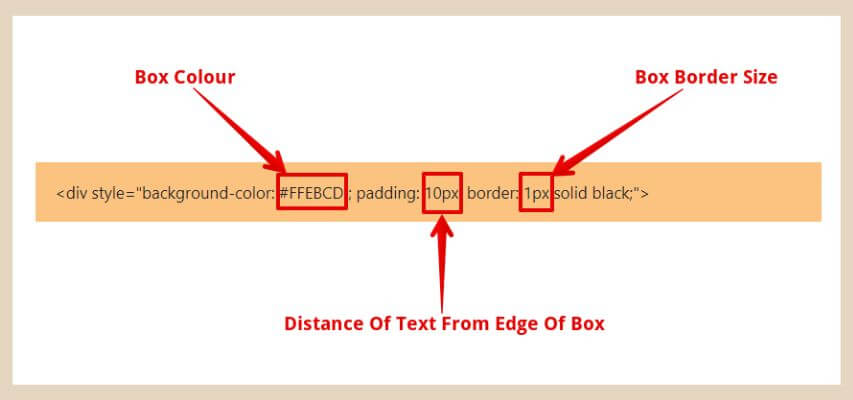
To change the colour, simply change the 6 digits after the # as per the image above, to your colour of choice (all colour codes start with a # but as it’s already there, you can just change the 6 digits).
Here is a great website for finding HTML colour codes, so simply copy and paste the code for the colour you like to replace the existing colour code I already have in there and your box will change to that colour.
Note: Colour codes are not case-sensitive so it doesn’t matter if they’re uppercase or lowercase. They will work regardless.
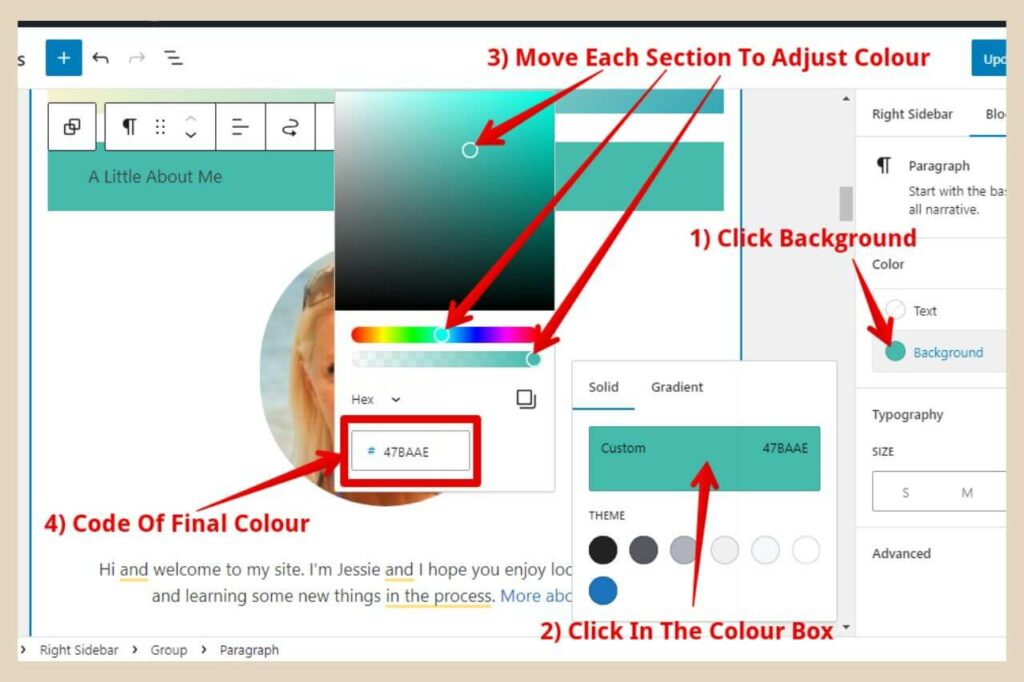
You can also get the code for any colour directly from the background colour block settings you saw earlier. Any time you pick a colour, the code for that colour will be shown in the box underneath it as per the image below.
To change the thickness of the border around the box, simply change the px number after “border” to make it thicker.
To change how far away the text (and image) is from the edge of the box, simply change the px number after “padding” to move it closer to or further away from the edges.
Wanna Get A Little More Advanced?
For those of you that want to get really nifty here, why not try adding a gradient background to your widget?
To do this, simply copy the following snippet of code and place it in the same place as before. This gradient will change colour from top to bottom. (Btw, this is the same snippet of code as before only with a little extra added to the beginning of it).
<div style="background-image: linear-gradient(#BFA67C, #FFEBCD, #FFF8E9); padding: 10px; border: 1px solid black;">Again you can change the colours as before by changing the 6 digits after the #. I have three different colours in this code but if you only want two then just delete the third one by deleting the comma after the second colour all the way to the last digit before the closed bracket.
Alternatively, if you want to add more colours, just put a comma then a space between the last colour and the closed bracket then insert your next colour of choice (make sure to copy the # as well if you’re adding extra colours as the full code for a colour is a # followed by the 6 digits).
Practising Mixing Colours Together
If you want to see how different colours look together, then you can actually practice on a heading/paragraph block using the same background colour block settings as before.
This time, however, click on the gradient tab and click any of the preset colours available. Some are two colours and some are three colours (one is even six colours) so pick one to play around with.

Once you’ve chosen your preset gradient of choice, you can click on each circle as per step 4 in the image above to change each colour (the preset in this image has two colours so you’ll know how many colours are in the preset by the number of circles).
When you click on one of those circles, a colour window will appear where you can change the colour. The block selected will change as you go along so you can see how the colours look as you change them.
Once you’re happy with your colour choices, make a note of each colour code from each circle and use them as your background colours to create the same gradient in your about me widget.
Changing The Direction OF The Gradient
If you want the gradient to change colour from left to right instead of top to bottom, simply add to right, (including that comma at the end) followed by a space in between the open bracket and the first colour code. Or you can just copy the code below where it’s already been done.
<div style="background-image: linear-gradient(to right, #BFA67C, #FFEBCD, #FFF8E9); padding: 10px; border: 1px solid black;">You can actually change this to other directions such as to left or if you want it to change diagonally like mine, you could use to bottom left. Here are some examples of code you can insert here to change the direction.
- To left
- To right
- To bottom right
- To bottom left
- To top right
- To top left
Just make sure to leave the open bracket there before it and the comma and space after it. By the way, just be warned that once you start doing any of these code customisations and realise how easy it is, you’ll be playing around with this for hours.
Let’s Get Those About Me Widgets Created
Now that you know how to create an about me widget and how to customise it, why not try adding one to your site?
You’ve also just learnt some HTML coding in the process too which I wasn’t actually planning to include when I started writing this post but here we are so never mind (this was supposed to be a basic beginners tutorial).
Oh well, either way, I hope you enjoyed this tutorial and found it helpful. If you do get stuck on anything or need more help, then please feel free to let me know in the comments below and I’ll be more than happy to help you out.
Happy About Me widget creating.

Helpful Guides to Read Next
These beginner-friendly guides will help you keep building your blog step by step.
- How to Use WordPress Widgets to Improve Your Blog Layout
- How to Use Visual Recent Post Feeds to Skyrocket Your Internal Clicks
- How to Create a Navigation Menu Your Readers Can Actually Use
- The Easiest Way to Add Header and Footer Code in WordPress
- How to Make Long Blog Posts Easier to Navigate with a Table of Contents

Jessie
Founder, nomorerush.com
Hi, I’m Jessie — founder of No More Rush. I help beginners build profitable, beginner-friendly blogs without the overwhelm or unrealistic expectations you see online. Everything here is built around simple, structured steps so you always know what to do next.