Artboards in Illustrator are like pages in a notepad, you can’t create a design without them. They’re the canvas for every single design you create and knowing how to edit artboards in Adobe Illustrator will help you keep your designs exactly as you want them.
So, whether you’re trying to add, delete, resize or rearrange your artboards, I show you every which way there is to do it because trust me when I say, there’s no shortage of ways to choose from.
How To Edit Artboards In Adobe Illustrator
Anyone who’s familiar with Illustrator will know that there’s usually more than one way to do something and editing artboards is no exception. There are a multitude of ways to edit your artboards and you can use any one of the following tools/panels to do it.
- Artboard Tool
- Artboard Panel
- Properties Panel
- Control Bar
Each one will give you similar if not identity options in many cases so you’ll probably end up using only one preferred method.
However, there’s no harm in knowing all the different methods, especially considering how busy and complex the app looks to complete beginners.
advertisement
Once you realise how many areas do similar if not the same tasks, the less daunting the app will appear and the easier it’ll become to master it.
So, let’s start with one of the first things it’s worth knowing when it comes to artboards and that’s adding, deleting and resizing them.
How To Add, Delete Or Resize Artboards In Adobe Illustrator
So, at the very first step of creating Illustrator designs, you’ll have the option to decide the size and the number of artboards you’d like to use before you even open your blank design in the Illustrator editor and they’re right there on either side of the Orientation options.
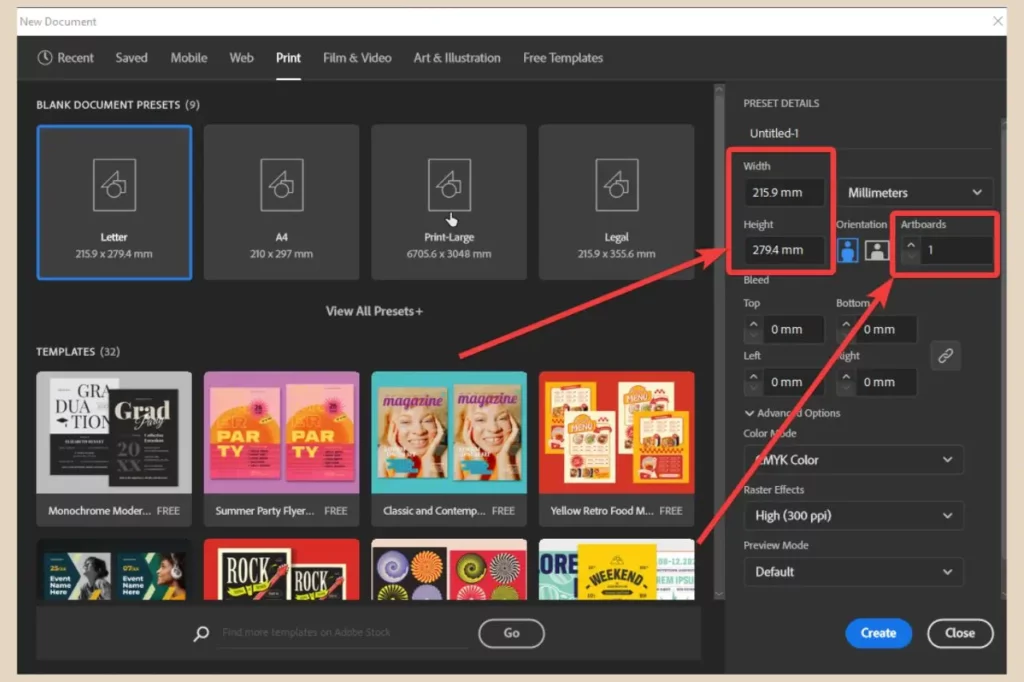
And that’s great if you already know the exact size and number of artboards you want to use but let’s face it, there are lots of occasions where you’ll want to add, remove or resize artboards mid-design.
Luckily, there are several ways to change your artboards once you’re in the editor and the first way to do it is by using the artboard tool.
Using The Artboard Tool
To add or delete artboards, click the artboard tool in the toolbar on the left-hand side of the page. Once it’s selected, your active artboard will have a broken line around it to signify that it’s currently selected.
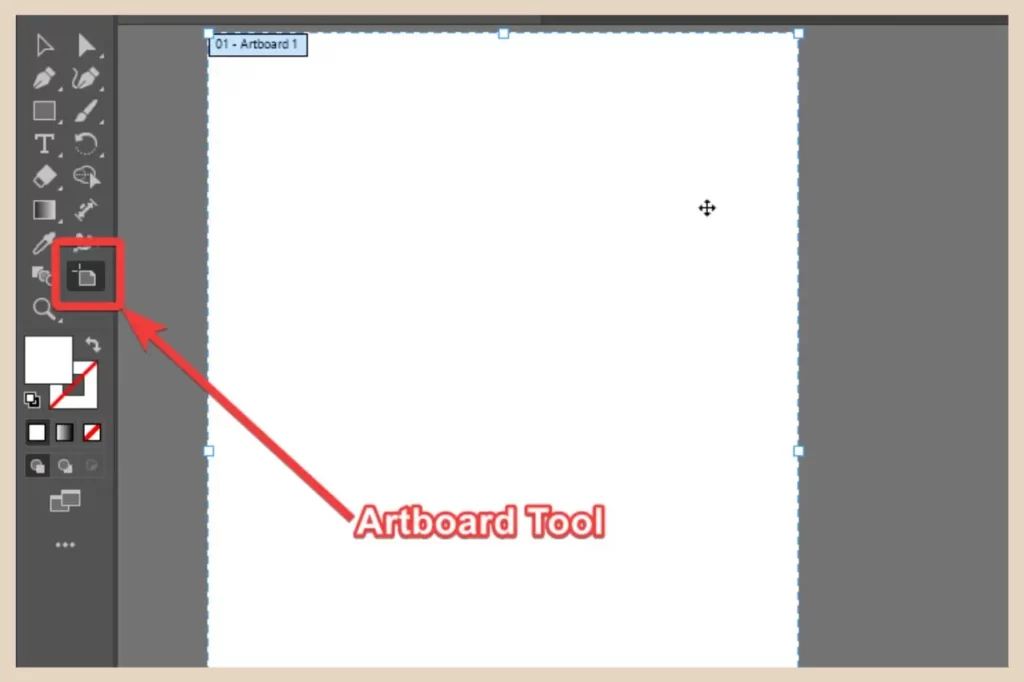
Now, click and drag your cursor anywhere across the blank pasteboard (the grey area) to create a new custom-sized artboard. To change its size manually, you can click and drag any of the corners to resize it.
To delete an artboard, just click the delete button on your keyboard and the selected artboard will be deleted (as long as it’s not the only artboard in the design).
If you want to move your artboard, you can do that too whilst the artboard tool is selected by clicking and dragging it to change its position on the pasteboard.
Using The Control Bar
If you have the Control bar showing (Window menu, Control) just below your menus, this will now display artboard options (it changes depending on what you have selected) and you can add or delete artboards by using the + icon or the trash can icon.
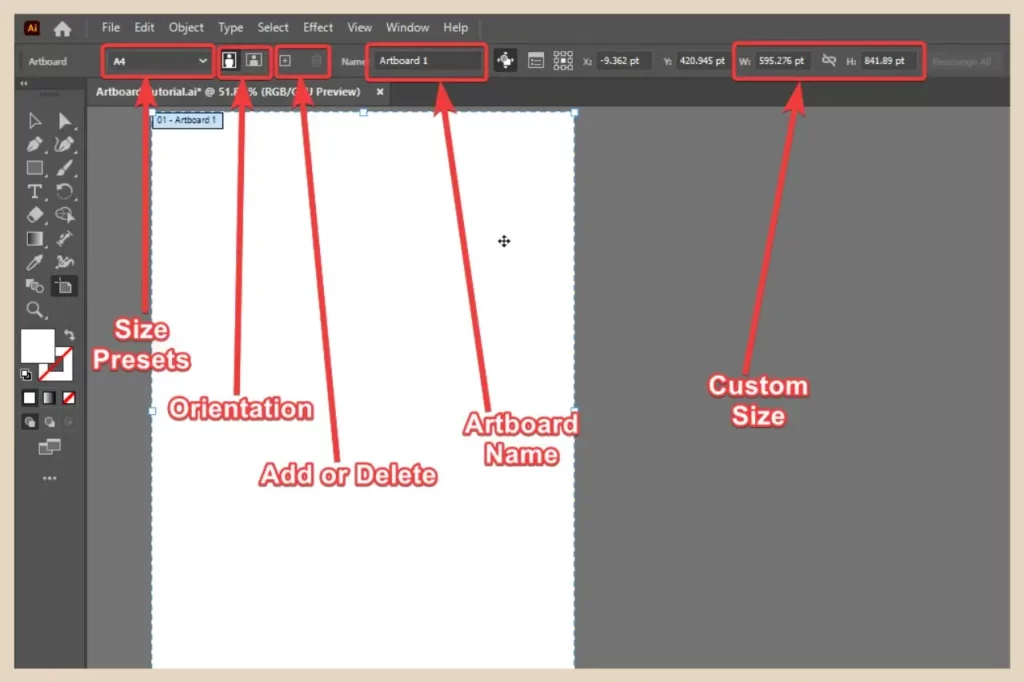
There are also size options here and you can use the Preset dropdown to select one of the preset sizes or you can use the W and H boxes to input your own custom size. You can also choose the artboard orientation and name your new artboard as well.
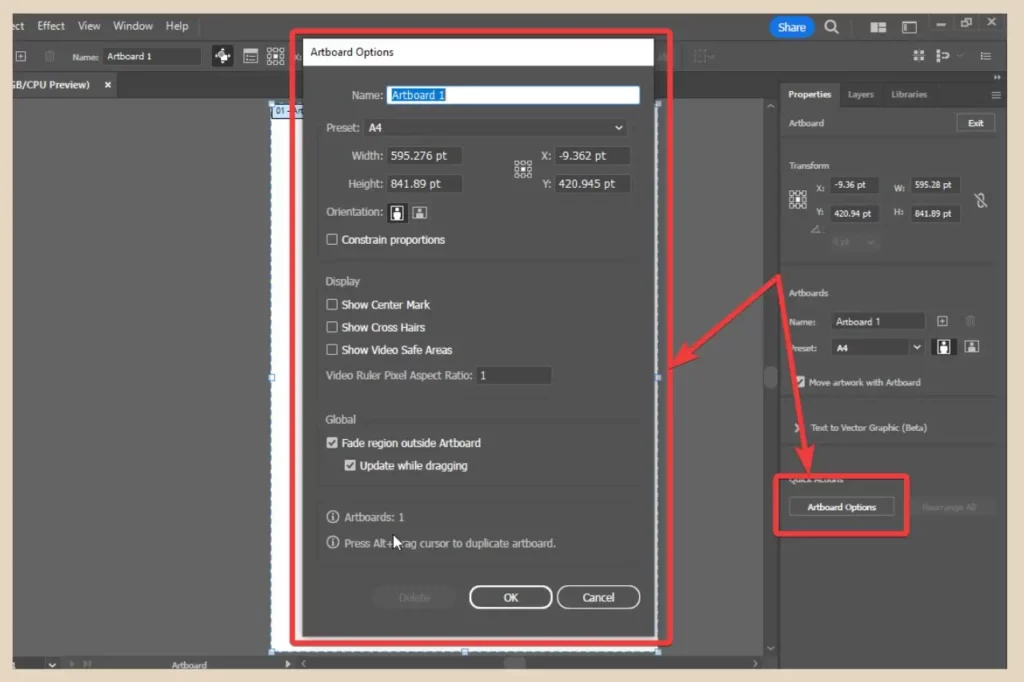
Using The Properties Panel
Another way you can add, delete or resize artboards is by using the Properties panel on the right which much like the Control bar changes depending on what you have selected.
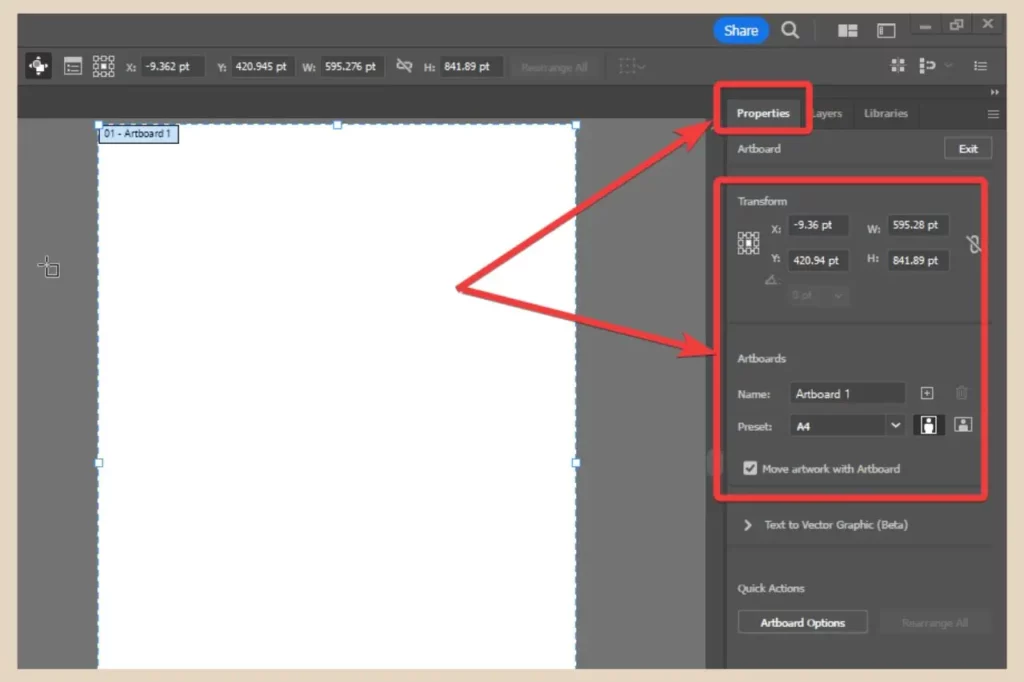
You can use the same + icon and trash can icon to add or delete your artboards and you’ll also find the same options to rename, change orientation and change the size or preset of your artboards.
There’s also an Artboard Options button near the bottom of the panel which will open up a new window with all the same options plus some extra checkboxes with some display options and global options.
You can also bring up all of the above options on the Properties panel without selecting the Artboards Tool.
If you click on the selection tool but do not select anything, you’ll notice an Edit Artboards button near the top of the Properties panel.
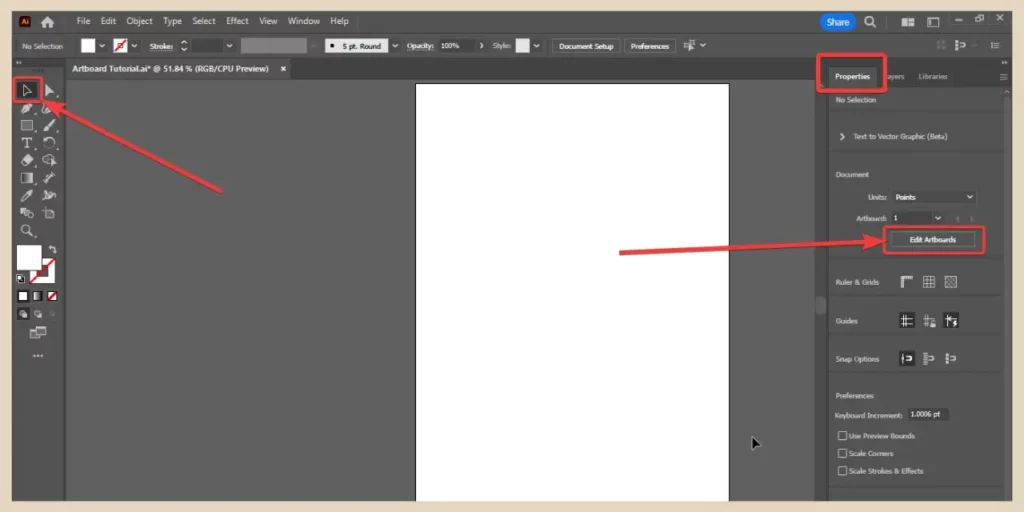
Clicking this will automatically select the Artboard Tool and change both the Control bar and the Properties panel to show all the artboard options as before.
Using The Artboard Panel
As I mentioned earlier, Illustrator likes to give you several ways to do the same thing (like it hasn’t given us enough ways already) and using the Artboard panel is another way to make all of these changes.
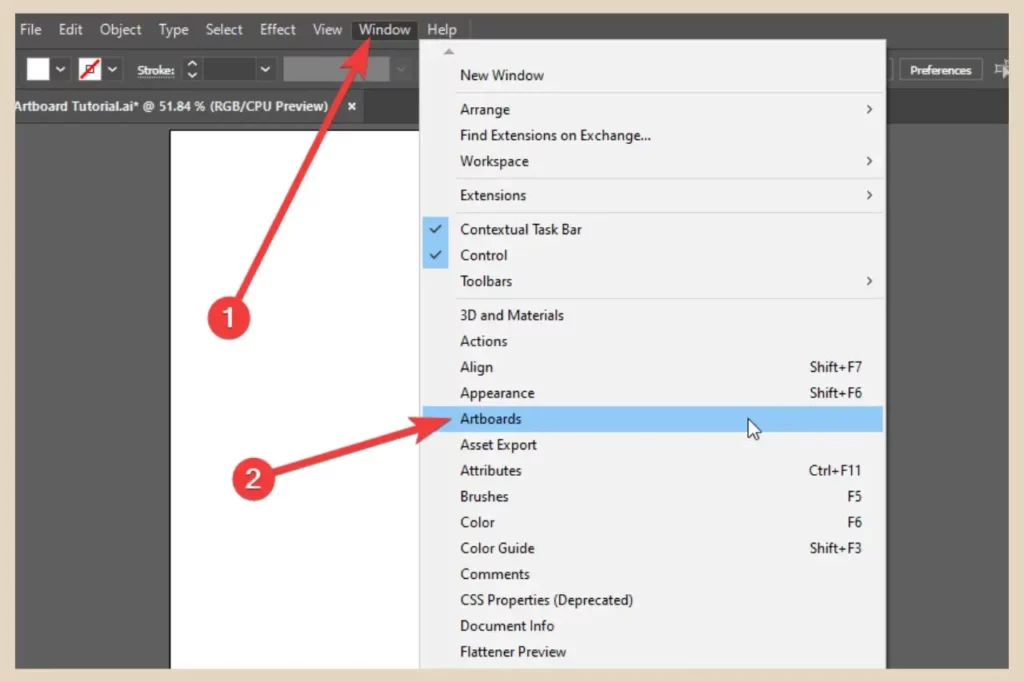
To display the Artboard panel, click the Window menu and then select Artboards from the menu options that appear.
This will now display the Artboard panel which will show a list of all the artboards you have within your design.
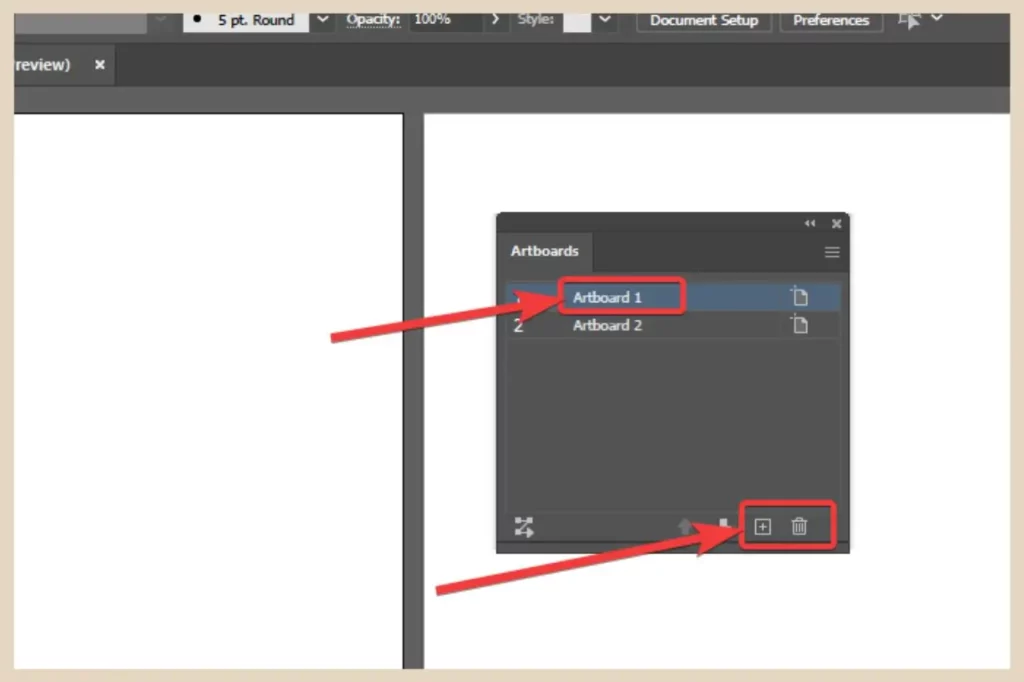
To add or delete an artboard, simply click the + icon or the trash can icon (with the artboard you want to delete selected) on the bottom right of the panel.
If you want to rename an artboard, double-click on the artboard name and start typing. When you’re finished, either hit the enter key on your keyboard or click away to save it.
Alternatively, you can click on the Artboards panel menu in the top right corner (the three lines) and from here you can add, delete and duplicate artboards.
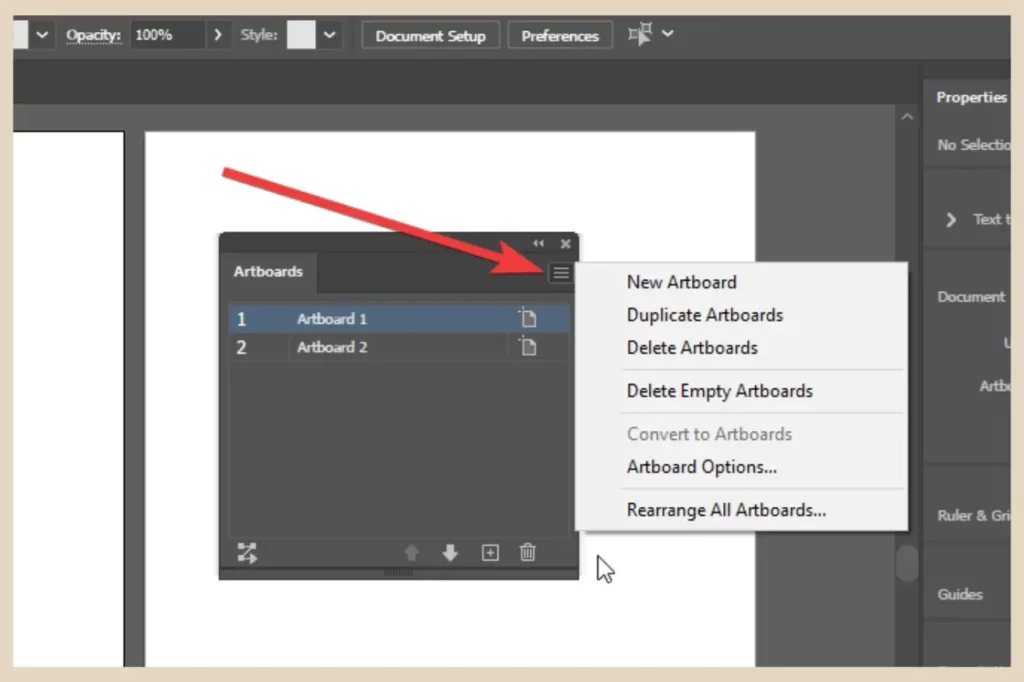
You’ll also find the option to delete empty artboards as well as the main artboard options we saw earlier that opened up in a new window.
How To Rearrange Artboards In Adobe Illustrator
When it comes to rearranging your artboards, you can click on the Artboard Tool and then click the Rearrange All button on either the Control bar or the Properties panel.
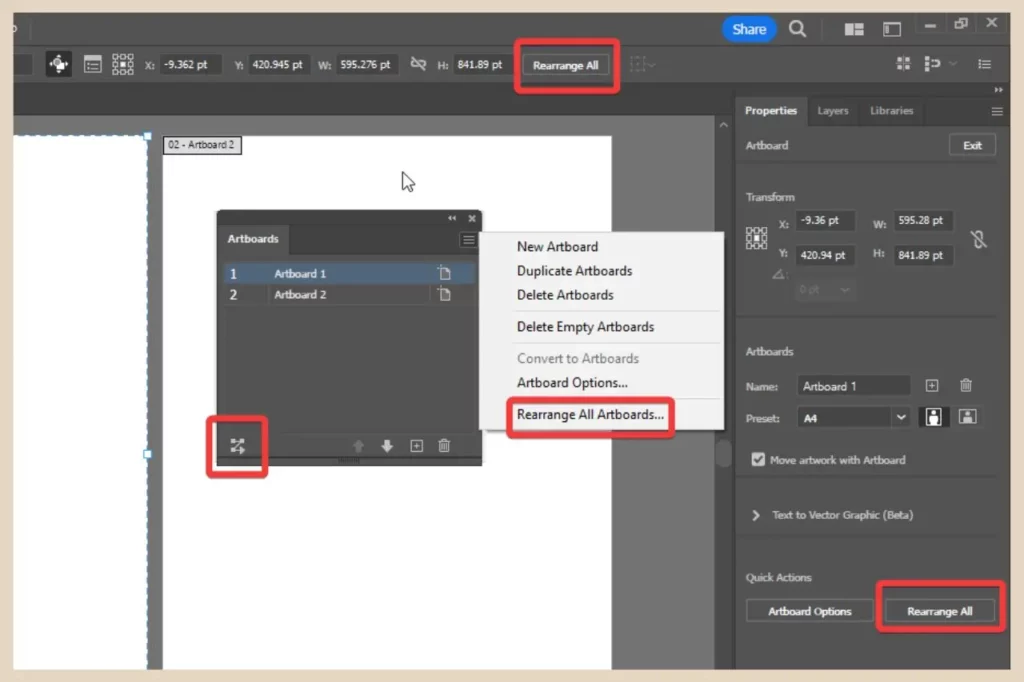
You can also use the rearrange icon on the bottom left of the Artboard panel or the Rearrange All Artboards option in the Artboard panel menu and any one of these four will open up the rearrange window.
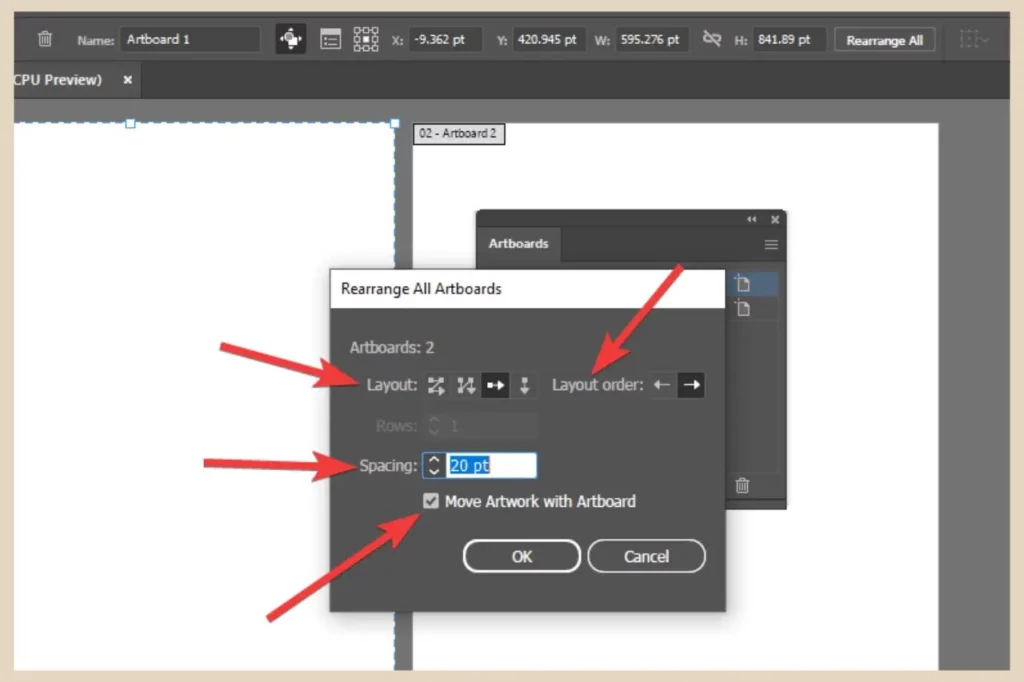
From here, you can rearrange the layout of your artboards by row or column or grid by row or column. You can also change the layout order and the spacing between each board.
There’s also a checkbox to Move Artwork with Artboard and this should be checked by default but it’s always a good idea to make sure it is checked because if for some reason it isn’t, your artwork will be left behind if you change the position of your boards.

You’ll also notice this same checkbox in the Properties panel whenever the Artboard Tool is selected so that you can keep all your artwork where it should be if you decide to move your artboards manually.
Selecting Or Viewing Your Artboards
If you have several artboards in your design, you can use the navigation controls either at the bottom of the screen or on the regular Properties panel (when the Artboard Tool isn’t selected) to switch between them.
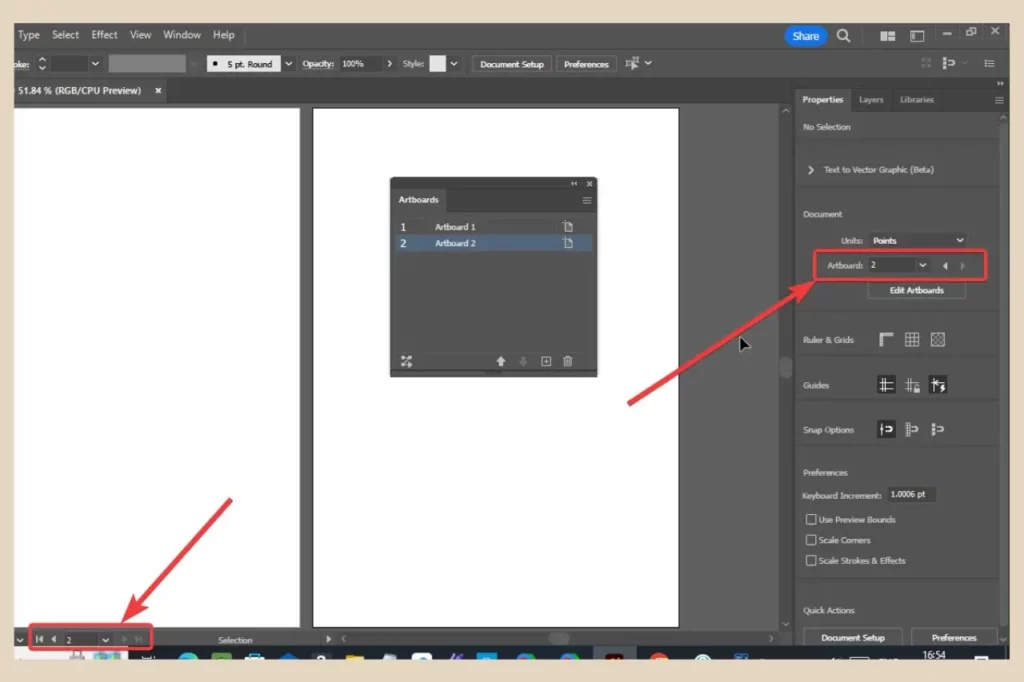
Clicking on each one in the Artboard panel will also do the same thing or you can click the Artboard Tool and select them manually by clicking on them.
There are also two viewing options that you can use to view them more effectively. If you click the View menu, you’ll have the option to Fit Artboard In Window which will fit the currently selected artboard in the centre of the screen.
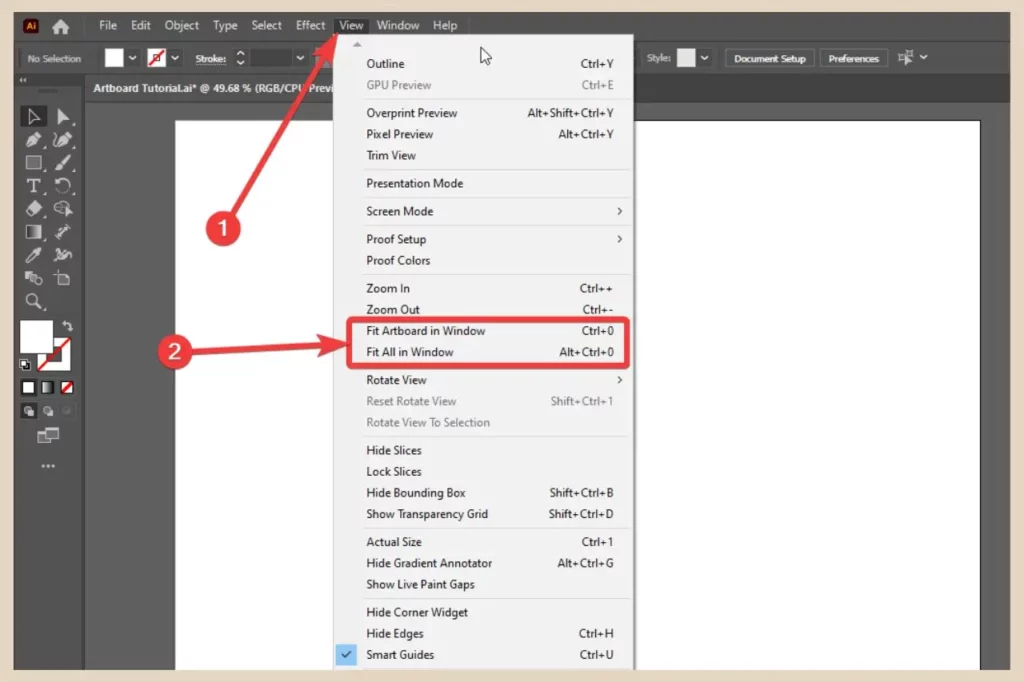
Alternatively, if you have several artboards in the design, you can click the Fit All In Window option which will fit them all centrally on the screen.
Exporting Your Artboards
One final thing worth knowing when it comes to artboards is that you can export them all as one file or individually as you need them and you can do this in one of two ways.
If you’re using the File, Export, Export As option, you’ll notice a Use Artboards checkbox near the bottom of the export window. By default, this will be unchecked and that will export all your artboards as one file.
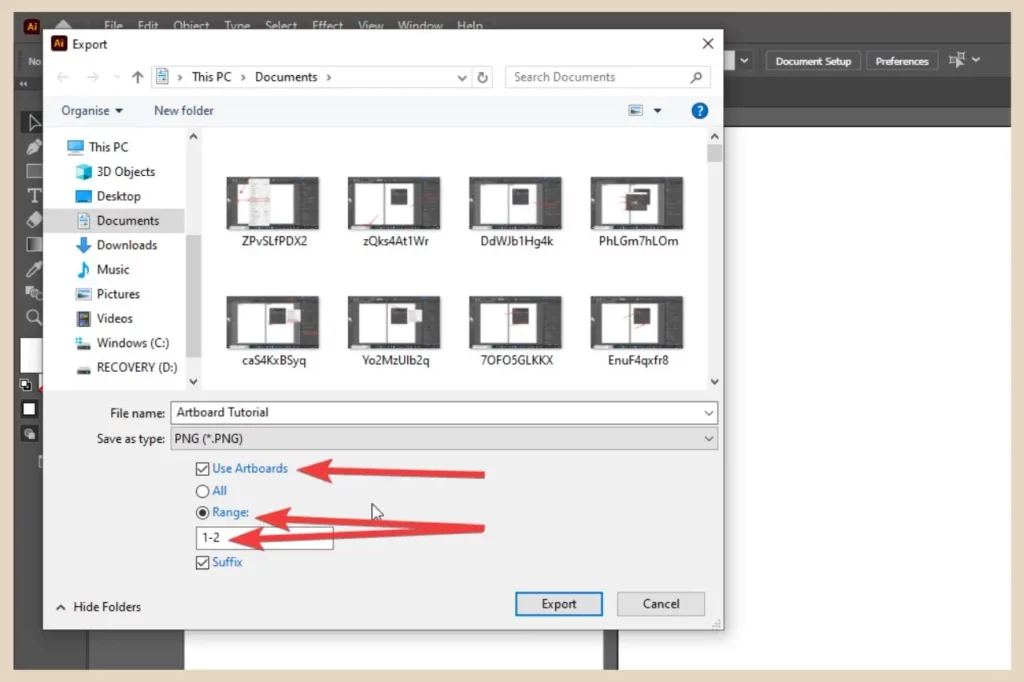
However, if you check this box, this will export each artboard as its own separate file. You can also use the Range option if you only want to export one or a range of the boards.
If you’re using the File, Export, Export For Screens options, you’ll see each artboard on the left of the export window and you can manually select which ones you want to export using the checkboxes.
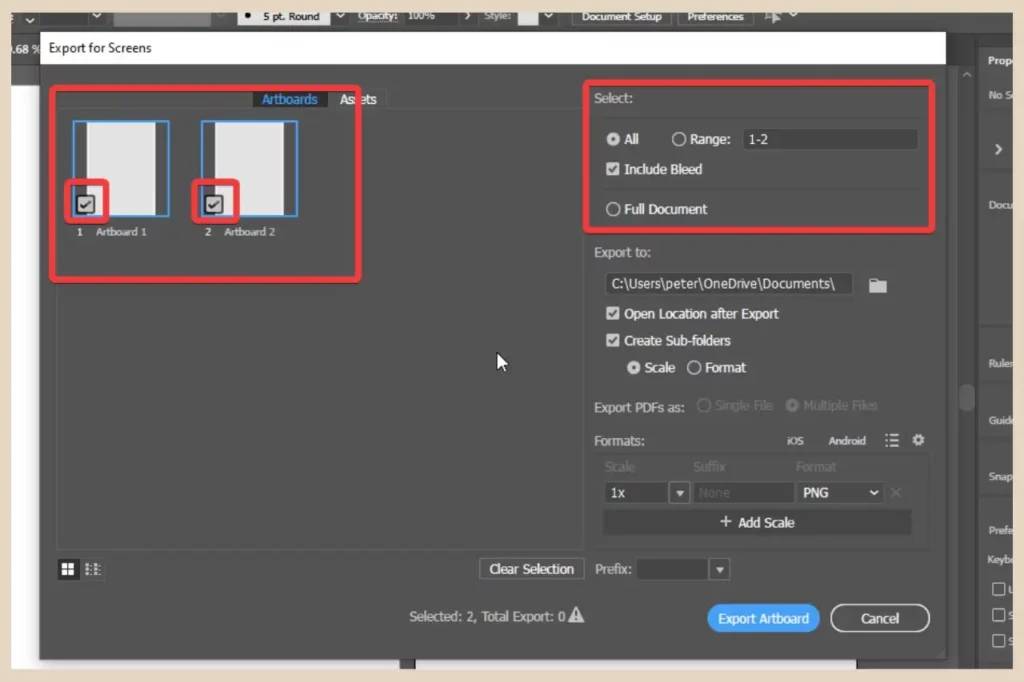
Alternatively, you can use the Select section on the top right of the export window to select all or a range of the boards to export them as separate files or export them all as one file using the Full Document option.
Let’s Get Artboard Editing
And that’s every which way to edit an artboard. As I mentioned earlier, Adobe Illustrator likes to make sure you have plenty of ways to do the same thing so I’ll apologise now if that all got a little bit repetitive.
That being said though, the next time you hear someone asking how to edit an artboard, you’ll now be able to answer confidently “Which way do you wanna know?”.
So go forth and edit your artboards like a seasoned Adobe Illustrator pro and if you feel like sharing your own Illustrator stories or experiences while you’re here, please feel free to share them in the comments below. I’d love to hear all about them.
Happy Artboard Editing!

Helpful Guides to Read Next
These beginner-friendly guides will help you keep building your blog step by step.
- How to Create Professional Blog Graphics with Adobe Illustrator
- How to Create Smooth Professional Gradients in Illustrator
- How to Use Layers to Make Illustrator Projects Easier to Manage
- How to Create an Illustrator Workspace That Fits Your Workflow
- How to Build a Custom Illustrator Toolbar to Speed Up Your Design Workflow

Jessie
Founder, nomorerush.com
Hi, I’m Jessie — founder of No More Rush. I help beginners build profitable, beginner-friendly blogs without the overwhelm or unrealistic expectations you see online. Everything here is built around simple, structured steps so you always know what to do next.