Want to know how to create images for a website with Canva? Canva is an excellent design platform where you can create and edit all kinds of designs.
You can create featured images, in-content images, social posts, Pinterest pins, social headers, create your own logos and much more plus the best part about it is that a lot of the features are free.
It’s one of the most fun parts of having a website, at least in my opinion anyway. Images can transform a webpage and website from dull and repetitive to bright and vibrant, and great imagery is an excellent way to grab your reader’s attention.
In this tutorial, I’ll be showing you where to get free-to-use images, how to add them to Canva and how to transform them from ordinary to awesome and you don’t even need to be experienced with design to do it.
How To Create Images For A Website With Canva
There are only really two things you’ll need here to create amazing imagery across your site and that’s a source of free-to-use images and a design platform like Canva.
Even if you’re taking your own photos or using screenshots, Canva is still a great place to edit and ramp them up to a whole other level.
You can even create your own images from nothing just by using the elements available from within the Canva platform.
How To Find Free Images To Use On Your Website
The very first thing you’ll need to do if you’re not taking your own photos will be to find free-to-use images and luckily there are several places where you can get them from.
My two personal favourites would be Pexel.com and Unsplash.com but there’s also Pixabay.com as well.
There’s also a selection on Canva too but for the most part, I get almost all of my images from Pexel or Unsplash.
It’s also not a bad idea to create a free account with the ones you plan to use because you can save images as you go along and see all of your previously downloaded images too if you ever need to reuse them.
For the next part of this tutorial, I’m going to be using Pexels but most of these sites are pretty similar in the way you use them.
Finding And Downloading Your Chosen Image
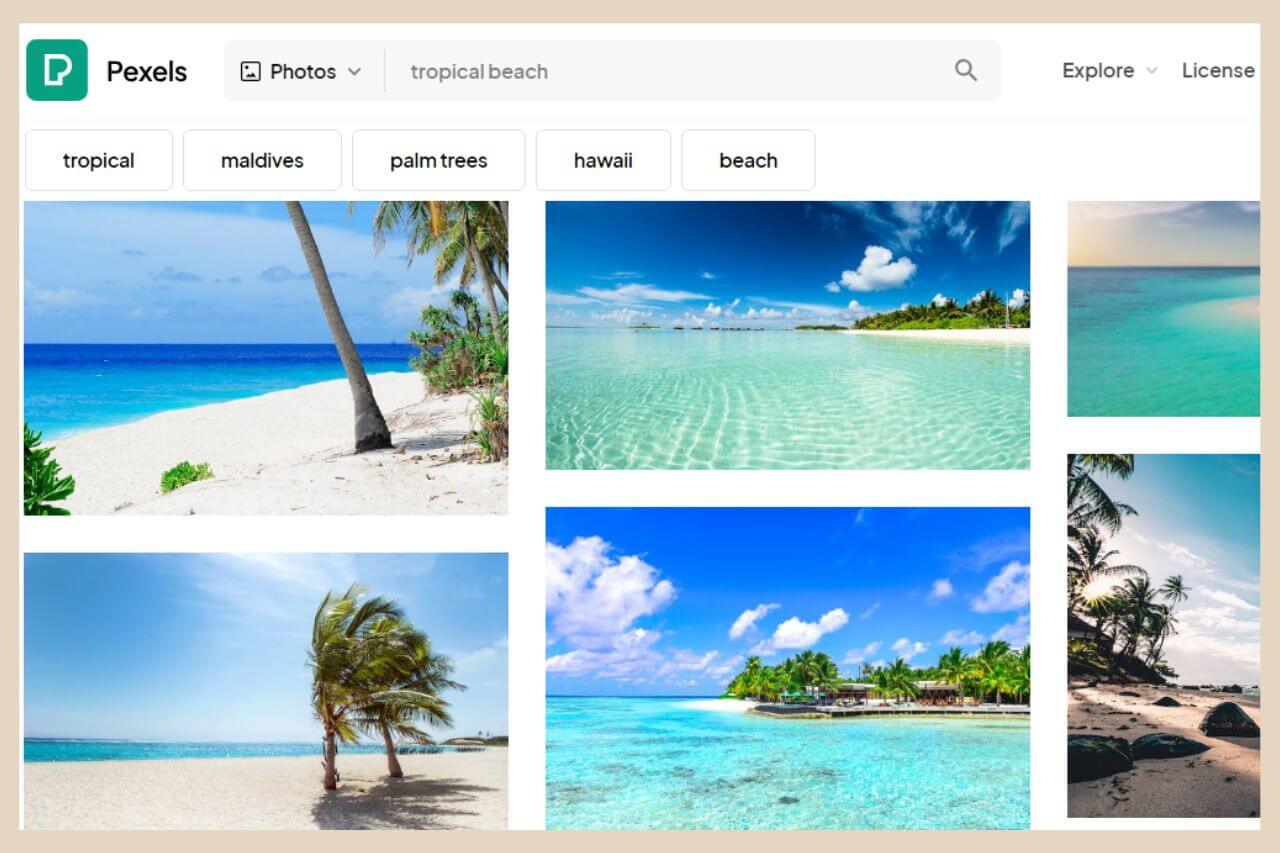
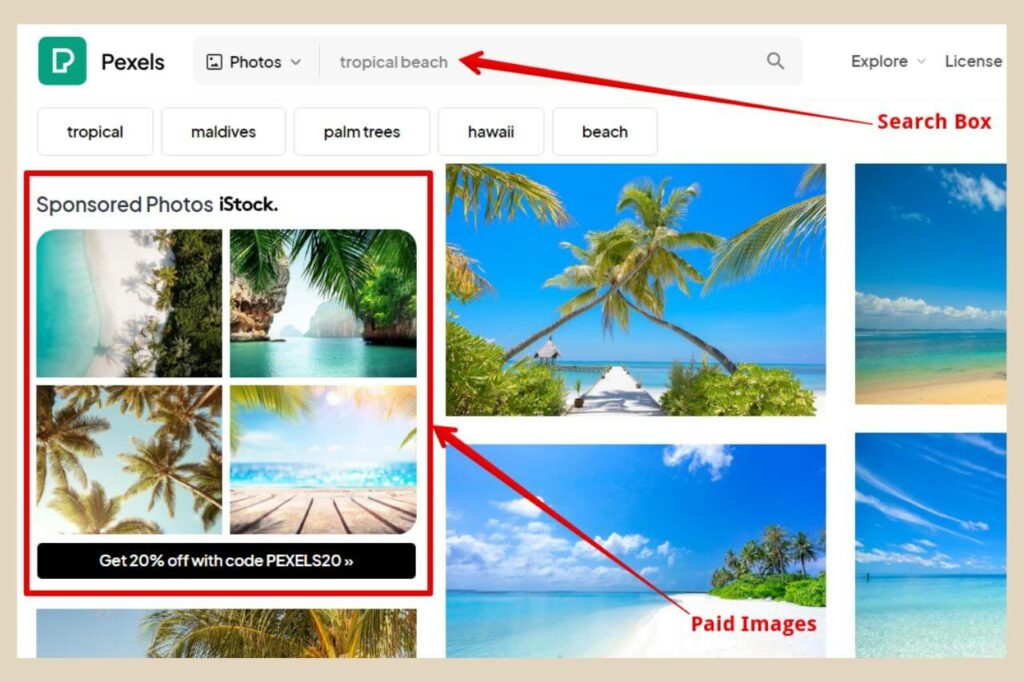
So, let’s pretend you have a travel website and you’re looking for a tropical beach image. Your first step is to type in the kind of photo you’re looking for into the search box at the top of the page which in this case is a tropical beach.
Most of the results will be free-to-use images but you will notice some iStock photos there as well which are not free. On Pexels, you’ll see them as grids of photos marked as “Sponsored Photos iStock” like the image below.
On Unsplash and Pixabay, you’ll see them as grids across the top and bottom of each page but all the other images here are free to use (except for those marked as Unsplash+ on Unsplash).
Image Saving Options
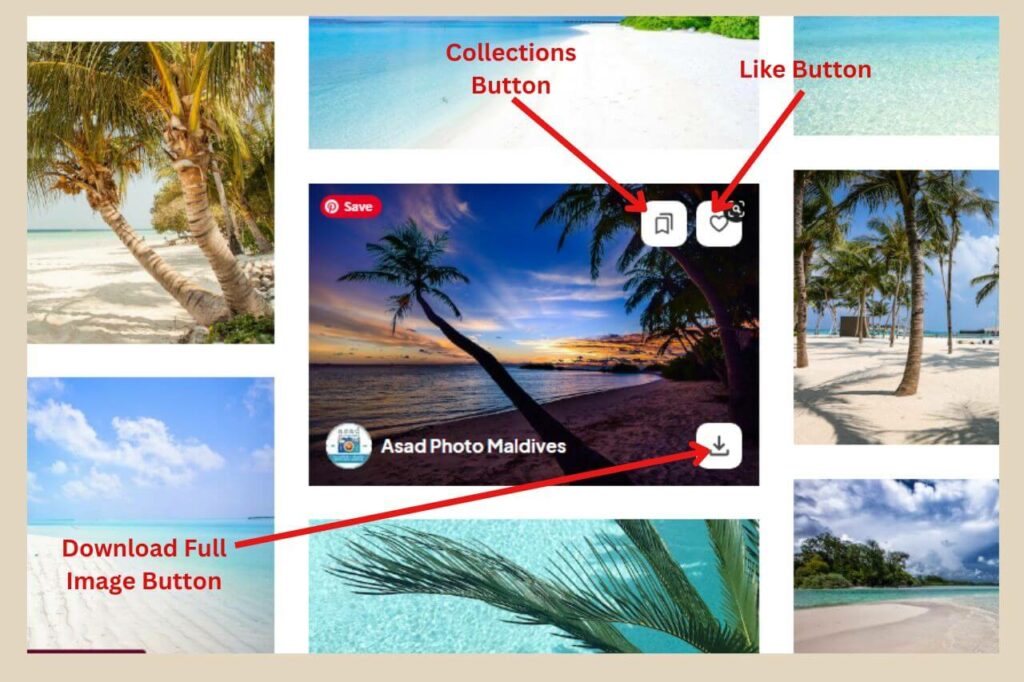
Once you’ve found an image that you like, you can either click the heart button to save it to a liked list, click the collection button to save it to a collection which you can create or you can click the download button to download the full-size image.
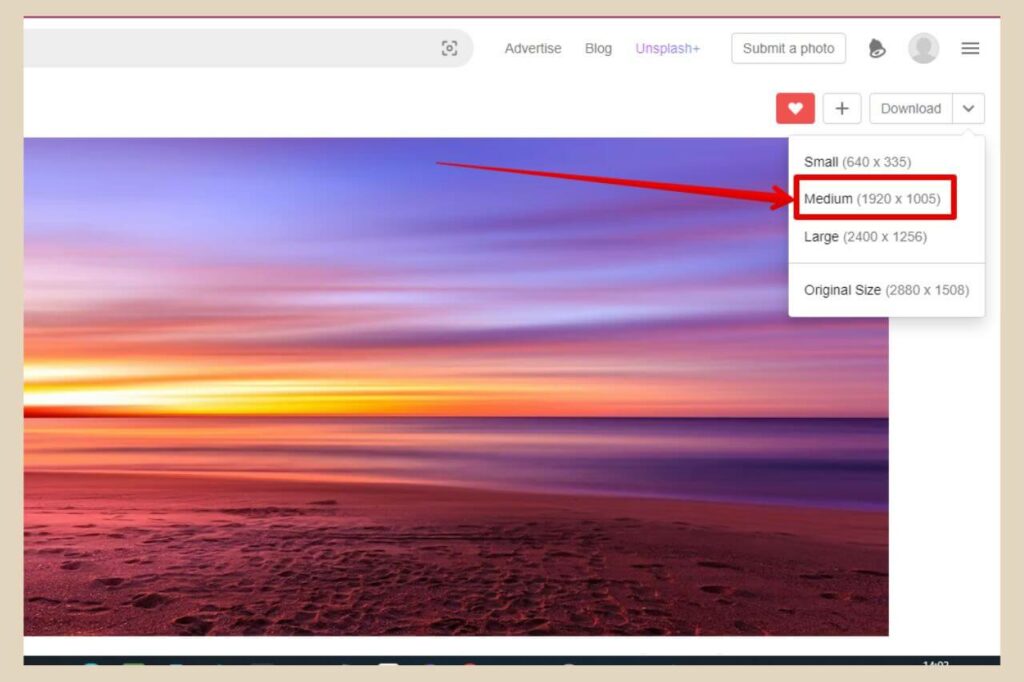
The full-size images are pretty big so it’s a better idea to actually click on the image which will pop open a window where you can see a larger version of the image and be able to choose a download size.
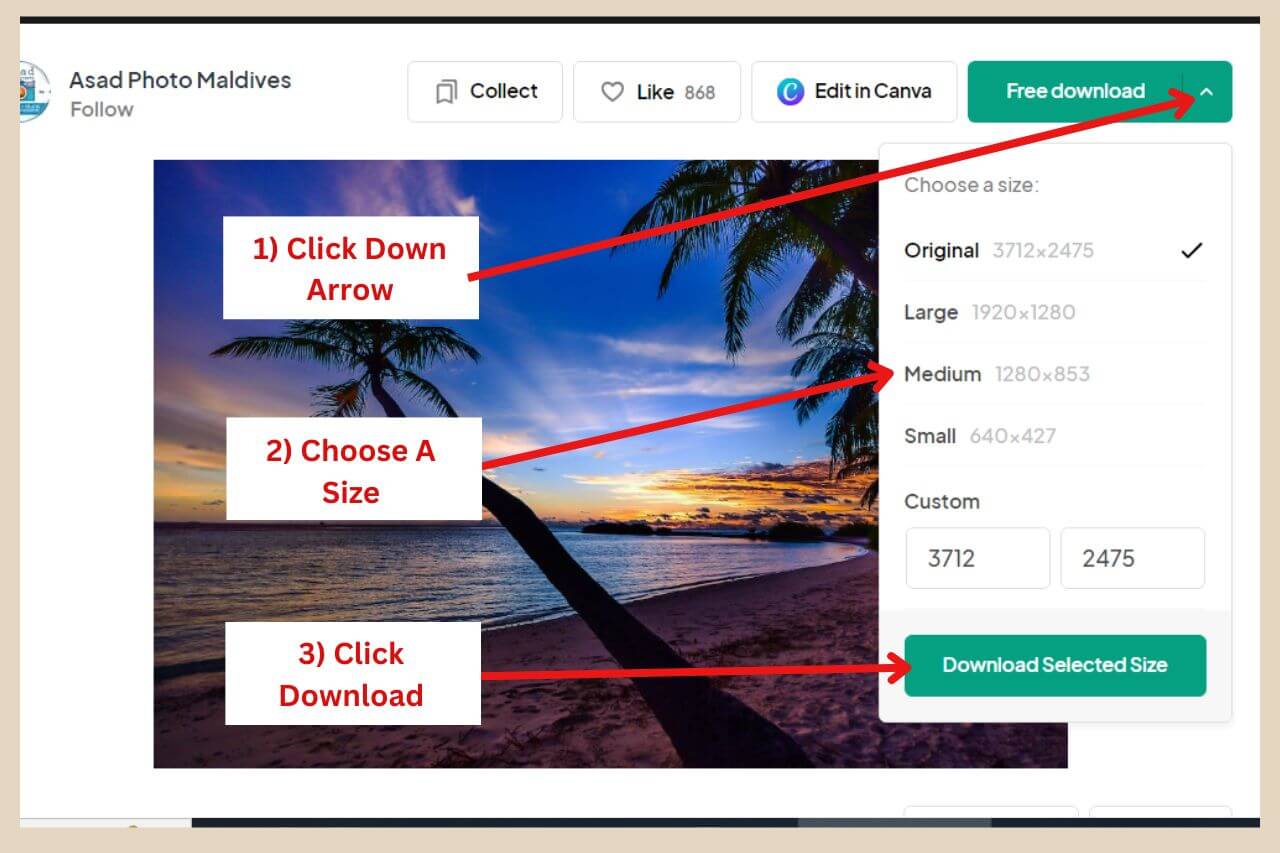
Click the down arrow on the Free Download button and four size options will appear which are Small, Medium, Large or Original. Click on your preferred size, then click the Download Selected Size button.
If you’re not sure which size to pick, you may want to download a couple of variations to see which one looks best on your site.
As I like all my images to fill the full width of my content area, I like to use 1280 x 853 medium-sized images which work perfectly with my theme but this is a personal preference so choose the size that works best for you.
Do be careful of the file sizes though as bigger images can end up slowing down your site if they’re too large.
Uploading Your Image To Canva
The next step is to head over to Canva.com to upload your image of choice. If you don’t already have an account, signing up through Google is the easiest method.
Once you’re on the home page you’ll see lots of options here but the easiest way to get started is to create your own custom-size design.
So, click the Custom Size button near the top of the page and insert your size of choice, then click the Create New Design button.
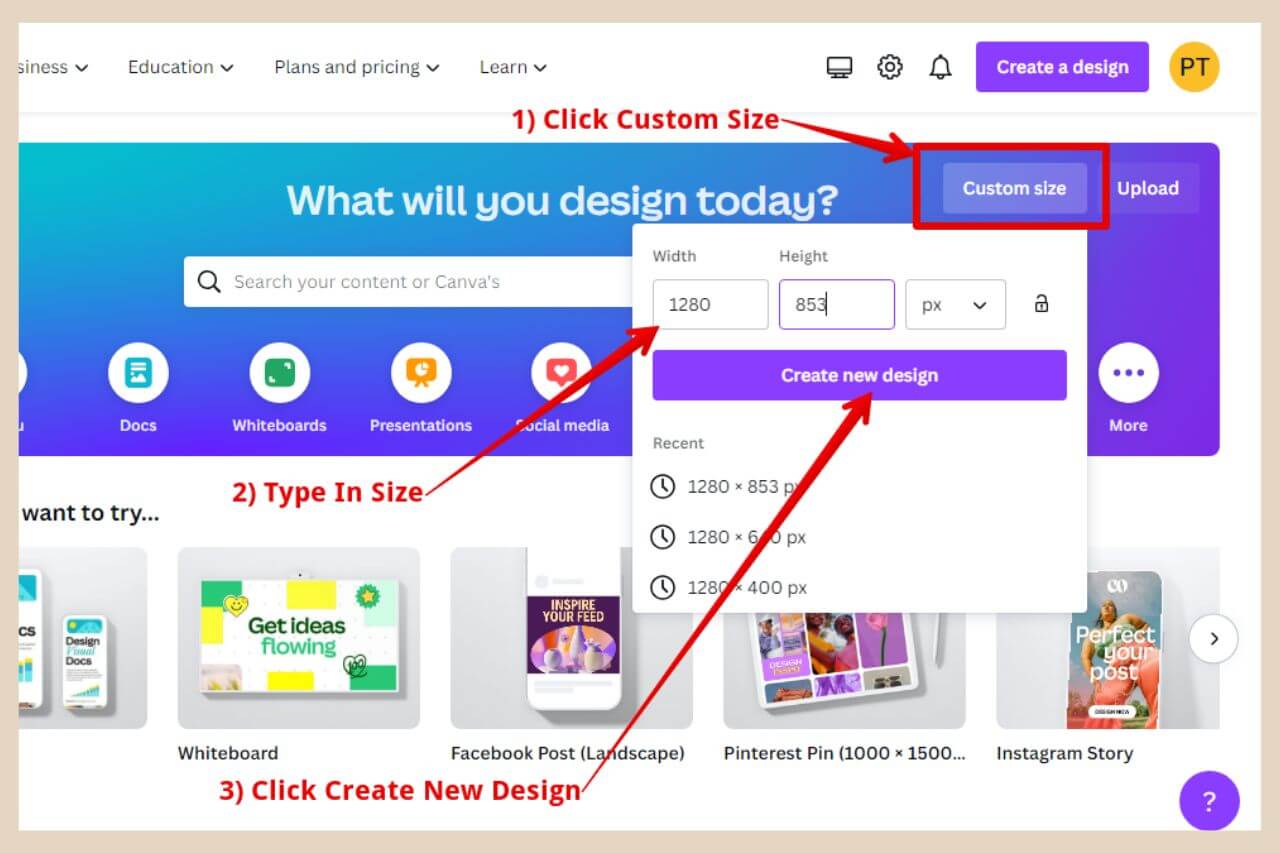
As 1280 x 853 is the most common size I download, I would use this size here. I like to try to keep all my images the same size throughout my site for consistency or at the very least, the same width.
If I have a really wide screenshot, then I may have to make the image shorter to fit it all in but I’ll always keep the same 1280px width so that it still fills the full width of my content area.
Once your custom-size design page is open, you’ll see a blank canvas where you can now add your image. To do this, click the “Uploads” section on the left-hand side of the page.
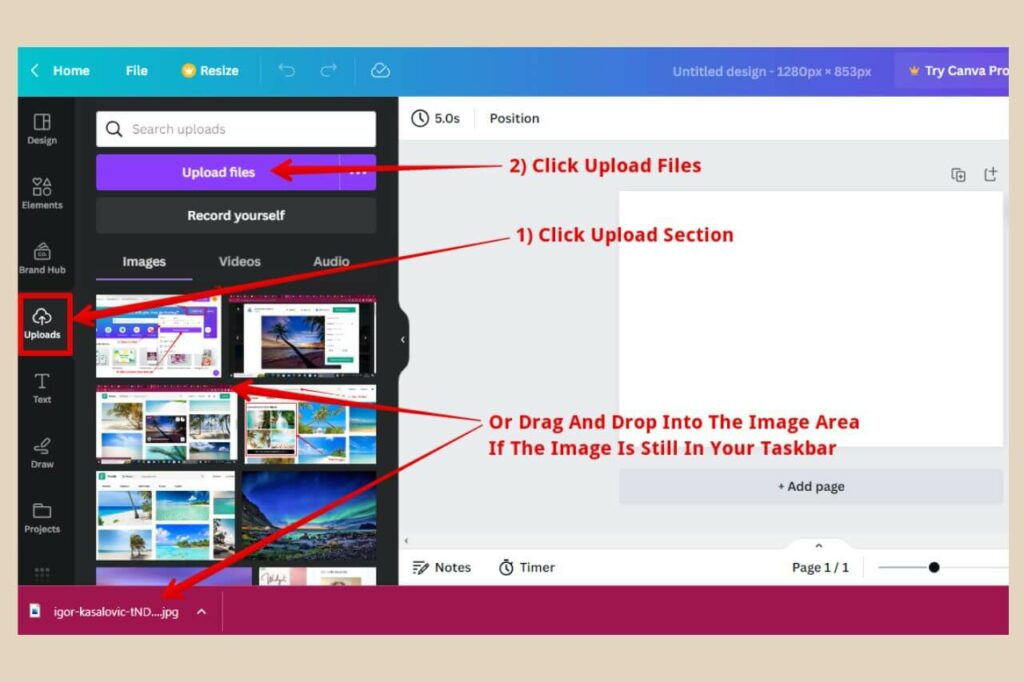
From here, you can either click the Upload Files button to search your computer for the image or if you’ve just downloaded it from one of the above-mentioned sites, then it should be in your taskbar so you can just drag and drop it into the image area.
Adding Your Image To The Canvas
Once it’s uploaded, you can now either click it or drag and drop it from the upload area to your blank canvas. If you click it, it will insert it as a smaller size within your canvas area where you can then resize it to your own liking.
If you drag and drop it, you can drag it across slowly and drop it when it snaps into and fills up the full area of the blank canvas (roughly when your cursor reaches the left side line of the canvas).
Alternatively, you can drop it when it’s a smaller image inside the blank canvas where you can again resize it to your own liking (for example, if you don’t want it to fill the full area because you want to put a border around it).
Images Often Differ In Sizes
As images from these sites are not always the same size even if you stick to let’s say the medium-sized ones, having this custom-sized design is a great way to keep all your images the same size.
In the example below, this is a medium-sized image from Unsplash but as you can see, it’s not the 1280 x 853 that I’d usually use.
This isn’t a problem though because once I bring it across to Canva and add it to my custom-size canvas, it will become the size I want.
Canva will crop sections of the image to fit it in (in this case, the left and right edges of the image) but you can simply double-click on the image and then drag it around until you’re happy with how it looks.
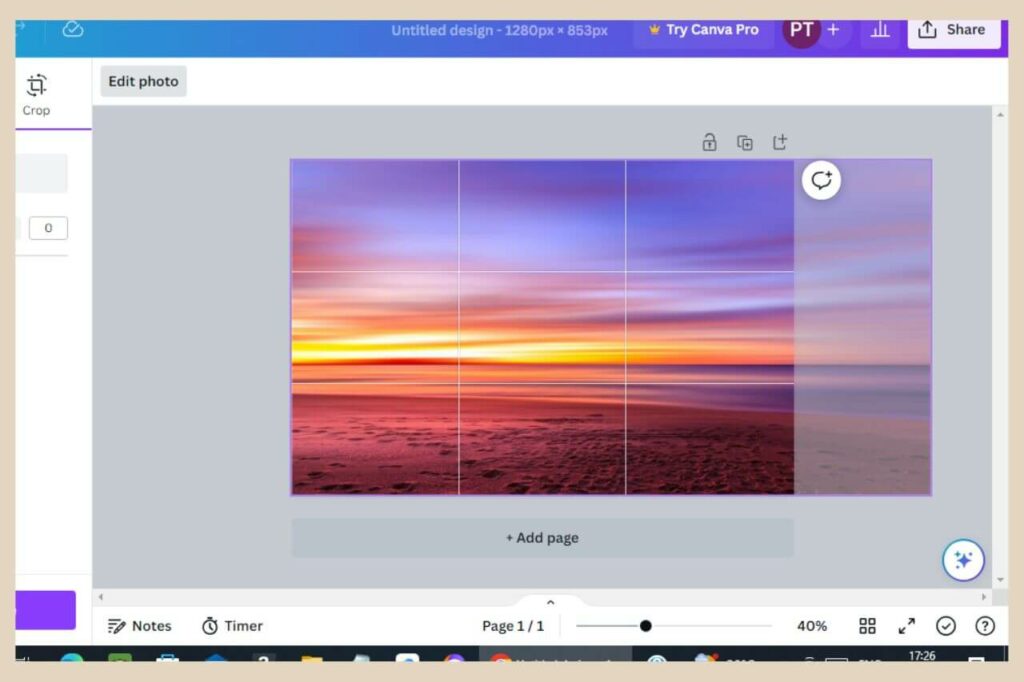
With this image above, I wanted all of that orange sunset in the picture so I dragged it all the way to the right so that it was just the right side of the image that was cropped out. The grided area is the canvas and the faded area on the far right is the cropped-out area.
How To Add A Border To Your Image
If you’d like to add a border to your image, then there are two ways to do it. The first way is to simply change the colour of the white canvas and not have your image fill the entire canvas area.
To do this, you’ll need to click the canvas area (not the image). A blue outline will surround the area that you have selected.
You’ll now notice some options at the top of the page so click the background colour button and a new section will appear on the left of the page.
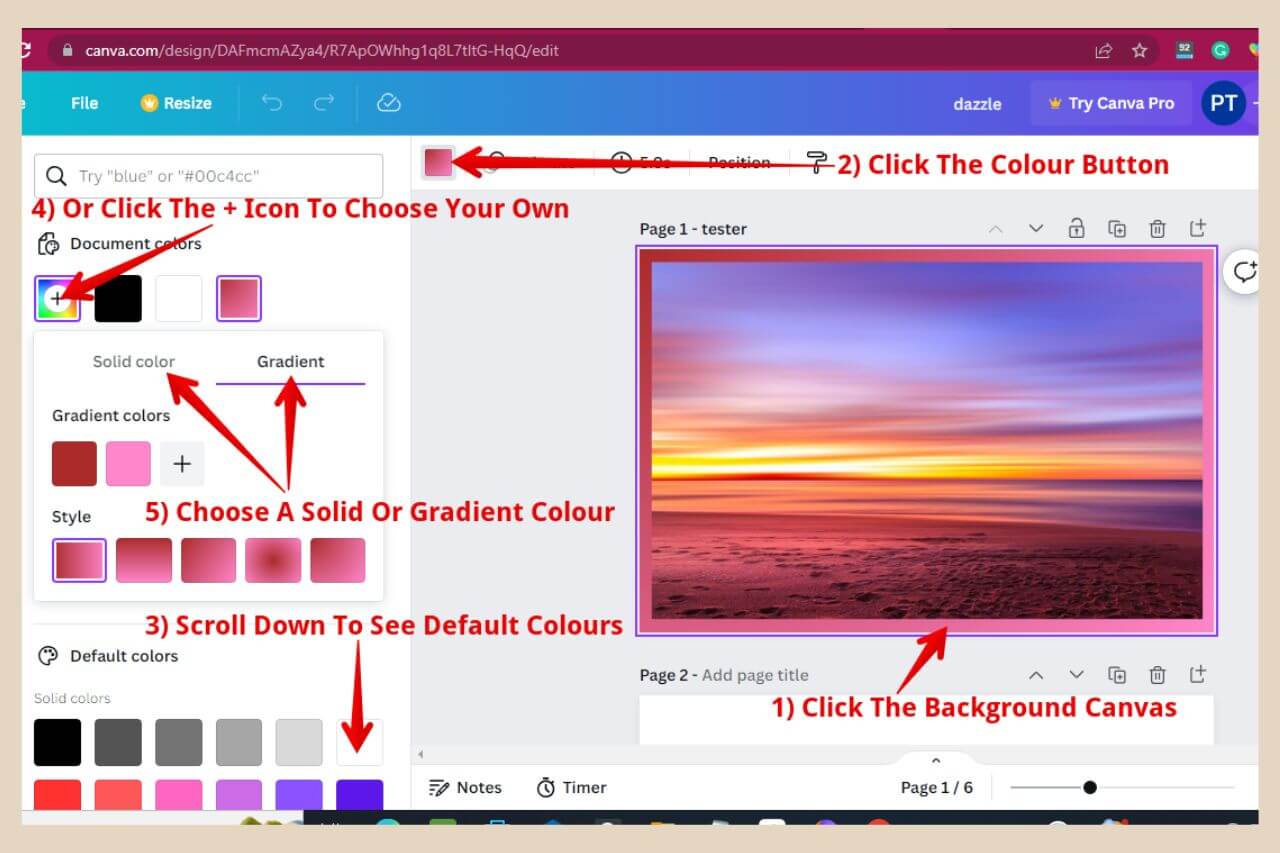
There are several default colours that you can choose from here by scrolling down or alternatively, you can click the “Add A New Colour” button to select your own.
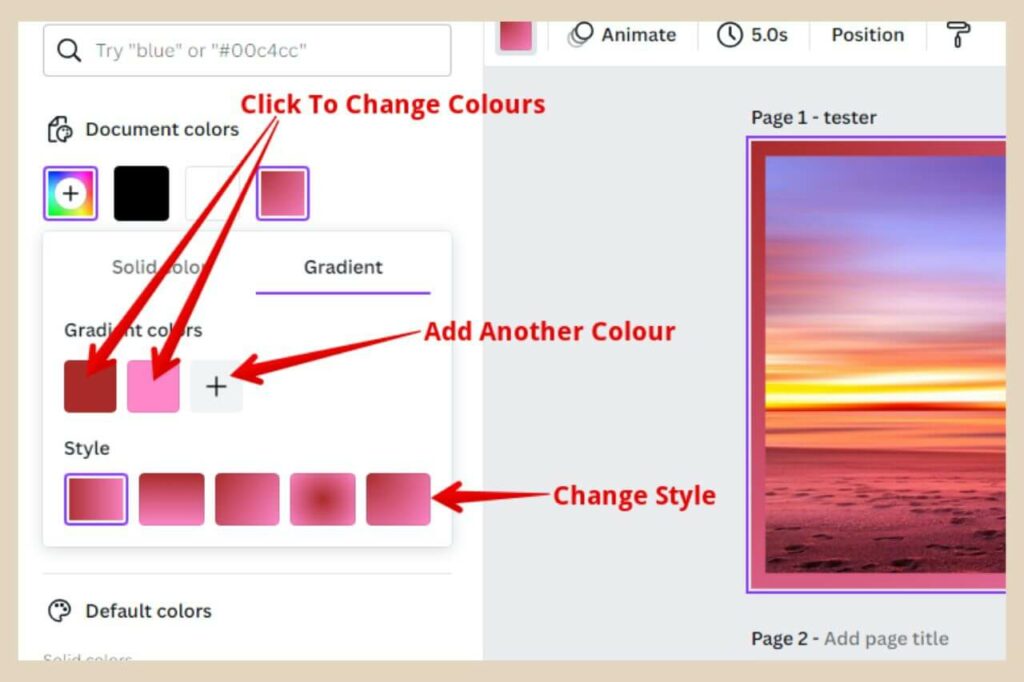
You can then choose between either solid colour (one colour) or gradient (several colours blending into each other).
If you want to use the gradient section, you can change colours, add more colours and change the style of the gradient. Your canvas will change colour as you make changes so you can see how it looks as you go along.
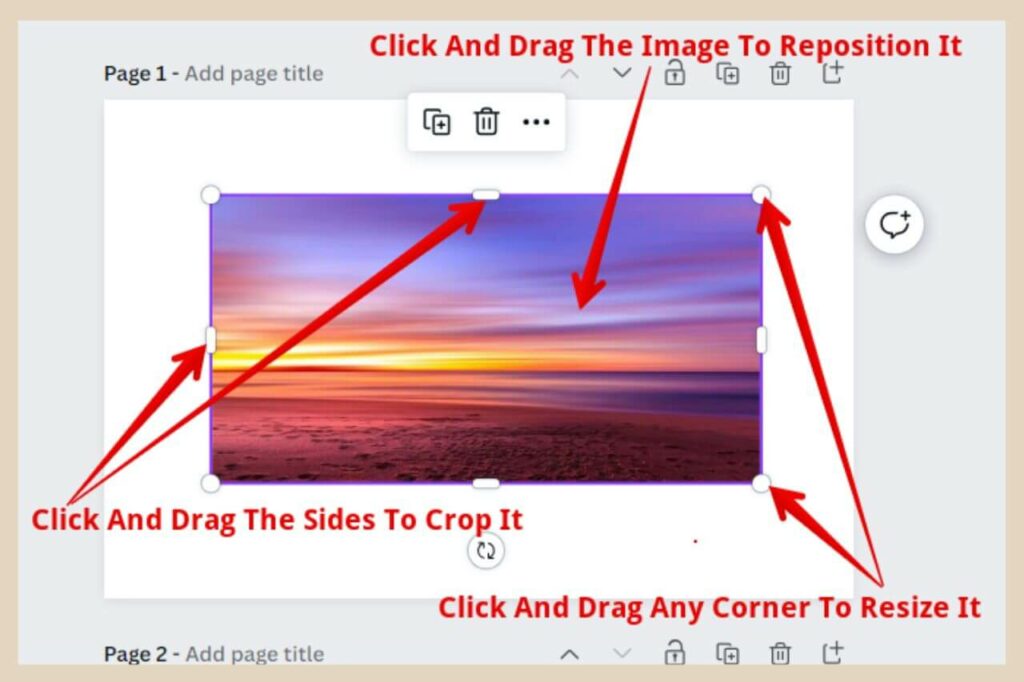
The last step here is to resize and reposition your image if you haven’t already so that the background canvas colour looks like a border around it.
So drag and drop to reposition, drag the corners to resize and drag the middle of the sides to crop.
Aligning Your Image
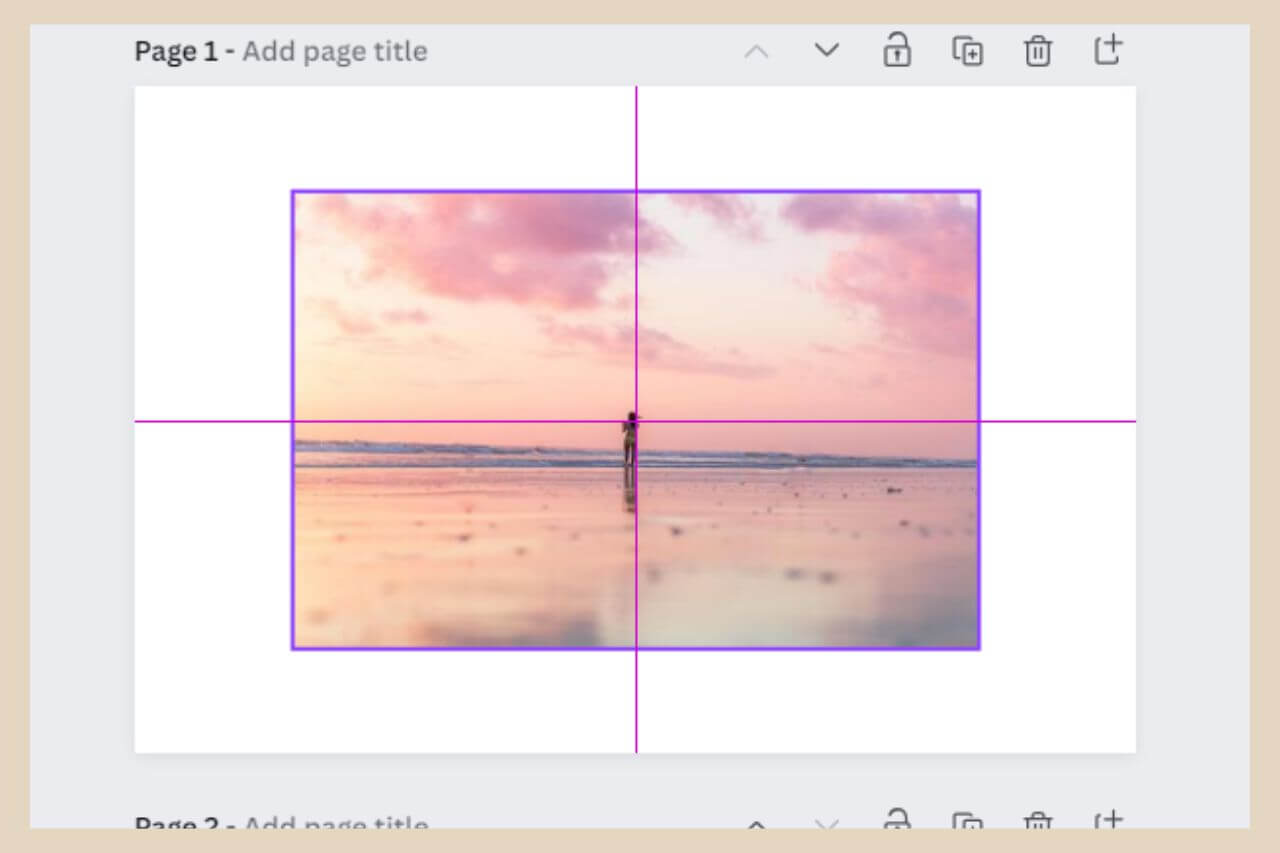
You can also see when your image (or any other item) is centred on the canvas either vertically, horizontally or both when you see the vertical and/or horizontal lines appear while dragging the image or items around like the image below.
The second way to add a border is to click on “elements” on the left of the page, then type “border” into the search box.
The best place to get cool borders is in the graphics section so click “see all” to see the full list of border graphics.
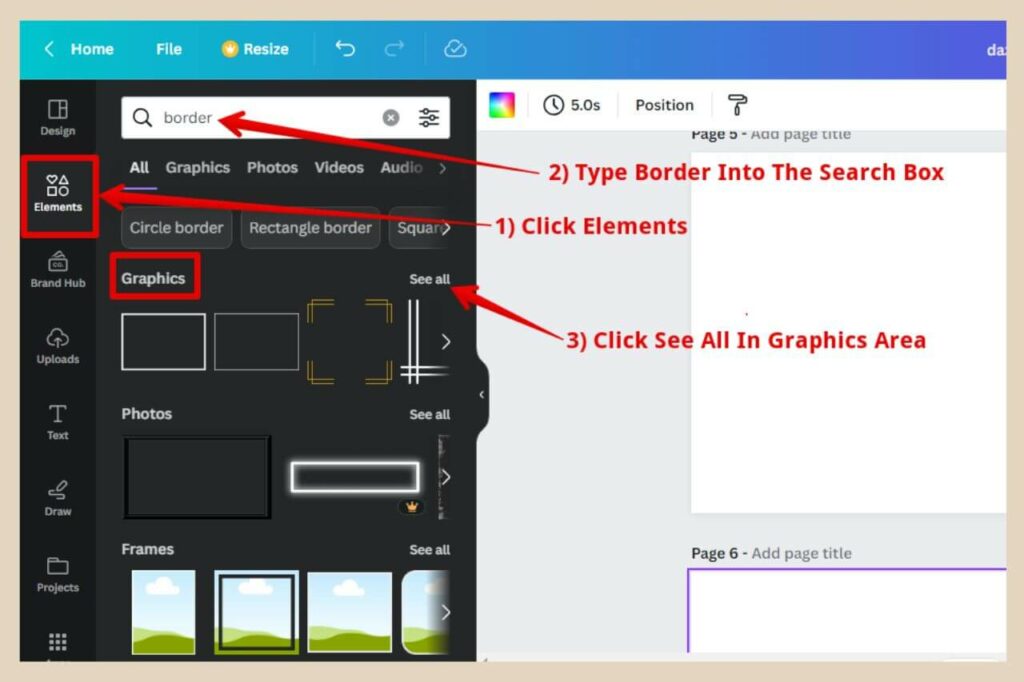
From here you’ll have a selection of different borders that you can simply click or drag and drop into your canvas.
You can also search for images, shapes, lines, arrows and anything else you can think of in this section.
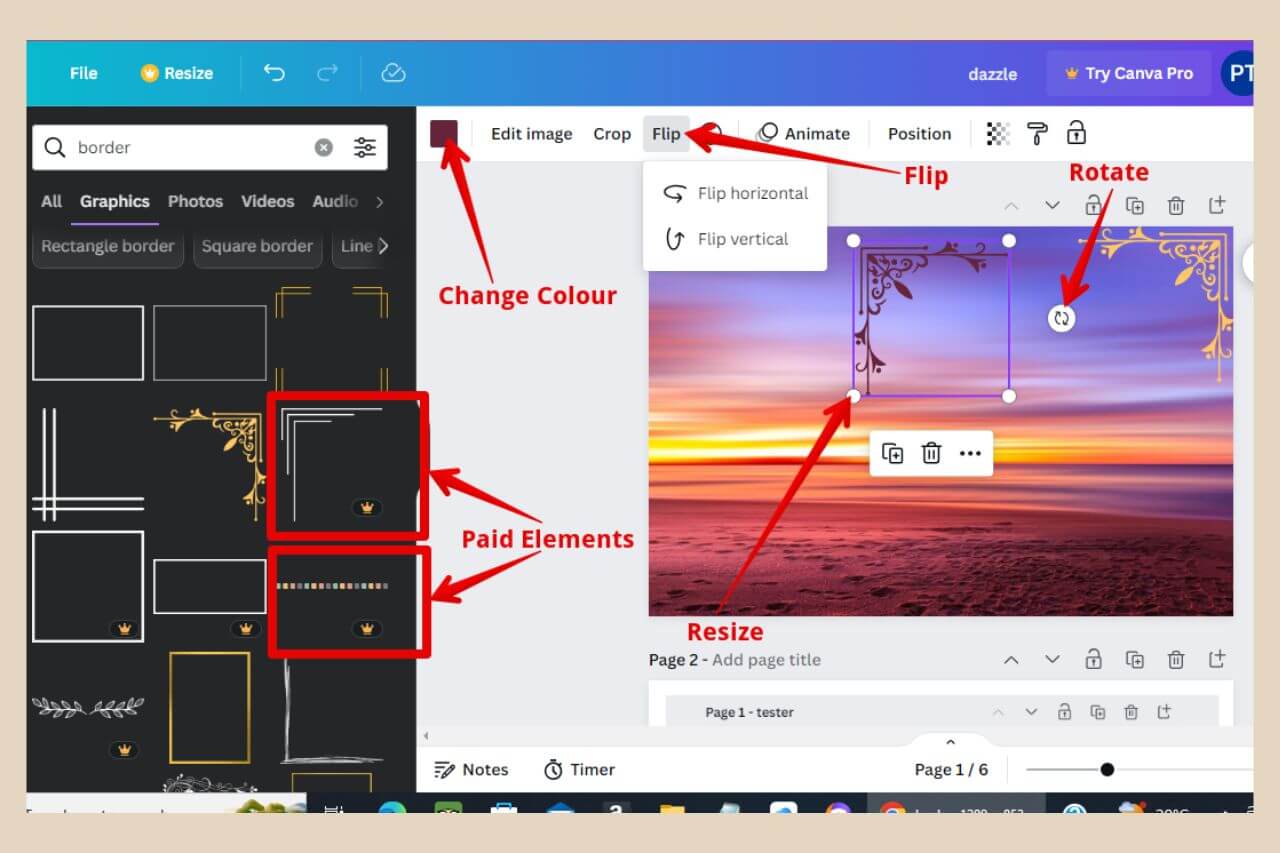
Anything with a crown on it is a Canva Pro element (paid) but if there’s no crown, then it’s free to use. These elements can be resized, flipped vertically or horizontally, rotated and in some cases, you can change the colour.
Just look for the colour background box when the element is selected. If it’s not there, then the colour can’t be changed.
How To Add Text To Your Image
Adding text is really simple. Just click on “Text” on the left side of the page, then choose the style of text you’d like to add.
You can click the Add A Text Box button to add regular text or you can choose one of the default text styles like Heading or Subheading or a combination of different ones to spice things up.
Alternatively, you can pick one of the jazzier presets underneath and then just change the wording after it’s been added.
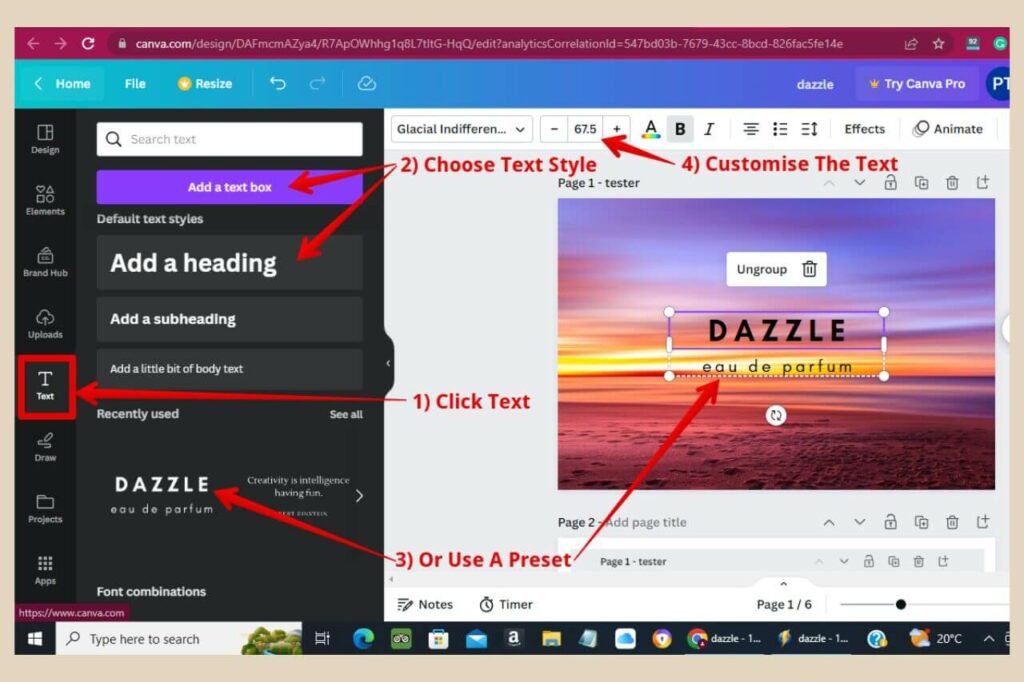
You can also customise your text using the options at the top of the page. These options include changing the font, the font size, the font colour, etc, and you can do this with the presets too.
As there are too many to list here, have a play around with these as some of them are very cool customisation options, especially in the effects tab where you can do things such as add a shadow or curve the text like an arch.
Adding A Box For Your Text
If you’d like to add a box (or any other shape) for your text then head over to the elements section again and this time click on “See All” in the Lines And Shapes area.
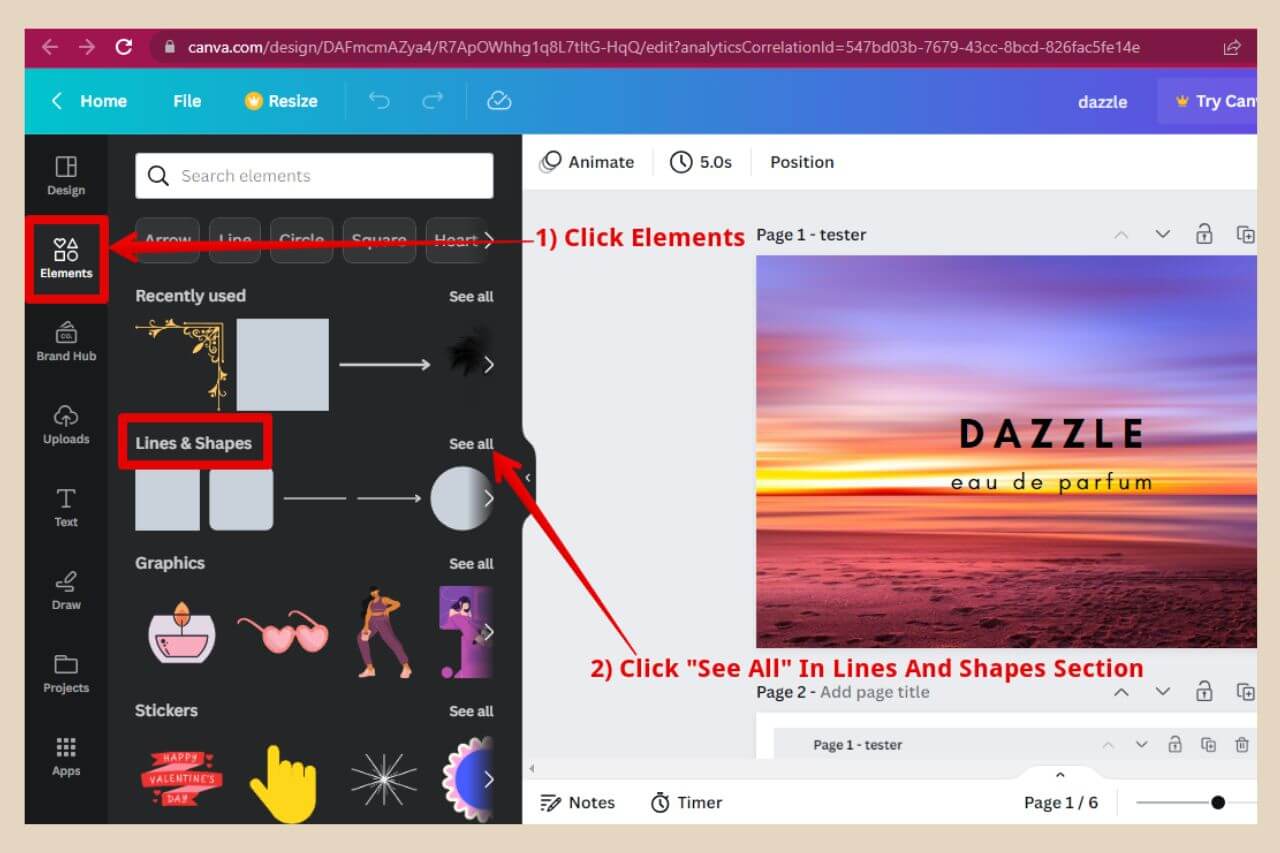
Ideally, if you’re using this shape as a text box and you want to be able to adjust it from all sides around your text, then you’ll want to pick a shape that you can resize not only in the corners but also at the sides too.
All the grey shapes here have that ability so you can resize them in numerous directions which makes them ideal for this situation.
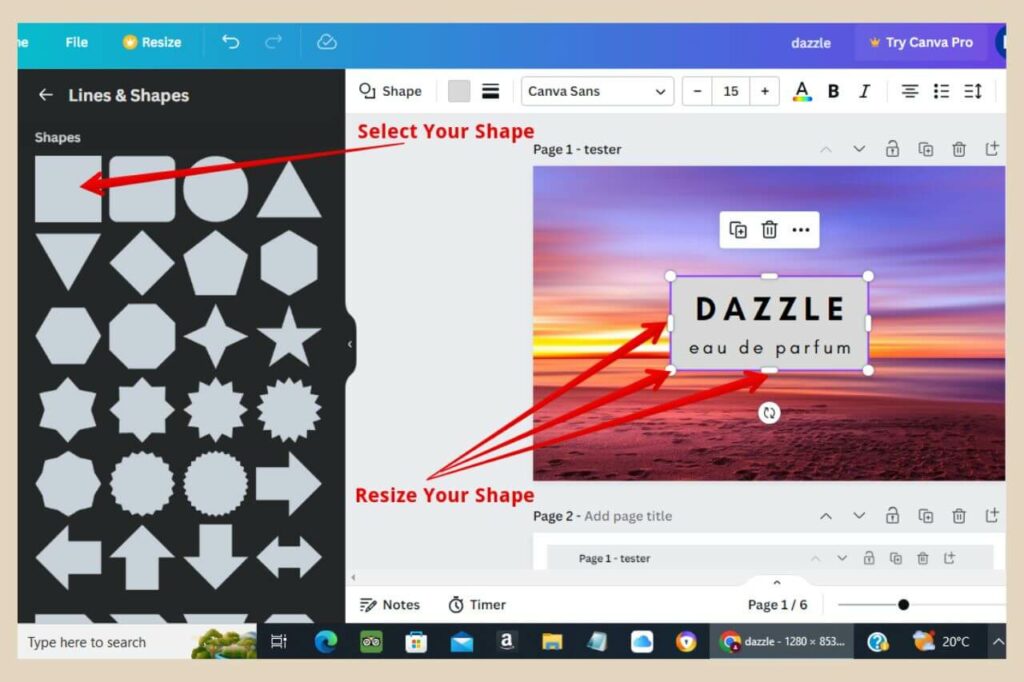
So, click or drag and drop the shape you’d like to use and adjust it to the size you need. One thing worth mentioning here is that there is a layer system at play here.
Changing The Layer Position Of Your Elements
As you add elements to your canvas there will be an order to them in that the last element added will sit above the ones beneath it.
In this particular instance, you’d want the shape to be behind the text, especially if it’s going to be coloured with a solid colour that would hide the text if you left it like this.
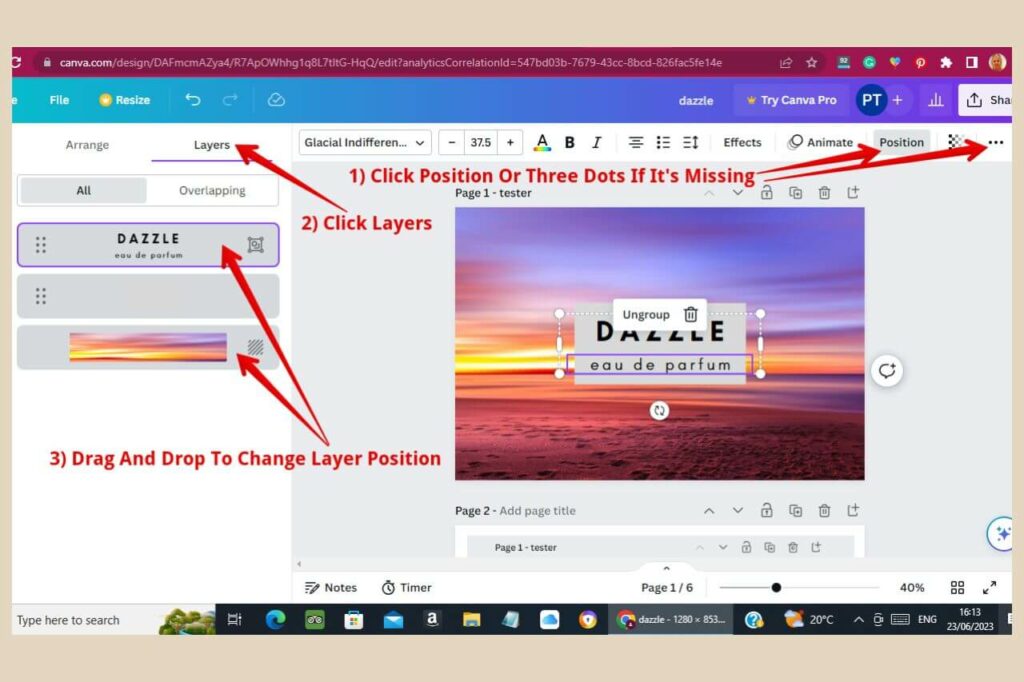
To change this, simply click the Position tab (or the three dots to expand the menu if you can’t see it) and some options will appear on the left of the page.
Click Layer and you’ll be able to change the order of your elements by dragging and dropping them to the desired layer position.
The top item is the element at the very front of your design and the last item at the bottom is the element at the very back of your design.
Changing Position With A Different Method
You can also do this by clicking on the three dots on the small box that appears whenever an element is selected (or by right-clicking on the element).

This will open up a menu where you can select “Layers” and then choose to move your element forwards, backwards, to the back, etc, although the position tab is a much easier way to do this.
You won’t always have to do this as quite often Canva seems to know what you’re at and will put newer elements behind the text but it’s well worth knowing how to do this in case you ever need to.
Making The Box Transparent
Once you’re happy with the order, you can customise your shape in several different ways using the options at the top of the page. You can change the colour, add a border to it or make it transparent if you like.
To make it transparent, click the three dots on the right side of the top menu to expand the menu further. Next, click the Transparency button and then click and drag the slider to change the level of transparency to your liking.
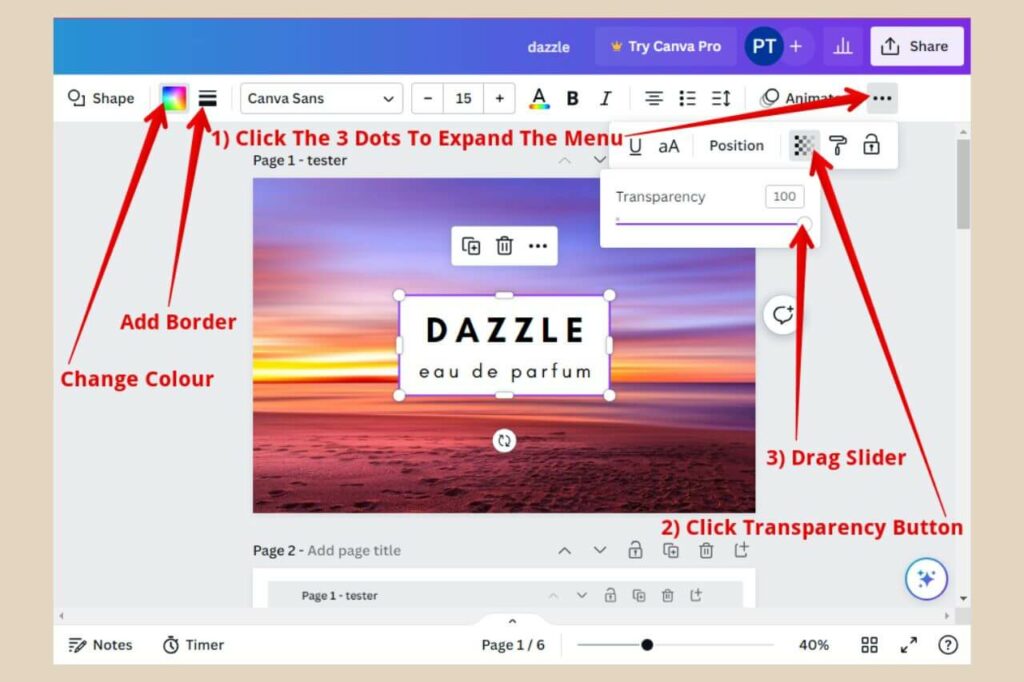
You can use this transparency tool for many elements within your design including images and even text.
It’s also worth noting that you can add a lot of different elements to your design including lines, arrows, icons, emojis and pretty much anything you can think of.
Just type what you’re looking for into the search box in the elements section and you should get lots of results.
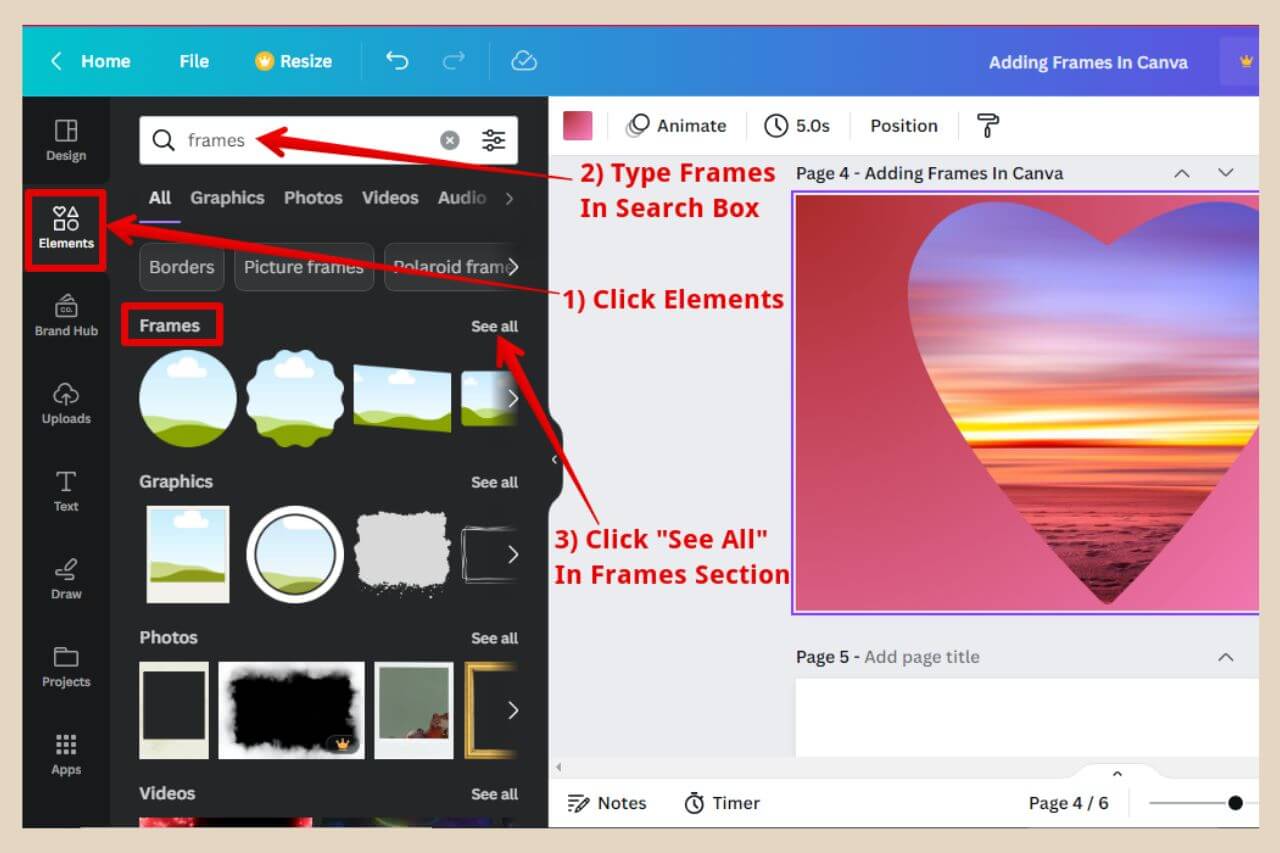
Adding Frames To Your Design
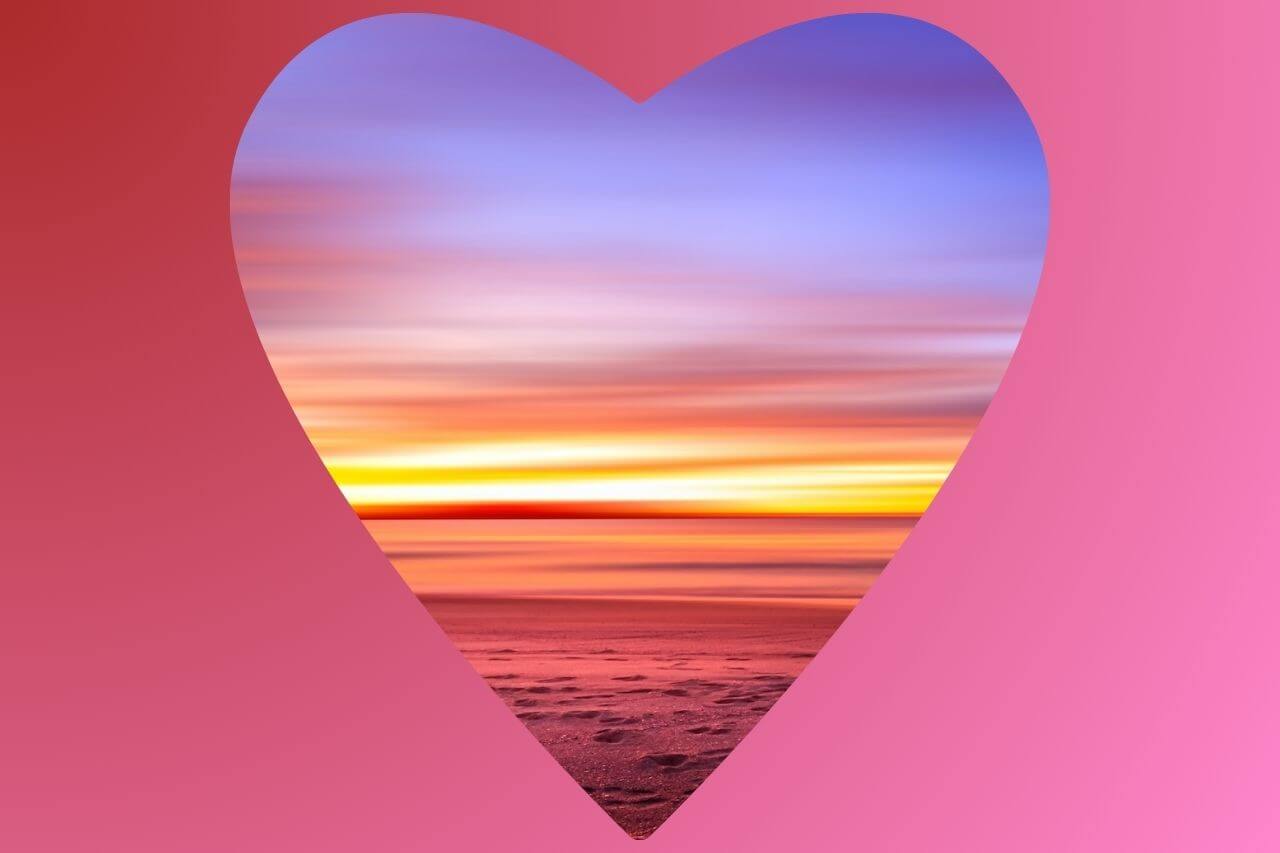
Frames are actually quite a cool little feature in that they allow you to add an image to them and the image will be cropped into the shape of the frame.
For example, if you added a heart-shaped frame and then inserted an image into it, the image would be cropped into it like the image below.
To add a frame, type “frame” (or if you know the shape of the frame you want, type heart frame, round frame, etc) into the search box in the elements section.
From here, you’ll need to click “See All” in the frames section as per the image below. This will bring up the full selection of frames available.
Next, click or drag and drop the frame you like the look of from the results that appear to add it to your design. You can then resize it to your preferred size.
Adding Your Image To The Frame
Now click the Uploads section where your images are and slowly drag and drop your image of choice across your design until you see it fill the inside of the frame.
To change the way it’s cropped, simply double-click on the image and then click and drag it around to your preferred position.
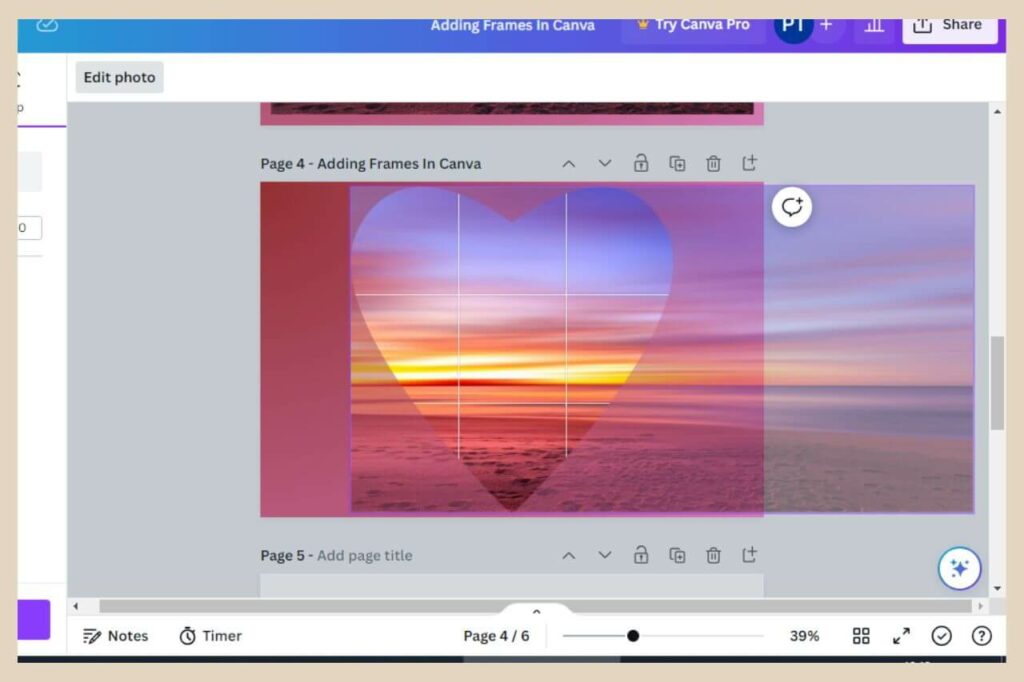
You can create pretty cool-looking designs with these frames and some frames will actually allow you to add multiple images too.
Adding Shadows To Your Design
Adding shadows is another way to jazz up your images so to add them, type in “shadow” or if you know what you’re looking then type in “palm tree shadow”, for example into the search box in the element section.
I tend to get shadows from the graphics section as they’re more likely to be customisable. So click or drag and drop the one you’d like to use to insert it and as before, you can resize it to your own liking.

If it doesn’t look shadowy enough, you can actually use the transparency tool here to make them look even more so.
The palm tree images I used here didn’t look very shadowy to me so I adjusted their transparency to get the final result you see in the image above.
You also don’t have to have the full element or image on the canvas either. You can place an element partially on the canvas if you want to create the effect that something is hanging over the image.
Like with the palm tree shadows above, I’ve rotated them slightly and I only have about 2/3rds of those images actually on the canvas. Anything that goes outside of the canvas border won’t show up and that can actually create pretty nice effects.
Grouping Elements Together In Canva
Let’s say you’ve decided to use several different text styles on your image. You’ve spent ages aligning them, positioning them and getting the right amount of space in between them but now you’ve realised that the final result is too big and now you want to make them smaller.
Rather than making each different piece of text smaller one by one and then having to realign, respace and reposition them all over again, you can simply group them together so that you can resize and move them as one unit.

To do that, click the first element, then hold down the shift key on your keyboard while you click all the other elements you’d like to group together.
Once you release the shift key, click Group on the small format box that appears and your selected items will now be grouped together as one unit.
Adding Other Elements To Your Design
You can get pretty creative on Canva and add as little or as much as your designs call for. With featured images, I like to include my website name somewhere, usually at the bottom of the image.
You can also create logos in Canva and I like to add mine to my featured images too.
If you ever find yourself completely stuck for image ideas, you could even just use a vibrant background (search “background” in Canva or Pexels etc and you’ll find lots of cool ones) with some fancy text added because those can also turn out really well.
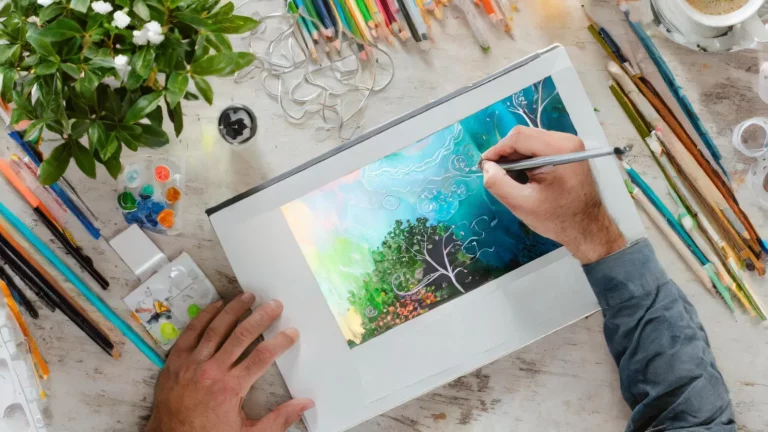
You can even create entire images from scratch just by using a background and a variety of different elements all added together to create informational-style images.
And if you really want to have a bit of fun with your designs, you could try using Canva AI tools to really add some pizazz to your creations.
Some Basic Page Controls
If you ever want to delete an item from your design, just click the bin icon on the small box that appears whenever an item is selected. To duplicate an item (copy and paste in one click), just click the duplicate button.
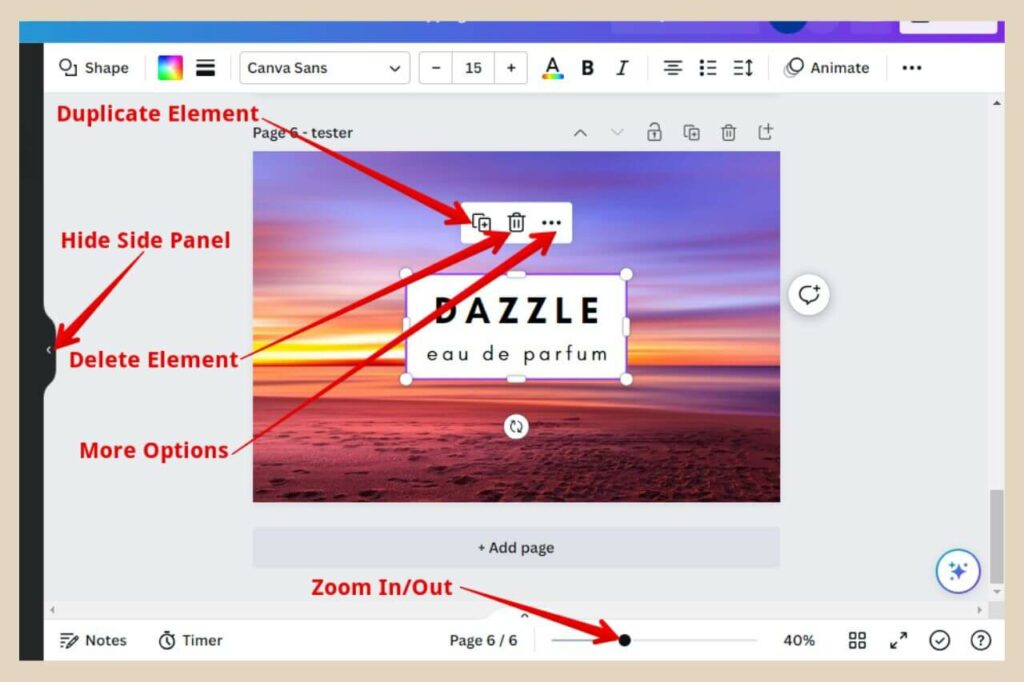
To zoom in and out of your design, click and drag the zoom slider at the bottom of the screen. To hide the side panel (where your elements or uploads are displayed), click the small arrow on the edge of the panel as per the image above.
To create a new page (another blank canvas underneath the one you’re working on), you can either click the + Add Page Button below the last page you’ve created or you can click the Add Page icon which is above every page and that will add a page beneath the page you click it on.
To lock a page, just click the lock page button above the page which will prevent all editing on that particular page until you’ve re-clicked the button again to unlock it.
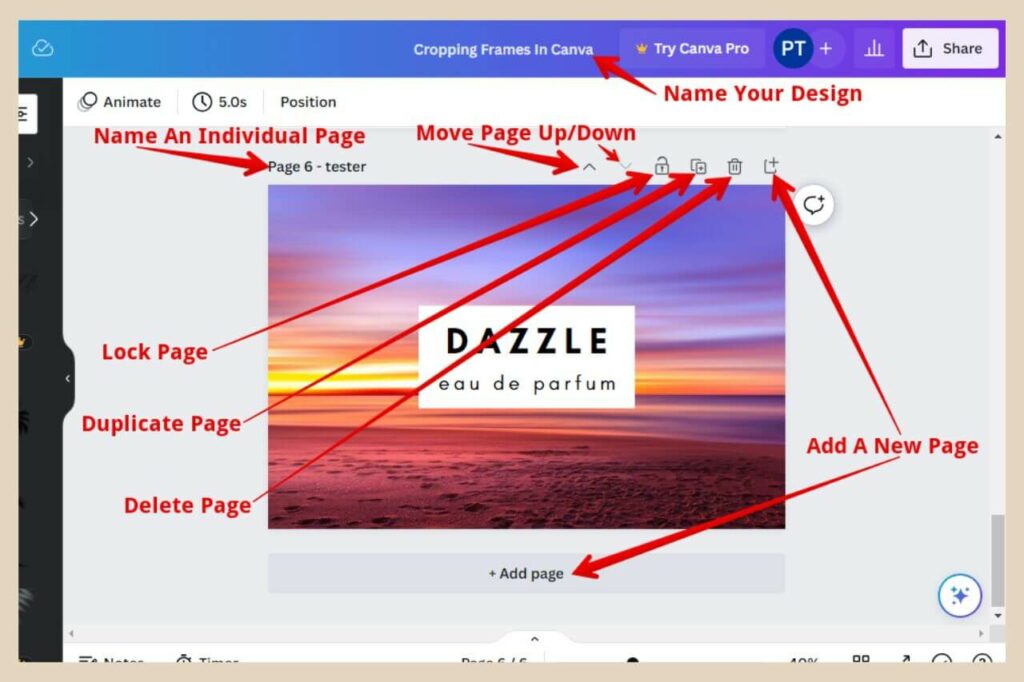
There are a few more buttons above every page and they are the delete page button, the duplicate page button and up and down arrows that will move your page up and down if you have more than one.
Keep SEO In Mind With Keywords For Page Names
To add a page title, click “add page title” above each page and type in your name of choice. It’s a good idea to keep SEO in mind here when you’re naming the page.
Keywords relating to the post you’re adding it to are a good idea as this image may rank under that keyword in the SERPs.
You can also name your entire design template here at the very top of the page but if you don’t also name your individual pages, then this title will be used as the image name anytime you download any of these pages.
Downloading Your Design
Once you’ve completed your design, the last step is to download it and to do that you’ll need to click on the Share button on the top right corner of the screen. From here, scroll down until you see the download button.
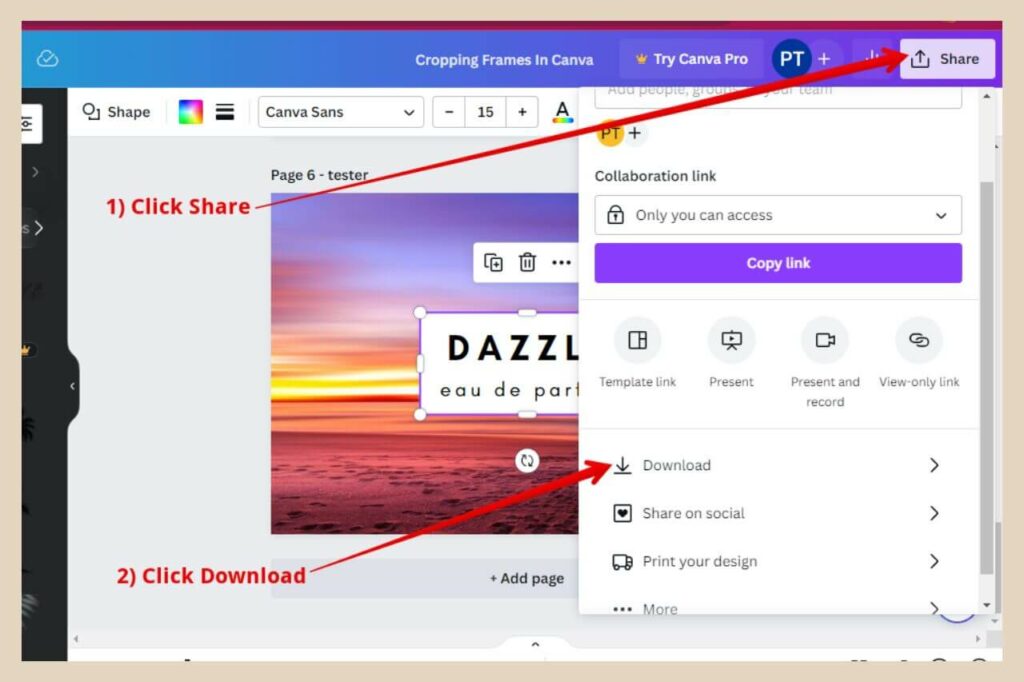
Once you click the download button, you’ll have the option to choose the file type from the drop-down menu. Canva will also suggest PNG but don’t necessarily go with this here.
PNG Or JPG
As a general rule of thumb, PNGs are better for graphics because they’re higher quality and JPGs are better for photos.
However, PNGs are bigger in file size so if you’re adding them to your website, then JPGs are a much better option because of their smaller file size.
If you’re using your designs on social media then you can stick to Canva’s PNG suggestion because you don’t have to worry about the larger file size here.
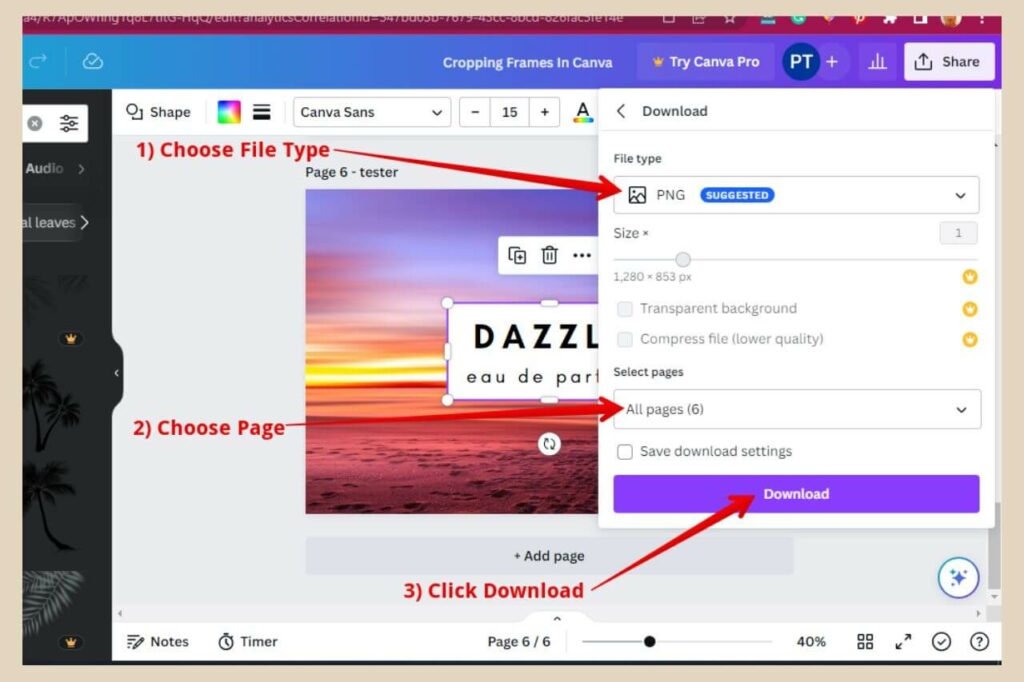
If you have more than one page of designs (it’s not unusual to have a sized template where you create all of your designs of that size by using multiple pages), you can use the drop-down menu to choose the page you’d like to download.
Then to finish, click the Download button and your new design will be downloaded to your computer (you’ll also see it in the taskbar so you can drag and drop it to where ever you’re planning to use it).
Compressing Your Image
If it’s going on your website and you’d like to compress it to keep your image file sizes down to a minimum, you can use a free site called TinyPNG.
Simply head to Tiny PNG, then drag and drop your image straight from the taskbar into the box at the top of the page and wait for it to be compressed (it takes seconds). Alternatively, click on the box to search your computer for the image.
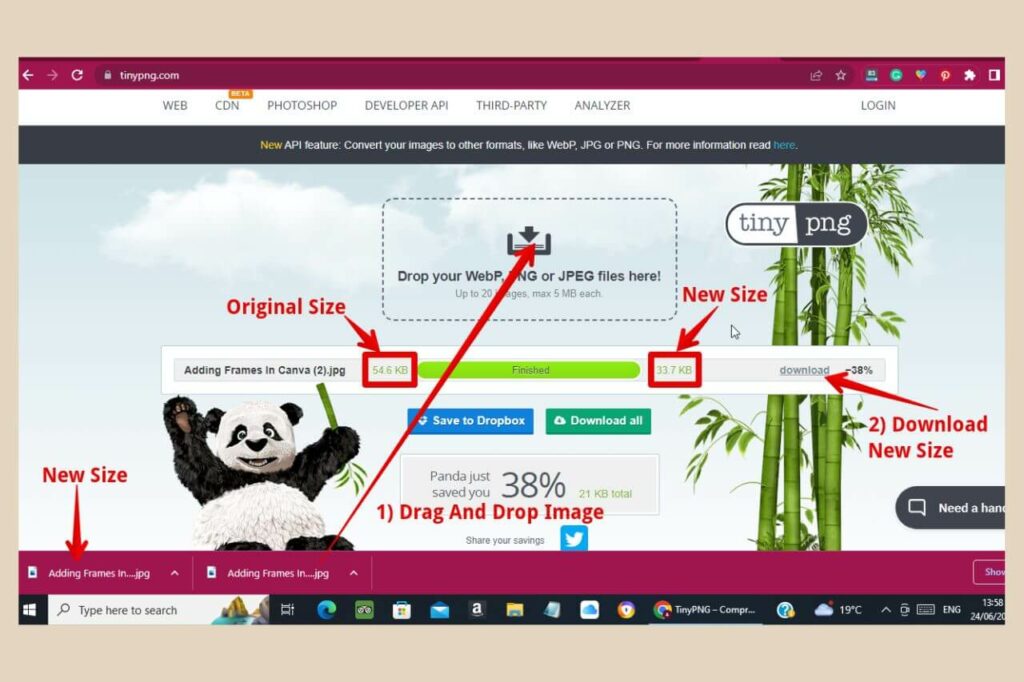
Once it’s compressed, click the download button and the compressed version will be downloaded to your computer (again, you’ll also see it in the taskbar so you can drag and drop it to where ever you’re using it).
Let’s Create Some Awesome Images
Now that you know how to create images in Canva, why not have a go for yourself and see what kinds of image designs you can create? You’ll be amazed at what you can create inside Canva and how quick and easy it is to do it.
I hope you’ve found this tutorial useful but if you have any questions or need help with anything, please do let me know in the comments below and I’ll be more than happy to help you out.
Happy image creation.

Helpful Guides to Read Next
These beginner-friendly guides will help you keep building your blog step by step.
- How to Create a Professional Blog Logo Without Hiring a Designer Using Canva Free
- Design Pinterest Pins in Canva That Actually Get Clicked
- How to Create Better Graphics Faster with Canva AI
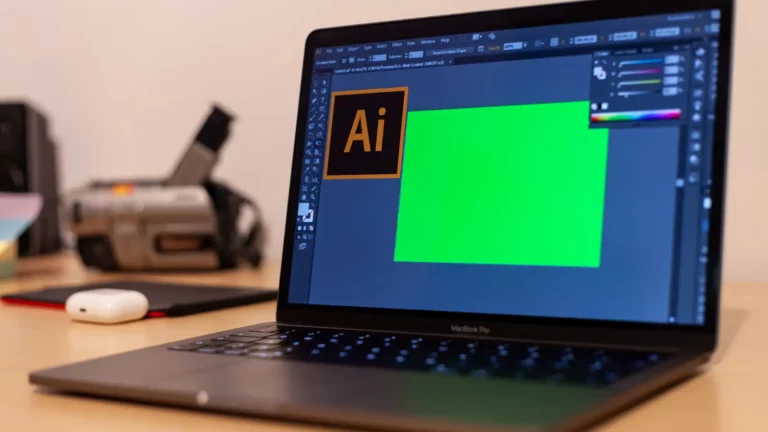
- How to Create Professional Blog Graphics with Adobe Illustrator
- Simple Design Tweaks That Make Your Blog Look More Professional
Ready to Scale Your Digital Footprint?
Publishing content is only half the battle. If you’re ready to amplify your reach, visit my Grow Hub for actionable deep dives on search engine optimisation, email list building, creating better content and graphics and sustainable traffic strategies.

Jessie
Founder, nomorerush.com
Hi, I’m Jessie — founder of No More Rush. I help beginners build profitable, beginner-friendly blogs without the overwhelm or unrealistic expectations you see online. Everything here is built around simple, structured steps so you always know what to do next.