Would you like to learn how to embed a Pinterest board in WordPress or even a Pinterest pin or profile for that matter? There’s actually a very easy way to do it and the best part is that you don’t even need a plugin for it either.
In this tutorial, I’ll show you how to add a Pinterest board, pin and profile to your posts/pages or widget areas using two different methods.
I’ll show you how to do it using the built-in WordPress embed block or if you’d like to customise the size, I’ll also show you how to do it using a Pinterest widget. So let’s get straight into this and add some Pinterest glamour to your site.
Why Add Pinterest Boards To Your Site
If you’re looking to jazz up the appearance of your site, then adding Pinterest elements to it is a great place to start.
I for one love great imagery and so do many other people so adding some striking Pinterest elements is a good way to catch your reader’s attention.
It’s also a great way to highlight your Pinterest profile as well as any other content you’ve pinned to Pinterest. Plus as an added bonus, it’s an extra opportunity to grow your Pinterest following right from your website.
What Pinterest Elements Can You Add To Your Site
You can add either a single pin, an entire board or your complete profile if you like and they can be added anywhere from within posts and pages to widgets areas such as your sidebar or footer for example.

To get started, we’ll start with individual pins and how you go about adding them to the content area of your posts and pages using the WordPress Pinterest embed block.
How To Embed A Pinterest Pin In WordPress With The Pinterest Block
The first thing you’ll need to do is to open up the page or post that you’d like to add the pin to in the WordPress Editor.
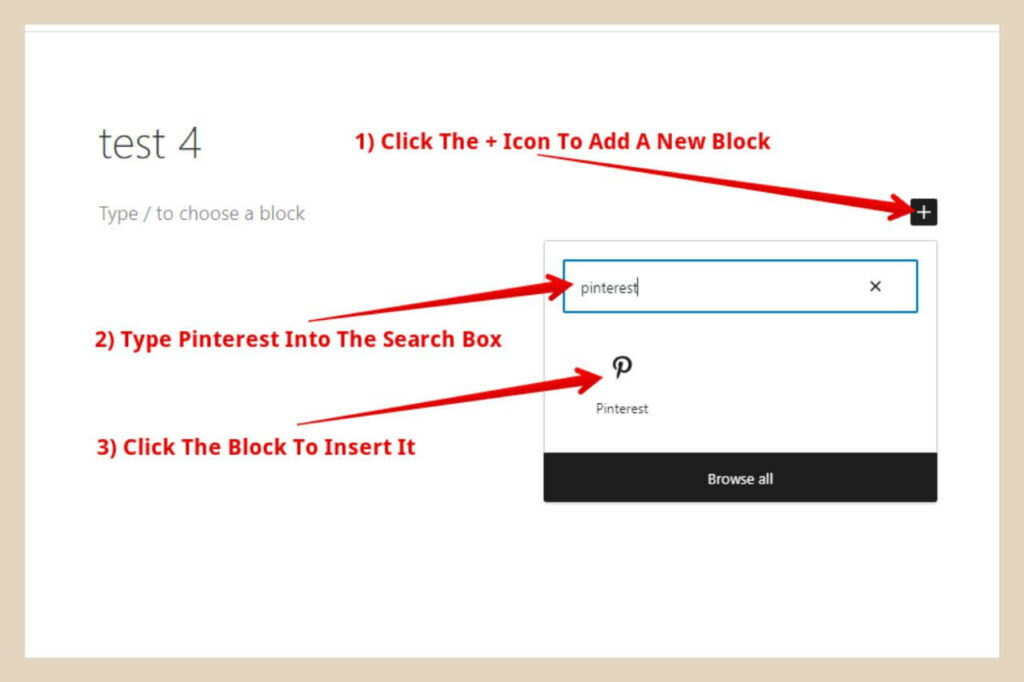
Once you’re in the post/page and have decided where you’d like to add the pin, you’ll need to click the + icon to add a new block.
When the small window appears, type Pinterest into the search box to find the Pinterest embed block. Once it appears, click on it to add it to your post/page.
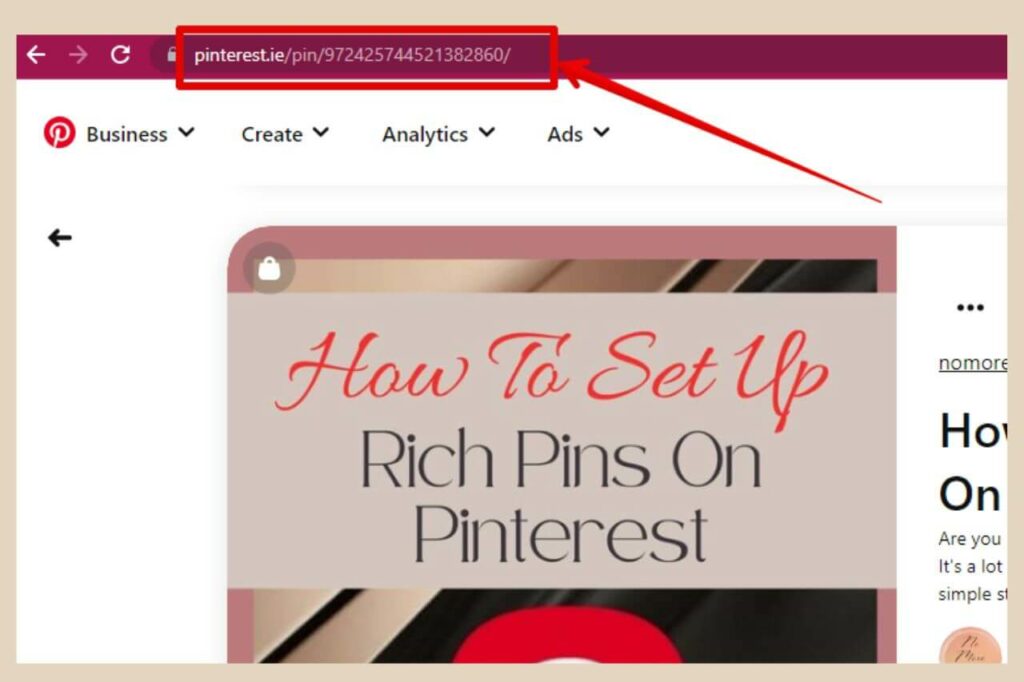
The next step is to head to your Pinterest profile and click on the pin that you’d like to use. Once the pin is open, you’ll need to copy the URL of the pin by copying the URL that is now in your address bar.
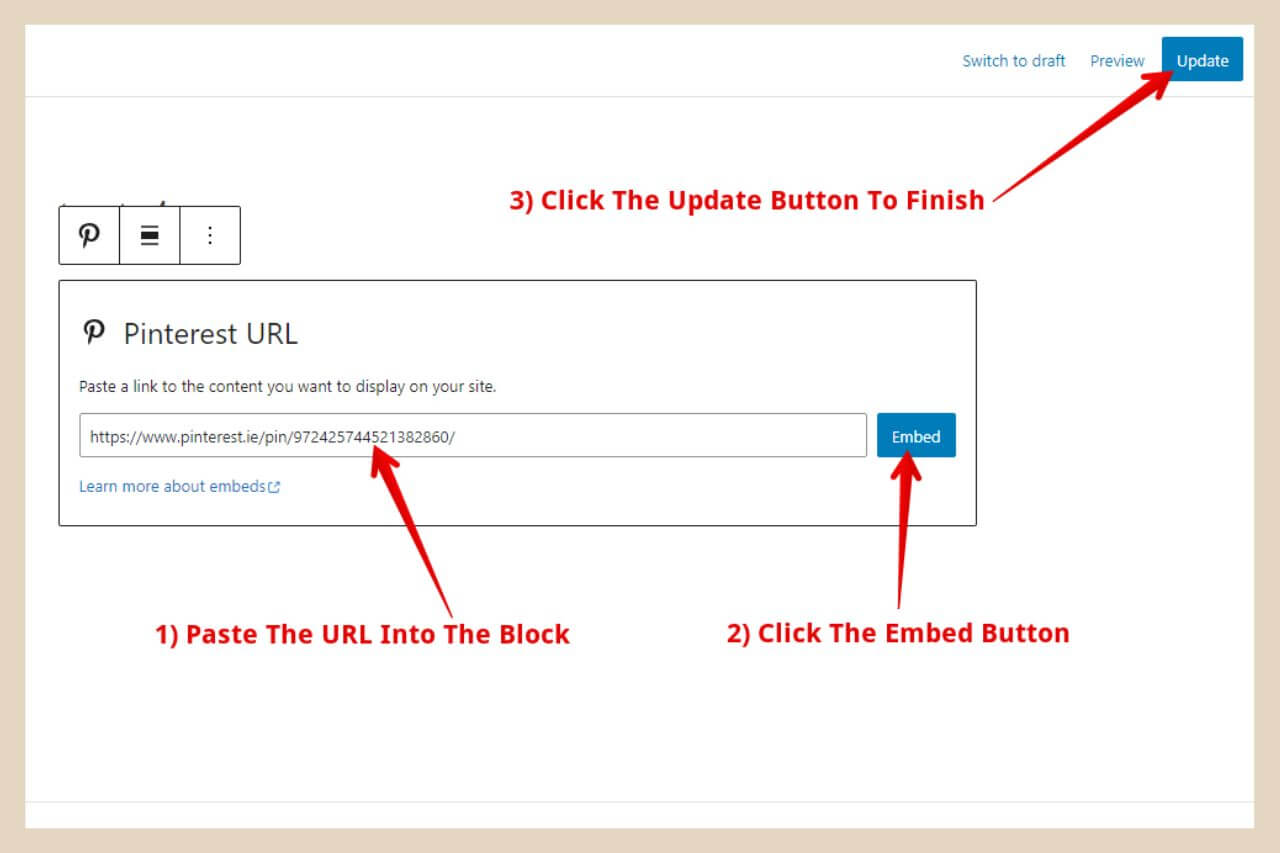
Now head back to your post/page and simply paste this URL into the block and then click the Embed button to finish. Remember to click the Publish/Update button at the top right of the page to save your changes.
Ta-da, you’ve just embedded your first Pinterest pin to a post (if it didn’t embed, check the easy fix below) and this is how a live embedded pin looks on a post.
This is a really simple way to embed a pin to a post but the one downside to this method is that this thing is HUGE.
Unfortunately, there’s no way to alter the size of this thing but if you’d like to be able to choose different sizes then this can be done using the Pinterest widget method which I’ll show you how to do in a moment.
When You Can’t Embed Pinterest In WordPress
Depending on where you are in the world, you may need to alter the pin URL just a little bit if it won’t embed. The reason for this is that only Pinterest links with the .com extension can be embedded with the Pinterest block.
So if you see a message that says “Sorry, this content could not be embedded”, simply change the existing extension to .com and that will solve the problem.

As you can see in the above image, my Pinterest link ends with .ie because I’m in Ireland and you may have a similar issue if you’re anywhere else in the world that isn’t the US.
Changing the .ie, .ca, .co.uk, .au or whatever link extension you have to .com, will allow you to embed the link and it won’t break anything in the process. Your embedded pin will still work and your visitors will still be sent to it when they click on it.
How To Embed A Pinterest Board In WordPress With The Pinterest Block
Embedding a Pinterest board is done in the exact same way as a Pinterest pin. The only difference is that this time you’ll be going to a different area to grab the URL.
To add a board, insert the Pinterest block as before but this time when you head over to your Pinterest profile, you’ll need to click on the “Saved” section to see all your boards.
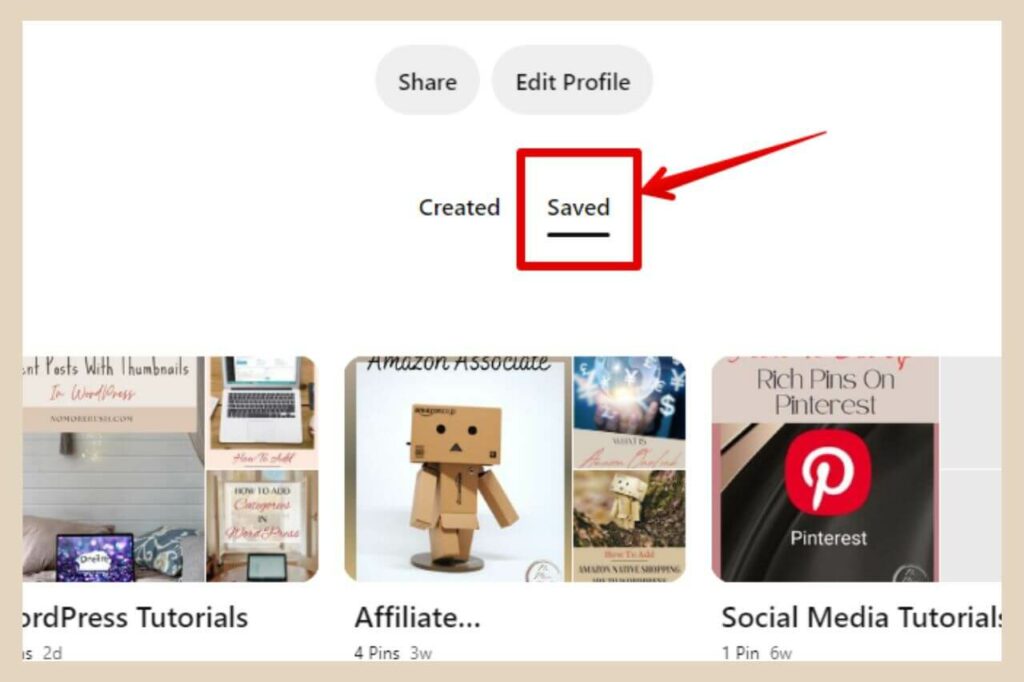
From here, you’ll need to click on the board that you’d like to use and once the board is open, you’ll need to copy the URL from the address bar as before.
Lastly, paste the URL into the block (don’t forget to change the extension to .com if it’s different) and click the embed button to add the board to your post. This is how a live embedded board looks on a post.
Depending on how many pins are on the board, your board may be scrollable so that your readers can see all the content saved to it.
You’ll notice that there’s some white space at the bottom of my embedded board and that’s because I only have 4 pins saved to it.
To avoid this empty white space, it’s probably best to use boards that have at least 6 pins saved to them so that there are enough pins to fill the default area size of an embedded board.
How Embedded Boards Work On Your Site
Boards also include a “Follow On Pinterest” button at the bottom and depending on where your readers click, they will be taken to different areas of your Pinterest account.
If they click on the top of the board where you’re profile name and image are, this will take them directly to your main profile page. If they click the board name, this will take them to your board page.
If they click anywhere else within the body of the board, it will take them to the particular pin that their cursor was above when they made the click.
Again, if you want more control over the size of the board, you can use the Pinterest widget method instead further down.
How To Embed Your Pinterest Profile In WordPress With The Pinterest Block
Embedding your Pinterest profile is done in the exact same way as embedding a pin or a board only this time you’ll copy the URL from the address bar when you’re on your main profile Pinterest page (again, don’t forget the .com bit).
An embedded board and an embedded profile look almost identical in that they’re the same size, the same layout and they react the same way depending on where your readers click on them as you can see with my embedded Pinterest profile below.
The only real difference is that there won’t be a board name under your profile name and image and this time, every single one of your pins will be included so that your readers can scroll down to see all of them.
Embedding Your Pinterest Elements With The Pinterest Widget Builder
If you’d like to have more control over the size of your embedded Pinterest elements then you may prefer to use the Pinterest Widget Builder instead.
This is actually my preferred method and it’s just as easy to do. So to get started, simply head to the Pinterest Widget Builder.
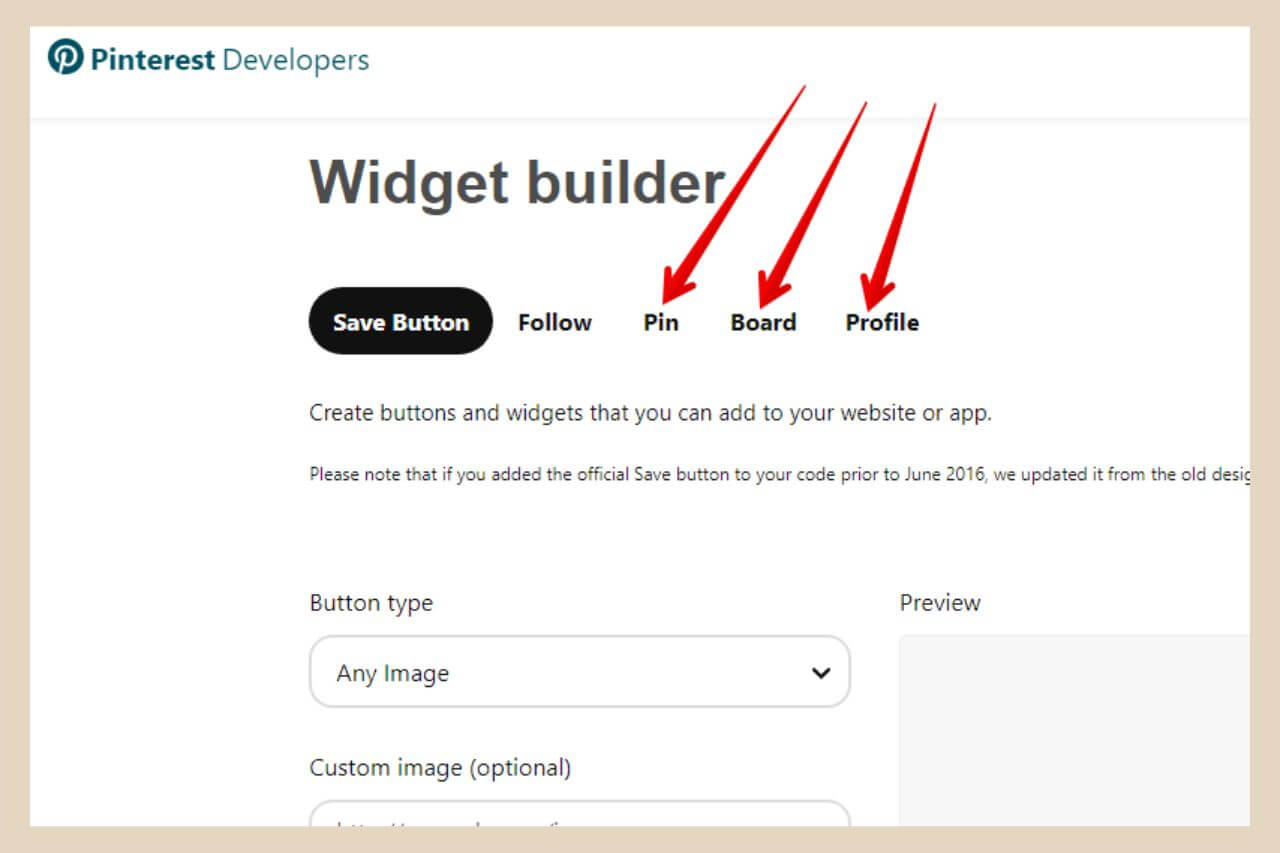
You’ll notice that there are a few things you can create here including follow buttons and save buttons but for the sake of this tutorial, we’ll just look at the pin, board and profile sections.
Creating A Pin Widget
To create a pin widget, simply click on the Pin button. Next, copy the URL, as before, of the pin you’d like to add to your post and paste it into the Pin URL box (don’t worry about the whole .com business here, it’s only in the embed block above where it’s an issue).
In the next box below, use the drop-down arrow to choose your preferred size between small, medium or large. You also have the option to hide the description of the pin if you like by clicking the checkbox.
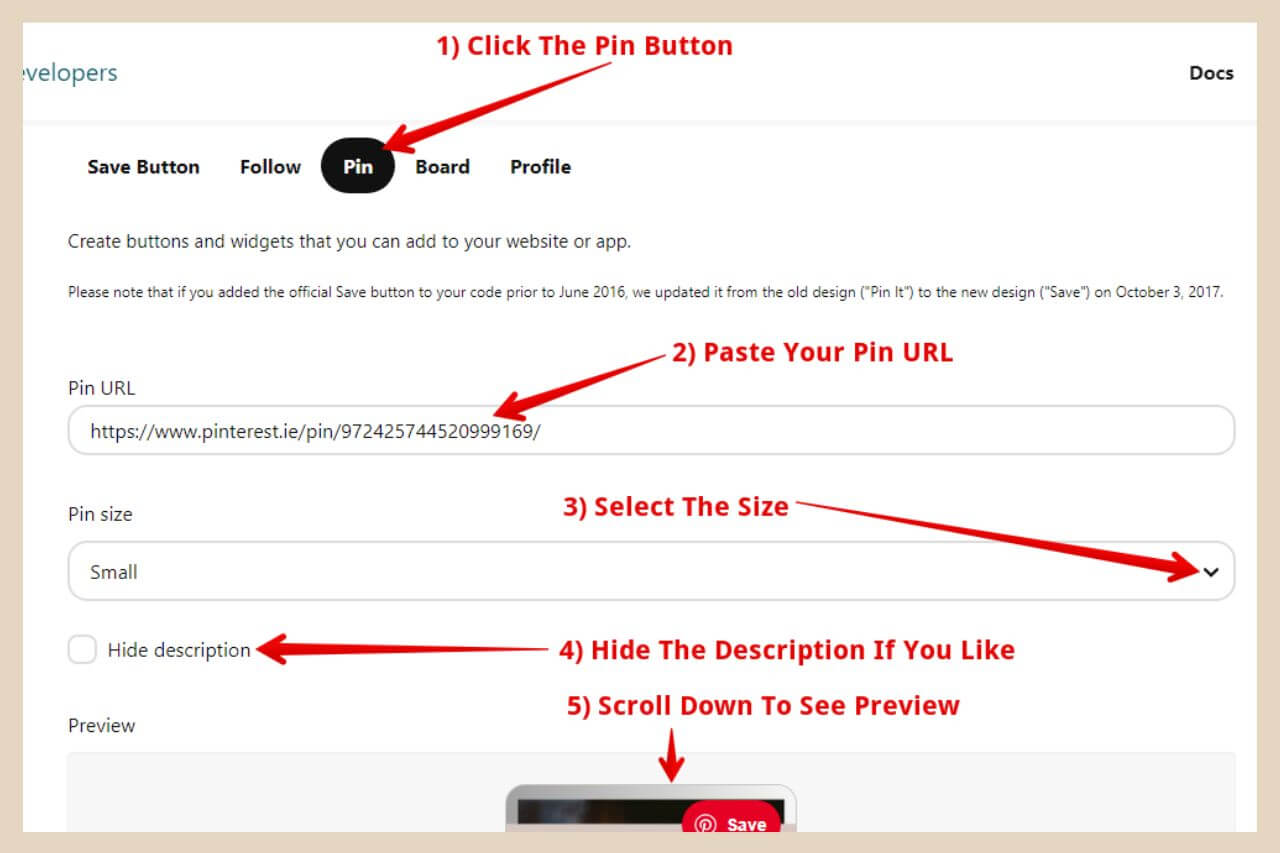
Next, scroll down to see a preview of your pin and if you’re happy, you’ll need to copy the two pieces of code that are beneath it.
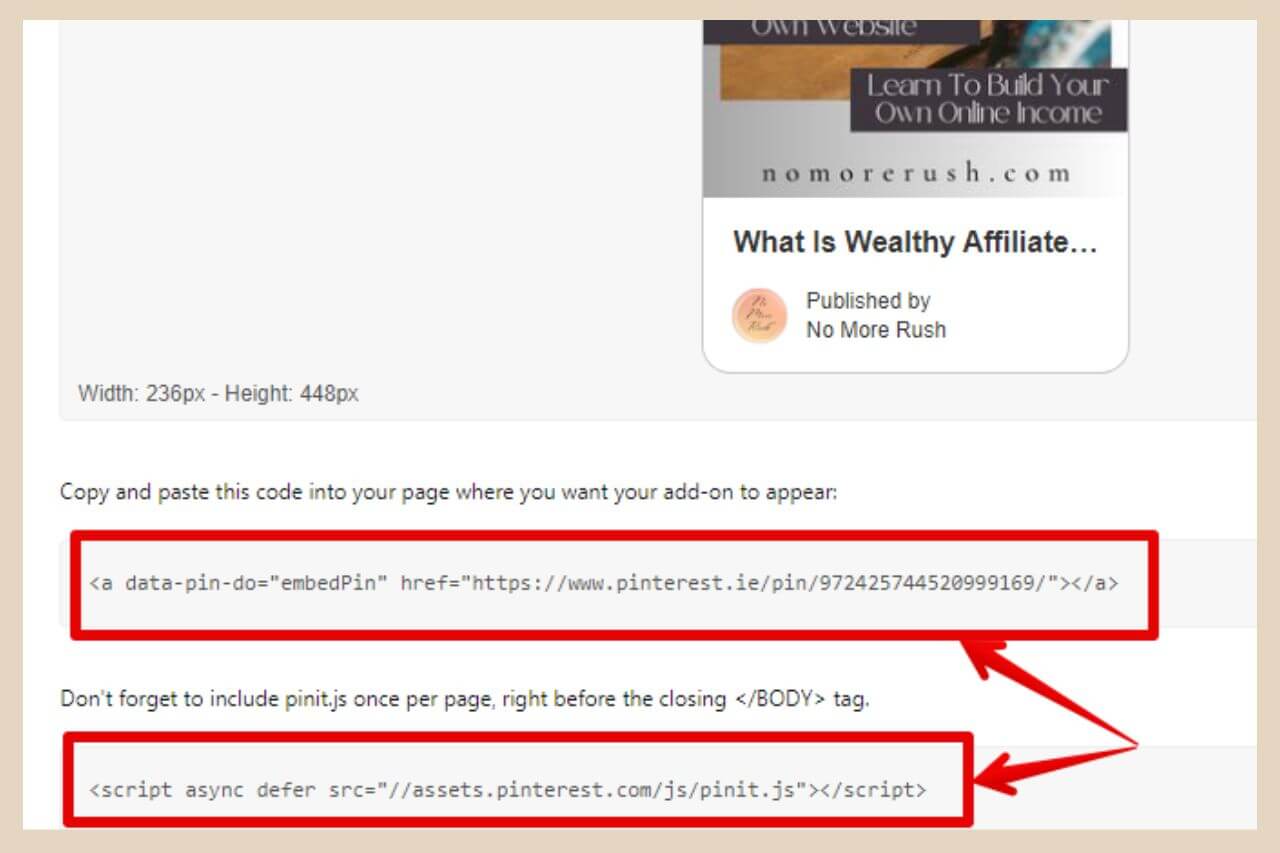
Head back to your WordPress editor and click the + icon to add a new block to the area where you’d like to place your pin.
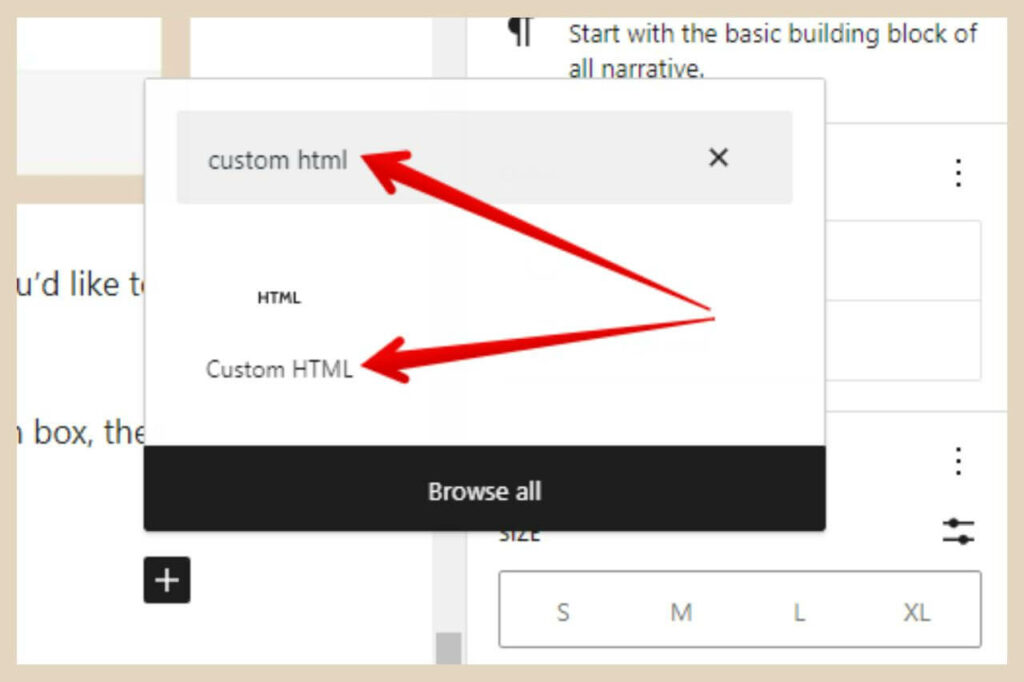
This time, however, you’ll need to use a Custom HTML block so type custom HTML into the search box, then click the block once it appears to add it to your post.
Paste both pieces of code into the block and your new pin widget will be added to your post. This is what the small-sized pin widget looks like on a Post.
As you can see, this is a much smaller size than the large one inserted earlier in this post but you can play around with these to see which size you prefer.
Creating a Board Or Profile Widget
As the options available for creating a board and profile widget are exactly the same, I’ll combine them into one section here to save duplicating the same instructions.
So first click on Board or Widget depending on which one you want to create. Next, copy the URL of your chosen board or your profile page and paste it into to URL box on the corresponding widget builder page.
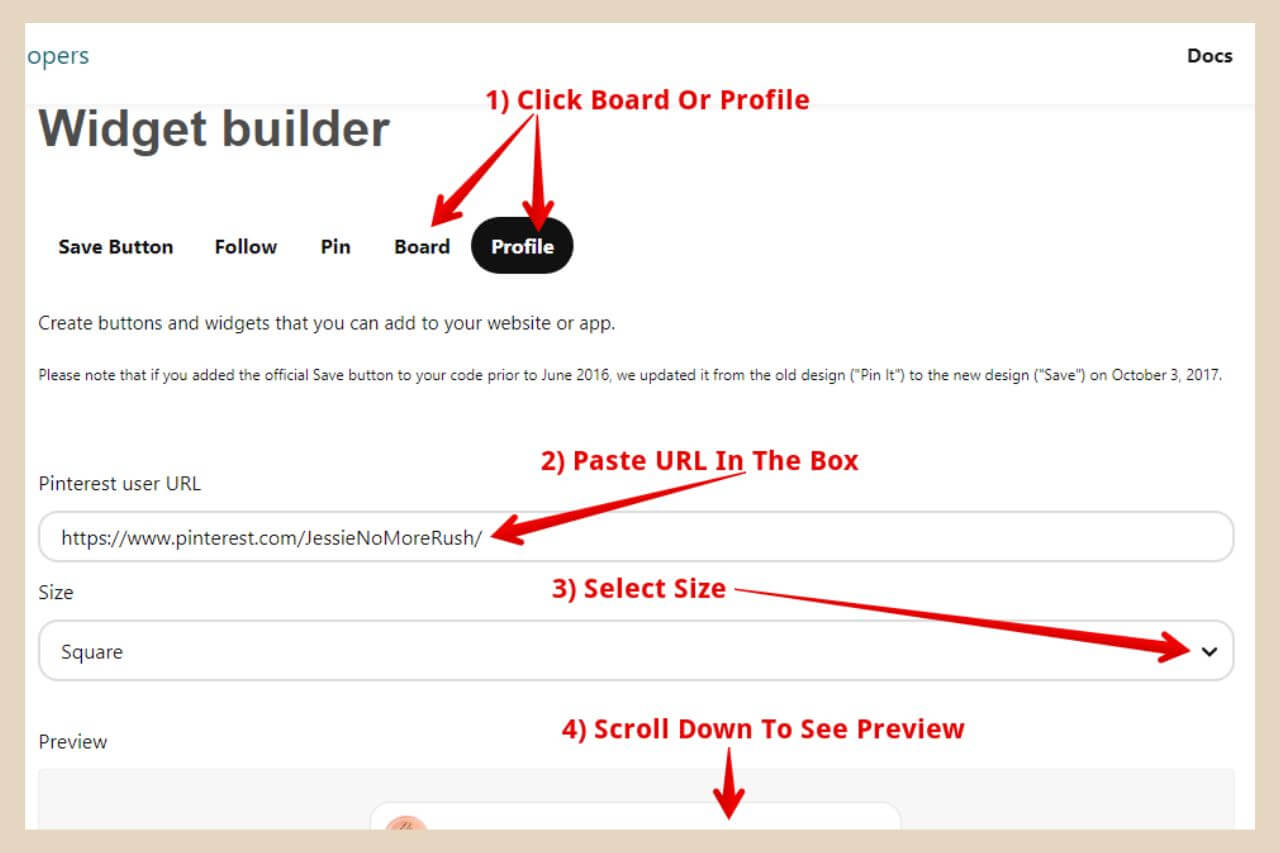
The next step is to choose your preferred size using the drop-down box below the URL box. From here you can choose between Square, Sidebar, Header or Create Your Own from the size options and you can see a preview of each one as you select them.
If you decide to create your own, you’ll be able to change the widget’s height, width and the width of the pins that appear inside it.
Once you’ve chosen your preferred size, copy both codes as before and paste them into a custom HTML block to add the board/profile widget to your post. This is how a square-sized profile widget looks on a post.
You can play around with these sizes or create your own until you’re happy with how it looks on your post.
How To Add Pinterest Elements To Your Widget Areas
To add Pinterest elements to your widget areas, you can simply follow the same steps as above only this time, instead of adding them to a post, you’ll need to hover or click Appearance in the main WordPress menu, then click Widgets to open up the widgets area.
Choose the widget area that you’d like to use and click the down arrow to expand it if it isn’t expanded already.
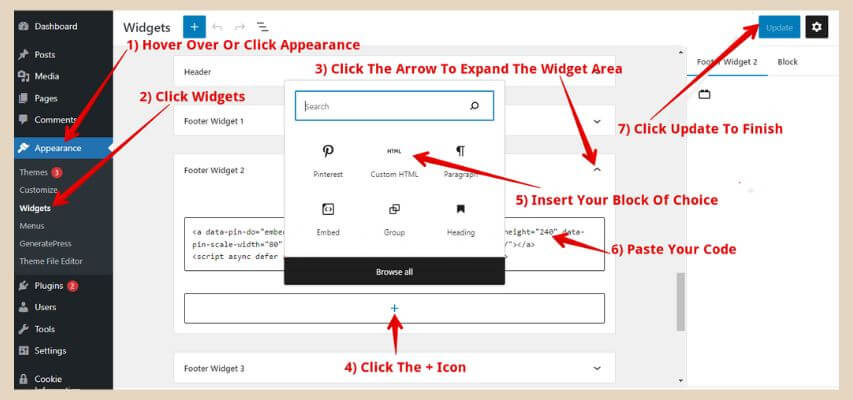
Simply click the + icon to add a new block and choose either the Pinterest embed block or a Custom HTML block if you’re adding the Pinterest widget, to add your element of choice using the methods described above. Then click the Update button at the top right of the page to finish.
Although you can use either the Pinterest embed block or the Pinterest Widget builder here, because the embed block creates such large elements, you may prefer to use the Pinterest widget builder instead so that the Pinterest element doesn’t overrun your entire widget area.
You can test this out yourself though to see which look you prefer. On a side note, the Pinterest widgets are pretty responsive so they will adjust somewhat to the area you place them in.
I’m actually using the square-sized widget in my sidebar because I’d preferred the way it looked to the sidebar-sized one so definitely play around with these to see which size you prefer.
Adding A Title Above Your Pinterest Widget
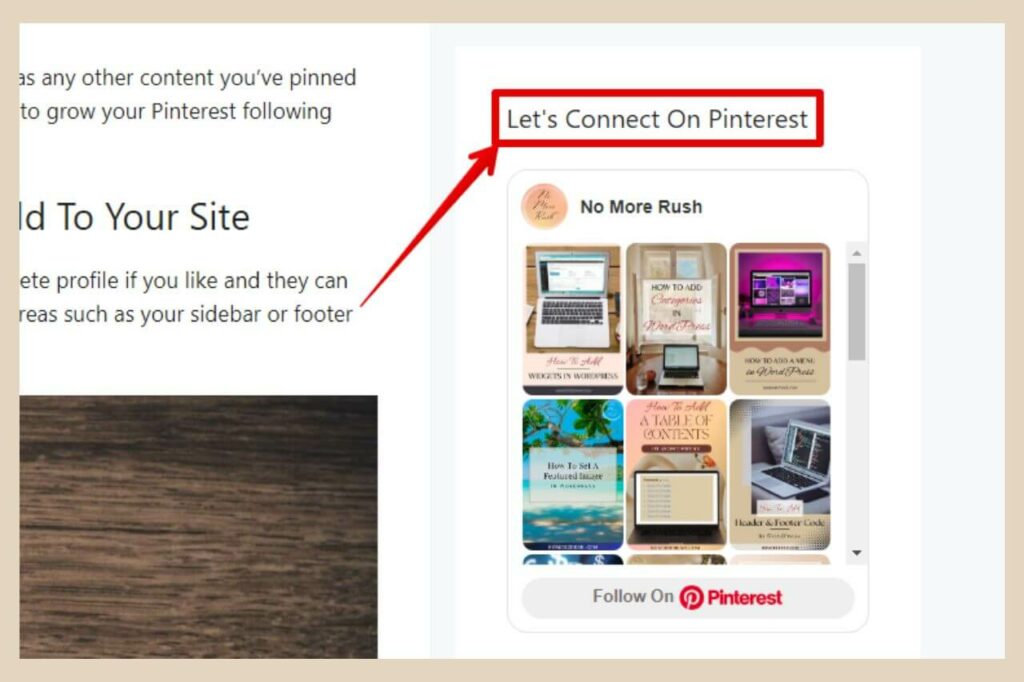
If you’d like to add a title above your Pinterest widget, then there are a couple of ways to do this. If you take a look at my sidebar, you’ll notice that I’ve added one.
To be honest, the only reason why I’ve done this is because all my other sidebar elements have one and it would drive my OCD crazy if I didn’t maintain the same consistency throughout the entire sidebar area ?.
So, if you’re adding your widget to the footer area, you can simply add a paragraph or heading block above it which you can then put your title into.
You can then use the block settings on the right of the page (click the button to the right of the Publish/Update button if you can’t see them, then make sure “Block” is selected at the top) if you’d like to change the font style of your title.
This can also work for the sidebar area too but if like me, your sidebar elements are within their own boxes, then you’ll end up with the title block in one box and the Pinterest widget in another.
The Title Work Around For Boxed Widgets
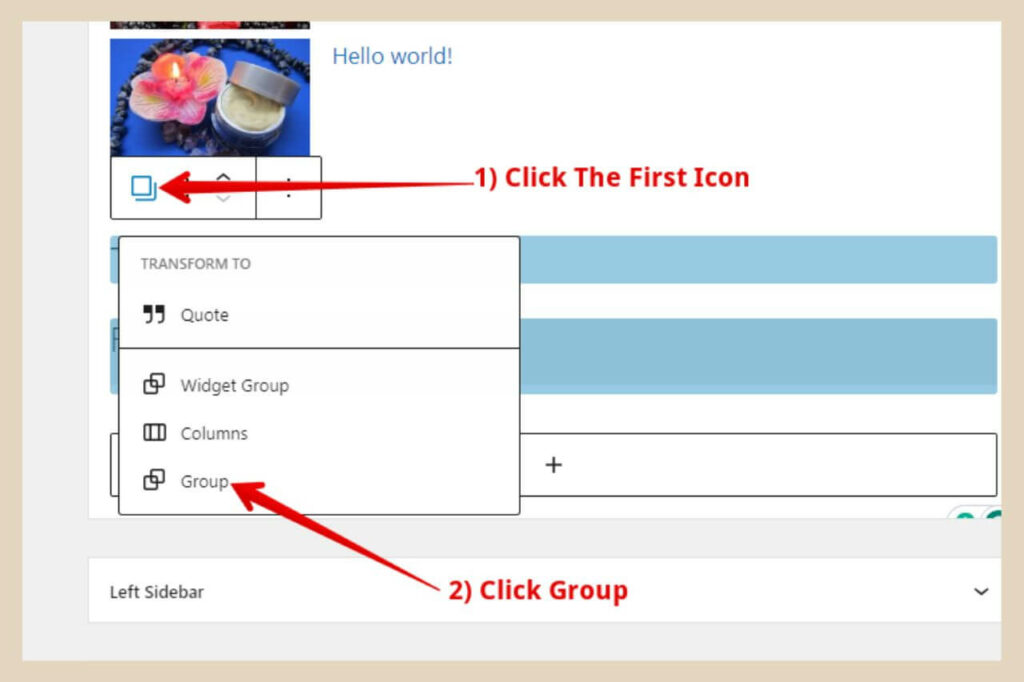
To get around this, you can do one of two things depending on which embed method you’re using. The first method is to group the two blocks together by holding down the shift key on your keyboard while selecting both blocks.
Next, click the first icon on the small block format box, then click “Group” from the small list of options that appears to group both blocks together.
If the title and the widget are too close together, you can simply add an empty paragraph or heading block in between them and that will create a line of space.
This method is the only way to do it with the Pinterest embed block but if you’re using the Pinterest widget builder, then there is a second way.
The second way is to copy the following piece of code and paste it right before the Pinterest widget code in the same custom HTML block.
<h5 class="wp-block-heading has-text-align-left">Let's Connect On Pinterest</h5><p></p>It should look something like the image below (the piece of code above is on the first line in the image below followed by the Pinterest widget code directly beneath it).
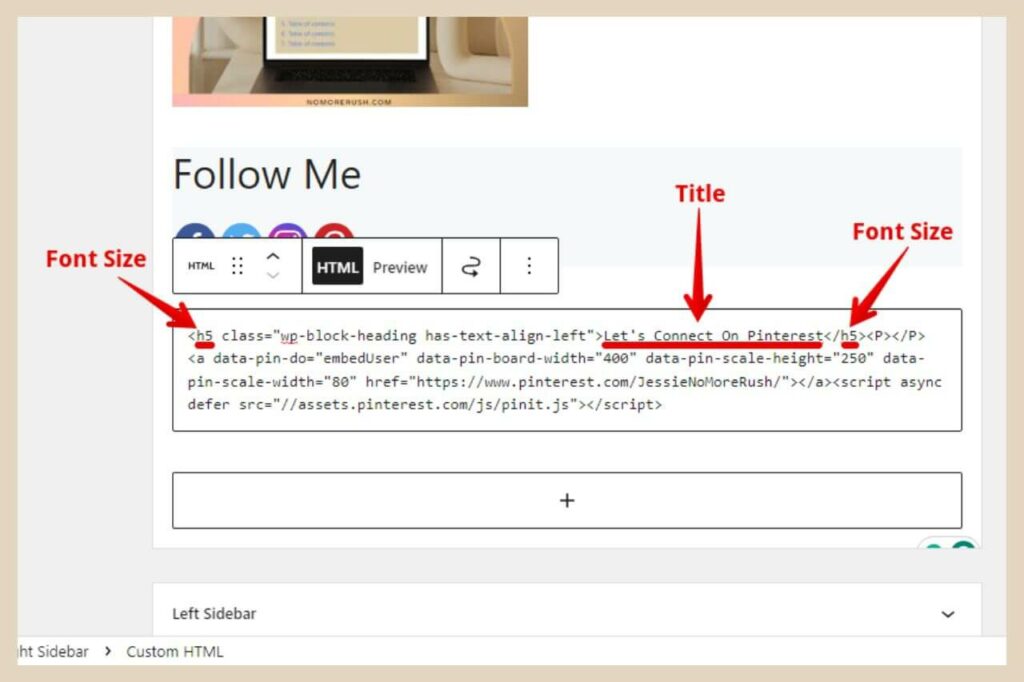
From here, you can now change the “Let’s connect on Pinterest” title to whatever title you’d like and you can also change the font size by changing the heading size from h5 (h5 is in that code twice so you need to change both) to whatever size you’d like from h1 to h6.
Or if you’d like it to be regular paragraph size, then simply replace the two instances of h5 with p and that’s all there is to it.
On a side note, I use the custom HTML method for mine because the grouping method changes the size and position of my Pinterest widget so keep an eye out for that if you choose the grouping option.
Let’s Add Some Pinterest Glam
Now that you know how to add Pinterest elements to your site, why not try it out for yourself? You’ll be amazed at how a little bit of Pinterest can jazz up your entire site.
I hope you’ve enjoyed this tutorial and found it helpful but if you do get stuck and need help with anything, please feel free to reach out in the comments below and I’ll be more than happy to help you out.
Happy Pinterest embedding.

Helpful Guides to Read Next
These beginner-friendly guides will help you keep building your blog step by step.

Jessie
Founder, nomorerush.com
Hi, I’m Jessie — founder of No More Rush. I help beginners build profitable, beginner-friendly blogs without the overwhelm or unrealistic expectations you see online. Everything here is built around simple, structured steps so you always know what to do next.