If you want to keep your designs organised and easy to manage, then it’s important to know how to use layers in Adobe Illustrator.
Layers make up all the individual elements of your designs, so you’ll want to know how to keep them organised and move or change them when you need to.
This is especially true if you’re creating Illustrator designs that have lots of different layers/sublayers, so let’s jump straight into this and get more acquainted with layers and learn how to use them like an Adobe Illustrator Pro.
What Are Layers In Adobe Illustrator
Layers in Adobe Illustrator are essentially all the individual elements that make up your entire design.
When you first open the app, you’ll have one empty layer but every time you add something new to the design, whether that be an image, text, a shape, etc, it will automatically be added as a new sublayer beneath the main layer.
So, each piece of artwork will be in its own layer/sublayer which makes it easier to find if you’re creating a particularly complex design.
Tiny design elements might be difficult to find on a busy artboard or may be hidden behind other design elements that are larger so your layers/sublayers are a great way to manage every single element within your design.
This also makes it easy to move, delete, hide, lock or reorganise the position of individual or groups of elements within your design. You can create new layers/sublayers and organise them in whatever way you please.
Basic Layer Organisation
For example, you could create, let’s say, one main layer and call it whatever the design is, ie, logo, flyer, etc. You could then create three sublayers, one for all your text, one for all your graphics and one for your main background.
Then within each one of these sublayers, you could create numerous sub-sublayers to organise your design even further and I’ll show you that in action in a moment.
If you’re working with several artboards, you’ll want to create a main layer for each one to keep all your artwork separated between each one so there are many reasons why it’s important to know how to organise and manage all your layers.
So, with that in mind, let’s look at how to use the Layers panel in Adobe Illustrator to keep all your artwork organised and laid out exactly as you want it.
Using The Layers Panel In Adobe Illustrator
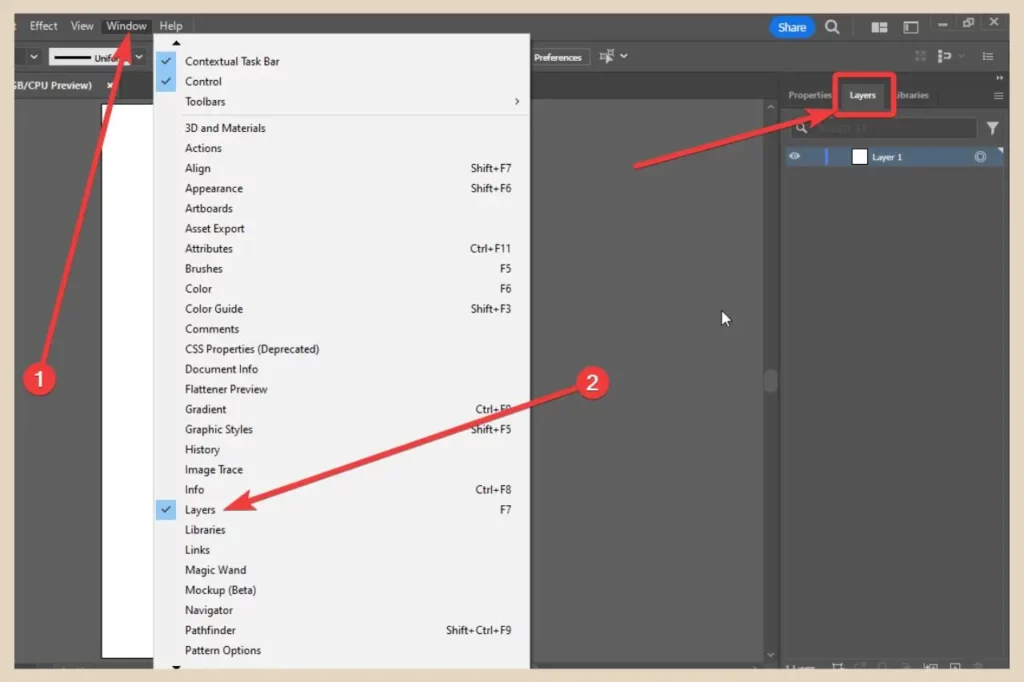
Depending on the workspace you have selected, the layers panel may already be present on the right side of your screen in the panel area but if it isn’t, you can add it easily by clicking on the Window menu, then selecting Layers from the options that appear.
The small Layers window that appears can then be dragged and dropped into the main panel area to dock it with the rest of the panels present.
As I mentioned earlier, you’ll start with one empty layer called Layer 1 but you can easily rename it by double clicking on the layer name.
You can always tell if a layer is empty or not because once you start adding items to your design, a small arrow will appear next to it to indicate that there are more items (sublayers) within it.
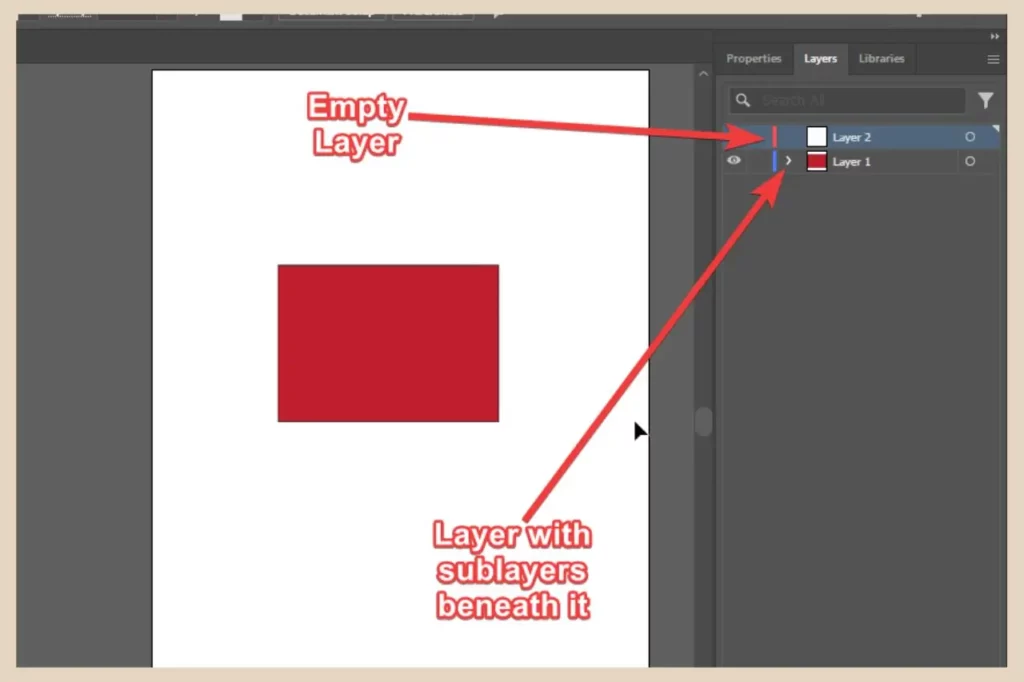
Clicking on this arrow will open up the layer to show all the sublayers within it. In this particular example in the screenshot below, I’ve added a red rectangle to the design while layer 1 was selected and as you can see, it’s been added as a sublayer beneath it.
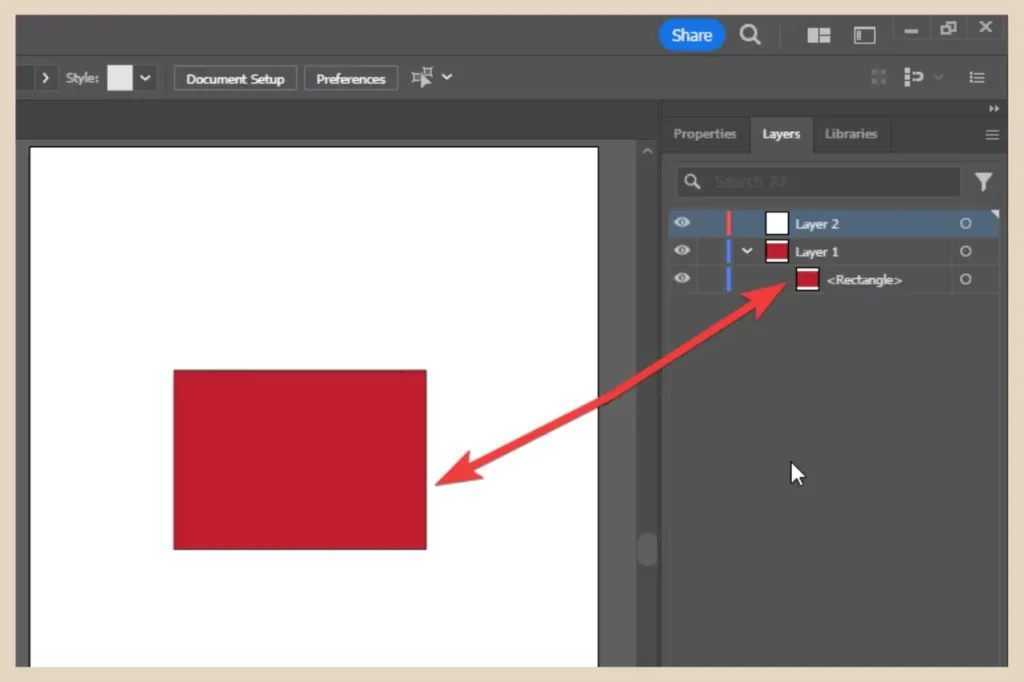
By the way, there will always be a layer selected so you’ll want to get in the habit of selecting the layer you want to use every time you add something new to your design. That being said, you can click and drag items to move them to another layer if you’ve placed something in the wrong one.
Layer Colours
You’ll also notice that there’s a colour to the left of the layer and this is really helpful for identifying what layer a design element is part of.
When you select an element, a coloured outline will surround it and this colour will match the colour of the layer it’s placed in. You’ll also notice that the anchor points and the centre point are the same colour.
This is particularly handy if you have a complex design with lots of elements in many different layers and you’re trying to locate where an element is in the layer panel.
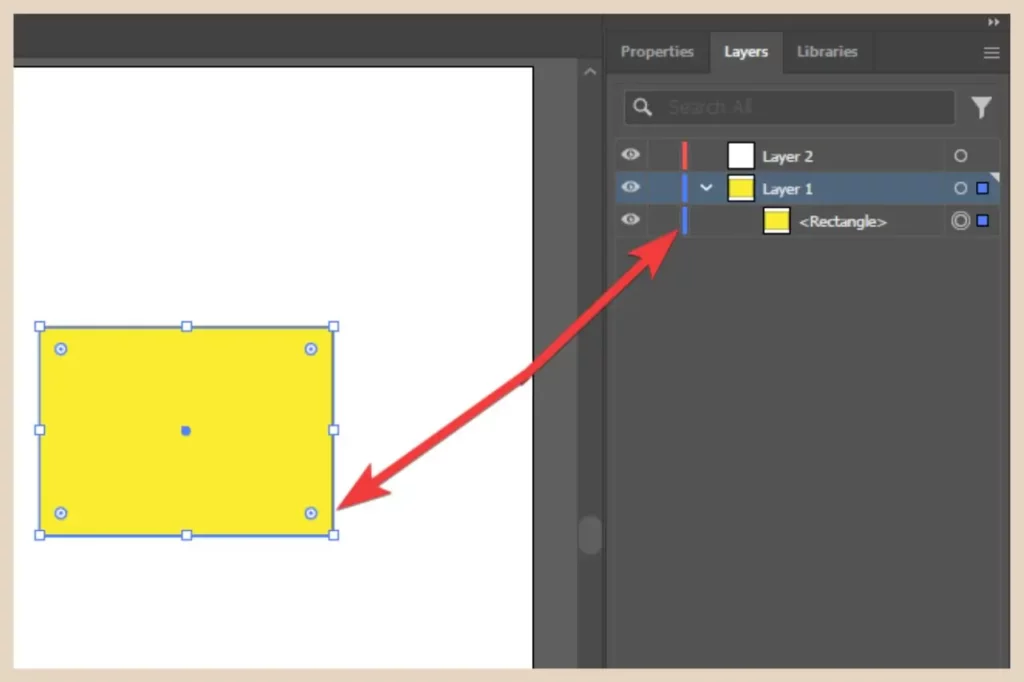
In the screenshot above, layer 1 has a blue colour assigned to it and you’ll notice that the outline around the selected rectangle is the same colour (I’ve changed the rectangle to yellow so you can see the outline colour more clearly).
If I were to move this rectangle into layer 2 which has a red colour assigned to it, this outline would then be red to match it so you’ll always know which layer your individual elements are part of. You can also change your layer colours to your own liking if you wish and I’ll show you how to do that next.
Layer Options
To change your layer colours and make some other layer changes, you’ll need to open the layer options and to do that, you’ll need to double-click on a main layer icon (not a sublayer as this only gives limited options) which is the square box that shows a preview of the layer.
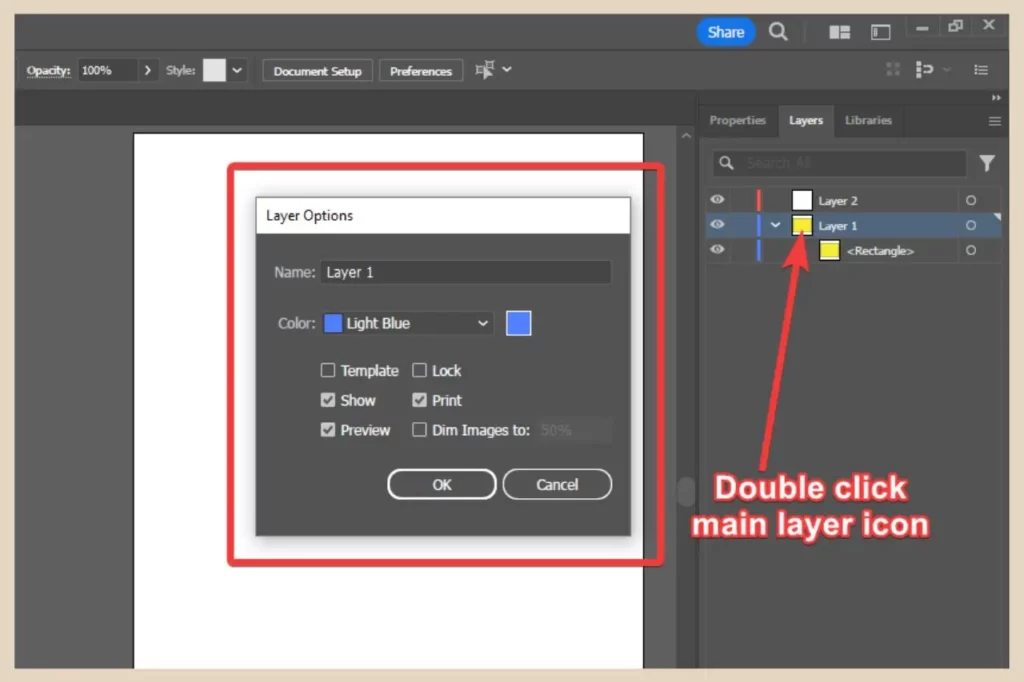
This will open up the full Layer Options window where you’ll be able to change the layer colour and rename your layer.
You’ll also be able to make the layer a template, show/hide the layer, lock/unlock the layer, dim images in the layers (make them more transparent), allow/disallow the layer to be printed and allow/disallow the preview of the layer.
The Layers Panel Icons
In the main layer panel, there are a few icons that you can use to control certain aspects of your layers.
The eye icon on the far left of the layer lets you show or hide the layer which means showing or hiding the artwork within that layer in your design. The eye icon is present when the layer is shown and it’s not present when the layer is hidden.
You can also hold down Ctrl (Windows) or Command (Mac) while clicking on the eye icon to change between outline view and normal view although this only works on the main layers and not the sublayers beneath them.
On the right-hand side of the show/hide icon is an empty area where you can lock or unlock your layers.
Locking a layer prevents you from making any changes to it so this is a great way to stop you from accidentally moving, deleting or altering any elements within it while you’re working on other parts of your design
By default, this area will be empty which means it’s unlocked, however, if you click on this area next to the layer you want to lock, a lock icon will appear to signify that the layer has now been locked.
Target Icon And Selection Icon
To the right of the layer, you’ll notice a circle icon (target icon) and possibly a coloured square icon (selection icon) if you have an item selected (the square will be the same colour as the layer colour).
Whenever you select an item, this selection icon will appear next to both the main layer and sublayer in which this item is located.
The target icon next to the sublayer will also change from a single circle to a double circle so both these two icons will let you know what you’ve selected in the layer panel.
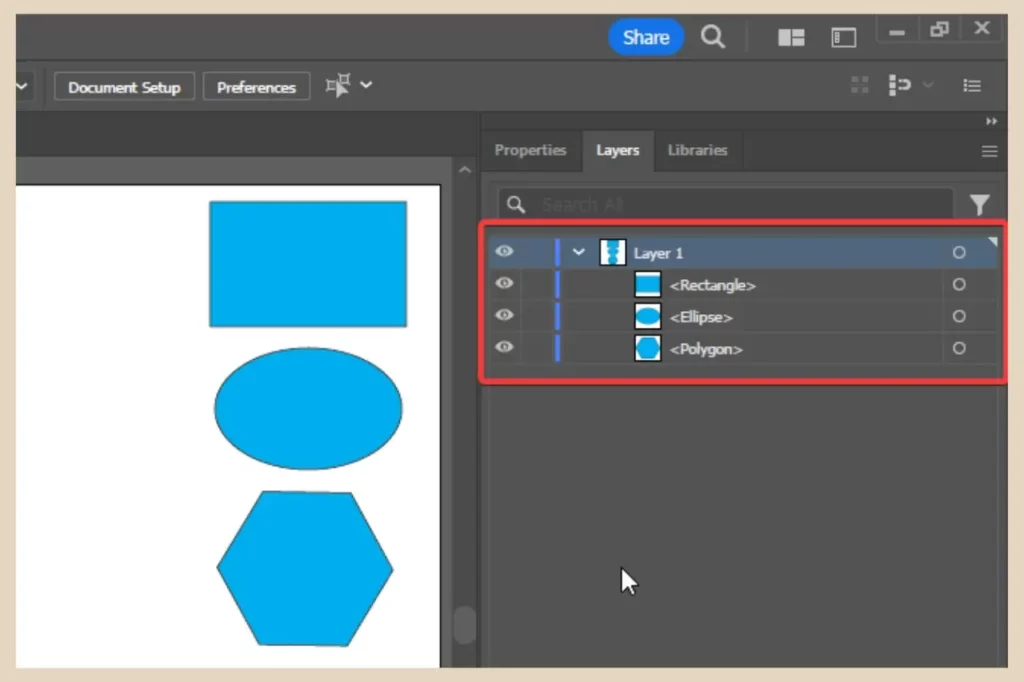
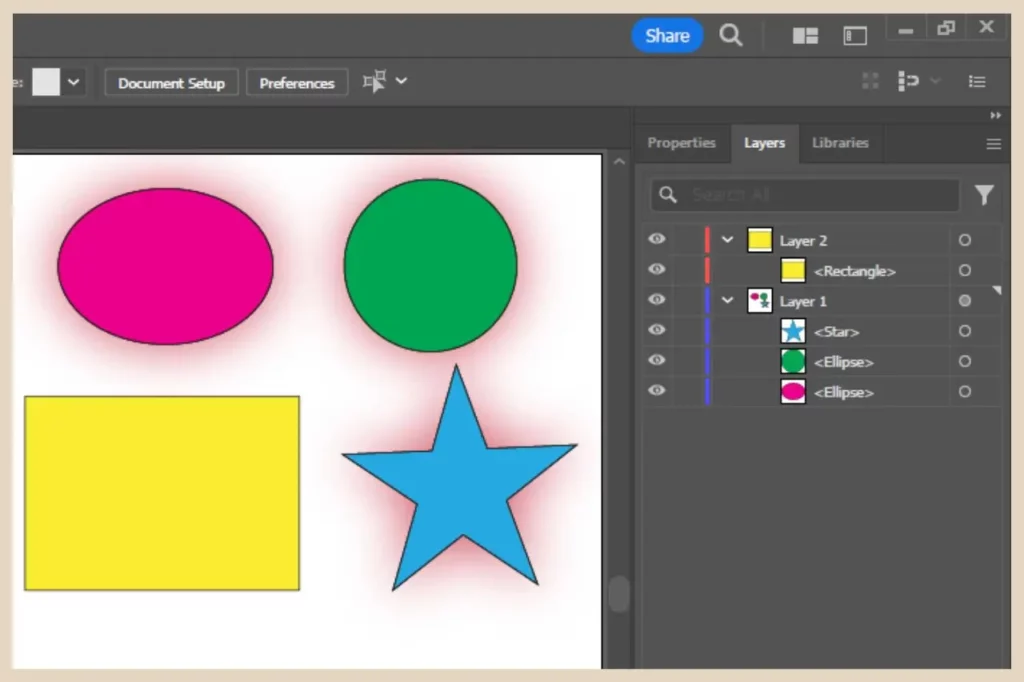
As you can see in the screenshot below, I’ve added a few more shapes to the design and I’ve added them all to layer 1. I’ve only selected the rectangle though and you can see how that affects the target and selection column next to the rectangle sublayer and the selection column next to the main layer.
You can also use either one of these icons to select an element if it’s difficult to select it or find it in your artboard. Selecting one will automatically select the other although the target icon is slightly different and I tell you why in a second.
If you want to select everything within a main layer, you can click on either the target or the selection icon next to the main layer and all the sublayers within it will also be selected.
You can also select several sublayers at once that are next to each other by holding down the Shift key and clicking on the first and last item which will also select every other item in between them. Alternatively, you can hold down the Ctrl key to select multiple items that are not next to each other.
How The Target Differs From The Selection
Now as much as these two icons appear to do the same thing, the target icon is slightly different because it’s linked directly to the Appearance panel and you can use it to add appearance attributes (effects, etc) at a sublayer or layer level.
advertisement
It will also look slightly different depending on 1) if you’ve clicked it and 2) the appearance attributes of the item within that layer so the icon will look one of the following four ways.
- Single Empty Circle – The item is not targeted and doesn’t have any other appearance attributes beyond a single fill and single stroke.
- Single Shaded Circle – The item is not targeted and does have other appearance attributes beyond a single fill and single stroke.
- Double Empty Circle – The item is targeted and doesn’t have any other appearance attributes beyond a single fill and single stroke.
- Double Shaded Circle – The item is targeted and does have other appearance attributes beyond a single fill and single stroke.
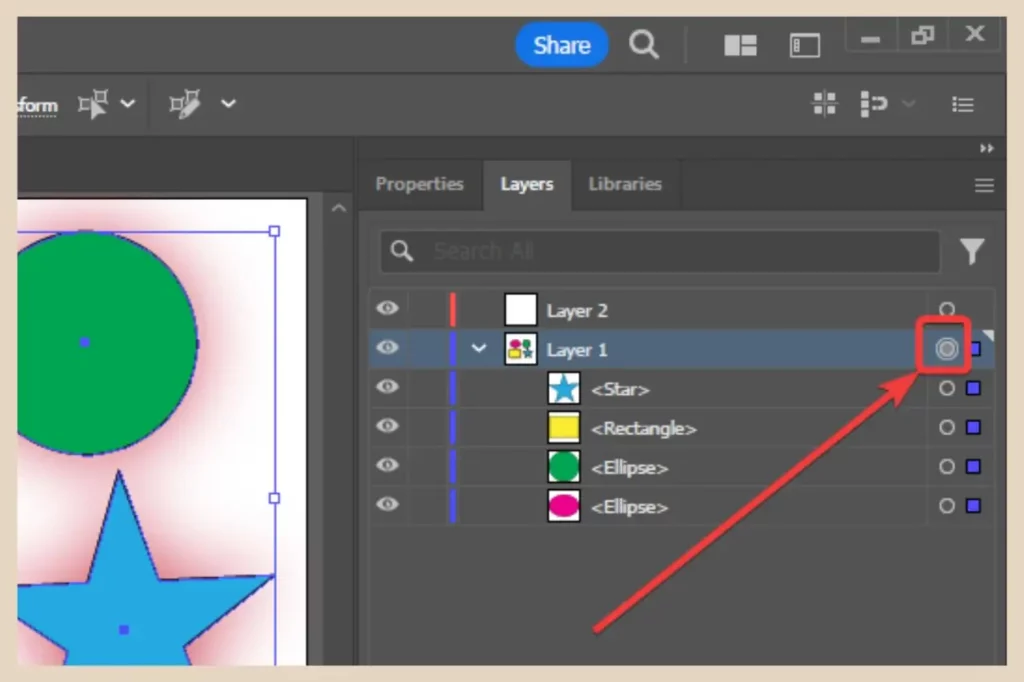
Now, if that sounds like complete gibberish to you then I’ll show you an example of this in action. In the screenshot below, I have the rectangle selected so the target icon is now a double circle to reflect that.
I’ve also added an Outer Glow effect to the rectangle so the target icon is now also shaded to indicate this (it is very light shading but trust me, it’s there).
You’ll notice how all the other sublayer target icons are single circles because they’re not selected. They’re also not shaded either because I haven’t added any effect to them.
Adding Effects At A Layer Level
Now, if you wanted to add an effect at a layer level, you would click on the main layer target icon before adding the effect. This would add the effect to every item/sublayer within that layer and if you add any other new items to the layer, they too would also automatically have this same effect.
So, even though clicking on the main layer target icon will show the layer and all its sublayers as being selected in the selection column, you’ll notice that only the main layer has the double circle target icon which indicates that the effects have been added to the main layer only.
This is exactly what I’ve done in the screenshot below and as you can see, this has only added the shaded effect to the target icon for the main layer and not the sublayers beneath it.
This means that if I move any of these shapes into a different layer, they will lose the effect because I added it to the main layer and not the individual items/sublayers within it just like the yellow rectangle in the screenshot below which has now been moved to layer 2.
Now, I should probably mention that as handy as it is to apply the same effect automatically to all items within a layer, the effect may look different to how it would look if you added it to each item individually. For this reason, I tend to add effects to items individually but the option is there if you want to use it.
Adding And Deleting Layers
To add or delete layers/sublayers, you can use a couple of different techniques. The first way is by using the icons at the very bottom of the panel as per the screenshot below.
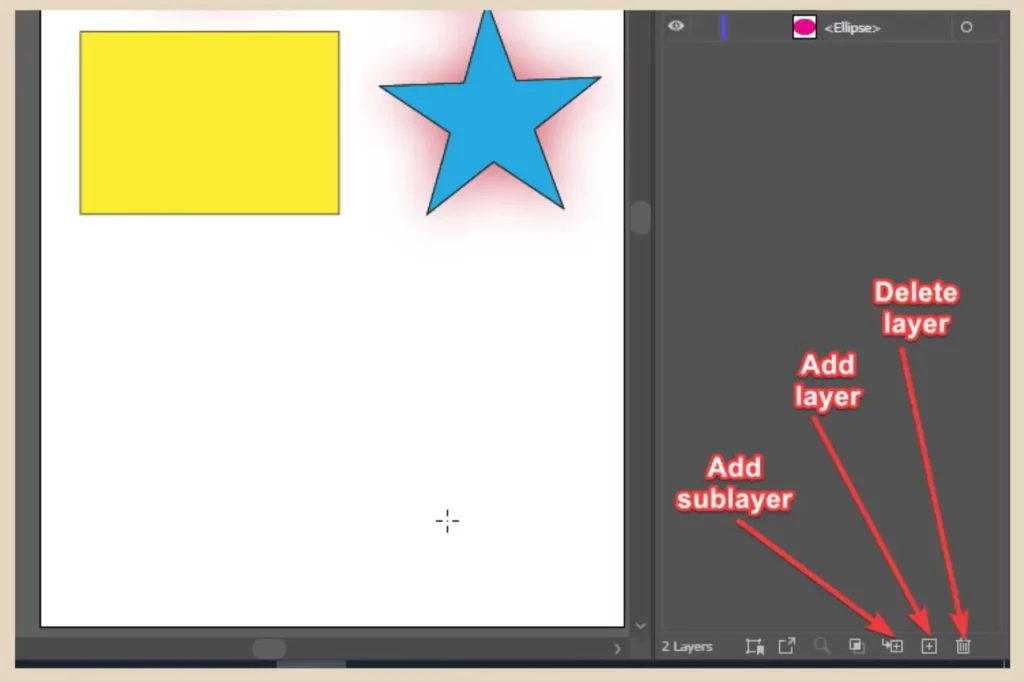
When you add a new layer, it will be placed above the currently selected layer. When you add a sublayer, it will be placed beneath and within the currently selected layer. You can also create sublayers within sublayers which is done a little differently and I’ll show you how to do that in a moment.
For deleting layers/sublayers, you can also select the layer/sublayer and then click the delete button on your keyboard. For more options, you can use the panel menu in the top right corner of the panel (the three lines).
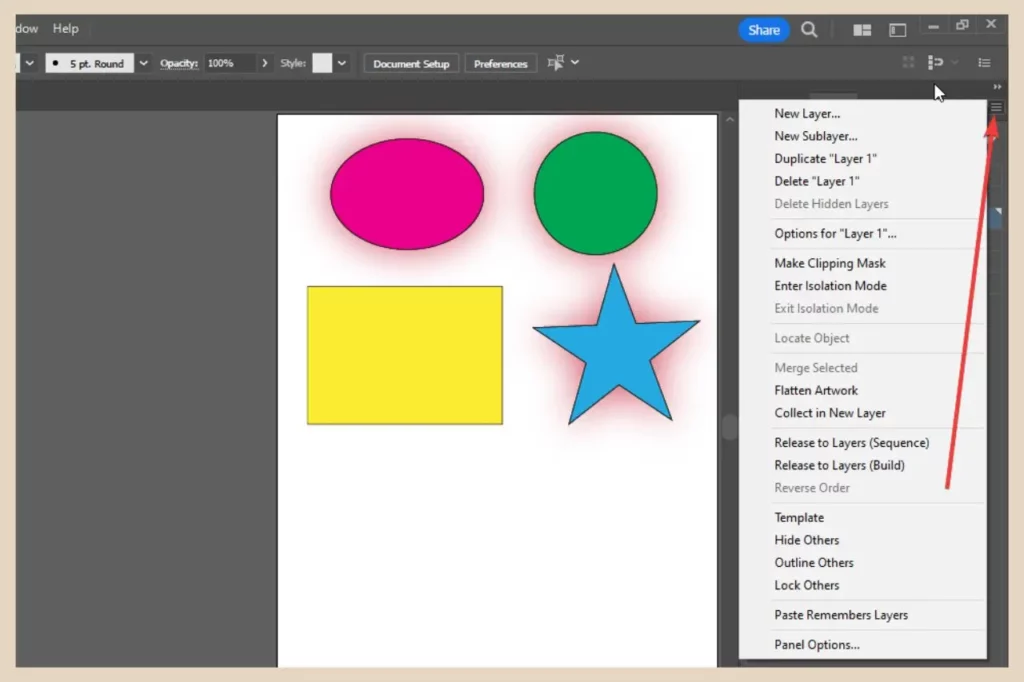
This will give you options such as adding, deleting and duplicating layers. When you add new layers using this option, it will automatically open up the layer options window so that you can name your layer, choose its colour, etc before it’s even been added. You can also merge selected layers here or collect them into a new layer.
If you ever want to separate your elements into their own individual layers, you can use the Release to Layers (Sequence) option here. Release to Layers (Build) on the other hand will do the same thing but it will also duplicate your layers at the same time but remove the uppermost layer in each duplication.
There are also Panel Options here which will let you change the appearance of the panel such as layer thumbnail size, etc so there’s a lot more you can do when you use the panel menu.
Organising Your Layers In Adobe Illustrator
Of course, the main purpose of layers is to keep your design organised so it’s a good idea to think about the types of elements you plan to add to the design and create layers for them right at the beginning such as images, graphics or text.
The screenshot below is an example of a poster I had to create when I first started learning how to use Adobe Illustrator (don’t judge, I was a complete beginner at the time). I chose this example because it has a lot of different layers within layers and it’s a good example of how busy your layers can get.
You can’t see the full extent in this screenshot but trust me, one firework alone has around 80 sublayers for each individual line that was used to create it.

As you can see, every single element has been named and organised into separate sublayers from the text to the graphics.
It’s then been organised even further into objects such as the Ferris wheel, the tent, the fireworks, etc with every element/shape used to create it in more sublayers underneath. This makes it super easy to find every single item in the design if anything ever needs to be edited.
Creating Sublayers Within Sublayers
To organise your layers like this and create sublayers within sublayers, you’ll want to create groups of items which you can do by selecting all the items you want to group, then clicking Object from the main menu, followed by Group.
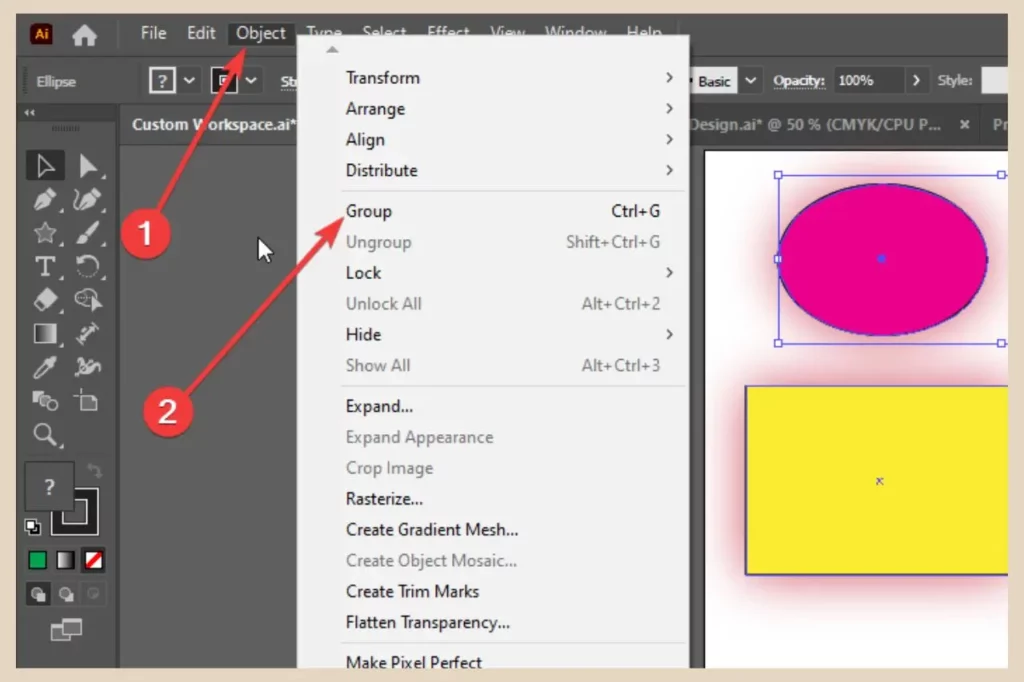
This will create a new sublayer called <Group> (which you can then rename appropriately) which will contain all your selected items beneath it so essentially sublayers within a sublayer.
You can then group these sub-sublayer items even further to create even more sublayers within sublayers as I’ve done in the screenshot below by grouping the four shapes together under one grouped sublayer and then grouping the shapes again into two separate sets each under their own grouped sublayer.
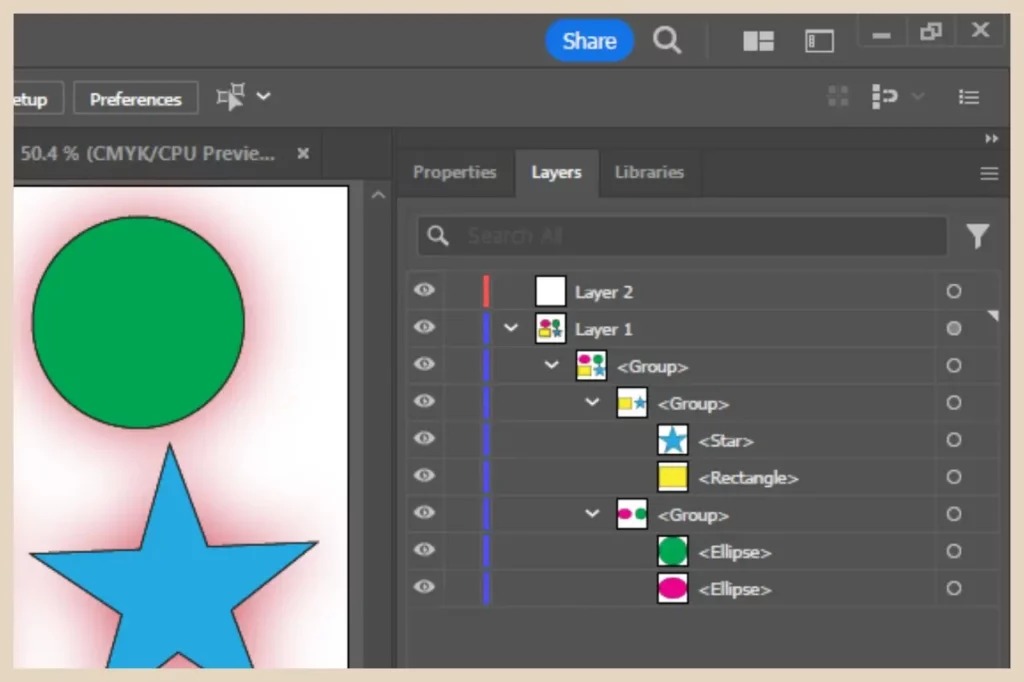
You can then name all these layers/sublayers appropriately so that they’re easy to identify. It’s also very easy to move items to different layers or change their order by simply dragging and dropping them from one layer/sublayer to another.
The Importance Of Layer Order
One final thing to note when it comes to layers is understanding their order in the panel and how that affects their position within a design.
For example, the layer/sublayer at the top of the panel will be at the very front of the design whereas the layer/sublayer at the bottom of the panel will be at the very back of the design.
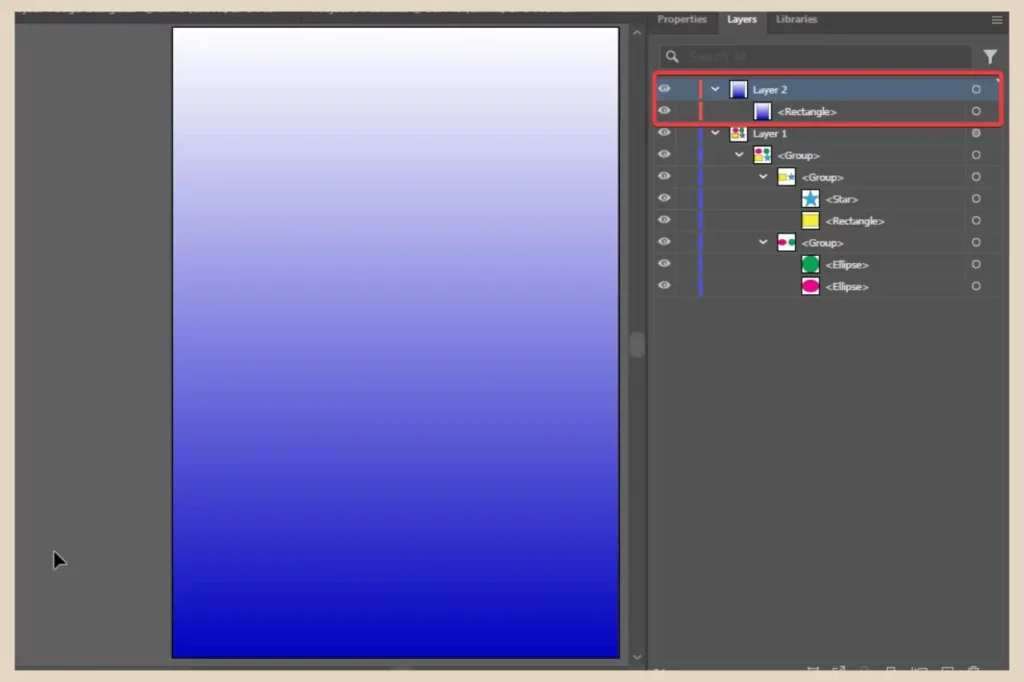
For example, in the screenshot below, I’ve added a blue and white gradient rectangle to layer 2 which is currently at the top of the layer panel.
I’ve also made it the same size as the artboard so that it can be used as a background but because it’s at the top of the panel, this puts it at the front of the design meaning it’s covering everything else beneath it.
However, if I click and drag it to the bottom of the panel, this moves it to the back of the design which now makes all the other objects in the design visible.
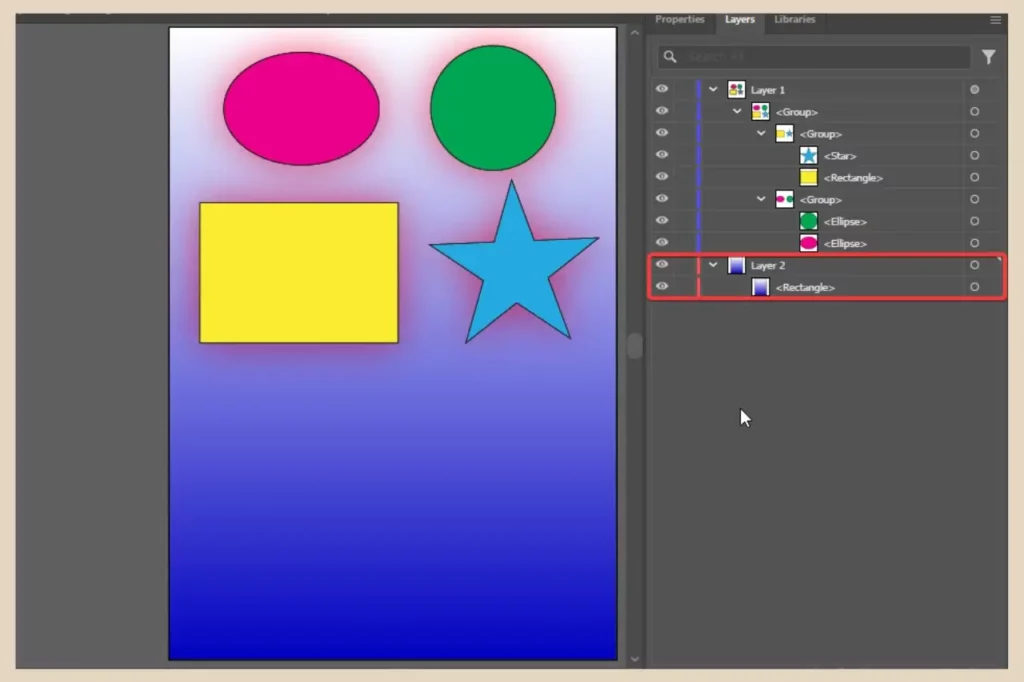
So bear this in mind when you’re organising your layers especially if you’re stacking objects on top of each other or adding text that you want above everything else.
Let’s Get Layering
Layers are such an important part of Illustrator designs and keeping them organised is something you want to get into the habit of doing right from the get-go.
So, now that you know how to do that and pretty much everything else there is to know about layers, you can now go forth and organise your layers like an Adobe Illustrator pro.
I hope you’ve found this tutorial helpful and as always, if you’d like to share your own thoughts or experience with Illustrator layers, then please feel free to do so in the comments below.
Happy Layering!

Helpful Guides to Read Next
These beginner-friendly guides will help you keep building your blog step by step.
- How to Create Professional Blog Graphics with Adobe Illustrator
- How to Use Clipping Masks for Better Illustrator Designs
- How to Edit and Manage Artboards in Adobe Illustrator
- How to Create an Illustrator Workspace That Fits Your Workflow
- How to Build a Custom Illustrator Toolbar to Speed Up Your Design Workflow

Jessie
Founder, nomorerush.com
Hi, I’m Jessie — founder of No More Rush. I help beginners build profitable, beginner-friendly blogs without the overwhelm or unrealistic expectations you see online. Everything here is built around simple, structured steps so you always know what to do next.