The question of how to add links in WordPress is a really common one and an important one too because your entire site is built around links so knowing how to add them is essential for anyone running their own website.
This is especially true if you’re monetising your site in any way because most monetising methods require you to add links of some kind to your site to receive those benefits.
In this tutorial, I’ll show you how to add regular text links, image links, affiliate text, image and banner links, and internal and external links so get your linking gloves on and let’s get straight into it.
Why Are Links So Important
Links are a major part of all websites and web pages in that they connect all the pieces of a site and the entire internet for that matter, together like a giant spider web, hence the use of the term web.
Your menus and entire navigational structures are built with links and without them, your pages and post would be dead ends that lead nowhere so their importance is vital to make a website work effectively.
Their use in connecting websites to each other is also just as important whether that’s for informational or promotional purposes.
When it comes to internal linking, this is actually great for SEO in that it links all of your content together making it easier for Google to find your content and it helps improve the UX (user experience) on your site.
If you’re writing a post on one topic but during it, you mention something else related to it that you’ve also written a post about, that’s a prime opportunity to add an internal link to it.

This gives your readers more content to read and it means that they’ll be on your site for longer which is great for SEO and rankings.
The Different Types Of Links And How They’re Used
There are several different types of links that you can create and here’s a brief look at some of them and what their purpose is.
- Internal Links – Links that take your readers to another post or page on your own website.
- External Links – Links that take your readers away from your site and out to someone else’s website.
- Text Links – Clickable text that can be internal or external links.
- Image Links – Clickable images that can be internal or external links.
- Affiliate Text Links – Clickable text links that contain your unique affiliate tracking ID that take your readers to a product website where you can earn a commission if they make a purchase.
- Affiliate Image Links – Clickable image links that work the same as affiliate text links.
- Affiliate Banner Links – Clickable ad-like banners that work the same as affiliate text and image links.
- Ad Links – Clickable Ad displays that take your readers to a product/company website where you earn revenue from just the click.
Whether you’re linking out to other websites for informational or monetisation purposes or linking to other areas of your site with internal links, the way to add them is pretty similar and straightforward.
Adding Internal Text Links To Post And Pages
Adding internal links (or any links for that matter) is a really easy process so to begin, head to the post/page where you’d like to add links in your WordPress editor.
Once you’re in the post you’d like to edit, select a piece of text that you’d like to use for the link. This is called the anchor text. You’ll want this to be something that relates to where the link will send your readers.
For example, let’s say you have a travel website and you’re writing a post about the best beaches in the Bahamas and you mention that there are plenty of good hotels in the area.
If you have a post all about the best hotels in that same area, you would use the “plenty of good hotels” text as your anchor text for the link to your other post.
Adding The Link
So click and highlight your chosen piece of text and then click the link button on the small format box that appears anytime a block is selected.
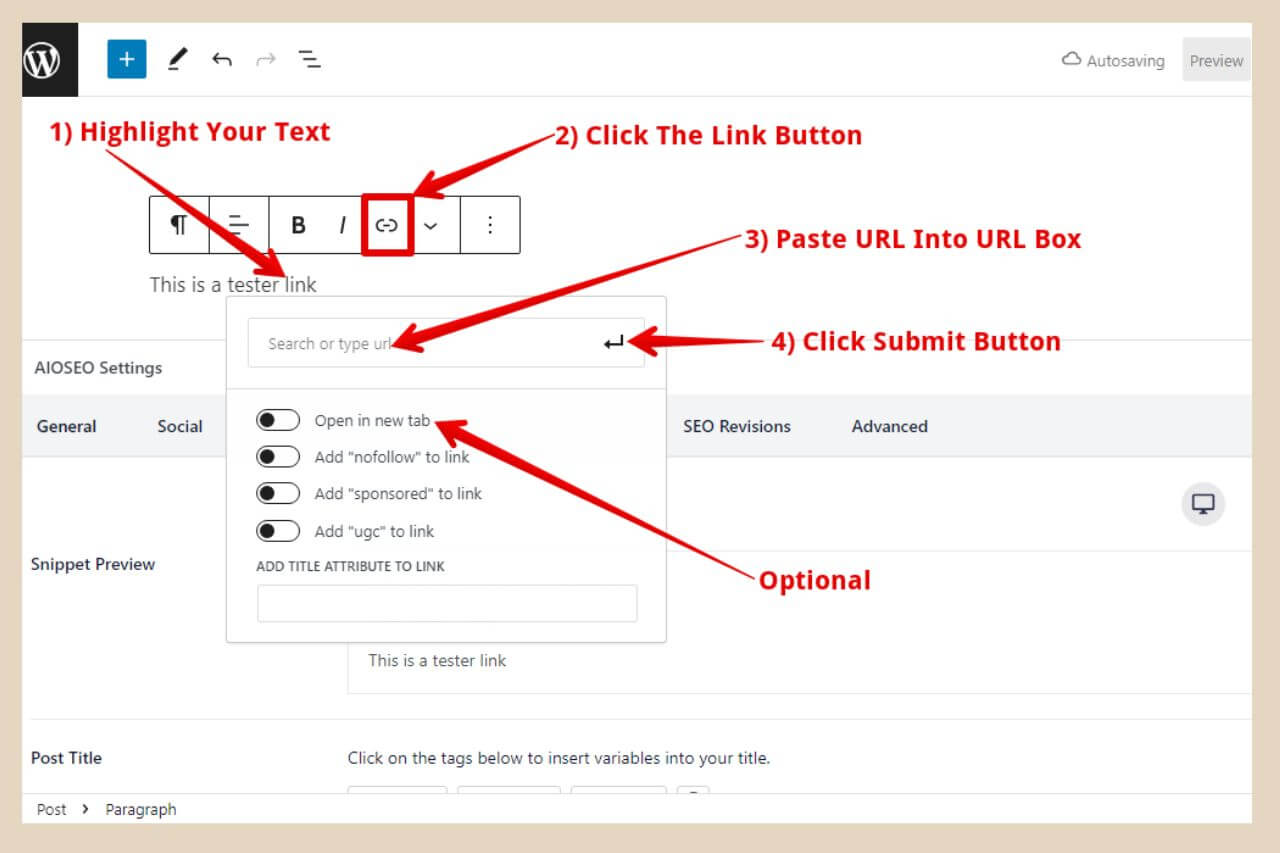
From here, you can head to the post/page you’d like to link to on your live site and copy the URL from the address bar and paste it into the search/URL box, then click the “Submit” button to finish.
A much easier way to do this though is to start typing the name of the post/page (or a specific word in the name) you want to link to in the search/URL box. As you type, WordPress will start to show a list of similar matching posts/pages beneath the box.

In the example above, I wanted to add a link to a post I wrote about Canva so I simply typed in Canva in the search box and that was enough to bring up the post I wanted to link to.
So, click on the post/page you’d like to link to and the link will be automatically inserted (no need to click the submit button) and that’s all there is to it.
More Link Options
To get rid of the link box when you’re done, just click anywhere away from it on the page and it will disappear.
There are a few more options here beneath the box such as “open in new tab” etc and you can use the toggle to add these to the link.
I’m using AIOSEO which is what’s giving me all these options so if you’re using a different SEO plugin, you may not see the same options but they can be added manually afterwards which I’ll show you how to do further down.
If you ever want to remove a link, just place your cursor anywhere within the anchor text and click the link button again to remove the link.

To edit a link, simply place your cursor anywhere on the anchor text again and click the edit button and then the submit button when you’re finished.
Pro Tip:
Try to add at least one internal link pointing back to every single post you create. If a post has no links linking back to it (this is called orphaned content or an orphaned post), it’s harder for your readers and Google to find it.
It also looks less important to Google than a post with lots of links pointing to it. The more internal links a post has pointing back to it, the more important it looks to Google, which can help it rank higher in the SERPs.
Adding External Text Links To Posts And Pages
Adding external links is almost an identical process so once you’ve highlighted your chosen anchor text and clicked the link button, head to the site you’d like to link to and copy the URL of the site from the address bar.
Paste the URL in the search/URL box as before and click the “Submit” button next to the box to add your link. Alternatively, you can click on the URL below the box which will also instantly add the link.
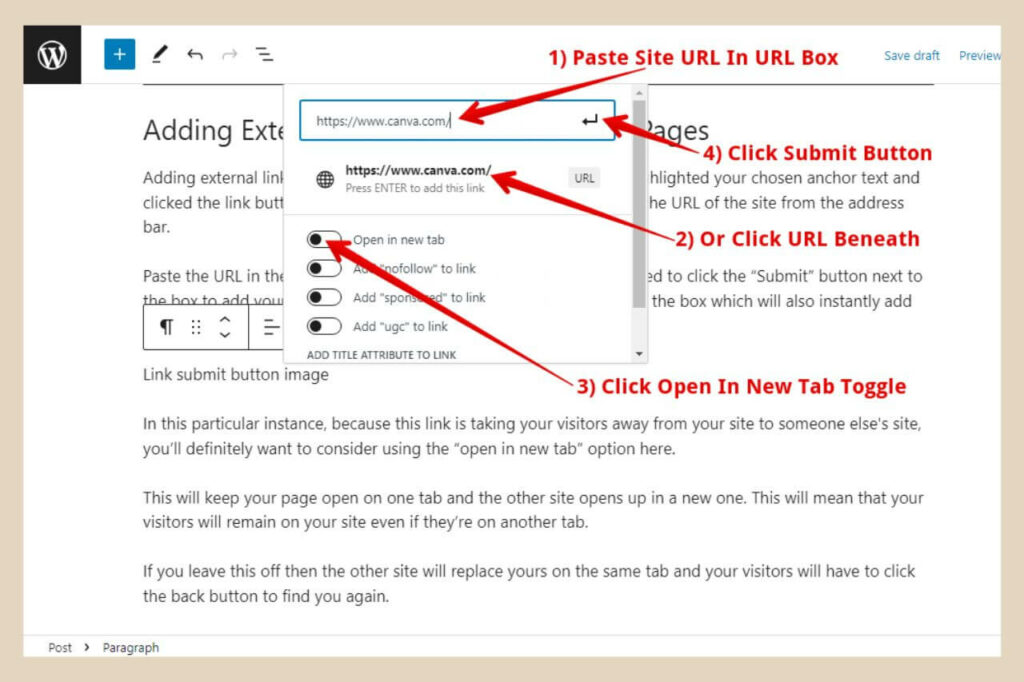
In this particular instance, because this link is taking your visitors away from your site to someone else’s site, you’ll definitely want to consider using the “open in new tab” option here.
This will keep your page open on one tab while the other site opens up in a new one. This will mean that your visitors will remain on your site even if they’re on another tab.
If you leave this off then the other site will replace yours on the same tab and your visitors will have to click the back button to find you again.
Adding Links To Images In Post And Pages
Again, much like adding text links, adding links to images is not all that different. To add them, click on the image you’d like to use and then click the link button on the format box.
The link box that appears will look slightly different to the one that appears when you’re adding text links but the process is pretty much the same.
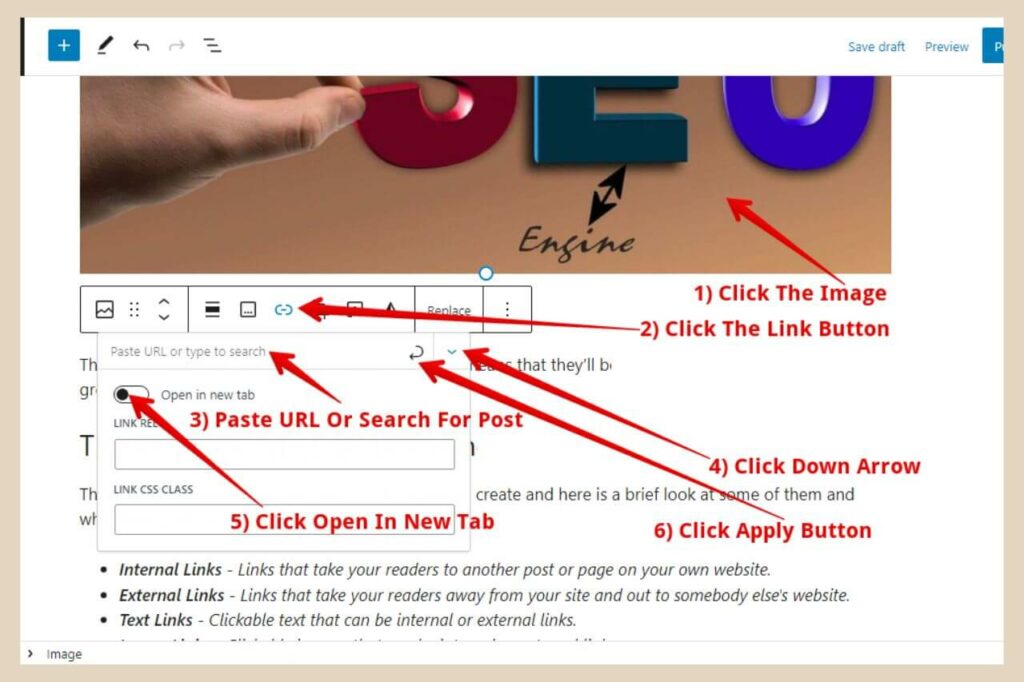
Paste the URL or type in the post/page name to search for internal links as you would with a text link. This time, however, to see more options, you’ll need to click on the small down arrow on the top right of the link box.
Here, you’ll be able to select the “open in new tab” option as well as add other link options such as “sponsored” if you’re using affiliate links (more on how to do that further down).
As I mentioned earlier, don’t worry if you’re not seeing the same options here because all of this can be added manually afterwards and it’s very easy.
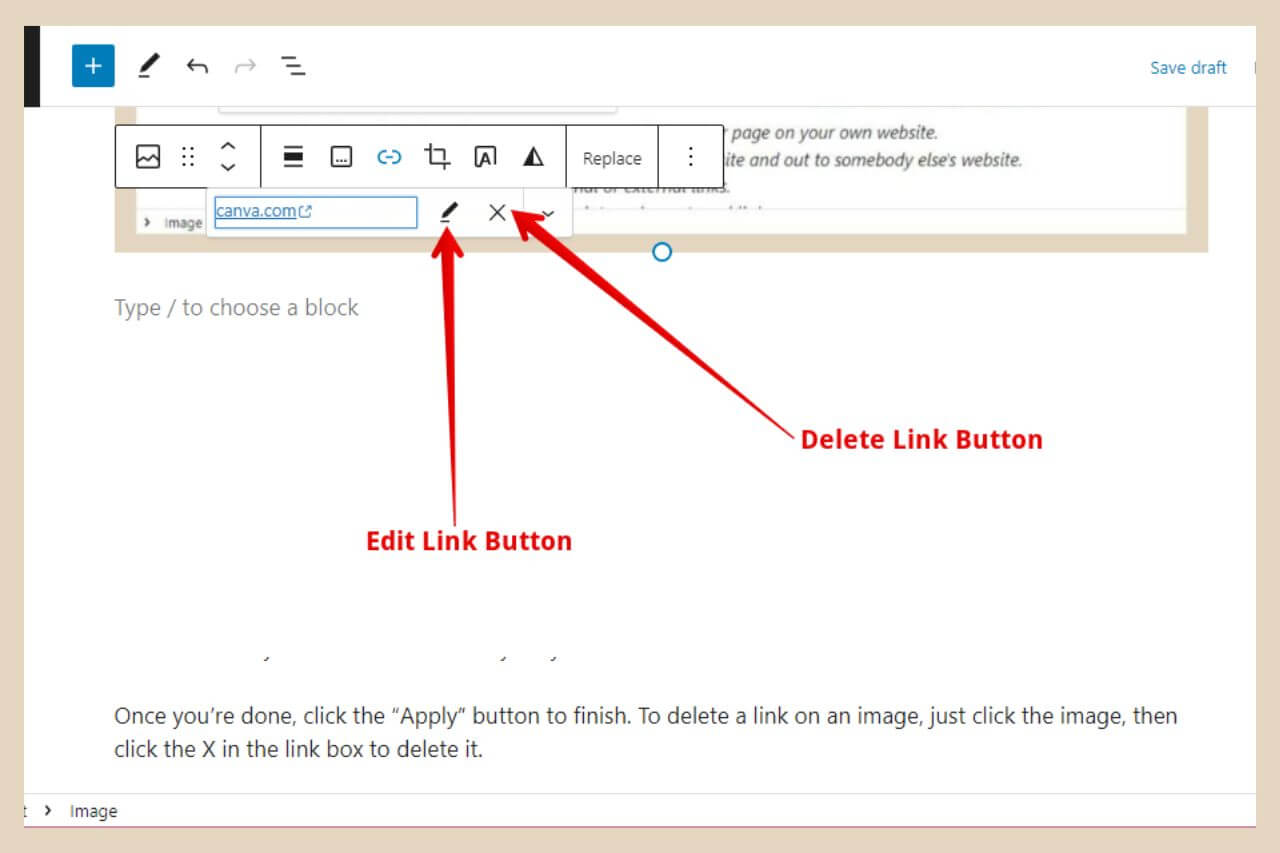
Once you’re done, click the “Apply” button to finish. To delete a link on an image, just click the image, then click the X in the link box to delete it.
To edit a link on an image, click the pencil icon, make your changes, and then click the Apply button to finish.
If you’ve added buttons to your posts, then you can add links to them as well in pretty much the same way.
However, if you’re using buttons for affiliate links, such as with a “Buy Now” type button, then there’s an additional step you’ll need to add here which I’ll cover in the affiliate links section next.
Adding Affiliate Text Links In Posts And Pages
To add affiliate text links, you’ll pretty much be doing it in the exact same way as a regular external text link but there will be one more step involved.
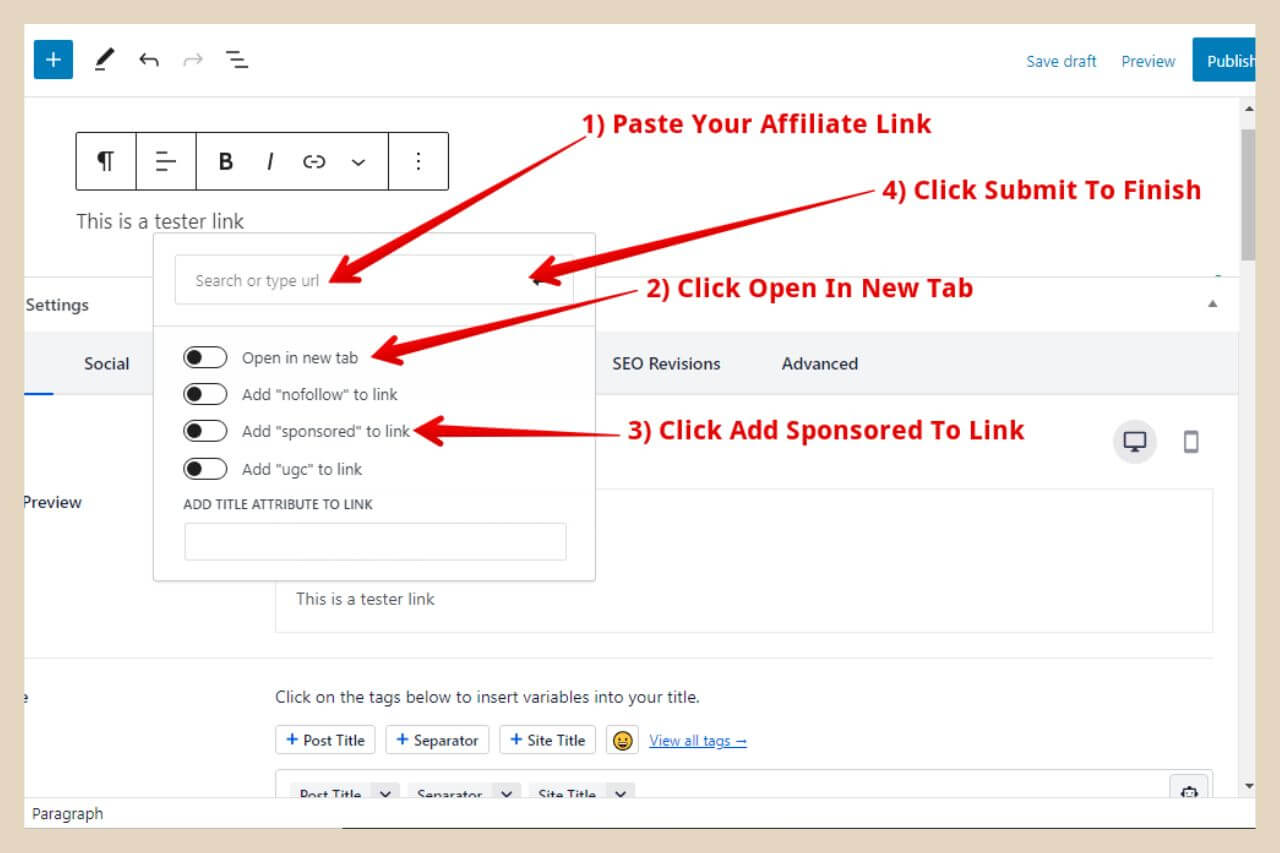
So, highlight the text you’d like to use (the product name, for example), then click the link button as before. Grab your affiliate link and paste it into the URL box and click the “open in new tab” toggle if you want to add that to the link.
Now here’s where the extra step comes in. Because this is an affiliate link, you’ll also need to add “sponsored” to it so if you’re using AIOSEO, you can simply click the toggle here to add it to the link and then click the Submit button to finish.
If you don’t have this toggle option, then you’ll need to add it manually afterwards. The easiest way to do this is to add the “open in new tab” option to the link before you hit the Submit button. This will make it easier for you to find the exact place where “Sponsored” needs to be added.
Using The Edit As HTML Option
The next step is to click on the block where the link is located and then click the 3 dots on the right of the format box where a new small menu will appear.
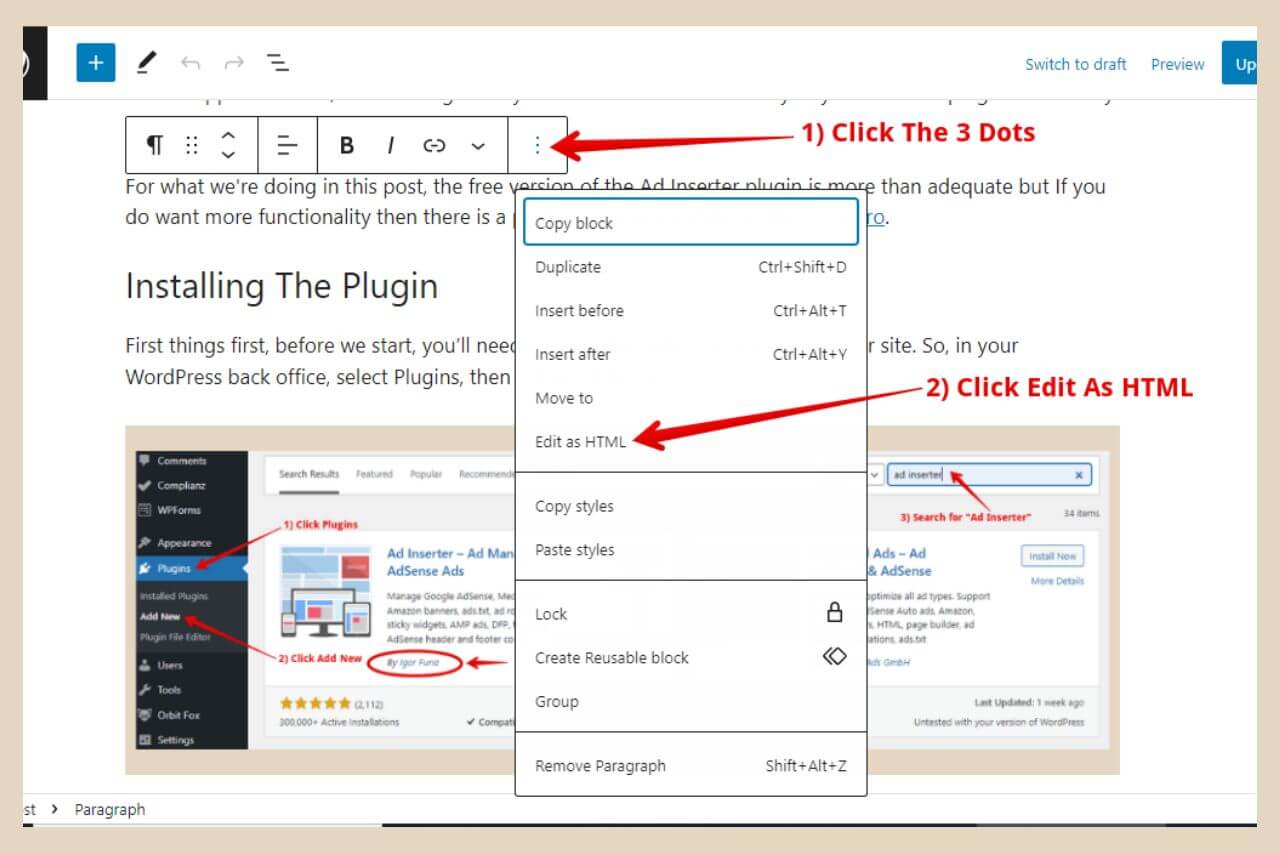
Click “Edit as HTML” and everything in that particular block will become HTML. Now you’ll need to search for your affiliate link and once you find it, look for a snippet of text within it that says rel=”noopener”.
This is the “open in new tab” code and this is also where you’ll need to add “sponsored” so simply place your cursor at the end of noopener before the “ and click the space bar to add a space, then type in sponsored.
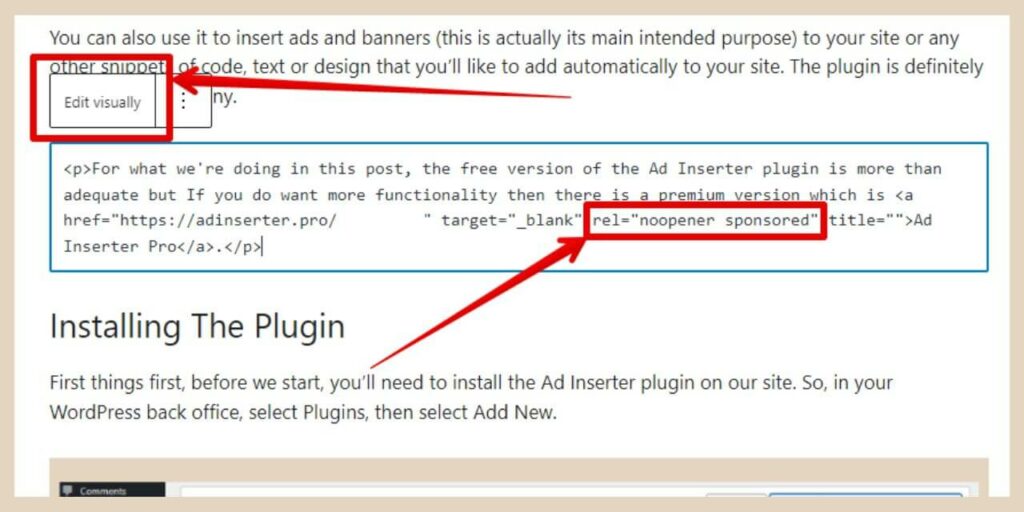
This little snippet of text should now say “noopener sponsored” like the image above and that’s all you need to do. Just click the edit visually button and the block will return to normal text.
Adding Affiliate Images And Banners To Posts And Pages
To add affiliate images or banners, you’ll need to add a different kind of block to your post rather than the usual paragraph, heading or image blocks you’d usually use and this is a custom HTML block.
So decide where you’d like to place your affiliate image or banner and let’s say in this instance it’s in between two paragraphs.
You’d simply place your cursor at the end of the first paragraph and hit the enter key on your keyboard to insert an empty block.
Next, click the + icon to choose your new block and when the small window appears, type Custom HTML into the search box.
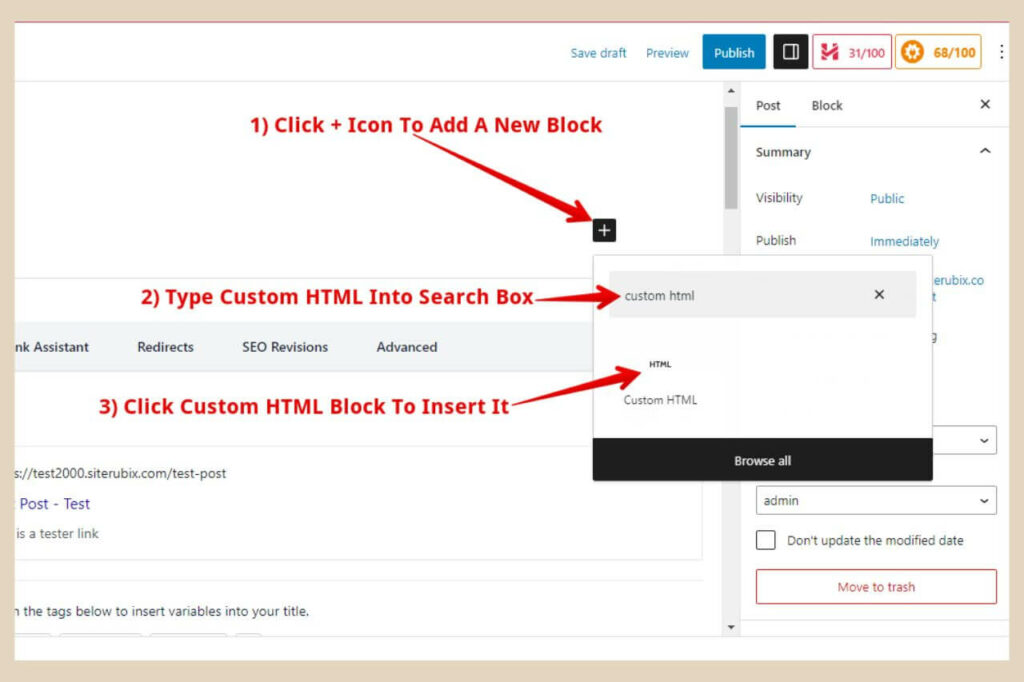
When the custom HTML block appears, click on it to add it to your post. All you’ll need to do now is to paste your affiliate image or banner code into this block and you’re all done.
If you’d like to center your image or banner, simply add <center> at the start of the code and then </center> at the end of the code to center your image/banner on the page. This should work as long as the code isn’t javascript code (you can’t really alter javascript code).
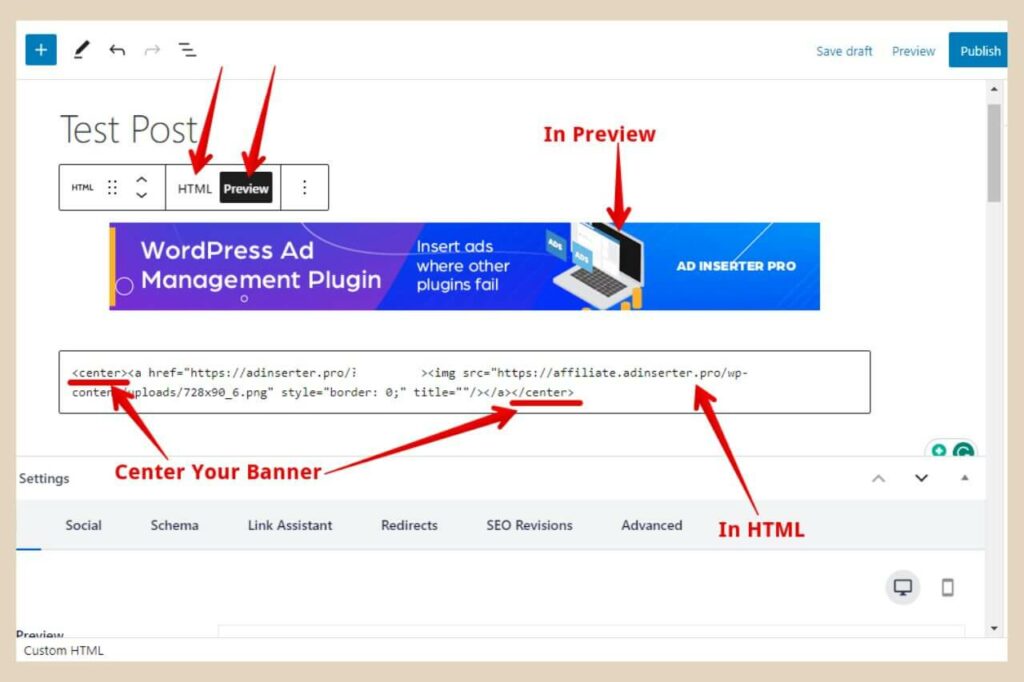
You can also switch between HTML and normal view by clicking the Preview button to see how your image/banner looks on the page. You can also use this same method to add AdSense or any ads you’re using to your posts/pages.
Adding Affiliate Links to Buttons Or Your Own Images
If you create Buy Now type buttons you can add your affiliate links to them by clicking the link button in the format box.
The only options you’ll have here though are to paste your affiliate code in the URL Box and the “open in new tab” toggle so you’ll need to use the edit as HTML method above to add sponsored to the link.
The same applies if you’re using your own images. Let’s say you’re reviewing a product and you’ve taken your own photos of it.
If you wanted to add your affiliate links to it you would follow all the steps as before to add links to an image however this time when you click the down arrow to toggle the “open in new tab” option, you would also add sponsored to the Link Rel box as per the image below.
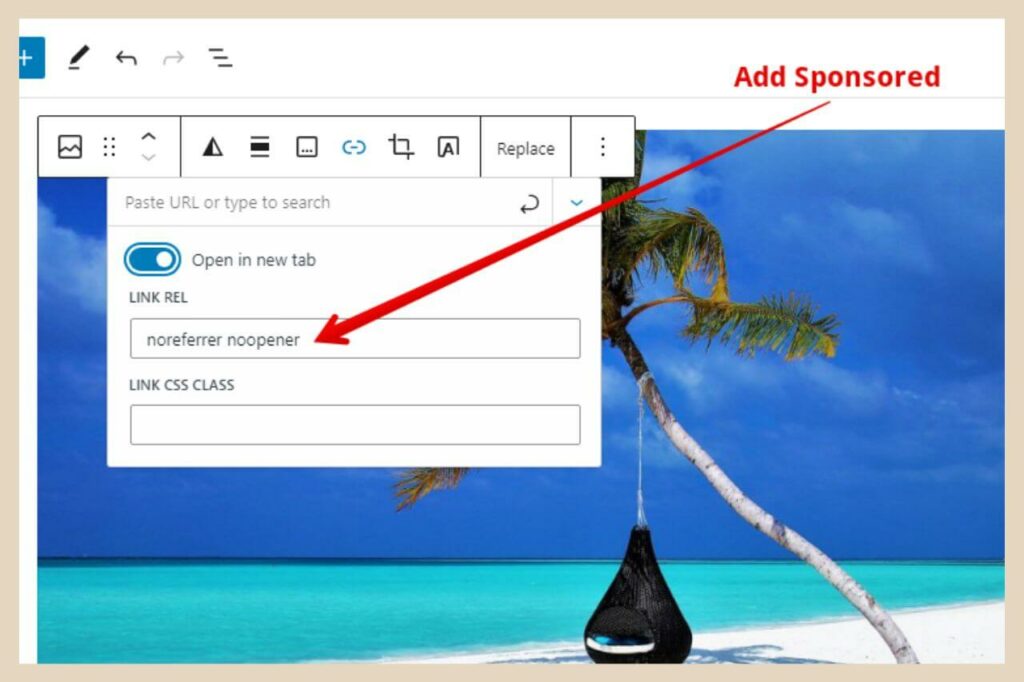
If you’re not seeing the same options here, then again you can add sponsored to the link manually using the Edit as HTML method as before.
Using AIOSEO To Automatically Add Links
If you’re using the pro version of AIOSEO, then there’s actually a feature included called Link Assistant. Link assistant will scan your entire site and suggest linking opportunities for you including the suggested anchor text to use for your link.
If you like the suggestions made, you can simply click an Add Link button next to the suggested links you’d like to add and Link Assistant will add them automatically for you without you having to go into the post manually.
The only downside is that it’s a pro feature so you have to upgrade to the paid version of AIOSEO to use it. Still, it’s a very handy feature nonetheless.
Adding Links To Your Widget Areas
You can also add links to your widget areas too. If you use AdSense or any other ad platform, you can add your ad links to your sidebar, footer, etc by simply adding a custom HTML block to the area.

Just hover over or click Appearance in the WordPress menu on the left of the page and then click Widgets from the new menu that appears to bring you to the Widgets page.
From here, choose the widget area you’d like to use and click the + icon to add a new block. Search for Custom HTML in the search box and click it when it appears to add it to the area.
Now, just paste your ad code into the block and click the Update button at the top of the page to finish. Again, you can click the Preview button to see how your ad looks and you can also add your affiliate banners to your widget areas too using this same method.
You can also add text/image links to your widget area as well so for example, if you’re adding an about me widget to your sidebar, you could add a link to your full about me page from the widget.
You can simply select the image or highlight a piece of text within the widget and add a link to it exactly as you would in a page or post.
Let’s Get Those Links Created
There are many reasons why you’d want to add links to your site and now that you know the different types of links and the different ways to add them, why not try adding a few yourself to your own site?
I hope you’ve found this tutorial helpful but if you do have any issues or you need help with anything, please feel free to let me know in the comments below and I’ll be more than happy to help you out.
Happy Linking.

Helpful Guides to Read Next
These beginner-friendly guides will help you keep building your blog step by step.
- How to Create a Navigation Menu Your Readers Can Actually Use
- How to Organise Your Blog Properly with WordPress Categories
- How to Make Long Blog Posts Easier to Navigate with a Table of Contents
- How to Add Click-Worthy Buttons to Your WordPress Posts
- How to Create Beautiful, Magazine-Style Column Layouts in WordPress

Jessie
Founder, nomorerush.com
Hi, I’m Jessie — founder of No More Rush. I help beginners build profitable, beginner-friendly blogs without the overwhelm or unrealistic expectations you see online. Everything here is built around simple, structured steps so you always know what to do next.