Last Updated: September 26, 2024
Now I know what you’re thinking. Why would you want to learn how to create blog graphics with Adobe Illustrator when you have the likes of Canva at your disposal?
When it comes to graphics on your blog, you’re probably thinking that Canva is king and, to be honest, you wouldn’t be too far wrong. I love Canva, in fact, I use it frequently and have done so for many years. It’s one of my go-to design tools but it does have its limits.
Adobe Illustrator on the other hand is way more advanced and there’s just so much more you can do with it. Illustrator, to me, is like Canva on steroids.
You can manipulate shapes, text, objects or any other elements you add or create in ways that are just not possible with tools like Canva and this can help you create truly unique designs that would be hard to replicate with Canva’s more restrictive tools.
Once you’ve played around with Adobe Illustrator, you’ll very quickly realise just how much more freedom and options you have with your designs. And when it comes to your blog graphics, there are so many ways in which you can use it.
How To Use Adobe Illustrator For Your Blog
When you think about your website and how you share your content, there are lots of different graphic elements being used. These include things such as your logo, your social media profiles/posts and everything else in between.
Adobe Illustrator can be used to help you design all of them as well as many other web graphics you may want to create to complement your brand designs. Here are just a few examples of graphics you can create using Adobe Illustrator.
- Website Logos
- Hero Images
- Favicons (Site Icons)
- Featured Images
- In Post Graphics
- Banners
- Sidebar Icons
- Social Icons
- Infographics
- Social Media Profile Graphics
- Social Media Post Graphics
- Email Headers
- Email Signatures
- Signature at the bottom of blog posts
I could go on but I think you get the idea here. There’s a lot you can do in Illustrator and you can do it all in great detail and with serious precision. This alone makes it a seriously powerful design tool and it’s also why it’s a favourite among professional designers.
Using The Adobe Illustrator Interface
Now I’m not gonna lie, if you’ve never used Illustrator before (or any other Adobe app for that matter) then you may be pretty intimidated when you first open up the app because, at first glance, it looks crazy complicated.
In fact, you may even consider running for the hills and never looking back, but I promise you, it’s nowhere near as complicated as it looks. You just need to familiarise yourself with the interface and then it becomes much easier and far less daunting.
I’ll start with how to open up a new design and some of the important settings you’ll want to understand early on.
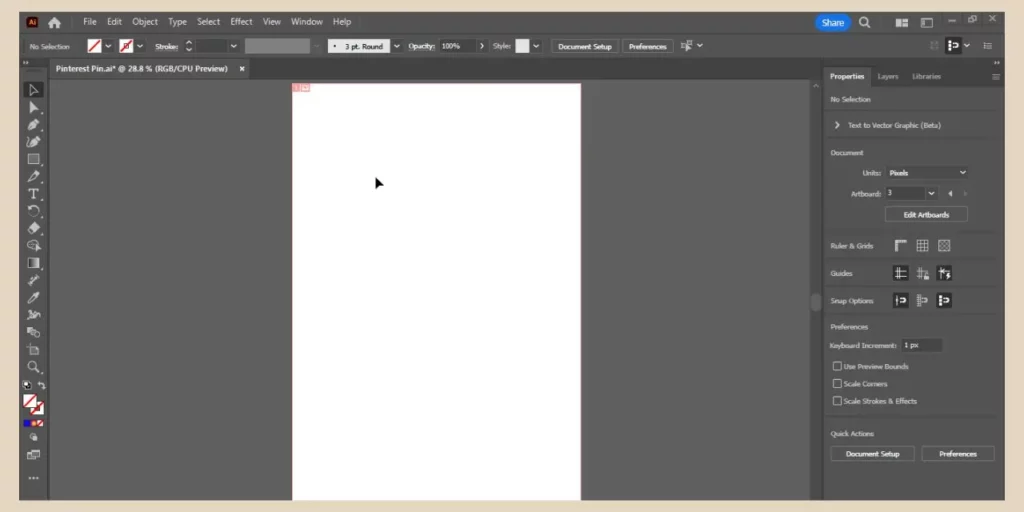
So, when you first open up Adobe Illustrator, you’ll want to start by creating a new file so click the New File button near the top left corner of the screen.
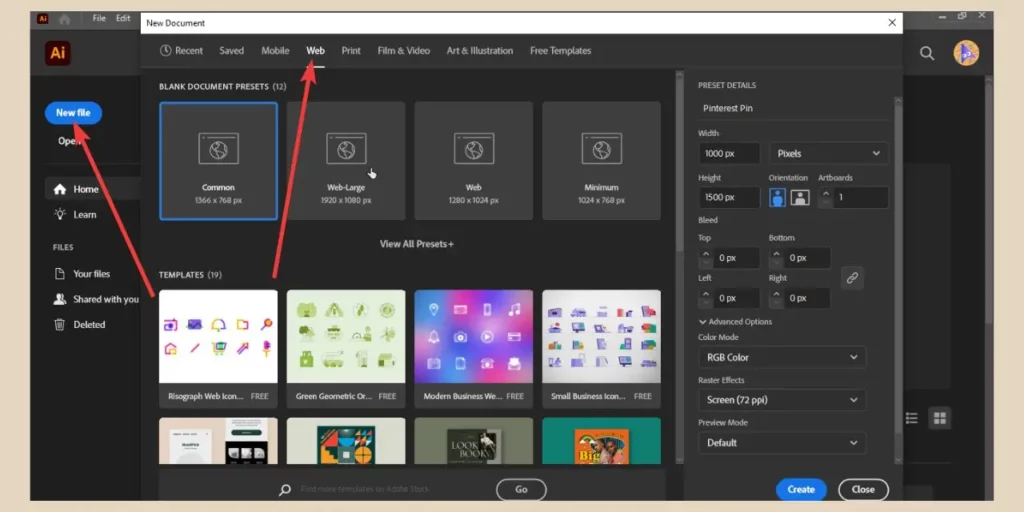
This will open up a new document window and seeing as we’re looking to create designs for web use, click Web from the options across the top of this new window.
Setting Up Your New Design
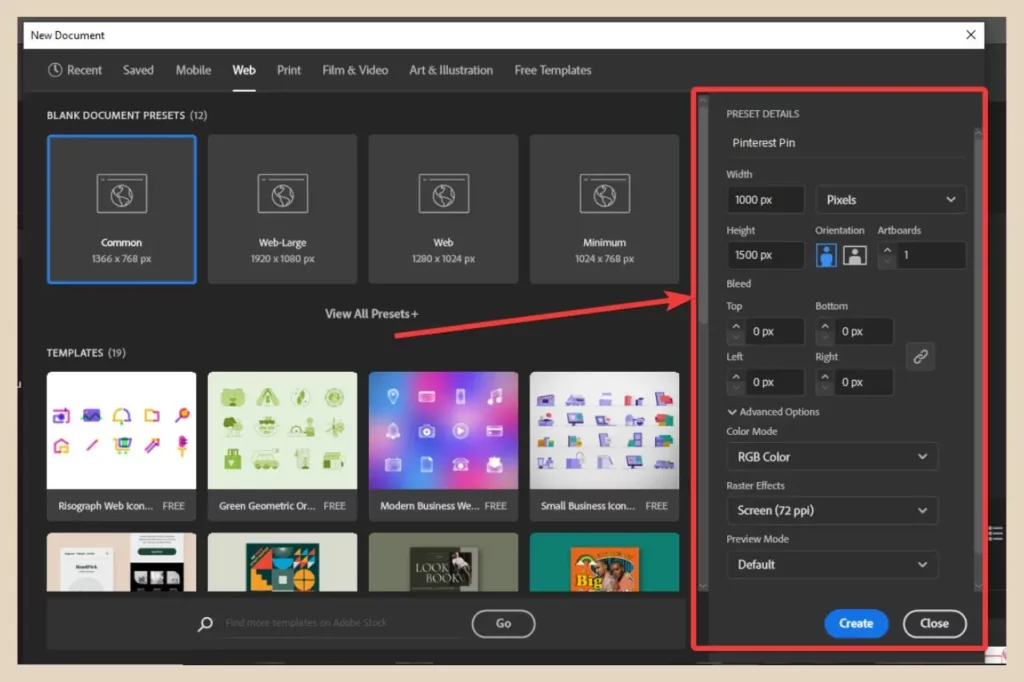
You’ll notice some popular document size presets as well as some templates that you can use if you wish but generally you’ll be creating your own custom sizes. To do that, you’ll need to use the panel on the right of the window to set up your new design.
So using this panel on the right, you can start by naming your design and then entering the width and height of the design you’d like to create.
Pixels (px) are what we want to use for sizing here so you can leave that as is. In this particular example, I’d like to create a Pinterest pin design so I’ll be setting this at 1000 x 1500 px.
Next, you’ll want to choose the orientation of your design between landscape or portrait so seeing as this is a Pinterest pin, I’ll be selecting portrait for this one.
Artboards, Bleed And Colour Settings
To the right of the orientation options, you’ll see something called Artboards (the white area where you’ll create your design) which is set to 1 by default. To be honest, in most cases, you’ll only need 1 artboard although you can add and remove them as you’re working on your design (I’ll show you that shortly).
So, for example, if you were designing a t-shirt, you’d probably want 2 artboards on that occasion. One artboard for the front of the t-shirt and a second artboard for the back of the t-shirt. Or if you wanted to create different colour variations of a logo, you could have separate artboards for each one.
The next section here is the Bleed amount area (the amount a design will extend past the printable area of a page) and you can ignore this one because this is used to avoid white borders on printed documents such as posters and seeing as these designs are for digital use, bleed doesn’t apply here.
For the last sections, you’ll want RGB Color selected for the Color Mode as this is the setting for digital designs that will be displayed on screens. The Rastor Effects should be set to Screen (72 ppi) and the Preview Mode can be left set as Default. At this point, you can now click the Create button to start working on your design.
Setting Up Templates
Before we get into to whole design aspect of things and figuring out this somewhat daunting screen we’re now looking at, you may want to consider making templates of the designs you plan to use often.
If you’re already an avid Canva user, then you probably already have templates set up for all the different sizes you use on your blog, ie featured images, in-article graphics of different sizes, Pinterest pins, etc and you’ll want to do the same thing in Illustrator.
So before you start adding anything to your blank design, you can save it as a template first. To do that, simply click File from the main menu options at the top of the screen, then click Save as Template from the options that appear.
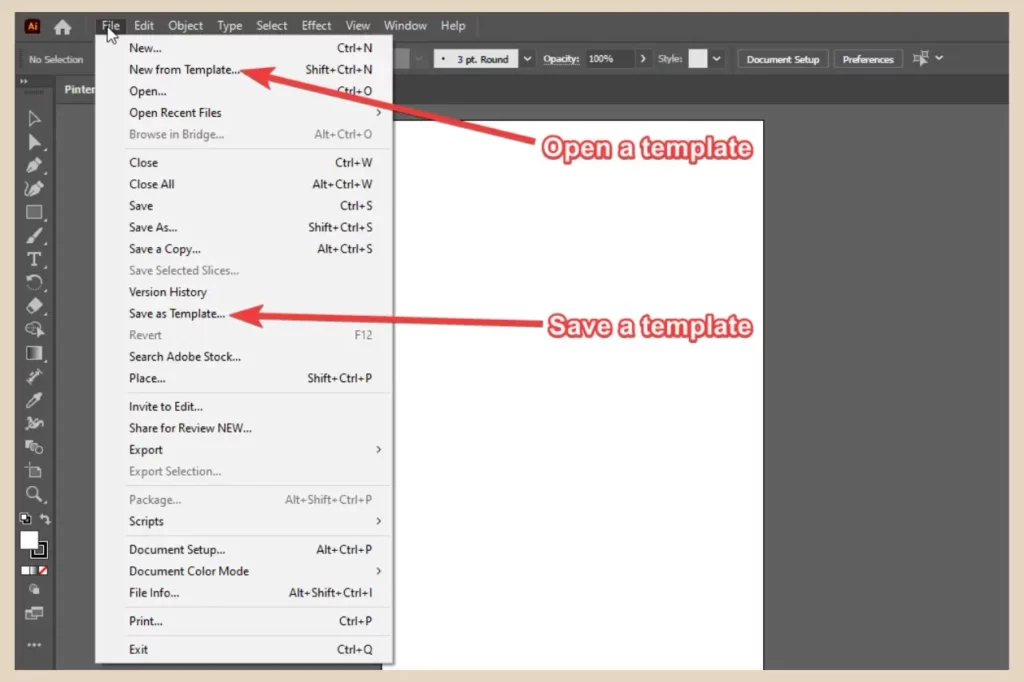
From here, you can select where to save it on your device. Now anytime you want to create a similar design such as in this case a Pinterest pin, you can simply click File, followed by New from Template to open up your preset designs.
So, if you know the different dimensions of all the designs you use across your blog, you could set them all up individually and then save each one as a template so that they’re already set up and ready to go anytime you need them.
You can also open up several design files at once which will open up in their own tabs across the top of the workspace.
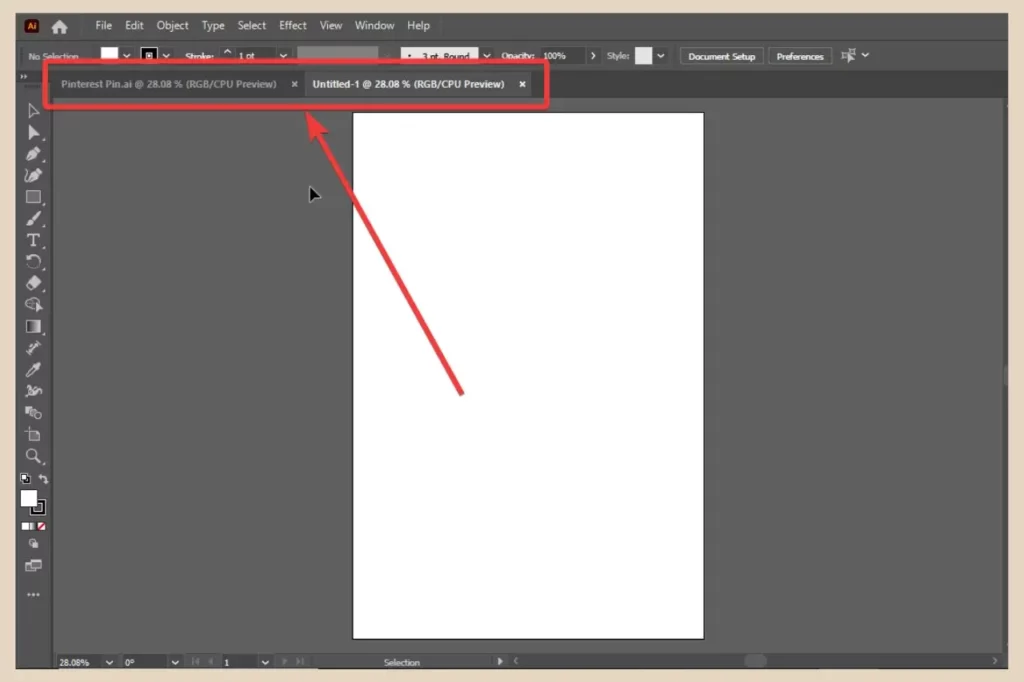
This makes it easy to work on several designs at once and switch between them by simply clicking on the tab you want to work on.
Finding Your Way Around The Adobe Illustrator Screen
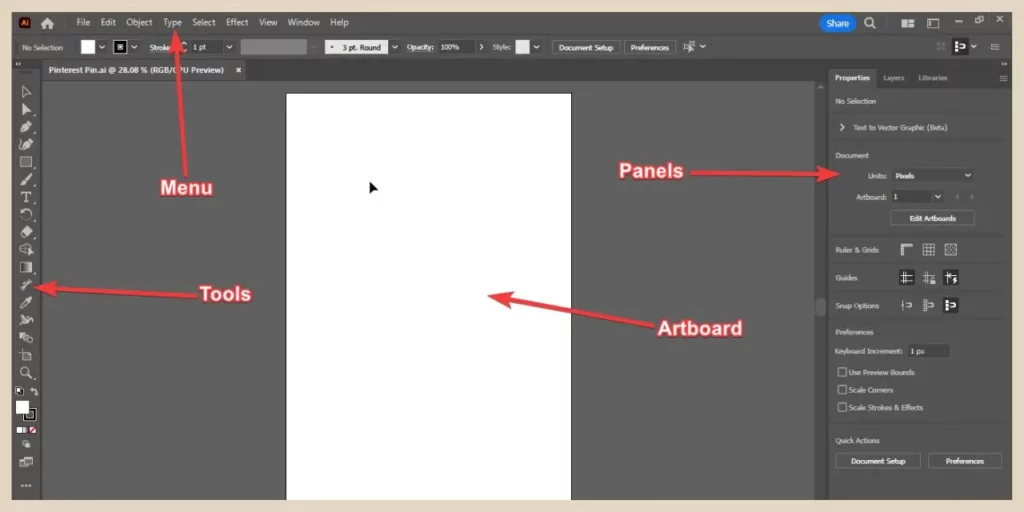
Now it’s time to find our way around the Illustrator screen which is not as difficult as it looks. To simplify the layout here, you’ll find all your tools on the left-hand side of the workspace, your menus across the top, your panels on the right and your artboard smack bam in the middle.
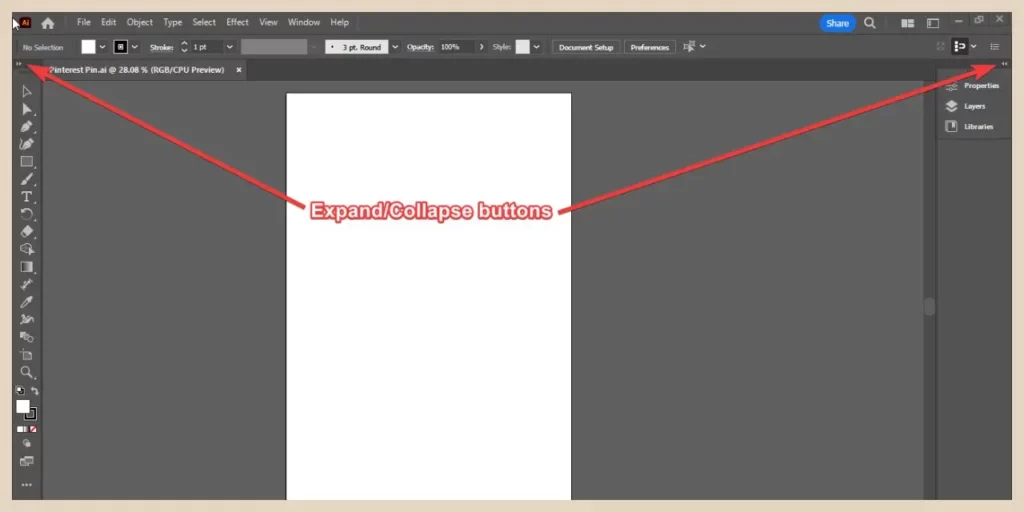
You can also use the Expand/Collapse buttons on either side of the screen (two small arrows) to expand or collapse the corresponding area if you want to make your workspace clearer (in the image above, I have the panels on the right expanded but in the image below, I have them collapsed).
One other thing I have present on my screen is the control panel/bar which is directly below the main menu but this may not be there by default.
This is a particularly useful panel because the options change depending on what you have selected (ie, if you have text selected, you’ll see text formatting options) so if it’s not there, I strongly advise that you add it.
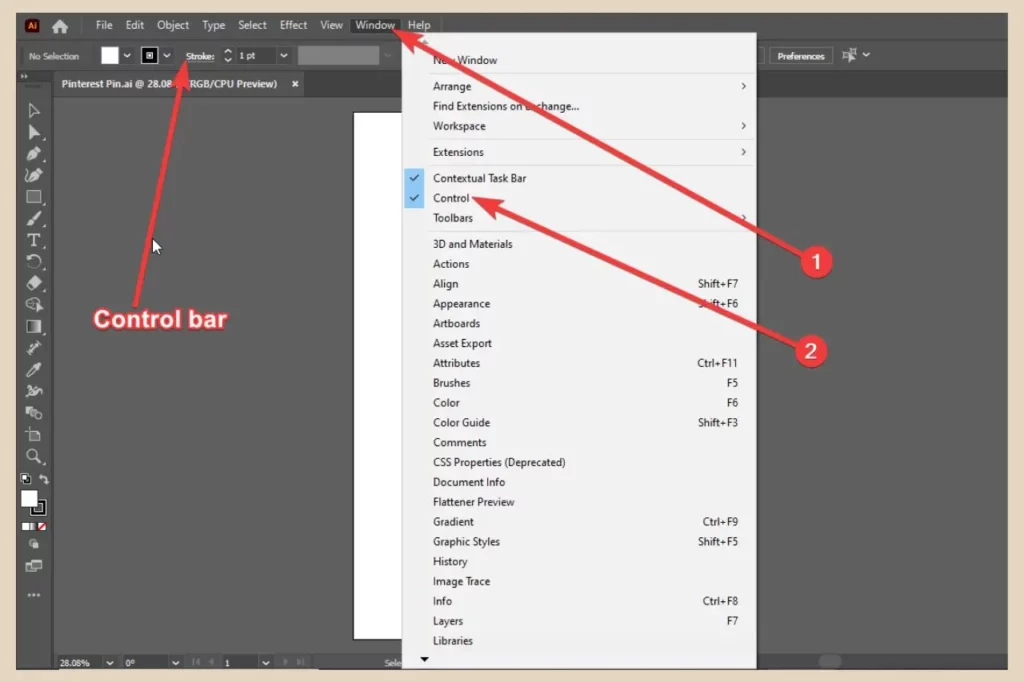
To do that, click on Window from the main menu across the top of the screen, then select Control from the options that appear. This will now add the control panel to the area below your main menu.
Adding More Panels To Your Workspace
You can also use this same Window menu to add more panels to the panel area on the right. There are many different panels that you can add to your workspace such as the brushes panel, colour panel, gradient panel, etc so don’t be afraid to try them out to see the different options each one has.
You’ll also find an Artboard panel in the Window menu and this lets you add, remove and name artboards but you can also click on the Artboard icon on the toolbar.
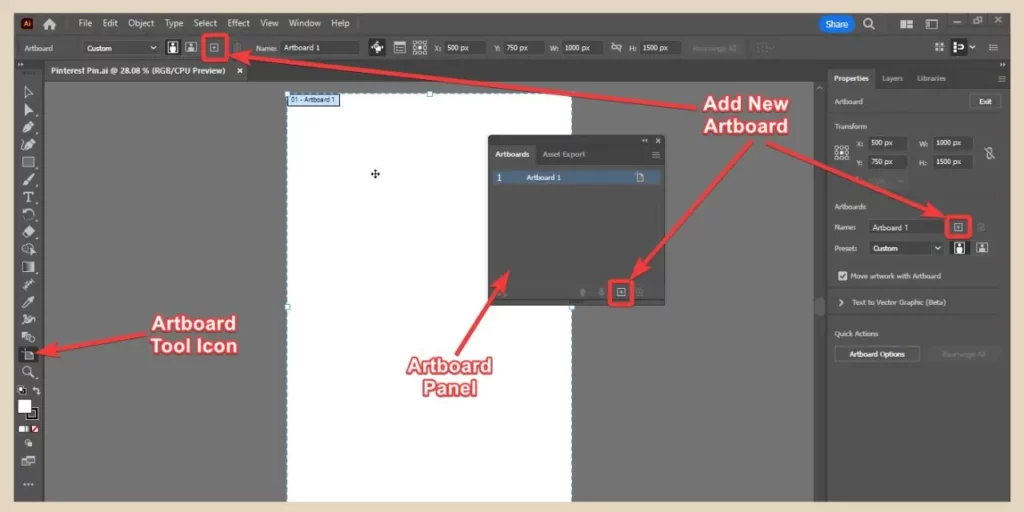
From here, you can either click and drag anywhere on the pasteboard (the blank area surrounding your artboard) to create a new artboard or use the + icon on the control bar, artboard panel or properties panel instead.
One panel that you may want to use frequently is the Character panel (for changing your fonts or paragraphs) but it’s not the easiest one to find. So, to add it, click on the window menu and click the small arrow at the bottom of it to scroll down until you see Type.
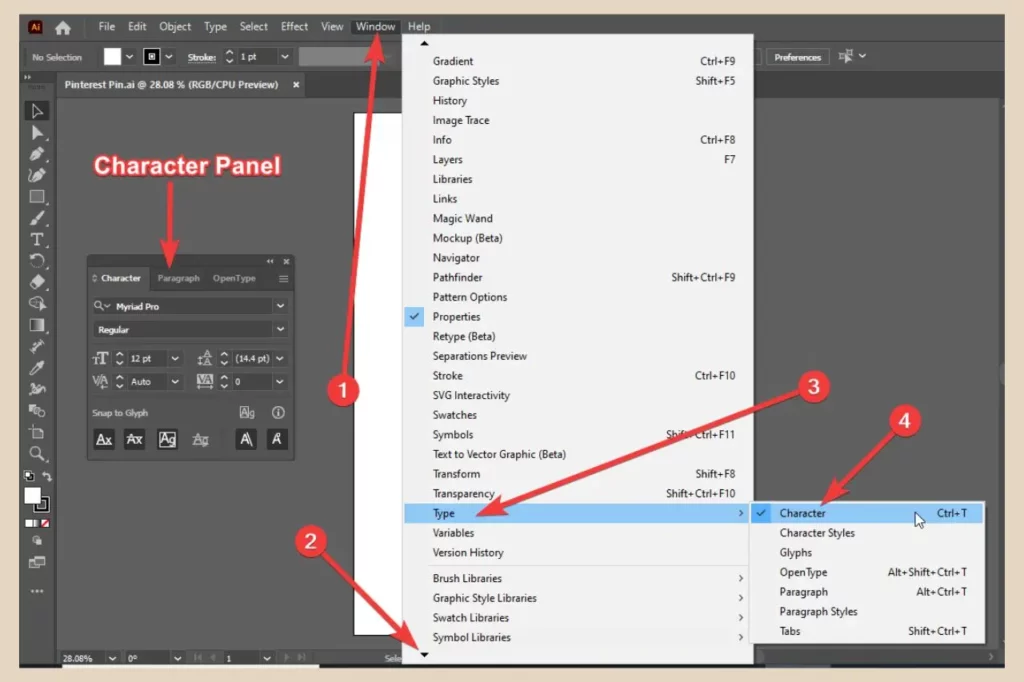
When you hover over Type, another small menu will appear to the side and from here, you’ll want to click Character. This will open up the character panel as well as the paragraph panel which are very handy if you’re planning to use text in your design.
Switching Workspaces
You can also switch between different workspaces (different panels already set up in the panel area) such as the web workspace, painting workspace, tracing workspace, etc depending on what you’re designing.
By default, the Essential workspace is selected which is the properties, layer and library panels but you can easily switch to a different workspace by clicking the window menu, then hovering over Workspace and clicking any of the other preset workspaces to switch over.
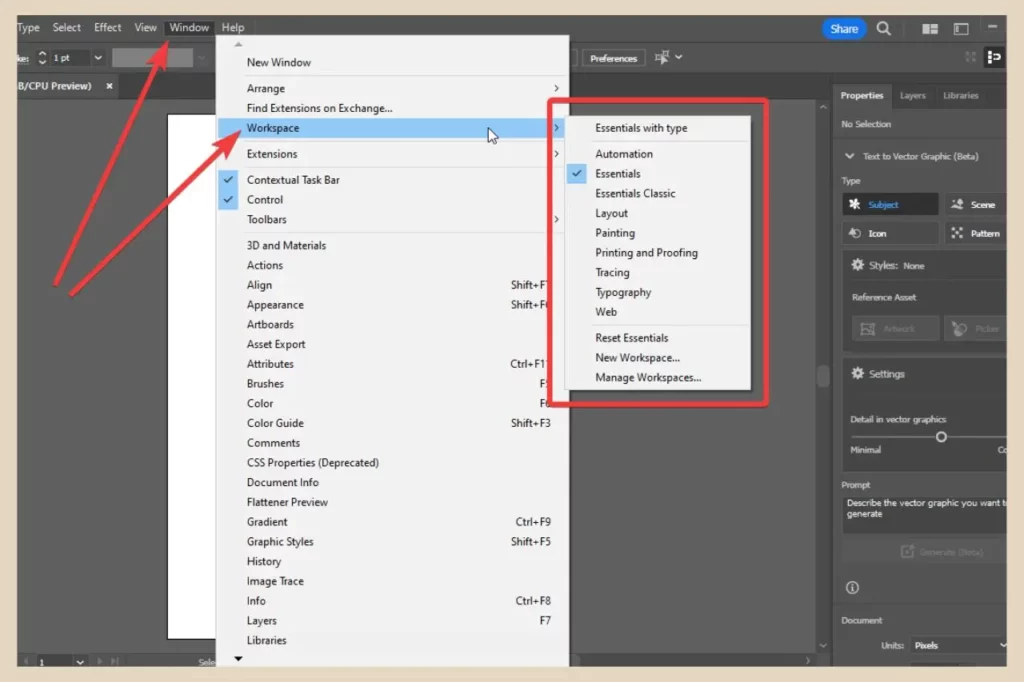
You can also create your own custom workspace by clicking on New Workspace to save a workspace you’ve created yourself.
And if you really want to customise things even further, you can even create your own custom toolbars as well while you’re at it.
Getting Started With Your Illustrator Design
So, to get started with your design, you’ll want to begin by creating a number of layers to help keep your design organised. You should see a Layers panel in the panel area on the right so click on it to open it up. If for any reason, it’s not there, you can add it by selecting it from the Window menu.
Any panel (other than the control panel) that you select from the Window menu will appear as a small window on your workspace and you can click and drag it to move it around the area.
You can also click and drag it to the panel area and if you release it when you see the blue outline, it will dock it to the panel area so you can keep your workspace tidier.
To remove it from the panel area, simply click on it by the tab and drag and drop it away from the panel area. You can then just click the X on the top right corner of the small panel window it becomes to close it down.
For this Pinterest pin, I’ll be creating 3 layers, one for the background, one for any text I add and one for any graphics (shapes/objects) I add.
Creating New Layers
By default, you’ll start off with one layer already present but to create more new layers, click the Create New Layer button (the small plus sign) at the bottom of the Layers panel. You can then double-click on each layer to rename them appropriately as I’ve done in the image below.

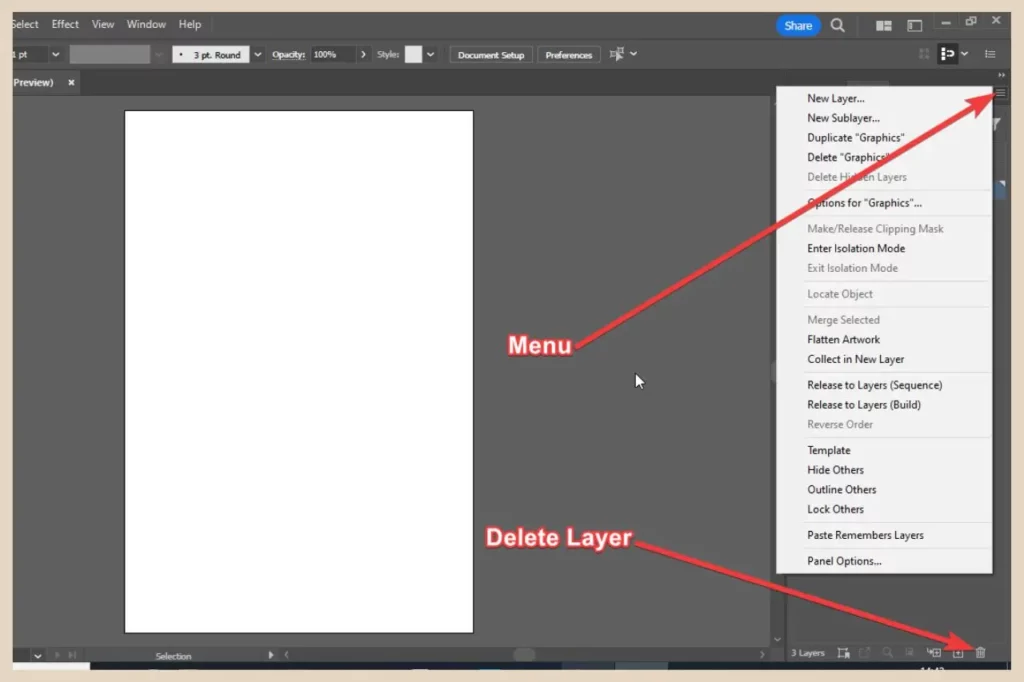
You can also add layers using the layers menu in the top right corner of the layer panel (the three lines) and this menu option lets you name your layer straight away and choose its colour.
There are also many more options available on the menu for your layers such as duplicating layers. If you want to delete a layer, you can do that by either using the trash can icon at the bottom of the panel or by using the layer menu.
With these layers, the one at the top of the list is the one at the forefront of the design and the one at the bottom is the one at the very back so if you ever notice that something you’ve added is missing, it could be that it’s hidden behind another layer.
Organising Your Layers
Luckily, it’s pretty easy to organise your layers and you can do that by clicking and dragging them to change their position and organise them appropriately in your design.
For example, in this instance, I have the background layer at the top which means that the other two layers are behind it. This is problematic because the background layer is going to be a full image covering the entire artboard which means you won’t be able to see the other two layers beneath it.
So, in this case, before I do anything else, I need to move this layer to the very bottom so that my text and graphics sit on top of it. You can also drag and drop items to different layers if you’ve accidentally added something to the wrong layer.
Hiding/Locking Layers
There’s also the option to hide or lock layers. You may want to hide a layer if, for example, you’ve added an image and traced over it to make your own version. You don’t want it to be visible in the design but you also don’t want to delete it either as you may need it for future reference.
In this case, you can simply click the eye icon to the left of the layer to hide or show it as and when you need it.
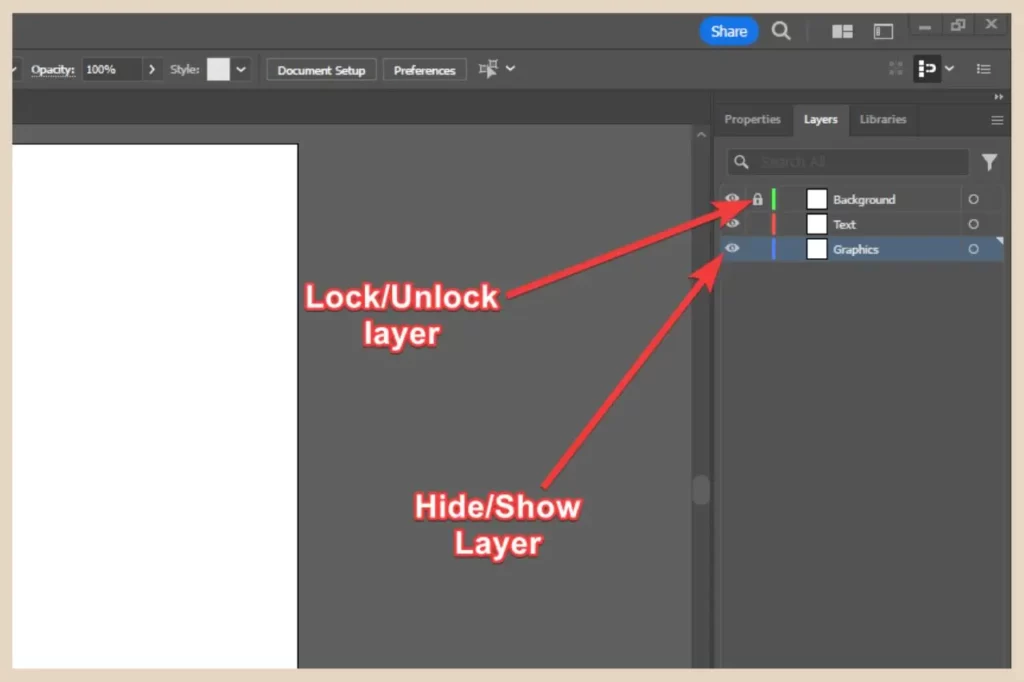
Locking layers on the other hand is a great way to make sure you don’t accidentally move or alter other layers when you’re working on a different one. When a layer is locked, you won’t be able to make any changes to it.
To lock a layer, simply click on the blank area directly to the right of the eye icon and a lock will appear to indicate that the layer is now locked. To unlock it, click on the lock icon and it will disappear to indicate the layer is now unlocked.
Adding An Image To Your Design
Now that the layers are in a better order, the next step is to start adding elements to create a design. In this particular example, I want to add a background image so to do that, first select the layer you’d like to add the image to (in my case, the background layer) and then click the File menu followed by Place.
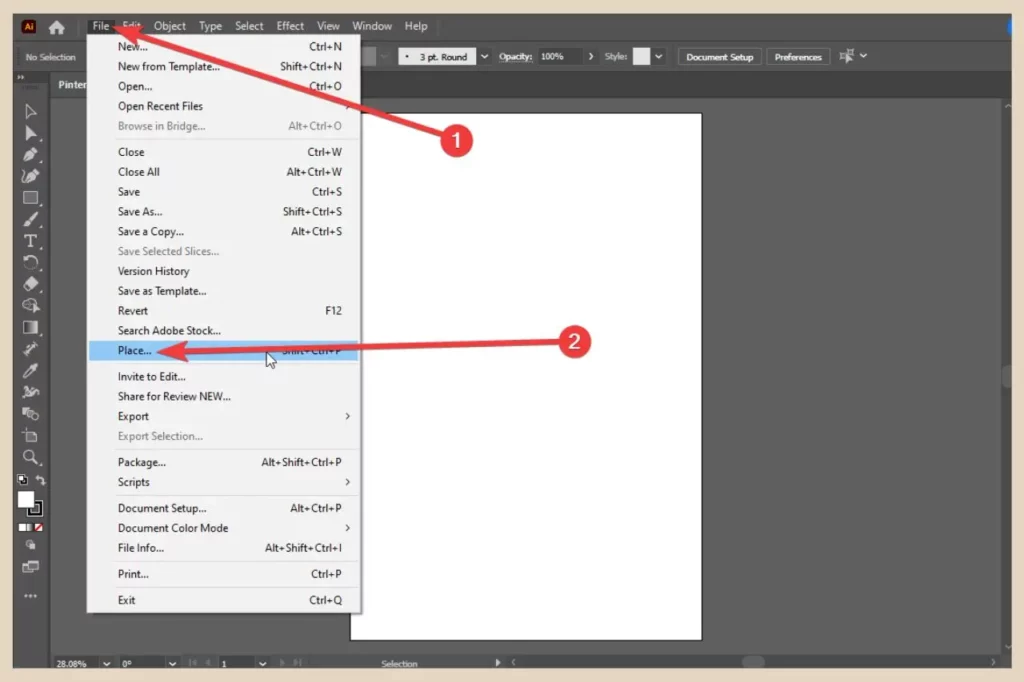
From here, you’ll be able to search your device for your image of choice. Once you’ve selected your image, you’ll notice a checkbox near the bottom of the window called Link and this may be checked by default.
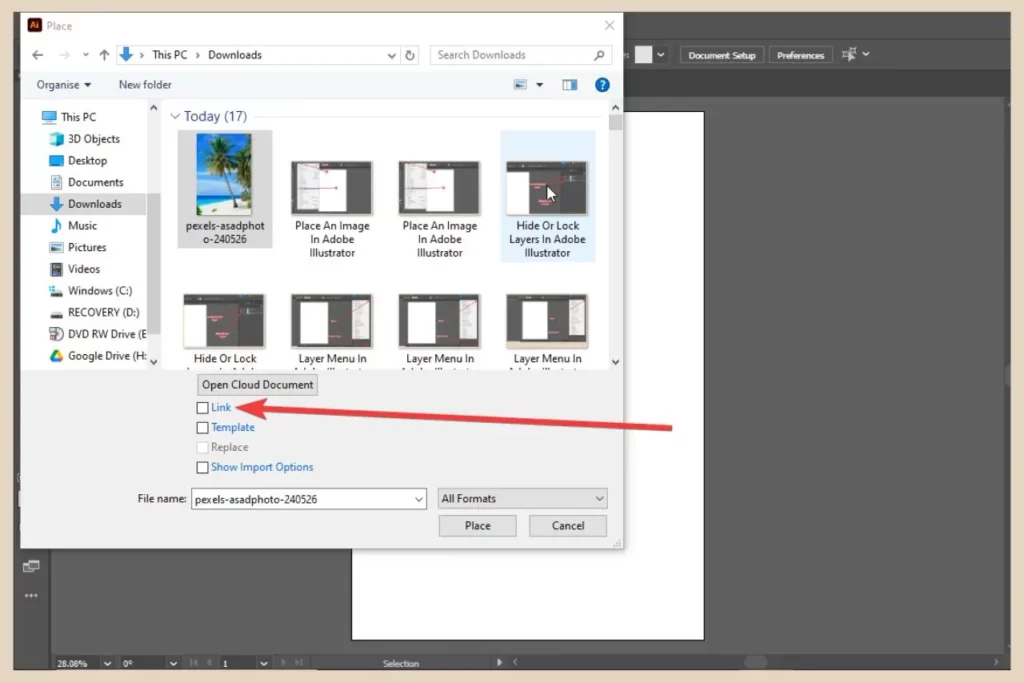
I tend to uncheck this when it is but essentially leaving it checked will mean that the placed image will be linked to the original. If you make any changes to the original, those changes will be reflected in every other instance where that image is used.
If you do place a linked image, you’ll know it because there’ll be a large X across the image when it’s in the Illustrator editor.
Making Adjustments To Your Image
The next step is to click on the artboard to place the image. Once it’s placed, it will be added to the selected layer as a sublayer and you can then move or resize the image as needed.
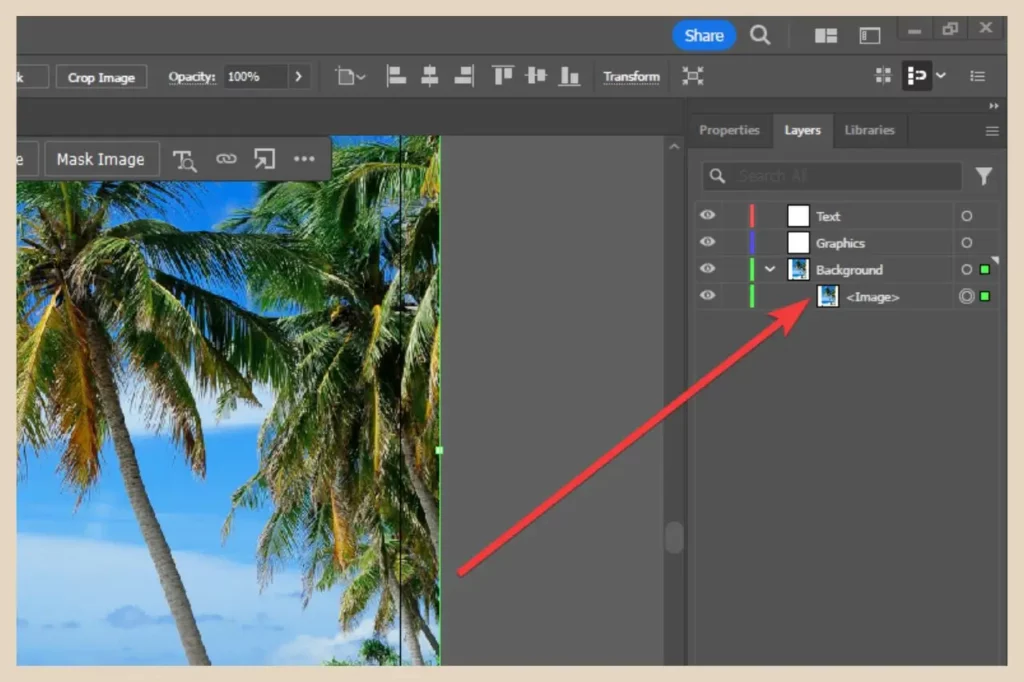
If you’re resizing, you can hold down the Shift key on your keyboard and click and drag the image from one of the corners to resize it. This will keep the image intact and prevent it from warping.
To crop the image, you can either click the Crop Image button in the properties panel on the right or on the control panel at the top of the screen if you’ve added it. The properties panel, much like the control panel will display different options depending on what you have selected.

Now it’s time to add some text and some graphics to the design so let’s have a look at some of the tools you can use with Adobe Illustrator.
Using Adobe Illustrator Tools
Now, some of these tools are more complex than others and as such need more in-depth instructions so I’ll be creating individual tutorials on how to use them. There’s so much you can do here that it would be impossible to put it all into this one post.
It would probably take me an entire month the write the thing and it would probably take you a good week to read it and nobody has that kind of attention span. Not that there’s anything wrong with long-form content but trust me, this would be taking the proverbial.
So, for now, I’ll cover the basic tools you’ll use the most often and I’ll start with the Rectangle tool. By the way, you can hover over any tool to see what is and if it has a small arrow in the bottom right-hand corner, this means that there are more variations of the tool which you can select by right-clicking on it.
Using The Rectangle Tool (and other shape tools)
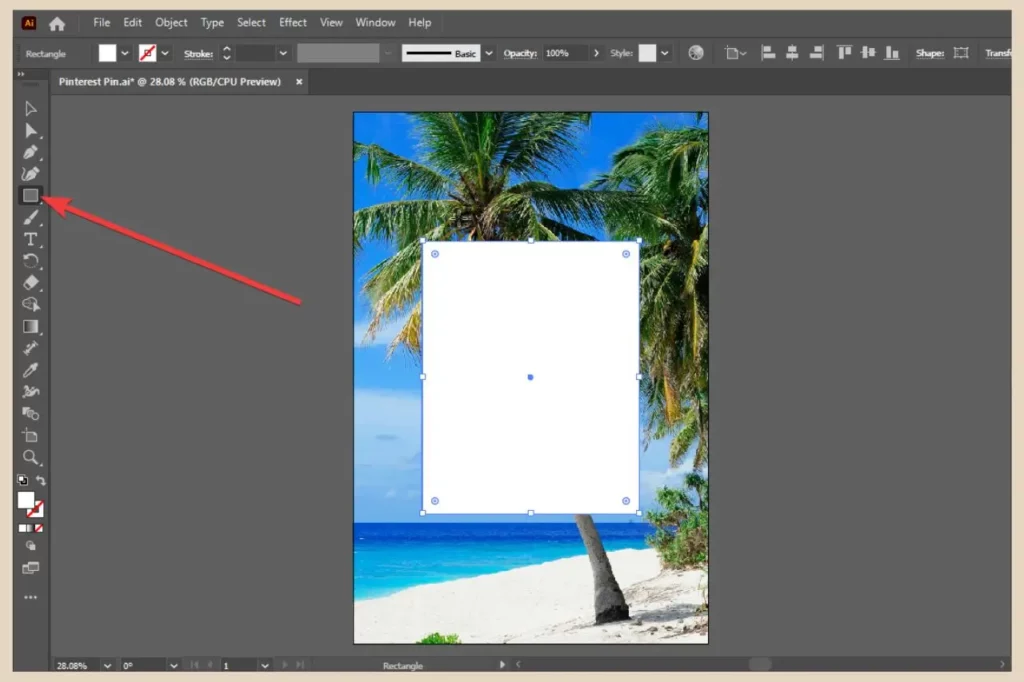
I want to add a box where I can add some text so first, make sure you select the right layer which in my case is the graphics layer. Next, click on the Rectangle tool and then click and drag your cursor into the shape you require on your artboard. You can also right-click on the rectangle tool if you’d prefer to use a different shape.
To make changes to your shape, you can use one of three areas. For just colour changes, you can use the fill colour or stroke (border) colour tools in the tools area. Selecting either one will bring up a colour window where you can make changes.

Just keep an eye on which one is at the forefront as this is the one you’re changing the colour for. For instance, in the image above, the fill colour is at the forefront so that’s the colour I’m changing.
If I were to click on the stroke icon instead which is currently tucked behind it, it would bring that one to the forefront to indicate that’s the one I’m changing.
More Formatting Options
For more options, you can use the control panel or the properties panel to make adjustments such as changing the fill or stroke colour, stroke thickness, opacity, alignment, etc because as I mentioned earlier, both of these areas will change to reflect the current area selected.
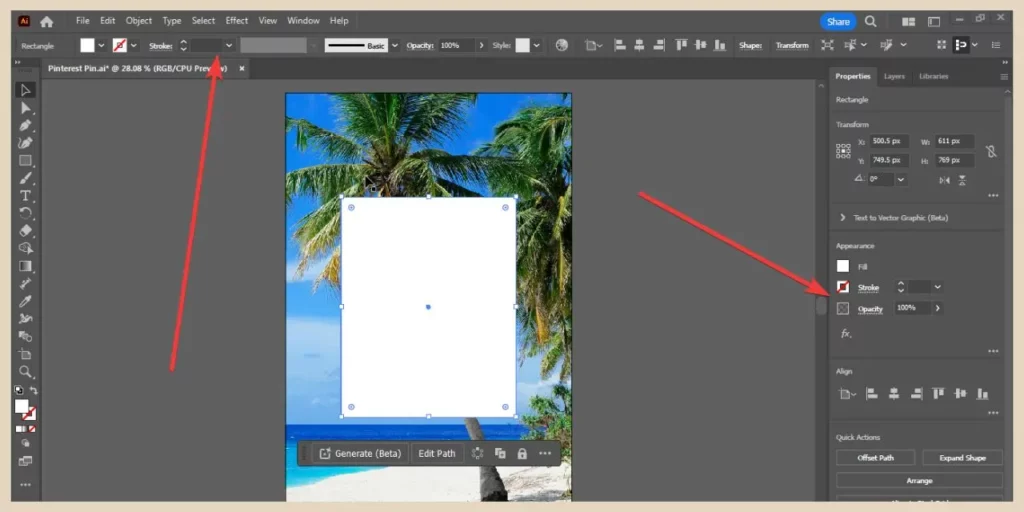
So, seeing as I want this box to be somewhat see-through, I’ll be changing the opacity here to create that effect.
If you’d like to create rounded corners on your shape, you can do that by clicking and dragging on any of the small circles on the inside corners of your shape.
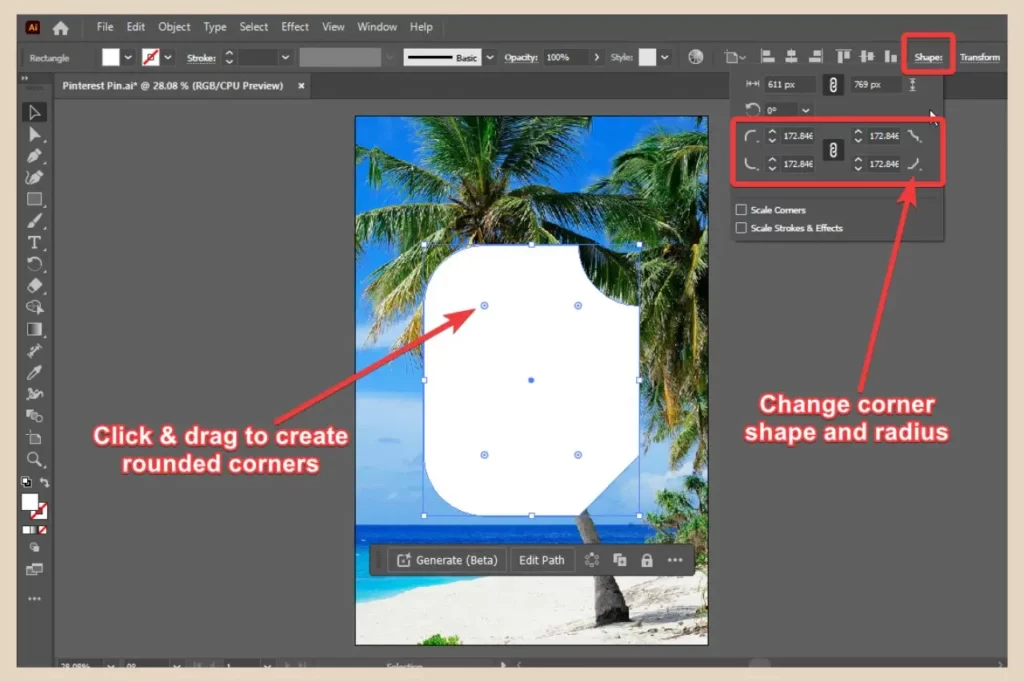
You can also use the Shape option on the control panel which not only lets you change the amount of rounding but also lets you change the design of the corners too.
On a side note, when you select any tool, it will remain actively selected until you either select another tool or deselect all tools completely.
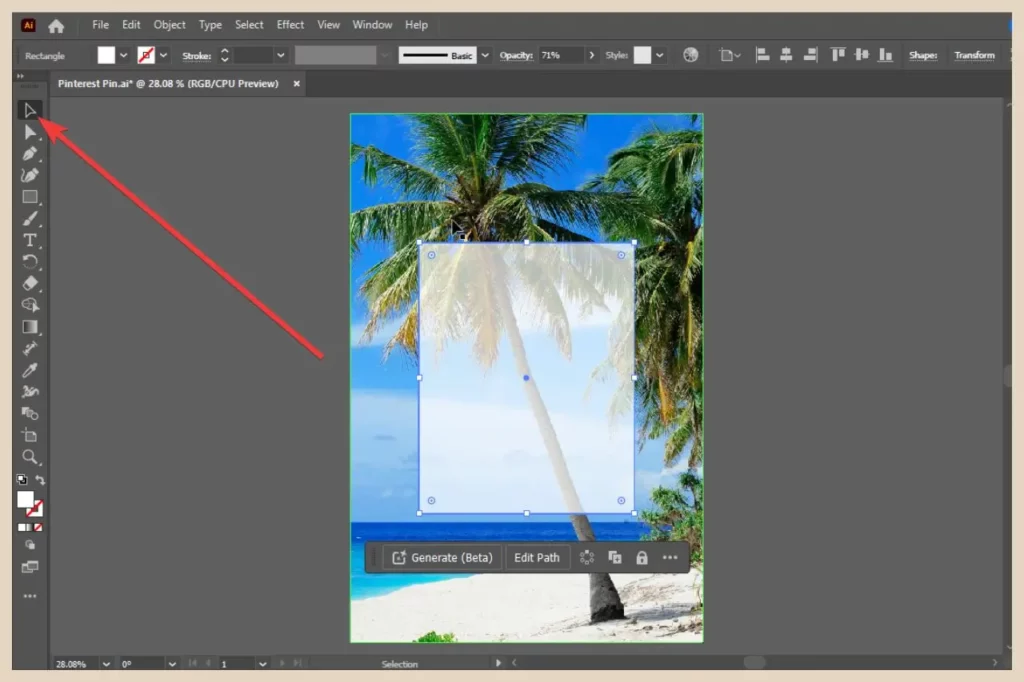
To deselect all tools and get back to being able to select the different items on your artboard, click the Selection tool at the top of the tools area.
Using The Text Tool
If you’d like to add some text to the design, start by making sure the appropriate layer is selected and then click on the text tool. From here, you can either click on the artboard and then start typing and this is called a point type.
Or you can click and drag your cursor in the artboard to create an area where you’ll type your text and this is called an area type (not to be confused with the area type tool which lets you fill the inside of an object with text).
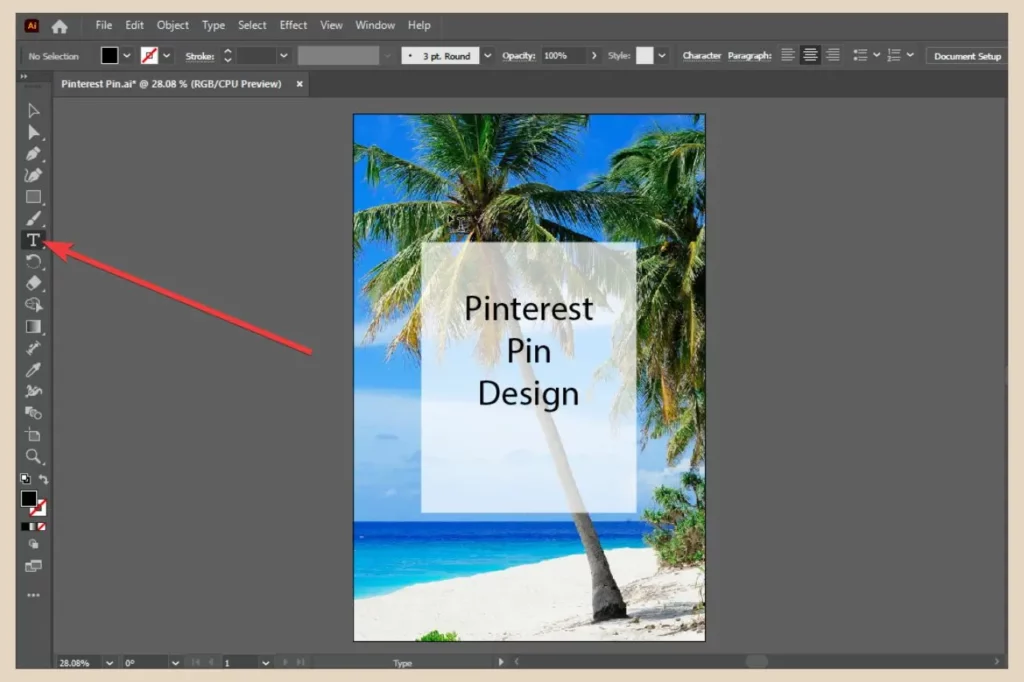
I prefer area type because not only can you be more specific with where the text is placed but you can also click and drag the edges of the text box to change its shape and size and the text will wrap with it (much like Canva).
With point type, the text will just resize if you change the text box size which is very annoying if you’re trying to get the text to wrap on more than one line.
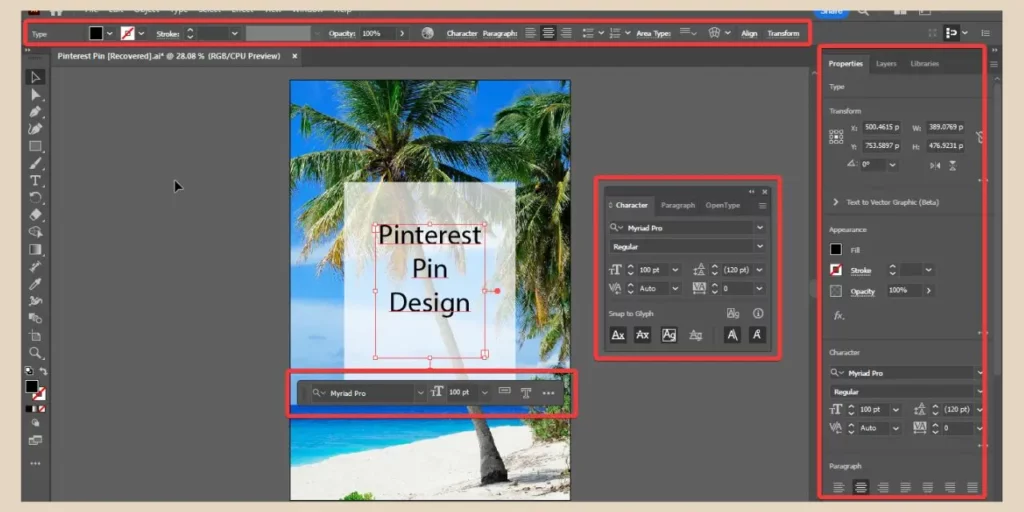
Once you’ve added your text, you can use the small toolbar that appears to change the font and font size or alternatively, you can use the properties panel, control panel or the character panel to make more changes.
Text Design Options
Now here is one area where Illustrator supersedes Canva by a long shot because there’s so much more you can do to design your text.
One example would be the ability to add highly customisable effects to your text such as shadows or glows like in the screenshot below. Text can also be filled with an image or used to fill a shape so that it mimics the shape’s outline.
You can also make text bend to any shape or curve using the type on a path tool which lets you type around the edges of shapes/along paths and this is a very cool way to create unique text designs.
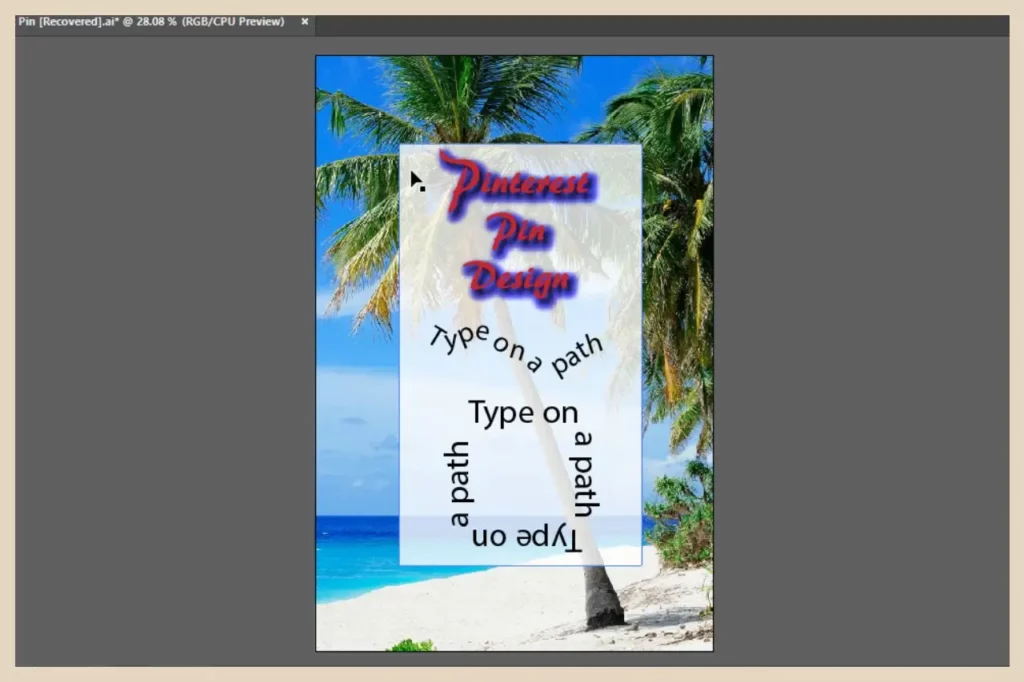
As you can see from the image above, there are lots of different ways to create unique text designs in Illustrator so don’t be afraid to play around with the different tools. You’ll be amazed at the kind of text designs you can create.
By the way, if you ever want to group any of your design elements together, you can do that by holding down the shift key on your keyboard as you select all the objects you want to group.
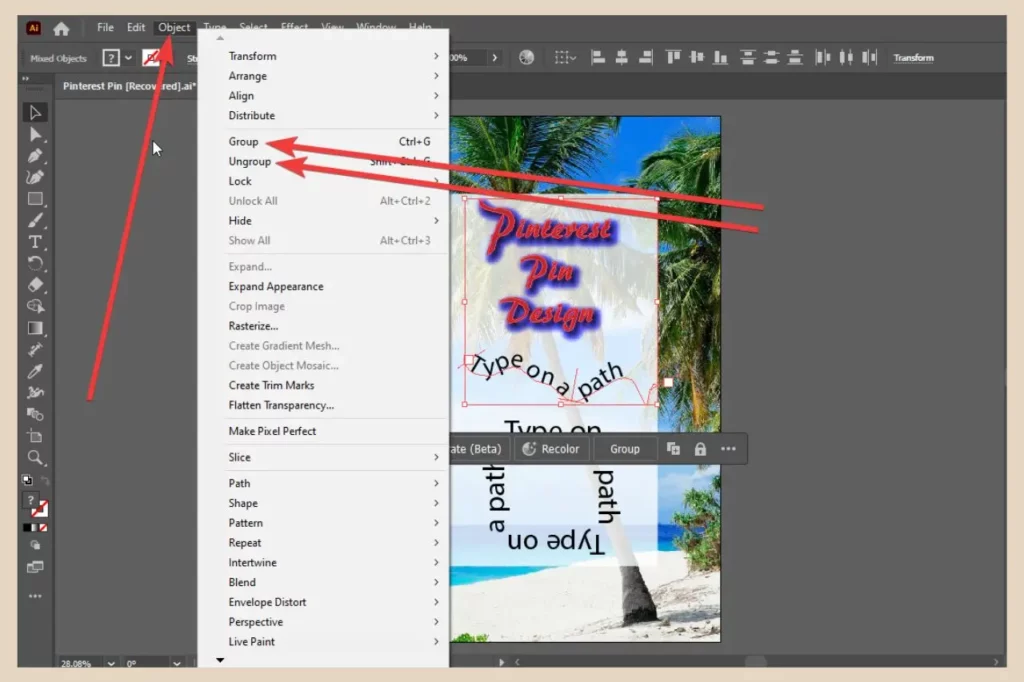
Next, click the object menu and from here, you can then click the Group option to group your selection together as one item. You’ll also notice an Ungroup option if you ever need to ungroup them.
Creating Shapes In Adobe Illustrator
Another thing you can do in Illustrator is manipulate shapes in any way imaginable and there are several ways to do it. One such way is using the Direct Selection tool which is right underneath the regular selection tool.
Simply click on it and select an object you’ve already added to the artboard. Once it’s selected, you can double-click on any of the anchor points (the square boxes) on the object path (the lines that create the object) then click and drag them to alter the shape.
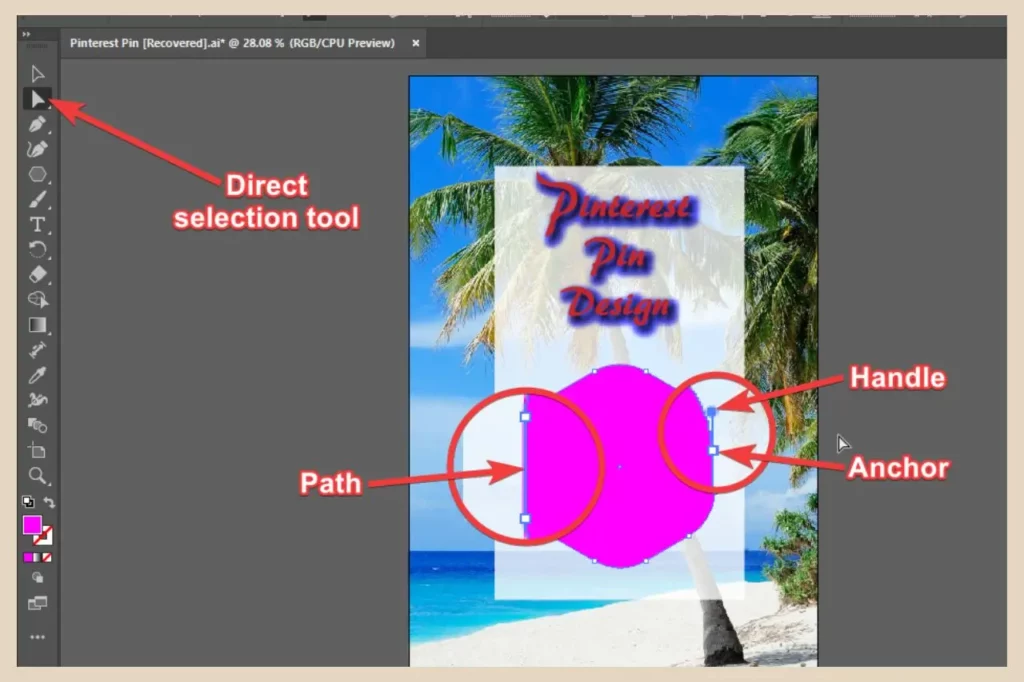
If the object in question has curves, you’ll notice smaller lines coming off the anchor points with small circles on the end of them. These circles are called handles and you can click and drag them to change the curvature of the object so essentially creating a completely different customised shape.
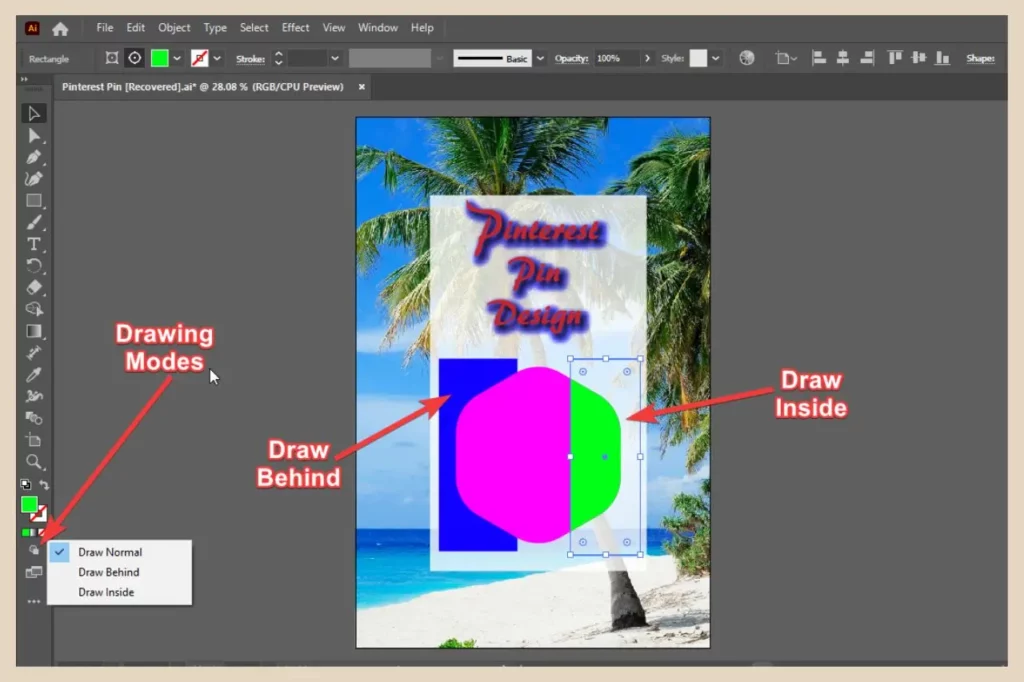
There are also drawing modes near the bottom of the toolbar which will let you add new objects either behind or inside other objects to create unique design effects like the screenshot below.
You can also use tools such as the Shape Builder or Pathfinder tool (which is actually a panel from the window menu).
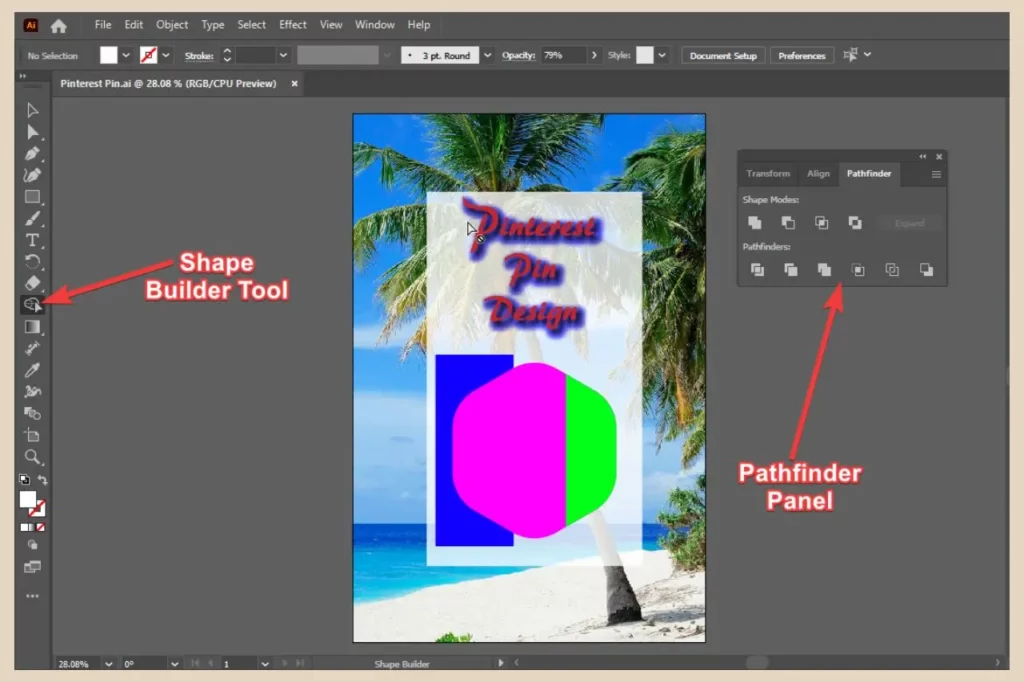
These tools will let you merge shapes or cut out intersections of overlapping shapes but again there’ll be a full tutorial on this because there’s just so much you can do here.
Using Drawing Tools In Adobe Illustrator
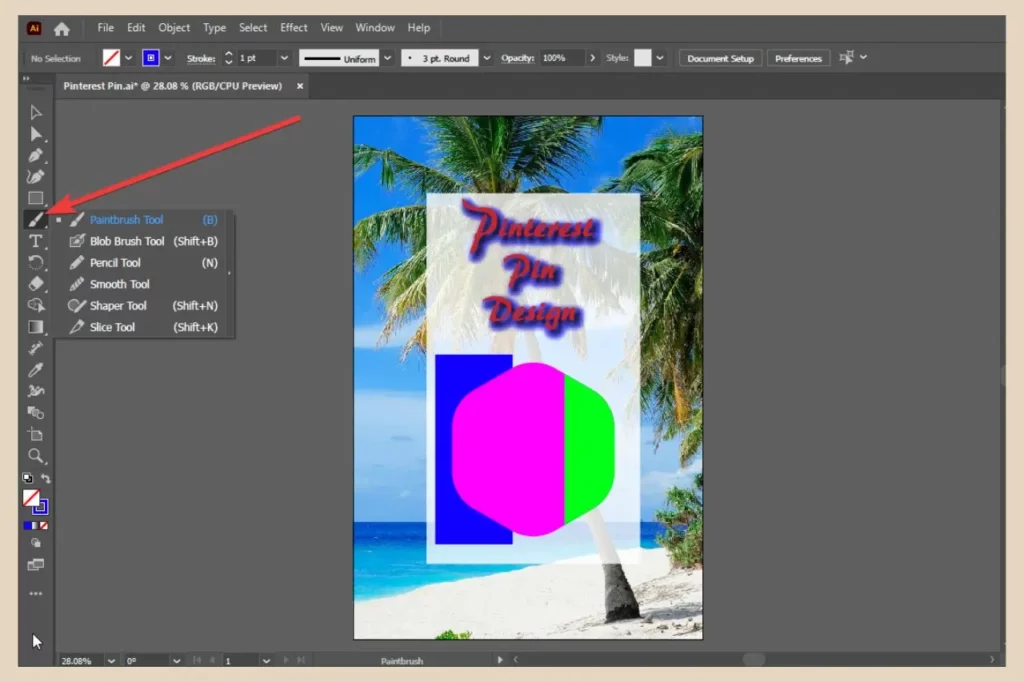
For those of you who want to up your design game, there are several drawing tools that you can use to create your own freehand designs. These include the paintbrush tool, pencil tool and the infamous pen tool.
With the paint and pencil tools you can create rough drafts of the objects you’re trying to draw and then use the direct selection tool to adjust the anchor points and handles to tidy up the design.
There’s also a Smooth tool and a Simplify tool (simplify is in the Object menu under Path) which can be used to smooth out rough areas of your drawings.
As for the pen tool, well, let’s just say it’s one of the hardest tools to master but when you do master it, there’ll be very little that you won’t be able to create.
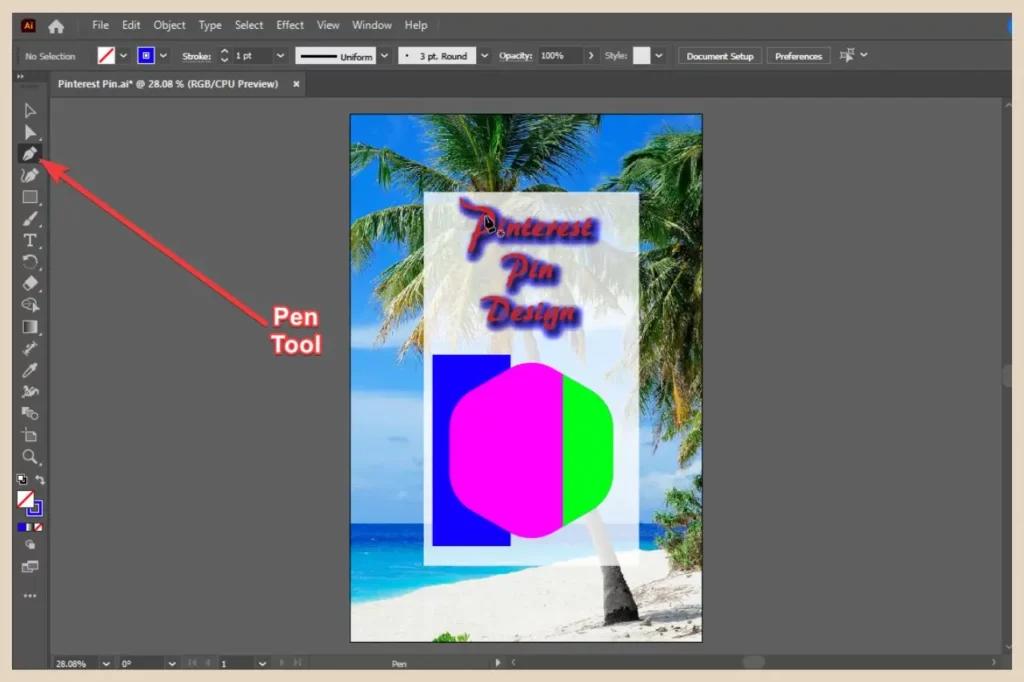
Essentially, with this tool, clicking will create straight lines and clicking and dragging will create curved lines but it does take a lot of practice. There are however a few tips and tools that you can use to help you master the pen tool quicker which I’ll cover in a tutorial solely for the pen tool alone.
By the way, not all tools will be showing in the toolbar so if you can’t find a particular tool, you may need to add it to the area first. To do that, just click on the three dots at the very bottom of the toolbar and this will open up all the tools available in the app.

To add one to the toolbar, simply click and drag it across to the toolbar area and it will be permanently added unless you ever decide to remove it (hoving over each tool will tell you what it is).
Using Colours, Patterns And Effects
For colours and patterns, there are individual panels for these which you can access from the window menu. For custom colours, you can use the colours panel but there are also preset colours which you can access from the Swatches panel.
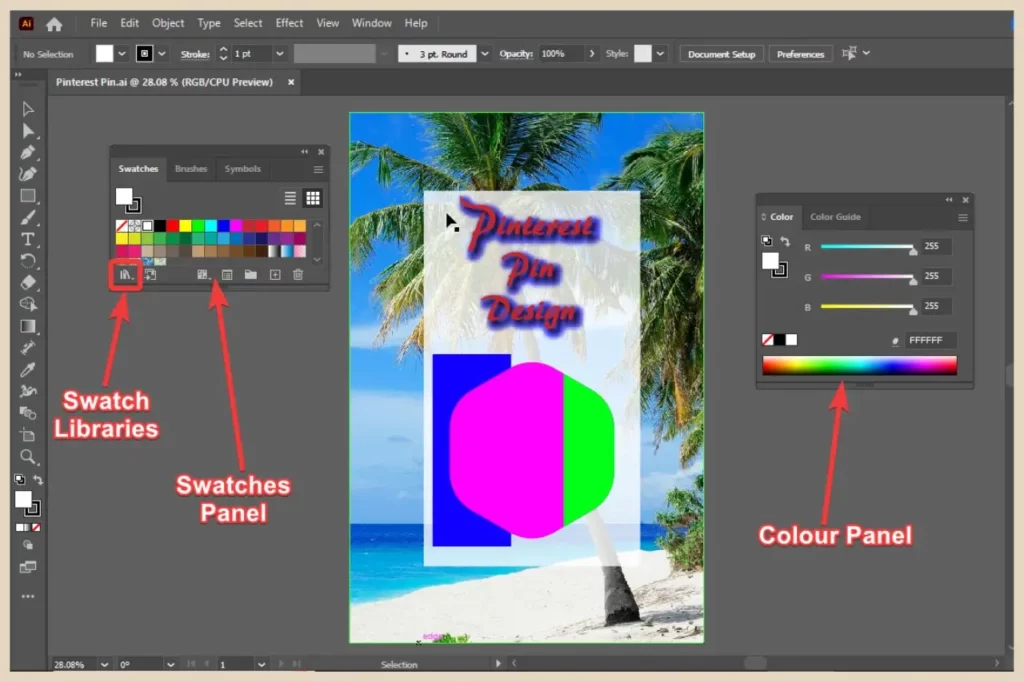
With the swatches panel, you’ll also find a selection of preset patterns and gradients and this is also where you can click and drag any custom colours, patterns or gradients you make to create your own custom swatches.
The swatches panel also has a swatch library where you can access even more preset colours, patterns and gradients. You’ll also notice that when you access certain panels, they will often open up other panels with them.
In the case of the Swatches panel, this also shows the Brushes panel and the Symbols panel which you’ll see as tabs across the top of the panel window.
There’s also a Gradient panel where you can create your own gradient colours (colours that blend into each other) which is also easily accessible from the window menu.
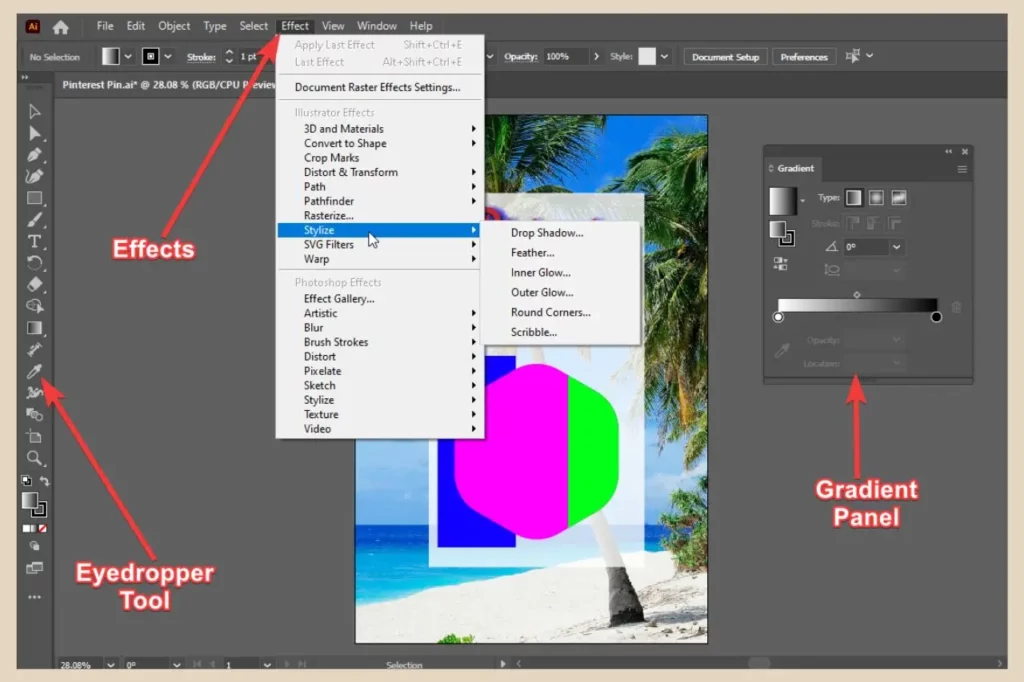
If you’d like to add effects to your objects, you can do that by clicking on the effects menu. From here, you can add shadows, feathered effects, glow effects and many more to create truly unique designs.
One more useful colour tool in Adobe Illustrator is the Eyedropper tool which lets you copy colours from other parts of your design to selected objects. That even includes colours from objects/images you’ve imported into the design.
The Clipping Mask Tool And The Slice Tool
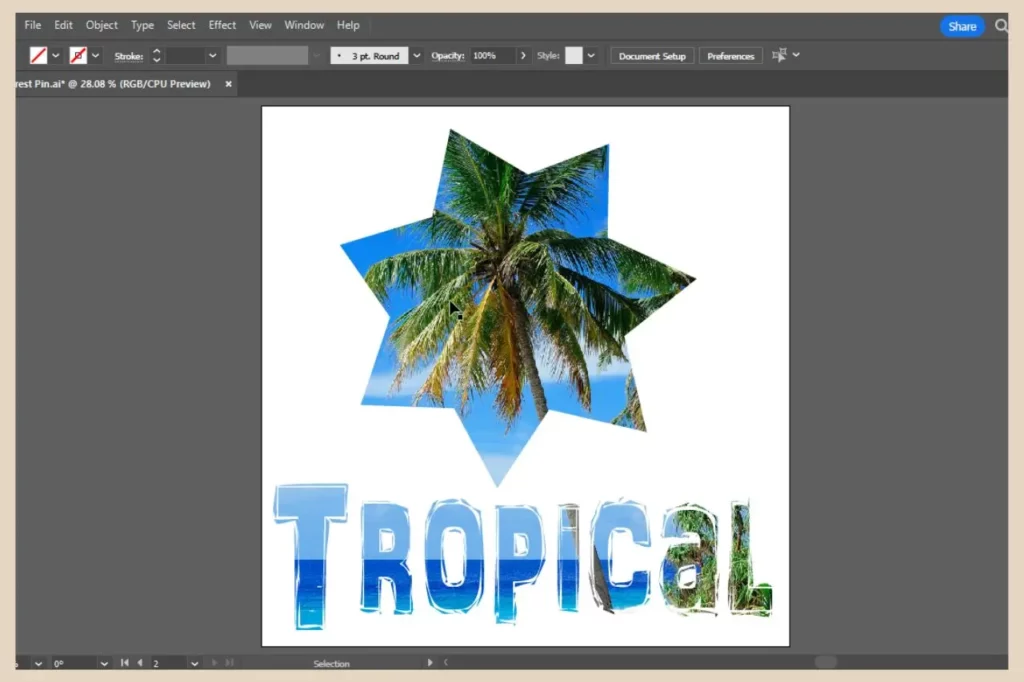
Two more interesting tools worth mentioning here are the Clipping Mask tool and the Slice tool. The Clipping Mask tool (found in the object menu) lets you place a shape over an image/pattern and only show the parts of the image/pattern that are within the shape.
The clipping mask is super easy to use and can create some pretty cool effects especially if you’re using text over an image like the screenshot below.
On the other hand, the slice tool is a tool mostly used in website design for separating elements of a design.
For example, you may create a layout for a webpage and include things such as a hero image, logo, icons, etc so that you can design how your webpage will look.
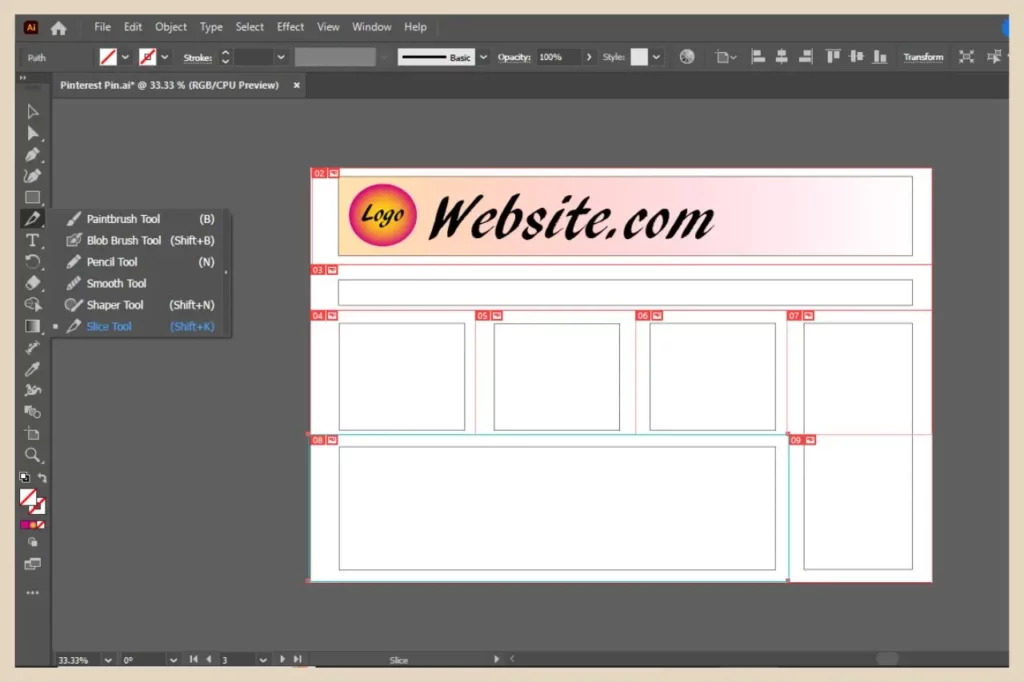
With the slice tool, you can then separate all the elements to create separate images for each one which you can then upload individually.
Exporting Your Designs
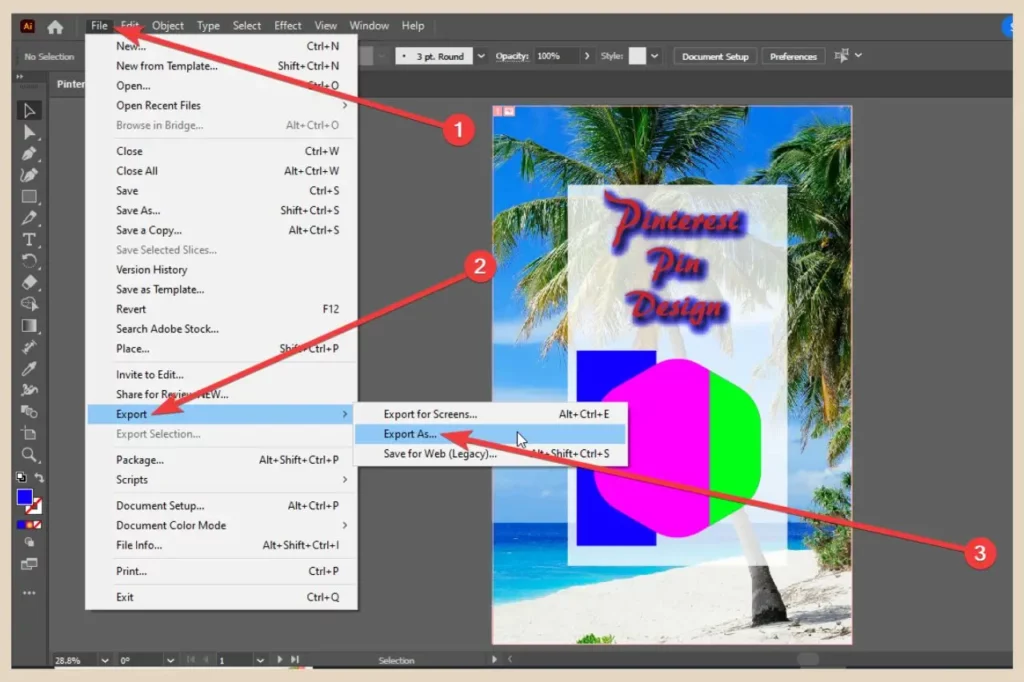
Once you’ve finished your designs, you can export them in your preferred file format (PNG and JGEP being the most popular formats for the web) by clicking File, Export and then Export As.
From here, you can use the dropdown arrow to select your file format of choice followed by clicking the Export button to finish.
Alternatively, if you want more exporting options, you can use the Save For Web option instead. You can then finish by optimising your images before uploading them to your site for the world to admire.
Let’s Get Designing In Adobe Illustrator
If you haven’t already ventured into the world of Adobe Illustrator then I truly recommend that you give it a try. Does it look a lot more complex than the likes of Canva? Yes. But is it easy to master? Absolutely.
And it really is worth it because once you’ve found your way around the app and discovered just how much more you can do with it, your blog graphics and designs will be on a whole other level of uniqueness and look so much more professional.
So, why not give Adobe Illustrator a go to see what you can create? It truly is a powerful design tool that can be used for so many of your blogging graphics.
And if you feel like sharing any of your own stories or experiences using Adobe Illustrator, please feel free to share them in the comments below.
Happy Illustrating!

You May Also Like
- Is Microsoft Copilot (Bing Chat) Good For Bloggers
- Is ChatGPT Or Bard (Gemini) Better For Bloggers

- How To Use Google Bard For Epic Blogging