Are you wondering why your website is taking a nap instead of sprinting? Well, large images are often the main culprit behind a sluggish website. These large, unoptimised images can chew up bandwidth and leave your visitors waiting, so let’s look at how to stop large images slowing down your website by optimising them first.
It’s pretty easy to do, and it’s good practice to get into the habit of doing it with every single image you upload to your site. There are numerous free online tools that you can use, but for this tutorial, I’m going to be using two of my favourites, which are Canva and TinyPNG.
Canva is a free design tool that you can use to resize your images, and TinyPNG is a free tool that can not only compress images to make them smaller but also convert them to smaller file types for better optimisation.
The Importance Of Fast Loading Websites
You’ve undoubtedly come across websites that take forever to load and I’m guessing that when you do, you don’t stick around for long. High-quality images are often hefty in size, and while they’re great for print, they can be a burden on web load times. The key is to strike a balance between having crisp, engaging visuals and ensuring your site maintains its quick speeds.
Owning a fast-loading website isn’t just about keeping visitors happy, it’s also about SEO. Search engines, like Google, use page load time as a ranking factor.
This essentially means that if you have a slow website, it will get pushed further down the results page which is something you definitely don’t want. Optimising images becomes not just a nice-to-have, but an essential part of web development.
If you want to keep both users and search engines on your side, image optimisation should be part of your strategy. And don’t worry too much about losing image quality, there are ways to compress and format images so that they maintain their allure without weighing down your site.
By optimising your images, you’re not just making your site faster, you’re also crafting a better experience for your visitors. And a happy visitor is more likely to stick around, engage with your content, and become a regular. This isn’t just good user practice, it’s also smart business.
Optimising Your Images To Speed Up Your Website
Slashing those hefty image file sizes without compromising visual quality is a bit of an art form. When you do it right, you’re giving your users a quick-loading page that still looks fantastic. And trust me, a snappy website is a user’s dream. But how do we get there?
The first thing to understand is that not all image formats are created equal when it comes to web performance. You’ve got formats like JPEG, PNG, and now WebP, but the key is choosing one that offers the best mix of compression and quality for the web. If it’s fast loading times that you’re looking for whilst still maintaining the quality of the image then WebP is the way to go here.
WebP is a next-generation image format that provides superior lossless and lossy compression for web images. Compared to JPEG or PNG, it can make your image loads lighter with the same quality which is a real game-changer for website speed.
Webp are 26% smaller than PNGs and 25% to 34% smaller than JPEGs saving you a significant amount on file size which in turn leads to faster loading speeds. But the original size of the image you’re uploading also plays an important part here too.
Using The Right Sized Image
If you’re getting your images from image sites such as Pexels or Pixabay, for example, you should never really need anything bigger than a medium-sized image (or even a small-sized image if the content area of your website is very narrow).
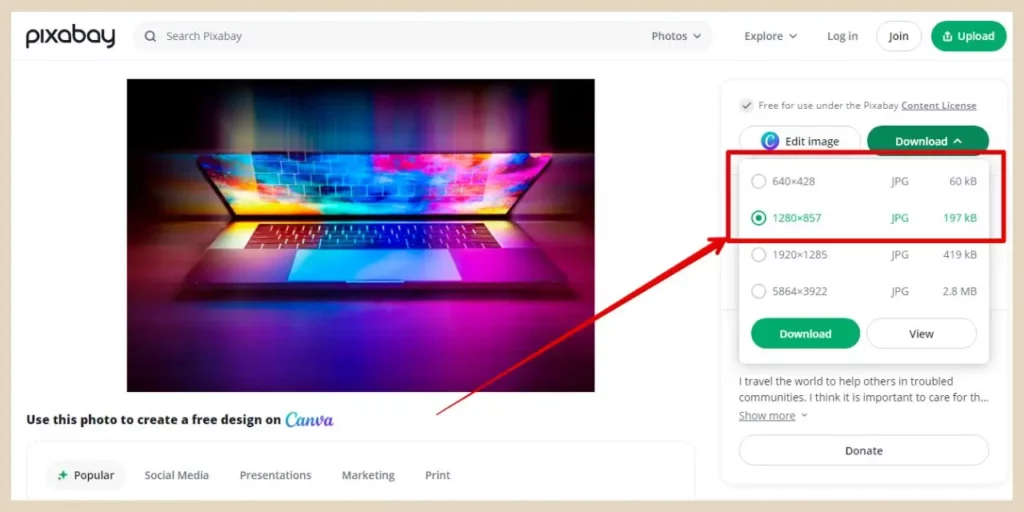
On average, these medium images are usually roughly 1200px by 800px and this is more than enough for a blog post image. Unless you’re looking to print out these images then anything bigger is just not needed and you’ll only be weighing down your page with unnecessary large image files and slowing it down in the process.
If you’re taking your own photos on your phone or camera or using images from sites that are large in size by default then it’s best to make them smaller first before you optimise them further. Phone and camera images in particular are huge and will slow down your loading times if you upload them without resizing and optimising them first.
One easy way to resize images is to use a free online design tool like Canva where you can create custom-sized blank designs that you can then drop your images into to resize them.
But before you do that, you may be wondering how to decide the perfect height and width dimensions for your website images. Well, the easiest way to do this is to check the size of the content area on your website and this is a simple thing to do using Developer tools.
Using Developer Tools To Check The Size Of Your Website Content Area
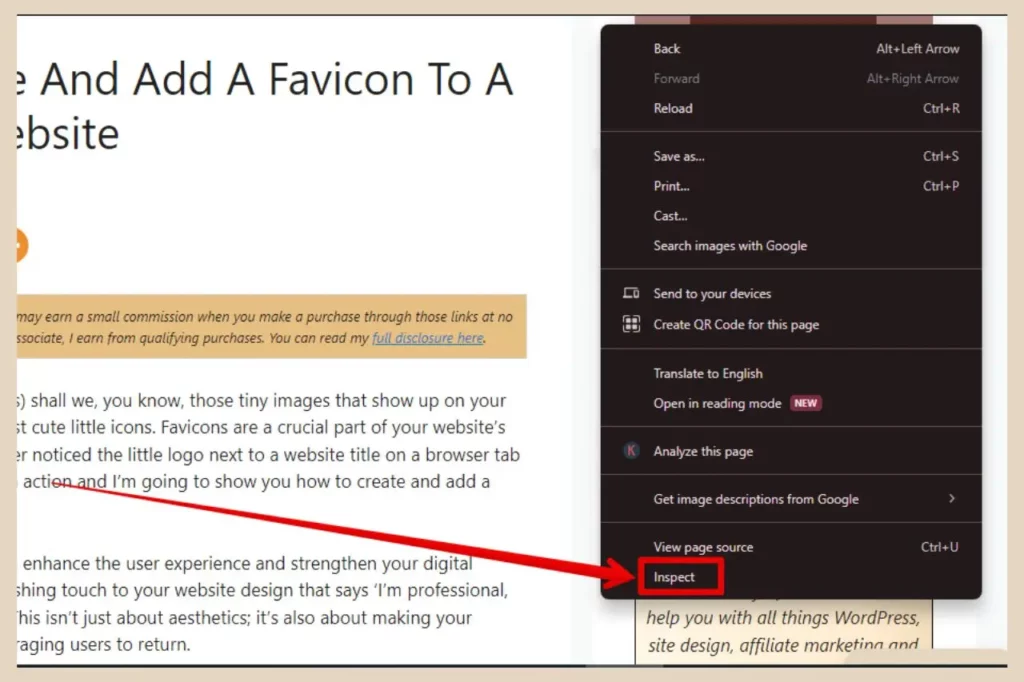
To access Developer tools, simply open your website in the Chrome browser, then right-click anywhere on the page and click the Inspect option at the bottom of the menu that appears.
If the Developer Tools panel opens up to the side of the page, click the three dots on the top right of the panel and select the Dock To Bottom button from the Dock Side options which will move the DevTools panel to the bottom of the page.
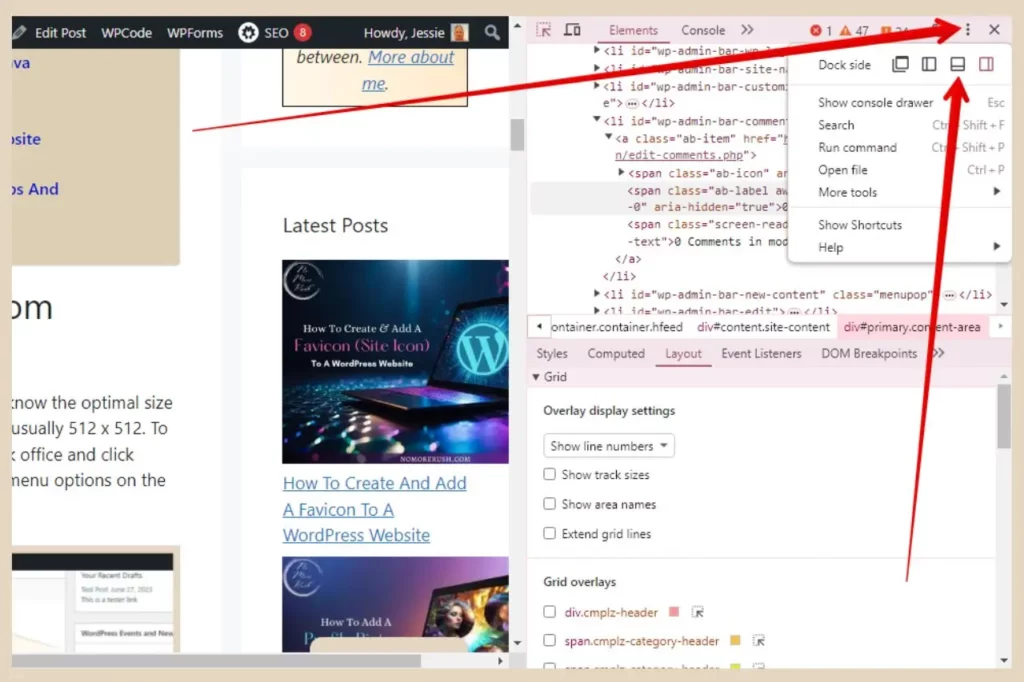
This will show your website in full width rather than the squeezed width that you see when the panel is on the side which won’t give you the accurate container sizes.
The final step is to click the Inspect button (the dotted square with the arrow inside it) on the far left of the DevTools panel.
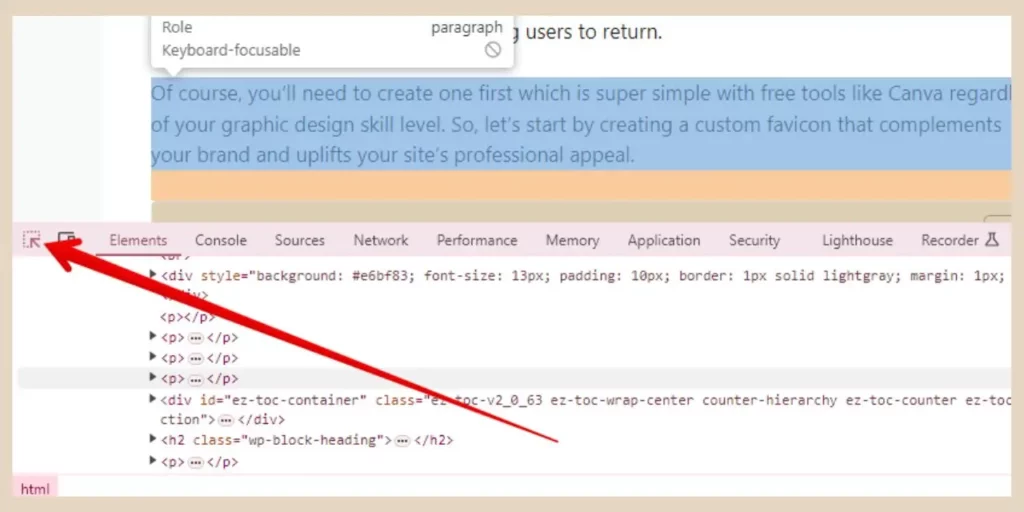
From here, you can hover over any area on your site and a small box will appear with some details about that particular area including the display width.
Finding The Width Of Your Website Content Area
So if you hover over any paragraphs or headings in your main content area, you should notice that they all come back with the same width and this is the width of your content area.
If you have any existing full-width images on your page, you’ll also notice that they too will come back with the same width even if they were uploaded to the site with bigger dimensions.
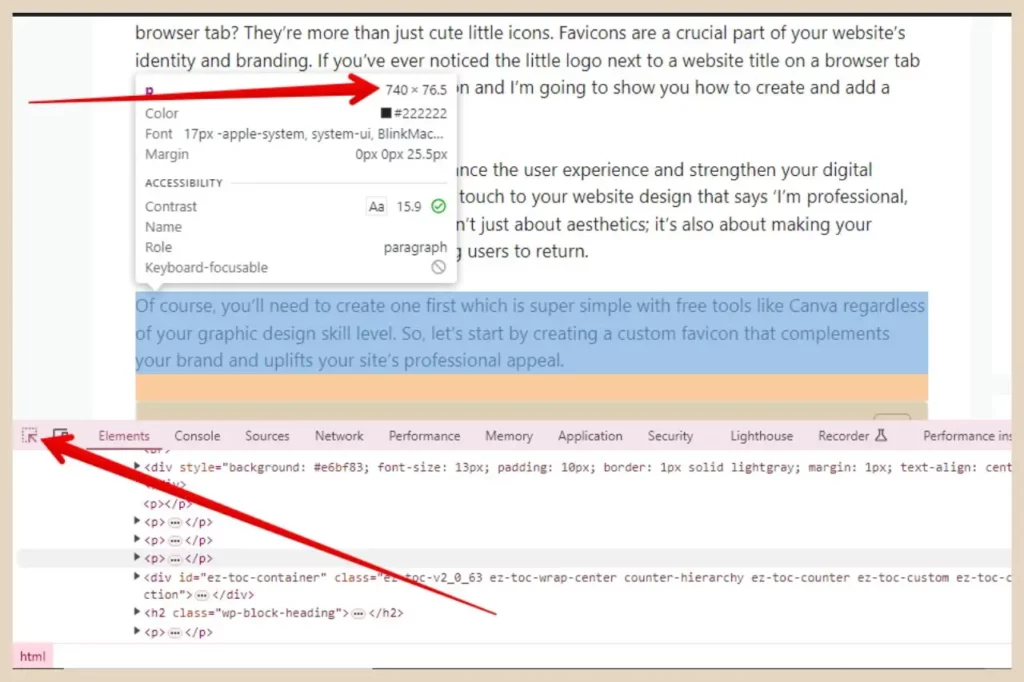
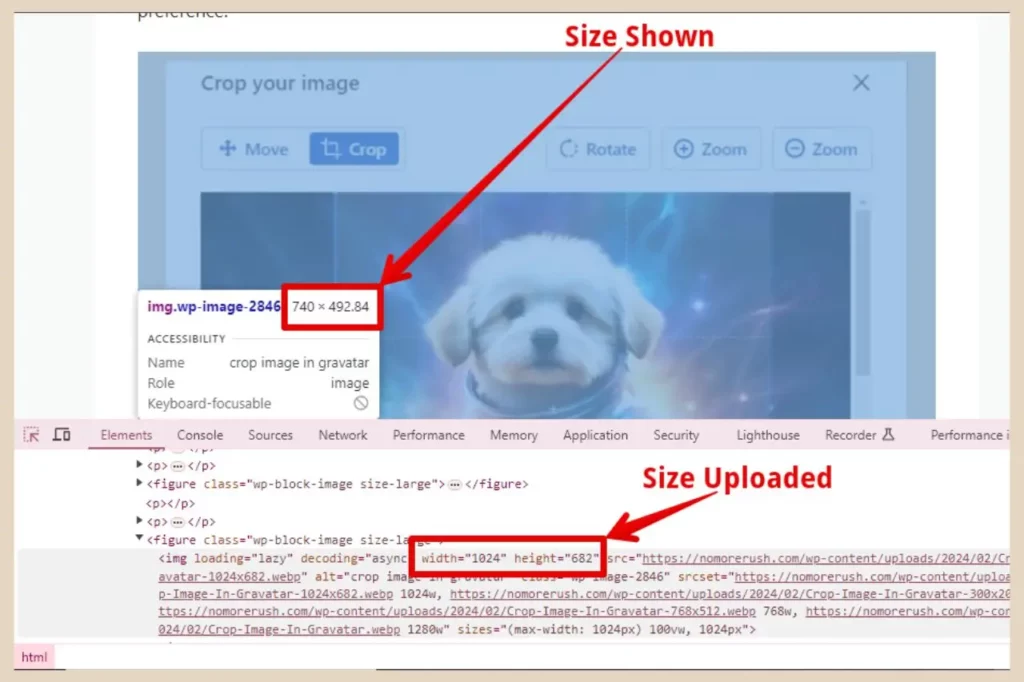
As you can see in the above image, the content area width for this site is 740 so if I upload images wider than this, they’ll just be scaled down anyway to 740 to fit the area.
This means that if I want a full-width image on my site then I don’t need to go any wider than 740px and this will save me not only a lot in file size but also loading time because the site won’t need to scale the image size down first before loading it on the page.
Choosing The Height Of Your Image
As for the height, this is purely a personal preference. Some people like a 4:3 ratio while others like a 3:2 ratio which is the most common ratio for images on sites like Pixabay, etc. You can even create your own custom sizes if you prefer a taller or shorter image.
As I like a 3:2 ratio, I’d want my images to be 740px by 493px. You can find the exact dimensions by either using an online aspect ratio calculator or by uploading a larger image of the same aspect ratio to your site, then using the Inspect option in the Developer Tools to see the exact size it’s scaled down to. Don’t worry if you see decimal points here, you can just round the number off.
You can also use the inspect technique to check your featured images in the same way to see the exact sizes being shown on your site.
Once you have the perfect image size for your website, you can then head over to Canva to resize all your images before uploading them into your media library.
Using Canva To Resize Your Images
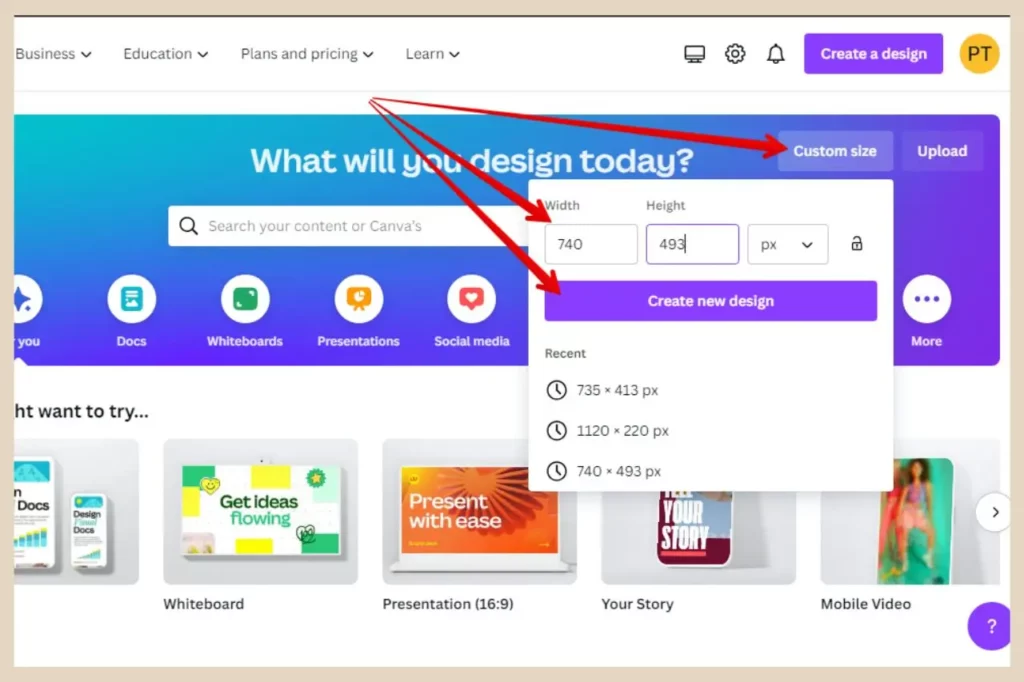
To resize your images in Canva, simply click the Custom Size button near the top right of the Canva home page. From here, enter the width and height that you need (so in my case it’s 740 by 493) in the box that appears and then click the Create New Design button.
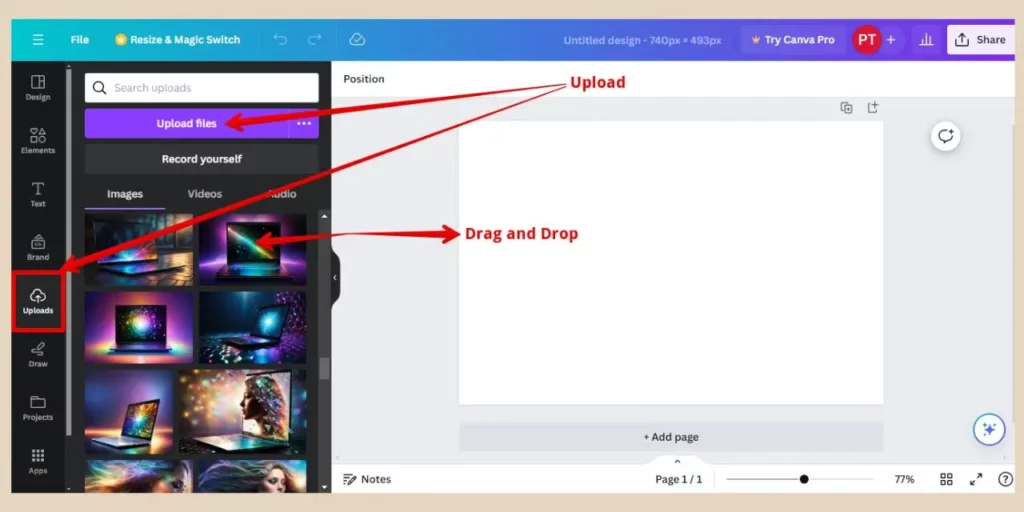
This will open up a blank design in a new tab with the size dimensions you’ve specified. At this point, you can now upload your image of choice using the Upload button, then once it’s uploaded in the image panel, you can drag and drop it onto the blank canvas which will resize the image to those dimensions.
If you use more than one image size on your website, you can create a custom size design for each one which you can then reuse for all your images of that size.
To download your newly resized image, simply click the Share button on the top right of the page followed by the Download button.
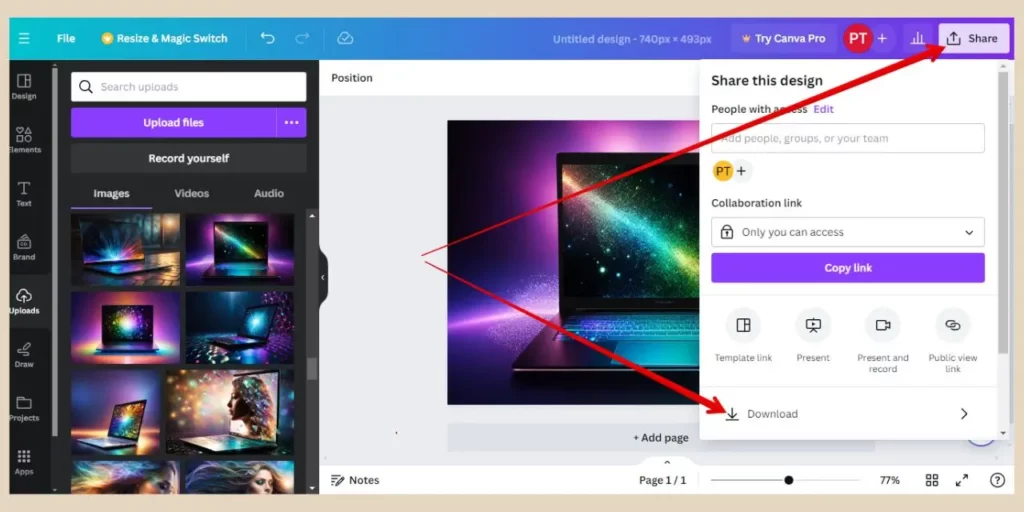
You can then use the file type drop-down menu to choose a file type so choose JPEG here then click the Download button again.

JPEGs are great for photos whilst PNGs are great for graphics but JPEGs are a much smaller file size so won’t be as heavy on your website. However, we’re about to convert this into an even smaller Webp file next so this isn’t really going to matter too much.
An Introduction to TinyPNG
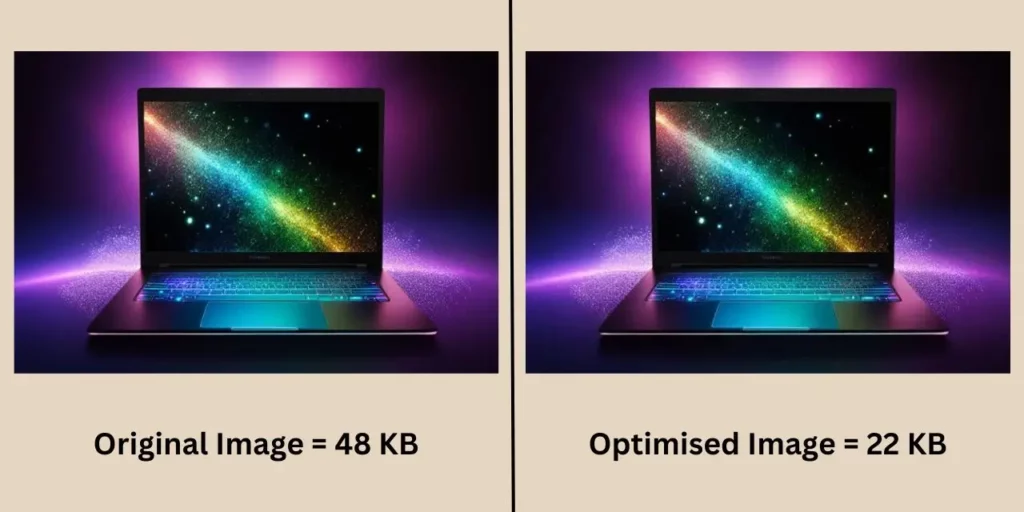
So, now that you’ve resized your image, the next step is to compress and convert this image to optimise it further, but you might be wondering what tools are best for the job. Well, that’s where TinyPNG comes in. It’s a nifty tool that’s popular in the developer and web designer community and for good reason.
TinyPNG is an online service that uses smart compression techniques to reduce the file size of your PNG and JPEG images. What’s fascinating about it is its ability to significantly compress images with hardly any noticeable change to the naked eye.
But the benefits of TinyPNG don’t stop at making images lighter. One of its biggest advantages is the ease of use. You don’t have to be a tech wizard to navigate its interface. Just upload your images and let TinyPNG do the heavy lifting.
And if you want to convert your image into the smaller next-generation Webp, you can do that too. There’s also another added layer of convenience. Alongside compressing and converting individual images, TinyPNG can handle multiple images at once. With batch processing, you can compress up to 20 images or convert up to 3 at once, streamlining your workflow and saving time.
Using TinyPNG To Compress And Convert Your Images
So, head over to TinyPNG. You don’t need to create an account to use it so there’s no signup/signin required here. If you only want to compress your images, then simply drag and drop them into the box area or click the box to search the files on your device.
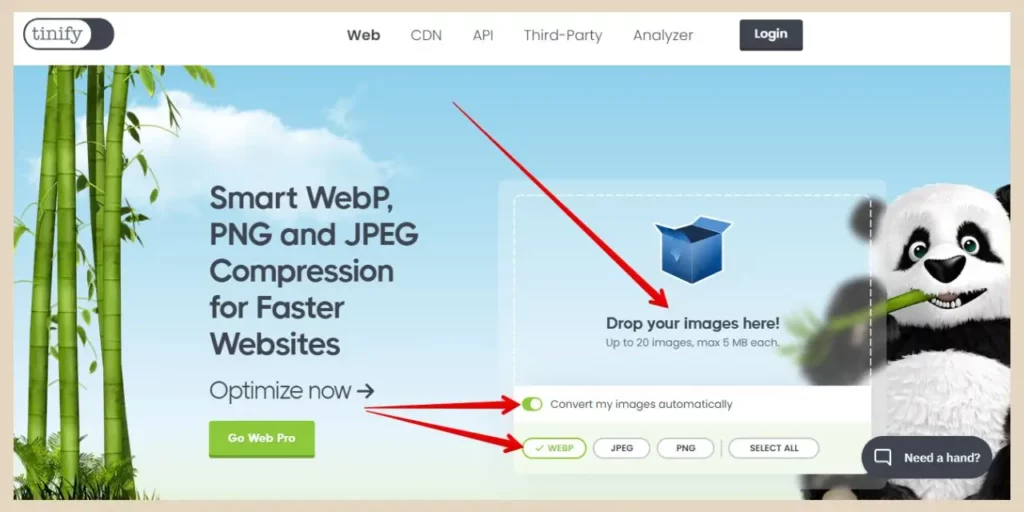
If you want to convert them to Webp as well, then click the Convert My Images Automatically button and then choose Webp from the options listed.
From here, you can then drag and drop or click to search and TinyPNG will compress and convert the images you add which you’ll find the results of beneath the drag and drop box.
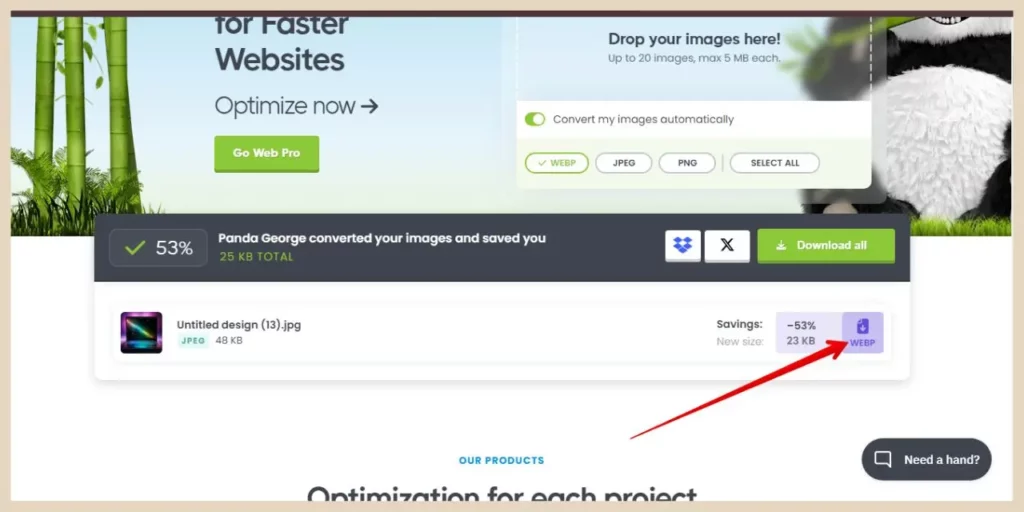
You’ll be able to see the original file size, the new file size and the percentage that TinyPNG just saved you.
To download your newly compressed and converted image, simply click the Download button on the far right of the result and your new optimised image will be ready to upload to your website.
And if you reach the max 20 compressed images or 3 converted images, simply refresh the page to continue compressing and converting.
Let’s Get Image Optimising
And there you have it. Some simple steps to help reduce the size of your images so that your website loads faster.
Remember, staying informed and applying the latest advancements, such as WebP, keeps your website running smoothly and your users happy. So why wait? Start resizing your images with Canva and compressing and converting them with TinyPNG, and watch your site speed soar!
Happy Image Optimising!

Helpful Guides to Read Next
These beginner-friendly guides will help you keep building your blog step by step.
- How to Add a Professional Author Image to WordPress
- How to Create a Favicon That Makes Your Blog Look More Professional
- How to Create Clear Screenshots That Improve Your Tutorials
- How to Create a Professional Blog Logo Without Hiring a Designer Using Canva Free
- The WordPress Plugins Every New Blogger Should Consider
Ready to Master Your Digital Canvas?
A great blog needs to be both functional and beautifully organised. Explore my core Build Hub to find more tutorials on configuring WordPress, perfecting layout anatomy, and setting up high-conversion frameworks.

Jessie
Founder, nomorerush.com
Hi, I’m Jessie — founder of No More Rush. I help beginners build profitable, beginner-friendly blogs without the overwhelm or unrealistic expectations you see online. Everything here is built around simple, structured steps so you always know what to do next.