As a blogger, there have probably been numerous occasions where you’ve needed to take a screenshot for one of your blog posts but what’s the best way of doing it? There are several tools that you can use to take screenshots for your blog but for this tutorial, I’m going to be showing you one of my favourites which is a free tool for Windows called ShareX.
As my site is predominantly tutorials, I need to take a lot of screenshots and by a lot, I mean A LOT!!!. So I need a tool that will allow me to take not only different-sized screenshots but also let me add my own text, arrows, lines, etc to the captured image.
Now Windows does come with its own built-in screenshot tool but it doesn’t necessarily have the same level of features as many third-party screenshot tools do.
Built-In Tools Vs Third-Party Tools
If you’re not already aware, Windows has a built-in screenshot tool called Snipping Tool which you can find easily using the search box in your toolbar.
It’s a pretty simple tool to use and if you’re only planning to take simple screenshots with maybe some text added to the capture, then you may not need to look any further.
However, third-party tools like ShareX will often offer more features and editing options. With ShareX, in particular, not only are there more editing options and features such as capturing entire pages but there’s also a screen recording feature so you can record your screen (as .mp4 or .gifs) as well as take screenshots.
There’s a lot you can do in ShareX so it may look a little complex at first but I promise you, it really isn’t once you know your way around the menus. So let’s take a look at how to install it and how to use it.
How To Take Screenshots For Your Blog With ShareX
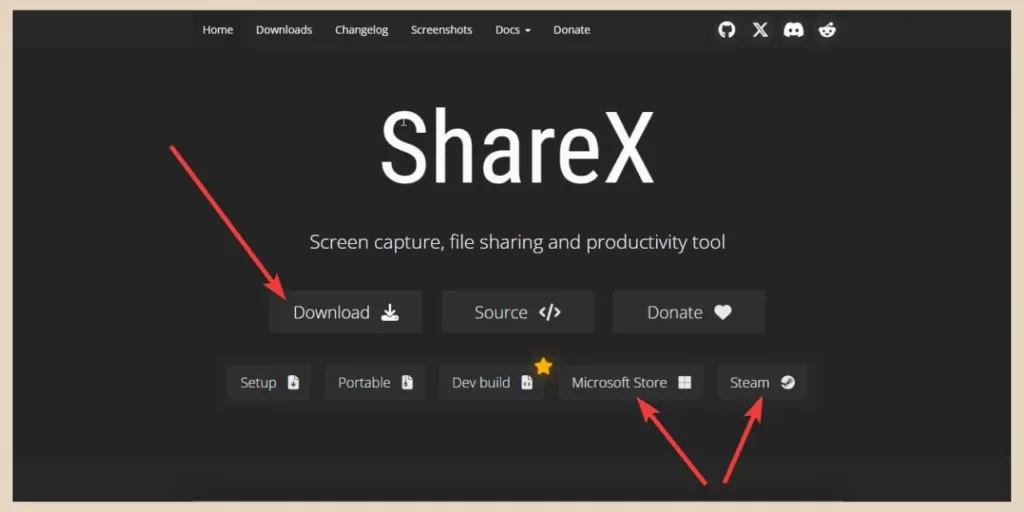
So, first, head over to ShareX and click the Download button. From here, a selection of further options will appear beneath it where you can choose to download it from the Microsoft Store or Steam.
Once it’s downloaded, you’ll be able to access the tool from your system tray, although I’ve also created a desktop shortcut and pinned it to the taskbar for easier access.
To access the tool, click on the ShareX icon to open up the tool window. From here, you’ll see a lot of different menu options on the left of the window that let you do a multitude of things with the tool.
You’ll also notice some keyboard shortcuts on the right that you can use to speed up your workflow. However, these will be replaced with previews of all your screenshots and screen recordings once you start taking them.
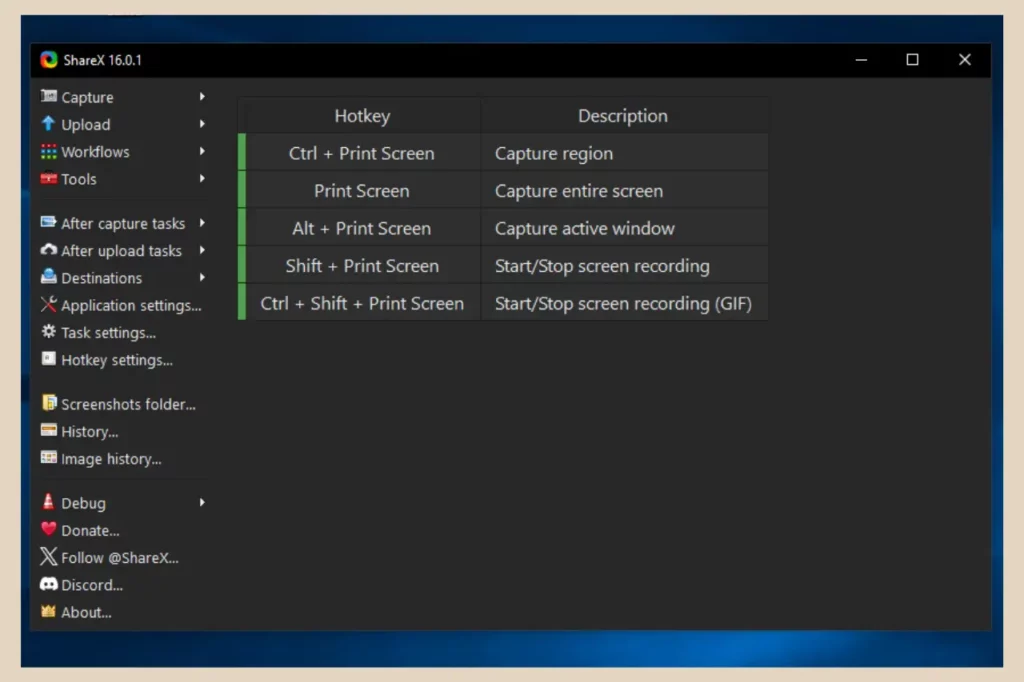
To be honest, as much as there are a lot of menu options here, you’ll probably only ever be using a small number of them so don’t worry too much about how busy it looks. It’s very easy to use once you know where everything is.
Turning On The Image Editor
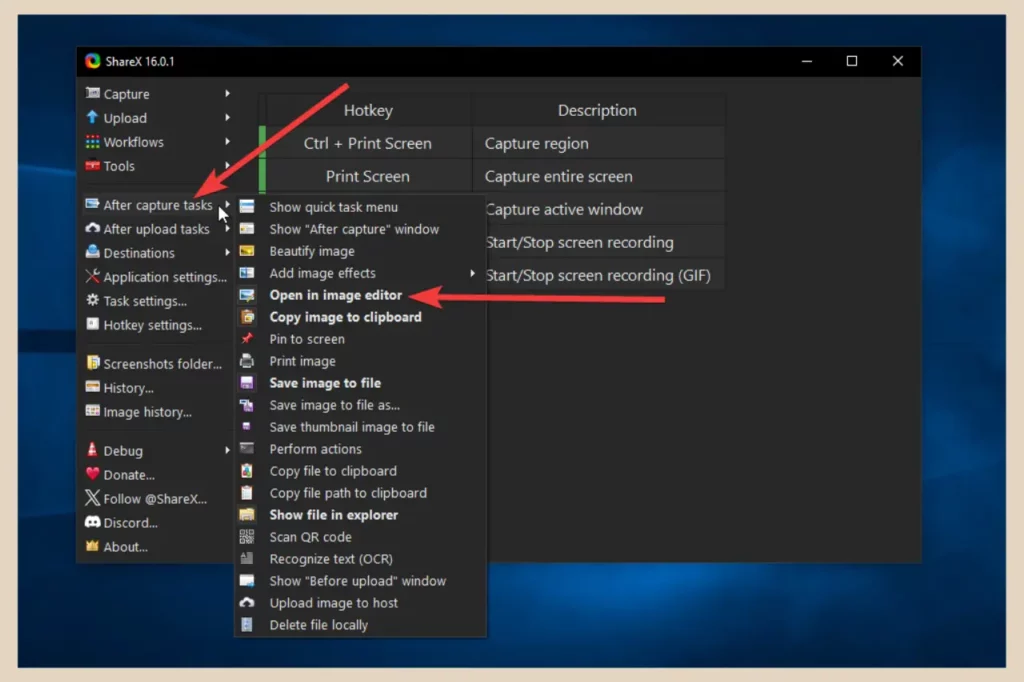
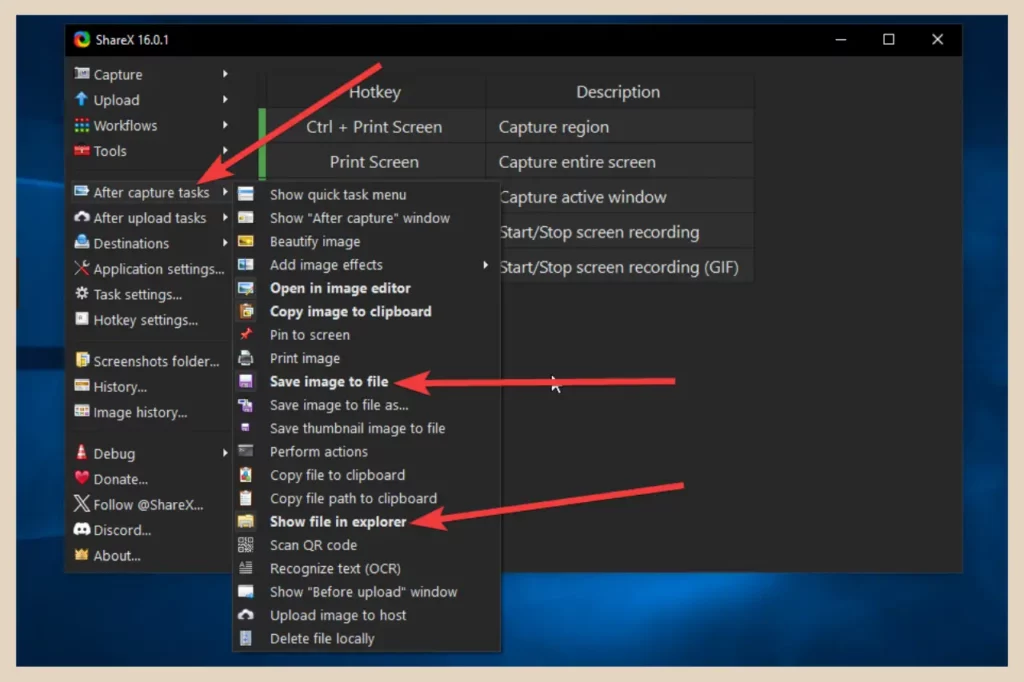
There is one thing that’s worth mentioning before you start taking your screenshots. If you want to add text, arrows, etc to your screenshot then you’ll want to turn on the Open in Image Editor option from the After Capture Tasks menu.
This will open up your screenshots in the image editor immediately after you’ve taken them so that you can edit them further.
You can add annotations before you take your screenshots but if like me you prefer to do it afterwards, then you’ll want to have the image editor enabled.
To do that, click on the After capture tasks from the menu which will open up a bigger menu to the right of it. There is a lot more you can add here which I’ll cover in a moment but for now, make sure Open in Image Editor is selected (it will be bold when enabled).
Set Up Where Your Files Are Saved
One other thing worth doing before you get started is to set up where you’d like your files to be saved on your device.
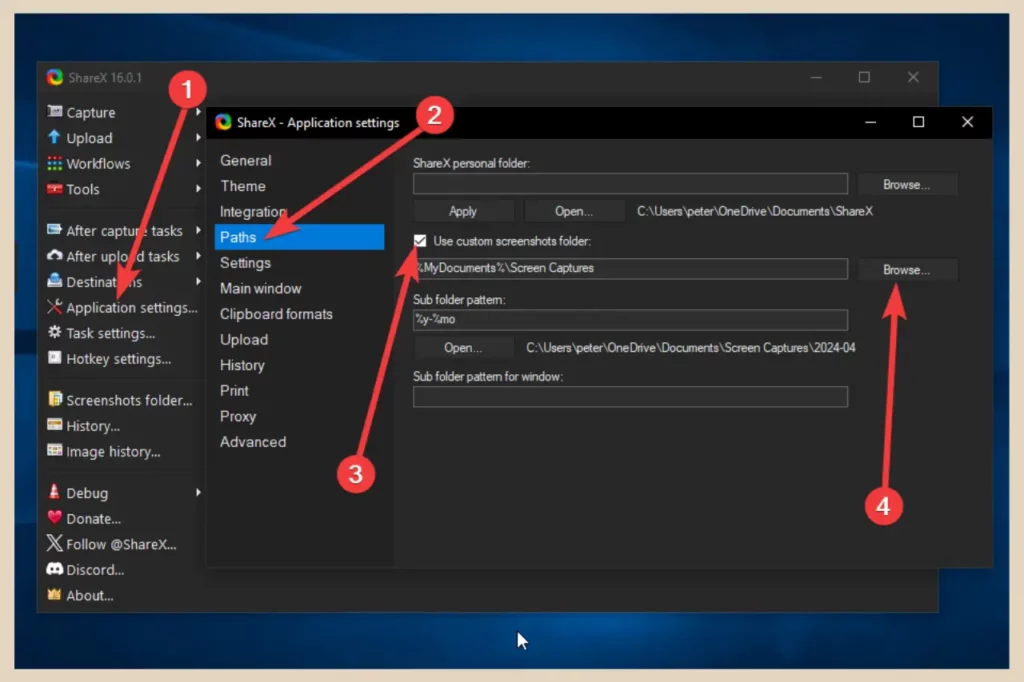
To do that, click Application Settings and then click Paths. In the paths settings, click the checkbox for Use custom screenshots folder and then click the Browse button to choose where you’d like to save your files.
Next, click After Capture Tasks and click both Save Image to File and Show File in Explorer. This will make sure your files are saved to your chosen folder.
For screen recordings, it will also open up your file explorer and show you your saved screen recorders every time you create one.
Taking Your Screenshots
To take screenshots with the ShareX tool, click the Capture option at the top of the menu. This will display another new menu to the right which will give you several different ways to take your screenshot.
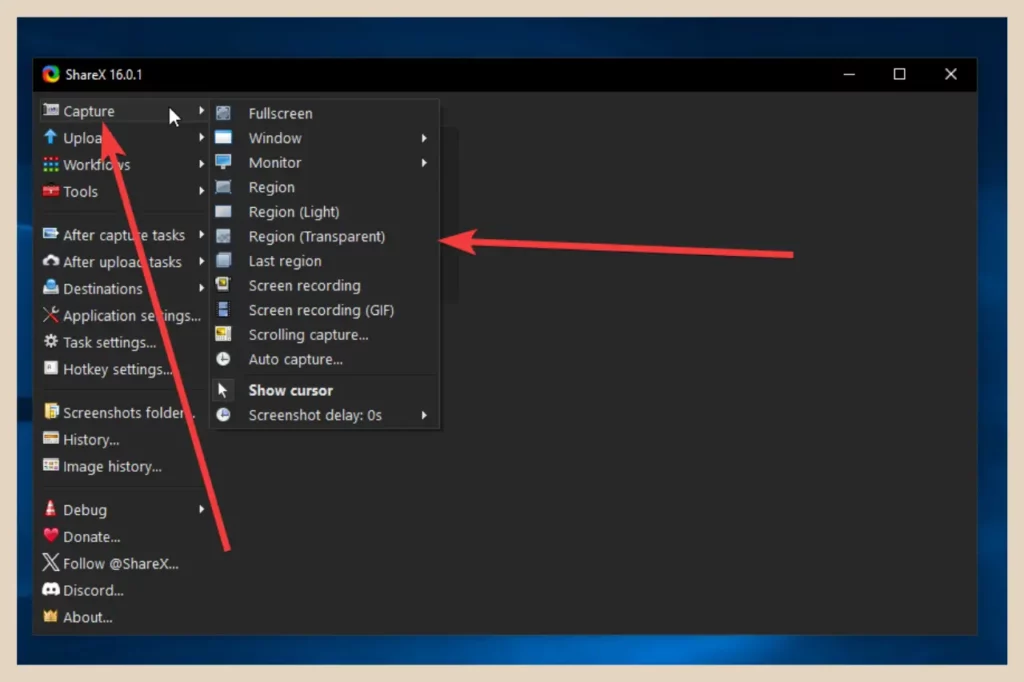
Depending on the type of screenshot you’d like to take, choose the one that best suits your needs. Below is a list of the different capture options and how they differ.
- Fullscreen – Captures the full screen you’re currently viewing.
- Window – Captures the full screen of a window you currently have open.
- Monitor – Captures the full screen of a particular monitor if you’re using more than one.
- Region – Captures a selected area of the screen you’re viewing (moving your cursor will automatically suggest areas or you can click and drag over your chosen area. You can also add text, arrows, etc before taking the screenshot).
- Region (light) – Same as above but with click and drag ability only (no suggested areas or ability to add text, arrows, etc before taking the screenshot).
- Region (Transparent) – Same as Region (light) but the screen doesn’t freeze while you’re preparing to take the capture (you’ll only notice the difference between light and transparent if there’s motion on the page). For example, Transparent makes it easier to that a screenshot of a certain part of a video.
- Last Region – Captures the last region you viewed.
- Scrolling capture – Captures the full scroll of a page.
- Auto capture – Set a timer to repeatedly take automatic captures every few seconds.
- Show cursor – Show or hide the cursor from the screenshot.
- Screenshot delay – Delay screenshot by a chosen number of seconds.
You’ll also notice two screen recording options here which I’ve omitted for now but I’ll cover those when we get into screen recording further down.
Using The Region Screenshot Option
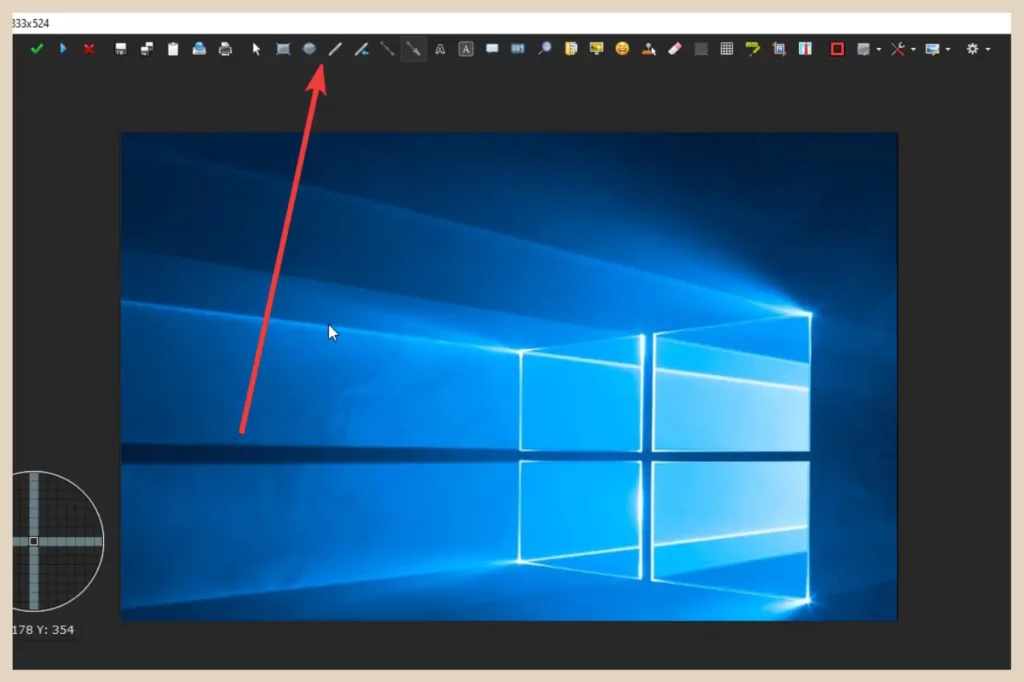
For the most part, you’ll probably be using the regular Region option more than any of the others as this one has the most flexibility.
So, once you’ve selected it, your cursor will change and moving it around the screen will place a broken white line box around different areas. If you’re happy with one of the selected areas, simply left-click with your mouse while that area is selected and that area will be captured.
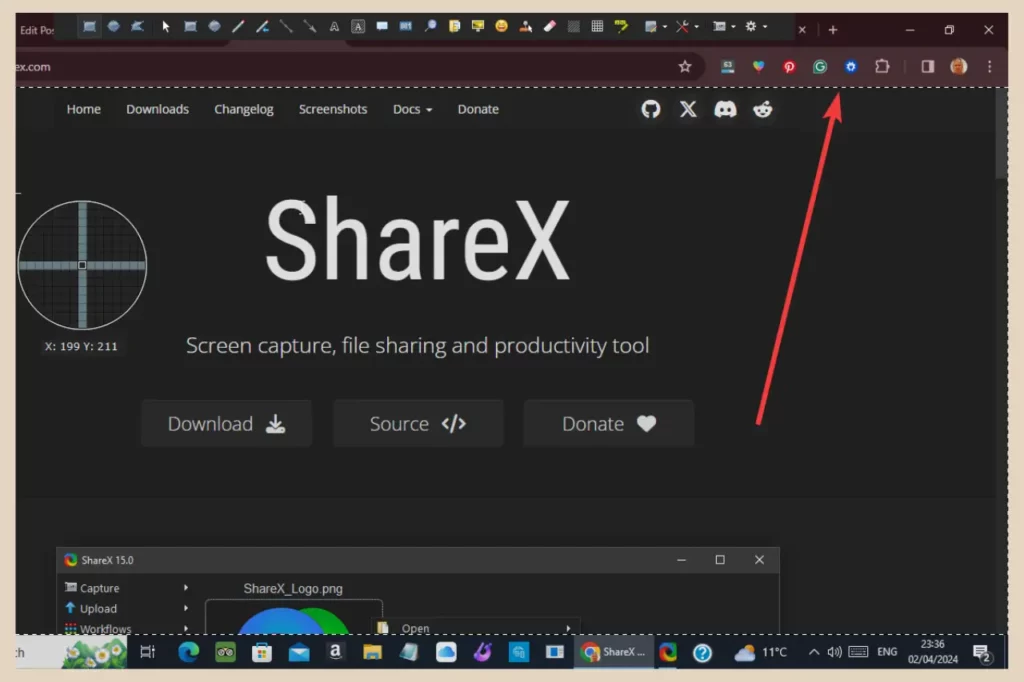
Alternatively, if you only want to capture a certain area on your screen, you can click and drag your cursor over the area you want to capture and release it when you’ve captured the area to your liking.
As I mentioned above, with the regular Region option, you’ll see a toolbar across the top of the screen which you can use to add text, arrows, etc to the screen before taking the screenshot.
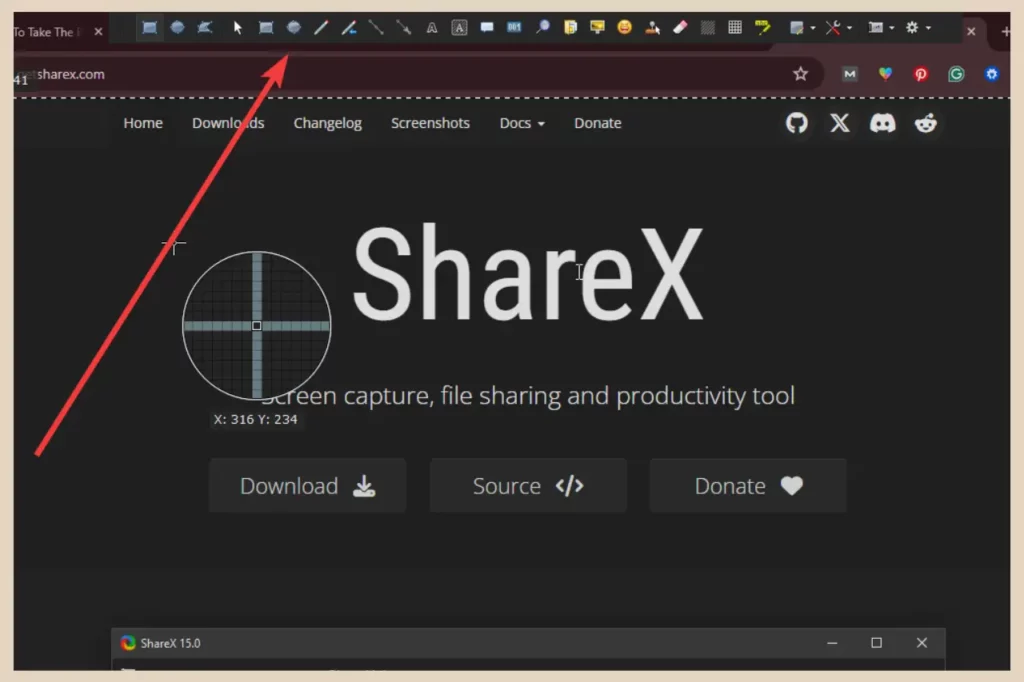
The editing options here are almost identical to those in the image editor (minus the save and upload options) so I personally prefer to do it after the fact but the option is there if you want to do it beforehand.
Once you’ve taken your capture, it will then open up in the ShareX image editor where you can now make changes to your screenshot and I’ll show you what you can do here next.
Quick Note: The first time you take a screenshot, you’ll get a message about ShareX automatically uploading your captures which you can choose to keep on or turn off. I’ve turned mine off because I very rarely use the upload feature and would rather do it manually as and when I need it but choose your own preference here.
Using The ShareX Image Editor
Once you’ve taken your screenshot and it opens up in the editor, you’ll notice an almost identical toolbar across the top of the page if you want to edit it.
This window does tend to open in a smaller size which will hide some of the icons so it’s not a bad idea to maximise the window to see the full range of options.
There’s a lot you can do here so the easiest way to familiarise yourself with all the different options is by hovering over each icon which will let you know what each one does.
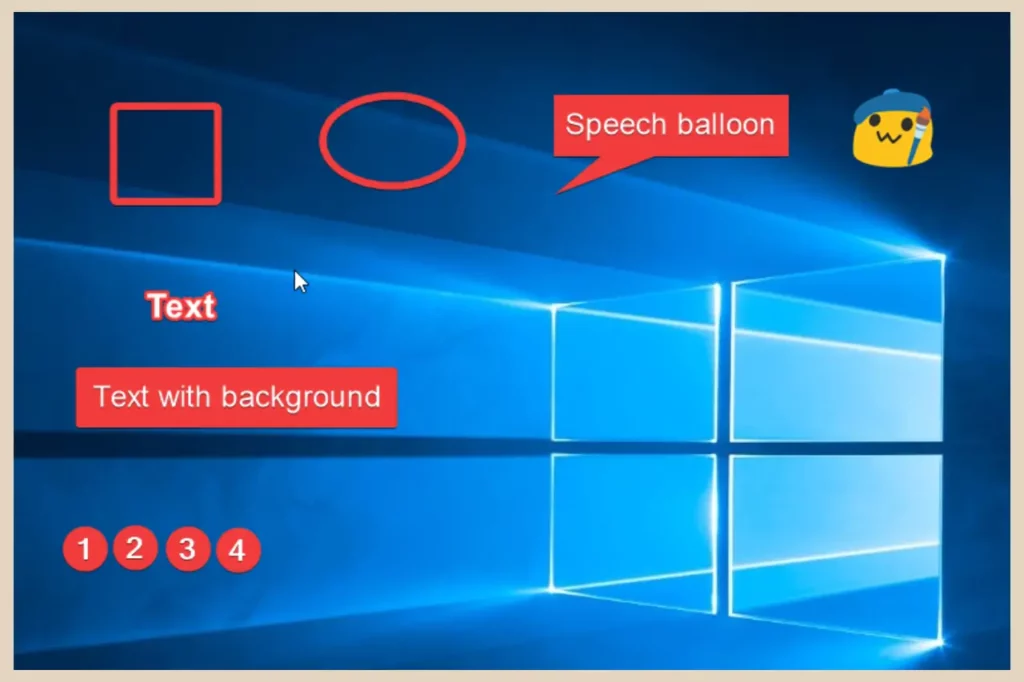
In the screenshot above, I’ve added a few different things to give you an idea as to what you can do in the editor but below is a more thorough list of the things you can do with your screenshot.
- Add an arrow.
- Add a rectangle/square – outline or filled.
- Draw a line.
- Add an ellipse/circle – outlined or filled.
- Use a brush/highlighter.
- Add text.
- Add text with a background.
- Magnify an area of your screenshot.
- Add a speech balloon.
- Add numbered steps.
- Use the smart eraser to erase parts of your screenshot (automatically refills the area with the surrounding colour so the erased section is unnoticeable).
- Add stickers/emojis.
- Blur or pixelate a part of your screenshot.
- Crop your screenshot.
- Resize your screenshot.
I actually prefer to crop and resize my screenshots in Canva but the option is there if you want to do it directly in the editor.
Changing The Colour And Size Of Your Annotations
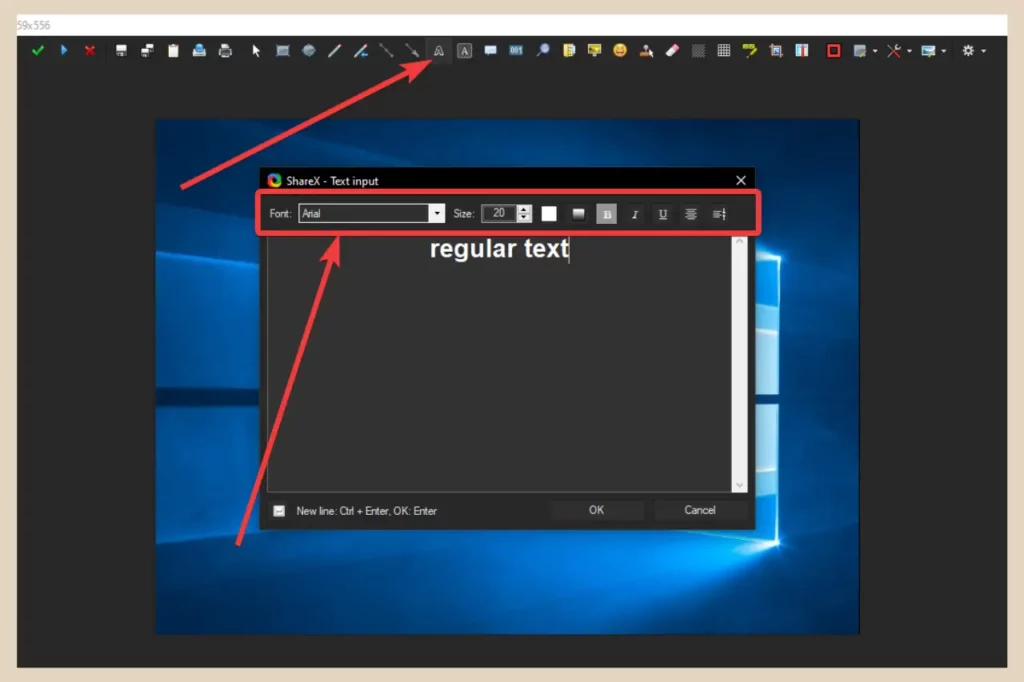
If you want to change the colour or size of your annotations then this will depend on the object you have selected. With regular text, for example, you can change the font, size and fill colour from the text window that appears.
The same applies to text with background. However, if you want to change the outline colour of regular text or the background colour of text with a background, you’ll need to use the colour icons near the right end of the editor toolbar.
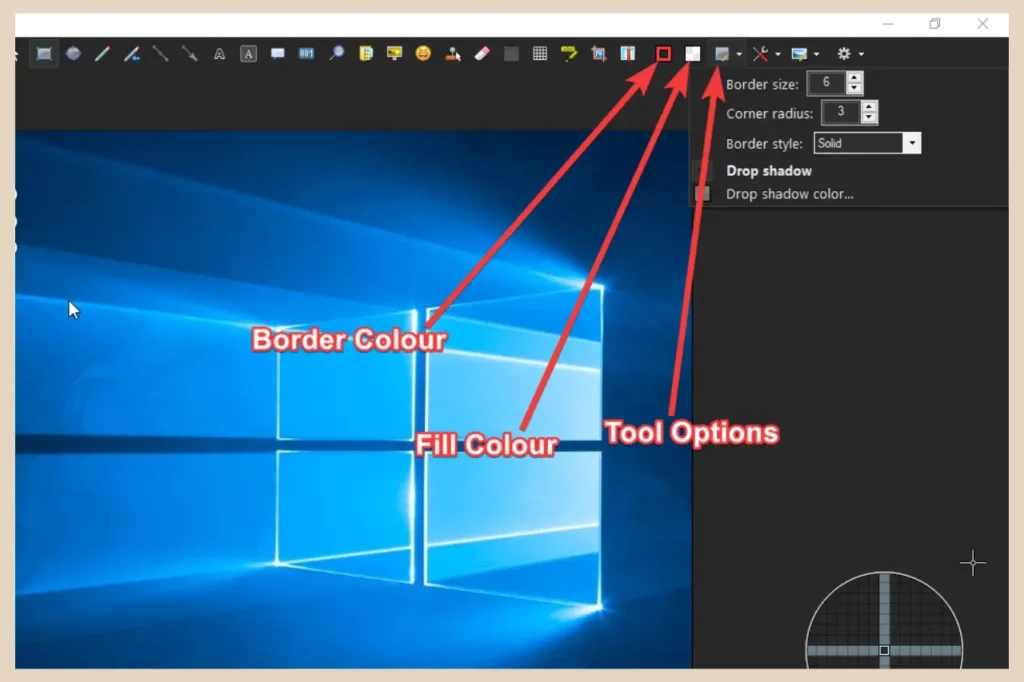
These colour icons are also how you change the fill and border colours of any shapes, arrows, etc that you add to your screenshots.
If you want to change the thickness of shape borders, lines, arrows, etc, you can do that by clicking on Tool Options and adjusting the border size from the small control box that appears.
Saving/Uploading Your Screenshots
Once you’re happy with your screenshot, you can save, save as or upload it using the icons on the left of the editor toolbar.

For uploading, you’ll need to set up your upload preferences first to specify where you want your captures to be uploaded to. So, click Destinations from the main menu followed by Destination Settings.
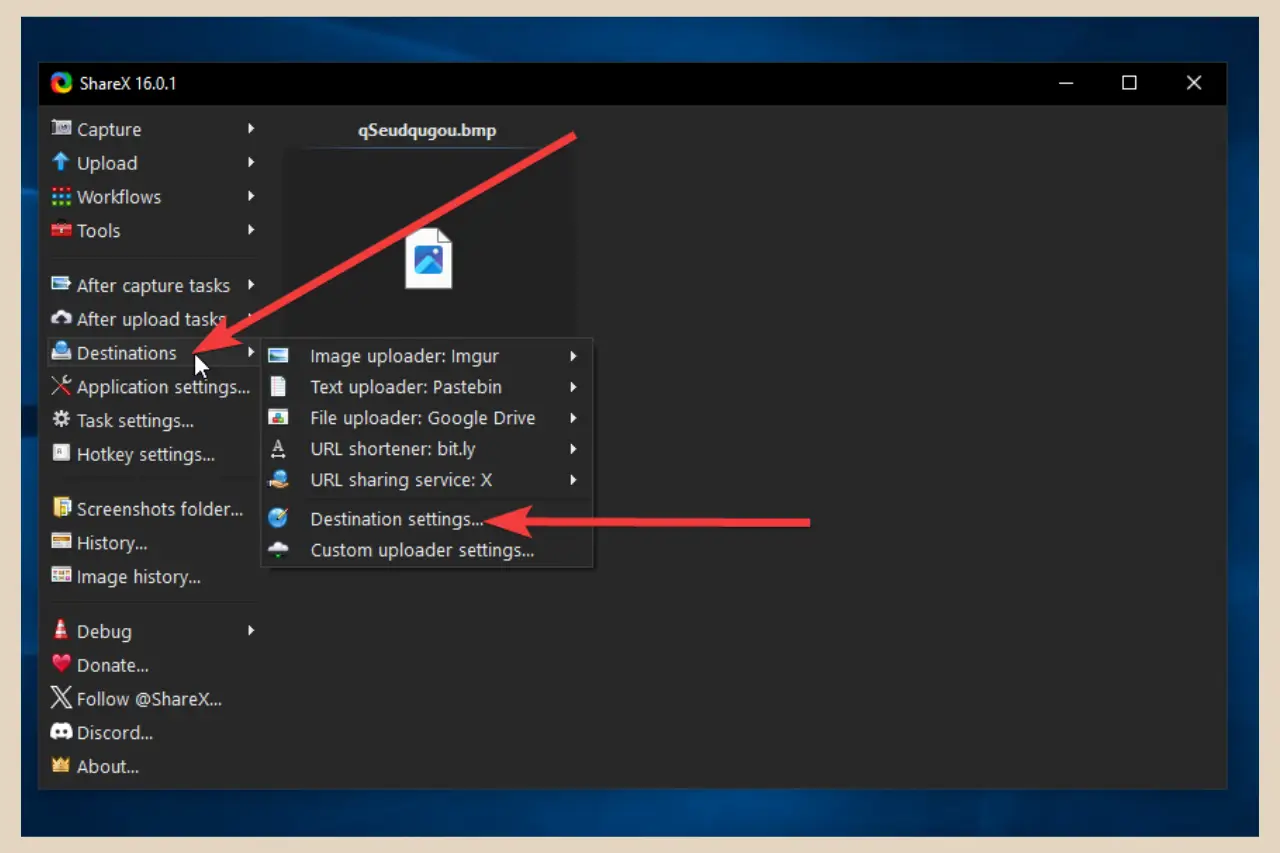
This will open up a new window where you can select and sign in to the different platforms you’d like to use for your uploads.
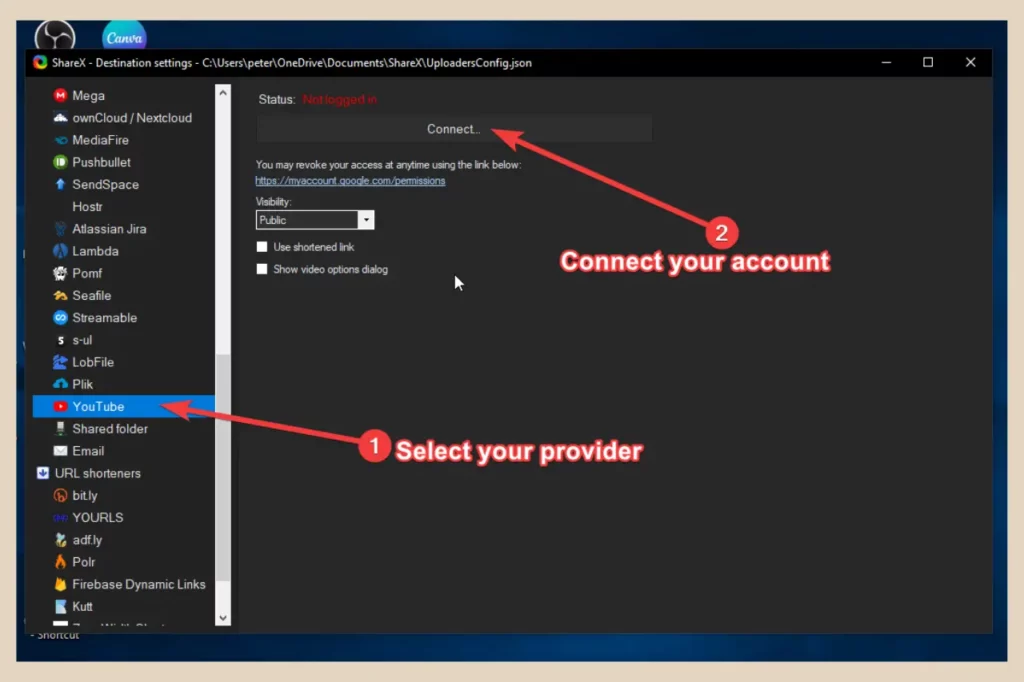
Once you’ve connected to the platforms you’d like to use, you can then select which platforms you want to use for the different upload methods.
To do that, click Destinations again from the main menu and this time, choose the upload method you’d like to use followed by the platform you’d like to upload to.
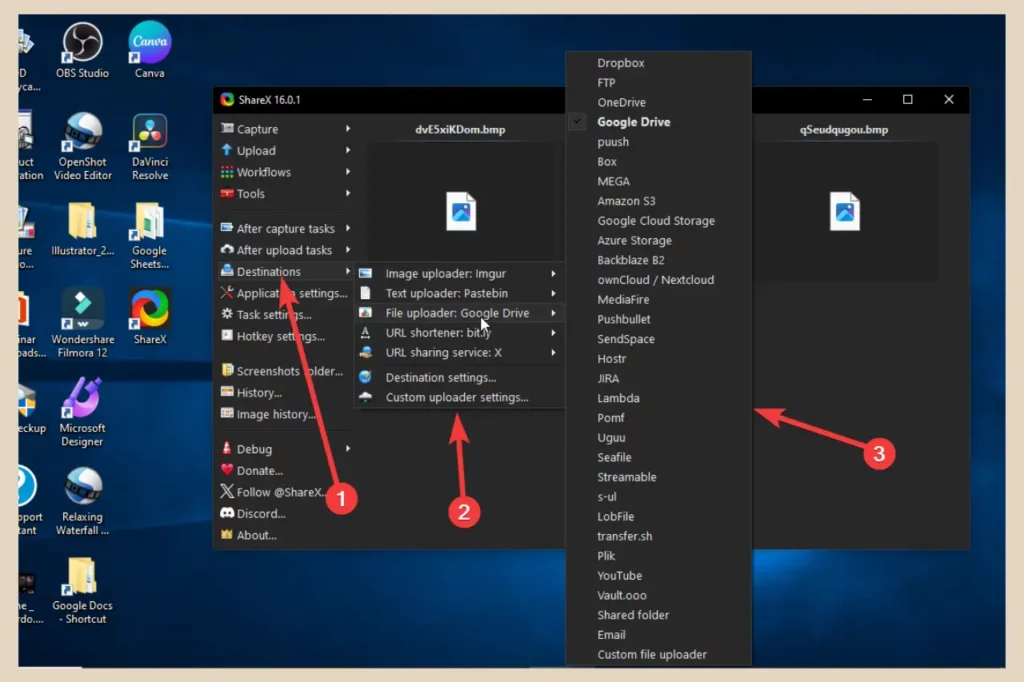
For example, if you want to upload a file to YouTube, you’d select File Uploader followed by YouTube. Once you’ve done this, these platforms will be the default for your upload methods but you can change these at any time when you want to upload to different platforms.
Using The ShareX Image Beautifier
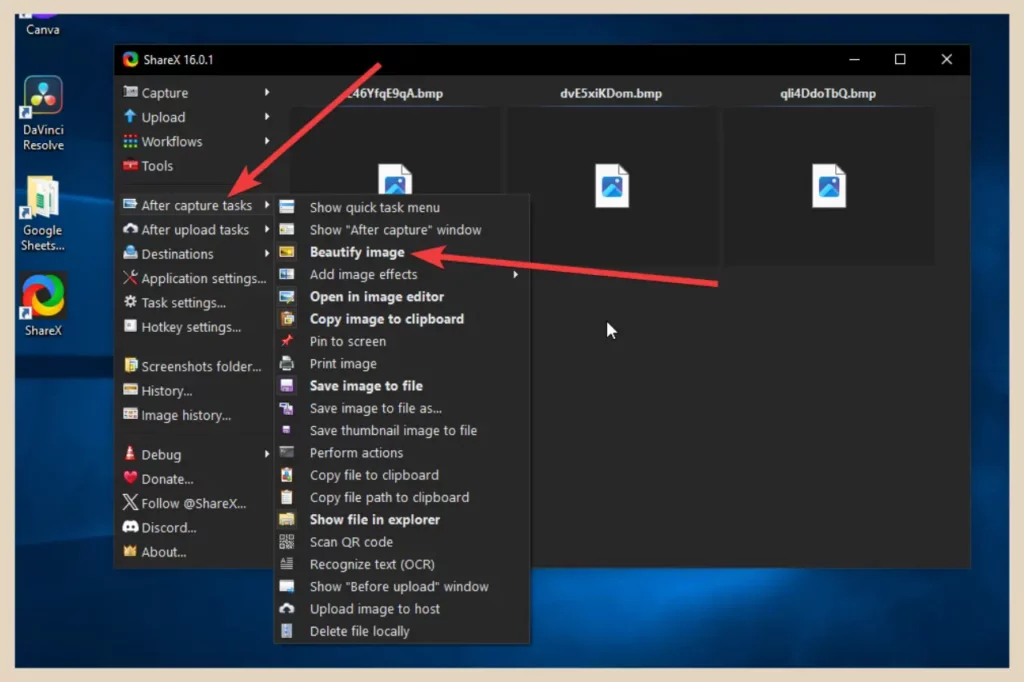
The ShareX Beautifier is a tool that lets you add more pizazz to your screenshots. To use it, click After Capture Tasks and then select Beautify Image. This will now automatically open up the image beautifier editor after you take a screenshot.
The Beautifier editor will open up first before the main image editor and here you can add borders and shadows to your screenshot.
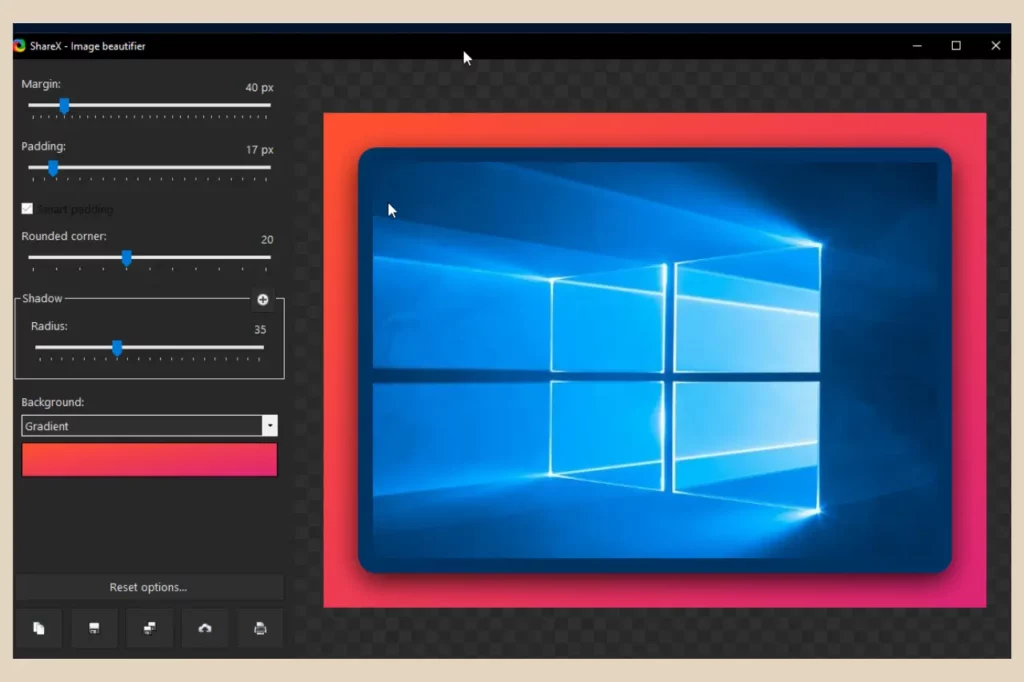
The beautifier will add its own default design to your screenshot as per the image above but you can adjust the colours, margins and shadows using the sliders on the left-hand side.
Once you’re happy with the beautified design, just click the X to close the editor window and your beautified image will reopen back up in the main image editor with your beautified surround.
Using ShareX Image Effects
Image effects are similar to the beautifier in that they add a fancy border around your screenshots and you can choose premade effects from ShareX to use on your captures.
But first, you’ll need to add or create these effects so click Task Settings and then click Effects from the new window that appears.
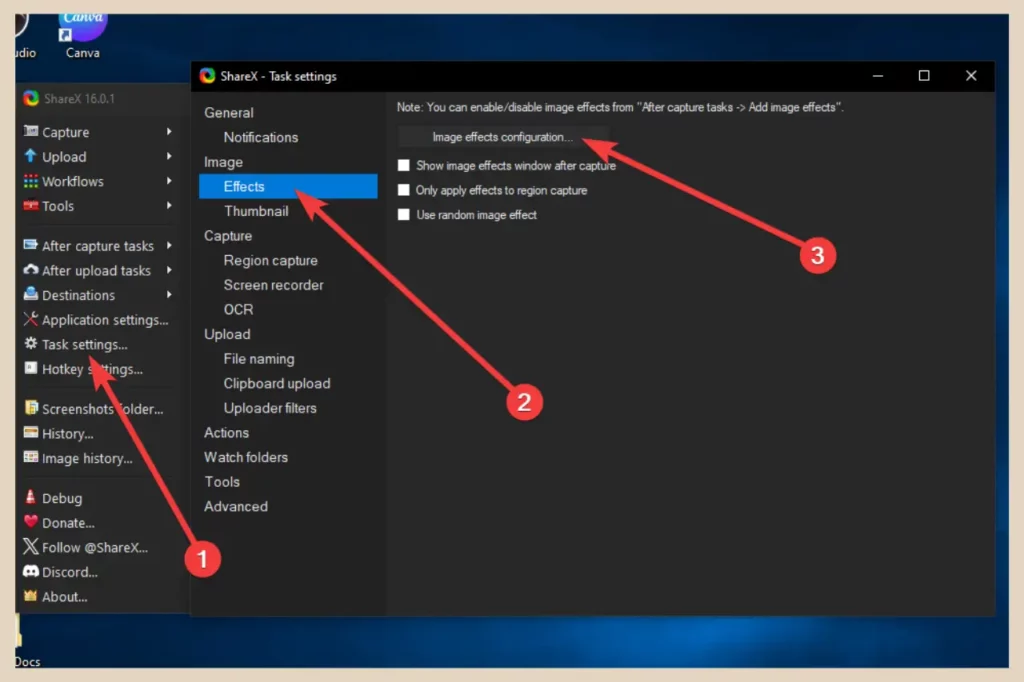
In the effects settings, click the Image Effects Configuration button which will open up a new image effects window. In this window, you can create your own effects or customise effects you’ve downloaded from ShareX.
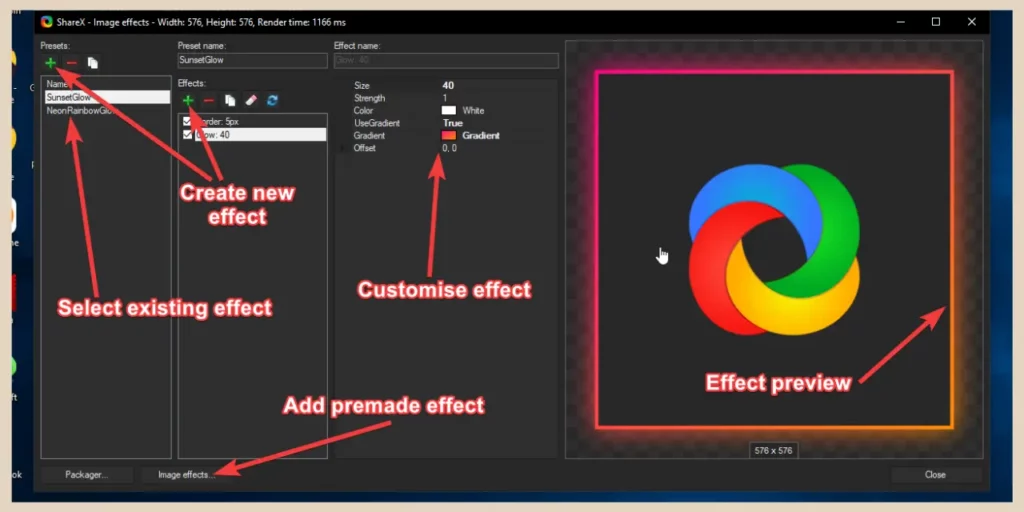
This is also where you can access the premade effects from ShareX so to do that, simply click the Image Effects button at the bottom of the page and this will take you to the ShareX image effects page.
From here, just click on any effect that you’d like to use to start downloading it and it will be added to the tool (click on it once it’s downloaded to add it).
Adding Image Effects To Your Screenshots
To add your image effects to your screenshot, click After Capture Tasks and then click on Add image effects to turn it on. You’ll then see another small menu where you can select the effect you wish to add if you have more than one effect saved.
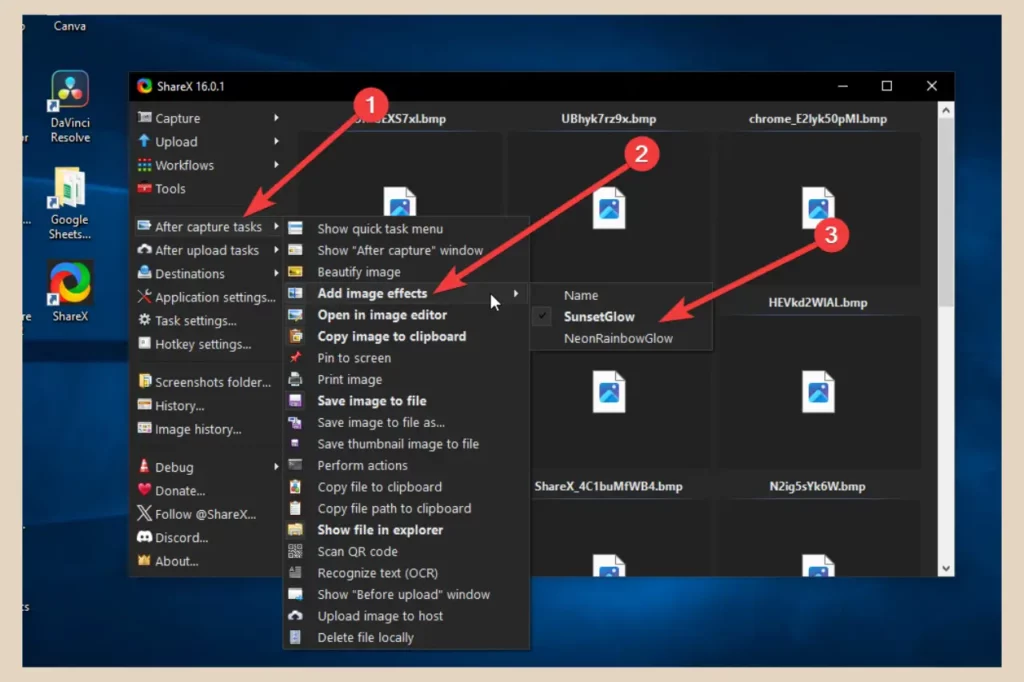
Once you’ve set this, your image effect of choice will automatically be added to every screenshot you take unless you turn it back off or choose a different effect to add.

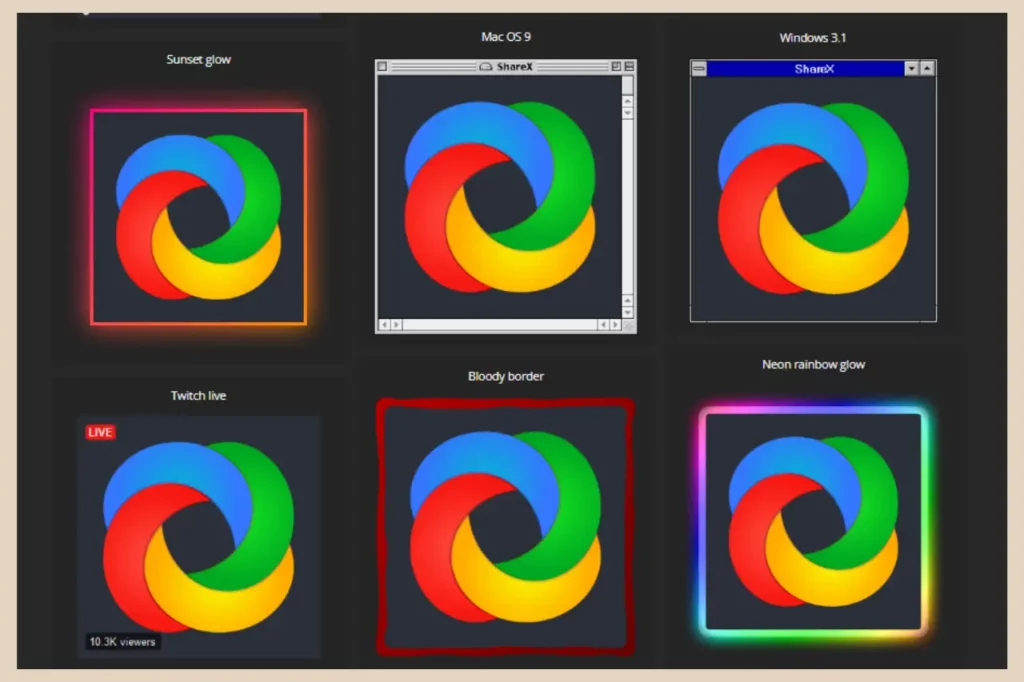
This screenshot above is just one example of some of the premade image effects that you can download from the ShareX image effect page and as you can see, they’re pretty snazzy.
How To Record Your Screen With ShareX
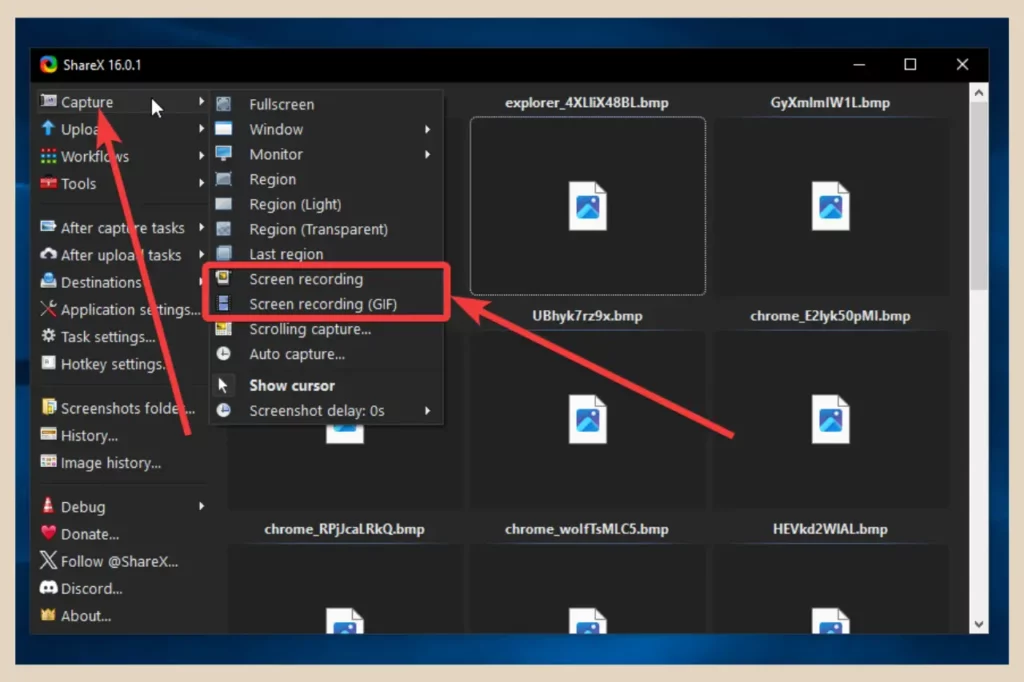
As I mentioned earlier, you can also record your screen with the ShareX tool which is extremely handy for anyone creating tutorials. To do that, click Capture and then click either Screen Recording to create an mp4 or Screen Recording (GIF) to create a GIF.
Much like the region capture, hovering your mouse will suggest areas for you to record or if you only want to record a small area, you can click and drag to record just your chosen area.
As soon as you confirm your recording area, ShareX will automatically start the screen record instantly although you will have a few seconds to minimise the ShareX tool window.
When you’re recording, you’ll notice a small red circle in your taskbar which is what you need to click when you want to stop the recording. If you right-click on it, you’ll also have the option to pause or abort the recording as well as stop it.
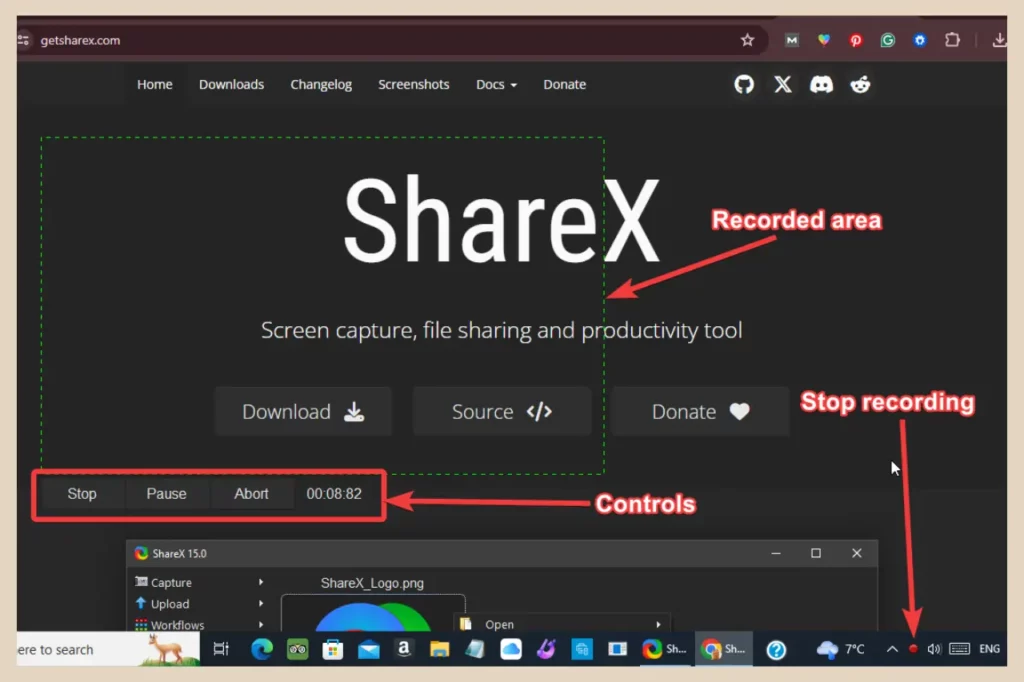
If you’re recording anything other than the full screen, you’ll also notice a control bar at the bottom of the recorded area which you can also use to stop, pause or abort the recording.
Once you stop the screen record, it will automatically be saved to your device and you’ll also see a preview of it (along with all your screenshots) in the preview area on the right of the ShareX window.
Unfortunately, there’s no screen record editor here if you need to snip sections off the beginning or end of your recording but there are plenty of free editors out there like Canva’s video editor that you can use for simple tasks like this.
Let’s Get Screenshotting
And that’s all there is to it. Despite its somewhat busy look when you first open it, it really is a super simple tool for all your screenshot and screen recording needs once you get familiar with it.
And as it’s a screenshot tool, screen recording tool and gif-creating tool all rolled into one, it’s the perfect little companion for anyone like me who needs to take a lot of screen captures.
I hope you’ve found this tutorial helpful and if you’d like to share your own stories or experiences with screenshot/screen recording tools, then please feel free to share them in the comments below.
Happy Screenshotting!

Helpful Guides to Read Next
These beginner-friendly guides will help you keep building your blog step by step.

Jessie
Founder, nomorerush.com
Hi, I’m Jessie — founder of No More Rush. I help beginners build profitable, beginner-friendly blogs without the overwhelm or unrealistic expectations you see online. Everything here is built around simple, structured steps so you always know what to do next.