Do you want to learn how to use Playground AI image generator? Well, look no further because that’s exactly what I’m about to show you.
If you’re just venturing into the world of AI image creation for the first time then Playground AI is an excellent place to start.
You can sign up for a free account and generate up to 500 images a day which is pretty awesome for a free plan and if that’s not enough, you can always upgrade to one of their paid plans to up the daily image limit.
You can also use all of the generated images commercially which is a huge plus and even though the free plan offers slower generation times, especially during peak periods, it’s rare to wait more than a minute or so for an image creation.
I use numerous free AI image-generating tools and Playground AI is up there as one of my favourites. It also happens to produce some pretty epic images even from the simplest of prompts so let’s get straight into this and look at what Playground AI can do.
How To Use Playground AI
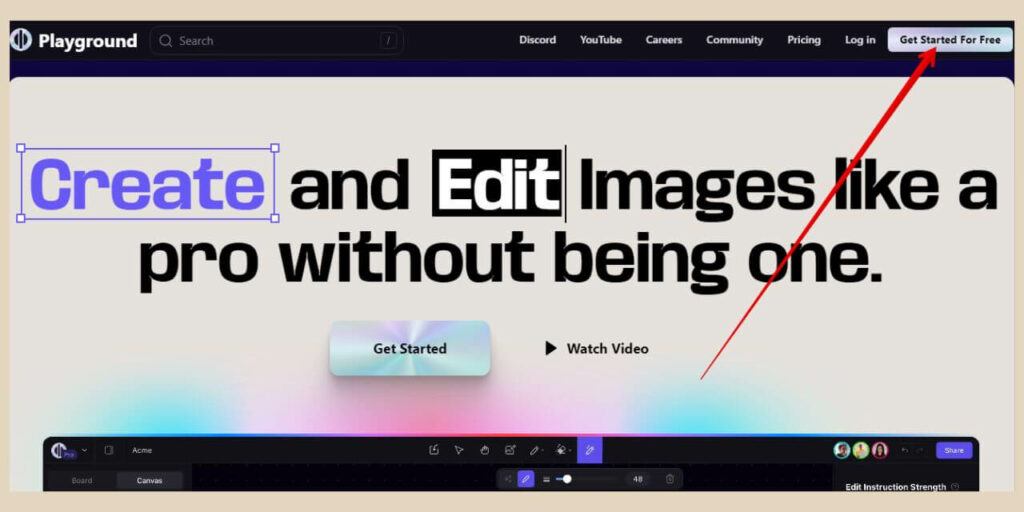
To get started, head over to Playground AI and click the Get Started For Free button in the top right-hand corner of the screen.
From here, you’ll be prompted to sign up using your Google account and once you’ve signed up, you’ll immediately be given a quick tutorial on how to use the platform.
With Playground AI, there are 2 areas where you can generate images and they are the Board area and the Canvas area.
The tutorial will show you how to use the Canvas area only but don’t worry, I’ll cover how to use both here.
I personally found the tutorial a little bit awkward to use but only because some things were out of the screen view (like the all-important Generate button) and there was no scroll bar to get to it.
Completing The Tutorial
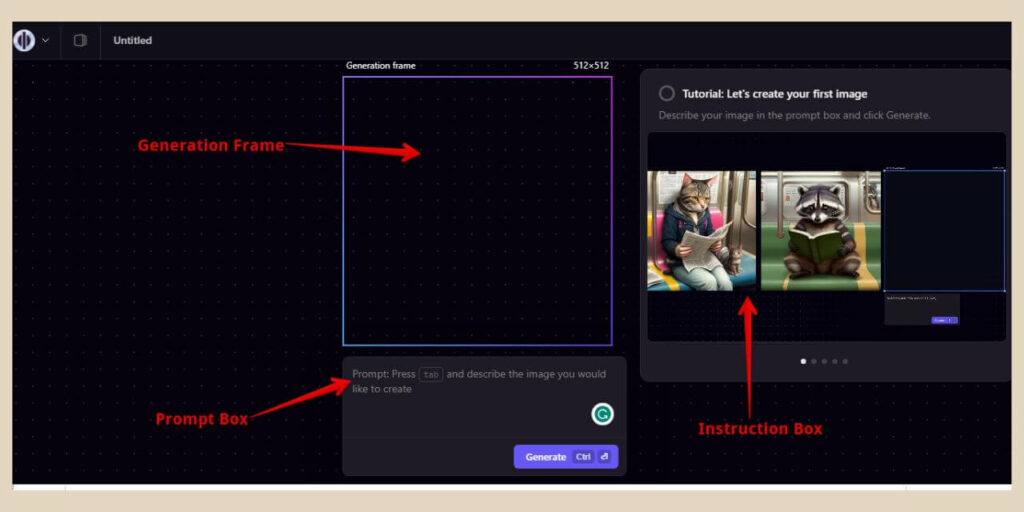
You can however just hover over the Generation Frame as per the image below, where the images are going to be generated and click and drag it further up the screen so you can click the Generate button.
It’s also one of those tutorials where you have to complete each action first before it moves on to the next one but it’s a pretty quick tutorial with only 5 or 6 actions.
Once you’re through the basics, a small window will appear at the top of the screen where you can either click the Close button to close the tutorial or click the Learn More button to get more tips and instructions which will open up in a new tab.
Once you’re finished with the tutorial, you’ll still be in the canvas area but you’ll now be free to start exploring the Playground AI platform.
As I mentioned, there are 2 ways to generate images and although there’s a lot more you can do in the canvas area, I’m going to start with the board area first because it’s by far the easiest to use.
How To Generate Images On A Board In Playground AI
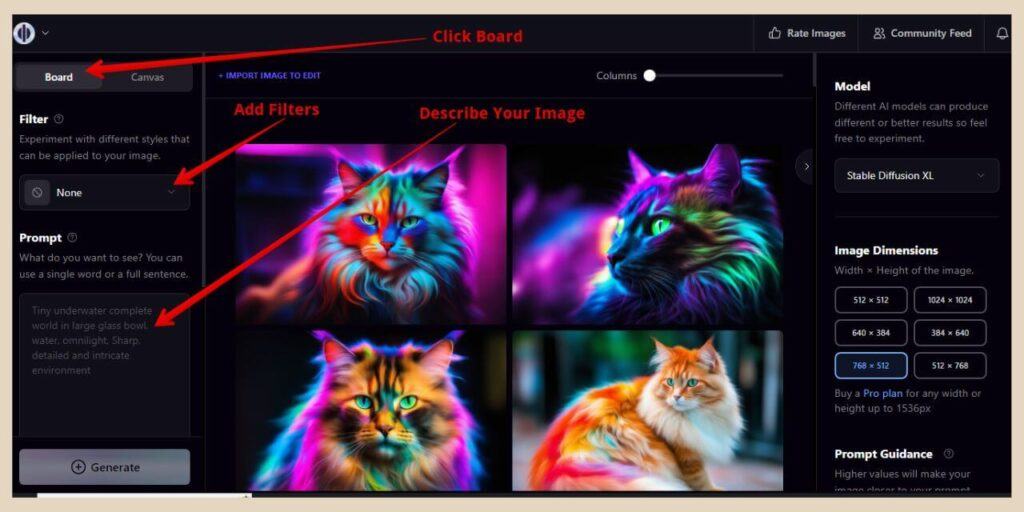
To generate images in the board area of Playground AI, click the Board button at the top of the left-hand side settings area. There are more settings on the right of the screen as well and I’ll get to all of these in just a moment.
Very quickly before I go any further, as the tutorial has already left you in the Canvas area, it’s very easy to switch across to the board area straight from here as mentioned above.
However, the next time you come into Playground AI, you’ll start on the home page which is also the Community Feed area.
So to get access to the board or canvas area the next time around or if you navigate to another area and get lost, simply click the Create button in the top right-hand corner of the screen.
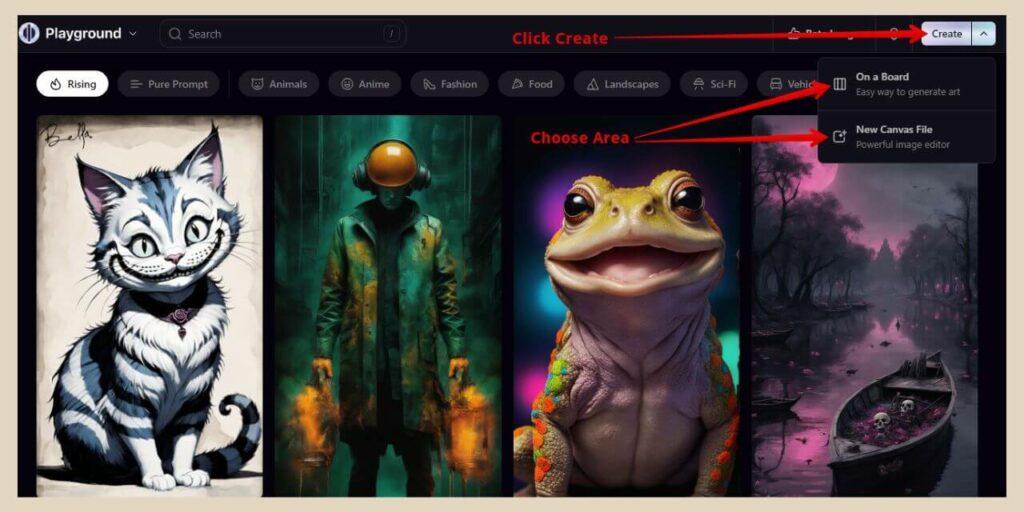
From here, you can then select either the “On a Board” or “New Canvas File” options that appear to get back to either area.
Navigating The Board Area
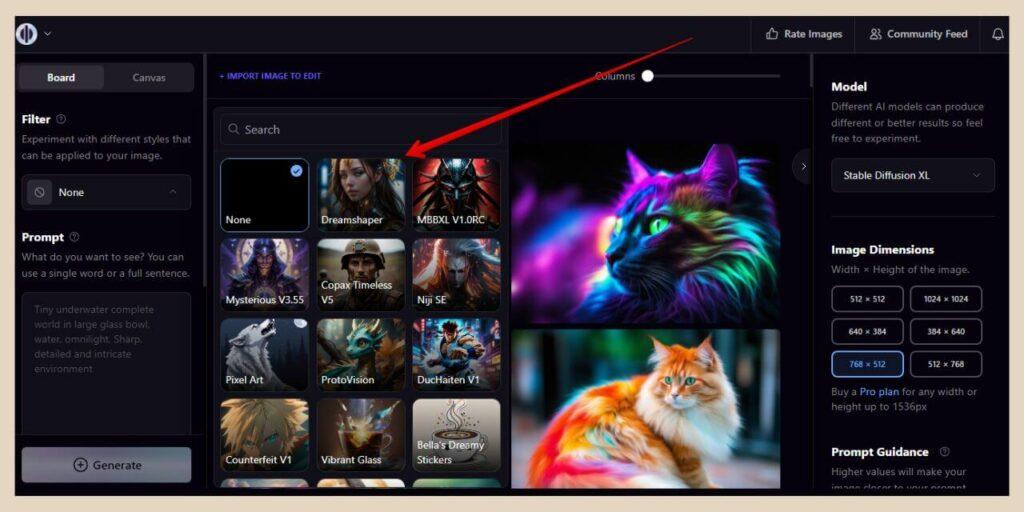
Back to the board area. I’ll start with the first few settings on the left side which are Filter and Prompt. The Prompt area is where you’ll type the description of the image you’d like to generate.
The Filter setting will allow you to add one of a selection of different filters to change the styles of the images generated and there are several to choose from ranging from Cinematic to Pixel Art.
Just click the filter area and a new section will open up to the left of it and you’ll be able to scroll through all the different filters.
Once you have all your other settings set up to your liking, it’s well worth playing around with the different filters because they’ll drastically change the look of the generated images.
You’ll very quickly identify your personnel favourites and sometimes even leaving it set to none will bring up some cool results.
Add A Negative Prompt Or Use Image To Image
If you scroll down below the Prompt box, you find the Exclude From Image section and this is where you can type in negative prompts of things that you don’t want to appear in the image.
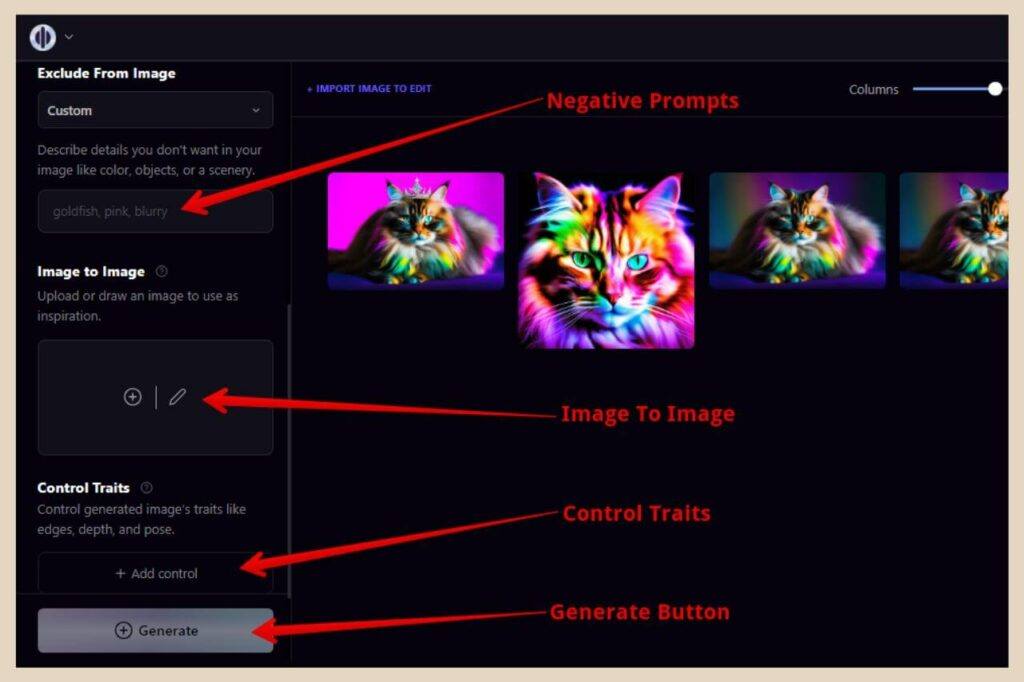
Below this, you’ll find the Image To Image section where you can either draw or upload your own image that the AI model can use for inspiration (I’ll show you some examples of that one further down).
You may also see the Control Traits section depending on which model you have selected (model options are on the right of the screen and some sections are only visible with certain models).
This is essentially a more powerful image-to-image tool where you can control the pose, edge and depth that are used to generate images (more on that further down).
And lastly, you’ll find the Generate button to generate all of your images but before you start generating, there are a few more settings on the other side of the screen.
Altering Your Settings In Playground AI
On the right-hand side of the screen, you’ll find a few more settings with the first one being the AI models that you can use.
There are 4 different ones to choose from and switching between them will produce very different results with your generated images.
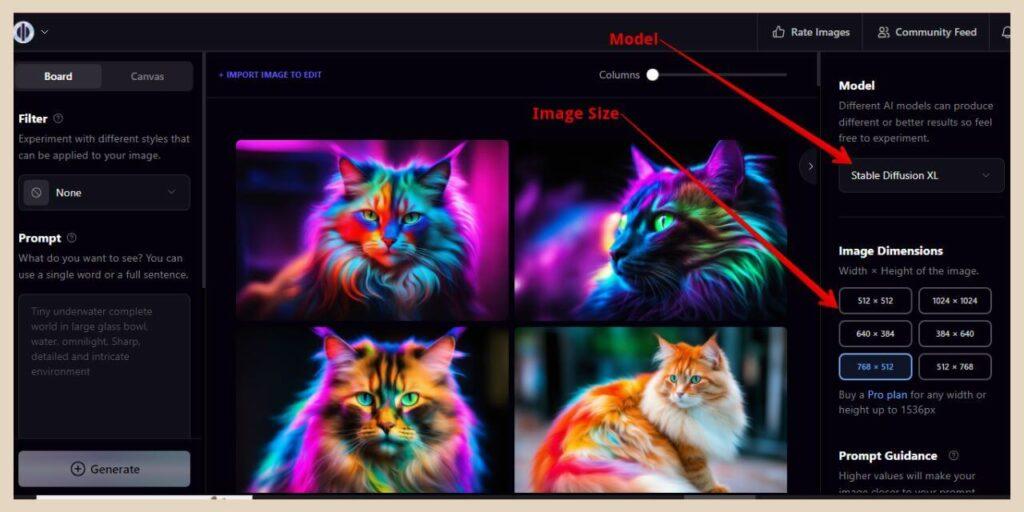
My personal favourite by far is Stable Diffusion XL but you can play around with the different models to see which ones produce the kind of images you prefer.
The next setting beneath this is the image dimensions and if you’re a free user, you’ll have 6 different sizes to choose from.
If you’re a paid user then you’ll have more custom-size options but if I’m being honest, you can easily just resize these images using the likes of Canva.
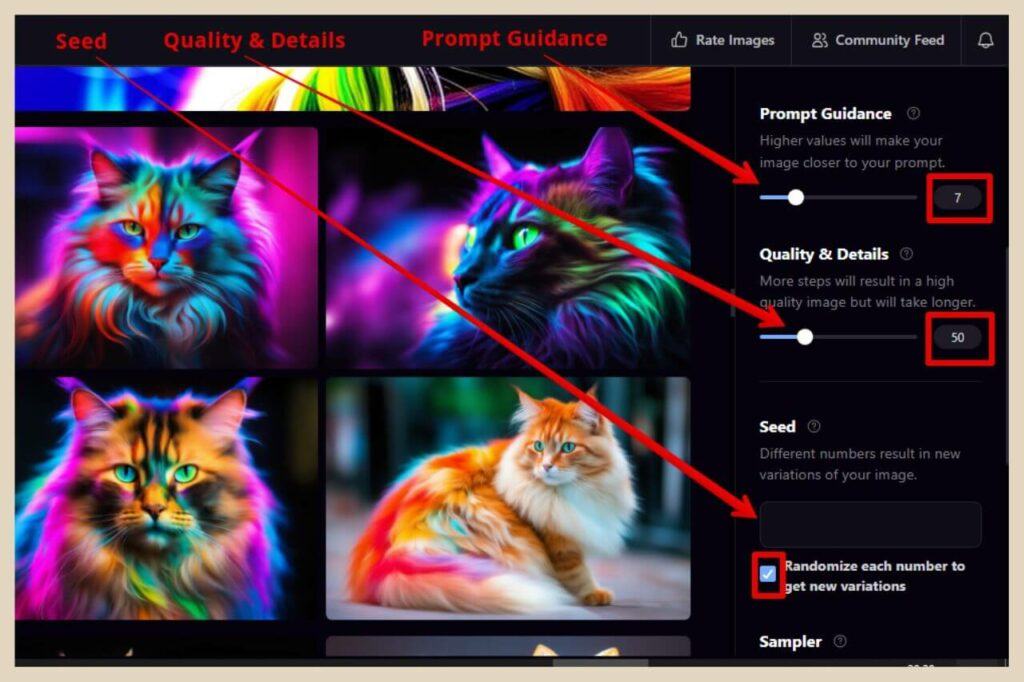
Using Prompt Guidance And Quality & Details
The next two sections are Prompt Guidance and Quality & Details and by default, these are pretty much set to the most common settings.
I personally very rarely change them but you can adjust these if you’d like to see the effect they have on your generated images.
As an example, here are four images below with all the same settings and the same seed number. The only thing I’ve changed here is the prompt guidance.
I’ll explain the seed in the next section but basically keeping the seed number and every other setting the same should produce the exact same image.
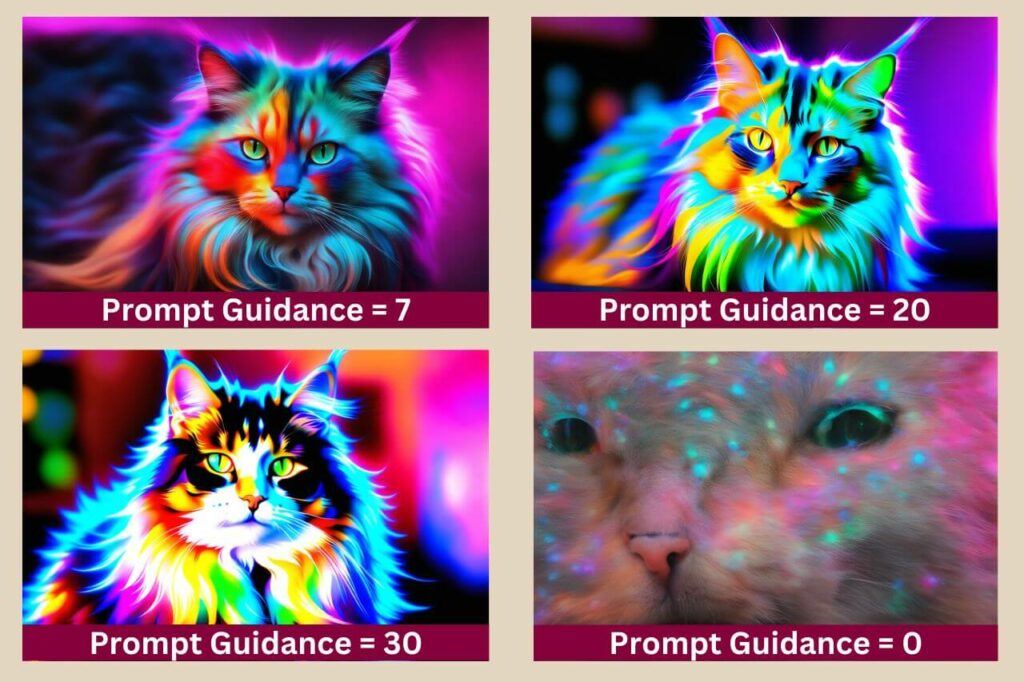
As you can see, the first image which was left at the default of 7 is the best image out of all of them but you can see the type of effect it has when you change it.
Similarly, with the next set of images, the only thing that I’ve changed here is quality & details.
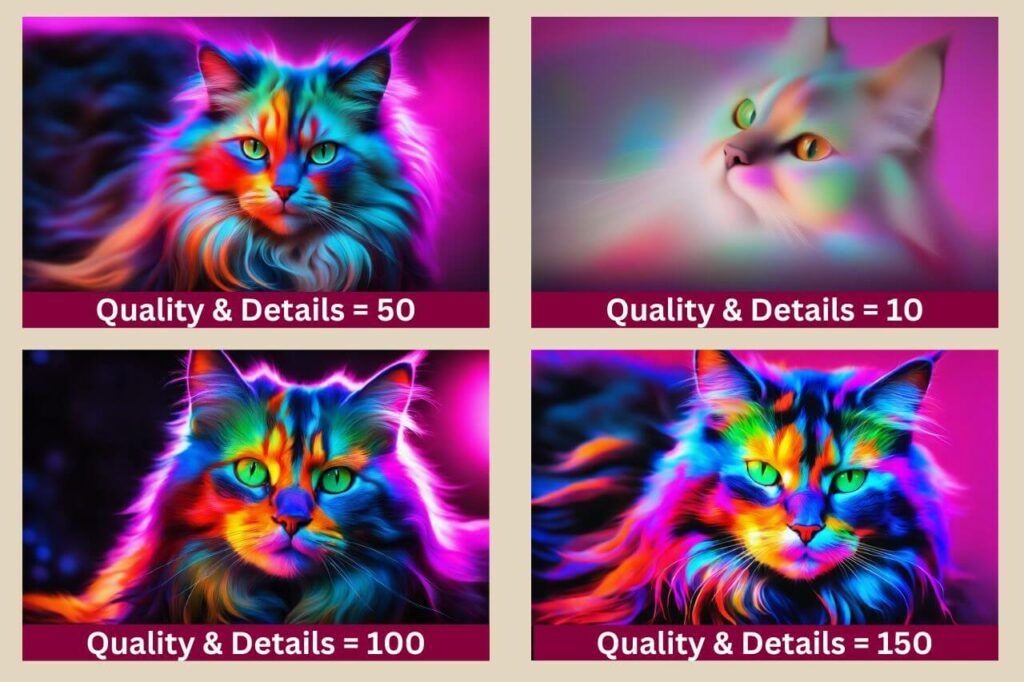
Again, the first image was left at the default of 50 but you can see the difference it makes with each change.
You can play around with these as you please to find the best results but as I previously mentioned, I personally very rarely change them.
Playground AI Seed Number
The next setting below Quality & Details is the AI image Seed area and as I briefly mentioned above, the seed can be used to replicate the same image if all the other settings and the prompt remain the same.
There’s a checkbox underneath the seed number box to randomise the seed number and this is checked by default so that you’ll always get different images for the same prompt.
However, if you generate an image that you like, you can click on it and the randomise checkbox will become unchecked and the seed number for that image will appear inside the seed number box.
You’ll also notice that the prompt and settings will change to those used to generate that image.
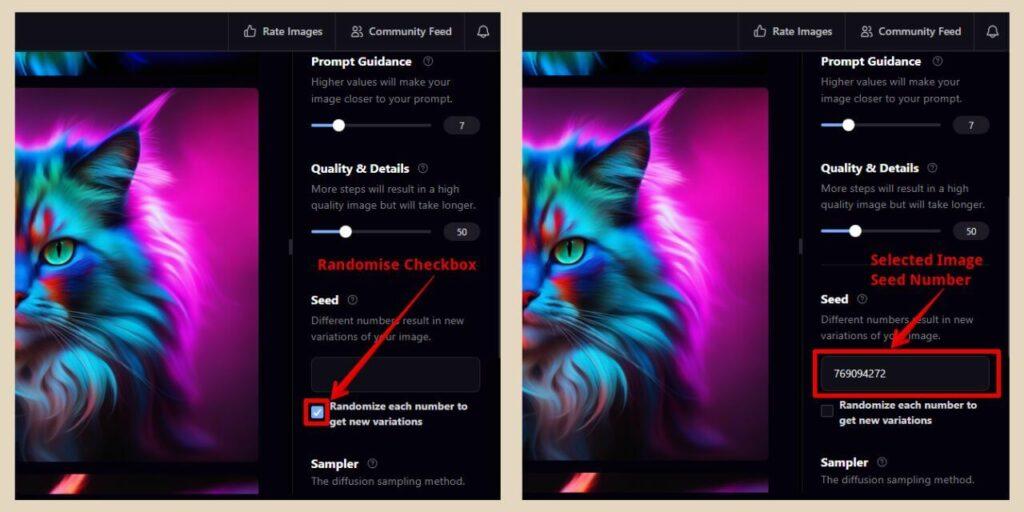
This is actually a great way of making variations of an image that you like and you can do that by making small changes to the seed number.
The seed number for the image I’m using is 769094272 but if I change one of the digits to something else, it will generate a variation of that image.
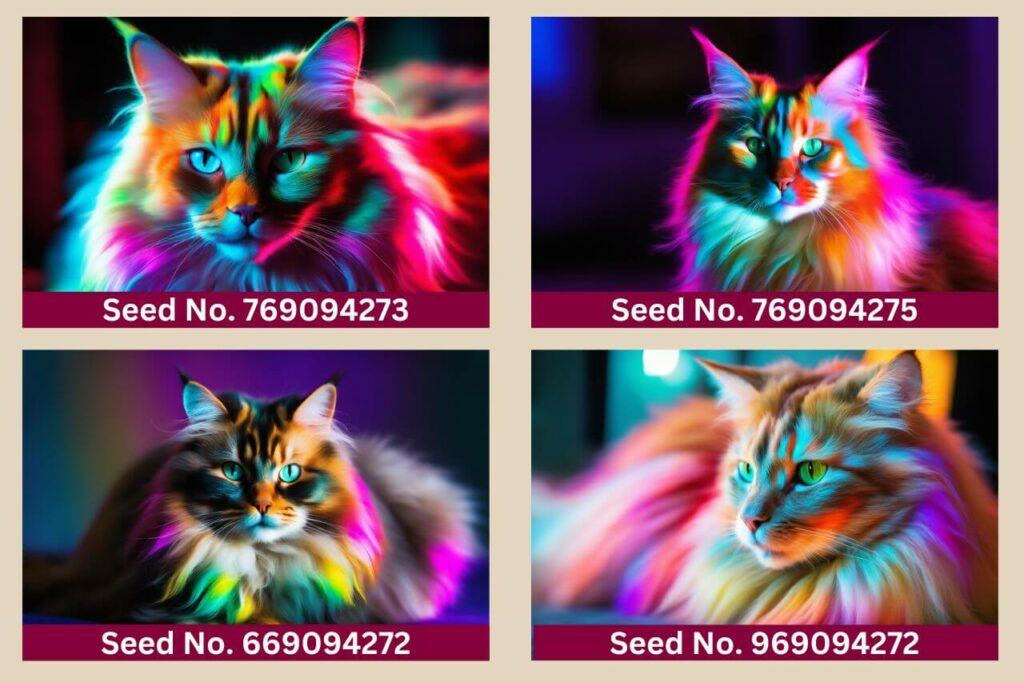
In the images above, I changed the last digit for images 1 and 2 and then I changed the first digit for images 3 and 4 and it actually generated some pretty cool variations of the original image.
You can try this out by changing any of the numbers within the seed to generate a whole host of different variations and sometimes you’ll end up with even better images.
You can also leave the seed as is and make changes to the prompt or other settings instead to make even more variations of your favourite AI images.
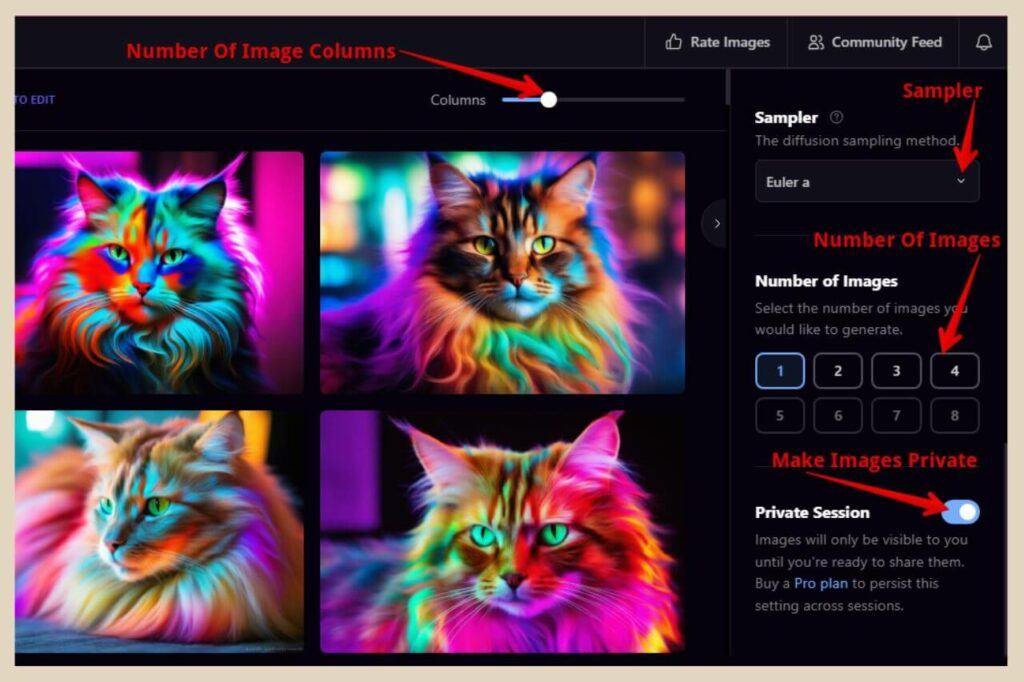
Playground AI Samplers
Underneath the seed area, you’ll find the Sampler area and you can change these to make subtle differences to your generated images.
To be honest it’s easier just to play around with these because the differences can be so subtle that you might not even notice them at first glance.
Mine is set to Euler A by default and I tend to leave it there because this is my favourite one to use but again, you can play around with these to see the difference but sometimes they are very subtle.
Although, I will mention that there are a few that make much bigger changes to your images than others. You can check out my full tutorial on samplers here if you’d like to see examples of the effect they have when you change them.
Under the sampler area, you’ll find the Number of Images area which will let you choose how many images you generate at once.
If you’re a free user, you can choose to generate between 1 to 4 images at a time but if you’re a paid user, you can generate up to 8 or 16 at once depending on your plan.
Making Your Images Private
The last setting here underneath the image number area is the Private Session setting. By default, this will be set to off which means that all your generated images will be visible in the community feed area on the Playground AI platform.
Other users will not only be able to see your images but they’ll also be able to see the prompts and settings used to create them. They’ll also be able to download your images or edit them to create their own variations.
advertisement
So, if you want to keep your generated images private, you’ll need to click the button to the right of the words “Private Session” to toggle it to on.
If you’re a paid user, you can set it to remain on private but if you’re a free user, it will revert back to off every time you start a new session and that includes navigating away from the Board page.
There’s also a column slider just above your generated images and you can use this to change how many columns of images you’d like to see in your main generated images area.
Once you’ve changed all the settings to your liking, click the Generate button and Playground AI will generate your images based on your prompt and settings.
Image Options In Playground AI
Once you’ve generated an image that you like, there are several other things that you can do with it. Simply hover over your image of choice and you’ll see a few different options appear as per the image below.
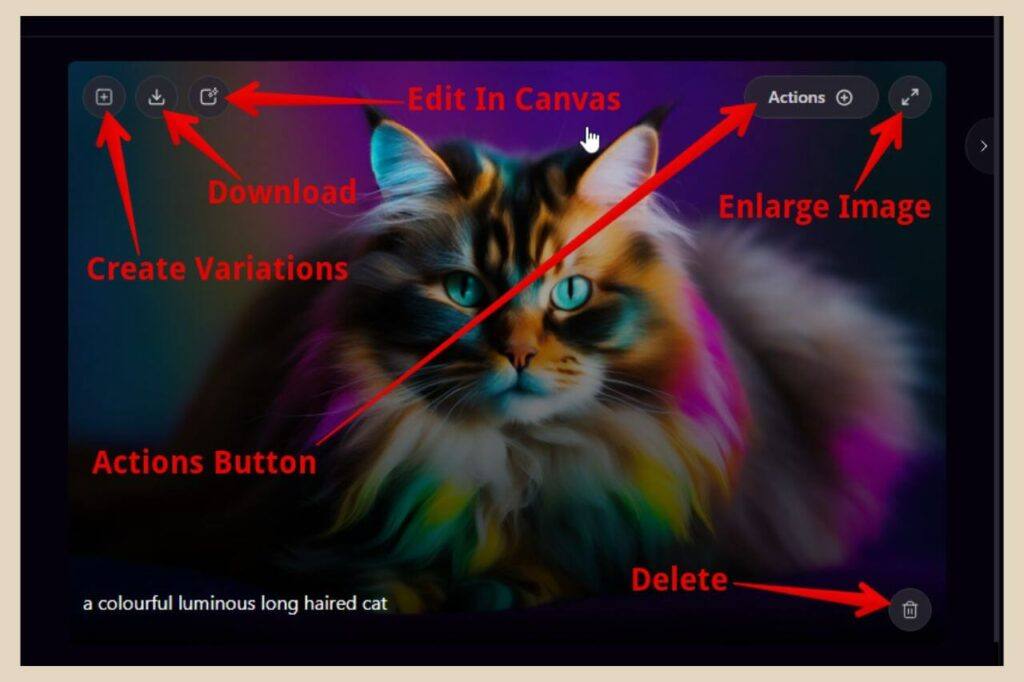
In the bottom right-hand corner, you’ll find the Delete button to delete your image. Then from left to right at the top of the image, you’ll find the Create Variations buttons which will generate a similar variation of the image each time you click it.
By the way, just to confuse issues, when you generate variations of an image using this button, they will have the same seed number as the original image so you can’t really replicate them.
The seed number will replicate the original image but not these variations. The same applies if you generate more than one image at a time so for example, if you choose to generate let’s say 4 images at once, they’ll all have the same seed number.
However, the first image in the set is deemed the original so if you use the seed number to try and replicate the images, it will be the first image that’s replicated and not any of the other 3 so just something to keep in mind if you’re trying to replicate images.
Anyway, the next button on hovering over an image is the Download button to download the image. After this, there’s the Edit in Canvas button which will bring your image over to the canvas area where you can edit it further (I cover that in more detail further down).
There’s also the Actions button which will give you several more options and the Enlarge Image button if you’d like to see a larger version of your image.
The Actions Button
With the Actions button, you’ll see a new menu with several more things that you can do with your image although some of them are a repeat of the options you see when you hover over the image.
So I’ll cover the new options here and ignore the repeated ones seeing as we already know what they do.
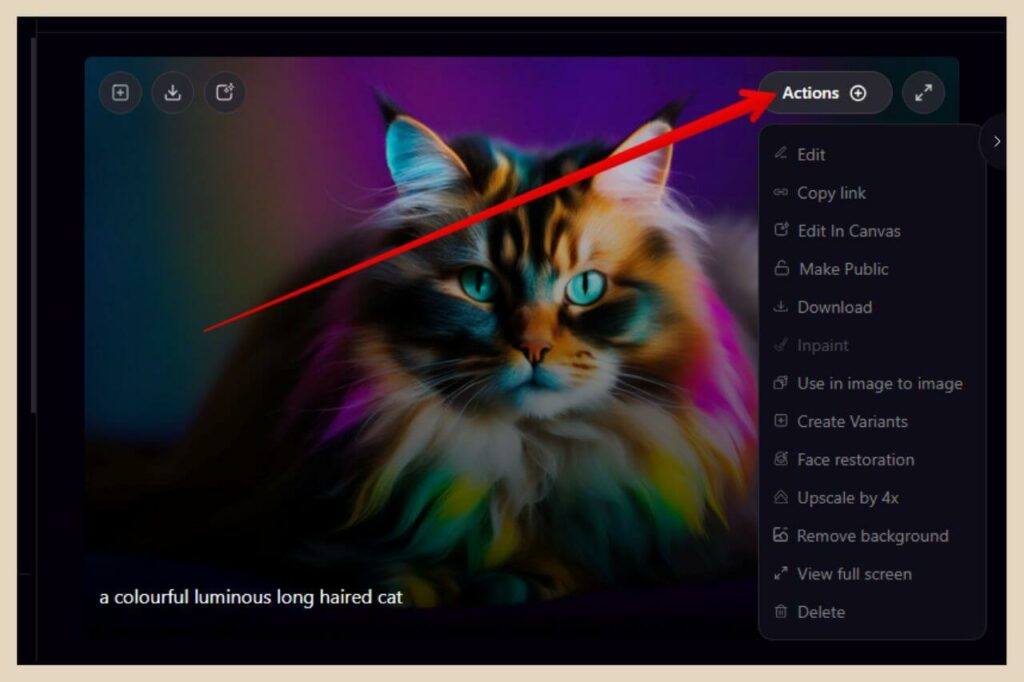
The first option here is Edit and this is different to the Edit In Canvas option which is also repeated in this menu too.
With the Edit option, you’ll be able to edit your image further whilst still remaining on the board area which is a little different to the canvas area but I’ll cover this edit option in the next section.
There’s also a Copy Link option which will let you copy the image link so that you can share it wherever you please.
More Actions Button Options
You can also make your image public and share it with the Playground AI community using the Make Public option if your image is currently set to private.
There’s the Inpaint option which lets you fill in or remove areas of your image that you’re not happy with.
Next, you’ll see the Use In Image To Image option which will allow you to use the image as inspiration with your next prompt.
There’s also the Face Restoration option will can help improve facial quality and details if you have a face within your image.
The Upscale By 4X option will upscale the current pixel size of your image by 4 so if your current image is 512 x 512, this option will upscale it to 2048 x 2048.
Finally, the last new option here in this menu is the Remove Background option which will remove the entire background from your image if you click it.
Editing Your Image In The Board Area
Let’s go back to the Edit option which will allow you to make changes to your generated image.
When you hover over an image and click the Actions button followed by the Edit option, this will open up the image in a new editing area which will look very similar to the regular board area.
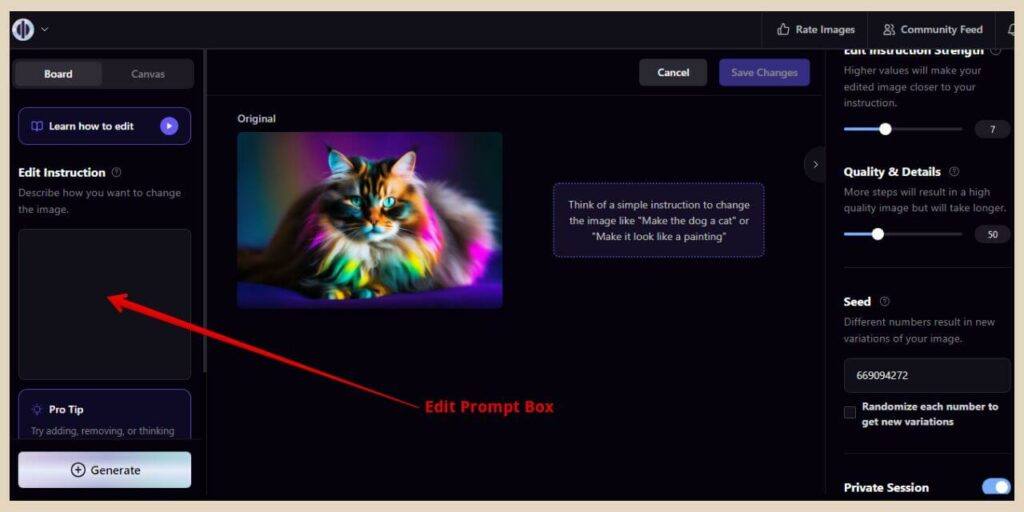
However, even though the left and right side settings are almost identical, the prompt box here will allow you to make changes to the image rather than generating entirely different ones.
So you could choose to change the background colour of an image, change the colour of an object within the image or even change a subject/object in the image into something else.
For instance, the examples it gives on the page are using a prompt like “Make the dog a cat” or “Make it look like a painting” so there’s quite a lot you can do here to alter your image.
I going to start by changing the background colour by typing “Change the background colour to pink” in the prompt box and clicking the Generate button.
Use The Mask Tool For More Accurate Results
It’s also not a bad idea to use the Mask tool to highlight the areas you want to change because when you don’t, it can end up applying the changes to the entire image. Case and point below.
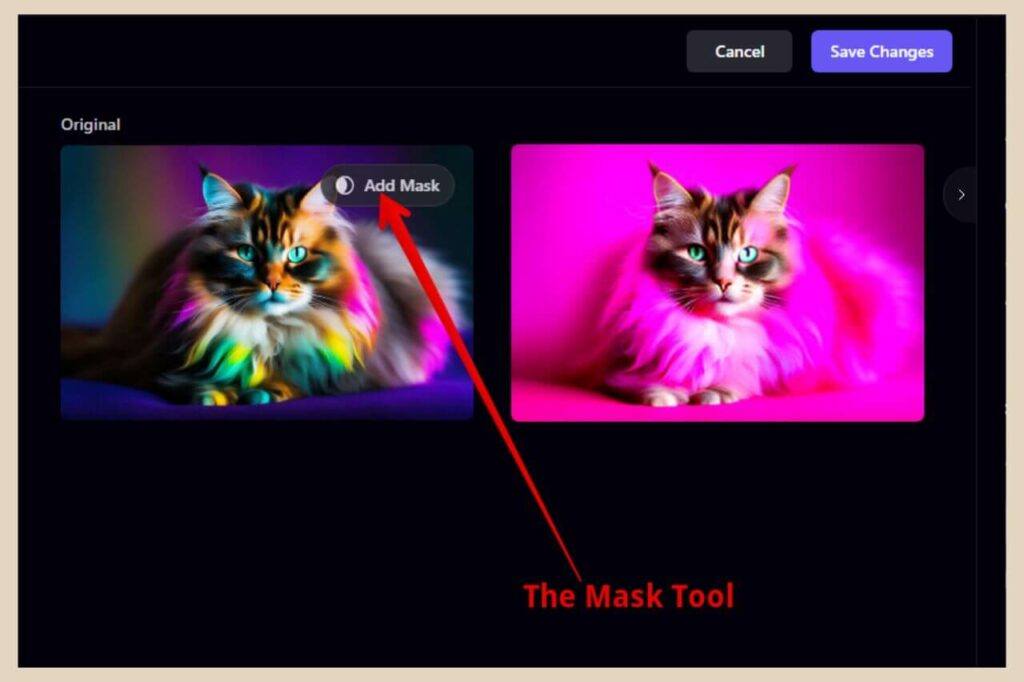
As you can see, it did indeed change the background colour to pink but it also changed the cat to pink while it was at it.
So to stop this from happening, hover over the original image and the Add Mask option should appear.
Once you click on it, a small control box will appear and you’ll now be able to click and drag a brush around the image to highlight the areas you’d like the changes to occur in.
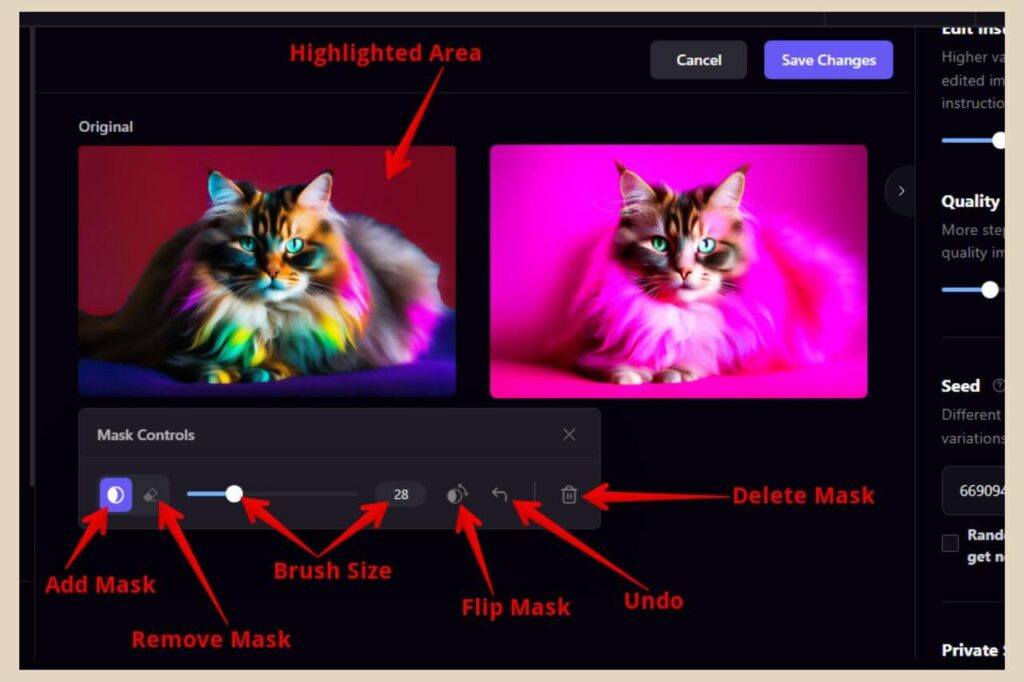
Mask Tool Control Box Settings
You can use the mask control box to change the brush size, remove areas of the mask if you’ve highlighted too much or delete the mask entirely to start again.
You can also undo the last area highlighted or flip the mask so that the highlighted area becomes the unhighlighted area and the unhighlighted area becomes the highlighted area.
As it’s the background wall area that I want to change, this is the area I’ve highlighted with the mask tool and this is what Playground AI generated once I clicked the Generate button again.
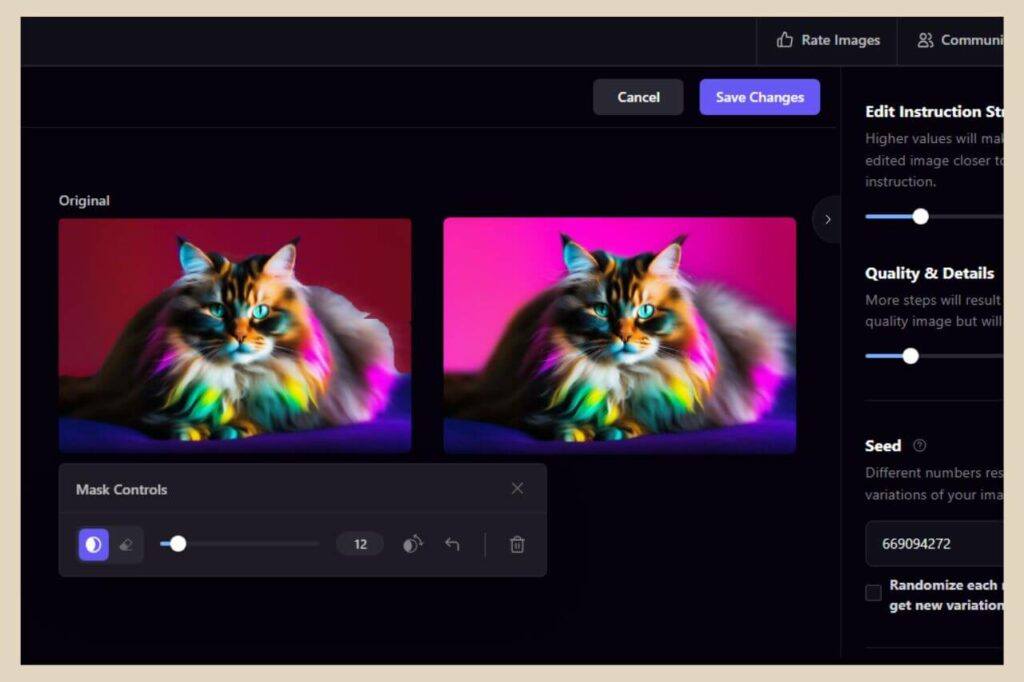
As you can see, it left the kitty alone this time which is exactly what I wanted but I’d like to make one more change so to do that, I need to make this new amended image the image I want to edit.
Making More Changes To An Image
By the way, the original image will always be on the left with the amended image on the right.
If you’re happy with the amended image, you can just click the Save Changes button and this new image will be created (your original image will also remain intact) and you’ll be back in the regular board area.
You can also click the Cancel button at any time to get back to the regular board area and anything you’ve done here will be discarded.
If you type any other instructions into the prompt box and/or click the generate button again, the amended image will be replaced with a different amended image.
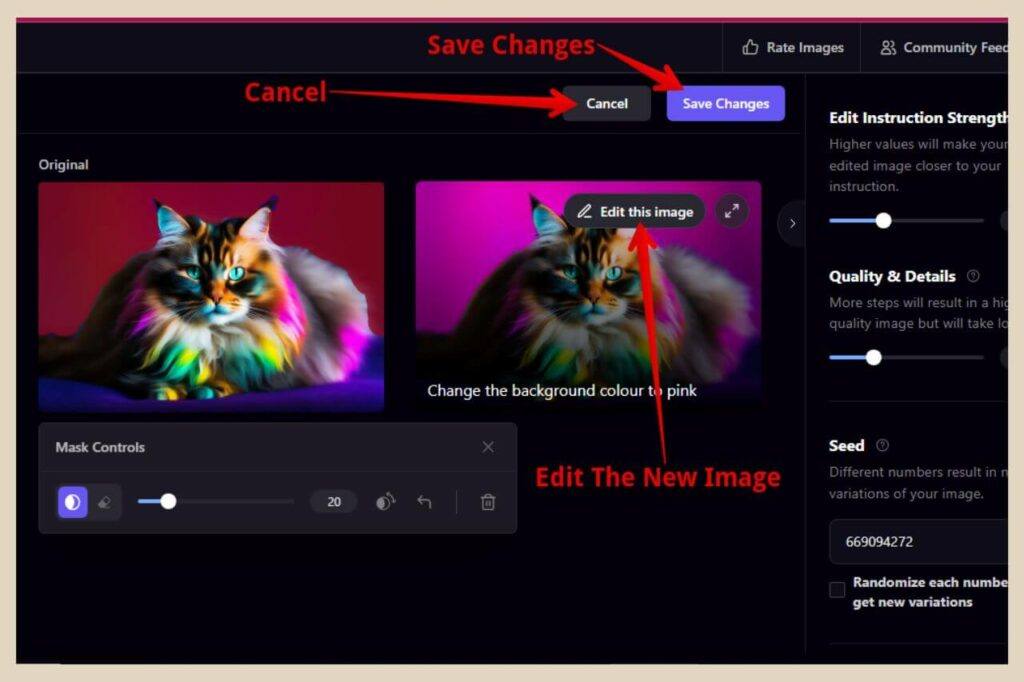
If you like the amended image but you want to make more edits to it, simply hover over it and click the Edit This Image button and this new amended image will now be on the left as the original image.
Editing An Amended Image
From here, you’ll now be able to add another prompt to make changes to this amended image in the exact same way as you did with the original and that’s exactly what I want to do next.
You may need to use the delete mask button if the mask remains on the new image, then just draw a new mask in the new area you want to work on.
So the last thing I want to do here is give the kitty a crown so I’ve highlighted the area where I want the crown to be added.
Next, I’ve added the simple prompt of “Add a diamond crown” to the prompt box and clicked the Generate button and this is what Playground AI came back with.
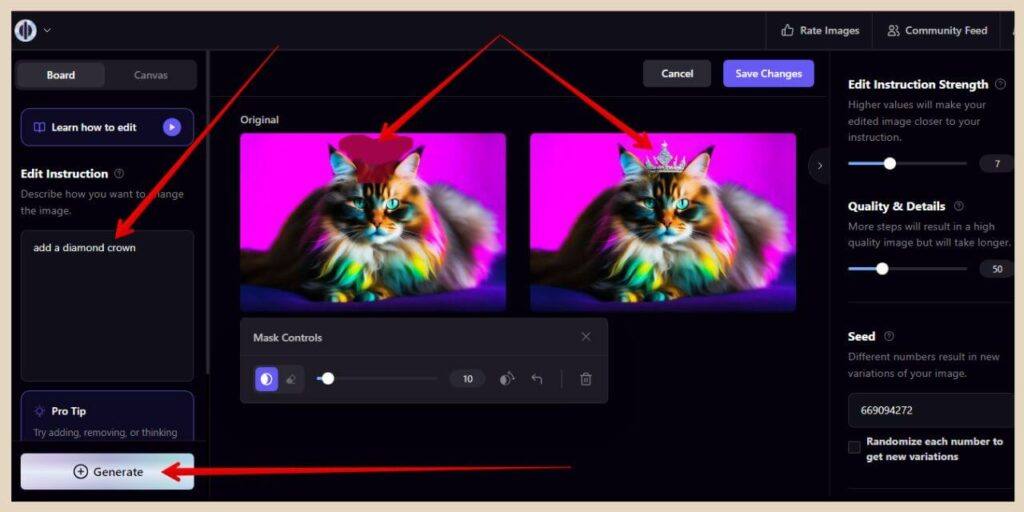
And there you have it. You can add, remove and change all sorts of things here to really alter your images.
Just remember to click the Save Changes button to save your new altered image and bring you back to the regular board area. You can even import one of your own images into the edit area too if you like.

To do that, simply click the Import Image To Edit button at the top of the screen in the regular board area and a window will open up where you can select any image stored on your device. From here, you can do all the same things as above.
How To Generate Images On A Canvas In Playground AI
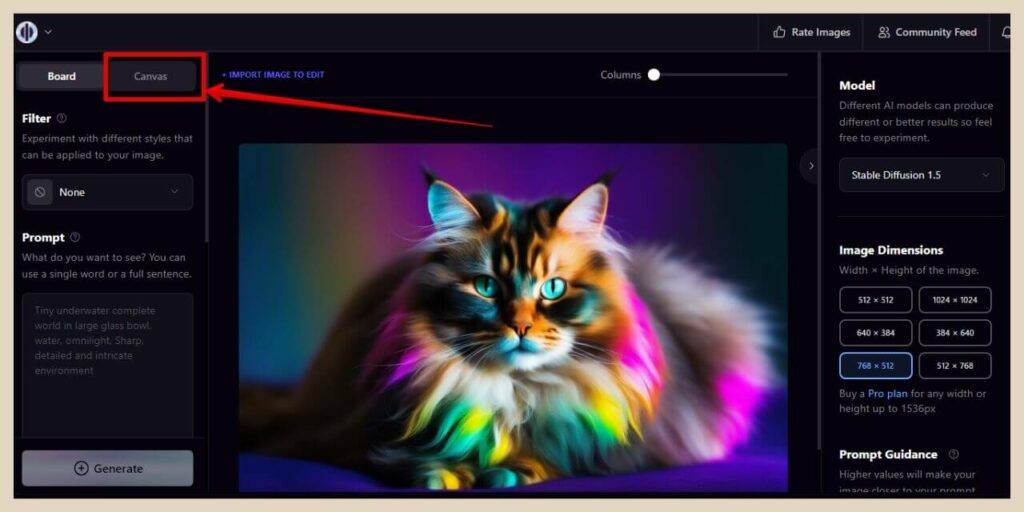
Now for the canvas area which is pretty similar to the board area but you’ll be able to do a little more editing here.
As we’re currently already in the board area, you can easily switch to the canvas area by clicking the Canvas button which is to the right of the Board button at the top of the left-hand side settings area.
If you’re in any other area of the platform, you can access the canvas area by clicking the Create button in the top right-hand corner of the screen and then selecting the New Canvas File option.
You can also access it by clicking the Playground AI icon on the top left of the screen which will open up a menu with more options.
From here, you can click the Your Canvas Files options where you’ll be able to either open a new file (free users can create 3 canvas files) or select an existing one.
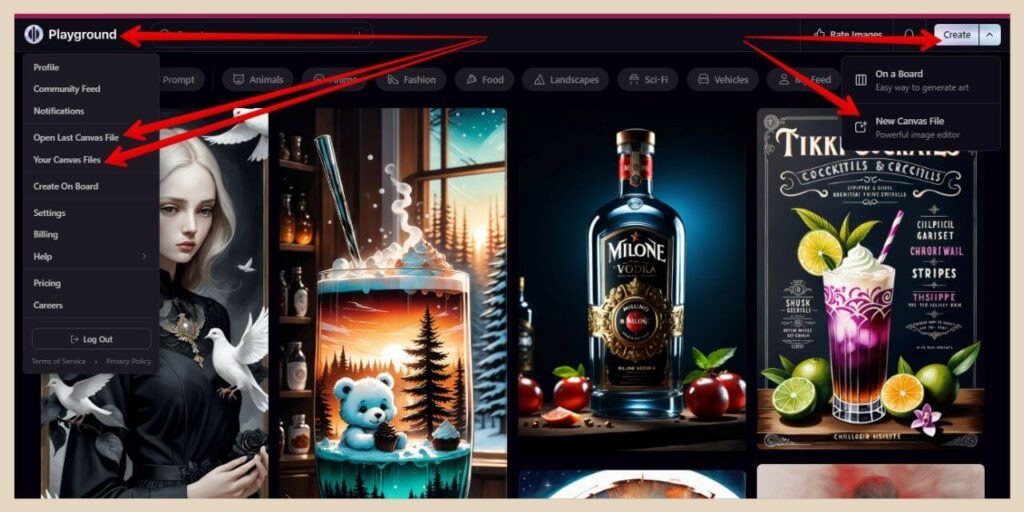
Or if you’ve already started a canvas file, you can click the Open Last Canvas File to get back there.
You can also use this same menu to navigate the Playground AI Platform to access the community feed (other people’s generated images), your profile (all your generated images), the board area and more.
Navigating The Canvas Area
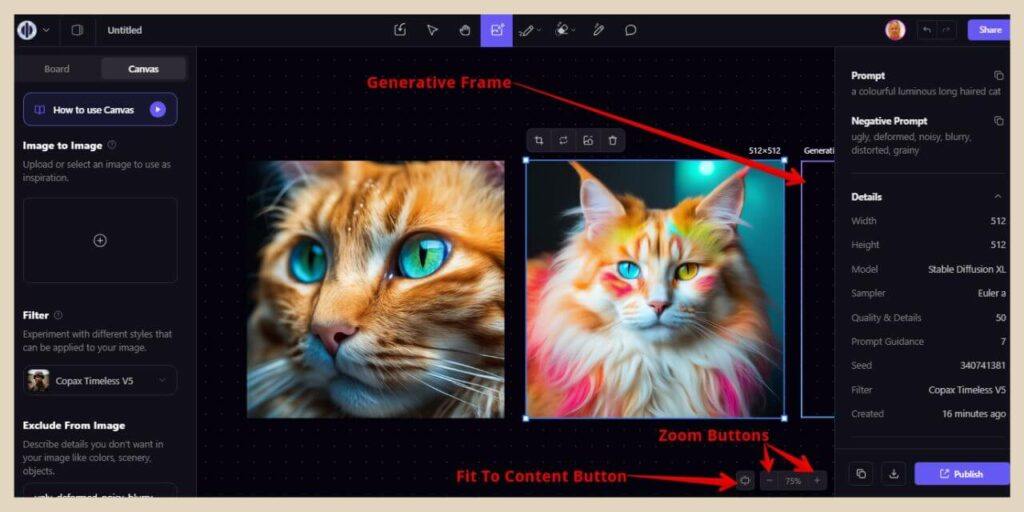
Once you’re in the canvas area, you’ll notice that most of the settings on both the left and right sides of the screen are pretty similar to those in the board area.
The biggest difference here is that there are no model options and you’ll also be working with the Generative Frame as you did in the tutorial and the prompt box and generate button are attached to it.
This generative frame can be moved around the canvas area as can any images that you create here so type your prompt into the prompt box and click the Generate button to create your first canvas image.

The new image will appear where the generative frame was and the generative frame will automatically move across to the side of it where you can then generate another image.
The One Slight Annoyance Of The Canvas Area
Now, here’s where the canvas area can get a little bit finicky. As you create more images, your previous images and/or the generative frame may start to get pushed out of the screen view.
This is exactly what’s happened in the below screenshot and there are no screen scrolling options here to get to it.
So, you will find yourself doing a lot of zooming in and out and clicking and dragging with the images and the generative frame to keep them in the screen view but you do get used to it very quickly even if it is a little annoying at first.
Oh, and if you ever lose the generative frame box (believe me, it happens frequently), just click G on your keyboard to bring it back up.
Outpainting In The Canvas Area
Where the canvas area does shine is with its editing options because there are quite a few cool things that you do here. I’ll start with outpainting which is basically a way to extend your image.
Sometimes, it can be a little hit or miss but when it hits, it can do an excellent job of extending an image.
So place the generative frame mostly over your image with a small section of it overlapping onto the blank canvas like the screenshot below.
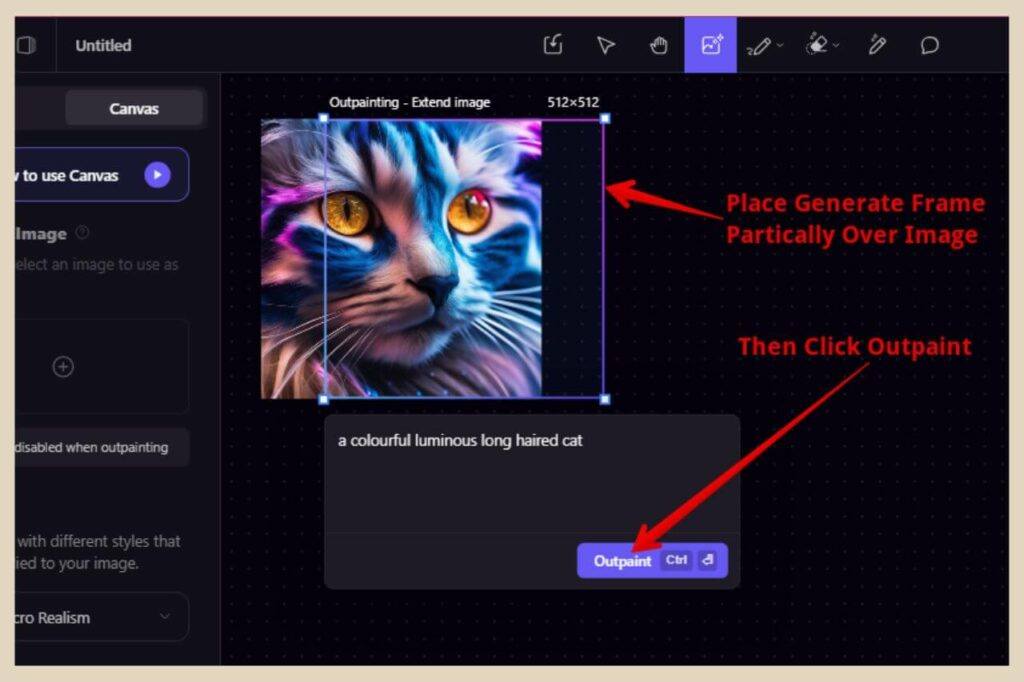
The Generate button should now say Outpaint instead so click it and Playground AI will attempt to fill the blank canvas area by extending your image.
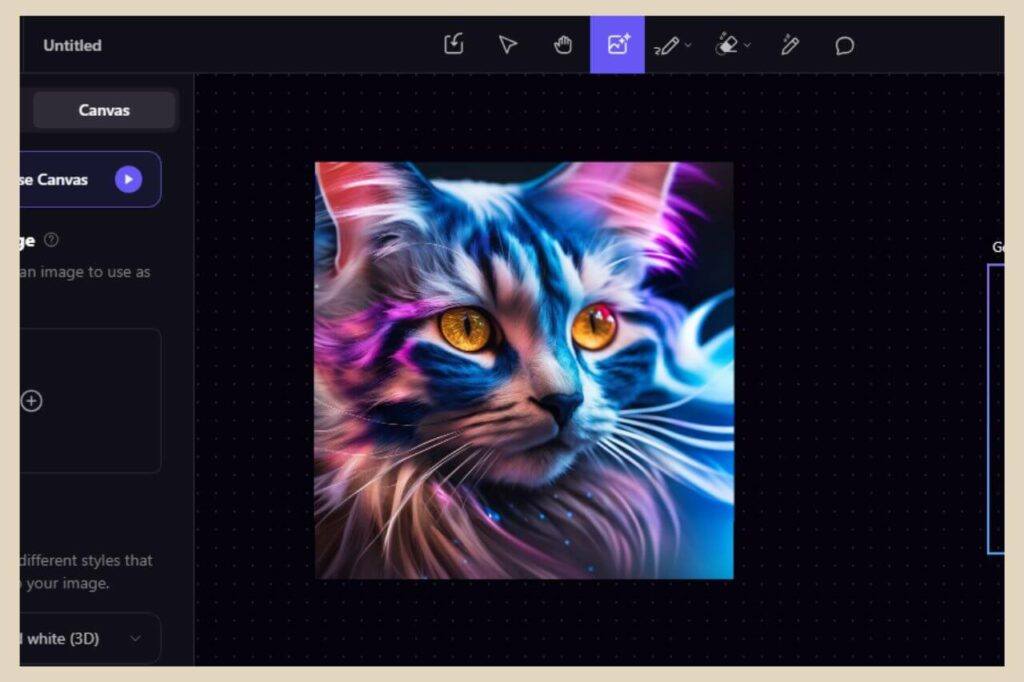
As you can see in the screenshot above, I ended up outpainting all the way around the image and Playground AI did a really good job at extending the image.
Outpaint Small Sections At A Time
I find it works best when you do small areas at a time. You can also drag the frame corners to make the generative frame taller or wider.
Alternatively, you can use the sliders in the image dimension area in the settings on the right-hand side of the screen.
If you hover or click on the image, you’ll also notice some options here at the very top and they are the Crop button to crop your image and the Image To Image Button which I’ll show you how to do next.
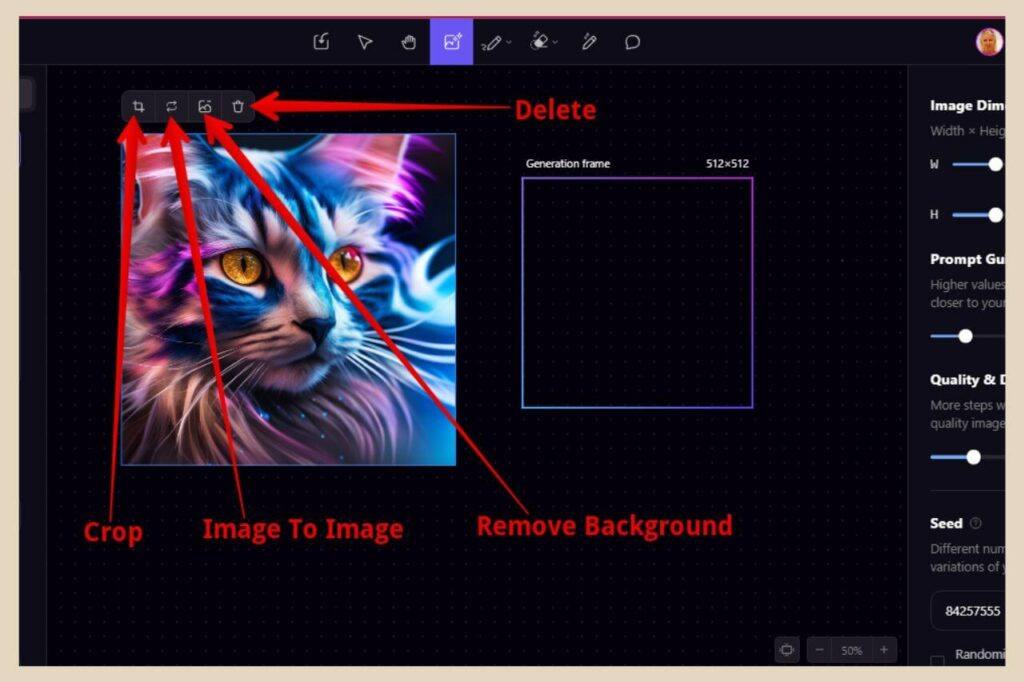
These are followed by the Remove Background button to remove the background and the Delete button to delete the image.
So let’s look at the Image To Image option and see what happens when we use this generated image as inspiration.
How To Use Image To Image In Playground AI
As I mentioned earlier, you can also use Image To Image in the board area and it works in the exact same way (although you can also draw an image in the board area which is a lot of fun).
You can either click the + icon in the Image To Image box to upload one of your own images from your device or you can hover over a generated image and select the Image To Image option I mentioned a moment ago.
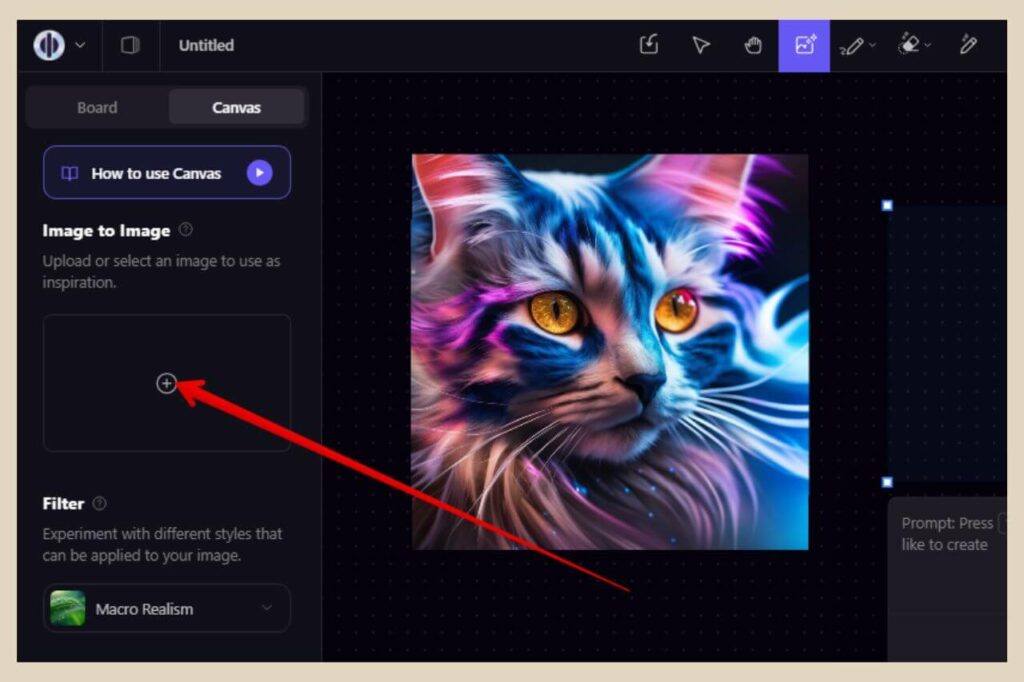
In this case, I’m using the generated image which will now be placed into the Image To Image box. You’ll also notice an image strength slider underneath that you can use to determine how close the generated image is to the original.
The higher the number, the clearer the image will be in the Image To Image box and the closer the generated image will be to the original.
On the other hand, the lower the number, the more blurry the image will look in the image box and the further the generated image will be from the original.
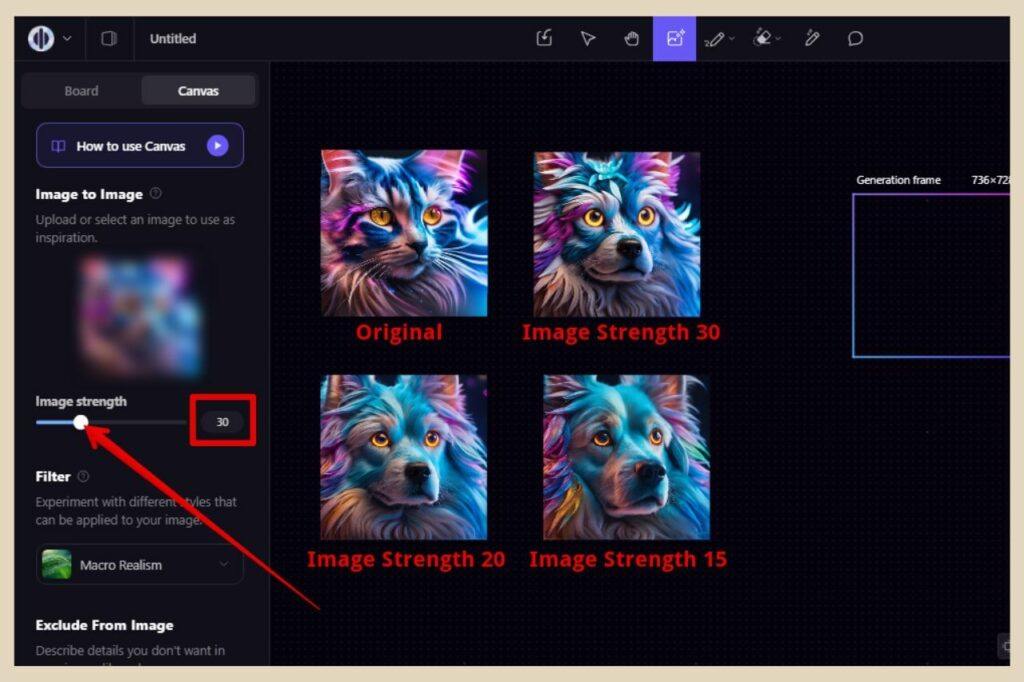
In the example above, I’ve changed the word Cat to Dog in the prompt box and I’ve moved the slider to a few different positions to show you the effect it has.
To remove the image from the Image To Image box, simply hover over it and click the little trash can in the top right corner to delete it.
Using Your Own Image For Image To Image
Next, I wanted to use one of my own images so I clicked the + icon and imported an AI-generated image that I created using Adobe Firefly using the prompt “A colourful sparkly unicorn in a forest”.
Once imported into Playground AI, I used the prompt “A colourful unicorn running through an open field on a summer day” and this is what it generated with the Image Strength set at different positions.
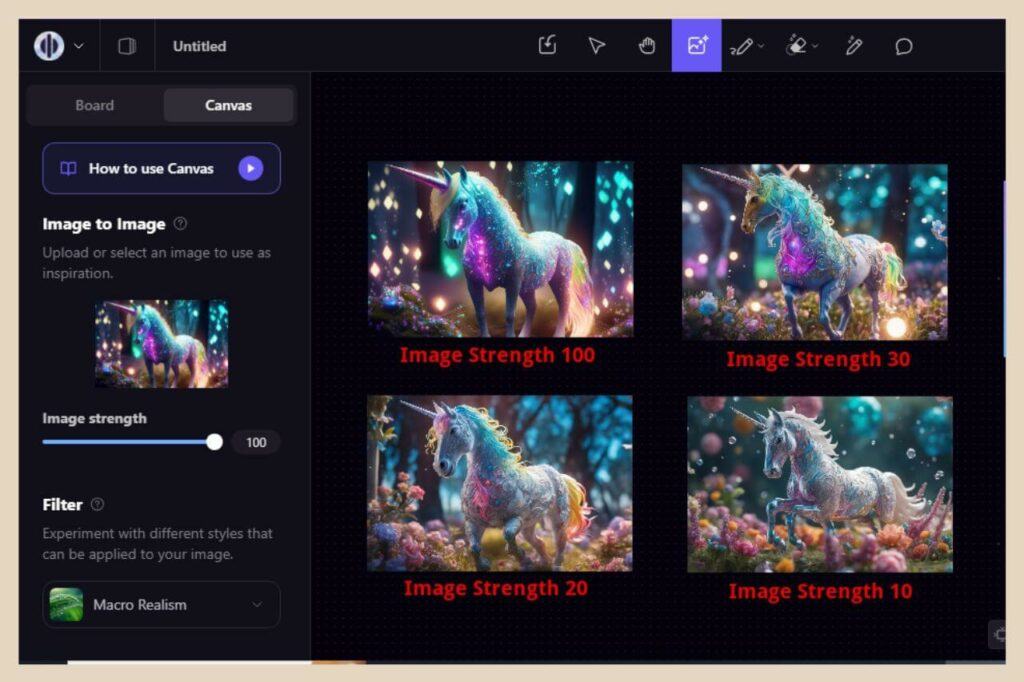
With the first image set to the max of 100, Playground AI generated an exact duplicate of the original image and ignored the prompt completely.
With the remaining images, Playground AI followed the prompt more closely as I lowered the number and veered further away from the original image whilst still keeping the general idea of the original image in mind.
How To Use Control Traits In Playground AI
The Control Traits tool is very similar to the Image To Image tool only more powerful in that it allows you to control the pose, edge and depth across images and again you’ll find it in the board area as well.
So, for example, if you had an image of a person sitting in a chair in the middle of a room with their legs and arms crossed, you can use Control Trait to control how closely those traits from the original image are used in the generated image.
Pose will allow you to copy the pose in the image as closely or loosely as you choose but it only works with people.
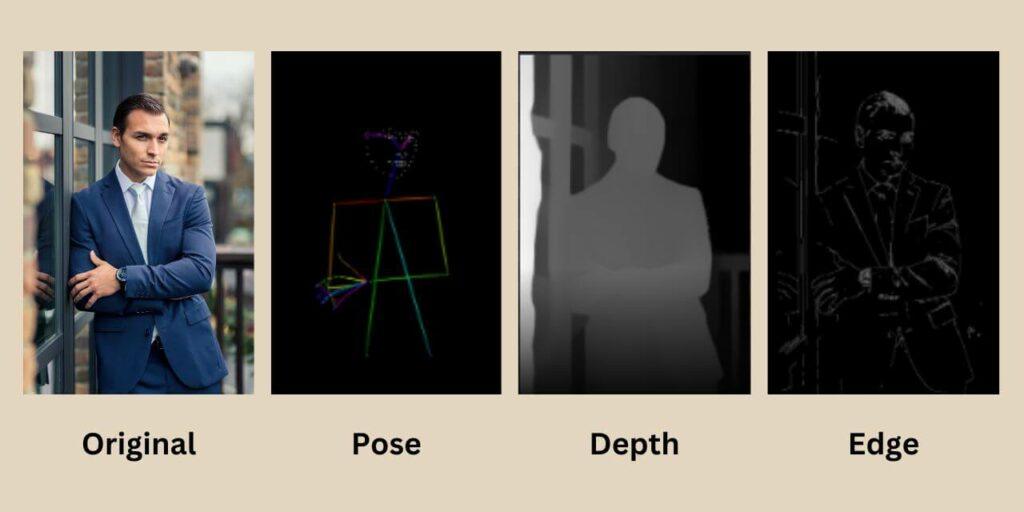
Edge will allow you to copy the edges and outlines in the image as closely or loosely as you choose and depth will allow you to copy the depths of all the elements within the image as closely or loosely as you choose.
Adding Traits From One Image To Another
To use Control Traits, scroll to the very bottom of the settings on the left-hand side of the screen and click the Add Control button. When the small window appears, click the Upload Image button to add your selected image.
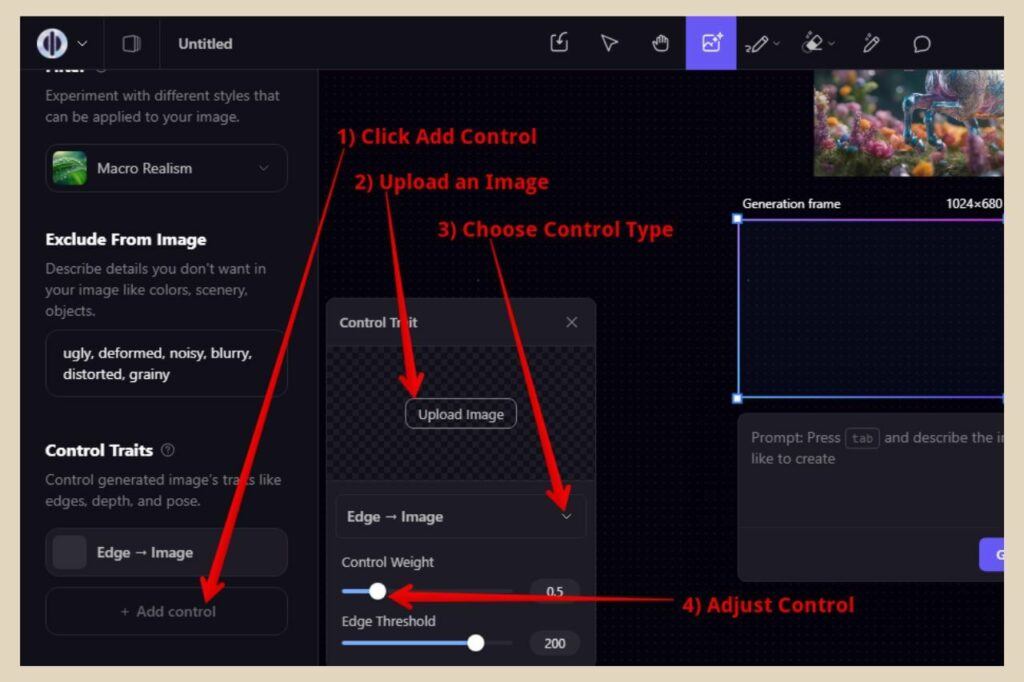
Next, select which control you’d like to use and then use the slider if you’d like to adjust how closely or loosely the trait is copied.
It’s best to start with the default settings and then adjust slightly until you get the desired result but generally the simpler the image, the lower the setting and the more complex the image, the higher the setting.
You can use one control or a combination and once you’re ready, describe the new image you’d like to create in the prompt box and then click the Generate button to see the results.
Canvas Image Options
At the very top of the canvas, you’ll notice a few more options that you can use starting with the Import Image icon which will allow you to import your own images into the canvas for editing.
The next icon is the Move/Select option to select and move your images around the canvas. This is followed by the Hand Tool/Pan option which you can use to move the canvas around (so essentially the replacement for scrolling).
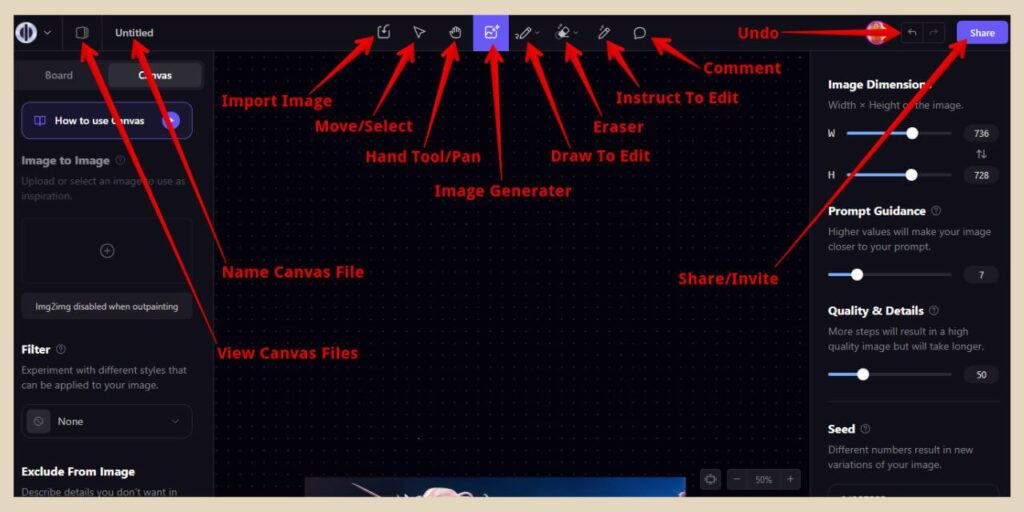
The next icon is the Generate Image option which is selected by default when you first land on the canvas area so anytime you want to get back to the regular image-generating canvas, this is the icon to click.
Next is the Draw To Edit icon which you can use to draw extra objects into your generated image. To use it, simply draw what you’d like to add to the area of your image and add its description to the original prompt.
Once you click the generate button, Playground AI will use your prompt and what you’ve drawn to generate a new image.
Editing In The Canvas Area
Next to this is the Eraser icon which you can use to erase areas of your images. The final editing option here is Instruct To Edit which is pretty much identical to the edit tool in the board area.
Simply select an area using the mask brush and then describe what you’d like to add, remove or change in the prompt box.
There is one final icon here and it’s the Comment icon so if you’d like to add a comment to your image, this is the icon to click.
You’ll also find an undo button in the top right corner next to your profile picture to undo any mistakes as well as a Share button which you can use to share and invite others to view or work on your canvas file.
Saving And Downloading Your Canvas Images
Now, you’re probably wondering how to save or download these images after all this work. Well, the canvas files themselves are automatically saved as you work much like a Google Doc or Sheet.
But if you’d like to download the images or save them to your profile with the rest of your generated images then you’ll need to do that one image at a time.

So, click the image that you’d like to download/save and you’ll notice that the right-hand side settings area will change.
It will now display all the details of the selected image including the prompt, seed and settings used to create it.
If you scroll down to the very bottom, you’ll also see some final options where you can adjust the light and colour settings before you finish. Once you’re ready, you can either copy, download or publish the image to your profile.
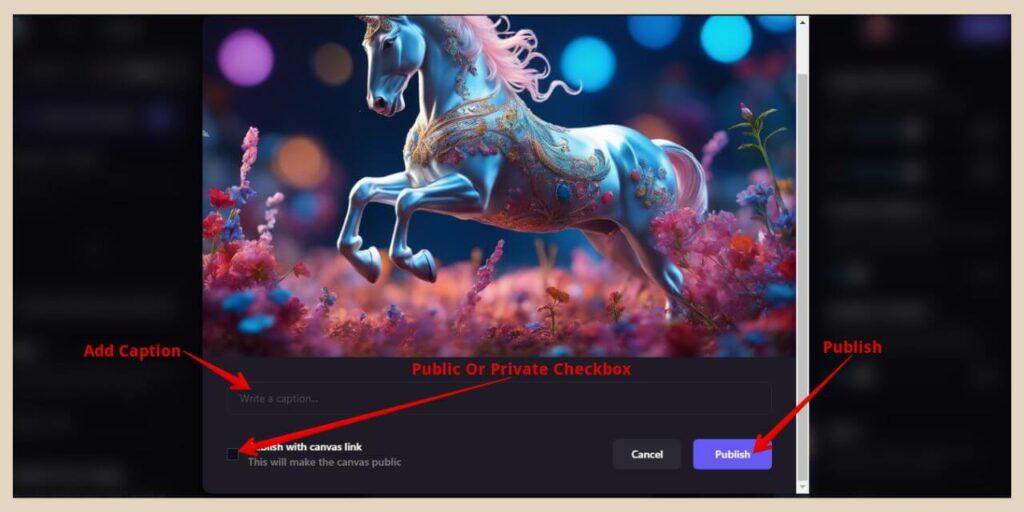
If you’re publishing to your profile and you want to keep the image private, just leave the “Publish with canvas link” checkbox unchecked and the image will remain private on your profile.
If you check this box, the image will be public so the Playground AI community will be able to see it.
Viewing Your Profile And All Your Images
If you’d like to view all your generated images, click the Playgropplund AI icon in the top left-hand corner of the screen followed by the Profile option from the menu that appears.
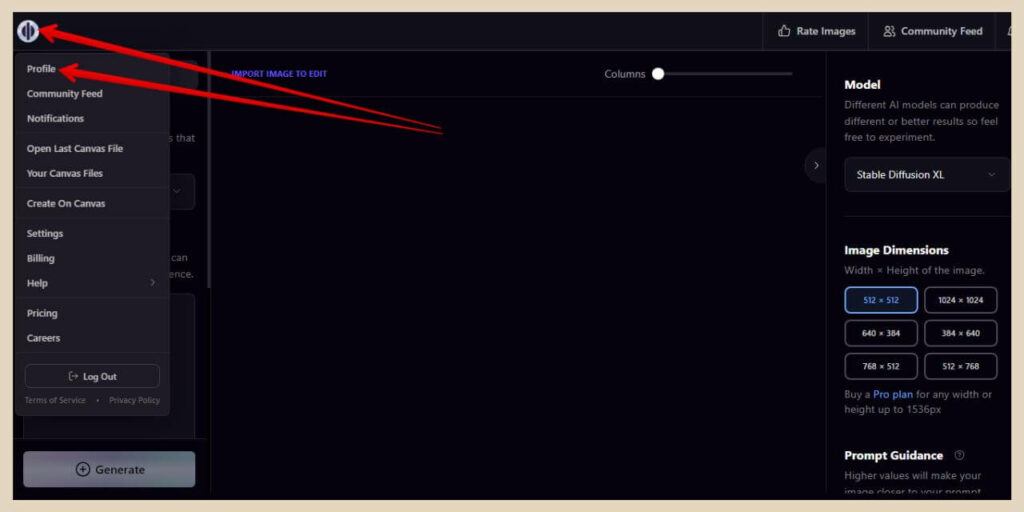
From here, you’ll be able to see all the images you’ve generated in the board area as well as any images you’ve published from the canvas area.
If you hover over any image, you’ll see a download icon, a delete icon, a like icon and a lock icon if the image is private.
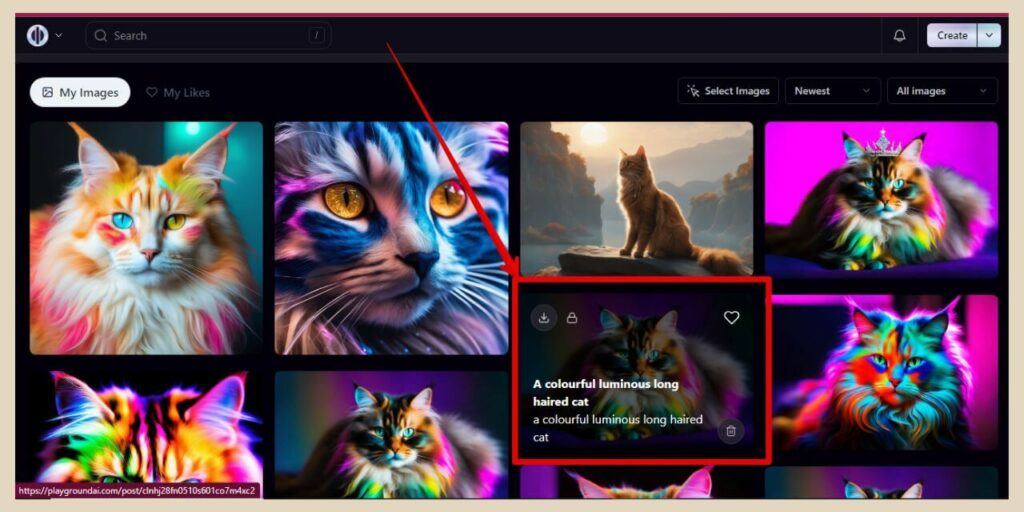
If you click on an image, a larger version will appear where you’ll see the prompt and settings used to create it as well as some more buttons to download, edit, etc.
You can also do the exact same thing in the Community Feed area (everyone else’s images) which you can access from the same Playground AI icon menu (directly underneath the Profile option).
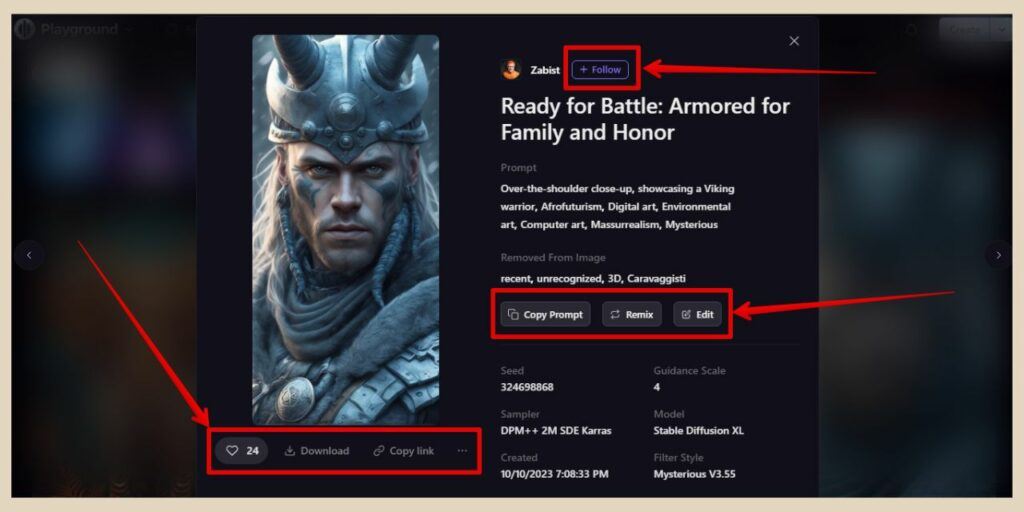
It’s also the main homepage so it’s where you’ll land every time you return to the Playground AI site and if you’re in the board area, you’ll also see a Community Feed link at the top right-hand side of the screen.
When you click on one of these community feed images, you’ll be able to download, edit, copy their prompts, etc just like your own images but you’ll also have the ability to follow the person who created the image as well.
Let’s Get Creative With Playground AI
As you can see, there’s a lot you can do in Playground AI and once you get the hang of using it, don’t be surprised if it becomes one of your go-to AI tools. I know it’s become one of mine.
It has more editing options than most of the other AI image-generating tools I use and it’s become one of the first ones I go to for all of my AI image creations.
So why not check out Playground AI for yourself and see what image masterpiece you can create with this seriously awesome tool that I for one love using.
I hope you’ve found this post helpful and if you feel like sharing your own thoughts and experiences with using the Playground AI image generator, please feel free to share them below. I’d love to hear all about it.
Happy Playgrounding!

Helpful Guides to Read Next
These beginner-friendly guides will help you keep building your blog step by step.

Jessie
Founder, nomorerush.com
Hi, I’m Jessie — founder of No More Rush. I help beginners build profitable, beginner-friendly blogs without the overwhelm or unrealistic expectations you see online. Everything here is built around simple, structured steps so you always know what to do next.