If you want to learn how to use Leonardo AI for all your image creations then this post is just for you.
I’ve been spending a lot of time recently playing around with several different free AI image generators and Leonardo AI is up there with some of my favourites.
It has a pretty generous free plan of 150 tokens that resets daily and all your generated images can be used for commercial use.
For this tutorial, I’ll be using the free plan but there are upgraded paid plans if you need more than what the free plan offers.
It’s also pretty easy to use even for the most novice of users and the quality of the images that it produces can be pretty epic once you get the hang of using it.
I use several AI tools but the AI image generators are my favourites and you’re about to see why. So, let’s jump straight into this to see what we can do with Leonardo AI.
How To Use Leonardo AI
To get started, you’ll need to head over to Leonardo AI to create a free account where you’ll have several methods to sign up.
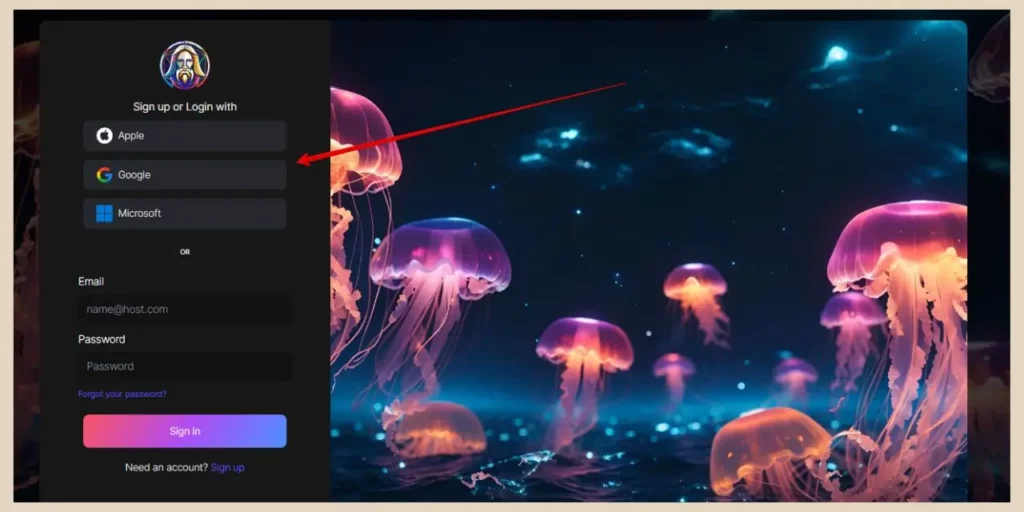
From here, you’ll be prompted to sign up using either your Apple, Microsoft or Google account so choose your preferred method to create your account.
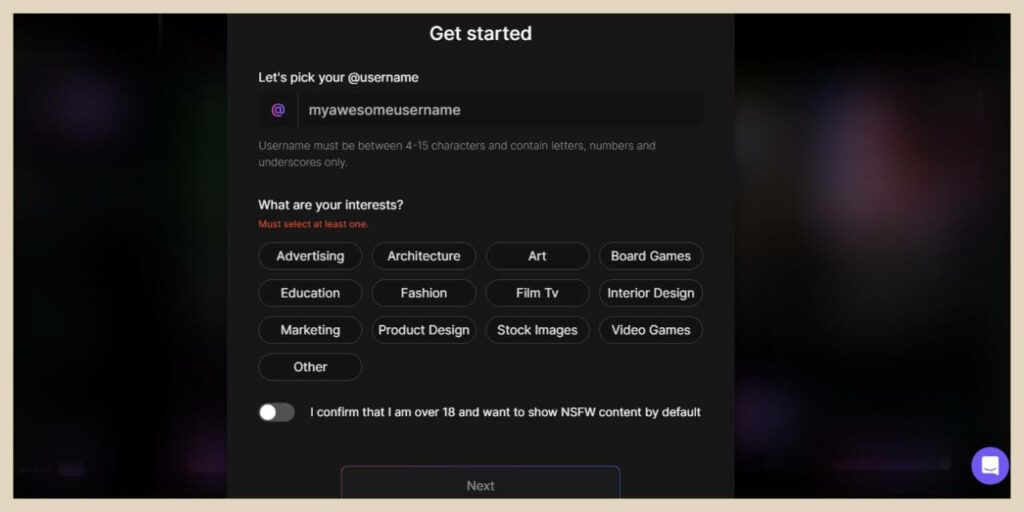
Once you’ve signed up, you’ll just need to create a username and select a few interests from the options listed and then you’ll have access to the Leonardo AI App platform.
There used to be a whole whitelist thing to get early access to the platform but that seems to be gone now.
Your Daily Tokens
So once you’re on the platform, you’ll notice near the top left-hand corner, a little token icon with 150 written next to it.
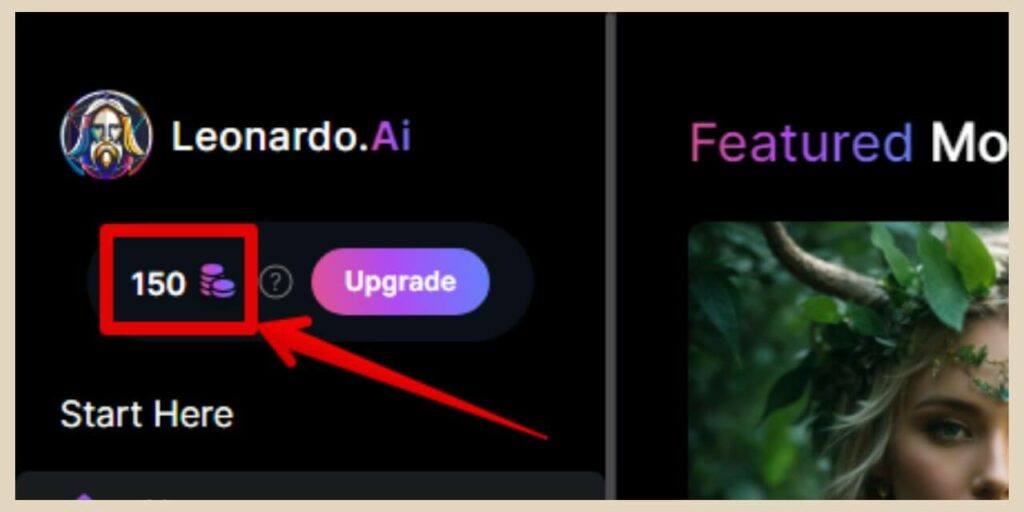
These are your daily tokens and as I mentioned a moment ago, as a free user, you’ll get 150 of them which will reset daily to generate images.
However, with this particular image generator, one token doesn’t necessarily mean one image.
Depending on the size of the image and whether or not you’ve used some of Leonardo AI’s extra features, the token cost of images can vary drastically so I’ll show you some examples of that as I move through the tutorial.
For now, let’s take a quick look around the homepage and how to navigate your way around the Leonardo AI platform.
Navigating The Leonardo AI Platform
Leonardo AI is pretty user friendly so it’s easy to use and to get around from the homepage.
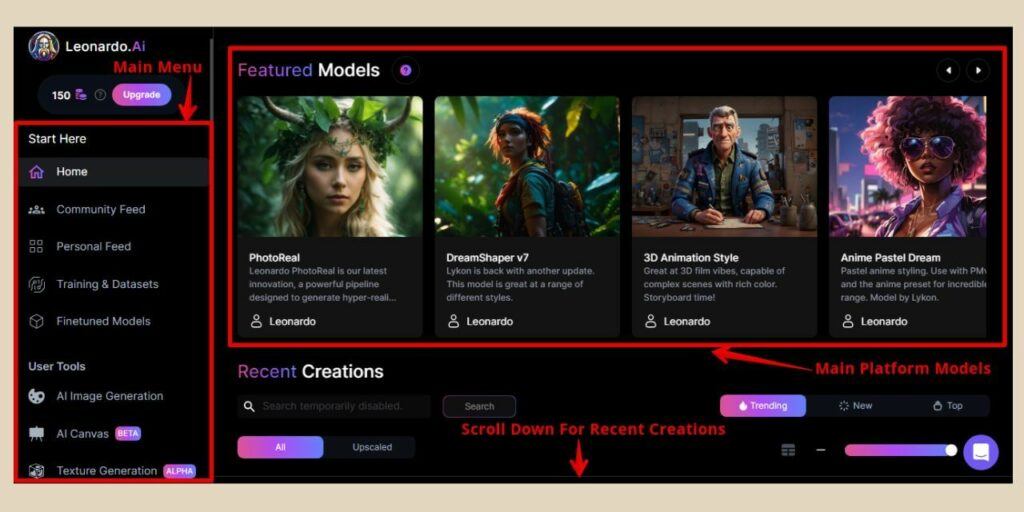
On the left-hand side of the screen, you’ll find the main menu and from here, you’ll be able to navigate throughout the entire platform so click any of the navigational links to take you to the corresponding areas which are:
- Community Feed – Other people’s generated images.
- Personal Feed – Your generated images.
- Training & Datasets – Where you can create and train your own fine-tuned model.
- Finetuned Models – Models that you can select to change the style of your images.
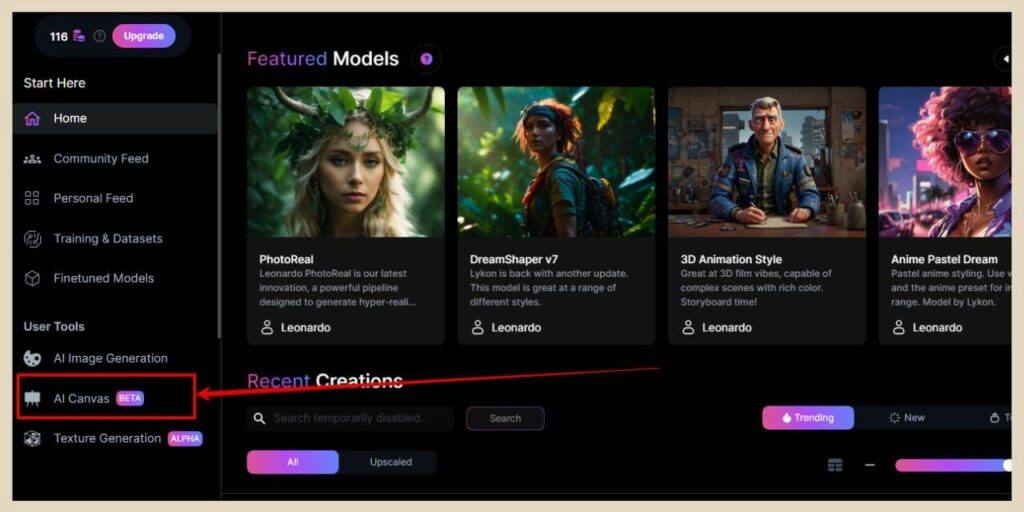
- AI Image Generation – The main AI image generation area where you can create your images.
- AI Canvas – A more powerful editing area where you can also generate images.
- Texture Generation – An area for uploading 3D models and applying textures.
If you scroll down, you’ll find a few more menu options including settings, API Access and an FAQ/Help section if you need it.
Lastly, in the main area of the homepage screen, you’ll see a selection of fine-tuned models at the top which you can scroll through using the arrows in the top right corner.
I personally find it easier to use the Fineturned Models area from the main menu as it has the full selection there but this is a quick way to select one of the main platform models.
And then below this, you’ll find Recent Creations which is essentially the same as the community feed area where you’ll see a feed of all the new images created by other members of the community.
If you’re ever stuck with what to create then you can use these images as inspiration which I’ll go into in more detail further down.
How To Generate Images In Leonardo AI
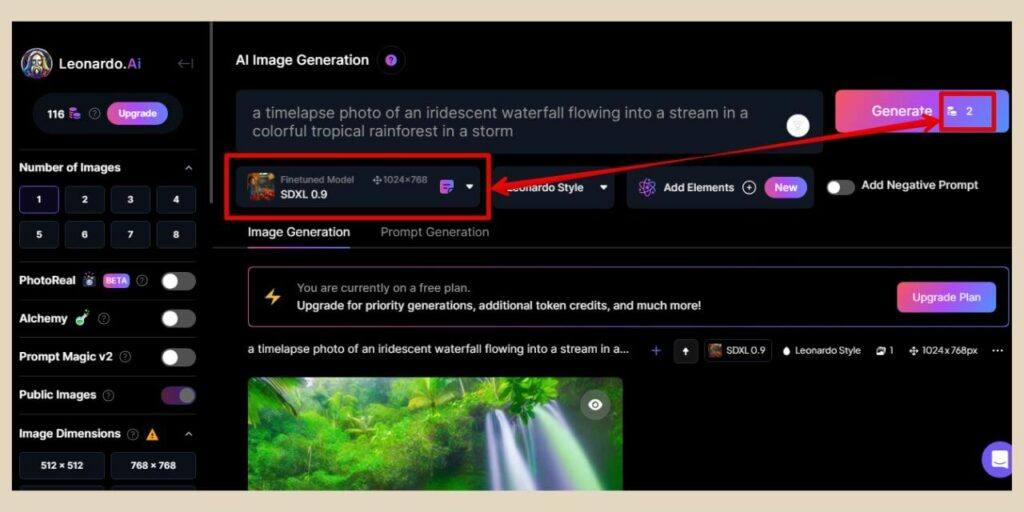
To start generating images in Leonardo AI, click the AI Image Generation option from the main menu on the left of the screen.
From here, you’ll be taken to the image generation page where you’ll have several options for generating your images.
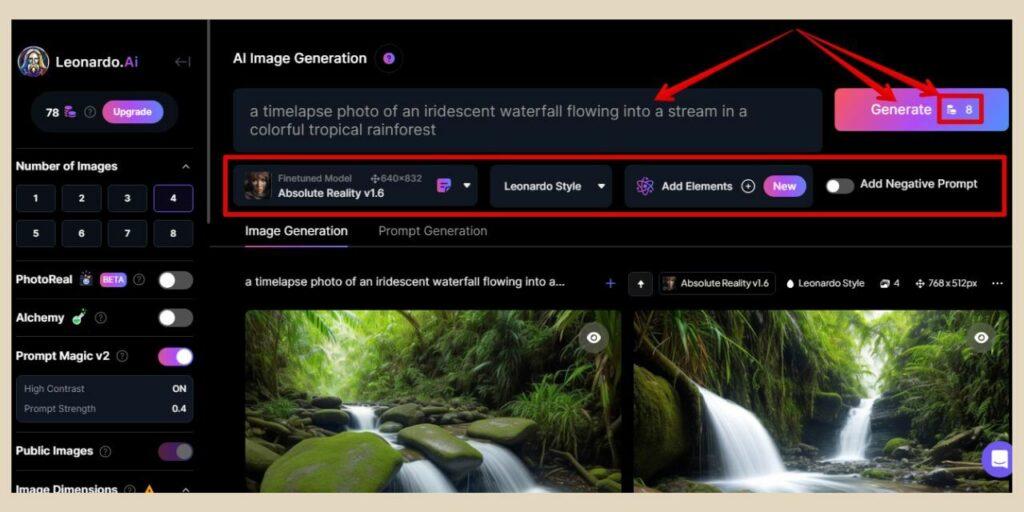
Across the very top of the page, you’ll find the prompt box which is where you’ll type in the description of the image you’d like to generate.
To the right of that is the Generate button which will also tell you how many tokens it’s going to cost you to generate images with your current settings.
Directly below this, you’ll find four settings that you can use to change the types of images generated.
The first one is the finetuned models and by default, there will only be certain ones listed here in the dropdown menu.
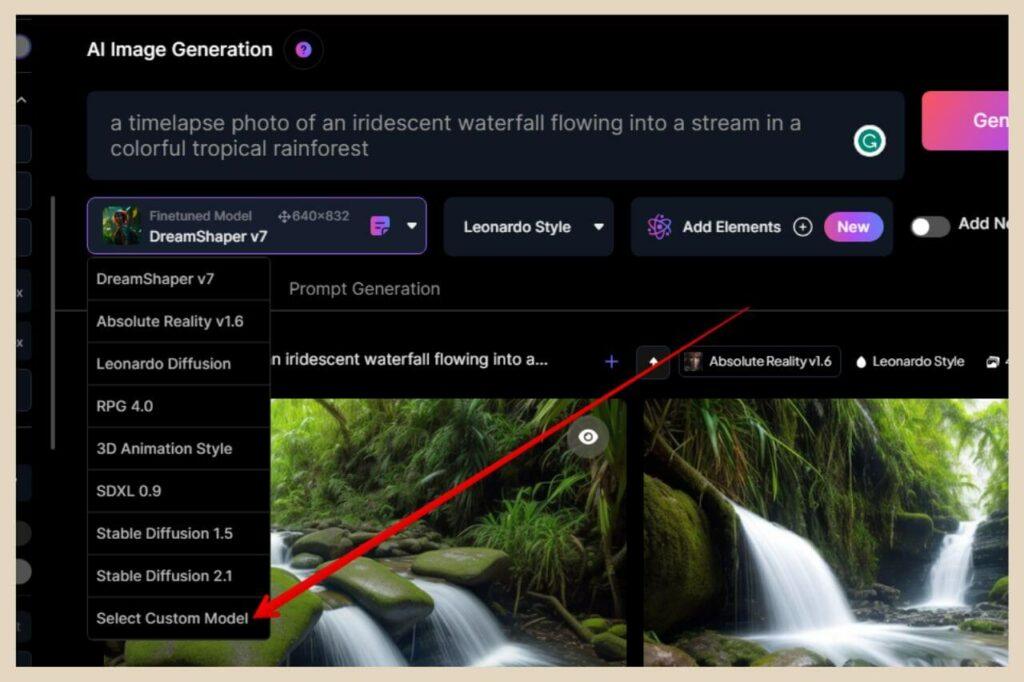
However, if you click the “Select Custom Model” option at the bottom of the dropdown menu, it will take you to the full Finetuned Models page where you’ll be able to see the full selection of models available.
Once you select one, it will bring you back to the image generation page and that selected model will now be added to the dropdown menu if it wasn’t there already but just note that some models use more tokens than others to generate images.
Choosing An Image Style
The next option is Style but if you’re a free user, you’ll only have the option of Leonardo Style or None.
However, when you first sign up to Leonardo AI, you’ll get a short free trial of the paid feature, Alchemy which is a feature that generates higher-quality images (More on Alchemy in a moment).
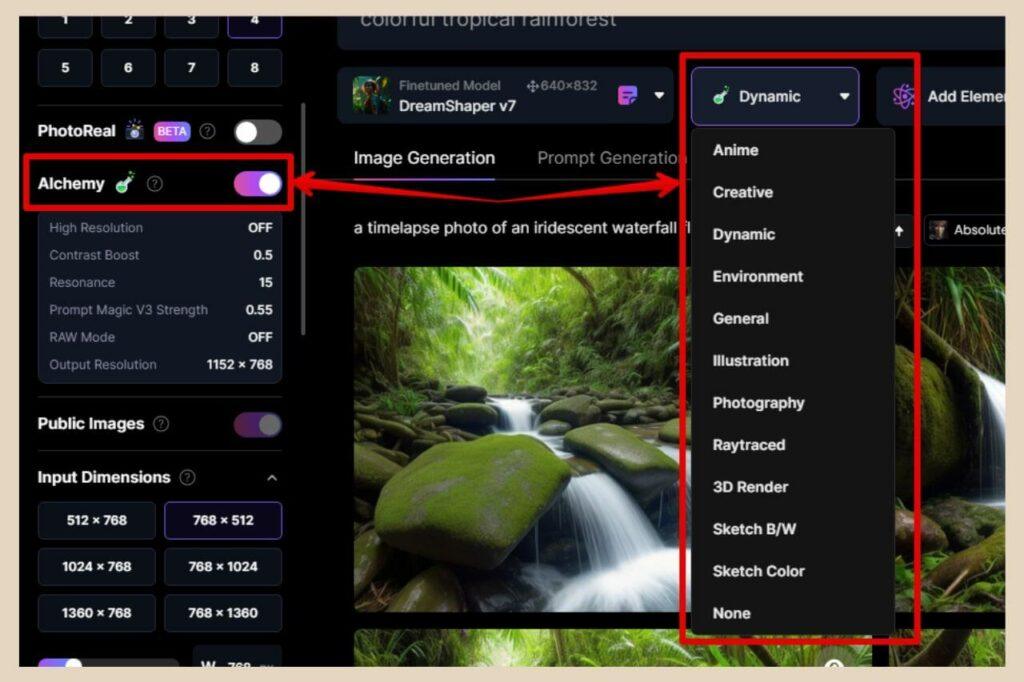
Turning the Alchemy feature on will cost you more tokens per image generation but it will also give you a lot more style options but again, it’s a paid feature that you can only use for a short trial period.
The next option is Add Elements and this is a very cool tool for adding element styles to your images like a glass & steel element style or an inferno element style.
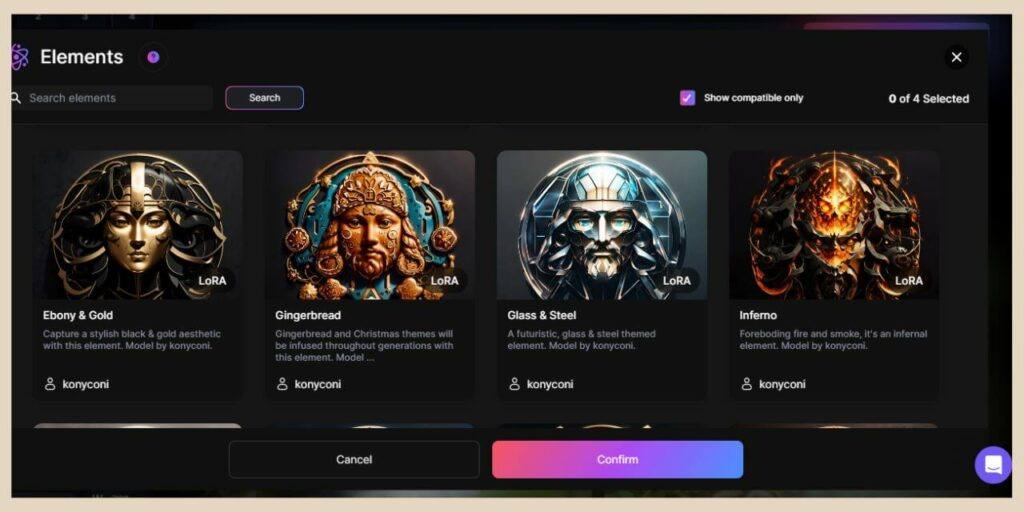
You can add one or combine up to four to create some very interesting image results and you can even control the element weight which basically means how much effect the elements have on the image.
I’ll show you some examples of this further down once we’ve generated some images.
The final option here is Add Negative Prompt and this is simply a way of excluding things you don’t want to appear in your image.

If you click the Negative Prompt toggle button to on, a brand new prompt box will appear below the main prompt box but this one will be for the things that you don’t want to appear in the image.
Image Generation Setting
The next area where you can adjust the settings for the images that you generate is the settings area on the left-hand side of the screen.
It starts with the number of images that you can create per generation and you can choose between one or eight images at a time.
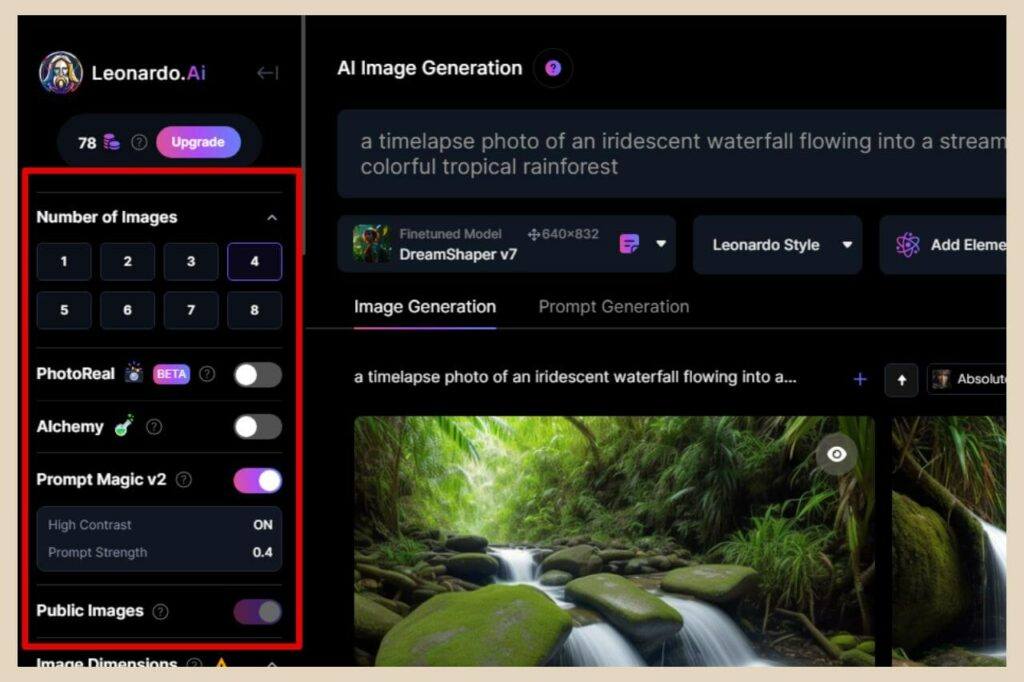
Beneath this, you’ll find three extra features that you can enable to enhance your images but turning these on will increase the token cost for your image generations.
The first one is PhotoReal which is a finetuned model that helps create hyper-realistic photos but it requires Alchemy to work.
Turning this feature on will automatically turn on Alchemy too. You also won’t be able to select a model whilst PhotoReal is enabled.
Using The Alchemy Feature
Alchemy is the second feature which helps create better image quality and enables more style presets.
Alchemy can be used alone without PhotoReal and the extra token cost remains the same regardless of whether PhotoReal is turned on or off.
The third feature is Prompt Magic v2 which helps produce better images from your prompts and this feature is included in the free plan.
You’ll notice in the image above that there’s a box underneath Prompt Magic and you can actually click on this to adjust the settings.
If you enable Alchemy and PhotoReal, the Prompt Magic feature will disappear, but you’ll also see similar settings under each one which you can also click on and adjust.
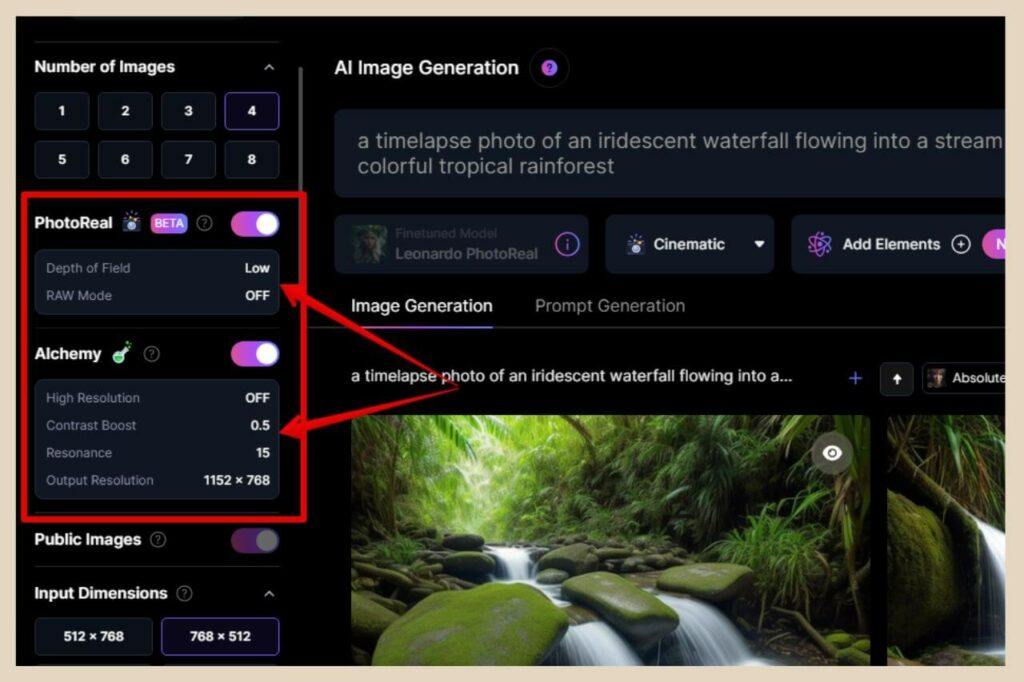
For the most part, I personally rarely change any of these except for the Alchemy settings which the Prompt Magic feature has now become part of.
Although Prompt Magic and PhotoReal can’t be used at the same time so it will be set to off by default whenever PhotoReal is enabled.
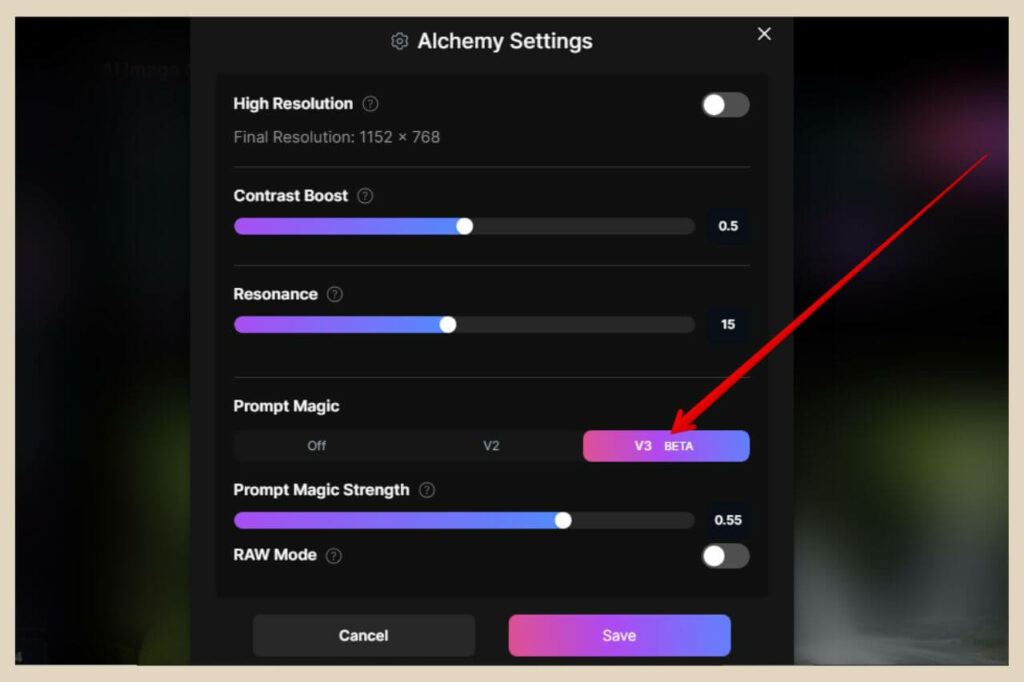
You can either leave it set to off or you can choose between the v2 version (the free version you can use when Alchemy is switched off) or v3 which is a more powerful version only available with Alchemy (both of which will automatically turn PhotoReal off if enabled).
As I mentioned, other than the Prompt Magic setting in Alchemy, I tend to leave the rest at their default settings but you can play around with them to see how the changes affect your generated images.
Public Images
The next setting here is the Public Images setting which is set to on by default. Unfortunately, as a free user, there’s no changing this as you need to be a paid user to avail of the ability to make your images private.
This means that all your generated images are public on the community feed so other members can download or edit your generated images and copy your prompts.
The next setting is Image Dimensions and you can use either one of the six preset sizes, use the size sliders or use the Aspect Ratio dropdown to select your image size preference.
Keep your eyes on this one though because numerous changes to other settings can adjust this automatically like changing the finetuned model or adding an image to the Image To Image tool for example. For this reason, I tend to set my size last once I’ve finished with all the other settings.
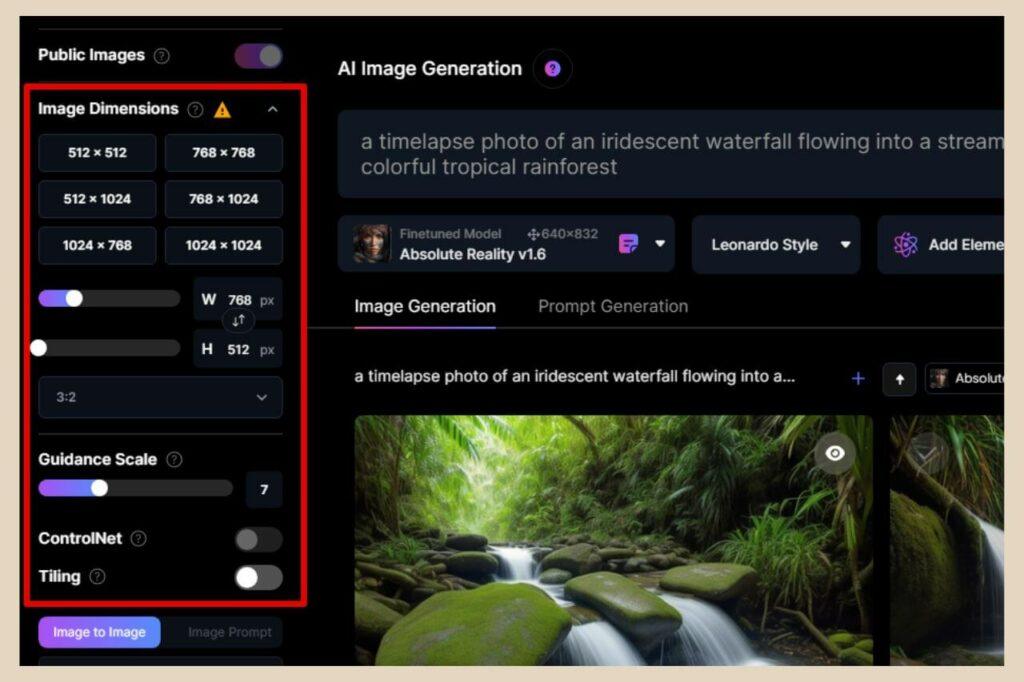
Guidance Scale is the next setting and by default, it’s set to 7 which also happens to be the recommendation. This is basically how closely or loosely the AI follows your prompt so I tend to leave this at the default setting.
This is followed by the ControlNet setting which you can use to control certain traits like pose or depth when you’re using the image-to-image tool which I’ll show you in a moment. The next setting is Tiling which can help you repeat textures and backgrounds within your images.
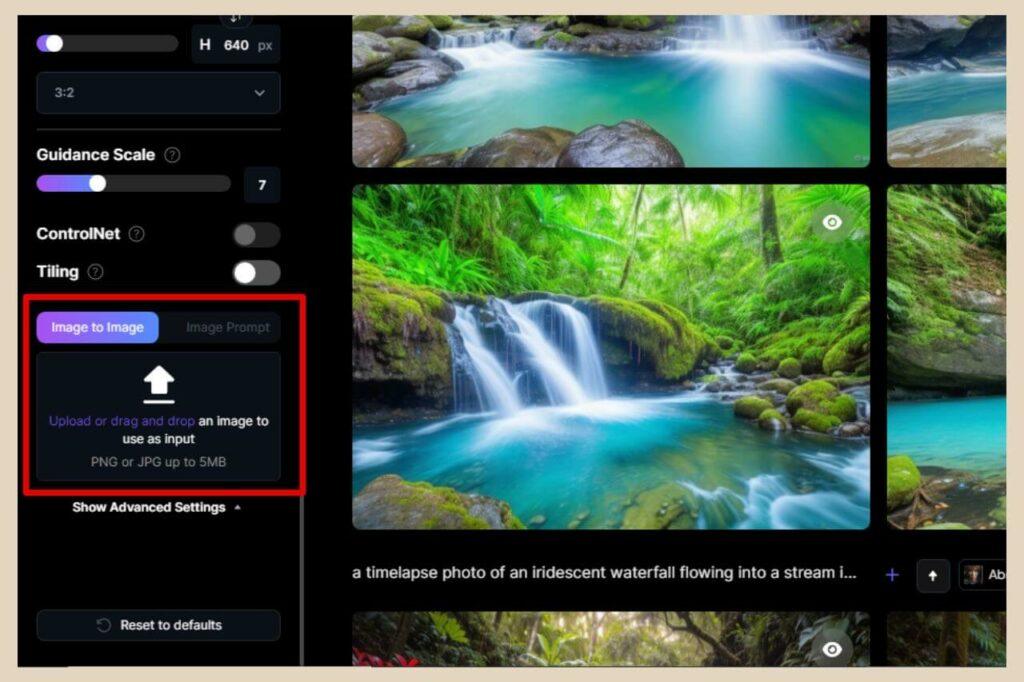
How To Use Image-to-Image In Leonardo AI
The next setting is the Image To Image setting which lets you use an image as inspiration for your prompts. To use it, you can either upload your own image from your device or use one of your generated images.
Once you’ve selected an image, you can use the Init Strength slider that appears beneath it to control how much of the original image is preserved in the newly generated one.
With this slider, the higher the Init Strength is set, the closer the generated image will look to the original.
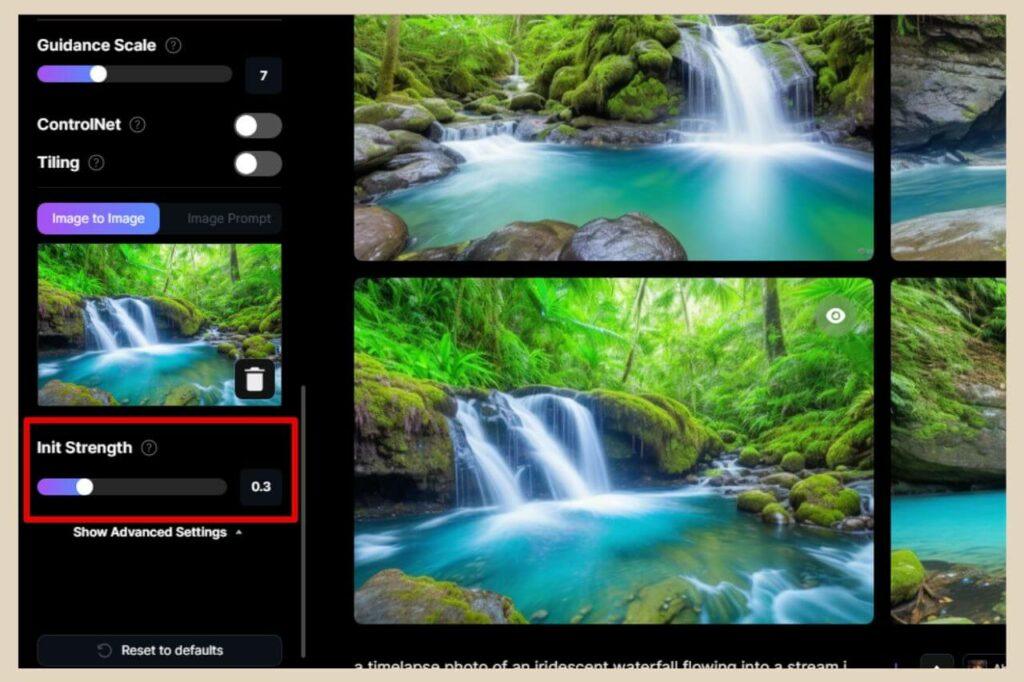
You’ll also now be able to use ControlNet if you want to copy over certain traits from the original image however if you turn ControlNet on, the Init Strength setting will be disabled.
Using ControlNet
With ControlNet, you’ll be able to copy four different traits from the original image and they are:
- Pose To Image – Copy the pose in the original image, ie, arms crossed, head in hands, leaning over, etc (only works with people).
- Edge To Image – Copy the edges and outlines in the original image, ie, objects, people, buildings, walls, doors, windows, etc.
- Depth To Image – Copy the depths in the original image, ie, the distances of elements within the image like the depth of a room with one person at the very forefront of the image, another standing further back in the image and the room wall at the very back of the image.
- Pattern To Image – Copy the pattern in the original image, ie, the overall patterns within the original image.
To use ControlNet, simply select the trait you’d like to copy using the dropdown box and then use the slider to select how closely or loosely the trait is copied.
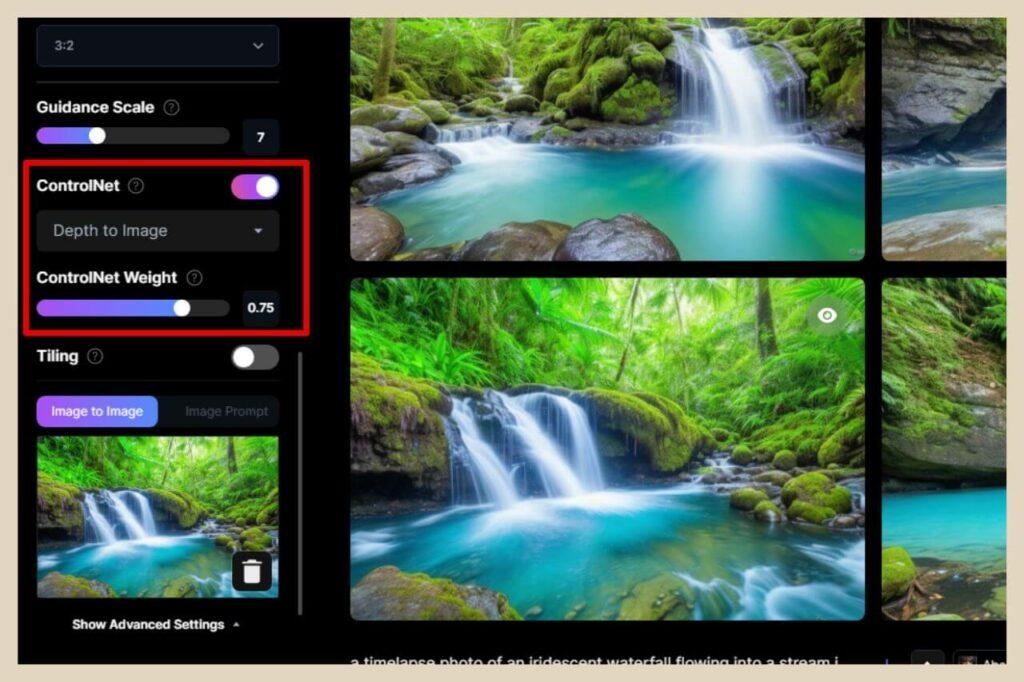
Then type your description of the image you’d like to generate into the prompt box and Leonardo AI will generate an image based on the prompt and the ControlNet settings combined.
How To Use Image Prompt
To the right of the Image To Image button, you’ll notice an Image Prompt button which is very similar to Image To Image but you’ll have the ability to add more than one image for inspiration.
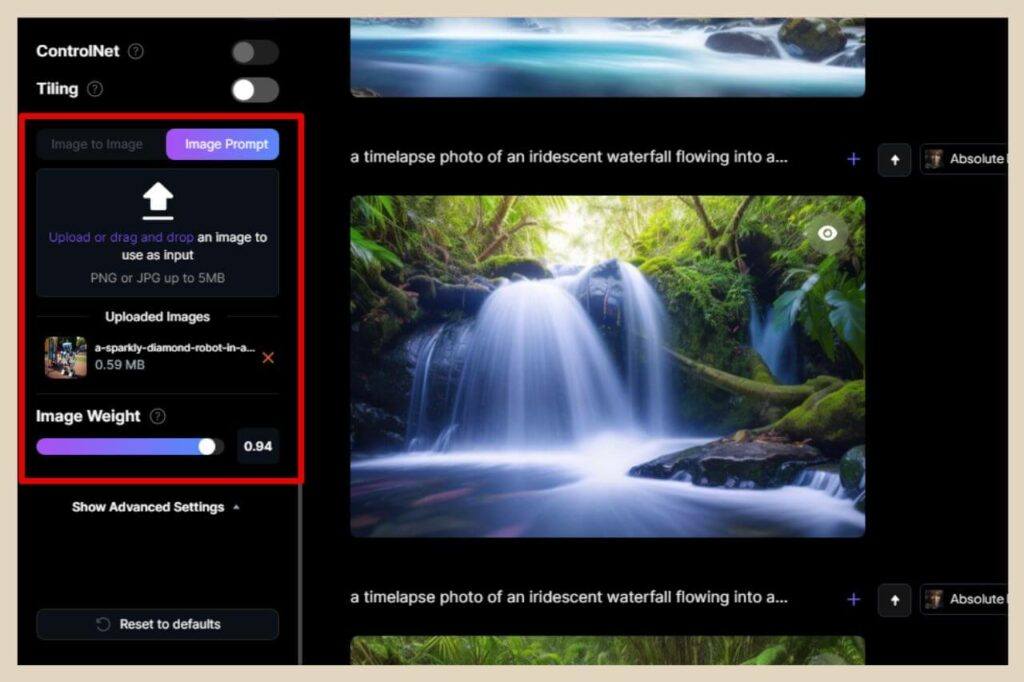
To use Image Prompt, the Prompt Magic v2 feature needs to be switched on first before you can select it. From here, you can upload up to five images as inspiration for your prompt.
You can then adjust the Image Weight slider to determine how much weight the reference images will have against the text prompt.
So the higher the image weight, the closer the results will be to the reference images whereas the lower the image weight, the closer the results will adhere to the text prompt.
Beneath the Image To Image area, you’ll see a Show Advanced Settings link and if you click this, a couple of more settings will appear underneath.
The first one is Recommended Sizes which is switched on by default. This automatically selects the image dimensions that best suit the finetuned model you’ve selected (the image size the model was trained with).
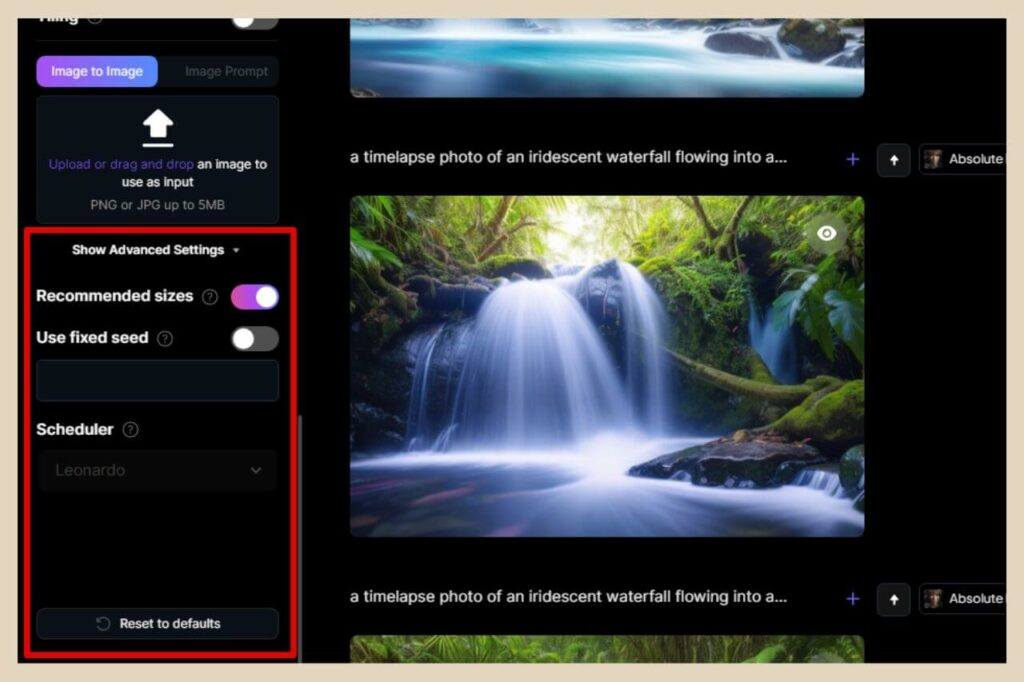
You can still select your own custom size but you may notice a little warning triangle that will suggest you stick with the recommended size for best results but honestly, the image dimensions make very little difference to the quality.
Using A Fixed Seed
Underneath this, you’ll find the Use Fixed Seed option which will be turned off by default. This is what allows you to get different image results with every generation even if the prompt and settings remain the same.
AI images have their own unique seed number and you can use AI image seeds to make duplicates or variations of AI images you like.
Usually using the same seed number (I’ll show you where to find that further down) and keeping all the other settings the same will let you generate the exact same image again.
You can also use the seed number to generate variations of an image you like by making slight changes to the number, for example, changing the first or last digit.
You can also make variations by keeping the seed number the same but making changes to the prompt or other settings instead.
The final setting here is Scheduler which defines how noise affects the generation but this is a paid feature only.
Some AI image generation platforms refer to them as Samplers and changing them makes subtle changes to the generated images (although some aren’t as subtle as others).
And finally, if you want to reset all the settings back to their defaults, there’s a Reset To Defaults button at the very bottom of the settings area.
Token Cost Of Generating Images In Leonardo AI
Let’s now get to the image generation and how much it will cost you to generate images. There are so many variables here that can affect the token cost but I’ll try my best to give you an idea of the main token eaters and how they affect the quality of your images.
The first one is the finetuned model you use and although most of them won’t cost extra tokens to use, there are a small handful that will like SDXL 0.9 for example which can up the token cost by double or more.
The next one is the image dimensions in that the larger the image, the more tokens it will cost to generate it (again watch out for this when changing finetuned models if you have the recommended sizes option enabled in the advanced settings).
So if you use a regular token cost model (which is most of them) and turn off all three features, PhotoReal, Alchemy and Prompt Magic v2 and then select any of the first five image sizes, it will only cost one token per image.
It also doesn’t matter if you change the aspect ratio either (I always use 3:2), it will still only cost one token per image.
Larger Images Cost More Tokens
However, if you select the last size option of 1024 x 1024, it will cost two tokens per image regardless of any changes you make to the aspect ratio.
If you use the sliders and go even higher, it will cost 3 tokens per image and then eventually 4 tokens per image if you go all the way to the end again regardless of any changes you make to the aspect ratio.
For this reason, I tend to use the smaller sizes and then change the aspect ratio. From here, I can just resize the image in the likes of Canva and conserve my tokens in the process.
Token Cost Of Using The Extra Features
The third thing that affects token cost is using the extra features. The Prompt Magic v2 feature isn’t too bad in that it only doubles the token cost so if you’re using the smaller sizes and a regular finetuned model, it will now cost you two tokens per image instead of one.

Alchemy, however, is a very different story. If you turn on Alchemy, it will cost you 16 tokens for one image using the smaller sizes and 26 tokens per image using the largest.
It won’t cost you any more though if you also turn on PhotoReal (Alchemy has to be turned on in order to use PhotoReal so really it’s Alchemy that’s eating up all your tokens).
One thing I will mention though, obviously if you’re generating more than one image at a time, the token cost will reflect that so if it’s one token for one image then generating four at a time would be four tokens.
However, when you’re using Alchemy, it’s a little different because the token cost is reduced if you generate more than one image at a time. For instance, generating two images at once will still cost 16 tokens.
If you generate four images at once, it will cost you 20 tokens or if you generate eight at once, it will cost 32 tokens so with Alchemy, it’s better token value to generate more than one image at a time.
Image Examples And Token Cost To Generate Them
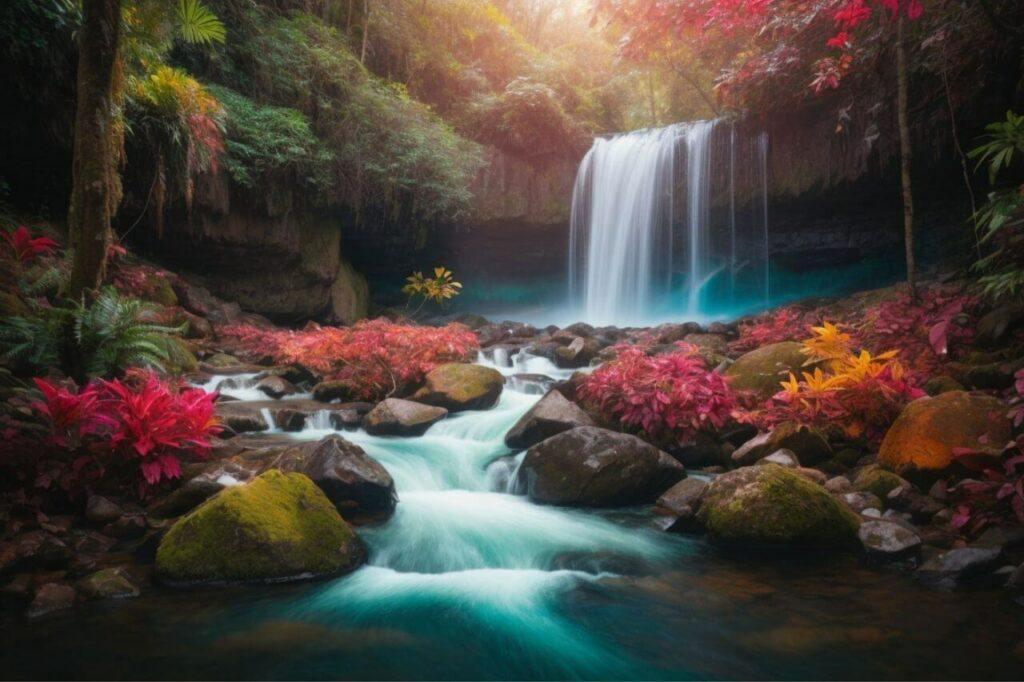
Below are some examples of the quality of images that you can generate with the different features enabled or disabled and what it costs to generate them using the smaller sizes.
I used the same prompt of “A timelapse photo of an iridescent waterfall flowing into a stream in a colourful tropical rainforest” for all the images and this is how they compared.
I generated four images at a time but I’ve picked the best one from each set of four to show you.
Images With Alchemy
The first image below was generated using Alchemy, PhotoReal and the Vibrant Style and it cost 20 tokens for four images.
This next image was also generated using Alchemy, but I turned off PhotoReal and used the Absolute Reality v1.6 model instead. The Prompt Magic was set to v3 and the style used was Dynamic. This also cost 20 tokens for four images.
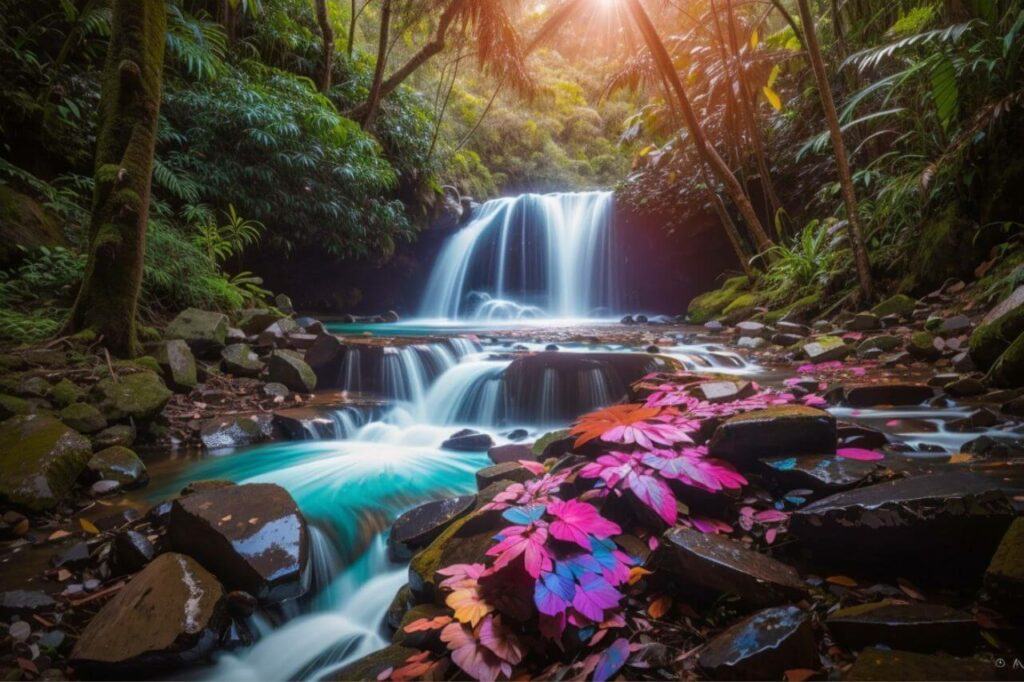
Using the Alchemy feature adds a certain look to your images and you’ll easily notice the difference when it’s switched off.
Images Without Alchemy
The next image was generated with Alchemy turned off. This image used the Absolute Reality v1.6 model with Prompt Magic turned on and the Leonardo Style. It cost eight tokens for four images so 2 tokens per image.
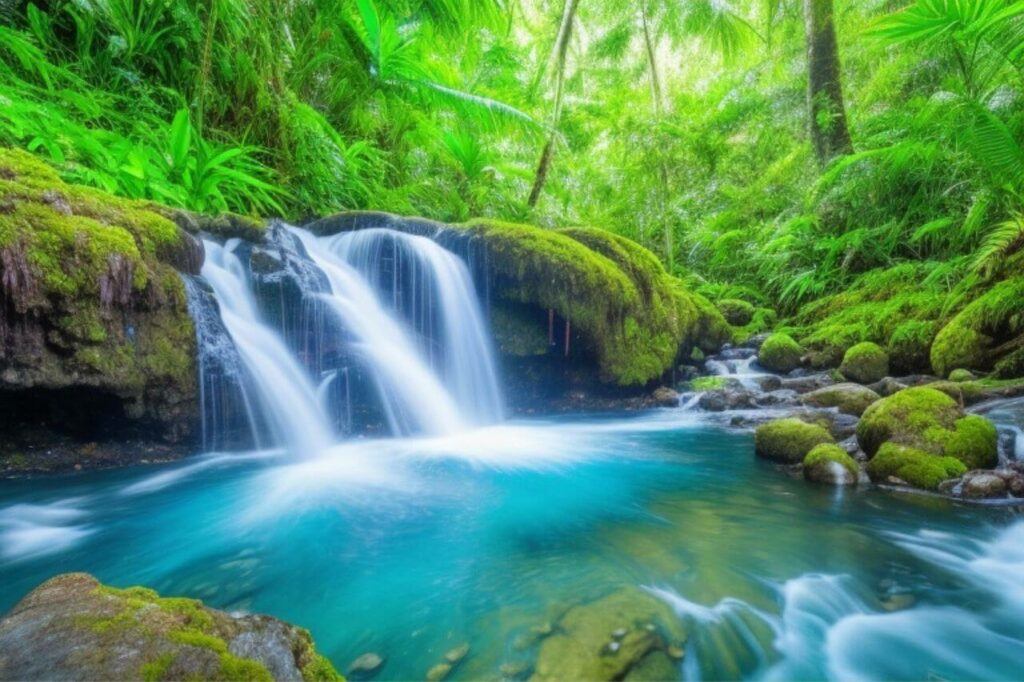
The final image below was generated with all three features turned off so all that was used here was the Absolute Reality v1.6 model and the Leonardo Style at a cost of four tokens for four images so one token per image.
So, you can see how the different settings affect the results of the generated images but remember, as a free user, you’ll only get to use the Alchemy and PhotoReal features for a short time as a trial.
Once the trial is over, you’ll have to upgrade to a paid plan in order to continue using it but as you can see from the above images, you can still generate great images without it and at a lower token cost.
Adding Elements To Your Generated Images
As I mentioned earlier, there’s one more thing that you can add to your images for some interesting effects and that’s adding elements. To add elements, click the Add Elements button at the top of the screen.
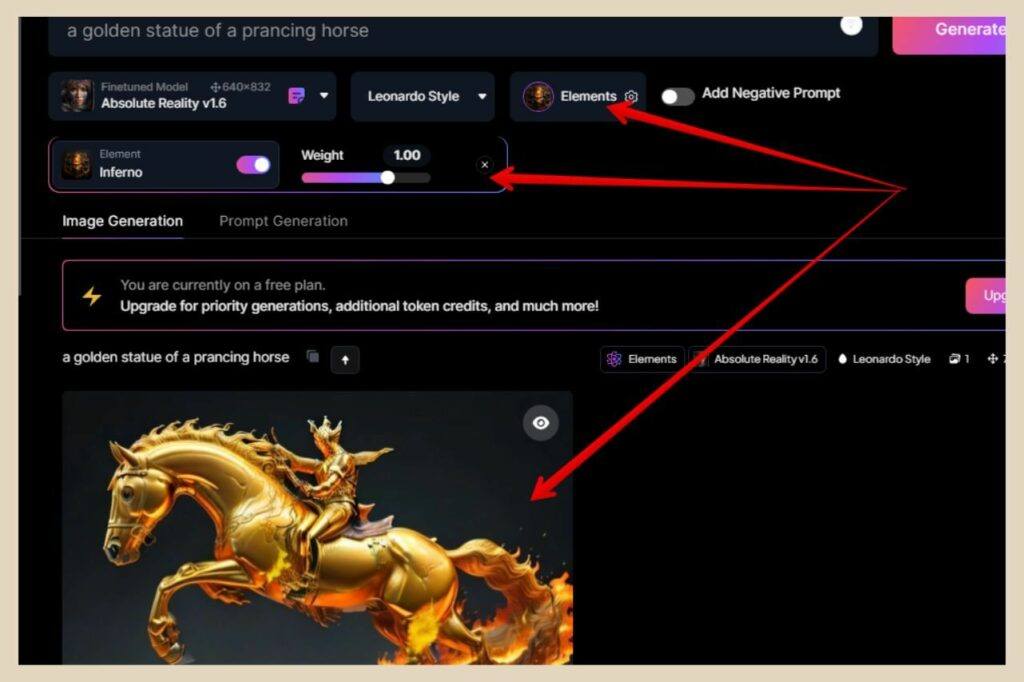
When the pop-up window appears, select the element you’d like to add and it will be added just below the Model/Style selection area.
From here, you can use the weight slider to determine how much the element influences the result of the generated image.
You can add up to four elements at a time although the recommendation is to lower the weight if you use more than two and different models will have different compatible elements so changing up the model will give you different element choices.
Image Options
Once you’ve generated your images, if you hover over them, you’ll see some further options which will allow you to do more with them.
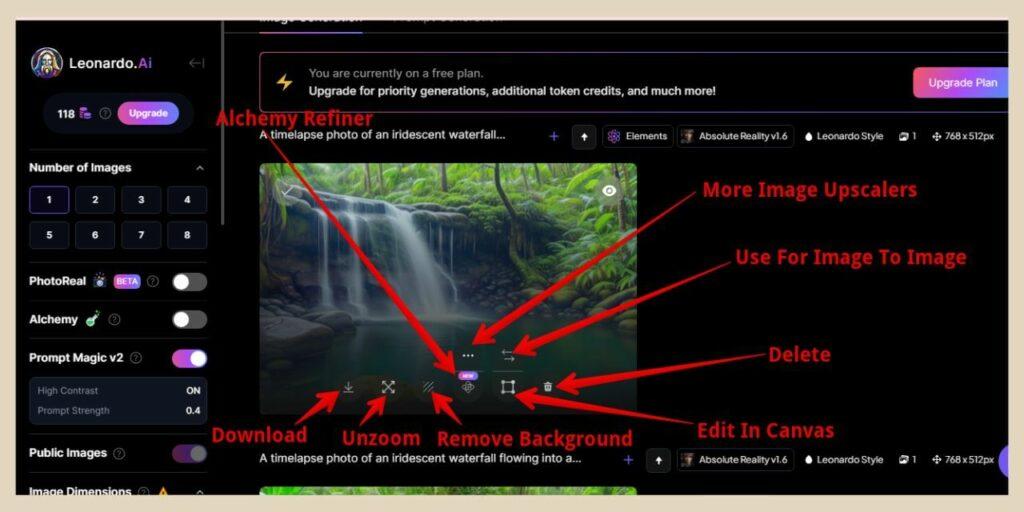
Some options cost nothing whilst others cost different token amounts and these options are:
- Download Image – Download the image to your device – No token cost.
- Unzoom Image – Zooms out slightly to give you a wider view of your image – Costs five tokens.
- Remove Background – Remove the background from your image – Costs two tokens.
- Alchemy Refiner – Refine and upscale your image – Paid Feature.
- Edit in Canvas – Edit your image in the Canvas editor (more on that further down) – No token cost.
- Delete – Delete your image – No token cost.
- Use For Image To Image – Use the image as inspiration with the Image To Image tool – No token cost.
There is one more button here which is the More Image Upscalers button which gives you a few more upscaling options to help improve your image and each one will cost you five tokens to use.
Finding The Prompt Details For Your Images
You’ll also see some details directly above each set of generated images and this is where you’ll find all the information related to what was used to generate the image/images.
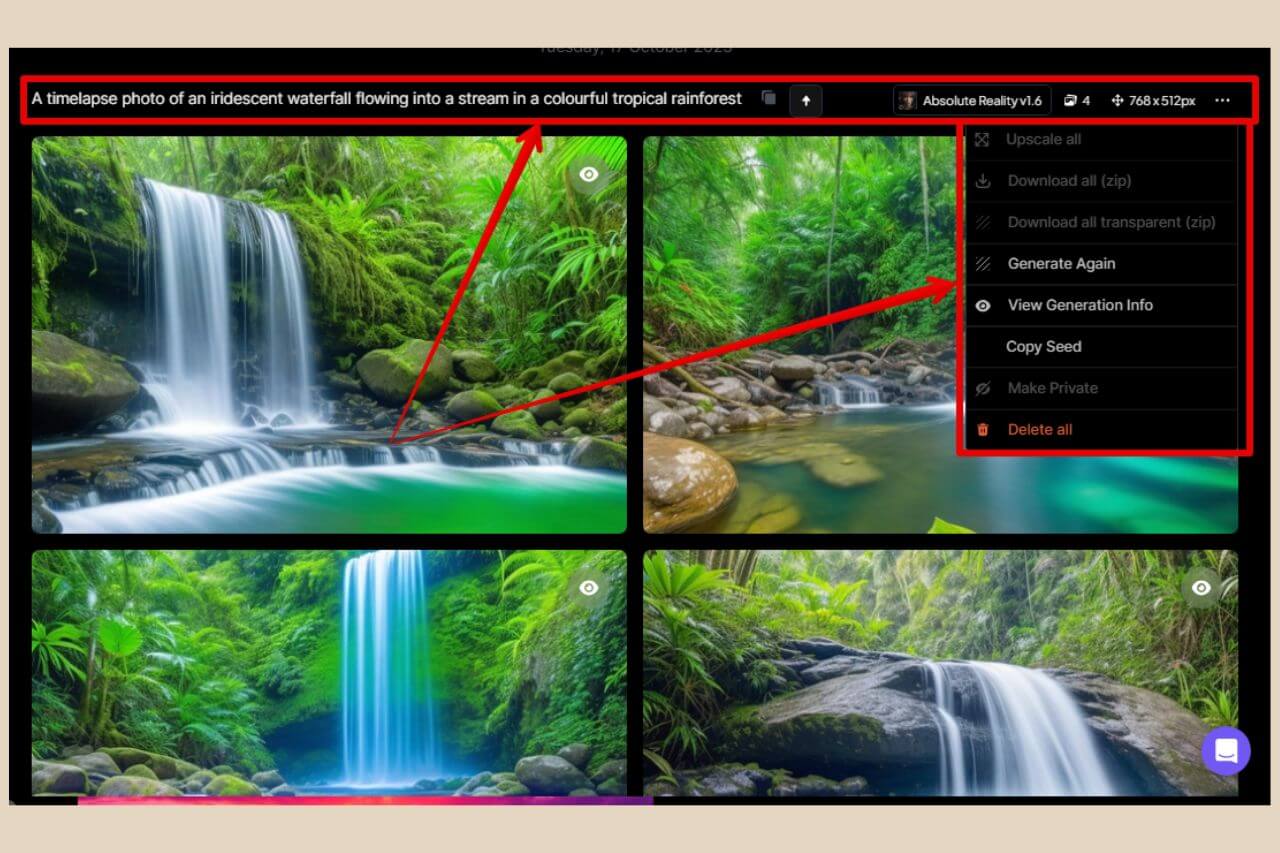
You’ll also have the option to reuse the prompt or copy the prompt using the first two buttons on the right of the prompt used.
If you click the three dots on the far right, another small menu will appear where you’ll be able to Generate Again, Copy Seed or View Generation Info.
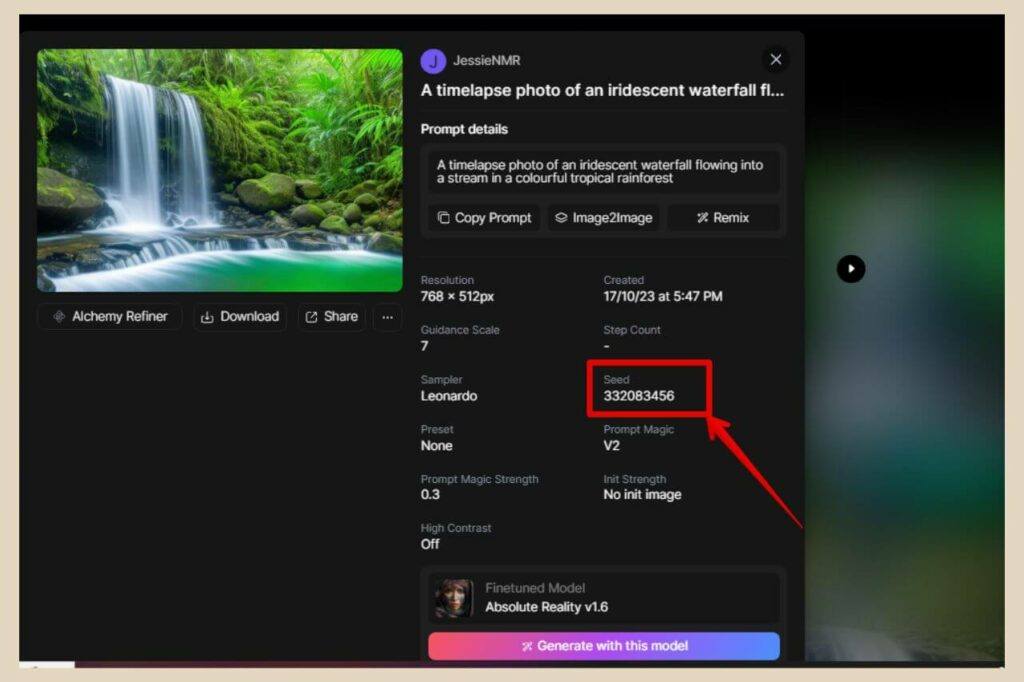
When you click the View Generation Info link, a new window will appear where you’ll see a few buttons to download, share, remix, etc but you’ll see the full information of what was used to create the image including the seed I mentioned earlier.
Prompt Generation
One final thing that you can do here in the image generation area is get better prompt ideas with the Prompt Generation tool.
The idea here is that if you’re not sure how to write detailed, descriptive prompts, this tool can help you do that by giving you prompt ideas from short simple words or phrases that you enter into the prompt idea box.
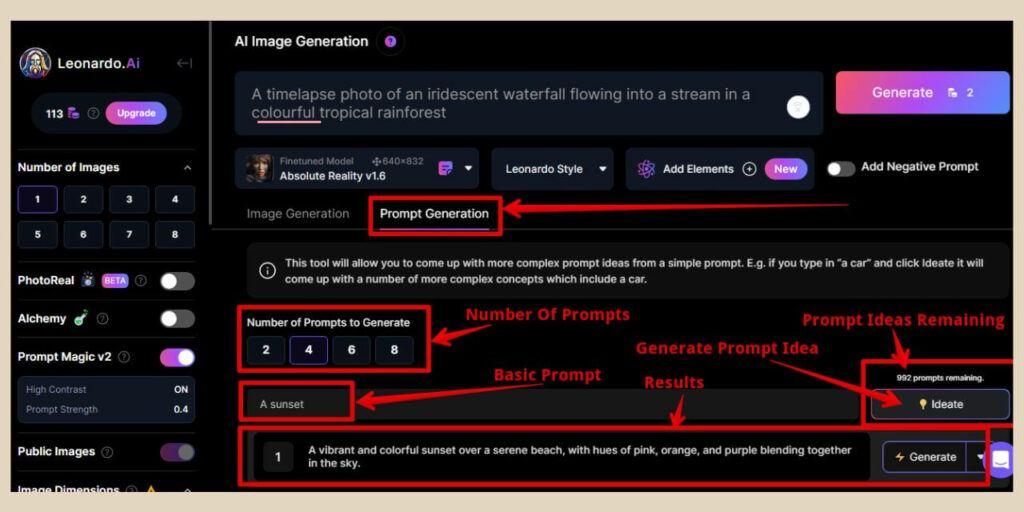
To use it, simply click the Prompt Generation tab which is to the right of the Image Generation tab and from here you’ll be able to enter some simple words like “A sunset” or “A tropical beach” which the prompt generation tool will use and turn into a more detailed prompt.
You’ll get one thousand of these prompt idea generations to use and you can choose to generate two to eight prompt ideas at a time.
If you like any of the prompt ideas generated, you can simply click the Generate button to the far right of it and an image will be generated using that prompt idea and the settings you’ve selected.
How To Use The Canvas Editor In Leonardo AI
Leonardo AI also has a canvas area where you can do quite a lot of editing both to generated images or to your own images you have saved on your device. You can also generate images here too.
To access the Canvas editor, simply click the AI Canvas option in the main menu on the left-hand side of the screen on the homepage.
Alternatively, you can click the Edit In Canvas option that appears when you hover over an image in the image generation area.
Once you’re in the canvas area, you’ll have some similar settings options to that in the image generation area but you’ll also have some options too.
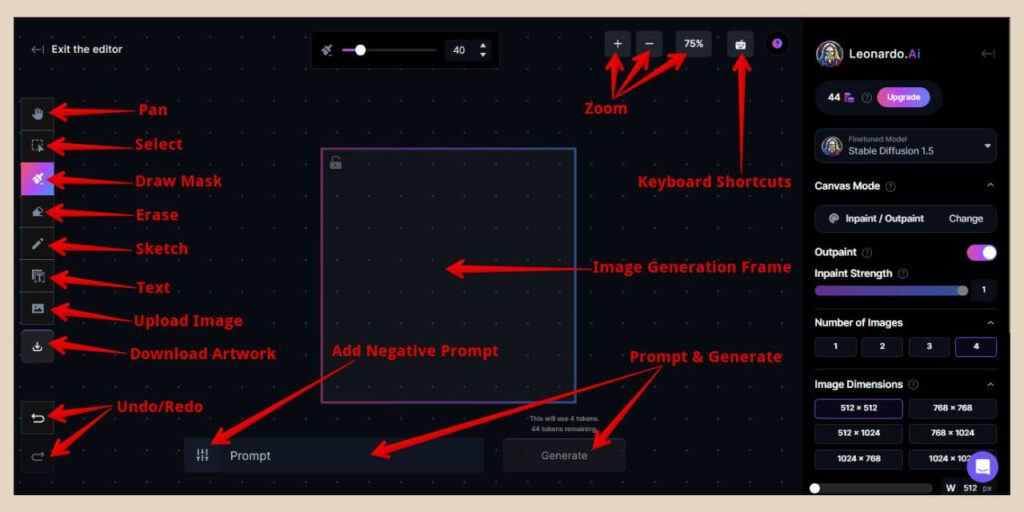
On the left-hand side of the screen, you’ll find several tools from movement tools to editing tools and they are from top to bottom:
- Pan – To move the canvas around (rather than scrolling).
- Select – To move images and the image generation frame around the canvas.
- Draw Mask – To highlight areas of your image for editing.
- Erase – To erase areas of your image.
- Sketch – To draw on the canvas or on images.
- Text – To add text to your images.
- Upload Image – To upload your own images.
- Download Artwork – To download your finished images.
- Undo & Redo – To undo or redo your last action.
Across the top of the screen, you’ll find some zoom buttons and a button that will show you a list of all the keyboard shortcuts that you can use to speed up your workflow.
The Central Canvas Area
Then in the center of the canvas, you’ll find the image generation frame where all your images will be generated.
And below this, you’ll find the prompt box to type in your descriptions with a negative prompt button to the left of it and the generate button to the right.
The settings on the right of the screen are pretty much the same as those found in the image generation area although there is one new one here as well.

The new setting here is Canvas Generation Mode which lets you switch between different modes depending on what you want to do in the canvas area.
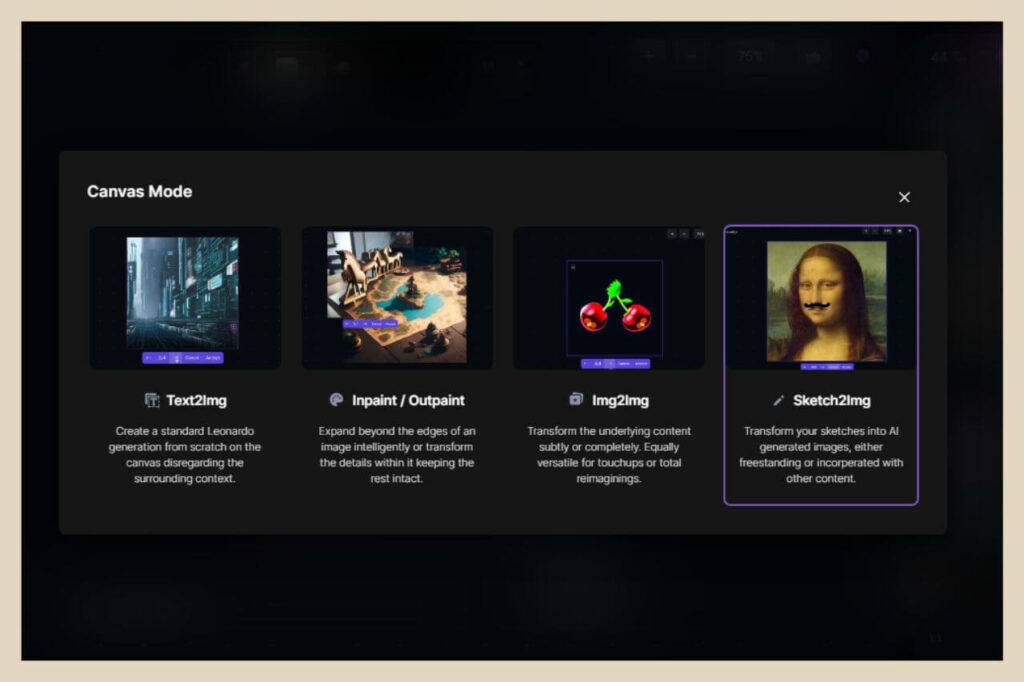
There are four different options to choose from here and they are:
- Text2Img – Text to image mode for generated images (just like the regular image generation area).
- Inpaint/Outpaint – Extend an image (outpaint) or make touch-ups within an image (inpaint).
- Img2Img – Image to Image mode for using an image as a reference (just like Image to Image in the regular image generation area).
- Sketch2Img – Sketch to image for turning your own sketches into generated images.
Regardless of what mode you work in here, there will be some differences to the regular image generation area.
How The Canvas Editor Differs
The main one is that no matter how many images you choose to generate at a time, unlike the image generation area, you don’t get to keep all of them.
For example, if you choose to generate let’s say four images at a time, you’ll see a small box below the results where you can use the arrows to flick between the four generated images.
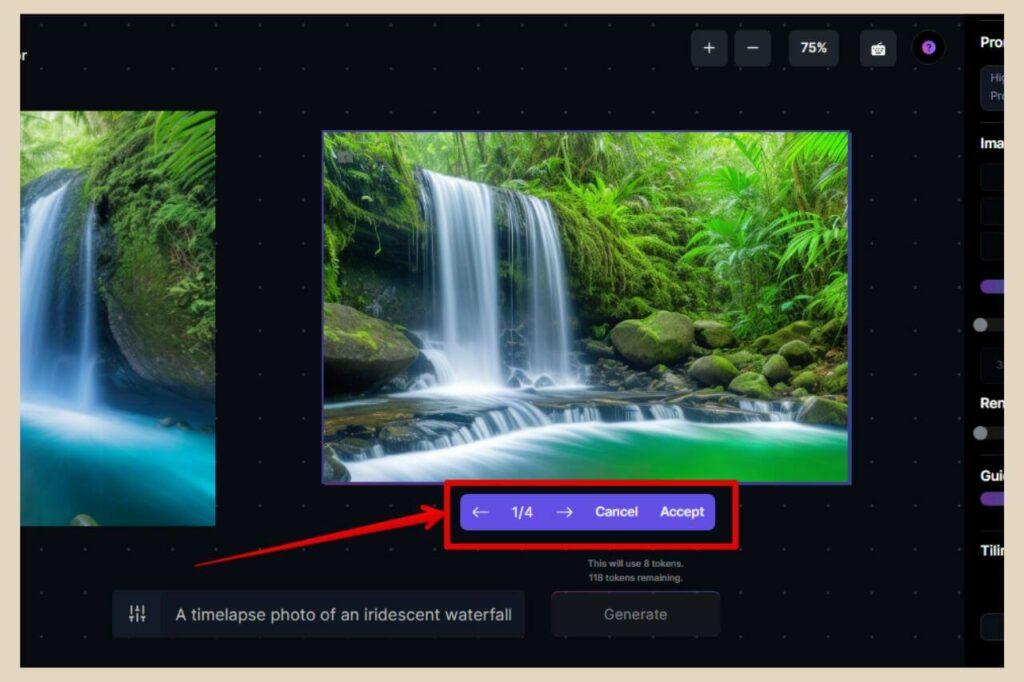
However, you can only keep one of them so you’ll need to select the Accept button once you’re looking at the image you want to keep.
The other three will then be discarded but it will still cost you the token cost of generating those four images even though you only get to keep one of them.
You’ll also need to get in the habit of moving the image generation frame every time you generate your images otherwise they’ll all generate on top of each other.
How To Outpaint In Leonardo AI
One thing I do want to show you here is the outpainting mode which is a very cool way of extending your images (it’s a little similar to the Unzoom tool in the image generation area but with much more control).
A great example of when you might want to extend an image would be if you had a close-up image of a person with just their head and shoulders visible.
With outpainting, you could essentially expand on that image so that it includes more body. To use it, select the Inpaint/Outpaint mode and make sure the Outpainting toggle is set to on.
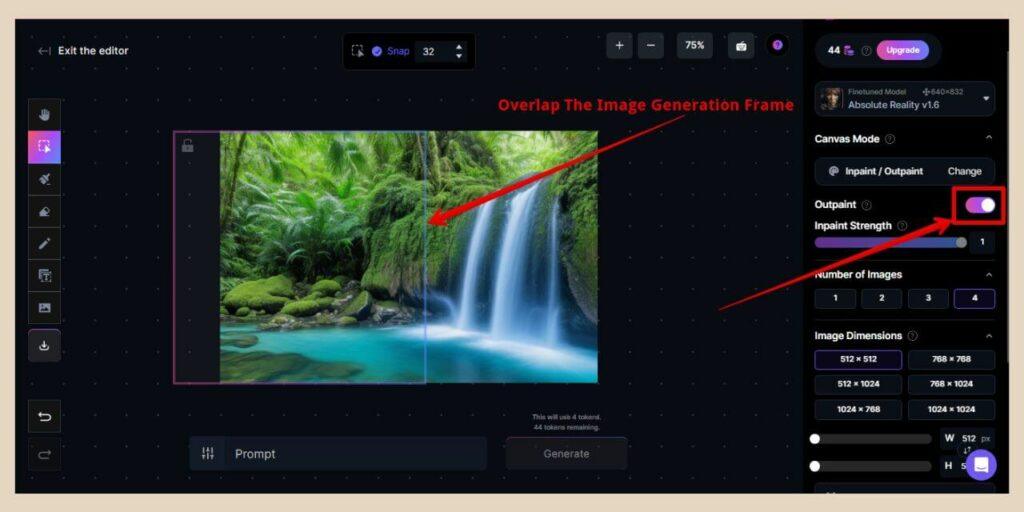
Then place the image generation frame mostly over the image you want to outpaint with a small area of it overlapping onto the blank canvas.
Use the prompt box to describe the image (or use the same prompt that you used to create it if it’s an AI image) and then click the generate button.
Leonardo AI will now try to fill in the blank canvas area with an extension of your image and for the most part, it tends to do a pretty good job at it.
The trick though is doing small areas at a time that you can then further extend on otherwise you may end up with unusual results.
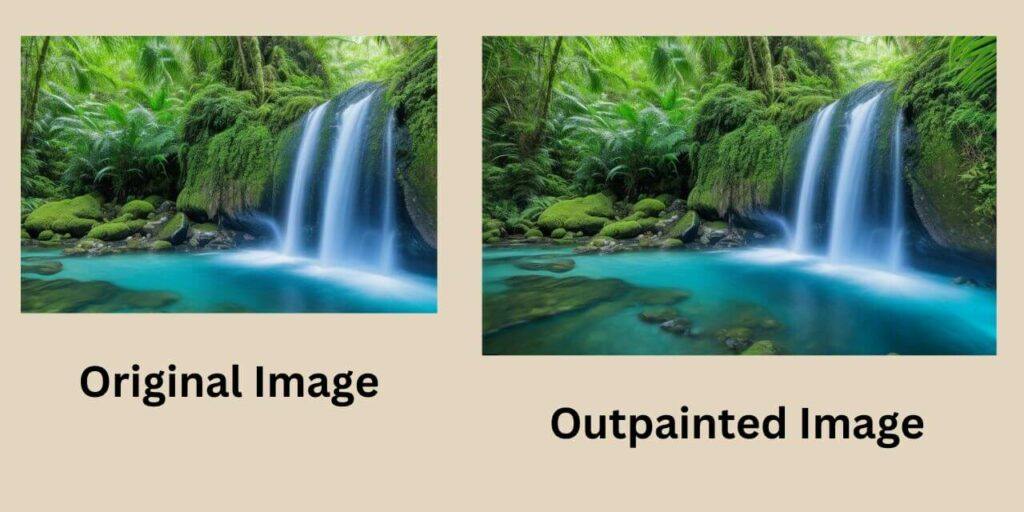
With the image above, I extended on both sides of the image and the bottom of the image and as you can see, Leonardo AI did a really good job at extending it.
How To Inpaint In Leonardo AI
If you want to make adjustments within the image, then you’ll want to use inpainting instead. To do that, simply click the outpainting toggle to off and use the Inpaint Strength slider if you’d like to adjust how much the inpainting will diverge from the original image.
Make sure that the image generation frame is over the image, then select the mask tool and highlight the area where you’d like to make changes.
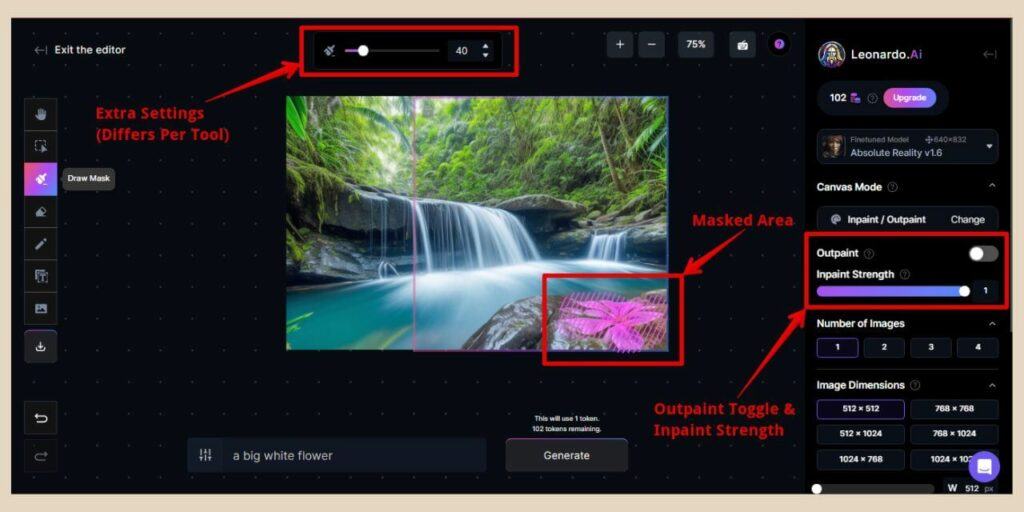
From here, you can either alter your prompt to make specific changes or leave the original prompt as it is if you just want to regenerate the same image but with a different variation in the masked area.
For example, if you have an almost perfect image of a person but a hand or nose doesn’t look right so you only want to regenerate that flawed area.
You’ll also notice that any time you select a tool, you’ll also get some extra options at the top of the screen and these are usually for changing sizes, colours, etc depending on the tool you’ve selected.
Accessing Your Generated Images
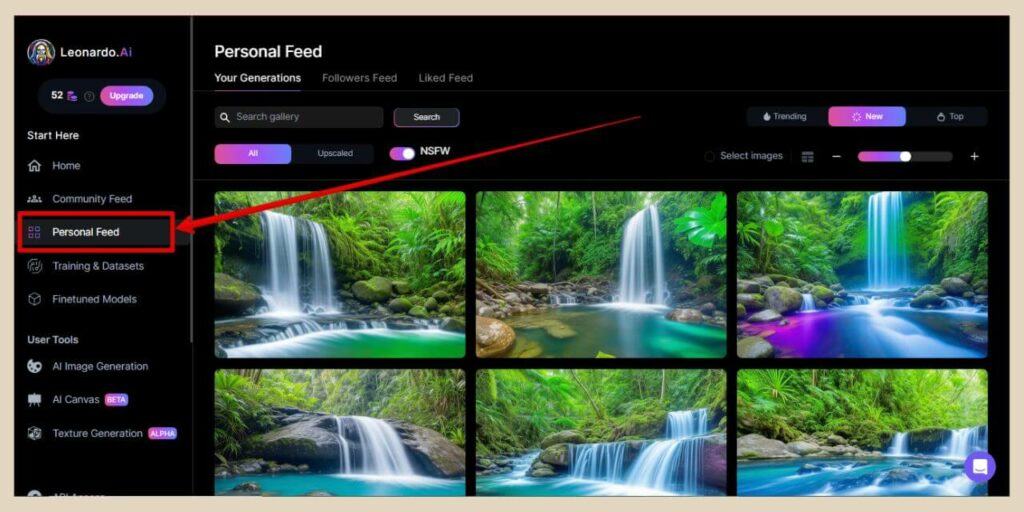
If you’d like to see all of your generated images, you can access your personal feed by clicking on the Personal Feed option in the main menu on the left of the screen on the homepage.
From here, you can select any of your generated images and when the pop window appears, you’ll be able to see all the details of that image again including the prompt, seed number and settings used to create it.
Just like the pop-up window in the image generation area, you’ll also see the buttons here that will let you download the image, share the image, copy the prompt, etc.
You can also click the three dots next to the Share button and even more editing options will appear.

If you head to the community feed area (directly above Personal Feed in the main menu), you can actually do the exact same thing here too with other people’s generated images.
Just select an image that you like the look of and when the pop-up window appears, you’ll be able to download, copy prompt, edit in canvas, etc in the exact same way as you can with your own images.
You’ll also be able to follow other members of the community by clicking on the follow button that appears next to their user name at the top of the window.
Let’s Get Image Generating With Leonardo AI
And there you have it. Leonardo AI is a very handy tool for generating all sorts of images in an instant and you can even use it to edit your own existing images to make them a little more unique.
So, if you’ve never played around with AI image generators before and Leonardo AI in particular, then I recommend you check them out.
They’re a serious amount of fun to play around with and a huge time saver when it comes to compiling your images.
They’re also a great way of producing your very own truly unique images so why not give Leonardo AI a try yourself and see what kinds of image creations you can generate?
I hope you’ve found this tutorial useful and if you feel like sharing your own stories and experiences with Leonardo AI, then please feel free to share them in the comments below. I’d love to hear all about them.
Happy Leonardo AI Image Creating!

Helpful Guides to Read Next
These beginner-friendly guides will help you keep building your blog step by step.
- The Best Free AI Image Generators for Bloggers and Creators
- Create Blog Graphics Faster with Adobe Firefly AI
- Generate High-Quality AI Images with OpenArt
- How to Use AI Image Seeds to Create Perfectly Cohesive Images for Your Blog
- How to Use AI Outpainting to Easily Expand and Fit Any Image Into Your Blog Layout

Jessie
Founder, nomorerush.com
Hi, I’m Jessie — founder of No More Rush. I help beginners build profitable, beginner-friendly blogs without the overwhelm or unrealistic expectations you see online. Everything here is built around simple, structured steps so you always know what to do next.