Are you looking for a GDPR/CCPA cookie consent plugin? Well, the Complianz plugin might just be the very one you’re looking for.
I’ve used a few different plugins for this purpose over the years but the Complianz plugin is by far my favourite. It’s easy to set up albeit it takes a little longer than most but it’s still easy nonetheless.
But once it’s done, it will automatically take care of all the important compliance steps from scanning and listing all the cookies on your site to creating supporting documentation such as a cookie policy and a privacy policy and of course adding the all-important cookie consent banner.
The Importance Of Being Complaint
As a website owner, it’s really important that you adhere to the various regulations that govern data protection and user privacy.
Regulations such as the General Data Protection Regulation (GDPR) and the California Consumer Privacy Act (CCPA) set the guidelines for how websites handle user data.
Failing to comply with these regulations can result in severe legal consequences, making it imperative to have the right tools in place. This is where plugins like Complainz come in to help your website comply with these regulations.
And as it’s designed with beginners in mind, this plugin takes the complexity out of compliance by offering a range of user-friendly features.
There are numerous must-have plugins that every blogger should consider adding to their site and a cookie consent plugin like Complainz is definitely one of them.
The Complainz plugin is available to use for free but you can upgrade to the premium version if you want to unlock even more features.
Installing The Complianz Plugin
Before we even get into setting up the plugin, you’ll first need to install the plugin on your site so start by clicking on Plugins in the main WordPress menu on the left-hand side of your WordPress back office.
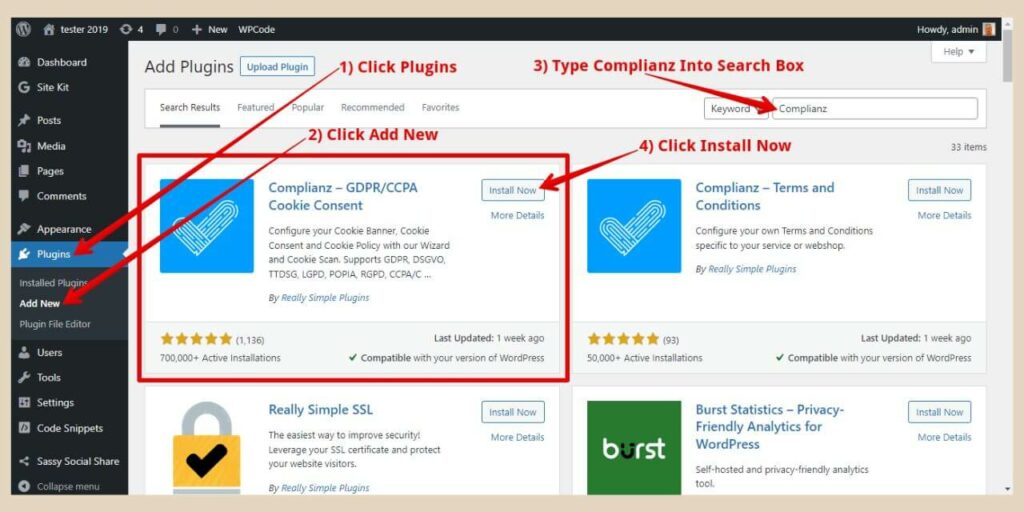
Next, click on Add New and when the Add Plugins page opens, type Complianz into the search box. Once you see the Complianz plugin in the results, click the Install Now button.
When the plugin is installed, the Install Now button will become an Activate button so click it to activate the plugin.
The Complianz Plugin Setup Wizard
As soon as you activate the plugin, you’ll be taken to the main plugin page and a small window will appear prompting you to either take a quick tour of the plugin or start configuring the plugin.
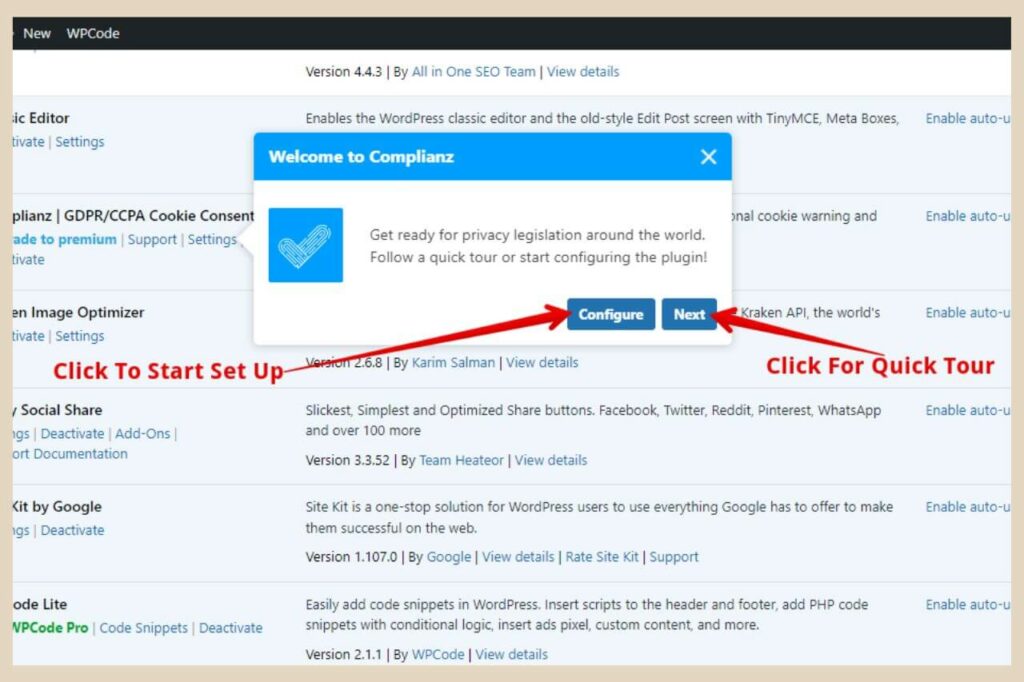
So, take the tour if you wish and then when you’re ready, click the Configure button to start the Complianz setup wizard.
For the sake of this tutorial, I’m going to be setting up the free version of the plugin but I will cover the extra features too if you want to use the premium version.
Choose Your Privacy Law/Guideline Region
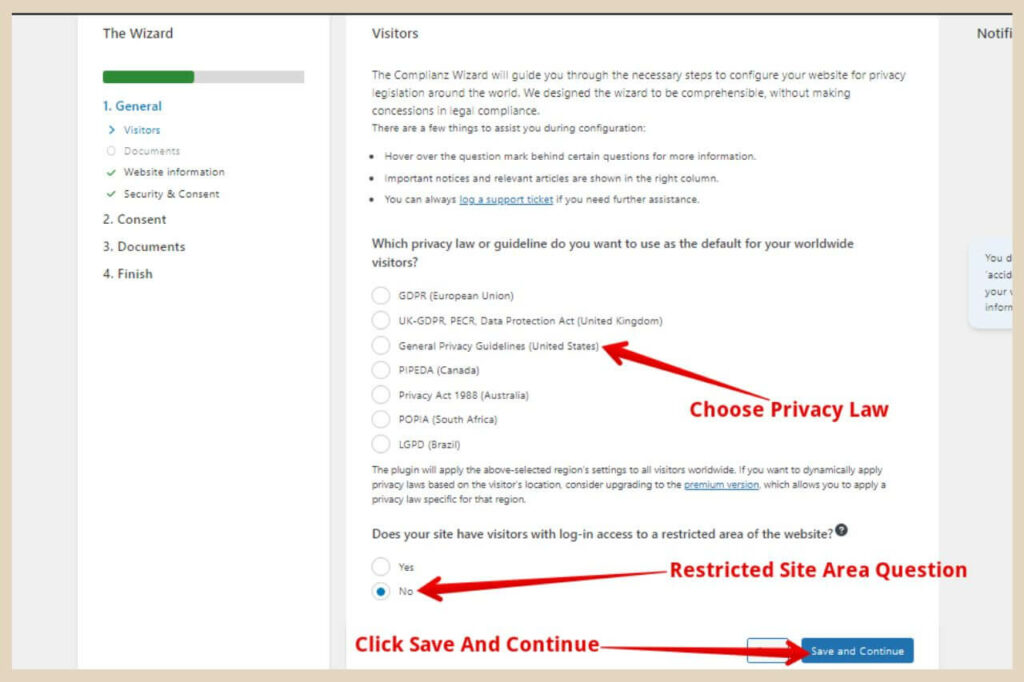
To begin, the very first step in the wizard is to choose which privacy law/guideline you’d like to set as the default for your visitors.
As a free user, you’ll only be able to choose one privacy law so choose the one that applies to the location you target the most.
Depending on the privacy law/guideline you choose here, another area may appear which will ask you if you target visitors from more specific areas relating to the privacy law/guideline you selected so use the checkboxes to confirm if any apply.
If you upgrade to the premium version, you can utilize all of the privacy laws/guidelines and use the Complianz plugin to automatically apply the correct privacy laws based on the location of each visitor.
The next step is to select whether or not your site has a restricted area that requires visitors to log in to access it so click the yes or no checkbox and then click the Save And Continue button to move on to the next step in the wizard.
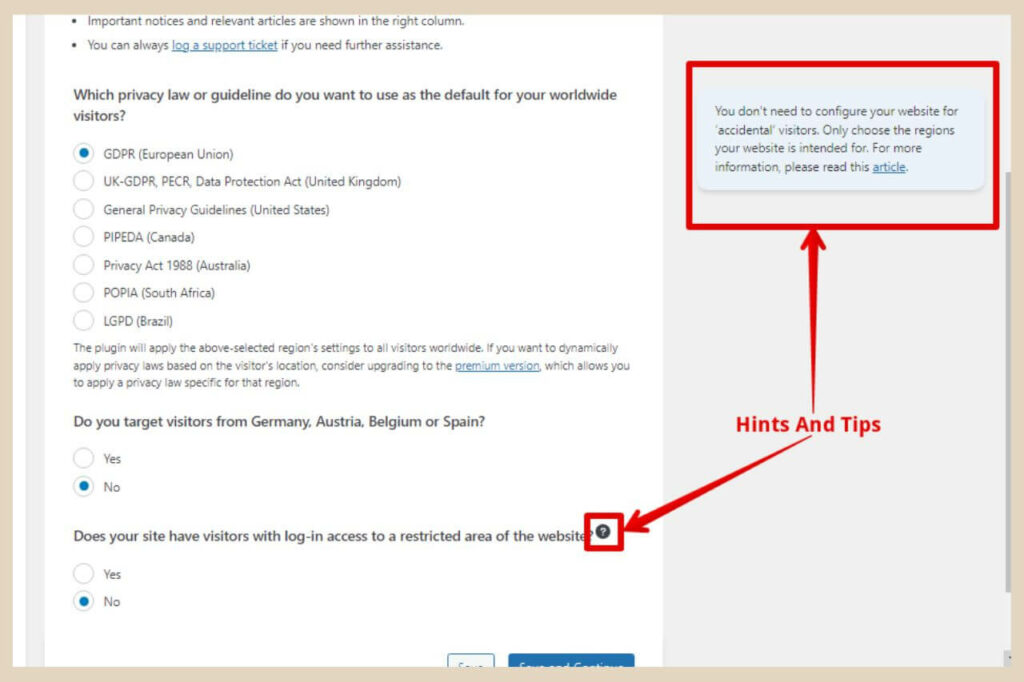
You’ll also notice some text on the right-hand side of the wizard as well as some question marks that you can click on next to certain areas throughout the wizard and these are helpful hints and tips to help you with the setup process.
Generating Legal Documents
In the next section, you’ll be able to choose to generate some legal documents or link to existing ones that you may already have on your site.
There are four documents that you can generate or link to although three of them require the premium version of the plugin to generate. In this section, you can generate the following documents.
- Cookie Policy – Free version of the plugin.
- Privacy Statement – Premium version of the plugin.
- Imprint – Premium version of the plugin.
- Disclaimer – Premium version of the plugin
With the free version of the plugin, you can generate a Cookie Policy but you’ll need to be using the premium version to generate any of the other documents.
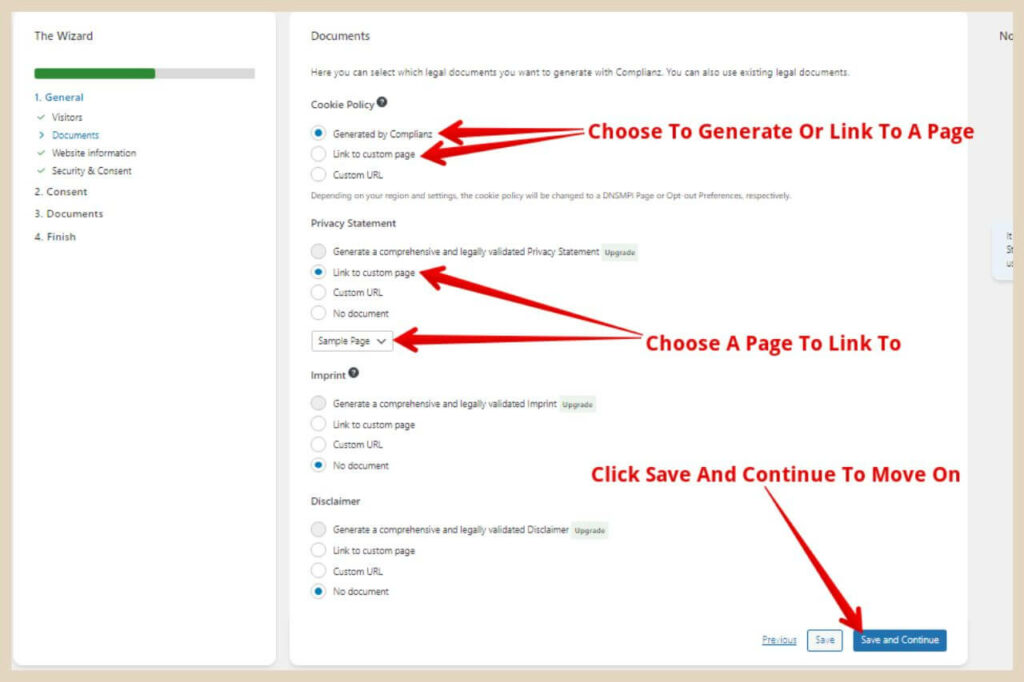
If you’re using the free version, you can, however, create your own documents and link the Complianz plugin to them using the Link To Custom Page option beneath each one. When you do that, use the dropdown menu that appears to select the page to link to.
So, for example, if you already have a privacy policy on your site, simply click the Link To Custom Page option and then use the dropdown menu to select your existing privacy policy page from the list of pages that are already on your site.
When you’re finished with the documents area, click the Save And Continue button to move on to the next section.
Adding Your Website Information To The Complianz Plugin
This next area is where you can add the website information that will appear on any documents relating to the Complianz plugin.
As an example, if you’ve used the plugin to generate a Cookie Policy or Privacy Statement, it will use the information you provide here to complete the document.
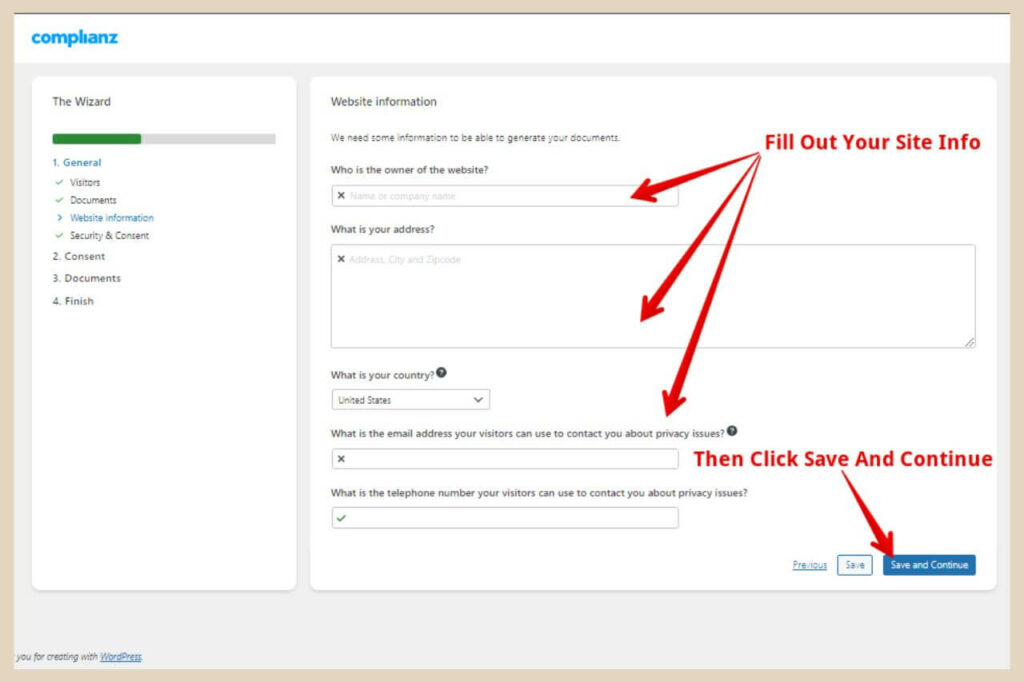
So, go ahead and fill in the information here, then click the Save And Continue button to move on to the next area.
Tips: You can use your website name in the owner of the website section. You don’t need to add a full address in the address field (just your country will do). You don’t need to add a telephone number in the telephone field (it will be added to your Complianz documents if you do).
The Security And Consent Options
In the Security And Consent section, you’ll have three areas of selection here but the first two are for premium users only.
The first selection is enabling Records of Consent which are more in-depth records of all the visitor’s consents that have taken place on your site.
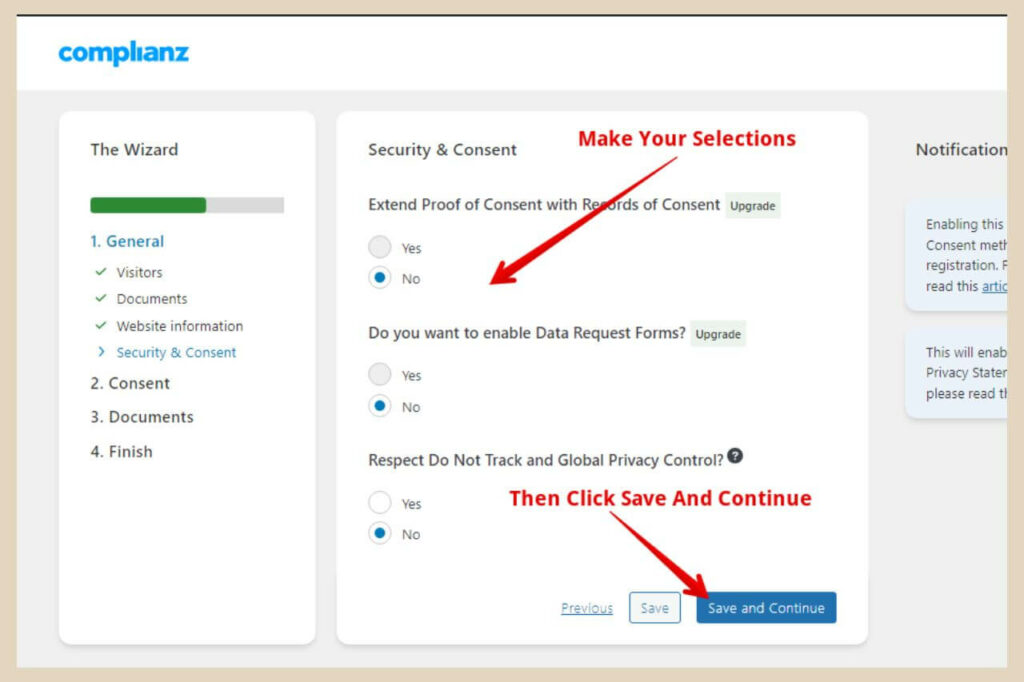
Selection number two is enabling Data Request Forms which are forms that your visitors can fill in if they want to request access to the data that you process about them.
They can also use the forms to request an export file of the data or to request the deletion of the data.
The third selection which is an available option for free users is the Do Not Track and Global Privacy Control option.
By selecting Yes here, visitors that have Do Not Track or Global Privacy Control enabled in their browsers will not be shown the cookie banner and their cookie consent status will be set to denied by default.
If you leave it set to No, these same visitors will still be shown the cookie banner where they’ll have to choose to accept or deny the cookies manually like all other website visitors.
So make your preferred selections and then click the Save And Continue button to move forward with the wizard.
Scanning The Cookies On Your Website
The next section is the cookie scan section where the Complianz plugin will scan your site for cookies and third-party scripts.
This scan should start automatically when you land on this page but if it doesn’t, click the Scan button to start the cookie scanning process.
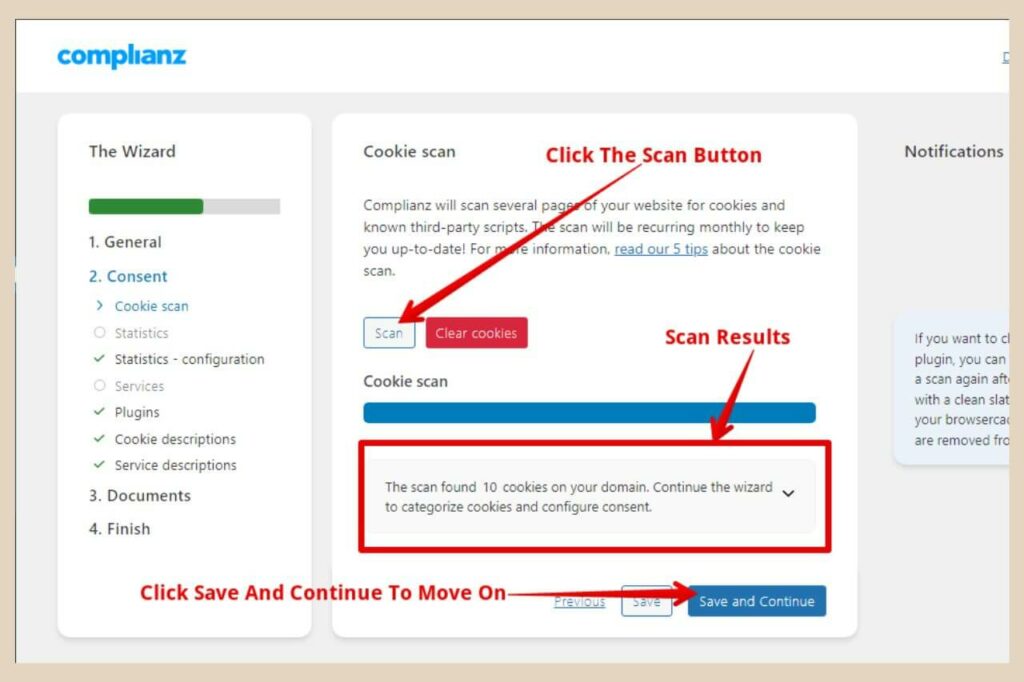
The plugin will repeat this scan automatically every month to keep up to date with any cookies that are present on your website.
If you’ve generated a Cookie Policy with the plugin, these cookies will all be listed within it so that your visitors can see what cookies are being used on your site and what they’re being used for.
Once the scan is complete, you’ll see how many cookies the plugin has found so you can now go ahead and click the Save And Continue button to move to the next section.
The Statistics Section
The Statistics section is where you’ll provide information on whether you compile statistics for your website so Google Analytics for example.
At the top of this section, the Complianz plugin will give you the option to install its own statistics plugin but there’s no need to do this if you’re already using Google Analytics or something similar.
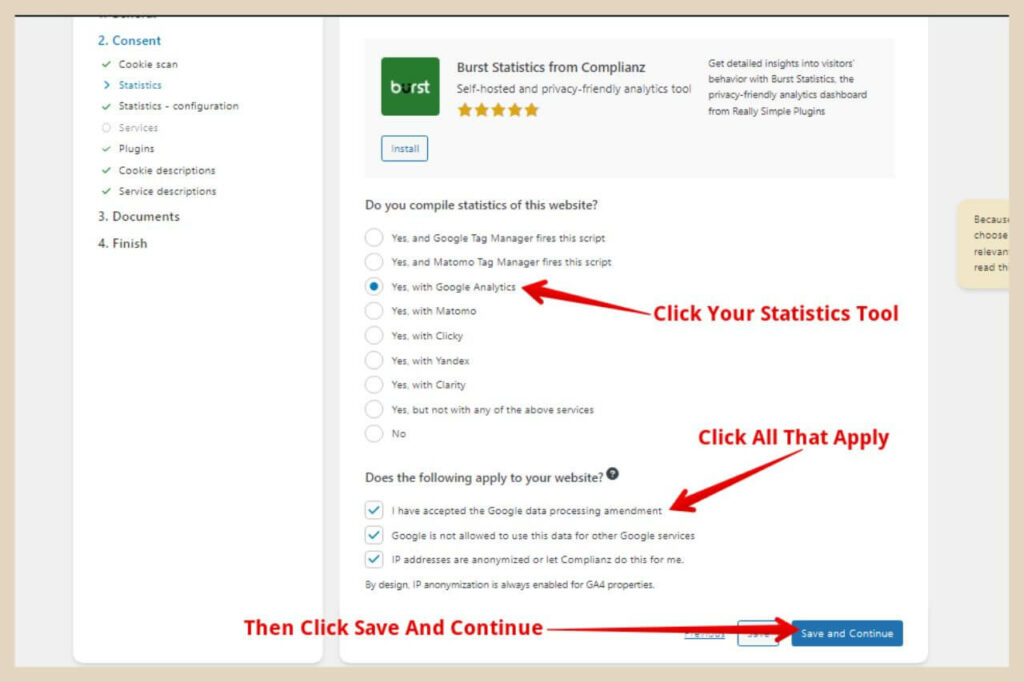
So, click the statistics tool that you’re using instead and if it’s Google Analytics, a few more options will appear at the bottom of the area which you’ll need to select if they apply to your site.
There’ll be three different options here and they are as follows.
- I have accepted the Google data processing amendment
- Google is not allowed to use this data for other Google services
- IP addresses are anonymized or let Complianz do this for me
The third option, “IP addresses are anonymised”, should be selected because GA4 enables this by default. However, for the first two options, you may need to check your GA account first to see if these apply.
Checking Your Google Analytics Settings
Option one should also apply but check that you’ve agreed to the Google Data Processing Amendment by heading to the Admin area of your GA account. The information for option two, “data sharing with other Google services” will also be in this same area.

So click Account Settings from the Account column (the first column) and the information in the above image should appear to the right of the column.
If all the checkboxes are empty in the Data Sharing Settings, then you can go ahead and tick option two in the Complianz wizard.
On the other hand, if any of these checkboxes are ticked then this means that you are sharing data with other Google services and in that case, you should leave option two unticked.
Just below the Data Sharing Settings, you’ll see the Data Processing Terms and if you’ve already agreed to them, you should see a sentence near the bottom that says “The Data Processing Terms for this account were accepted on x of x date”.
If you see that then you’re all good and you can go ahead and tick option one in the Complianz wizard.
If not, then you may want to take this opportunity to accept the Google Data Processing amendment before heading back to the Complainz wizard and ticking the option one checkbox.
Once you’re finished, you can click the Save And Continue button to move on to the next section.
The Statistics – Configuration Section
In the next area, the first option you’ll need to select is whether or not you want to ask consent for statistics. As some countries do require consent for statistics, it’s better to select Yes here.
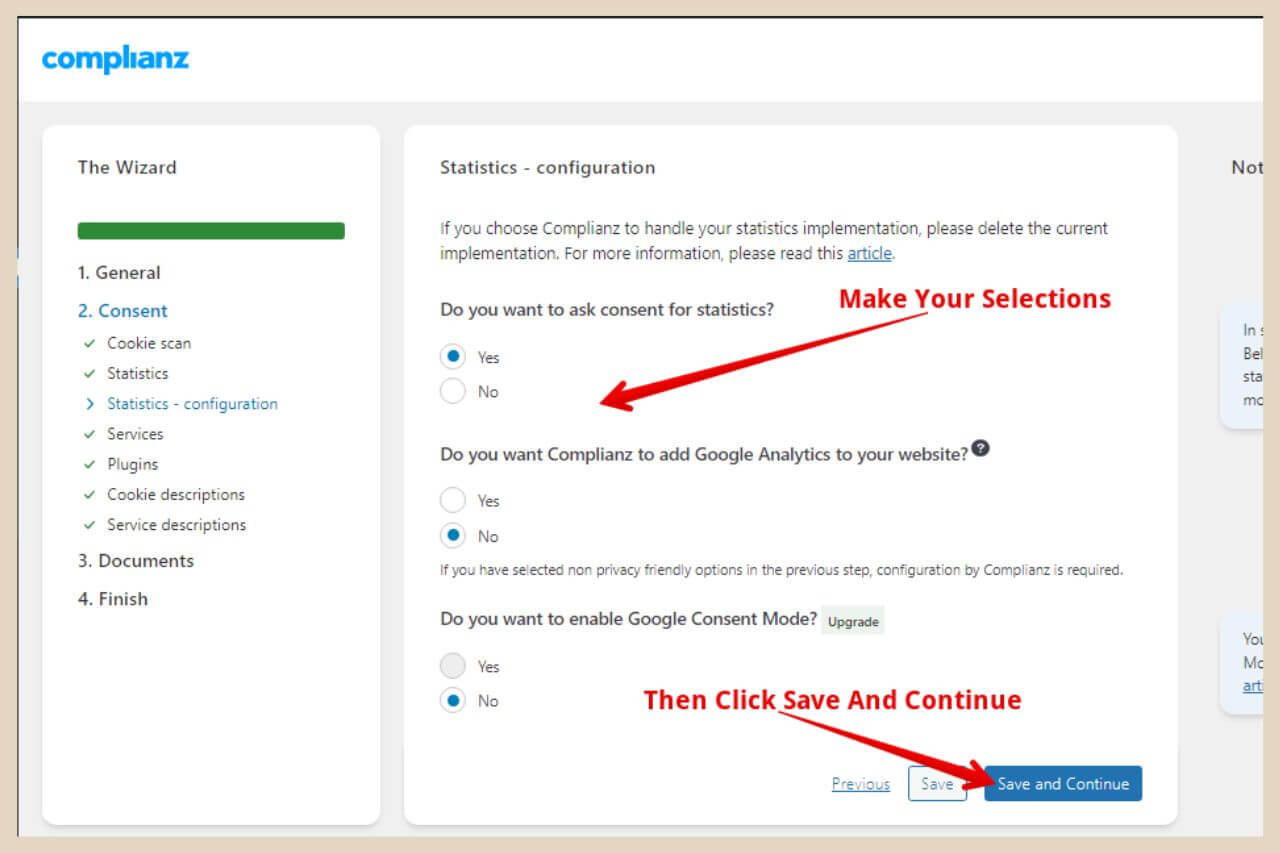
The second option is if you’d like Complianz to add Google Analytics to your site. As most people will have already set up their Analytics and added the Google tag to their site themselves, most will select No here.
The final option is for premium users only which is whether or not to enable Google Consent Mode.
If you enable Google Consent Mode, statistical cookies will only be allowed once permission is granted by the visitor. Again, once you’ve made your selections, click the Save And Continue button.
The Services Section
This next section is all about the services you use on your site. The very first option here is if you’d like to use Consent Per Services. The default is Consent Per Category which is fine so I would leave this set to No.
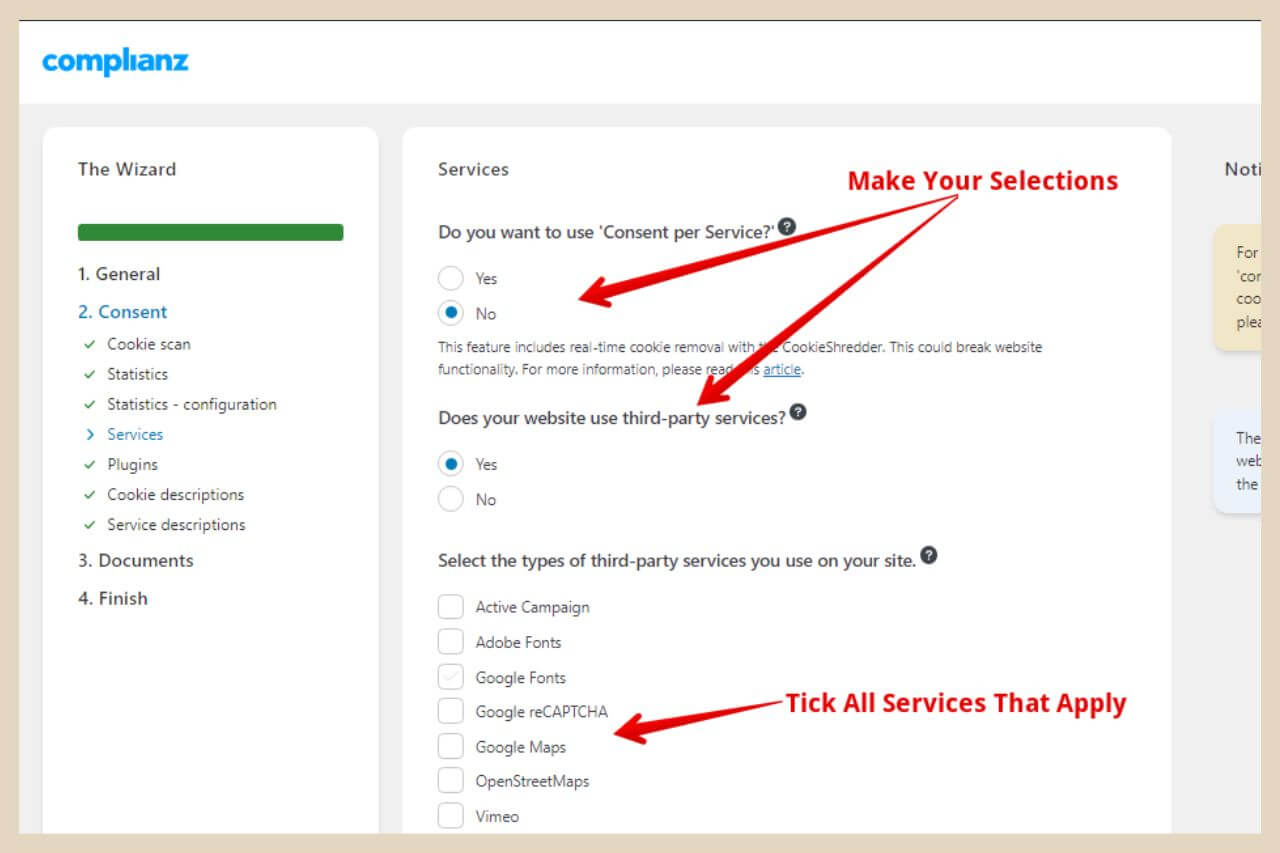
You’ll then need to select whether or not your site uses third-party services like embedded videos, social share buttons or social feeds for example.
Most sites will have some third-party services so the chances are you’ll need to select Yes here. At this point, you’ll see a list of popular third-party services so tick any that apply to your site.
You’ll next be asked if you have any embedded social media on your site so again buttons, feeds, etc. If the answer is yes, then use the next section to select which social platforms are used on your site.
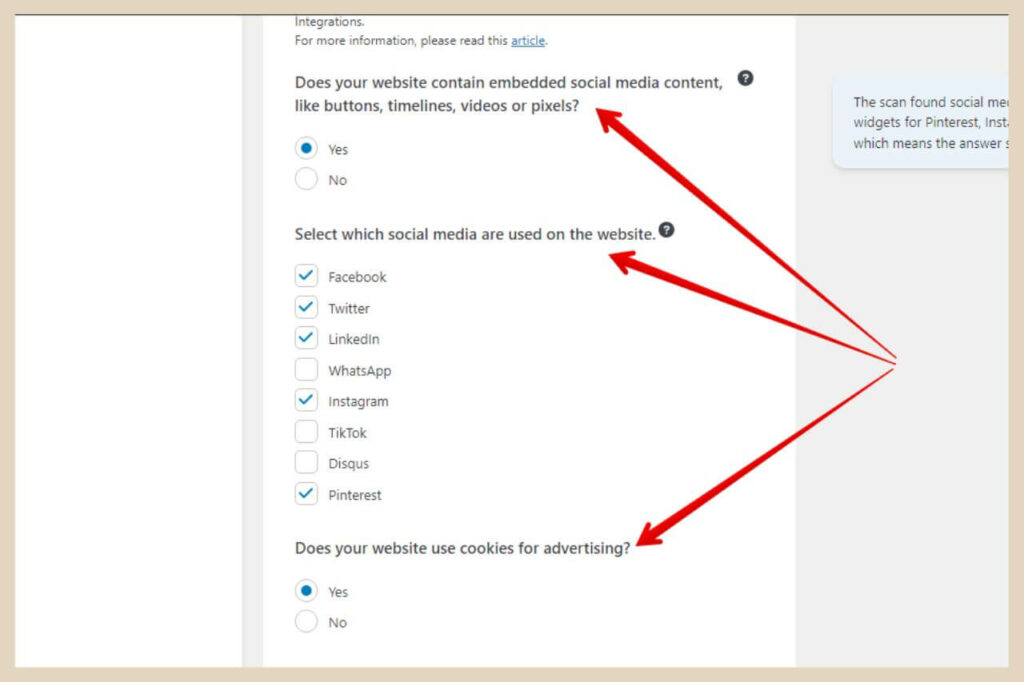
You’ll be asked next if your website uses cookies for advertising. If you’re using Google Adsense or something similar then the answer will be Yes here.
Now you’ll be asked if any of your advertising cookies are used to show personalised ads. Google AdSense ads are personalised by default so if you’ve never changed these settings then you’ll need to answer Yes here.
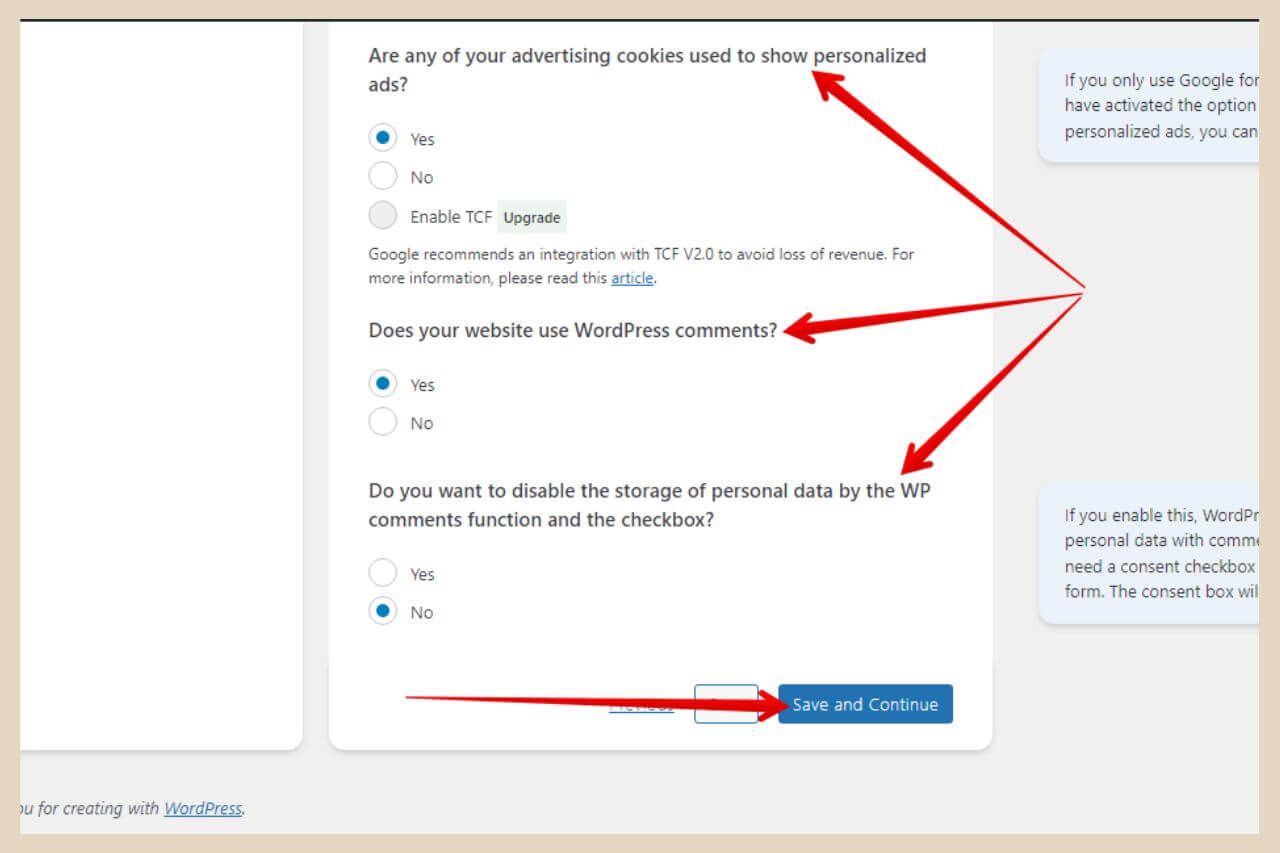
The next option will be to select whether or not you use Comments on your site so choose Yes if this applies.
You’ll also have the option to disable the storage of personal data and the comments checkbox. I personally leave this set to No but choose you’re own preferred option here then click the Save and Continue button.
The Plugins Section
Next, the Complianz plugin will detect any plugins that need integration so you may see a small list of certain plugins here in the Enabled Intergrations box.
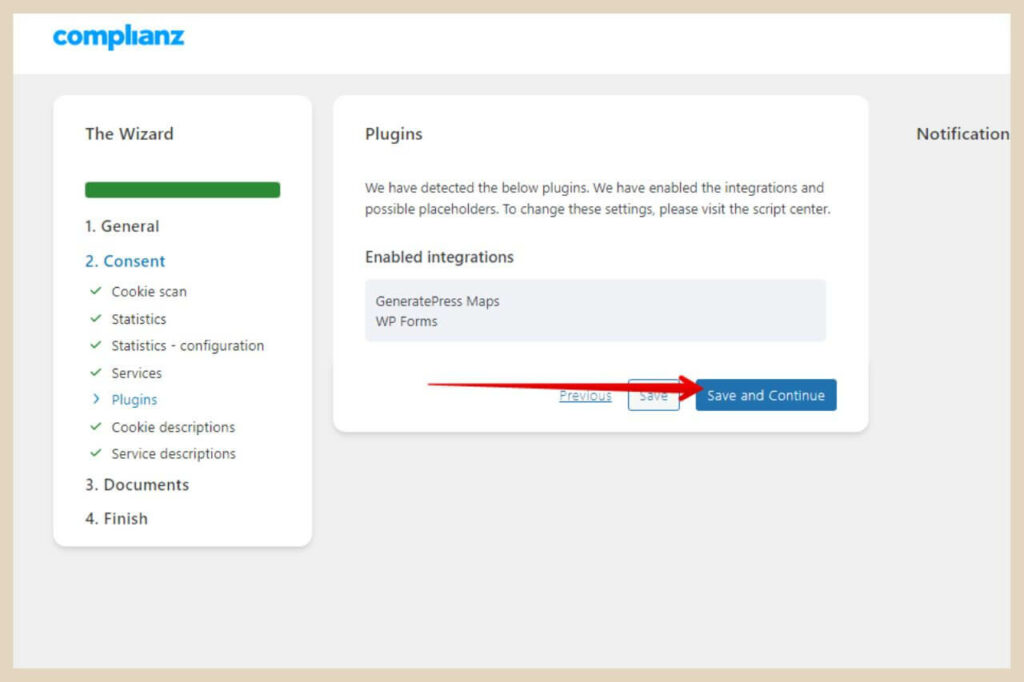
There’s not really anything else to do here so you can go ahead and click the Save And Continue button to continue with the wizard.
The Cookie Description Section
In the next section, the plugin will sync with cookiedatabase.org to create full descriptions of all the cookies on your site for your Cookie Policy.
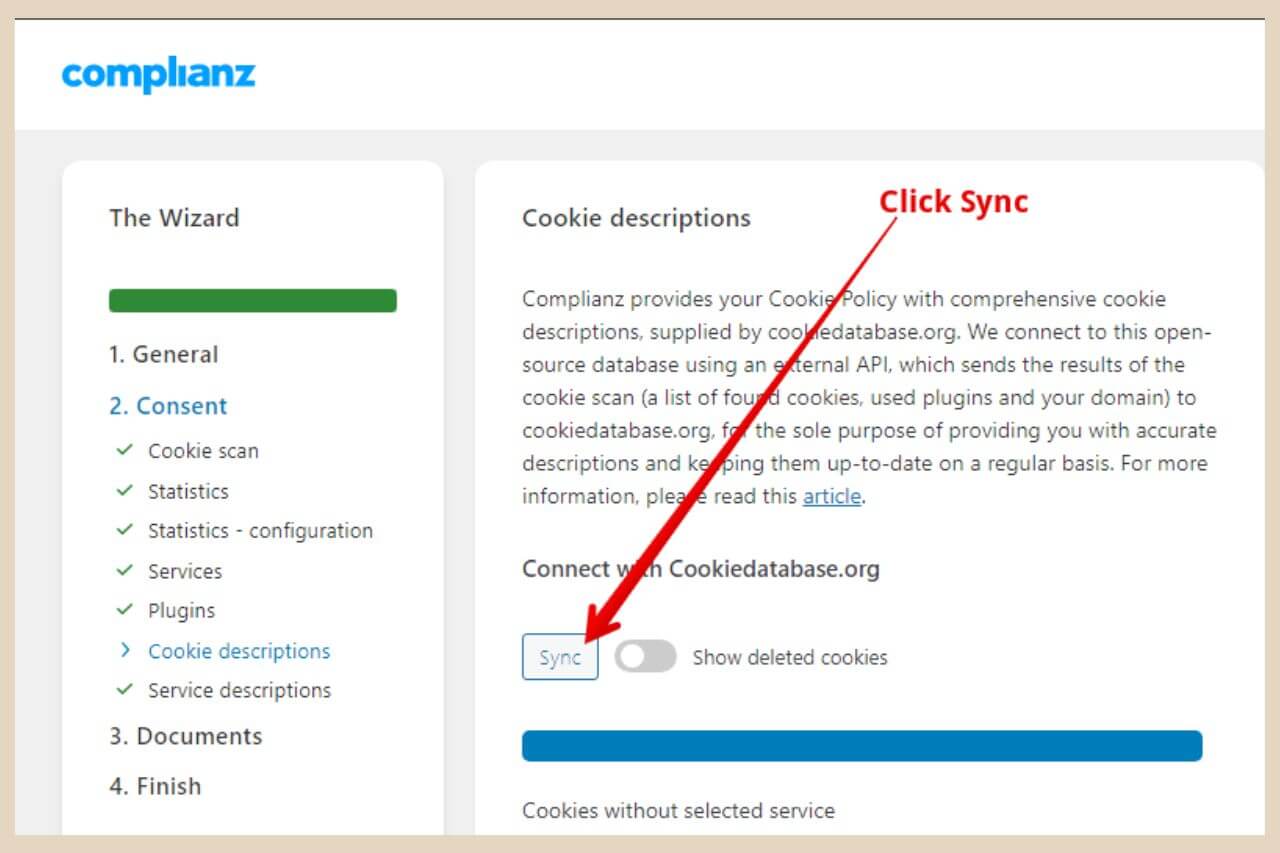
When you first land on this section, the Complianz plugin should automatically sync to the cookie database to compile all the descriptions but if for any reason it doesn’t, you can simply click the Sync button to do it manually.
Once it’s synced, you should see a list of all the cookies the Complianz plugin has detected on your site and the descriptions for these cookies will be added to your Cookie Policy so you can go ahead and scroll to the bottom of the section and click the Save And Continue button.
The Service Descriptions Section
This section is pretty similar to the last but only this time, the plugin will list all the services on your site that use cookies.
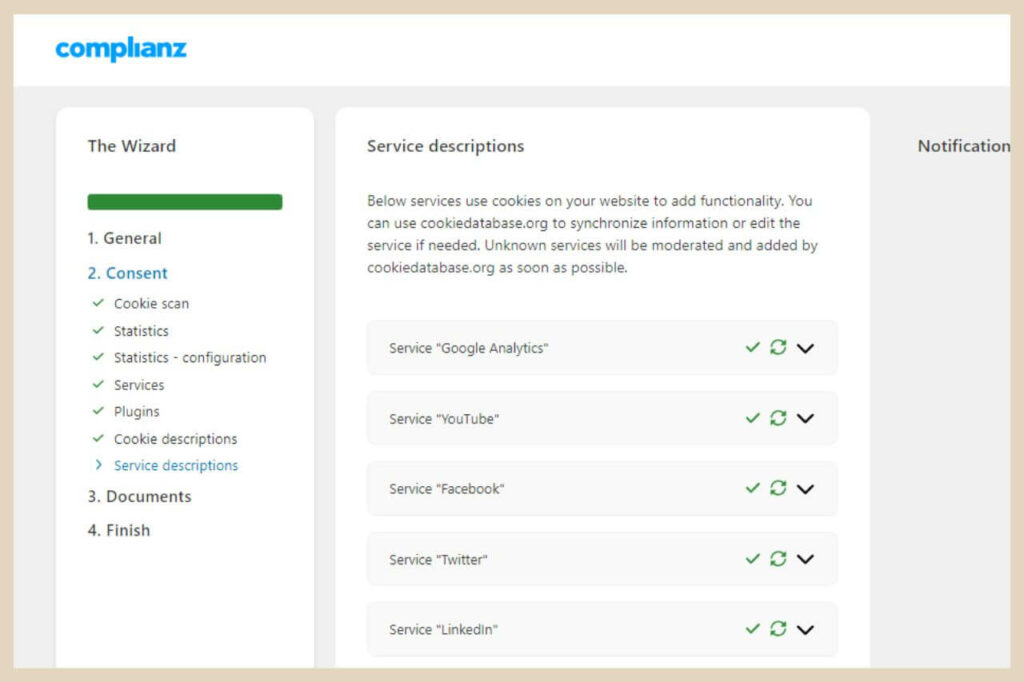
The descriptions for these service cookies will also be added to your Cookie Policy so again, there isn’t really anything to do here so just scroll to the bottom and click the Save And Continue button to move forward.
The Create Documents Section
If you opted for the Complianz plugin to generate any pages for you at the beginning of the wizard, this is where you’ll now be able to create those pages.
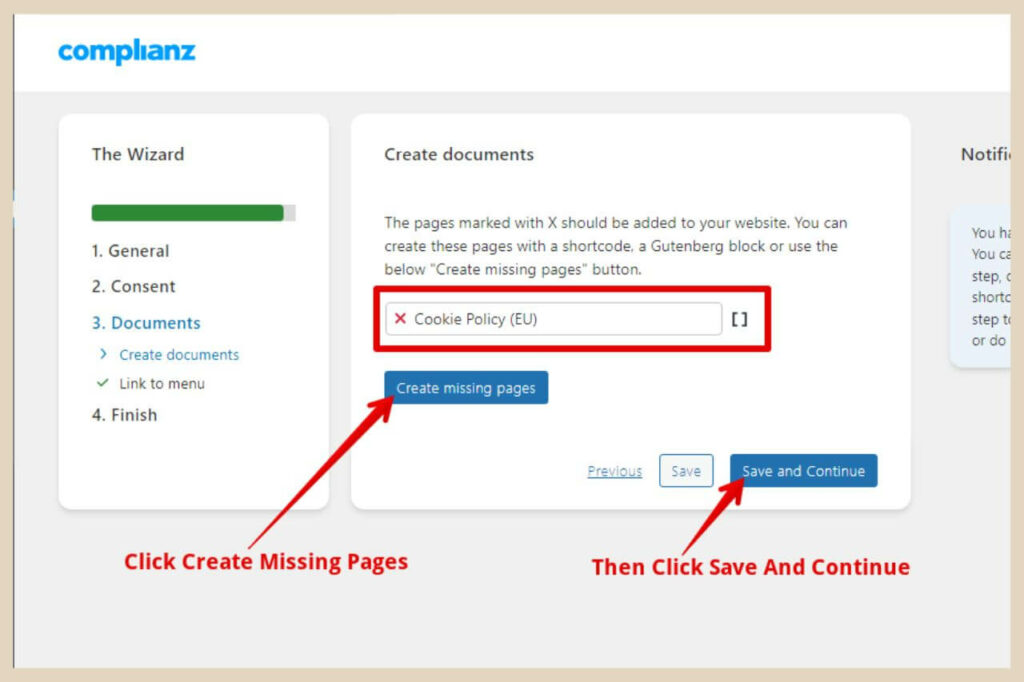
In my particular case, I only wanted a Cookie Policy generated but if you’re using the premium version and choose to have other pages generated, then you’ll also see them here too.
So, click the Create Missing Pages button and your generated pages will be created. You can now click the Save And Continue button to move on.
The Link To Menu Section
Now you’ll need to add your generated documents to a menu of your choice. For premium version users who have set up multiple versions of policies and statements, the region redirects can be selected to show different versions of documents to visitors from different regions.
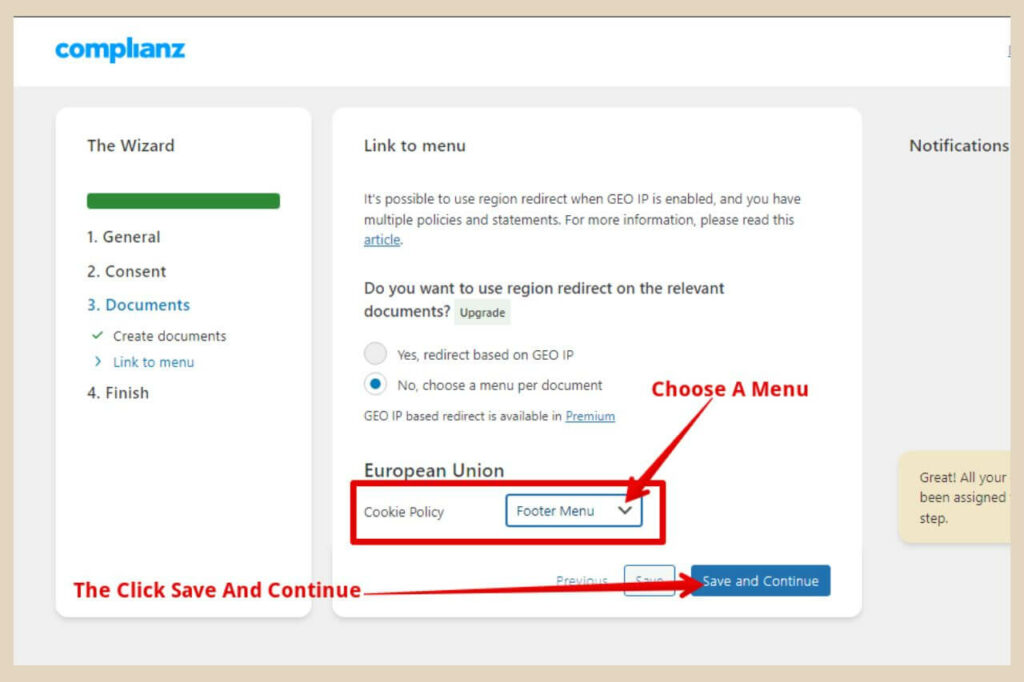
Otherwise, you can go ahead and use the dropdown menu to choose from one of your existing menus and your generated documents will be added to your menu of choice. Once again, click the Save And Continue button to continue on to the next section.
Finishing The Complianz Plugin Setup Wizard
This is the very last step in the wizard and all you need to do here is choose to turn on or off the cookie banner and the cookie blocker.
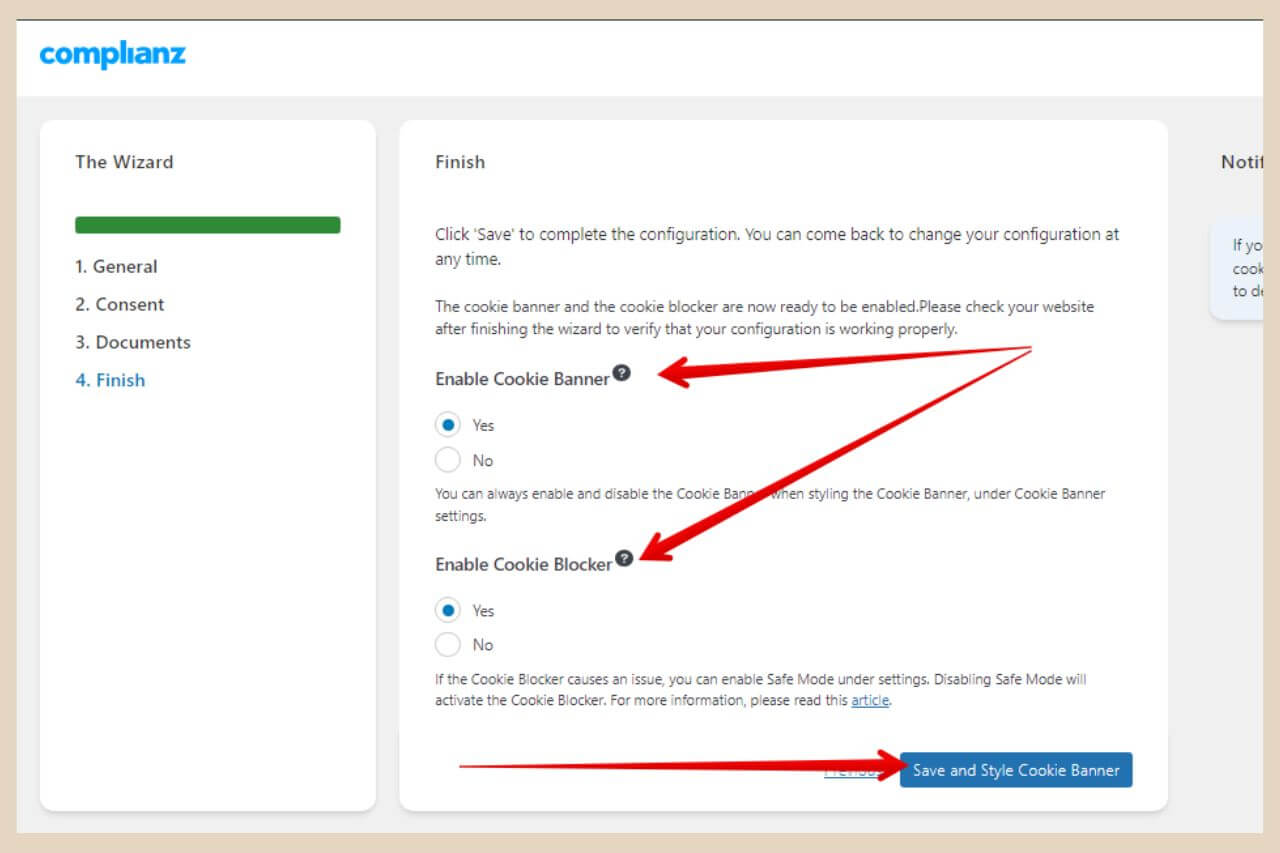
By default, both the cookie banner and the cookie blocker will be enabled so if you’re happy with these settings you can go ahead and click the Save And Style Cookie Banner button.
Styling Your Complianz Cookie Banner
Now that the wizard is complete, you’ll be taken to the banner styling area where there are five different sections that you can customise.
If you want to jump to a particular section, you can use the section links on the top left of the page to jump straight to those sections.
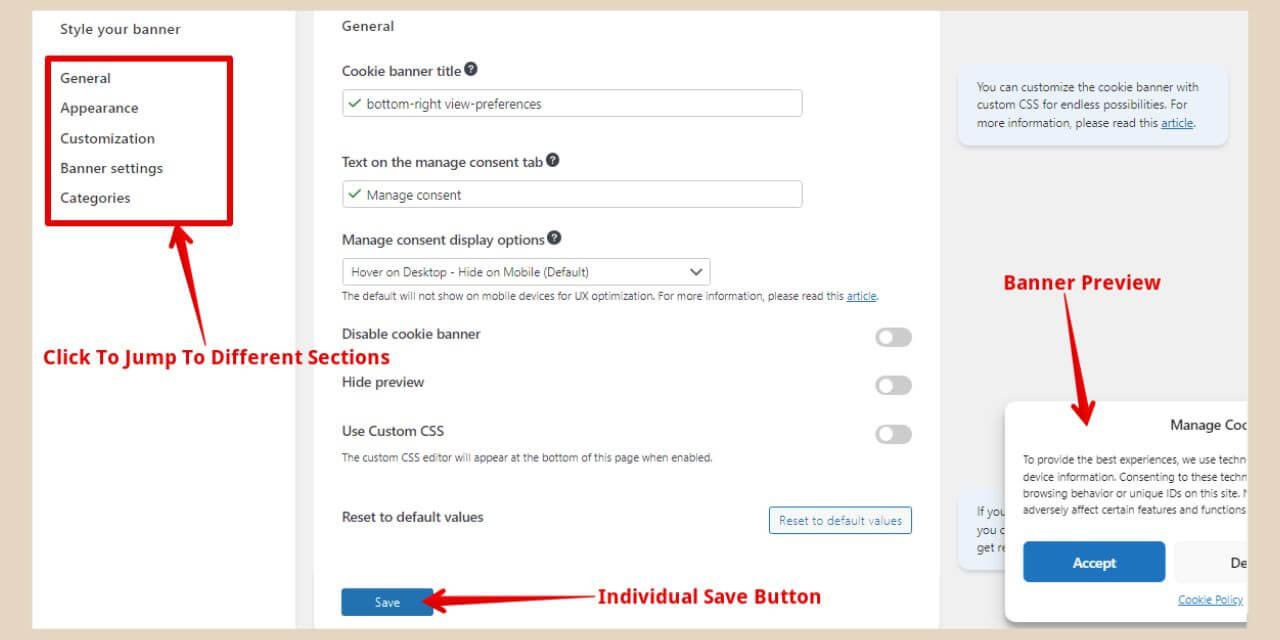
Now although this is one long page of different sections, each one will have its own Save button so when you make any changes, make sure you click the individual Save button at the bottom of each section.
You’ll be able to customise numerous things in this area including the position of the banner, the colours within the banner and the text in the banner too.
There will also be a preview of the banner in the bottom right-hand corner of the screen so you’ll be able to see how any changes you make look before saving them.
Other Settings In The Complianz Plugin
You may have noticed that when you activated the plugin, a new item called Complianz was added to your main WordPress menu and you can get to the wizard and all other settings for the plugin from here.
As well as the wizard and the cookie banner settings, you can also make several other changes to the plugin’s settings.
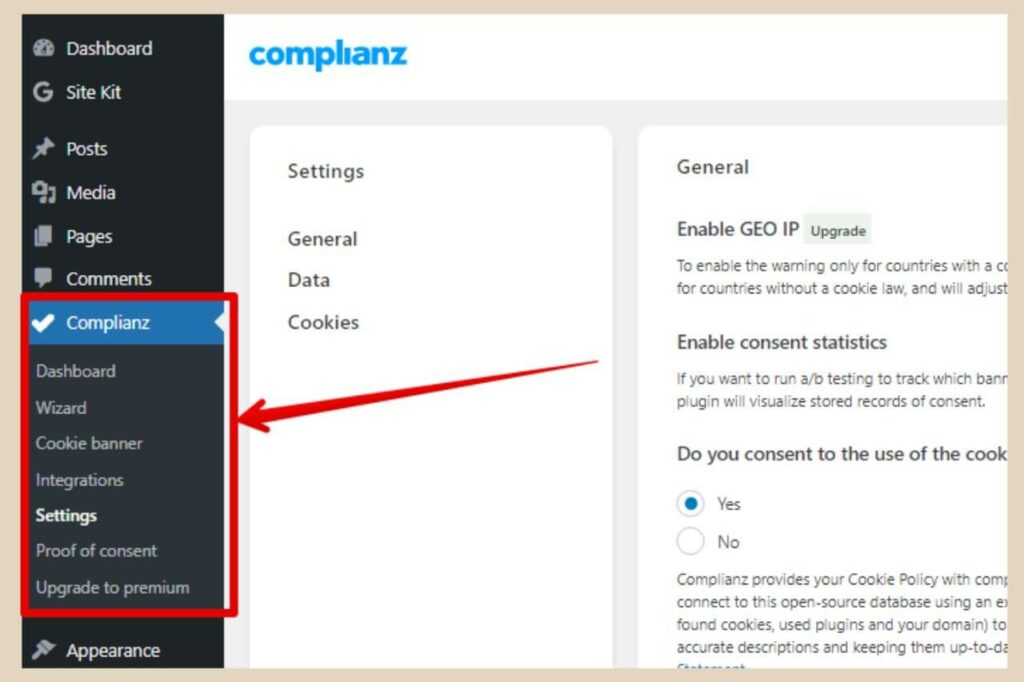
In the Integrations area, you can manually block individual cookies for different services, plugins and scripts until the visitor has consented to the cookies.
In the Settings area, you can change several things such as enabling GEO IP (premium feature) so that the cookie banner is only shown to visitors from countries that have cookie laws.
You can also disable consent to use the cookie database if you don’t want to use it or disable the automatic monthly cookie scans.
There are quite a few different plugin settings here so you may want to peruse through them to make sure you’re happy with the setup.
The last area here is the Proof of Consent area which will list all consents that have occurred on your site so that you’ll have proof of them should you ever need them for legal reasons.
Let’s Get Compliant With The Complianz Plugin
Although the setup is a little long-winded compared to some other plugins, the fact that it automatically takes care of important steps like listing all the cookies on your site puts it ahead of many others where these steps have to be completed manually.
And of course, you can still manually add cookies and alter individual settings too if you don’t want to use the automatic approach so it’s a great option for those who prefer to have more control too.
So, if you’re looking for an easy-to-use plugin that will help your website adhere to user privacy and data protection laws, then the Complianz plugin is definitely one that will do that for you.
I hope you’ve found this tutorial helpful but if you need more help, please let me know in the comments below and I’ll be more than happy to help you out.
Happy Compliance Adhering!

Helpful Guides to Read Next
These beginner-friendly guides will help you keep building your blog step by step.

Jessie
Founder, nomorerush.com
Hi, I’m Jessie — founder of No More Rush. I help beginners build profitable, beginner-friendly blogs without the overwhelm or unrealistic expectations you see online. Everything here is built around simple, structured steps so you always know what to do next.