So you want to monetise your website and now you’re wondering how to create a Google AdSense Account. Well, it’s actually pretty straightforward and in this tutorial, I’ll show you step-by-step how to do it.
I’ll also show you how to set up auto ads and how to create and insert manual AdSense ads too so you’ll know how to do both methods. So let’s get straight into this and get your account and ads created.
How To Create A Google AdSense Account
Google AdSense is completely free to set up and use but before you even get started, you’ll need to have a regular Google account (basically a Gmail account) first to sign up for AdSense so if you don’t already have one, then now’s a good time to set one up.
Once you have a regular Google account set up, you’ll need to head over to Google AdSense and click on any of the numerous Get Started buttons. Next, you’ll be prompted to sign into your Google account, so sign in to move on to the setup section.

In the setup section, you’ll be asked to provide your website URL so type or paste your site URL into the Your Site box.
You can even set up an AdSense account before you even have a site set up by clicking on the “I don’t have a site yet” checkbox. You can then add your site later when you’re ready.
Underneath this, you’ll have the option to receive or not receive customised help and performance suggestions so click your preferred option.
Next, use the drop-down box below this to choose your payment country. This needs to be the country in which you currently live so make sure you don’t make a mistake here as this can’t be changed later.
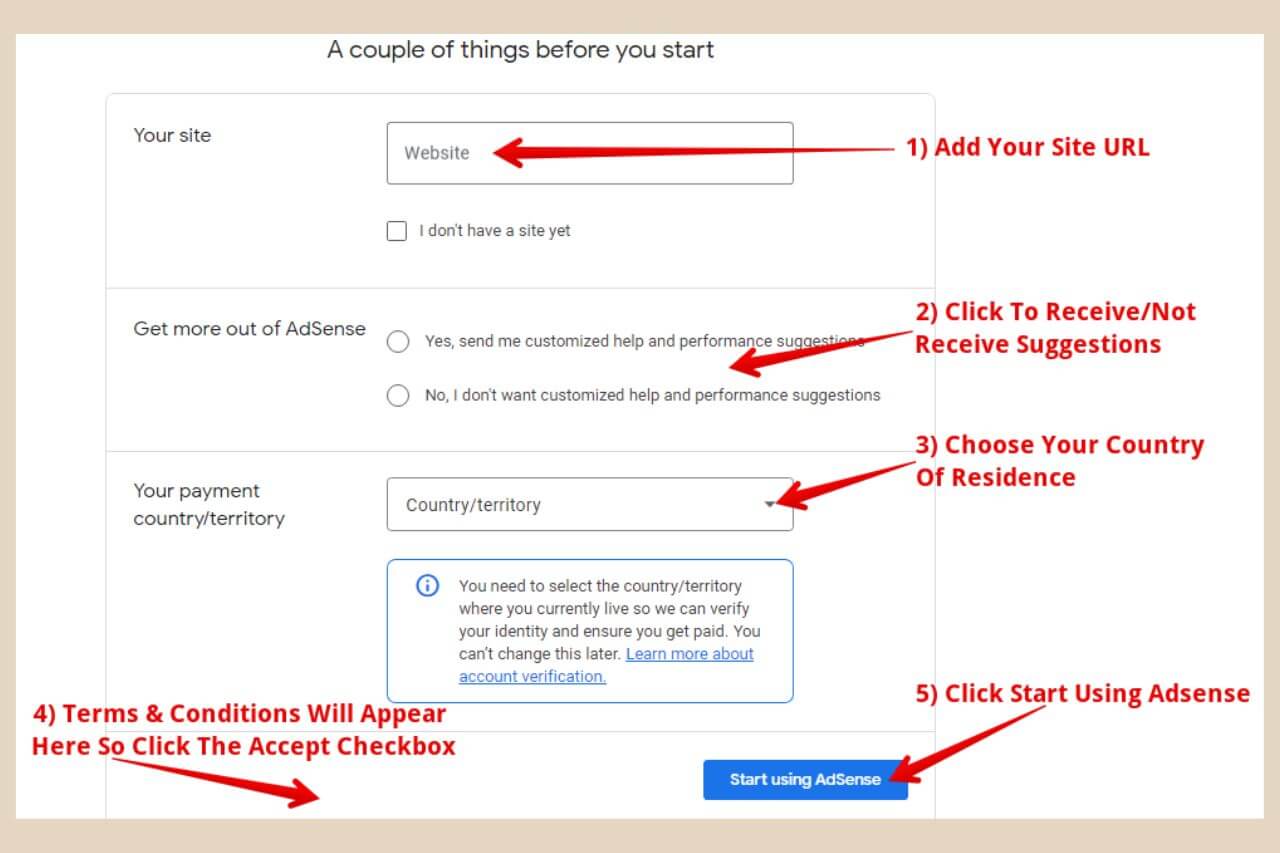
A new terms and conditions section should have appeared below the payment country section so click the check box to accept Google AdSense terms and conditions before clicking the Start Using AdSense button to continue.
This will bring you to your new Google AdSense dashboard where you’ll need to do a few more things to finish setting up your account.
Submitting Your Personal Details
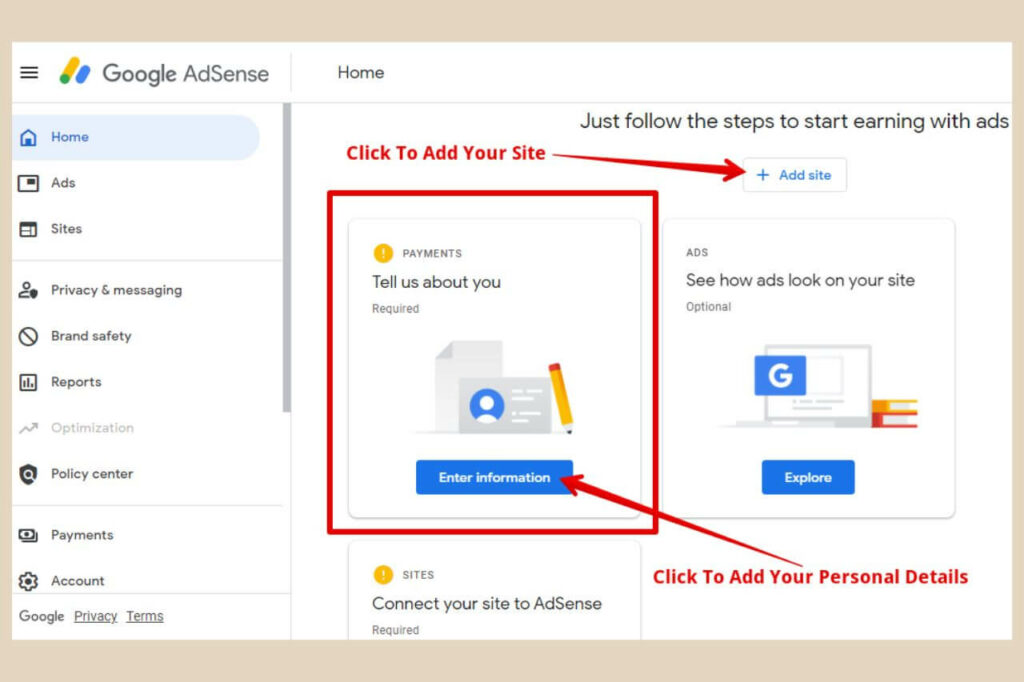
If you haven’t already added your website, you can click the Add Site button here at the top of the page to start the full setup process.
Next, you’ll need to submit your personal details. You’ll notice a box that says Payments near the top of the page and this is where you’ll need to add your personal details so click the Enter Information button to continue.
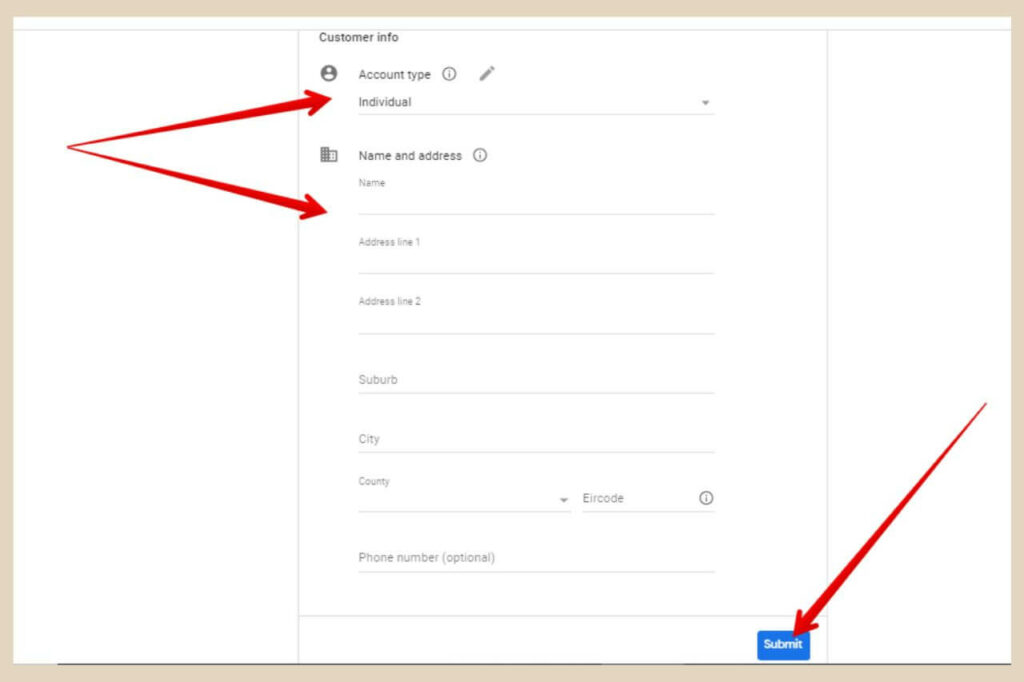
A new page will open where you can fill in your name and address details. For account type, if you’re running your own website, you would select individual here. Once you’ve completed all the details click the Submit button to finish.
You may get a Verify Address box if AdSense can’t find your exact address so select the verified address that AdSense finds if it’s correct to continue.
Connecting Your Site To Google AdSense
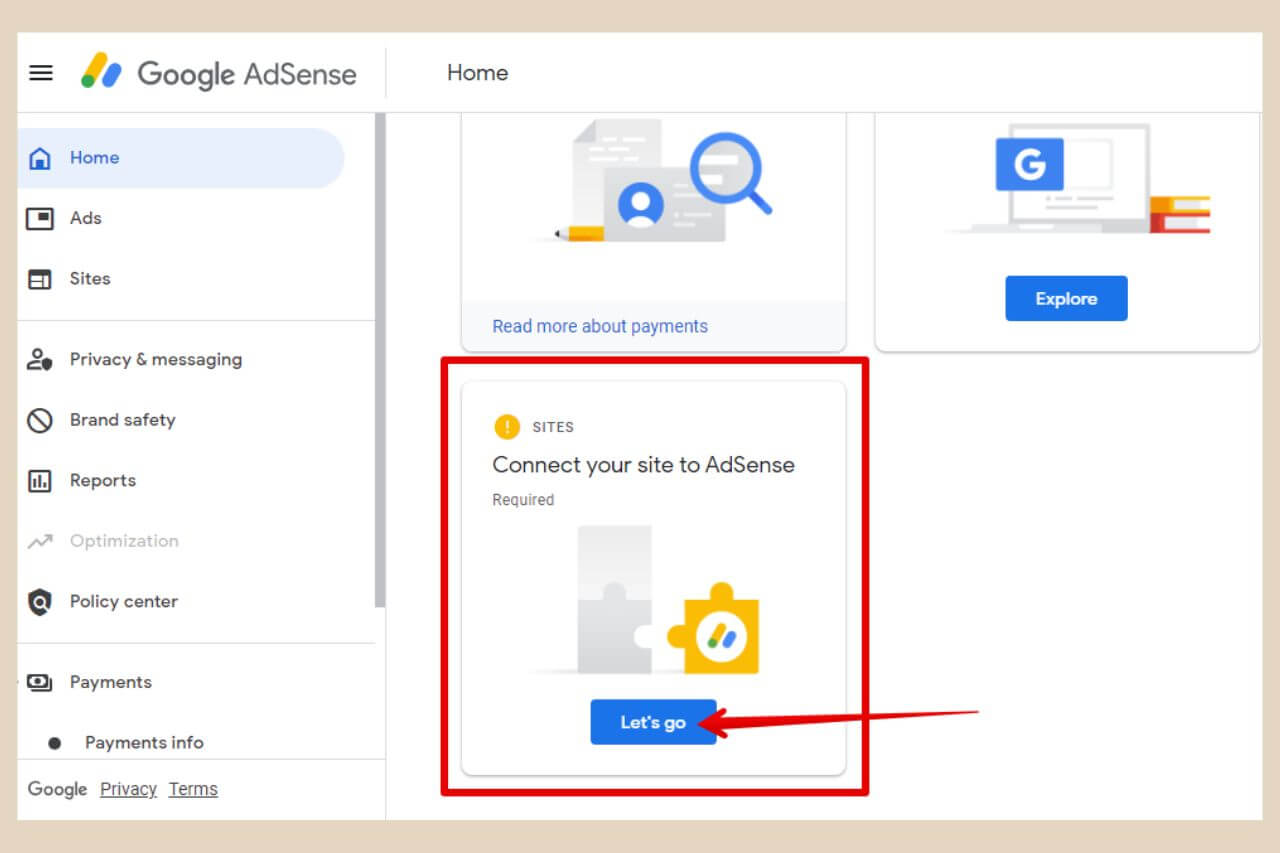
The next thing you’ll need to do is connect your site to AdSense so scroll down to the third box on the screen which says Sites and click the Let’s Go button.
On the next page, you should see you’re site listed in the Site URL box so click on it to move on to the next step.
If you have more than one site or if you ever build more sites in the future, you can add them here using the Add Site button.
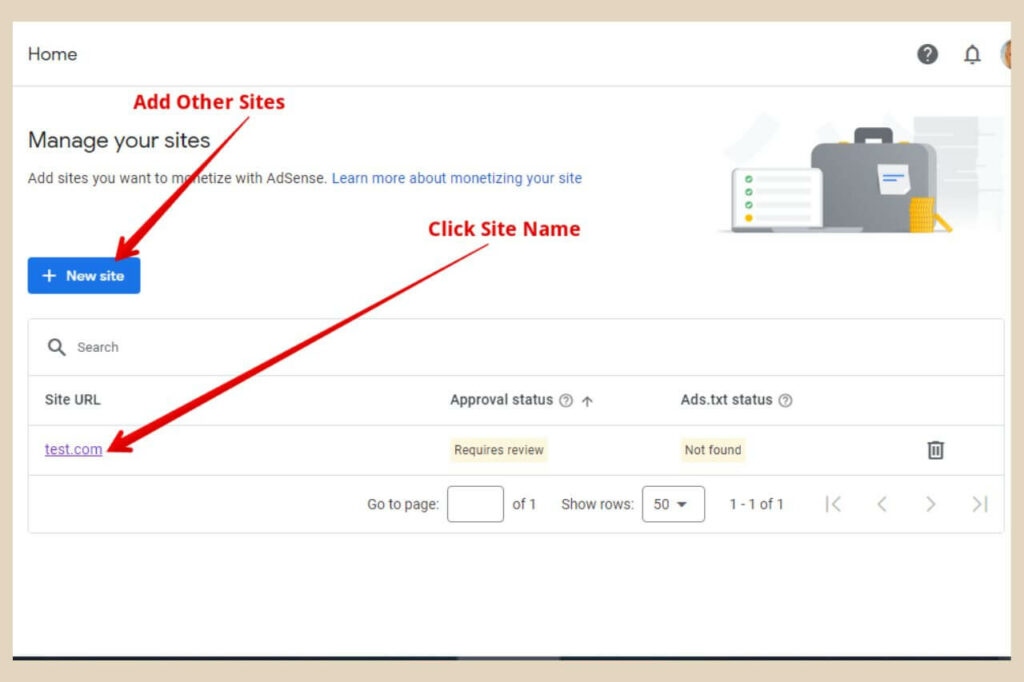
Once you’ve clicked on your site name, this will bring you to a new page where you’ll see options to connect your site to AdSense.
By default, the first option (AdSense Code Snippet) will be selected and this is the one you’ll want to use.
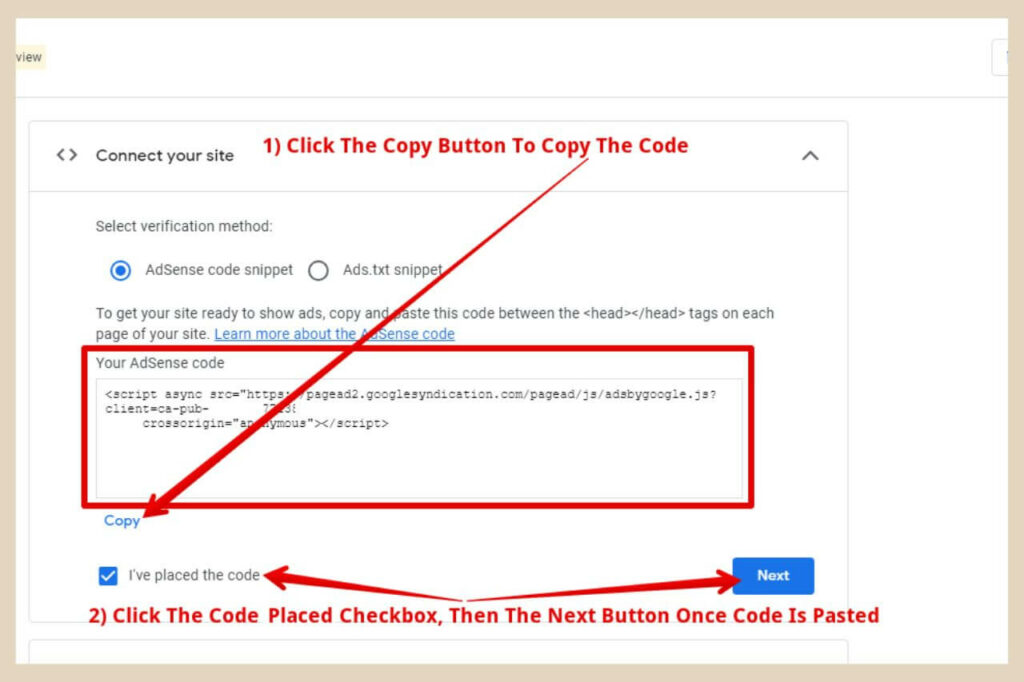
So, simply copy the code in the box and head back to your WordPress site where you’ll need to add this code to your site’s header.
Adding AdSense Code To Your Site’s Header
The easiest way to add code to your site’s header is by using a header/footer plugin such as WPCode or Ad Inserter.
In this next example, I’ll be using WPCode but if you’d like to use Ad Inserter, then click the link above for a full tutorial.
So head to your WordPress editor and hover over or click Plugins from the main menu on the left-hand side of the page.
Next, click Add New from the new menu options that appear which will take you to the Add Plugins page.
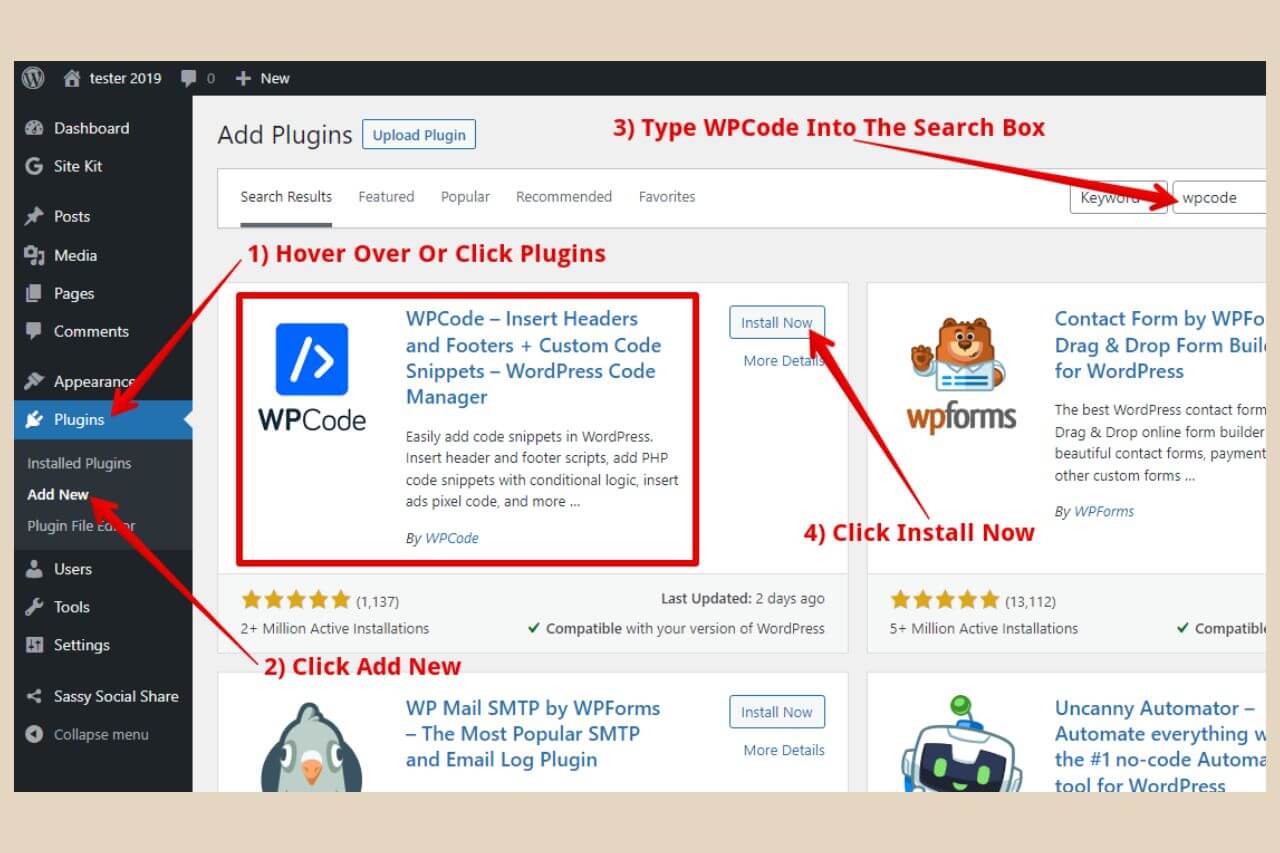
From here, type WPCode into the search box at the top of the page and when it shows up in the results, click the Install Now button to install it on your site. This button will now change to an Activate button so click it again to activate the plugin.
You’ll now notice a new item in your main WordPress menu called Code Snippets so hover over or click on it.
Next, click Header & Footer from the new menu options that have appeared and this will take you to the Global Header & Footer page.

From here, you simply need to paste your AdSense code into the header area as per the image above, then click the Save Changes button to finish.
Request Website Review
Once you’ve pasted the code, you can then head back to AdSense and click the “I’ve Placed The Code” checkbox.
Then click the Next button to continue. You’ll now see a notification that AdSense will review your site to make sure it complies with their policies so click the Request Review button to finish.
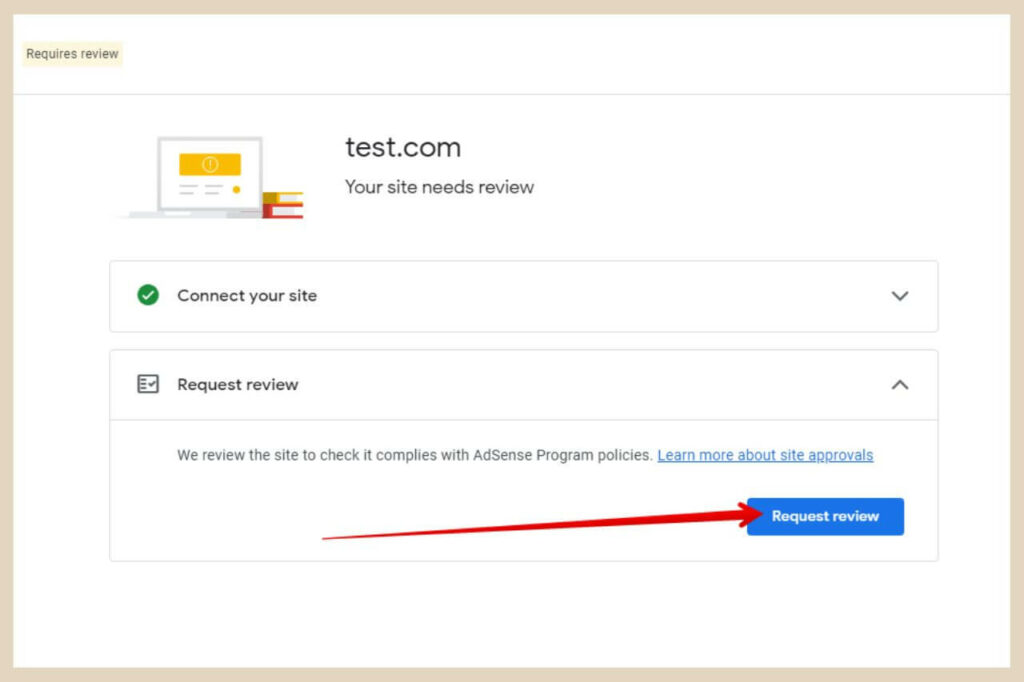
As much as there aren’t many stipulations for signing up for AdSense, you should at least have a privacy policy, some good quality unique content and some visitors to your site before you add it for review.
You can get more information here about AdSense eligibility requirements to make sure your site is ready.
It usually only takes a few days for AdSense to review your site (sometimes it can take a few weeks) but if all is well and you get accepted, you’ll now be able to start adding ads to your site.
If you do get rejected, then it’s usually content-related (that is assuming that you’re not violating any of their policies) so you can simply add more content, make your content more in-depth and then reapply again.
It’s not usually that difficult to get accepted eventually even if it does sometimes take more than one attempt.
How To Create AdSense Ads For Your Website
To Create ads for your site, you’ll need to start by heading to Ads in the main menu on the left-hand side of the AdSense dashboard.
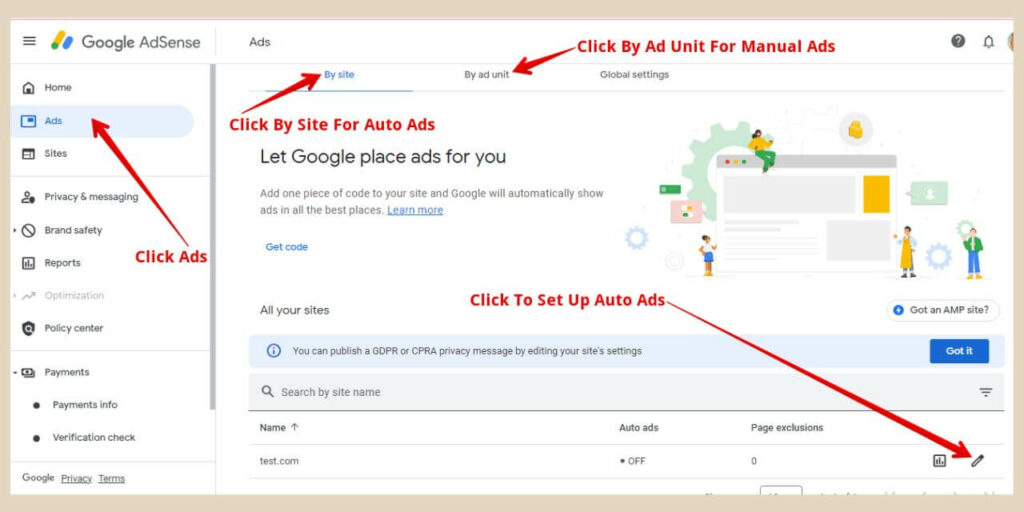
From here, you’ll have a few different ways to create ads for your site. If you click on the By Site tab (which is the tab you’ll land on by default), this is where you can set up auto ads.
If you click on the By Ad Unit tab, this is where you’ll be able to create your own ads of choice which you’ll then be able to add manually to your site in the places where you want them.
The Global Settings tab is where you can switch a toggle to allow AdSense to automatically optimise your ad sizes for mobile devices.
Setting Up AdSense Auto Ads
If you’d like to set up auto ads then click on the pencil icon to the far right of the screen across from your website name.
Note: You can not have more than one AdSense account associated with your Google account so if you have more than one website, you would add all your sites to the one AdSense account with each one needing to be verified individually.
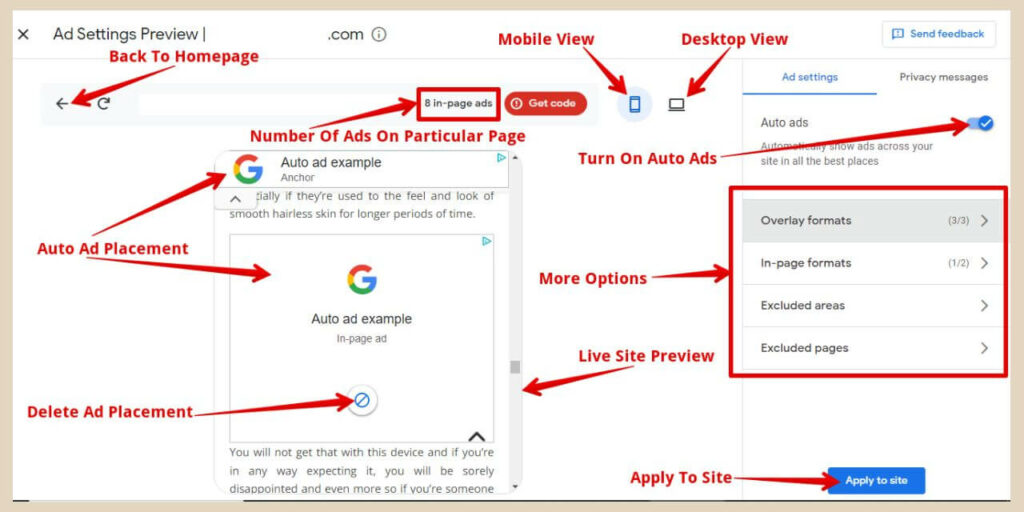
Once you’ve clicked on the pencil icon, this will take you to the auto ads page where you can see a preview of where auto ads would be placed on your site.
To see the ad placement preview, you’ll need to switch the Auto Ads toggle to on which is at the top right of the page as per the image below.
Don’t worry though, ads won’t actually be placed on your live site yet until you click the Apply To Site button on the bottom right of the page.
This lets you play around with the different settings to see how they look before actually implementing them on your site and there’s a lot you can play around with here.
Using The Preview Window
You’ll see a preview window of your live site which you can switch between mobile view or desktop view using the view icons near the top of the page.
By default, your homepage will be displayed but you can move around your site in the preview window by clicking on the individual posts from your homepage to see where ads are being added in different areas.
You can then get back to your homepage by clicking the back arrow on the left next to your site name above the preview.
On the right of your site name, you’ll see how many ads are going to be placed on the particular page you’re currently viewing in the preview window.
You can also scroll up and down the page to see actually where the ads are going to be placed.
If you don’t like the placement of a particular ad unit (or if there are just too many ads and you want to get rid of a few), you can click the delete button within the ad unit to get rid of the ones you don’t want.
Note: The code to add auto ads is the same code you’ve already added to your site for verification with AdSense so you don’t need to add it again.
Overlay Format Ads
There are a few more options available here on the right of the screen that will let you control the amount of ads and the types of ads being added to your site.
They are Overlay Formats, In-Page Formats, Excluded Areas and Excluded Pages. I’ll start with Overlay Formats which are ads that appear over certain content areas of your site so the top or bottom of the screen for example.
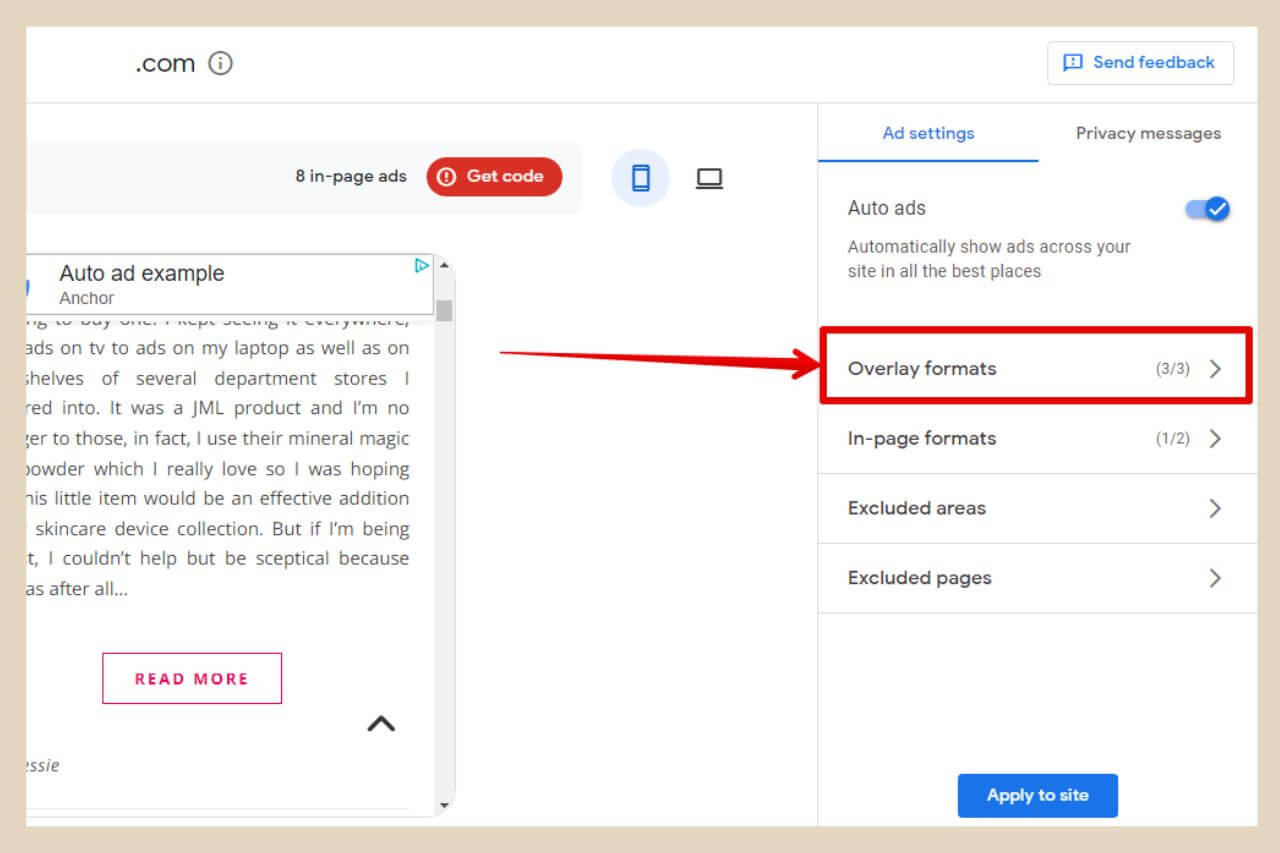
If you click on the Overlay Formats area, a new section will appear where you’ll be able to control the types of overlay ads that appear on your site.
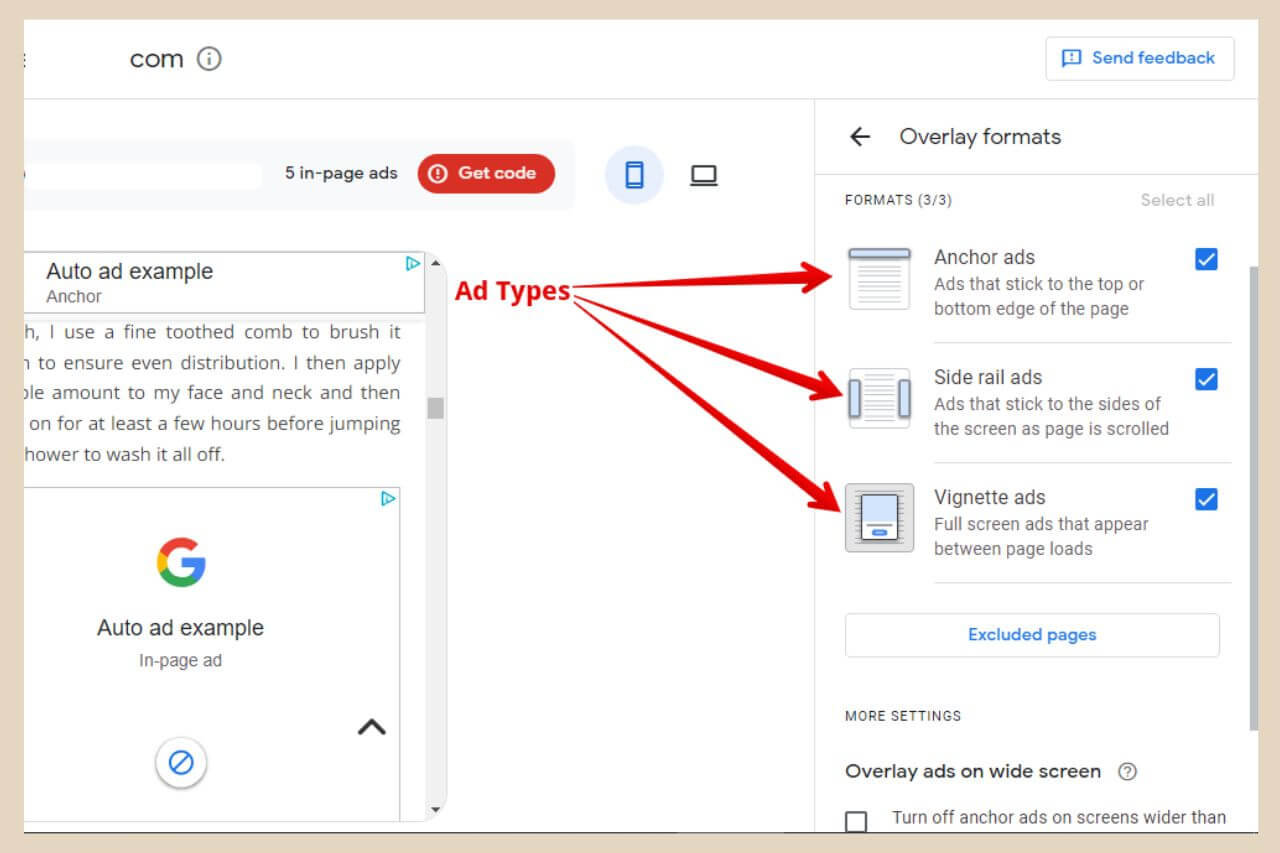
There are three different types of overlay ads here that you can choose to enable or disable and they are as follows:
- Anchor Ads – Ads that stick to the top or button area of the screen and remain there even when scrolling.
- Side Rail Ads – Ads that stick to the sides of the page and remain there even when scrolling.
- Vignette Ads – Ads that pop up as visitors move from one area of your site to another.
You can simply use the checkboxes here to enable or disable each or all of them depending on which ones you’ll like to show on your site.
If you scroll down further, you can also choose to disable certain ad types on wider screens by using the checkboxes further down.
You can also exclude pages here by clicking on the Excluded Pages button but as this area has its own tab, I’ll show you how to use this area in the Excluding Areas section further down.
In-Page Format Ads
The next section is the In-Page Formats section and these are the ads that are displayed within your posts/pages in between the content. There are two different types of ads here and they are as follows:
- Banner Ads – One ad in one unit.
- Multiplex Ads – Multiple ads in one unit that appear in a grid.
You can use the checkboxes here to enable or disable the different ad types just like before. You can also use the Ad Load slider to adjust the amount of ads that are displayed on each page.
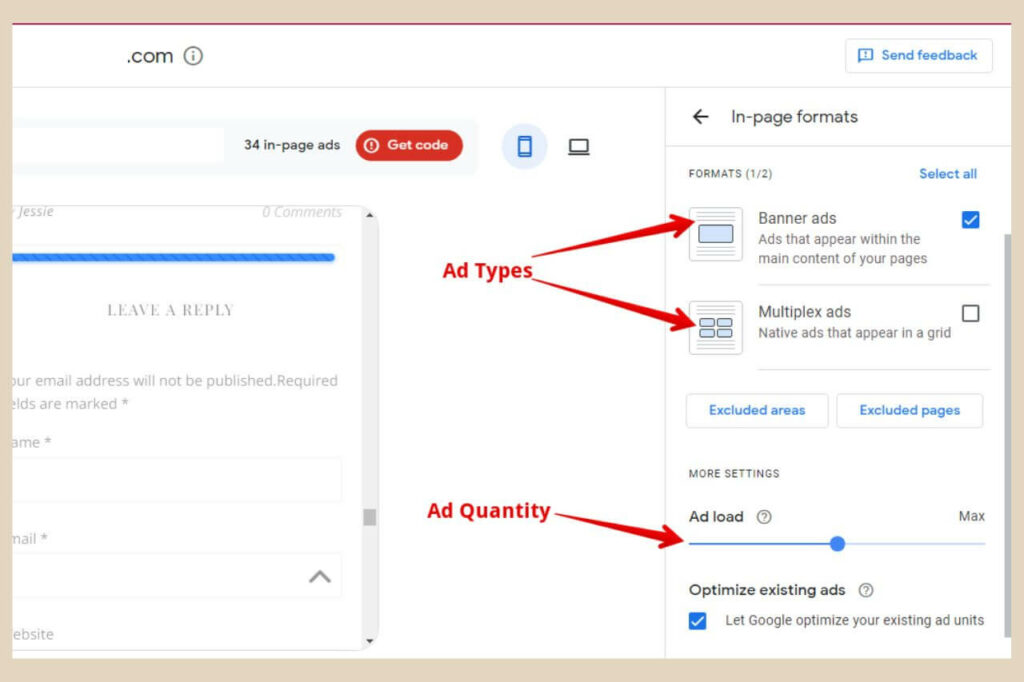
If you’ve already placed manual ads on your site, you can tick the Optimise Existing Ads checkbox and AdSense will optimise these ads as well as your auto ads to place them in the best-performing areas.
Again, you’ll notice an Excluded Areas button and this time also an Excluded Pages button which will take you to the same tab areas that I’m about to go into below.
Excluding Areas From Showing Ads
If you’d like to exclude certain areas from showing ads, you can use the next section which is the Excluded Areas section.
Once you’ve clicked on this section, you’ll notice some areas within the preview window that now have blue lines across them.
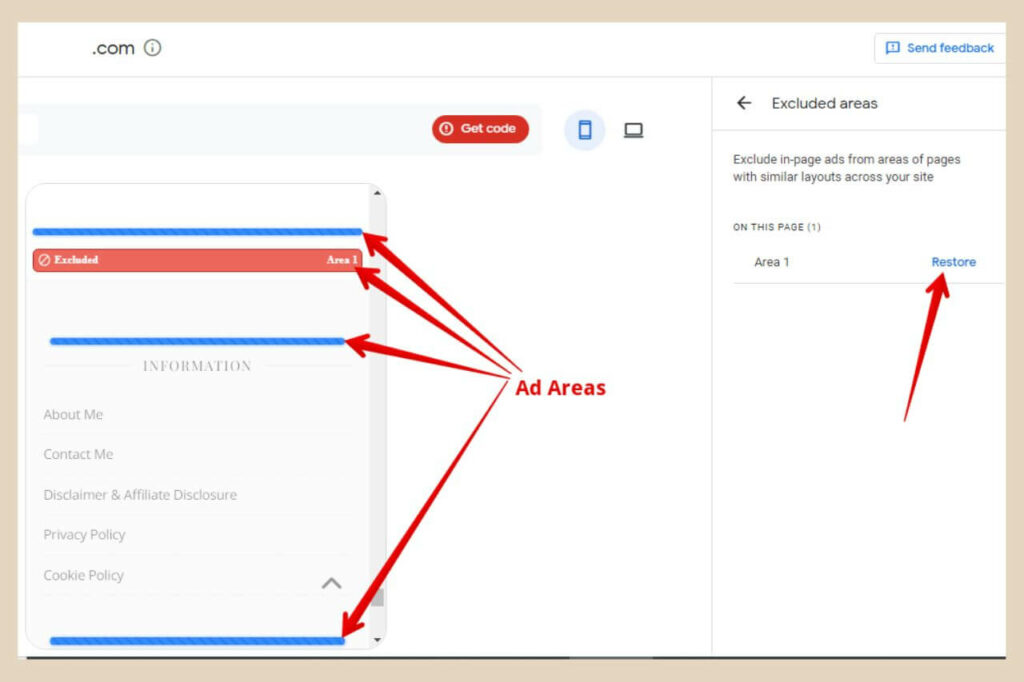
These blue lines are the ad areas so to exclude them from showing any ads, you simply need to click them and they will turn red and no longer show ads in that area.
To turn them back on again, you can either click the area again or you can click the Restore button next to the area listed on the right of the page and ads will start being shown in that area again.
Excluding Pages From Showing Ads
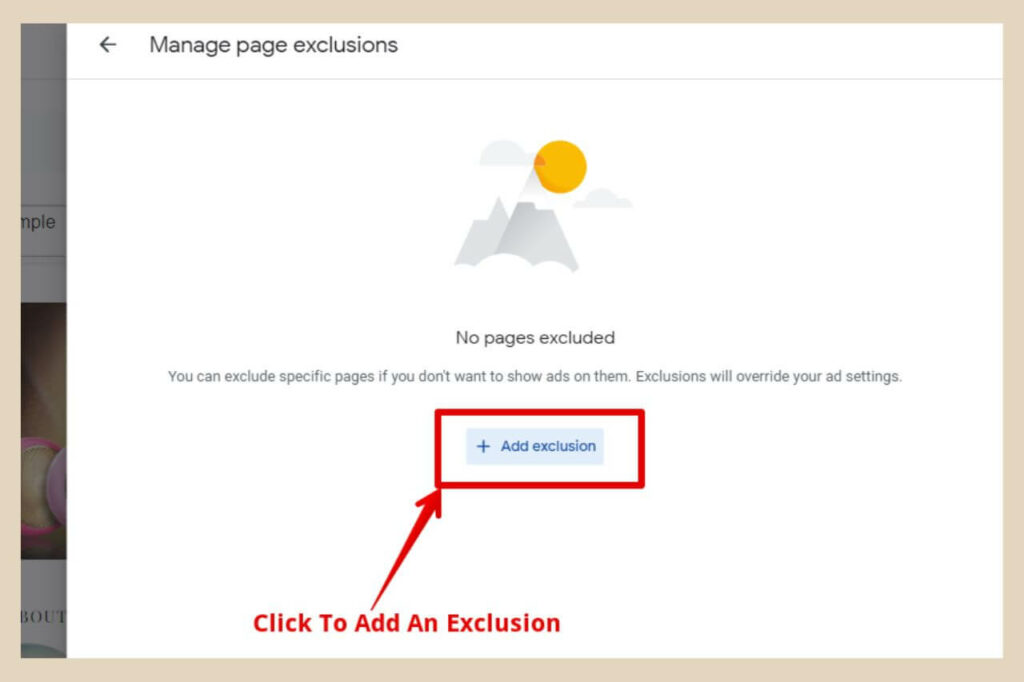
If you’d like to exclude certain pages from showing ads, you would use the last section which is the Excluded Pages section.
Once you click on this area, a new section will appear where you can add pages to an exclusion list by clicking the Add Exclusion button.
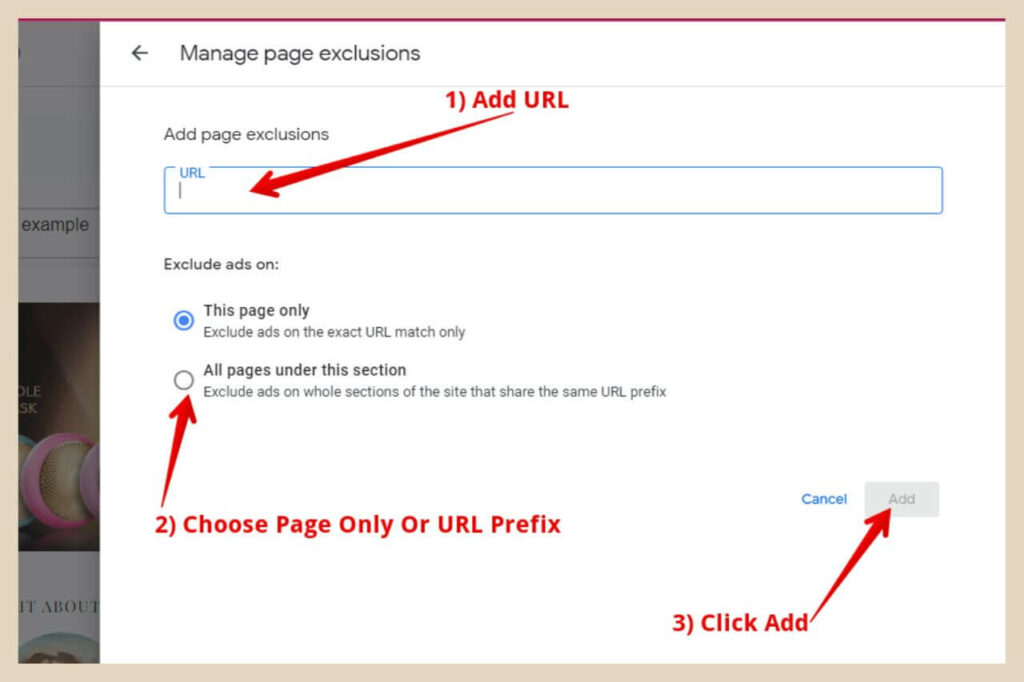
Once you click this button, another new section will appear where you can add the URL of the page/post you’d like to exclude from showing ads.
Simply paste the URL into the URL box, choose to exclude just the page or all pages that contain the URL prefix then click the Add button to finish. You can then add more URLs if you want to exclude numerous pages/posts.
Once you’ve finished here, this is as much as you can control with auto ads so if you’re happy, you can go ahead and click the Apply To Site button. Your auto ads will now be added to your site and should start displaying within an hour or so.
There are a couple of things to note when it comes to Auto ads and the first one is that as easy as it is to just set up auto ads and move on, you are giving up a lot of control using them.
Some ads can also be a little intrusive (those pop-up vignette ads in particular). They are a quick and easy option but you should use caution with them because if you’re not careful, you could end up with a site that is so littered with ads that it takes away from the user experience.
They’re also not as customisable as manually added ads either so just some things to consider before you go down the auto ads route.
Why I Prefer To Add My Ads Manually
I like to have full control over where my ads are placed and for that reason, I prefer to add my ads manually. And it’s not just about their placement on a page/post/widget area either.
I don’t like to use ads on affiliate posts. Why you may ask? Well, ads are usually based on what the visitor has been viewing online and affiliate sales are worth a lot more than ad clicks.
If I’ve written a review about a product, when a visitor lands on my post, they’ve probably already been doing some research on that product prior to arriving on my post.
As ads are based on the visitors browsing history, if I have ads on that posts, chances are that those ads will show the exact product that the visitor has been researching all day which is also the exact product that I’m reviewing on that same post.
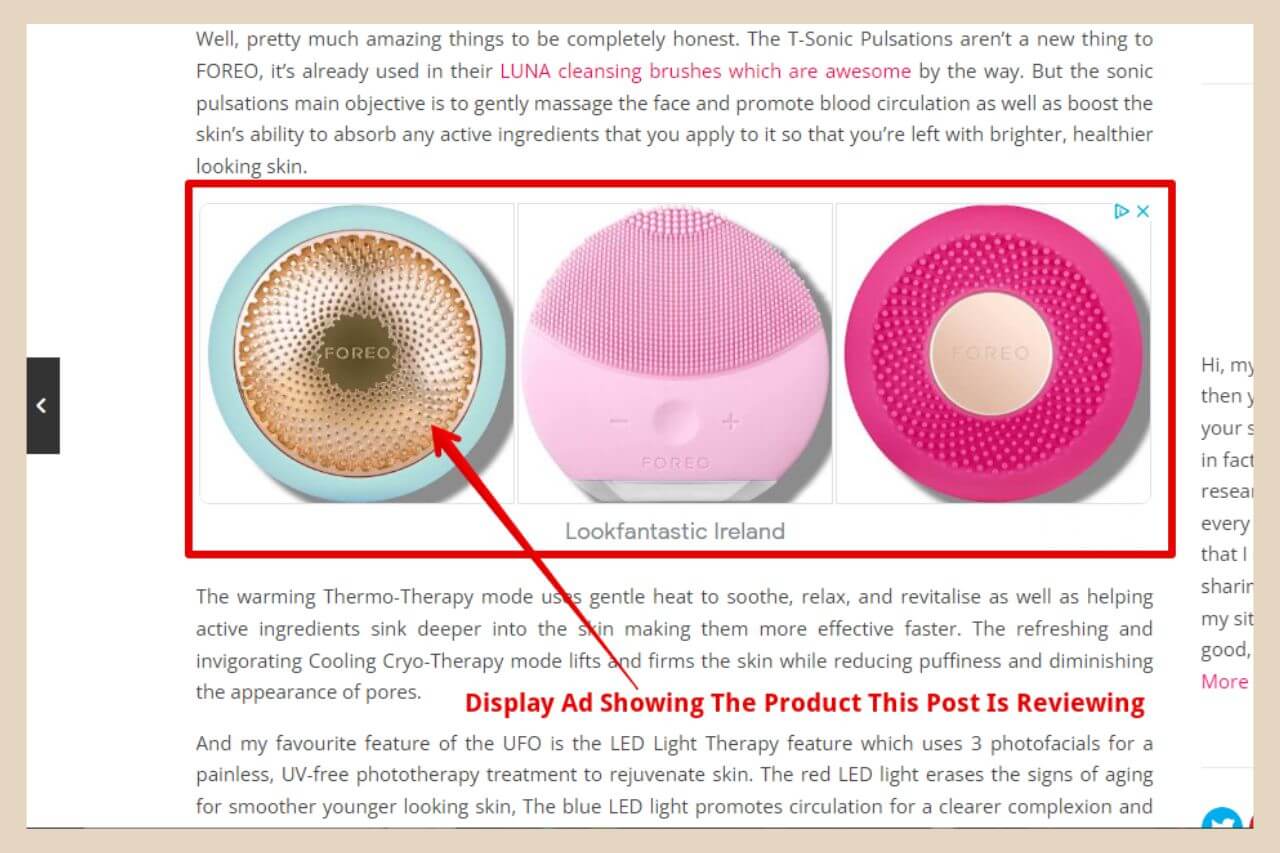
The image above is a prime example of this happening. Earlier today I purposely placed a display ad on a skincare device review on one of my other sites. I then purposely spend the day repeatedly putting the device name into Google search.
Because of that, now when I head to this post, the display ad on the post is now showing the exact product that the review is about.
Losing Affiliate Link Clicks To Ad Clicks
Affiliate sales are worth a lot more than ad clicks so I’d much rather that the visitor clicks on one of my affiliate links rather than the ad for the same product which is worth much less.
Even when you take into consideration that an affiliate link click needs to end in a sale in order to generate revenue and an ad click doesn’t, the difference between what they can be worth can be huge.
In order to prevent that from even being a possibility, I tend to leave ads off all affiliate posts for that reason.
I could use the excluded pages section to get around this but I just find it easier to insert ads as and when I want them.
Of course, this is personal preference but it is some food for thought when thinking about your monetisation strategy.
Creating And Adding AdSense Ads Manually
If you’d like to create and add your ads manually, you’ll need to head to the By Ad Unit tab where you’ll see a selection of different ad types that you can create.
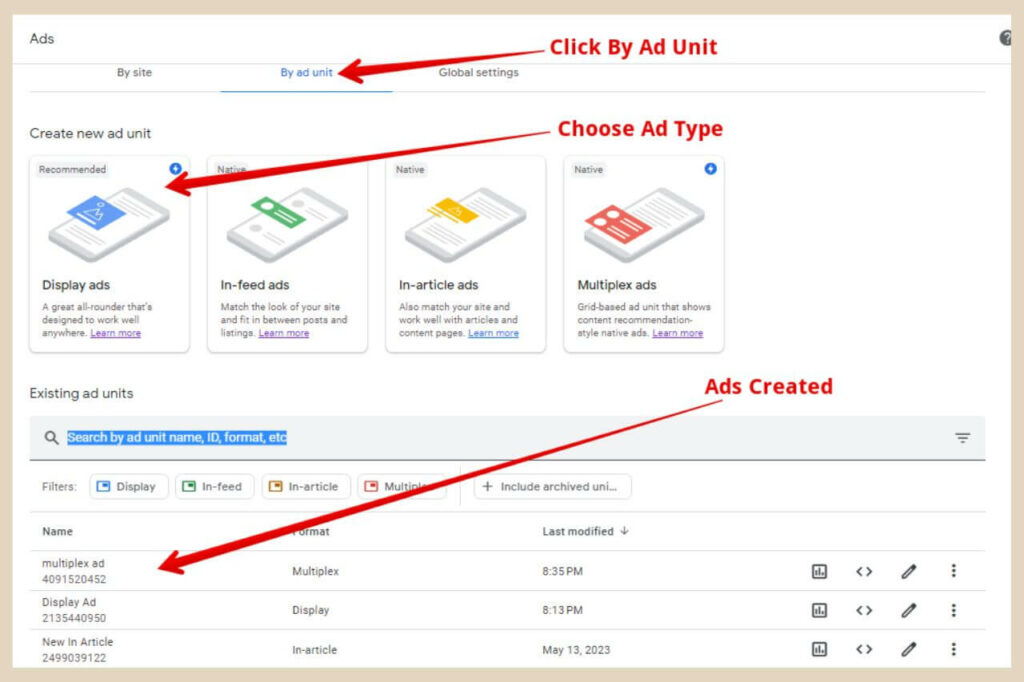
There are four different ad types that you can create here with some being more customisable than others and they are as follows:
- Display Ads – Display ads are regular ads that can be used anywhere on your site. They look like ads and are made to stand out from the rest of the content.
- In-Feed Ads – In-Feed ads are for use within feeds such as a homepage with an article list where ads will be placed in between the listed items.
- In-Article Ads – In-Article Ads are great for placing in between content on posts/pages. They differ from display ads in that they are made to look less like ads so that they blend in with the content.
- Multiplex Ads – Multiplex Ads are ad units that have multiple ads within them in a grid format.
You can use a whole variety of ad types across your site depending on the ones you like and where you plan to place them so let’s have a look at each one and how you add them.
In-Feeds ads are a little bit more advanced so for that reason, there will be a dedicated tutorial on just that alone coming soon. As for the other three ad options, let’s start with display ads.
Creating Display Ads
To create display ads, start by clicking on the display ad box. This will take you to a new page where the first step will be to choose an ad layout.
You can choose between a square ad, a horizontal ad or a vertical ad and you’ll be able to see a preview example of how the different layouts look in the ad preview window.

Once you’ve made your selection, you’ll next need to name the ad. You’ll also have the option to change the ad size from responsive to fixed but I would leave this at the default responsive.
This way, the ad can adjust to the area you’re placing it in and adjust when viewed on different screen sizes.
You can’t really customise a display ad so the final step here is to click the create button to finish. A new page will now appear with the ad code which you’ll now need to copy and paste within your site.
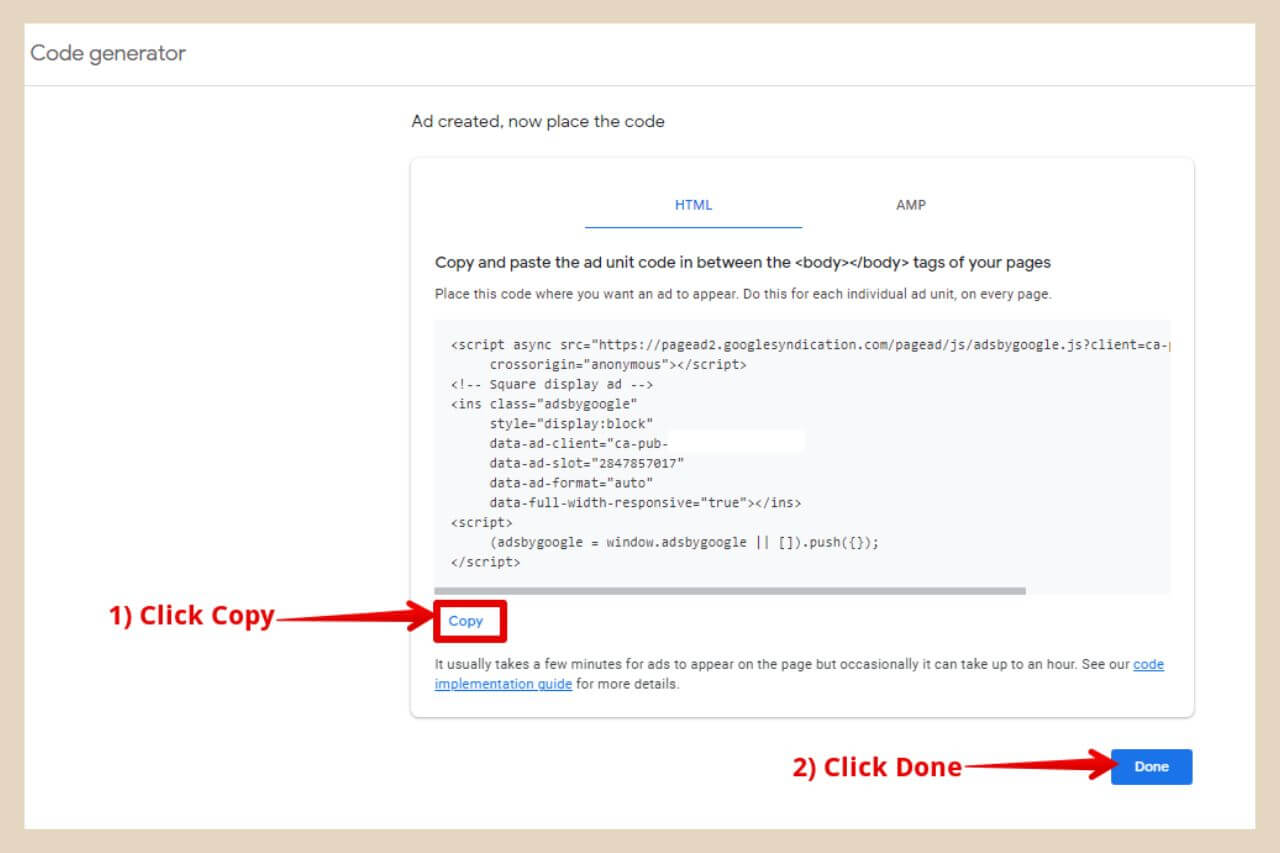
By default, you’ll be shown the HTML code and this is the one you want so click the copy button to copy the code, then click the Done button to close down the window.
Manually Placing AdSense Ads On Your Site
You’ll now need to head back to your site and decide where you’d like to place your new ad. If you want to place it within a page or post, simply head to the page/post where you’d like to place it.
Once you’ve decided where you’d like to add it, click the + icon to add a new block to the area.
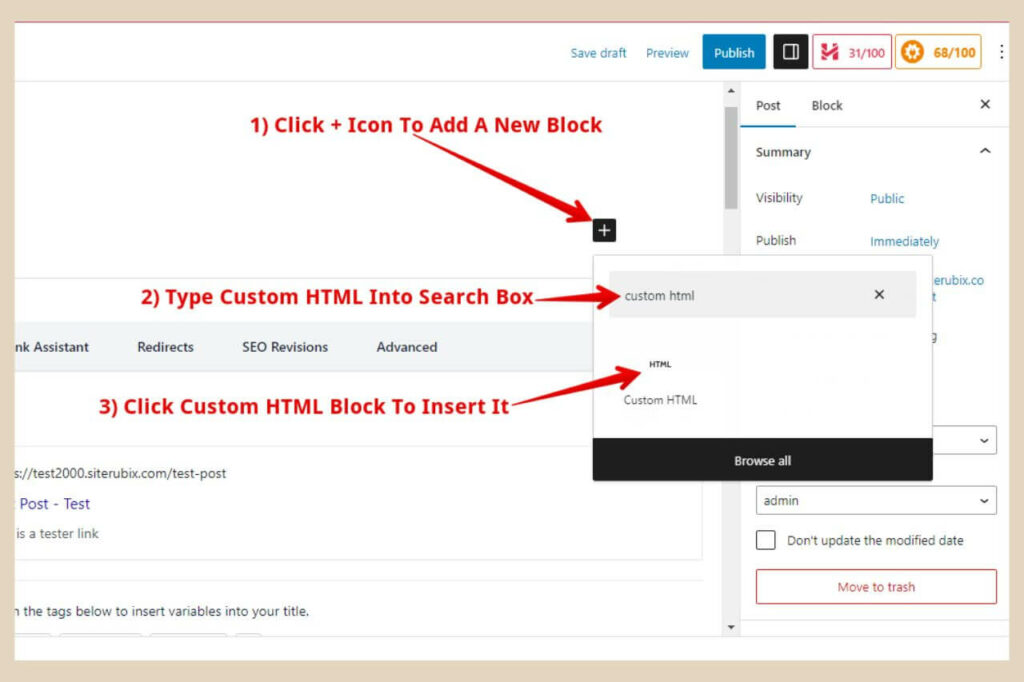
When the small window appears, type Custom HTML into the search box and when the Custom HTML block appears, click on it to add it to the area.
Paste the code snippet that you copied earlier into the HTML block, then click the Publish/Update button at the top of the page to finish. You’re new ad is now added and should start showing within an hour or so.
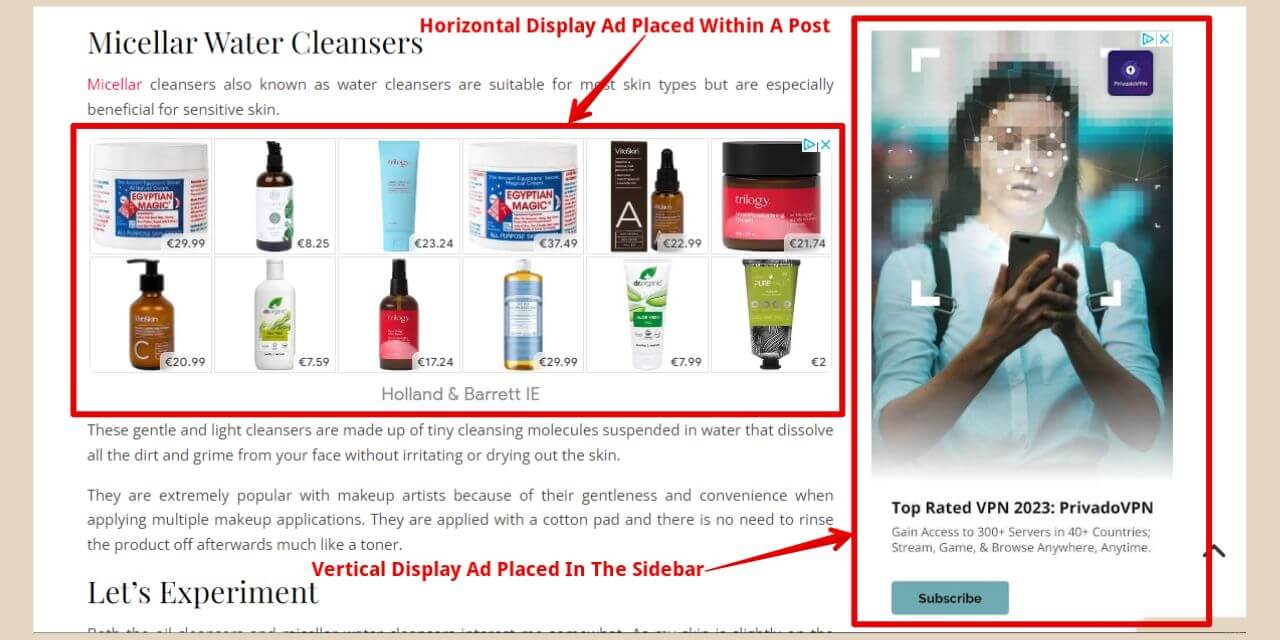
In the image above, there are two display ads here. A horizontal one which I’ve placed within the content of the post and then another vertical one which I’ve placed in my sidebar.
To add your ad to your sidebar area (or any other widget area for that matter), simply hover over or click Appearance in the main menu on the left-hand side of the page in your WordPress editor.
Next, click Widgets from the new menu that’s appeared to take you to the widget page.

From here, choose the widget area where you’d like to place your ad and much like the post/page method, click the + icon to add a new block to the area.
Again, you’ll need a custom HTML block here so insert one and paste your ad code just like before. Click the Update button to finish and your ad will be added to your widget area of choice.
Creating In-Article Ads
To create In-Article ads, click the In-Article ad box to take you to the In-Article ad page. From here, you’ll see a preview window which will show you an ad in between some random content which is essentially how these ads will look.
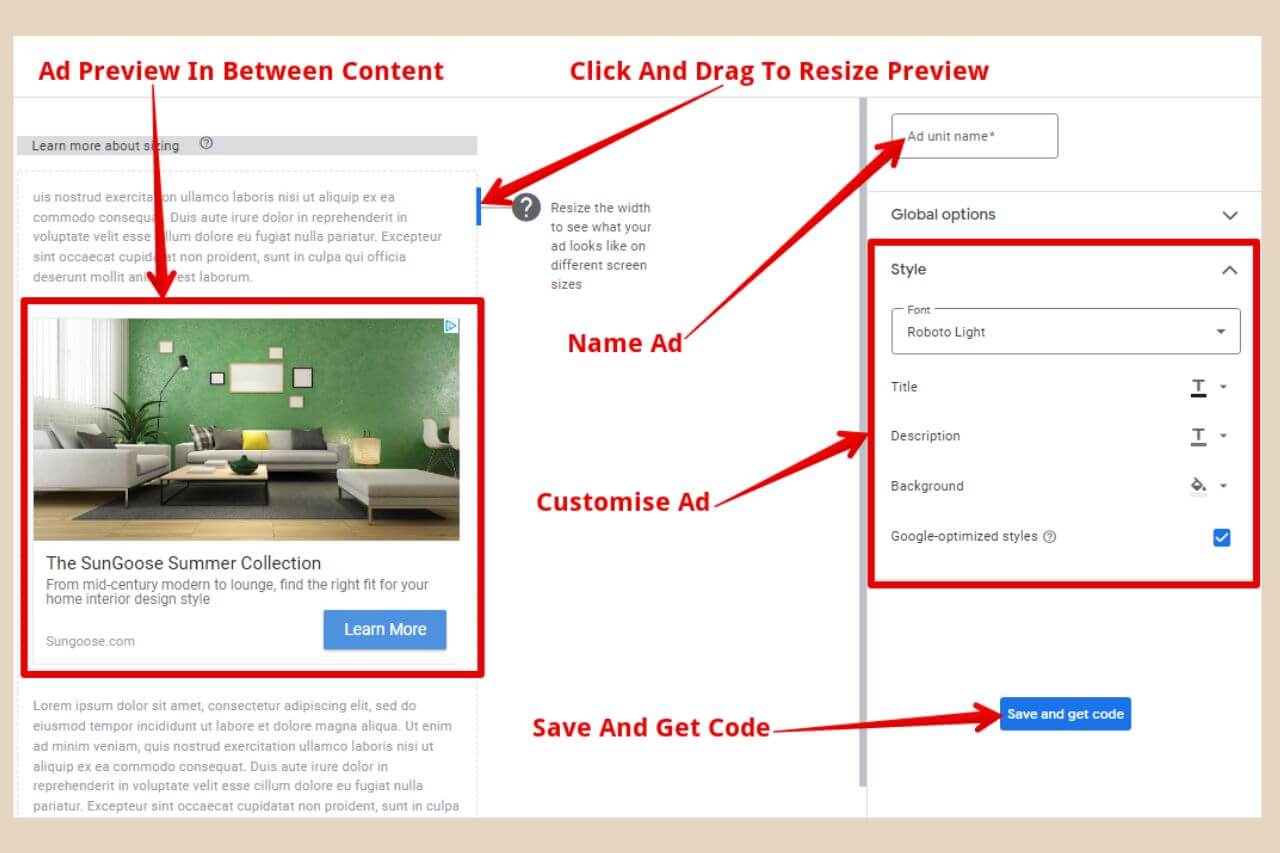
You can click and drag on the blue area near the top of the preview window to change the size of the area. This lets you see how the ad will look on wider or narrower screens.
On the right-hand side of the screen, you see an area where you can name your ad unit. You’ll also see some customisation options below this in the Style section.
From here you can change the font style, the individual font colours for the ad title and the ad description and the background colour of the entire ad unit.
There’s also a checkbox here that lets Google optimise your ad styles for you. Google will use your style options unless it feels that other styles will perform better so it’s up to you whether or not you leave this checkbox ticked.
There’s also a Global Options tab where you can choose to let Google also show display ads as well as in-article ads in this same ad unit.
I personally leave this on but you can choose to turn it off by clicking the small slider if you wish. Once you’re happy will all the settings, click the Save And Get Code button to continue. This will take you to a page much like before where you can now copy the ad code.
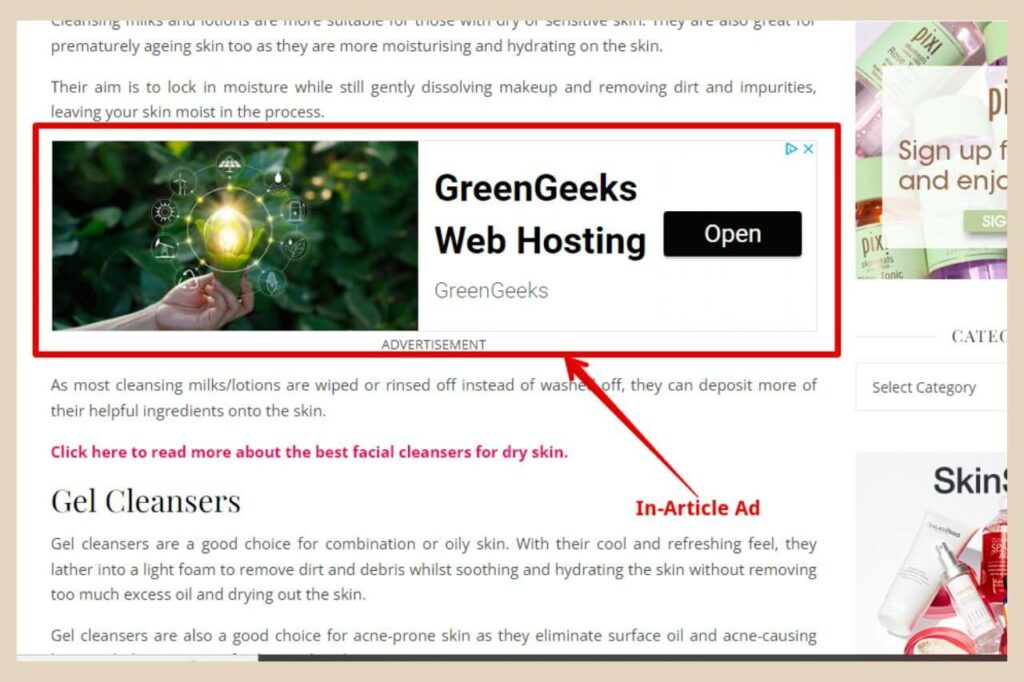
To insert your ad code within your pages/posts, follow the exact same method as above using a Custom HTML block and you’re all done. The above image is how an In-Article ad looks on a website.
Creating Multiplex Ads
To create multiplex ads, simply click on the multiplex ads box. Multiplex ads can be created in either a horizontal layout or a vertical layout using the buttons at the top of the screen.
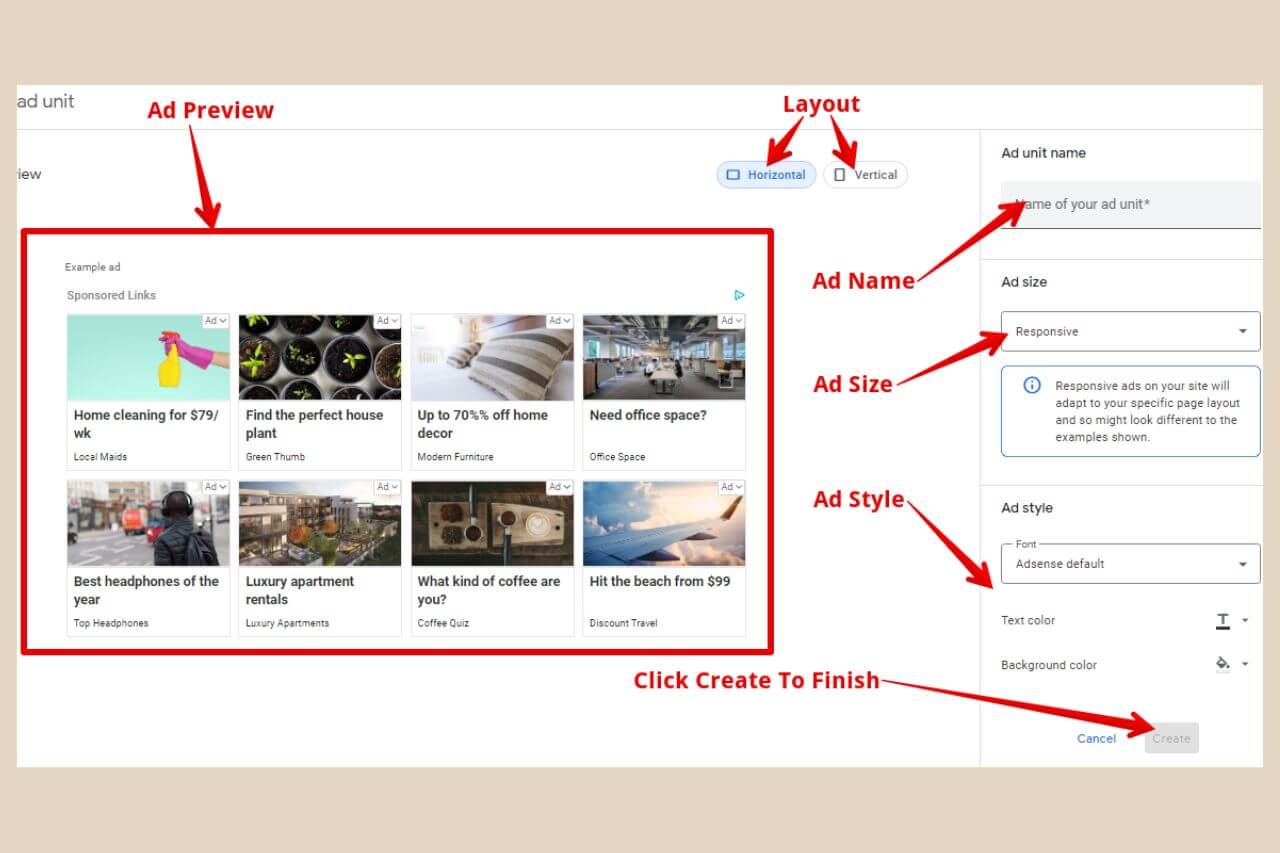
You’ll also see some familiar options on the right of the page where you can name your ad unit and choose between responsive or fixed for your ad size.
For the customisation options, you can change the font style, the text colour and the background colour. Once you’re happy with the settings, click the Create button to continue.
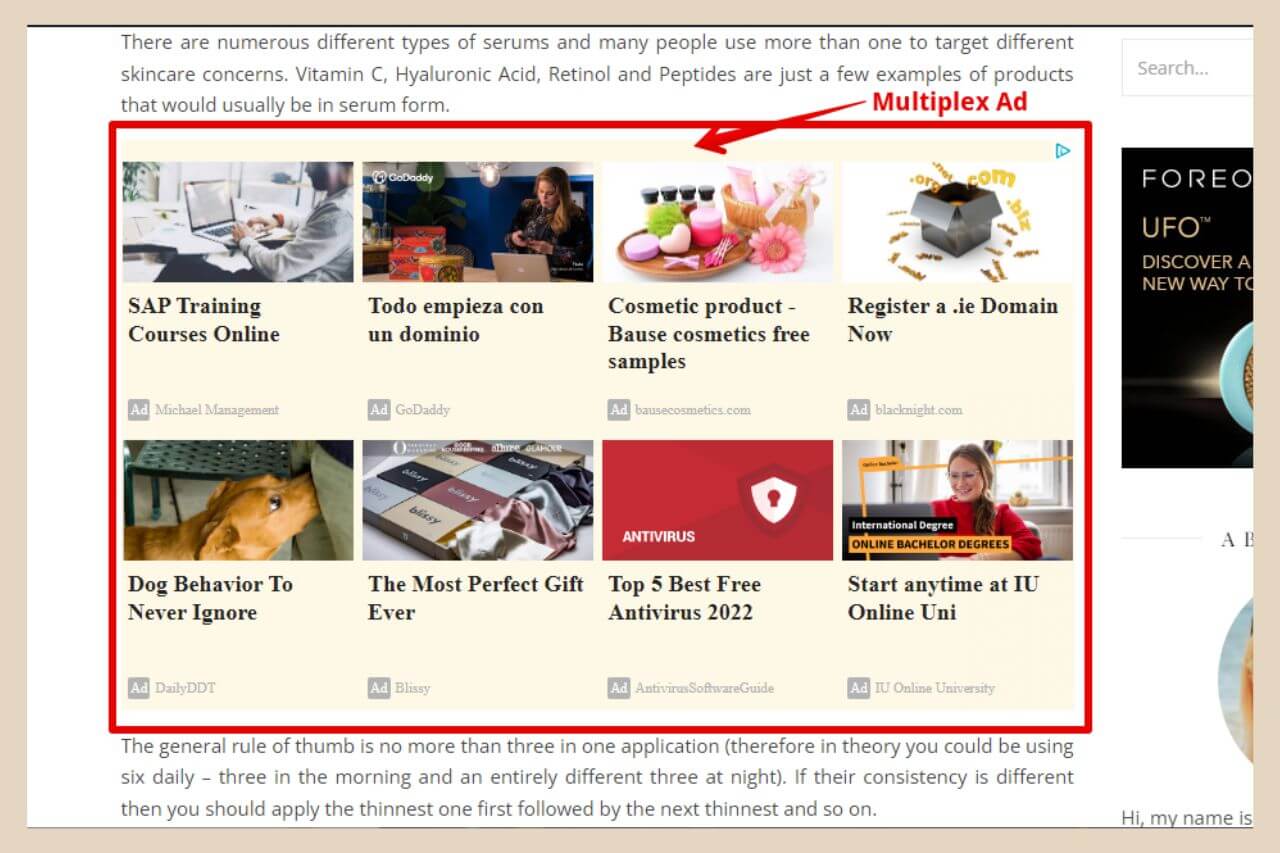
As before you’ll be taken to the code page where you can copy the code and insert it into your site using the same methods mentioned above. The above image is how a Multiplex ad looks on a website.
You can also create ads manually and then use a plugin to add those ads to multiple pages across your site automatically and there’ll be a full tutorial coming soon on how to do that so watch this space.
Your Created Ads List
Any ad that you create will be listed on the main By Ad Unit page beneath the ad type options. If you ever want to copy the code for an existing ad unit you can do that by simply clicking on the Get Code button.
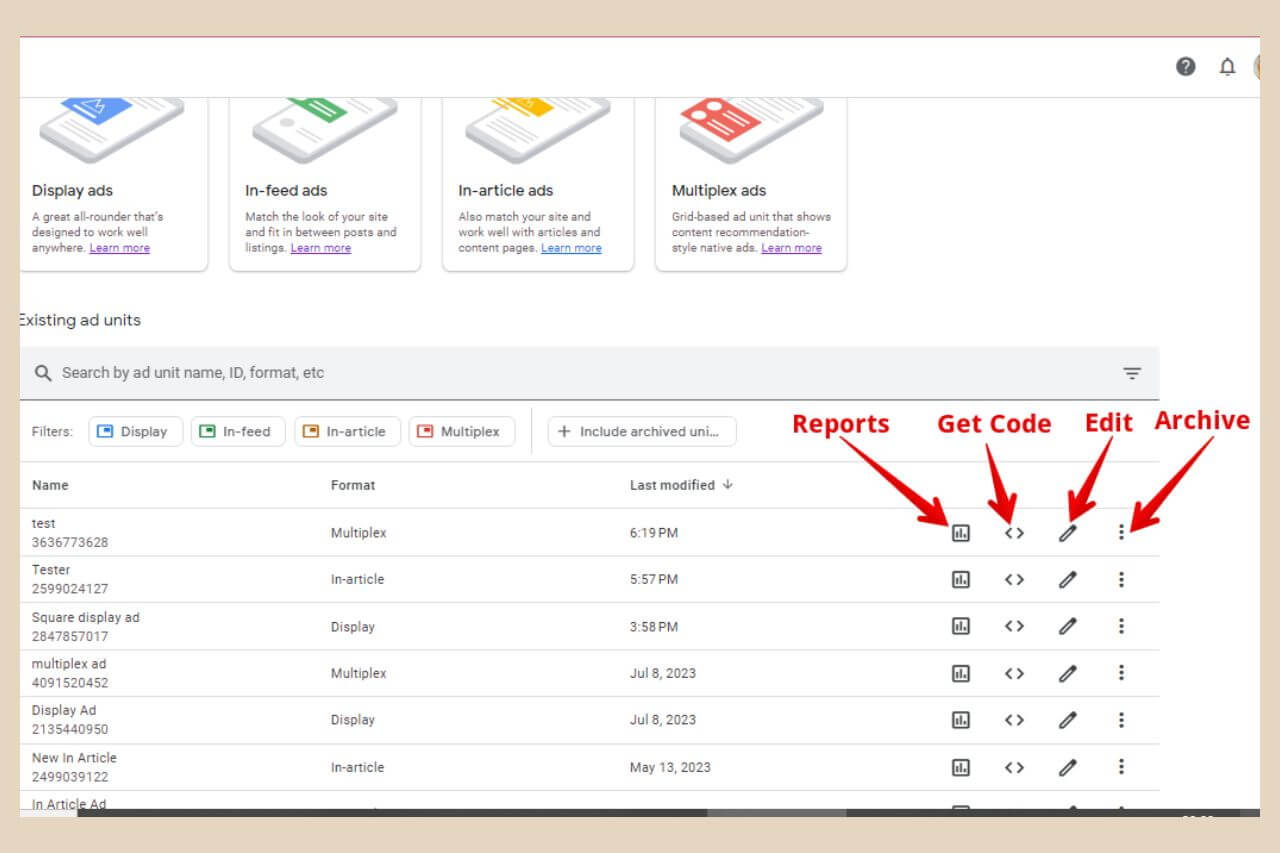
If you’d like to see how well one particular ad is doing, you can click the See Report button and a report page will appear that will show you the stats for that particular ad unit including how many times it’s been clicked and how much revenue it’s generated.
If you’d like to make changes to an existing ad, you can click the Edit button and this will take you to the page where you can change colour, layout, etc.
The three dots at the far right of each ad listed is the More button and clicking this will bring up an Archive button which you can use if you want to archive ad units that you no longer use.
To see your full AdSense earnings, the homepage will now become your main dashboard where you’ll be able to get an overview of your entire AdSense ads performance.
Let’s Get Those Ads Created
Once you start using Google AdSense, you will get the hang of it really quickly. It may not be the highest-paying way to monetise a website but as your traffic grows, it can become a very lucrative method.
I hope you’ve found this tutorial helpful and if you’d like to share your own AdSense stories or if you need any help with anything, please feel free to leave a comment below.
Happy Ad Creating!

Get the Free Blog Monetisation Guide
A simple guide to understanding blog income streams and choosing the right monetisation path.

Helpful Guides to Read Next
These beginner-friendly guides will help you keep building your blog step by step.
- How to Connect AdSense and Analytics to Uncover Your Highest-Earning Content
- How to Set up Google Analytics and Track Your Blog Traffic
- How to Set up Google Search Console and Get Your Blog Found Faster
- How Affiliate Marketing Actually Works for Bloggers
- Is Wealthy Affiliate Worth It for New Bloggers?
Ready to Turn Content into an Asset?
Transitioning from a time-consuming hobby to a reliable business requires a clear plan. Head over to my main Monetisation Hub to master affiliate marketing frameworks, digital product creation, and ad network optimisation.

Jessie
Founder, nomorerush.com
Hi, I’m Jessie — founder of No More Rush. I help beginners build profitable, beginner-friendly blogs without the overwhelm or unrealistic expectations you see online. Everything here is built around simple, structured steps so you always know what to do next.