For any website owner, knowing how to set up Google Analytics in WordPress is extremely important because Google Analytics is used to help you monitor your website’s traffic.
As a website owner, this information is essential to see how well your site is growing and to see which posts are bringing in more visitors than others.
In this tutorial, I’ll show you step-by-step how to set up Google Analytics in two different ways. I’ll show you how to do it the manual way and how to do it using Google’s plugin, Site Kit.
What Is Google Analytics
Google Analytics is a free tool for tracking website visitors on your website. It provides data on how many visitors your site is receiving, what countries your visitors are coming from and what your visitors are doing whilst on your site.
It also provides data on many other aspects of your site’s performance. This includes what posts/pages your visitors are viewing and how long they’re spending on your site.
It’s a great way to see which posts are bringing in the most amount of traffic to your site which means it can help you make decisions on your content strategy and let you know when particular posts need some extra work and attention.

It’s an invaluable tool for all website owners and something that you should be setting up pretty early on after your website creation so let’s get started and get those analytics up and running.
How To Set Up Google Analytics Manually
To begin, you’ll need to have a Google account (basically, a Gmail account) to get started so if you don’t have one already, then now’s a good time to create one.
Once you’ve created a Google account, you can head over to Google Analytics to start the setup process. This Google account will be used to create your Google Analytics account.
If you’re using Google Chrome and you’re already signed into your Google account, you’ll be taken straight to the welcome page on Google Analytics.
If you’re not signed in or you’re using a non-Google browser, you’ll be asked to sign in to your Google account first before being redirected to the welcome page.
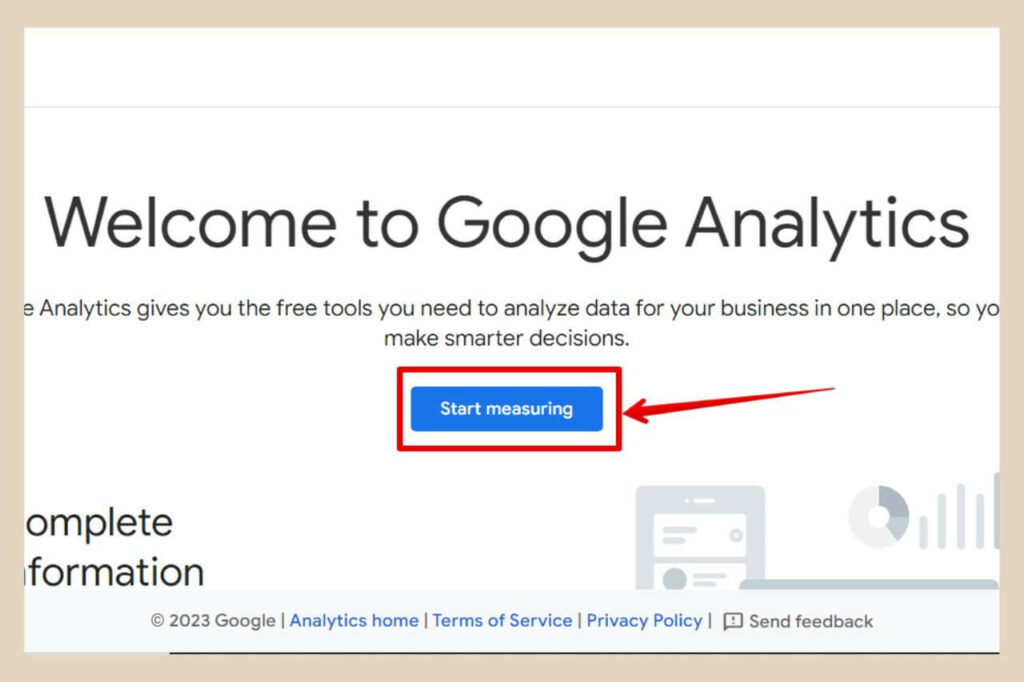
Once you’re on the Analytics welcome page, click the Start Measuring button to get started. On the next page, you’ll be asked to create a Analytics account so start by adding an account name.
This would usually be your company name or in the case of a website, you could use your website name. You don’t use your full URL here so if your website was mywebsite.com, you would just use My Website here.
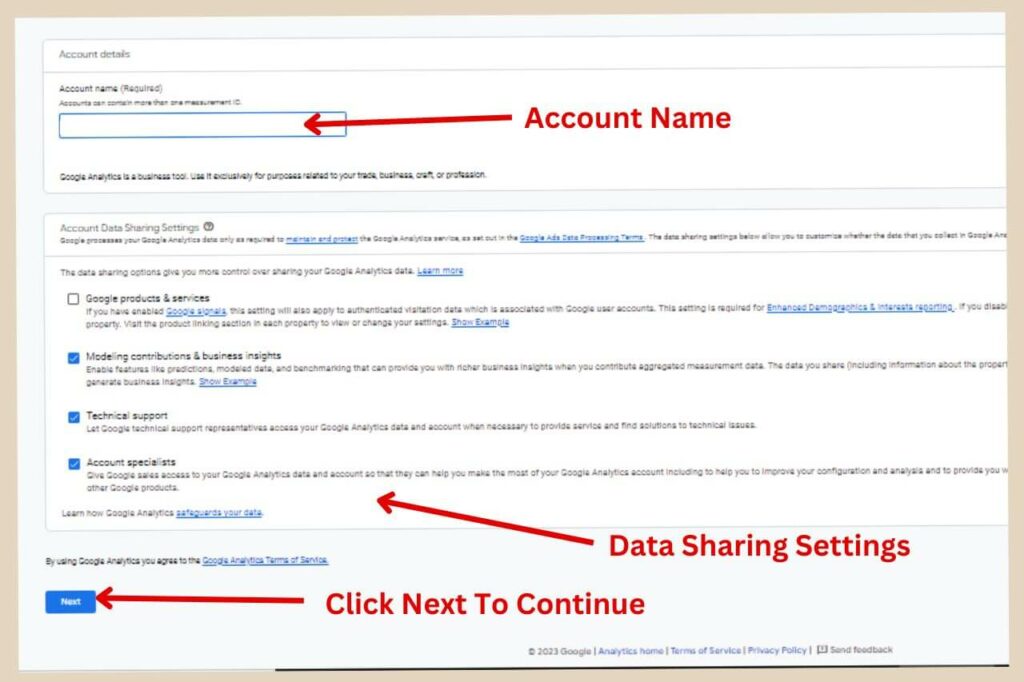
Next, you’ll see some data-sharing settings beneath this where you can check or uncheck the boxes depending on your own preferences. I tend to leave these as is so click the Next button to continue.
Creating A Google Analytics Property
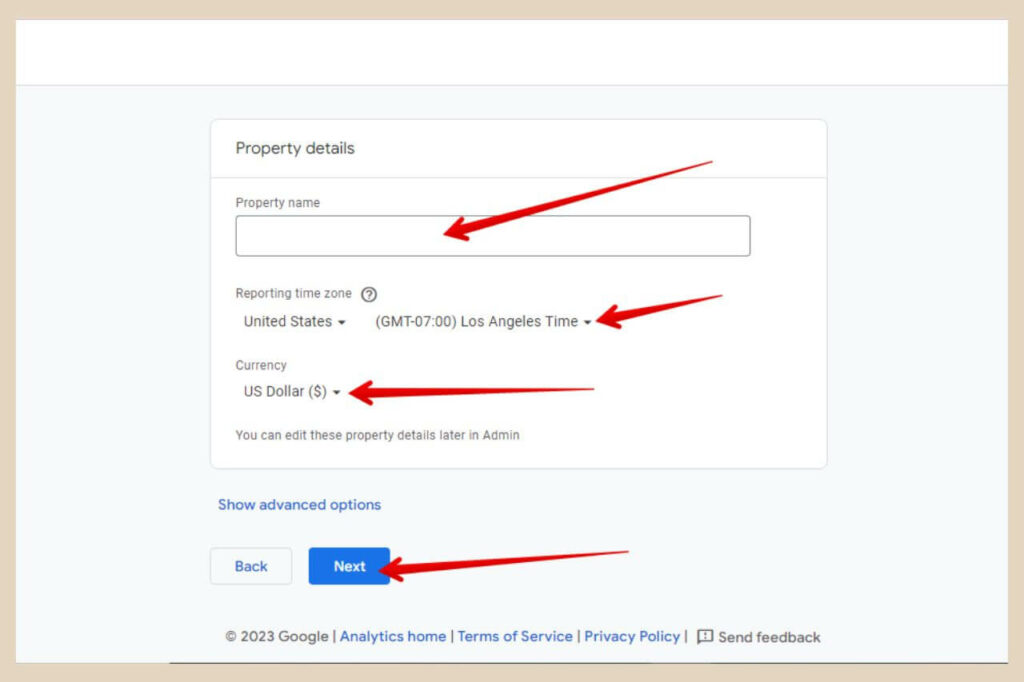
The next step is to create a property so type a name into the property name box. You can use your website name again here if you like.
You’ll also need to set your timezone and currency here so use to dropdown menus to make your choices, then click the Next button to move on to the next page.
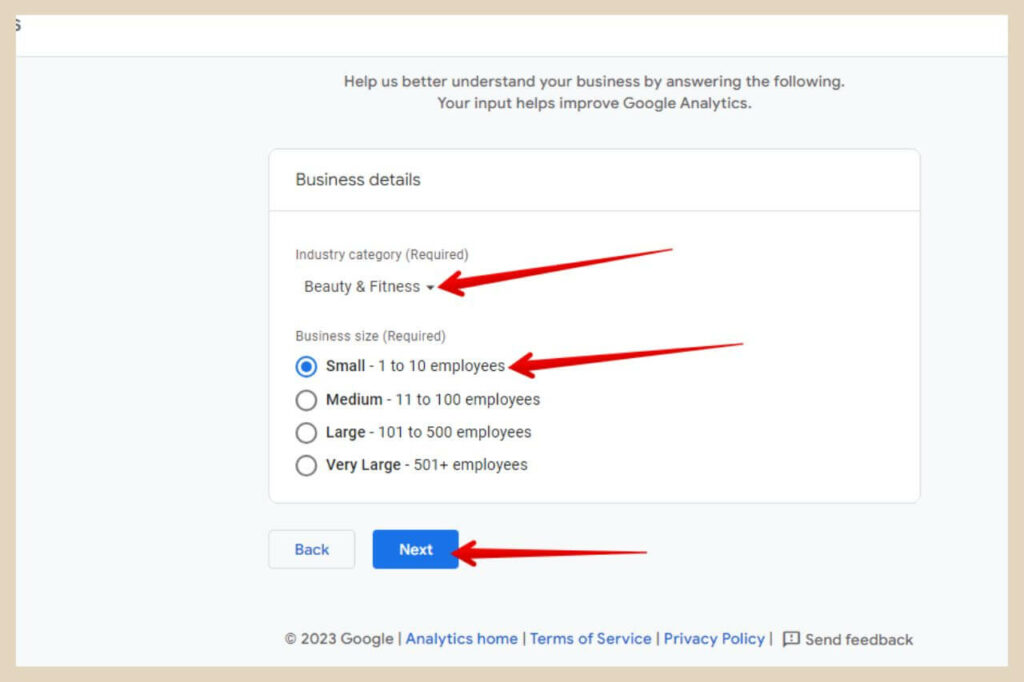
On the next page, you’ll need to describe your business so use the dropdown arrow to choose a category that best describes what your website is about.
You’ll also need to state your business size here too so choose the closest size and then click the Next button to continue.
On the next page, you’ll need to choose your business objectives. This is basically what you’ll mainly be using Google Analytics for so select the ones that apply the most here.
You can select more than one option on this page so select your choices and click the Create button to move on.
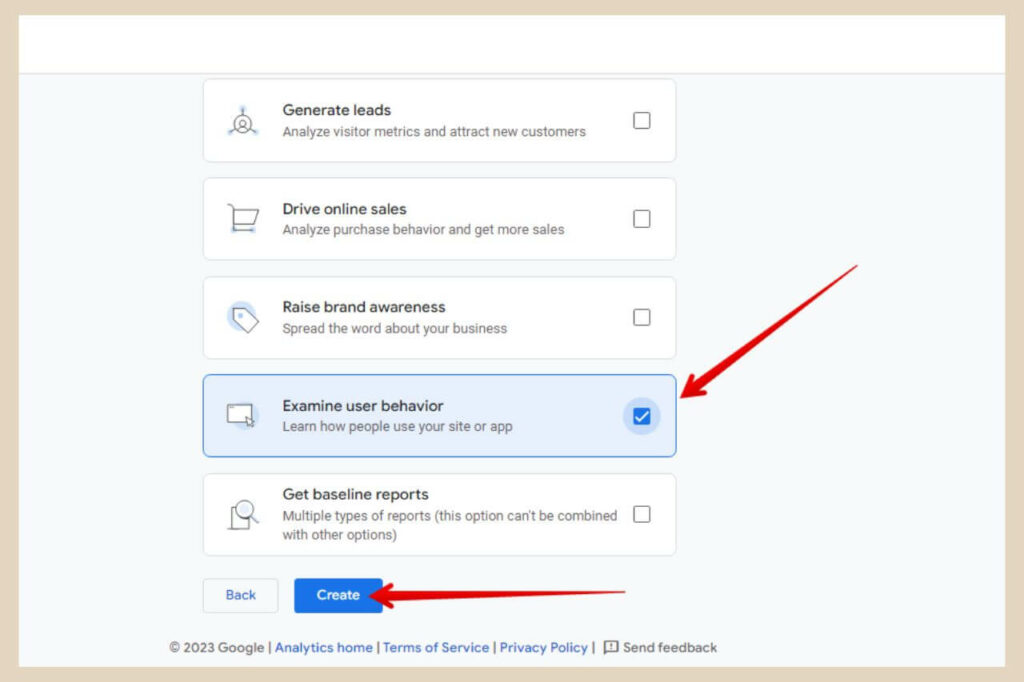
At this point, a pop-up window will appear asking you to accept Google’s terms of service so click the checkbox to agree to the terms then click the I Accept button to close the window.
Setting Up Data Collection
The last page will ask you to set up data collection so choose Web from the selection and another window will pop up from the side asking you for your website details.

This is where you’ll be adding your website URL so make sure you don’t make any typos here and that all your site details are correct.
Use the dropdown arrow to choose Http or Https depending on what your site is then type or paste your website URL into the URL box.
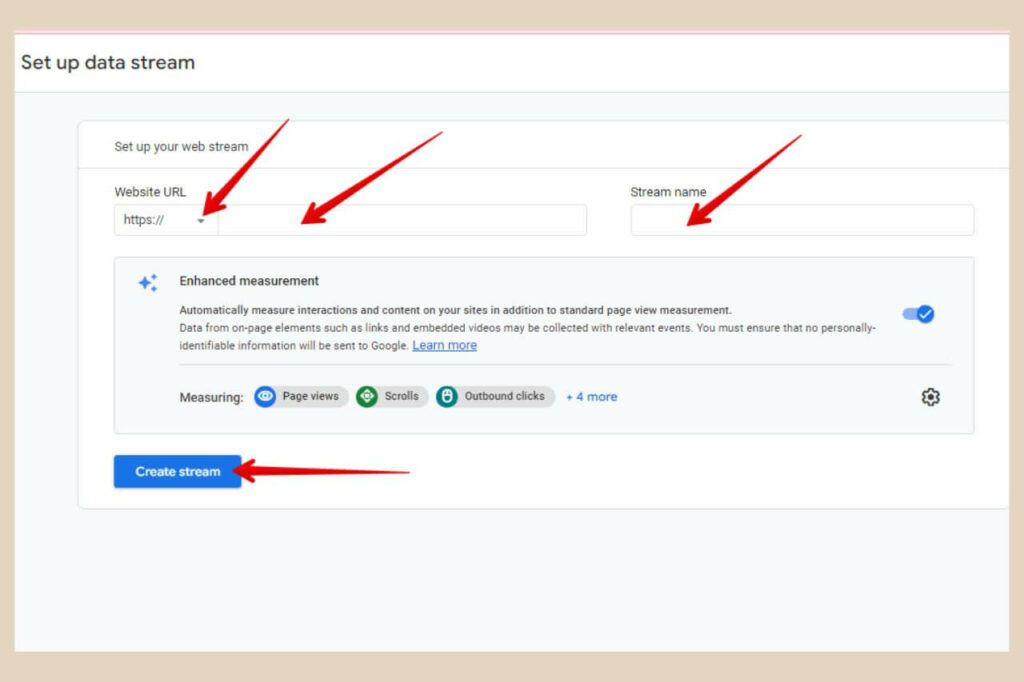
For the Stream name, you can just use your website name again here. Once you’re done, you can then click the Create Stream button to finish.
From here a brand new pop-up window will appear with your web stream details just like the image below. I’ve blanked my details out in this image but yours will be filled with your stream details.
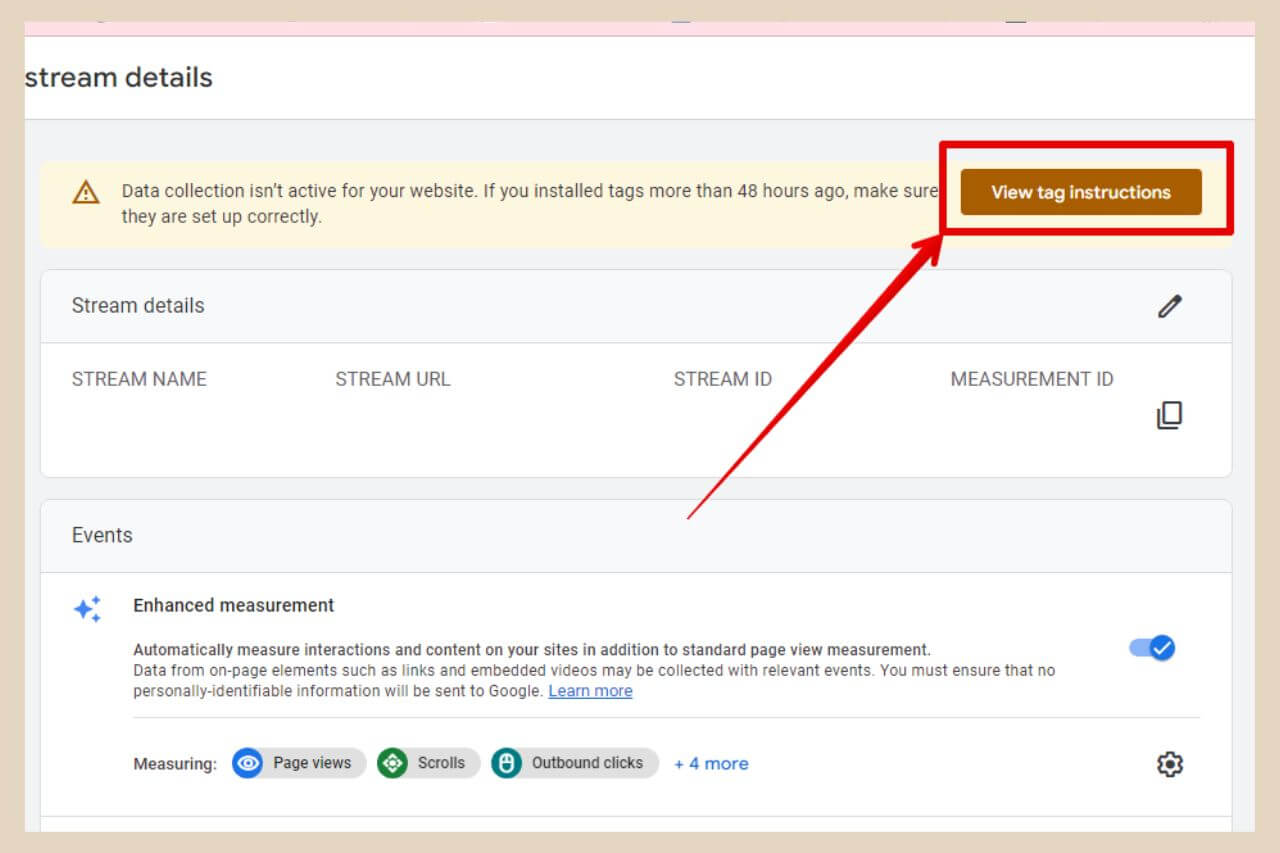
At this point, you’ll now need to add a tag to your site to connect your website to Google Analytics so click the View Tag Instructions button to see your options.
Connecting Your Website To Google Analytics
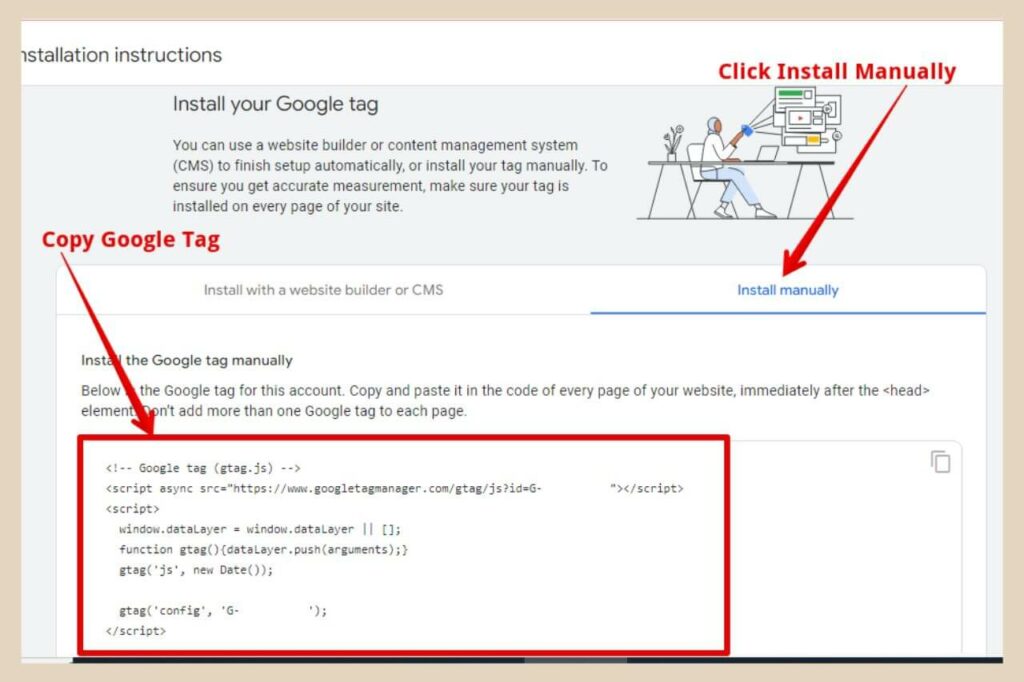
There are a few different ways to connect your site to Google Analytics and for this part of the tutorial, I’ll show you how to Install the tag manually.
So, click the Install Manually tab and this will bring up your unique Google tag which you’ll need to copy and paste into the header area of your site.
The easiest way to manually add code to your site is by using a header/footer plugin like WPCode or even Ad Inserter.
Manually adding code to your theme files is not recommended unless you’re using a child theme. The reason for this is that if you ever change your theme or your theme is updated (which happens very frequently), any codes you’ve added will be lost.
Adding A Header/Footer Plugin To Your Site
So for this tutorial, we’ll be using one of the most popular header/footer plugins and that’s WPCode. So, the first thing you’ll need to do is install the plugin if you’re not already using it (for adding header code with Ad Inserter, see link above).
To add the plugin, hover or click on plugins in the main WordPress menu on the left of the page, then click Add New from the new menu options that appear.
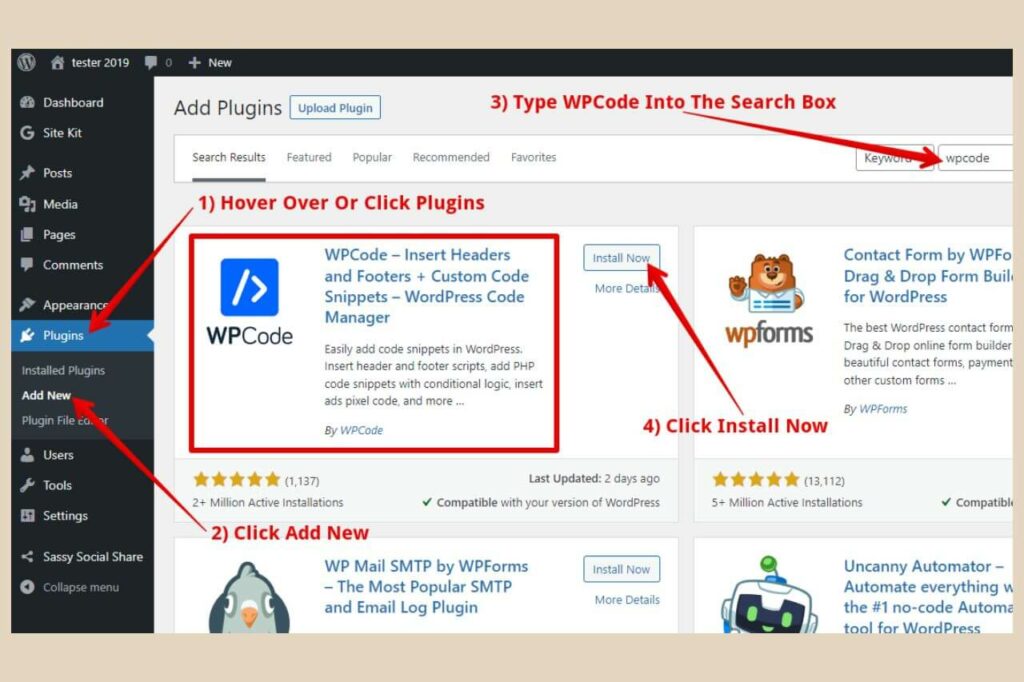
At the top of the page, type WPCode into the search box. When you see the WPCode plugin, click the Install Now button on the plugin followed by the activate button (the install now button will become the activate button once the plugin is installed).
Adding Your Google Analytics Tag
You will now find the plugin in your main WordPress menu under the name Code Snippets. From here, hover or click on Code Snippets, then click Header & Footer from the new menu options that appear.
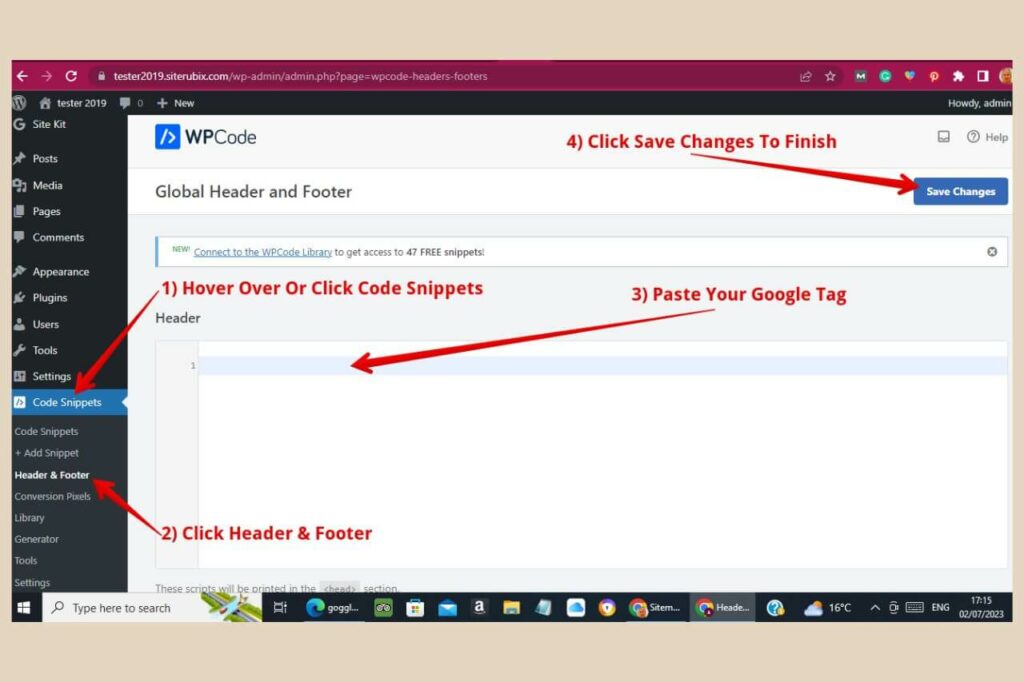
At the top of the new page that appears, you’ll notice a header section and this is where you’ll need to paste your Google Analytics tag.
Once the tag is pasted, click the Save Changes button to finish and your site will now be connected to Google Analytics.
Completing The Google Analytics Setup
You can now head back to Google Analytics and close down the pop-up windows to bring you back to the data streams page which should now look something like the below image with your site details listed.
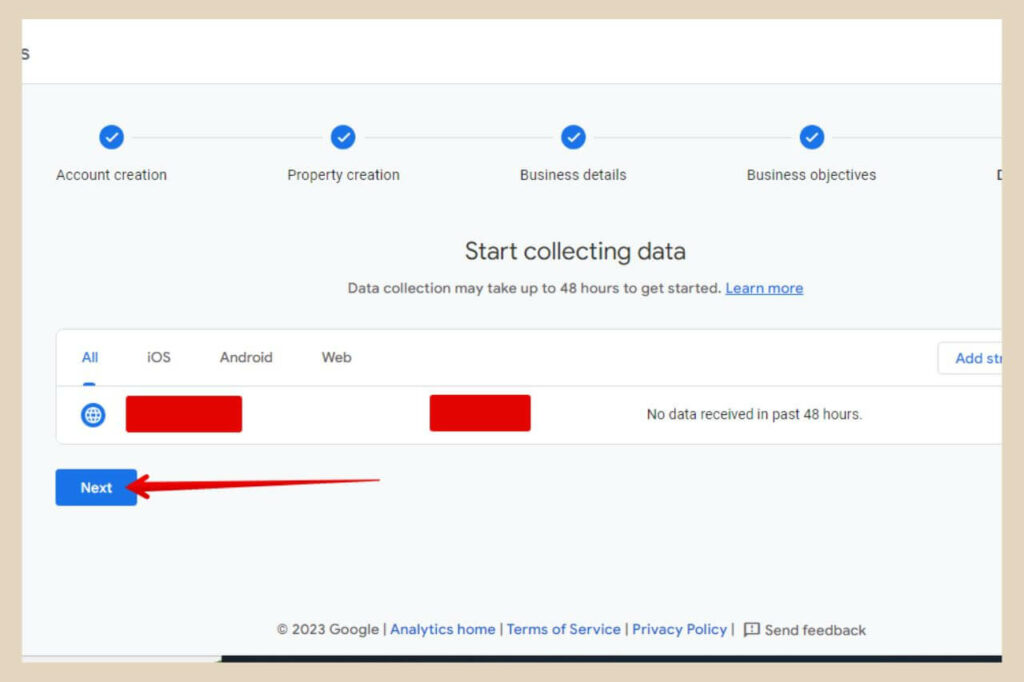
Click the Next button to finish the setup and when the new Data Collection is Pending page shows up, scroll to the bottom and click the Continue To Home button. This will take you to your Google Analytics Dashboard.
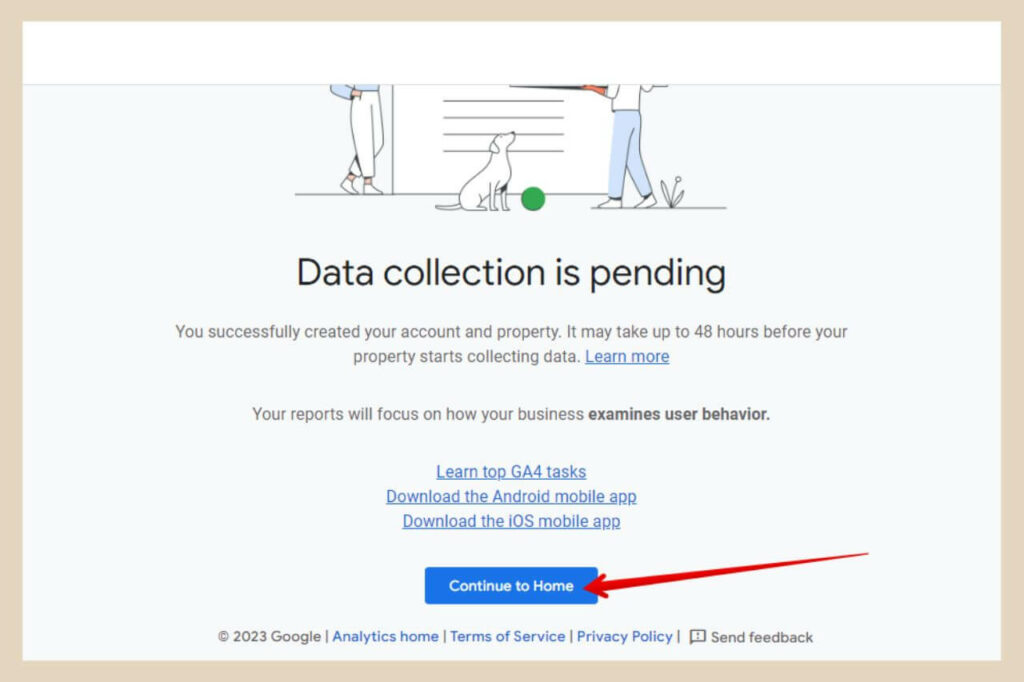
You’ve now successfully set up Google Analytics and should start seeing visitor data within the next day or two.
What About Google Search Console And Bing Webmaster Tools
You can also set up Google Search Console right from within Google Analytics (you really should have both).
Search Console lets you submit your posts for indexing and monitors your SEO efforts by showing you what keywords you’re ranking for and what keywords are bringing visitors to your site so it’s another very important tool.
You can also set up another tool called Bing Webmaster Tools which is Bing’s equivalent to Search Console so that you can monitor your efforts across both search engines.
They’re both relatively easy tools to set up and here’s a full step-by-step tutorial on how to set up both.
If you use the Site Kit setup method below, Google Search Console will also be set up for you. You can then set up Bing Webmaster Tools afterwards using your Search Console information.
Just check out the tutorial above and start at the “Adding A Sitemap” section and carry on from there.
If you have a Google Adsense account, you can also link it to your Google Analytics account too. Just check out my quick tutorial on how to do that to combine both accounts on one dashboard.
Setting Up Google Analytics With Site Kit
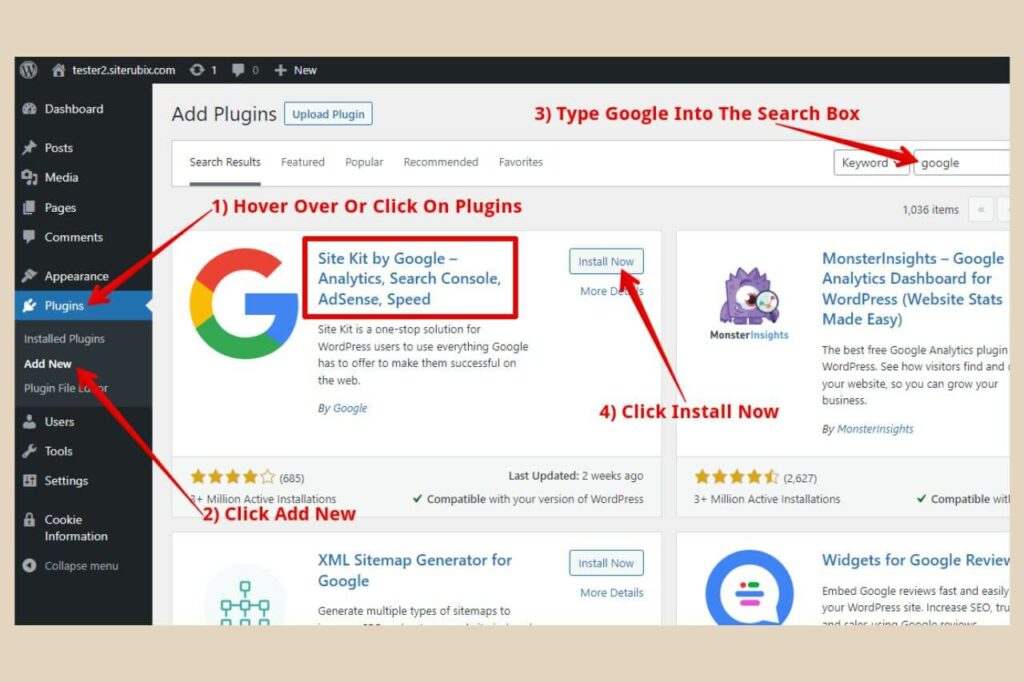
If you’d prefer to use the Site Kit plugin method instead, start by hovering over or clicking on Plugins in the main WordPress menu on the left of the page.
From here, click Add New from the new menu that appears. Next, type Google into the search box and when Site Kit by Google appears, click the Install Now button.
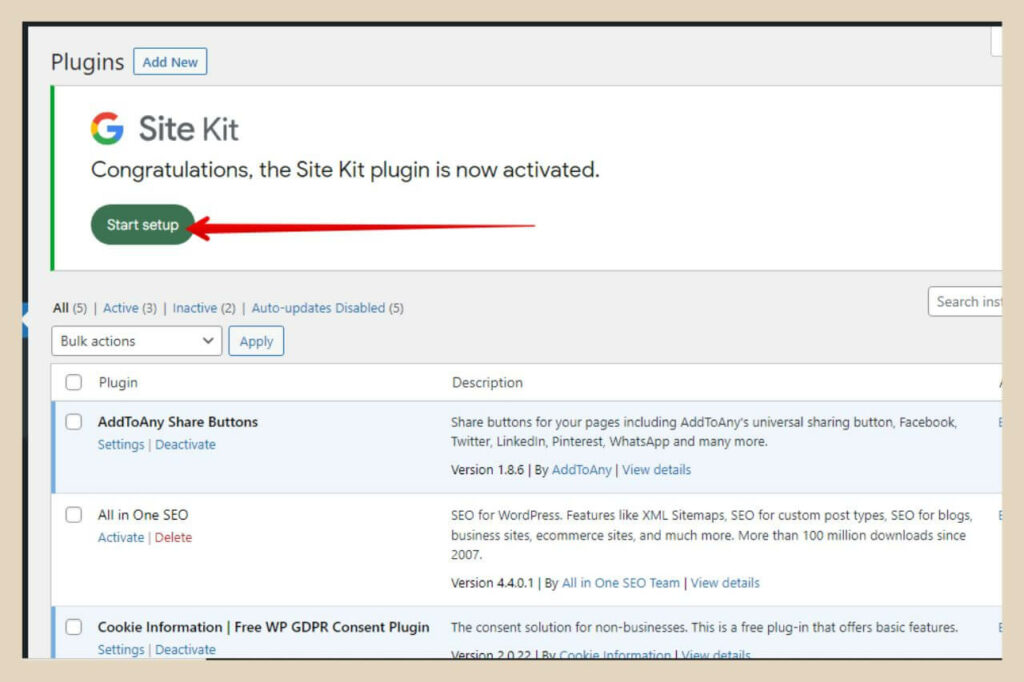
Once the plugin is installed, the install now button will change to an Activate button so click on it to activate the plugin.
There’ll now be a notification from the plugin at the top of the screen where you can click the Start Setup button to get started.
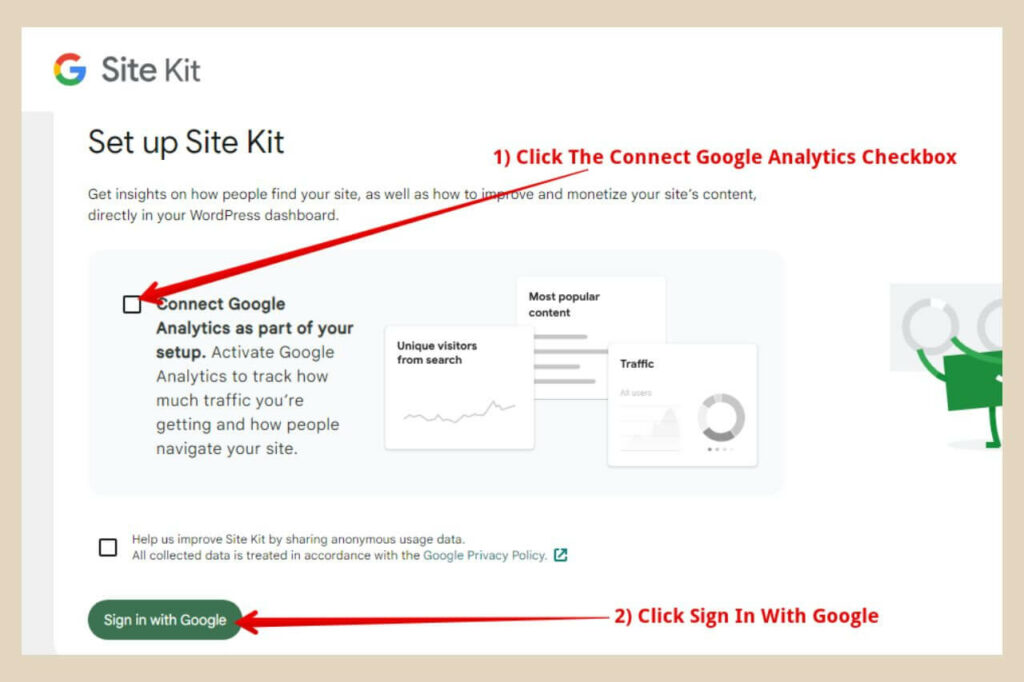
On the first page that appears, click the Connect Google Analytics checkbox, then click the Sign In With Google button to continue.
There is another checkbox here that you can click if you’re happy to share anonymous data but if not, you can leave it unchecked and move on to the next step.
The next step is to sign in to your Google account. You’ll also be asked to allow Site Kit to access your Google account so click all the checkboxes then click the continue button to move on.
Setting Up Site Kit
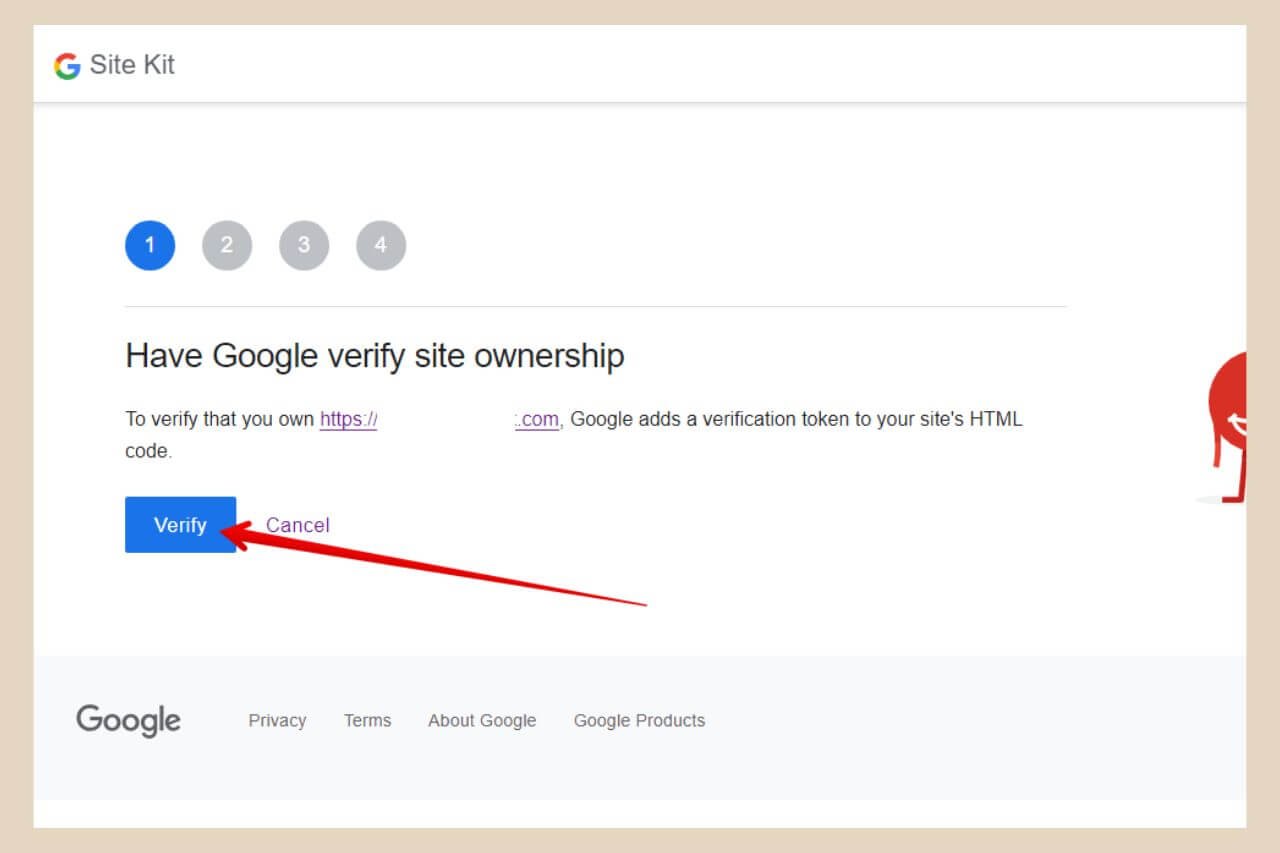
You’ll now begin the setup process and the first part will be to verify your site ownership so click the Verify button to get started.
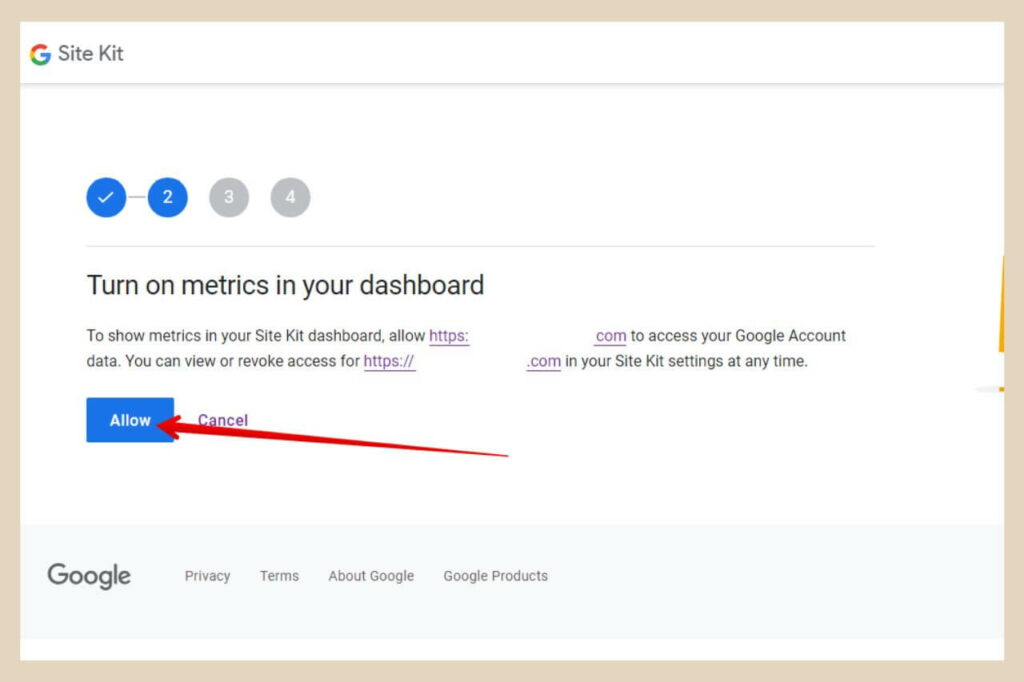
The next step is to turn on metrics in your dashboard. This will add Google Analytics metrics to your Site Kit dashboard so click the Allow button to move on to the next section.
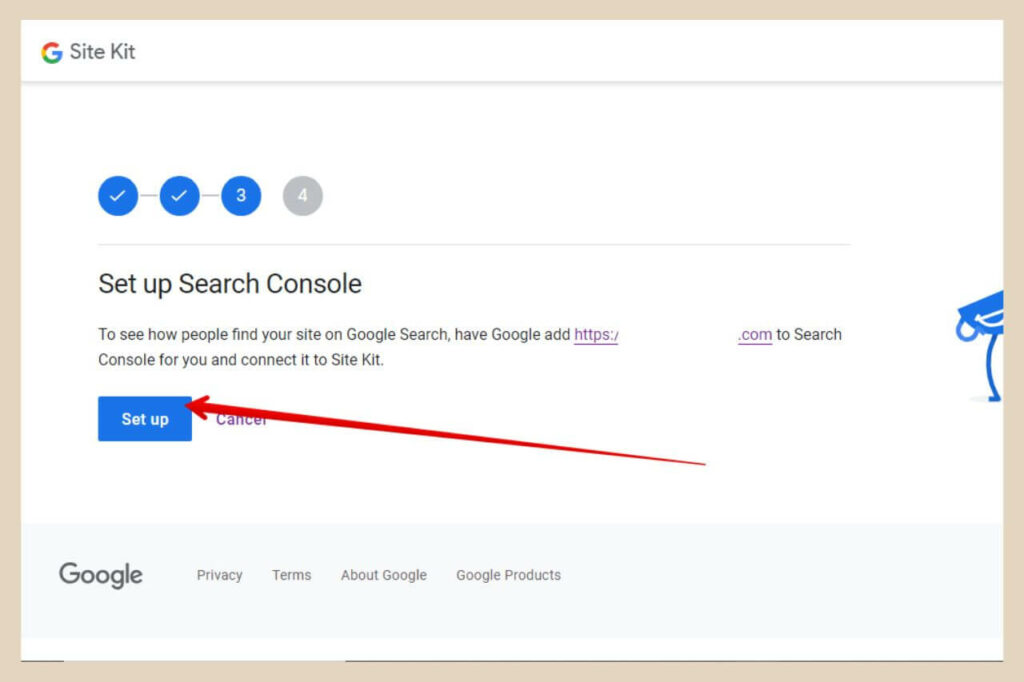
On the next page, you’ll now be asked to set up Google Search Console so click the Set Up button to continue.
Site Kit will now automatically set up Search Console for you and also add its data to your Site Kit dashboard.
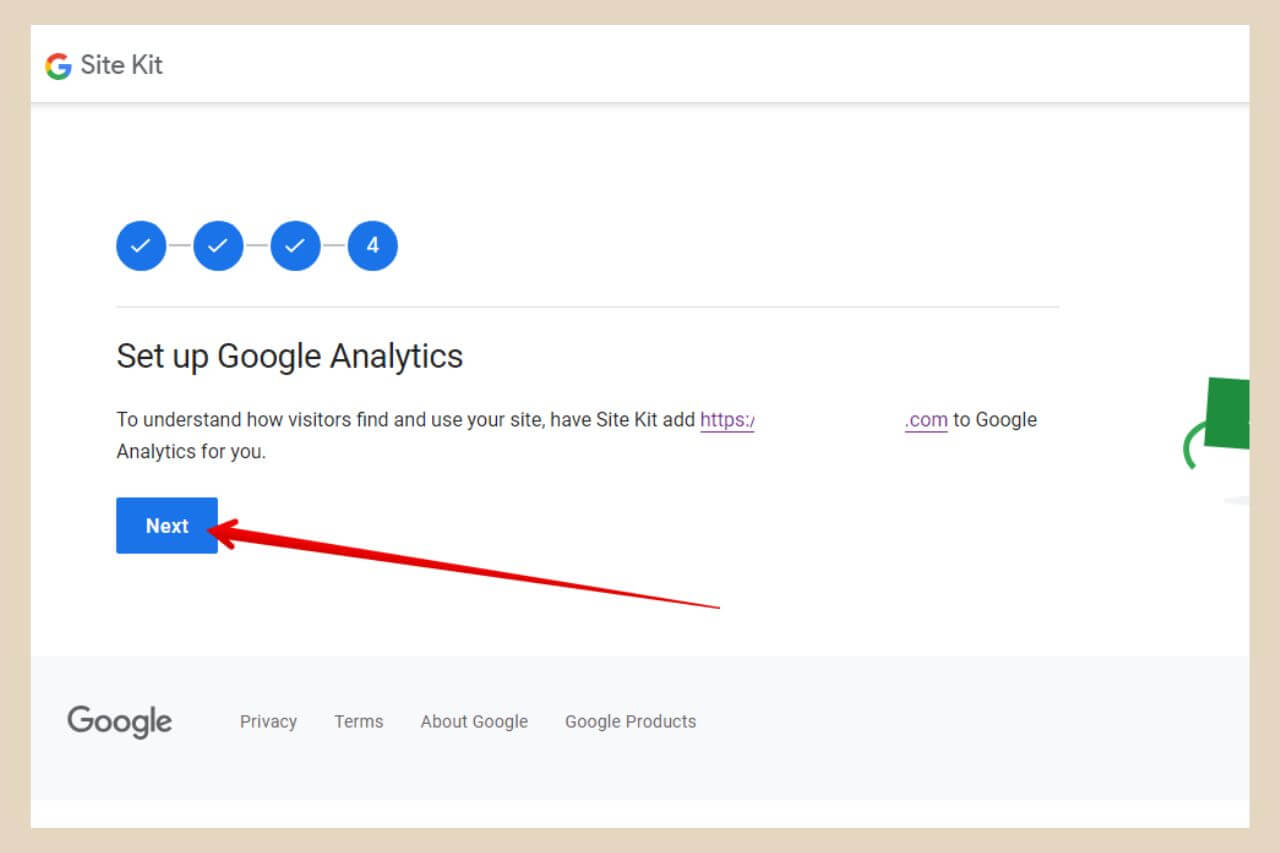
Finally, you’ll be asked to set up Google Analytics so click the Next button to close down the setup page and you will be brought back to the Site Kit dashboard in your WordPress back office.
You’ll now be asked to select a Google Analytics account so if you already have one, you can select it here by clicking on the dropdown menu.
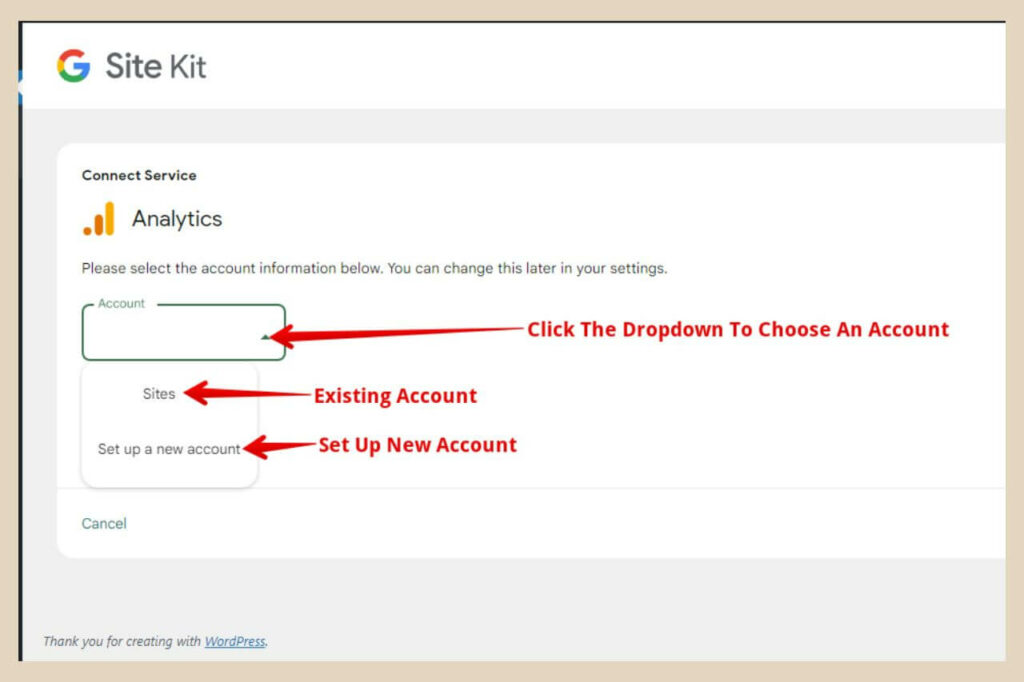
If you don’t have an account, you can also create one here by choosing Set Up A New Account from the dropdown menu.
Setting Up A New Account
If you choose to set up a new account, Site Kit will set one up for you using your site information so select Set up a new account from the dropdown menu and a new page will appear.
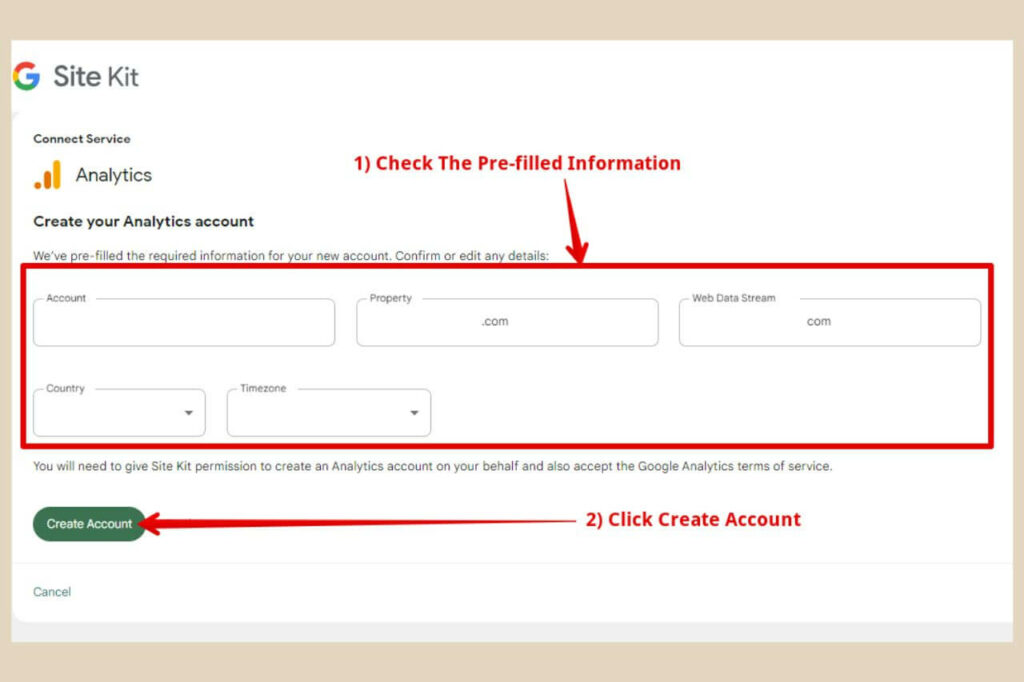
Site Kit will pre-fill the details based on your site so double-check that you’re happy with the prefilled information (it can be edited if you need to) then click the Create Account button
You’ll now be prompted to sign in to your Google account again and then you’ll need to click the Continue button on the Site Kit access permission page.
From here, you’ll be redirected to Google Analytics where you’ll be asked to agree to Google’s terms of service just like method one earlier.
Once you’ve accepted their terms of service, your analytics account will be created and you can click the Go To My Dashboard button.
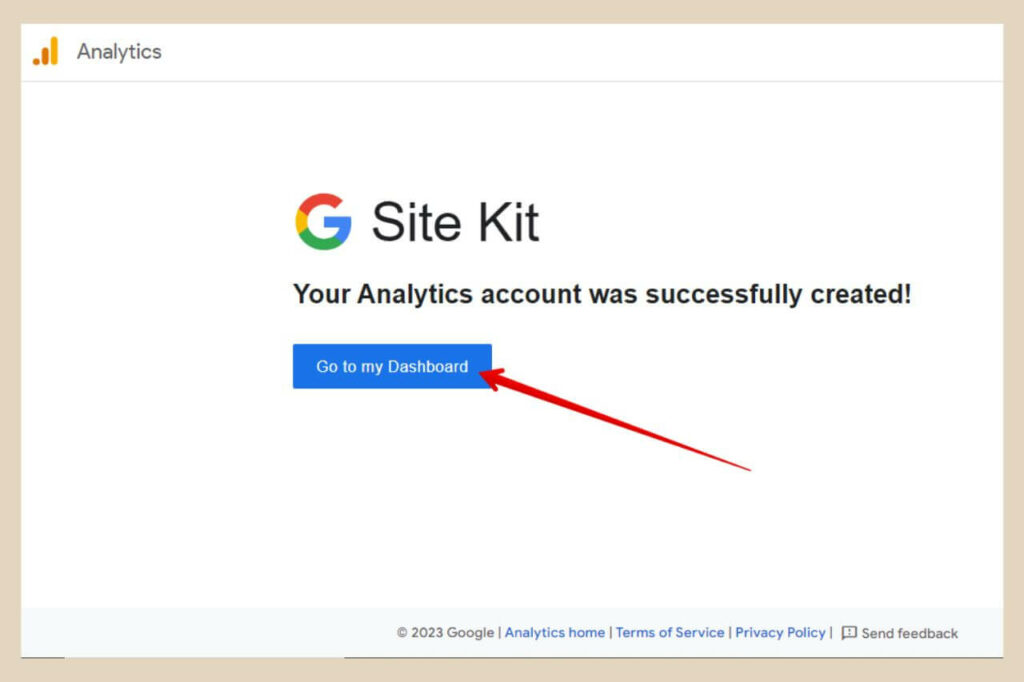
This will bring you back to your Site Kit dashboard within your WordPress back office and you should start to see data within a day or two.
Choosing An Existing Account
If you already have an account, choose this account from the dropdown menu and this will bring up two new boxes. Select Set Up A New Property from the Property dropdown box that has now appeared.
Then select Set Up A New Web Data Stream from the Web Data Stream dropdown box that has also appeared.
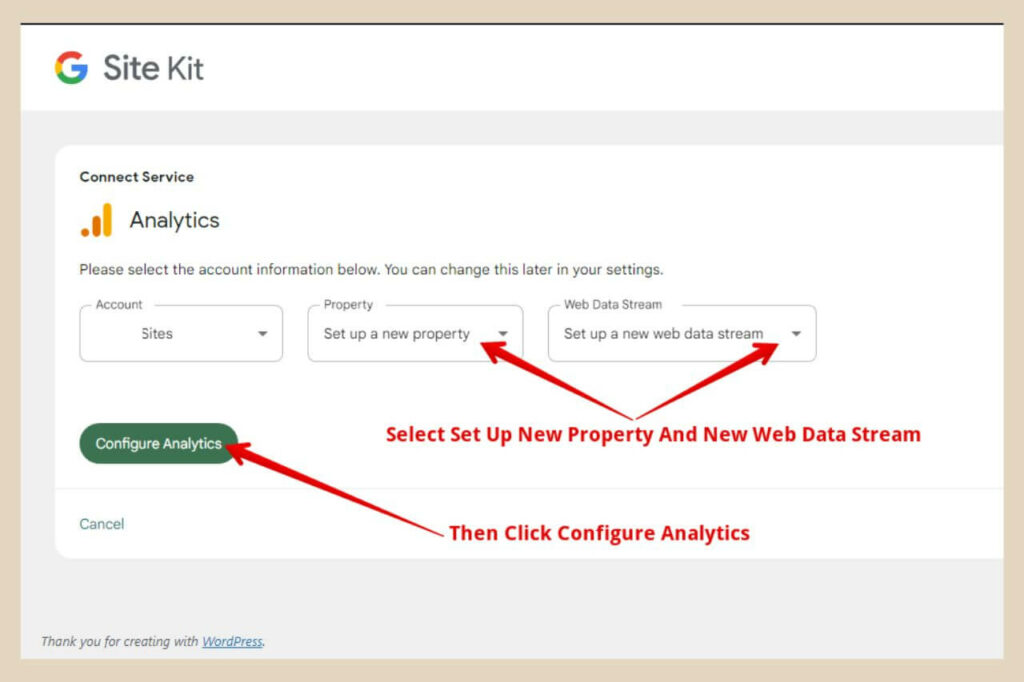
Then click the Configure Analytics button to continue. A pop-up window will appear asking you for additional permission to create a new property so click the Proceed button to continue.
You’ll once again be asked to sign in to your Google account followed by the Site Kit access permission window so click continue to move on.
This will now take you back to the Site Kit dashboard and your set-up is now complete. You will now start to see data from both Google Analytics and Google Search Console on your Site Kit dashboard within a day or two.
You can now also set up Bing Webmaster Tools using the tutorial earlier on in this post.
Let’s Get Those Metrics Flowing
Once the data starts to flow in, you’ll be able to see a lot of different metrics that will show data such as how well your traffic is growing to what keywords you’re ranking for in Google.
I personally don’t use the site kit method but only because I’ve been doing this longer than Site Kit has been around and I’m used to doing it the manual way.
It’s also been said that Site Kit can slow down your site, but apparently, this has now improved. As I prefer to use the analytics and search console platforms directly, I can’t confirm its effect on site speed so you’ll have to test this out for yourself if you choose the Site Kit method.
I hope you’ve found this tutorial helpful, but if you do have any issues and need help with anything, please feel free to let me know in the comments below, and I’ll be more than happy to help you out.

Helpful Guides to Read Next
These beginner-friendly guides will help you keep building your blog step by step.
- How to Set up Google Search Console and Get Your Blog Found Faster
- How to Set Up Google AdSense to Start Monetising Your Blog Traffic
- How to Connect AdSense and Analytics to Uncover Your Highest-Earning Content
- Get More Pinterest Visibility with Rich Pins
- Design Pinterest Pins in Canva That Actually Get Clicked
Ready to Scale Your Digital Footprint?
Publishing content is only half the battle. If you’re ready to amplify your reach, visit my Grow Hub for actionable deep dives on search engine optimisation, email list building, creating better content and graphics and sustainable traffic strategies.

Jessie
Founder, nomorerush.com
Hi, I’m Jessie — founder of No More Rush. I help beginners build profitable, beginner-friendly blogs without the overwhelm or unrealistic expectations you see online. Everything here is built around simple, structured steps so you always know what to do next.