Want to know how to set up Google Search Console in WordPress? If you’re running a website, then you really should be utilising the invaluable information that Search Console provides because it will probably become the tool that you’ll use the most to help grow your website.
In this tutorial, I’ll show you step by step how to set up Google Search Console and as an added bonus, seeing as it’s so quick and simple to do once Search Console is set up, I might as well show you how to set up Bing Webmaster Tools too while you’re here.
Bing Webmaster Tools is Bing’s equivalent to Google’s Search Console and if you’re setting up one, you might as well set up the other so that you can monitor your site performance in both search engines. So let’s start with Google Search Console as this is the more important one of the two.
What Is Google Search Console And Why You Need It
Google Search Console is an invaluable tool for any website owner because it helps you monitor your SEO and ranking efforts which is one of the most important factors in growing a website.
Previously known as Google Webmaster Tools, Search Console is a free tool that monitors search behaviour and lets you see what keywords you’re ranking for and are leading visitors to your site.
It lets you see what posts/pages they’re landing on from those keywords and the average ranking positions for those keywords too.
You can submit your sitemap to Search Console which gives Google a list of every piece of content on your website making it easier for Google to find and crawl your site.

You can also submit your new posts to Search Console to help speed up the indexing process as well as see any errors on your site that may be hindering your website growth.
Google Search Console is probably one of the most powerful and useful tools in your website performance monitoring arsenal, maybe even more so than Google Analytics so it’s not one you want to miss.
Making Your Setup Easier
Before I go any further, there’s one thing I wanted to mention. When we’re talking about tools that help monitor your site’s performance, there are actually 3 tools that all website owners should be utilising.
They are Google Analytics, Google Search Console and Bing Webmaster Tools, (although Bing unfortunately is often missed) and their main purposes are as follows.
- Google Analytics: For monitoring on-site behaviour – What visitors do on your site.
- Google Search Console: For monitoring search behaviour – How visitors get to your site.
- Bing Webmaster Tools: For monitoring search behaviour on Bing’s search engine.
Another thing I wanted to mention is that once you set up one, it becomes a lot easier to set up the next one but there is an order to this.
So with that in mind, the order in which you’d want to set up these three tools is Google Analytics first, Google Search Console second and then Bing Webmaster Tools Third.

Each one uses the details and verification of the one before which is why it gets easier to set each one up if you follow the order mentioned above.
Start With Google Analytics
So before we get going here, you’ll need to have Google Analytics already set up as this tutorial will be using Google Analytics to set up Search Console and linking them together in the process.
If you haven’t set up Google Analytics yet, then here’s a full step-by-step tutorial on how to do that before you continue with this tutorial on setting up Google Search Console.
Note: If you use the Site Kit method of setting up Google Analytics then Google Analytics and Google Search Console will be set up at the same time so you can skip straight to the “Adding A Sitemap” section further down and continue from there.
But otherwise, let’s get into this.
How To Set Up Google Search Console From Google Analytics
Although you can set up Search Console separately and then link it to your analytics account after the fact, it’s much easier to just set it up through your already set up Analytics account and it’s really simple to do.
So to start, head to your Google Analytics account and click on the cogwheel at the bottom of the screen on the left-hand side of the page under the main side menu and this will take you to the Admin page.

If you have more than one account or property, make sure you have the one you want to set up Search Console for selected.
From here, you’ll see two columns. The first column will be the Account column and the second one will be the Property column.
Scroll down the page until you see the Product Links section in the second (property) column.
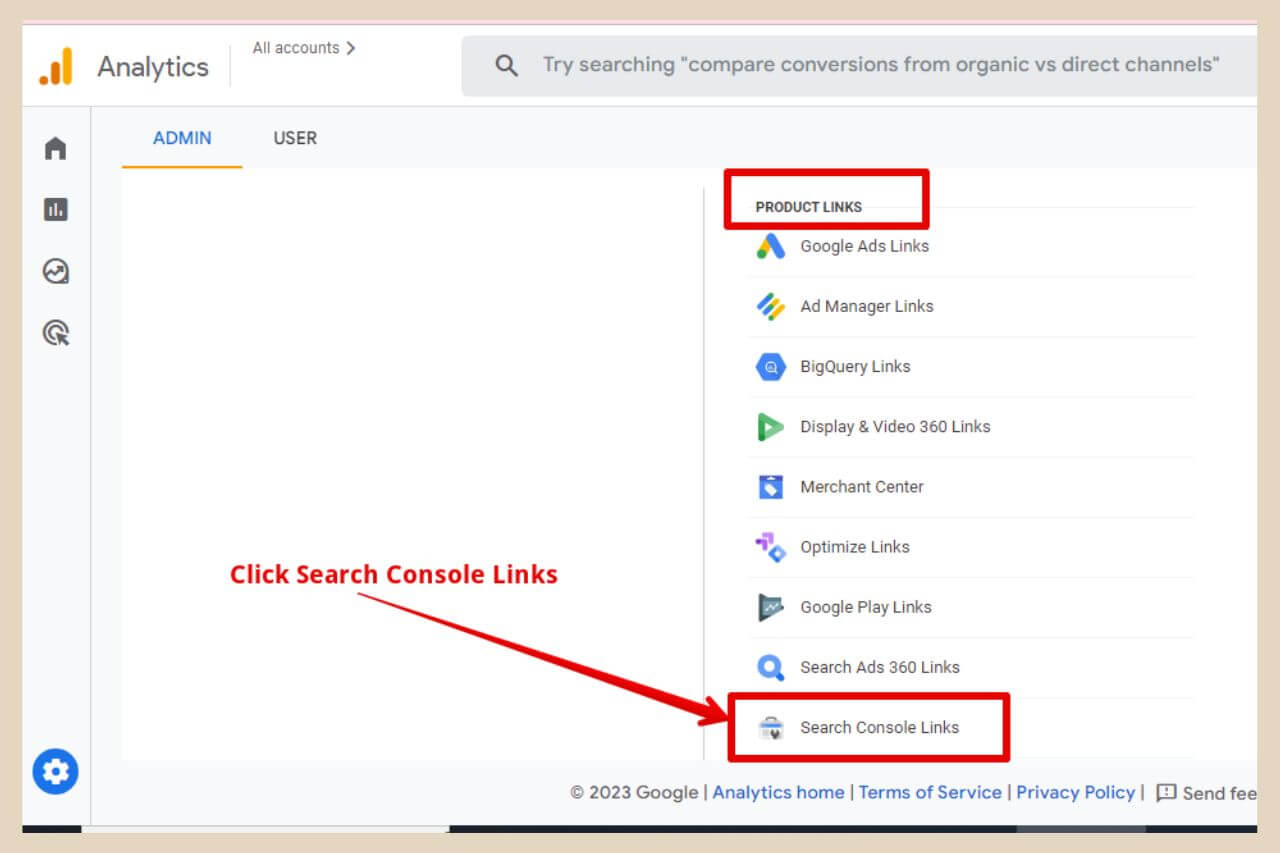
At the bottom of the product links section, you’ll see Search Console Links so click Search Console Links and a new page will come across from the side of the screen.
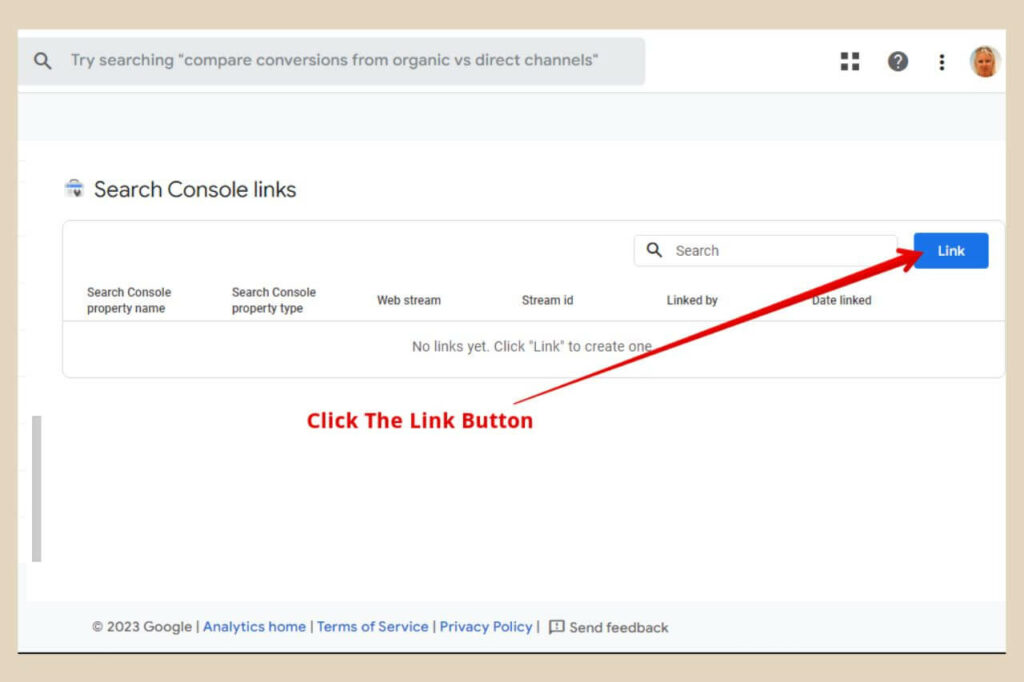
To create a link to Search Console click the Link button on the right-hand side of the screen and another page will come across from the side of the screen.
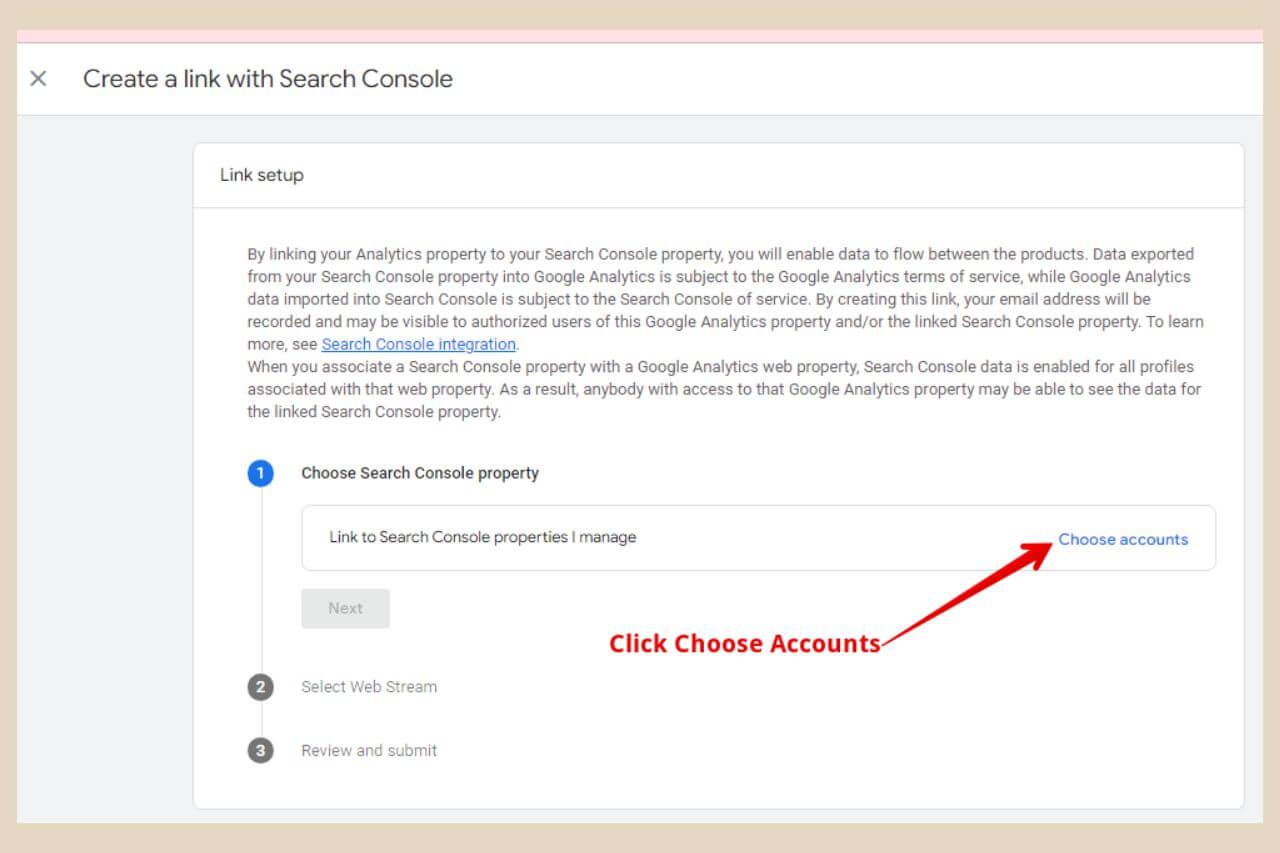
On this next page, You’ll need to click the Choose Accounts button which will bring yet another page across from the side of the screen (bear with me and all these side pages, we’re almost there)
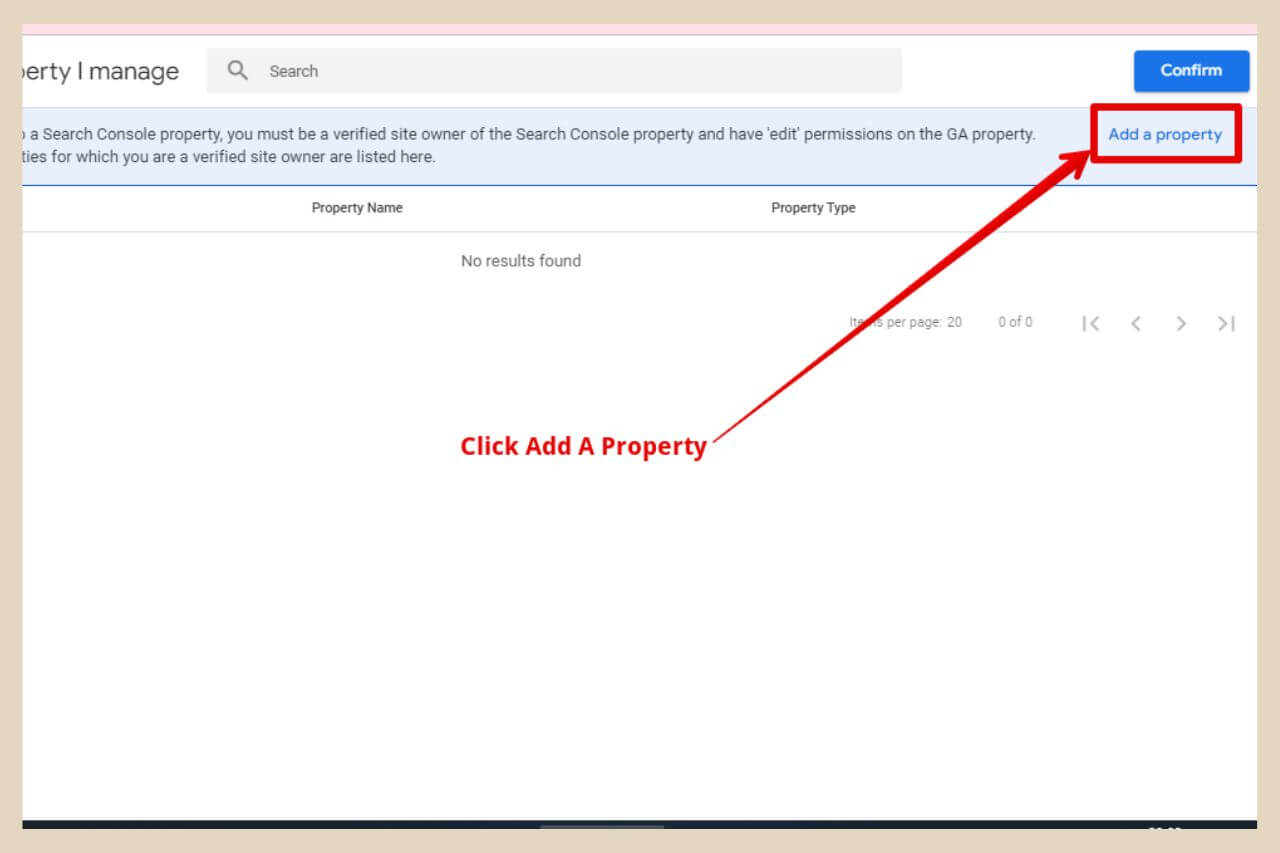
On the next page, click the Add a Property button and a small pop-up window will appear that will tell you that you’re about to be redirected to Search Console so click the OK button to continue.
Creating A Property In Google Search Console
This will open up a brand new tab on the Google Search Console site where you’ll now need to add your URL.

There’ll be two boxes here and you’ll want to use the second one which is the URL Prefix box so enter your website URL into the box and then click the Continue button.
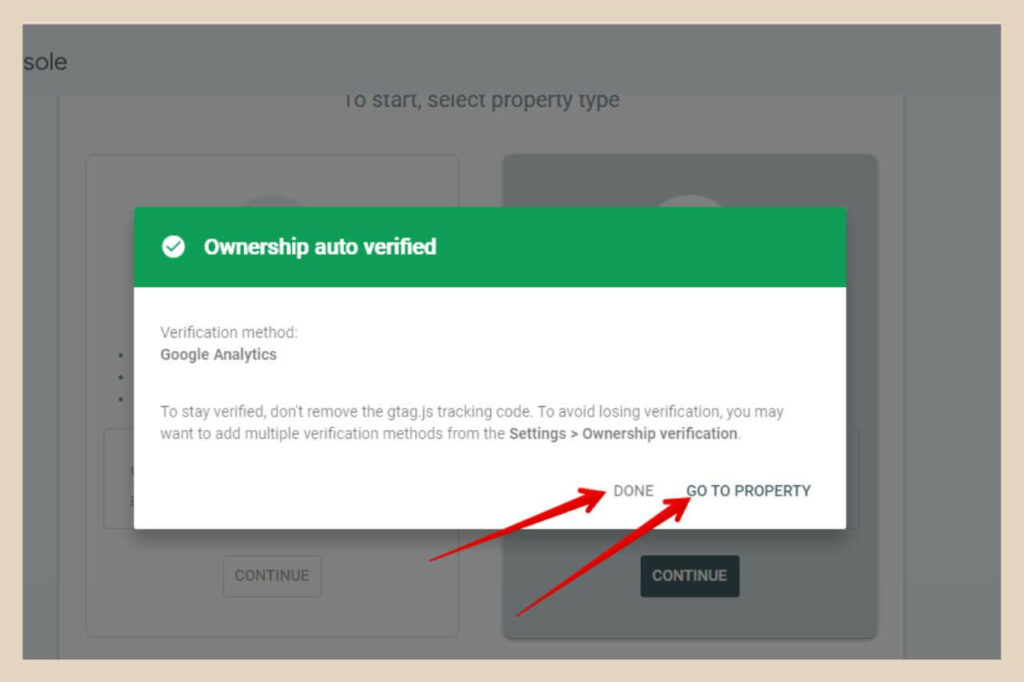
Because you’ve already verified your website ownership with Google Analytics, Google Search Console will now auto-verify your ownership of the site using these same details and you’re all done.
You can now either click the Done button and head back to Google Analytics to finish linking the accounts or you can click the Go To Property button to check out your newly set up Google Search Console account.
We’ll finish linking Google Analytics to Search Console next but before we do that, click the Go To Property button to bring you to the Search Console dashboard in a new tab.
Leave this tab open for now as you’ll need to come back here in a moment and do one more little thing after you’ve linked the accounts before setting up Bing Webmaster Tools.
Linking Google Analytics And Search Console
To finish linking Google Analytics and Search Console, you will need to head back over to Google Analytics and you should land back on the last page you were on which is the Add a Property page.
Now however you should see your website listed in the property list so click the checkbox to select your site then click the Confirm button.
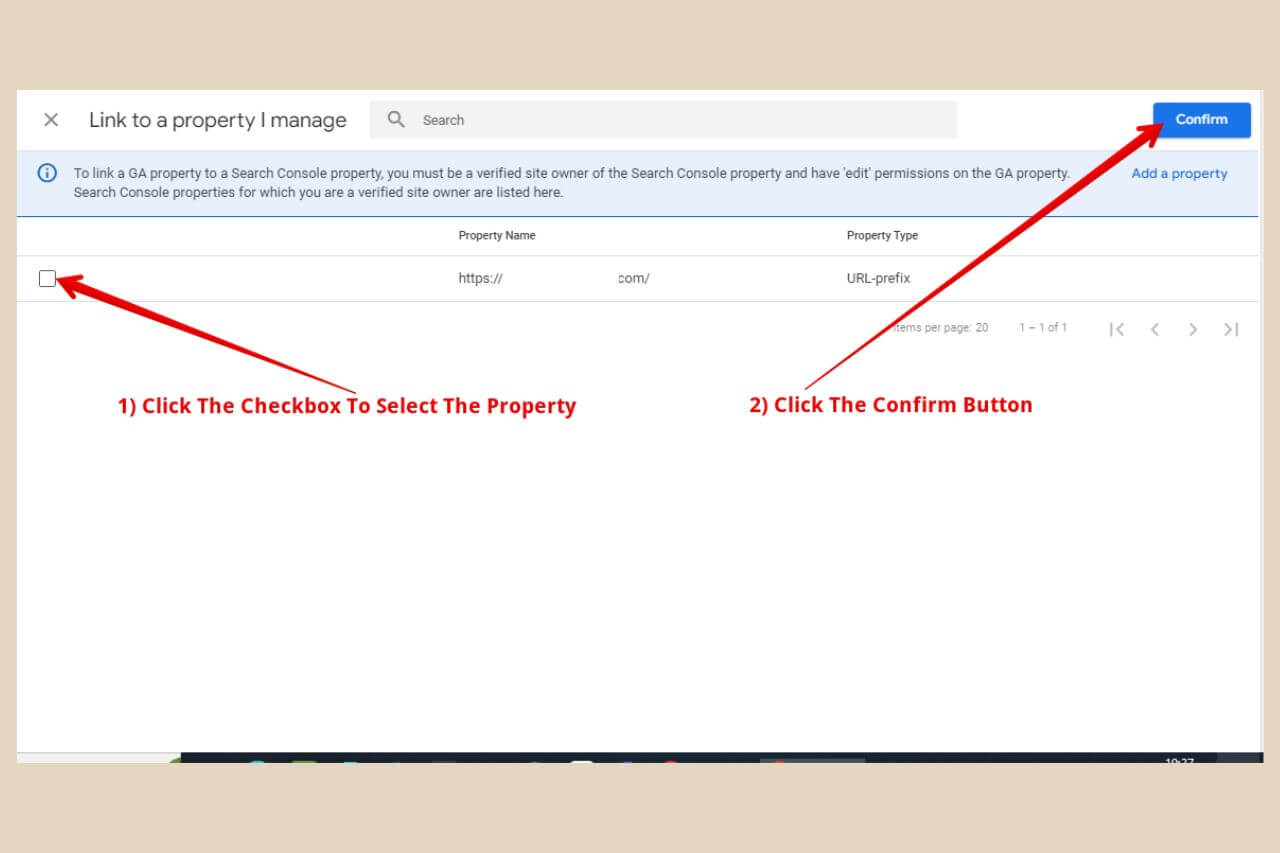
This will close down the Add a Property page and bring you back to the Link Setup page where you’ll now see your website added in the Choose Search Console Property box.
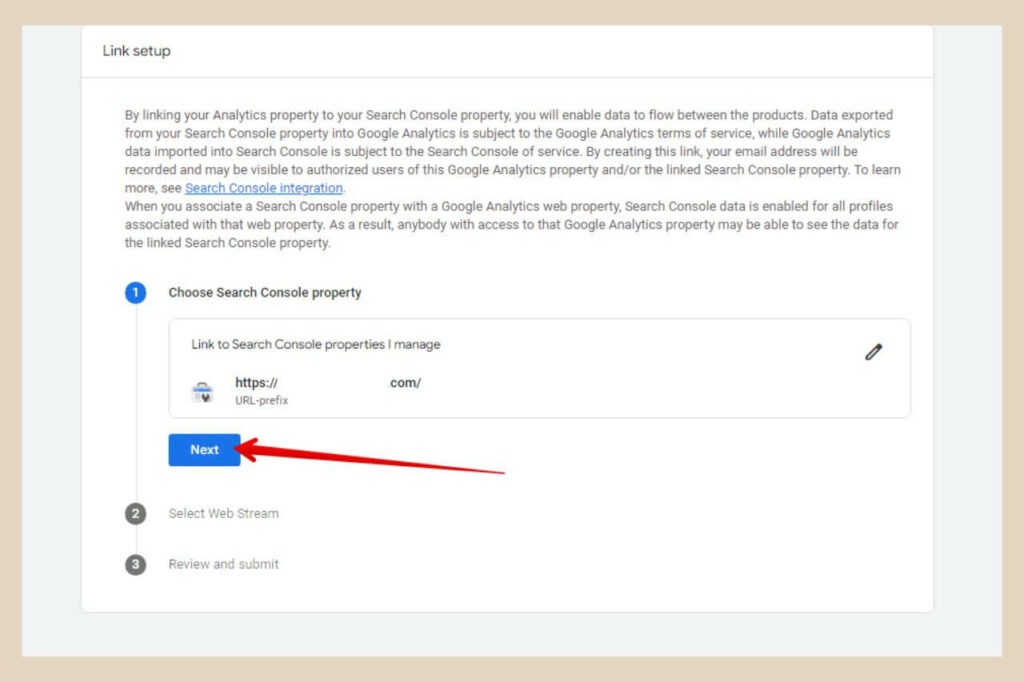
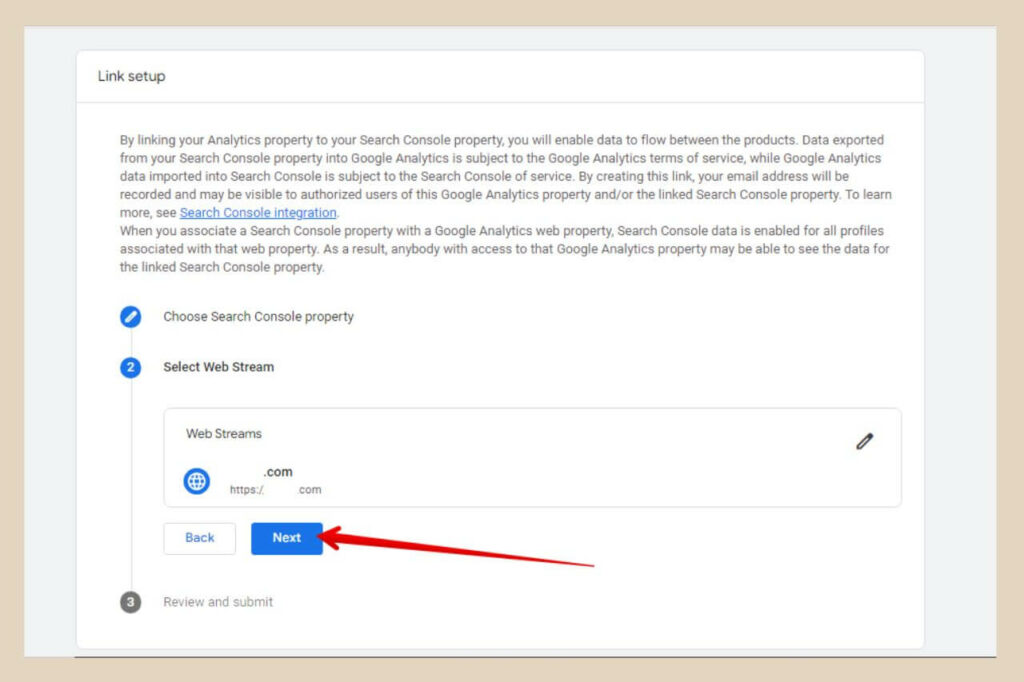
From here, click the next button which will bring you down to the Select Web Streams section below it.
Click the Select button and when the new page pops across, hover over your site name and click the Choose button.
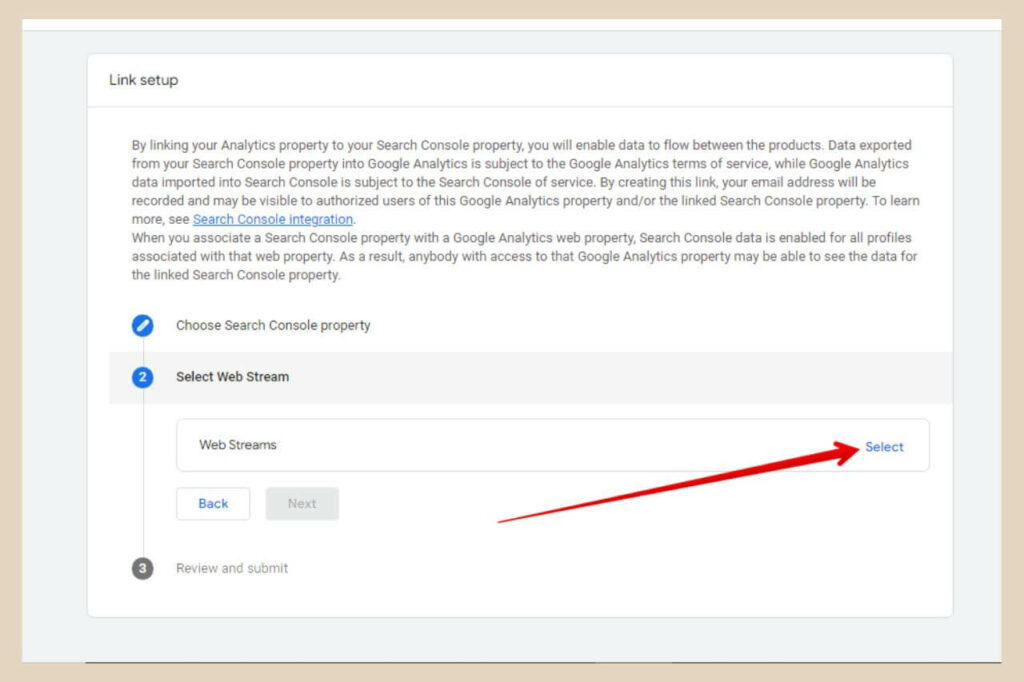
You’ll notice that your site has now been added to the Select Web Streams box so click the Next button to continue.
This will bring you down to the Review and Submit section where you can review your site details. Once you’re happy that the details are all correct, click the Submit button to finish.
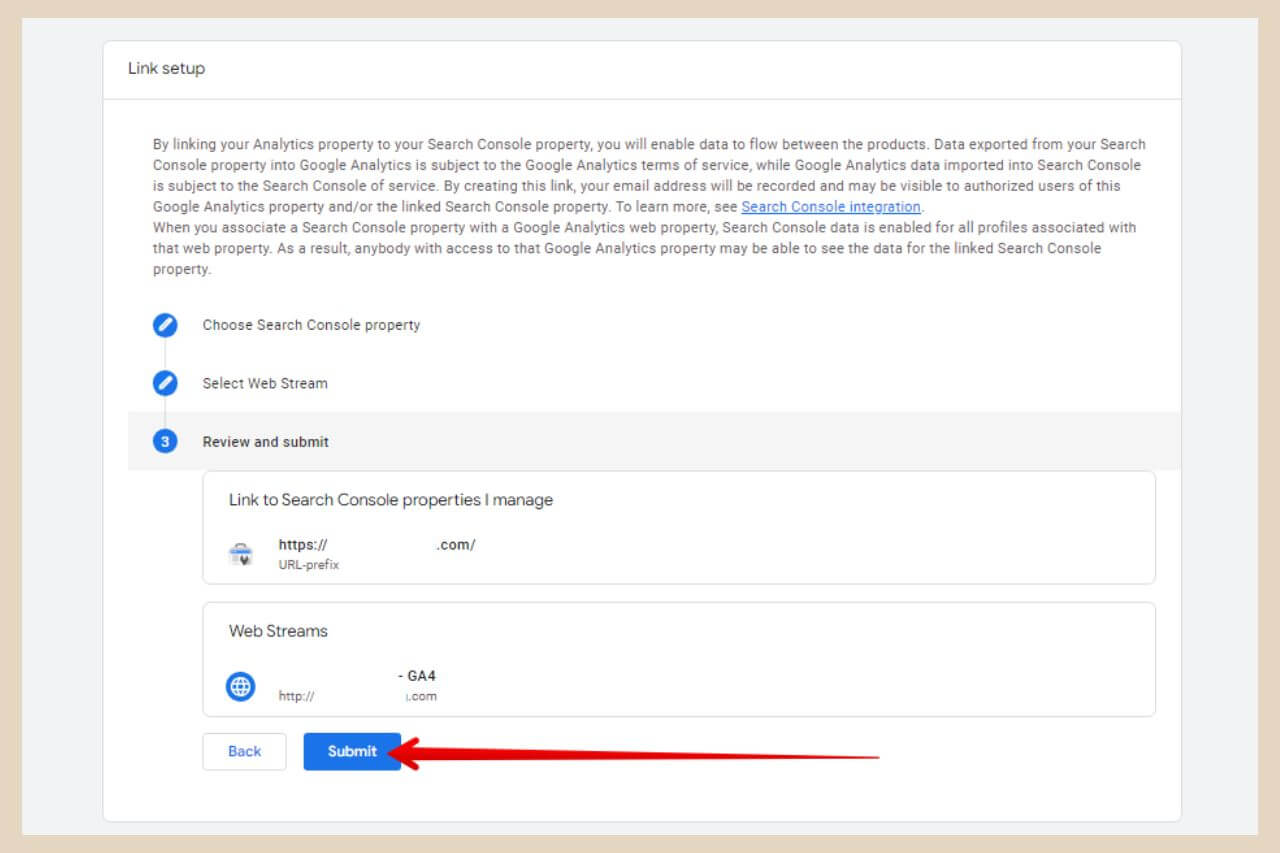
Your new Search Console account is now linked to your Google Analytics and you can click the X to close the confirmation window.
Linking Existing Google Analytics And Search Console accounts
If you’ve already set up a Search Console account directly through the Search Console site, you can still link it to your Analytics account very easily.
Simply click on the cogwheel to access the admin section then scroll down and click Search Console Links in the second column as per the steps above.
You may even have an Insights and Recommendations box at the bottom of your home page like the image below suggesting that you link your Search Console account. If you click on Link Account, this will also take you to the same place.

From here, you can simply follow the same steps as earlier from the “Linking Google Analytics And Search Console” section to link your Google Analytics and Search Console accounts.
Adding A Sitemap To Google Search Console
Now that your Search Console is set up, you’ll need to do one final step which will also save you some time when you set up Bing Webmaster Tools in a moment and that’s adding your sitemap.
You should be using an SEO plugin and these will automatically create a sitemap for you so to add a sitemap to Search Console, hover over or click on your SEO plugin in the main WordPress menu on the left side of the page in your WordPress back office.
When more menu options appear, search for a section called Sitemaps and click on it.
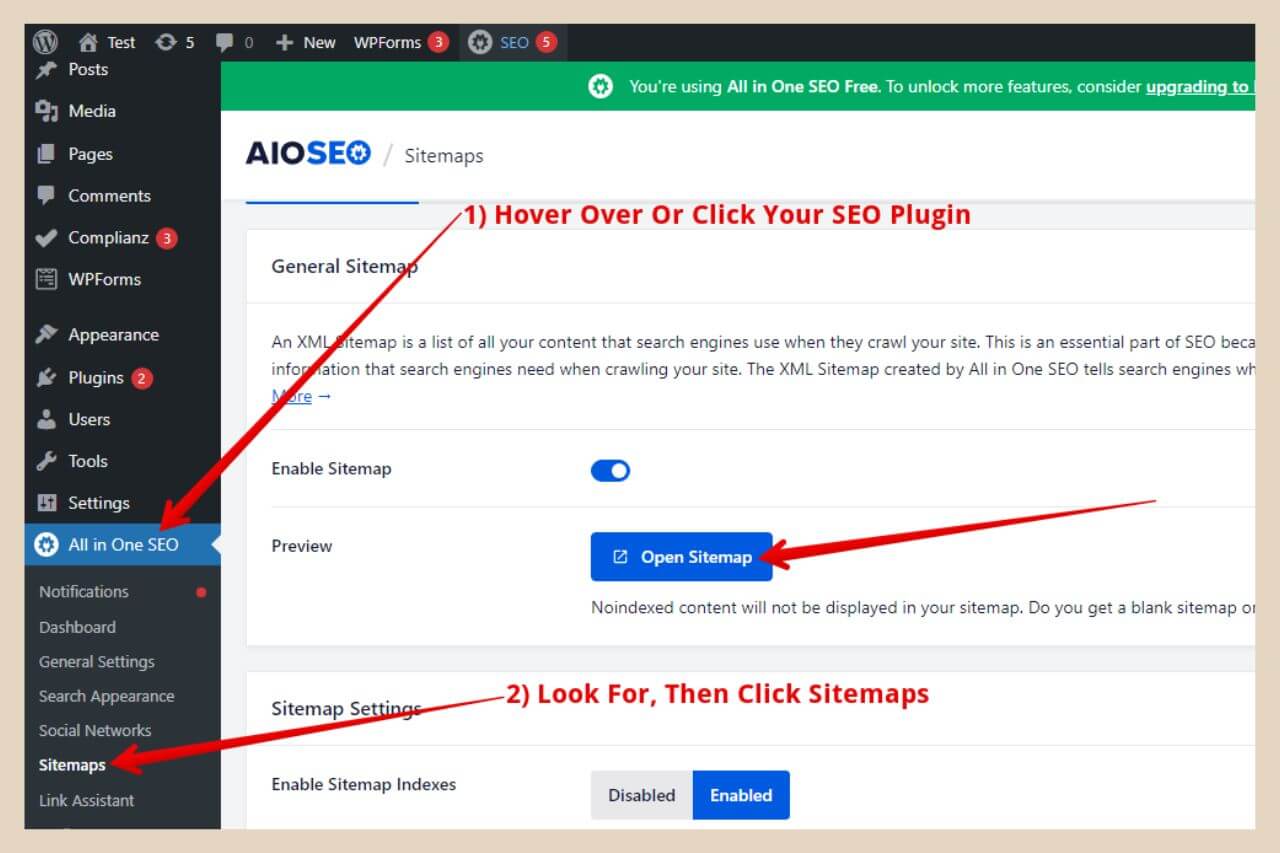
Depending on the SEO plugin you’re using, the method to access your sitemap may be slightly different but in my case with AIOSEO, I simply need to click on the Open Sitemap button to access it.
Once your sitemap opens, the only thing you need to look at here is the extension at the end of your sitemap URL in the URL address bar as per the image below.
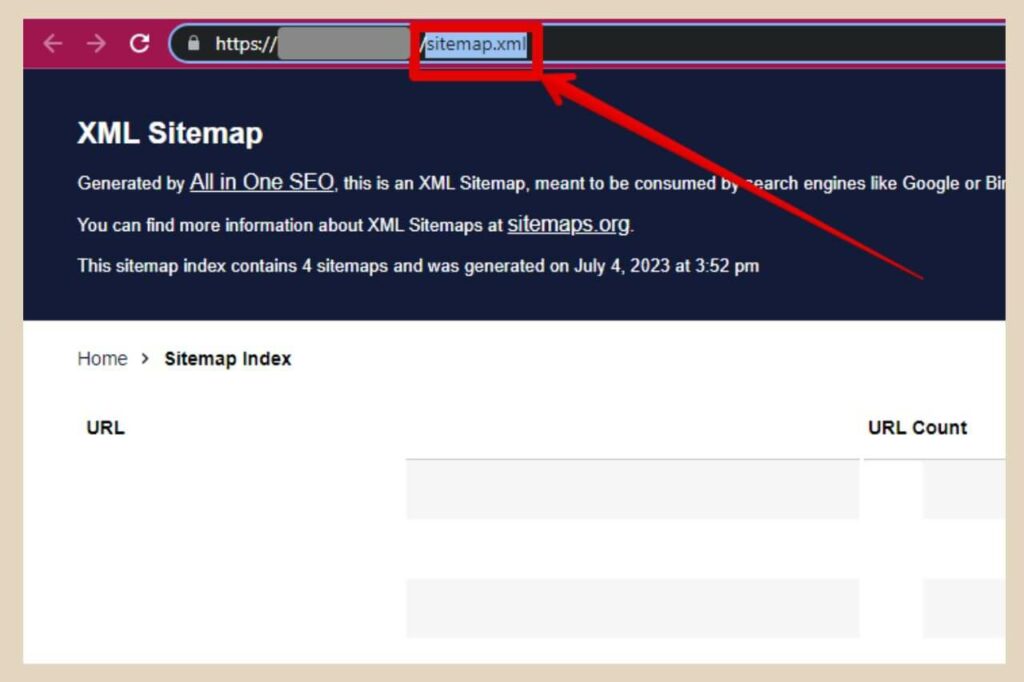
This might vary depending on the SEO plugin you’re using so simply copy the extension like the image above and head back over to the Google Search Console tab you left open earlier.
Submitting The Sitemap
Once you’re on the Search Console page, click on Sitemaps from the main menu on the left of the page and this will take you to the Sitemap page.
From here, you’ll notice that your website URL is already pre-filled in the “Add A New Sitemap” box so the only thing you need to paste here is the URL extension for the sitemap like the image below (in my case it was sitemap.xml).
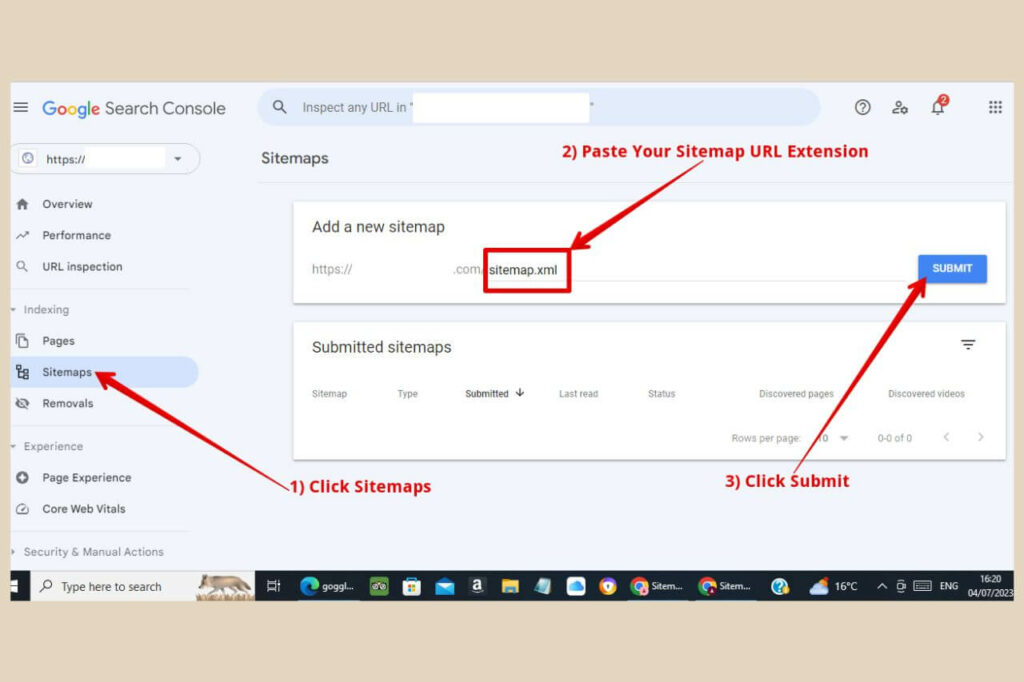
So go ahead and paste the URL extension and then click the Submit button to finish and that’s all there is to it.
Your sitemap should now be successfully added and your Search Console account is set up and ready to go. You should start seeing data within a few days.
How To Set Up Bing Webmaster Tools
Now that you’ve set up Google Search Console, you can also set up Bing Webmaster Tools too. Many people forget about Bing but it is still the second biggest search engine on the planet.
Yes, Google towers high above Bing with its numbers but Bing can still bring you in a large amount of traffic and we want as much traffic as we can get, right?
So to start, head to Bing Webmaster Tools and click the Get Started button. The easiest way to set up Bing Webmaster Tools is to sign up using your Google Account.
By doing it this way, Bing will use your already verified Google Search Console information which makes the whole setup process super quick and simple.
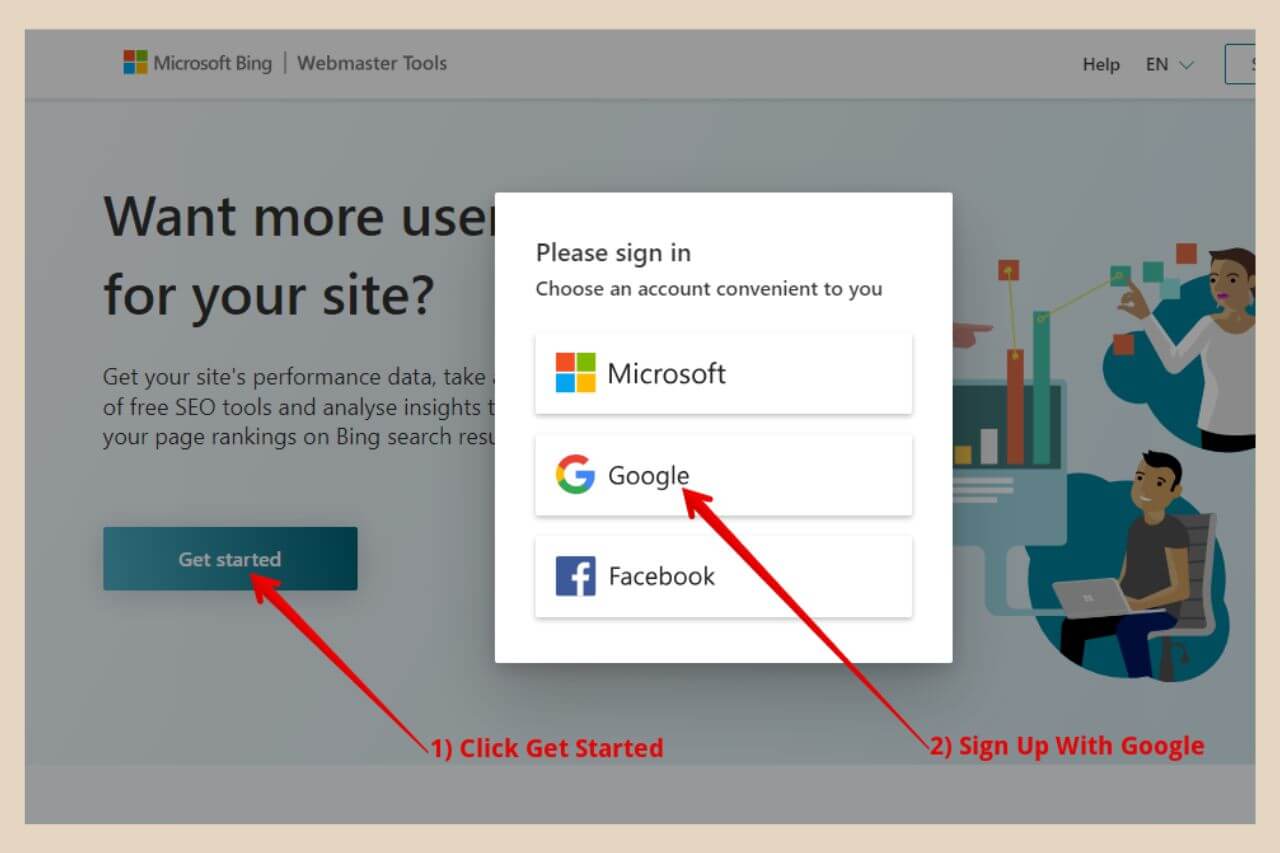
Once you’ve signed up with Google, you’ll land on a page that gives you two ways to set up Bing Webmaster Tools.
The Easier Setup Of Bing Webmaster Tools
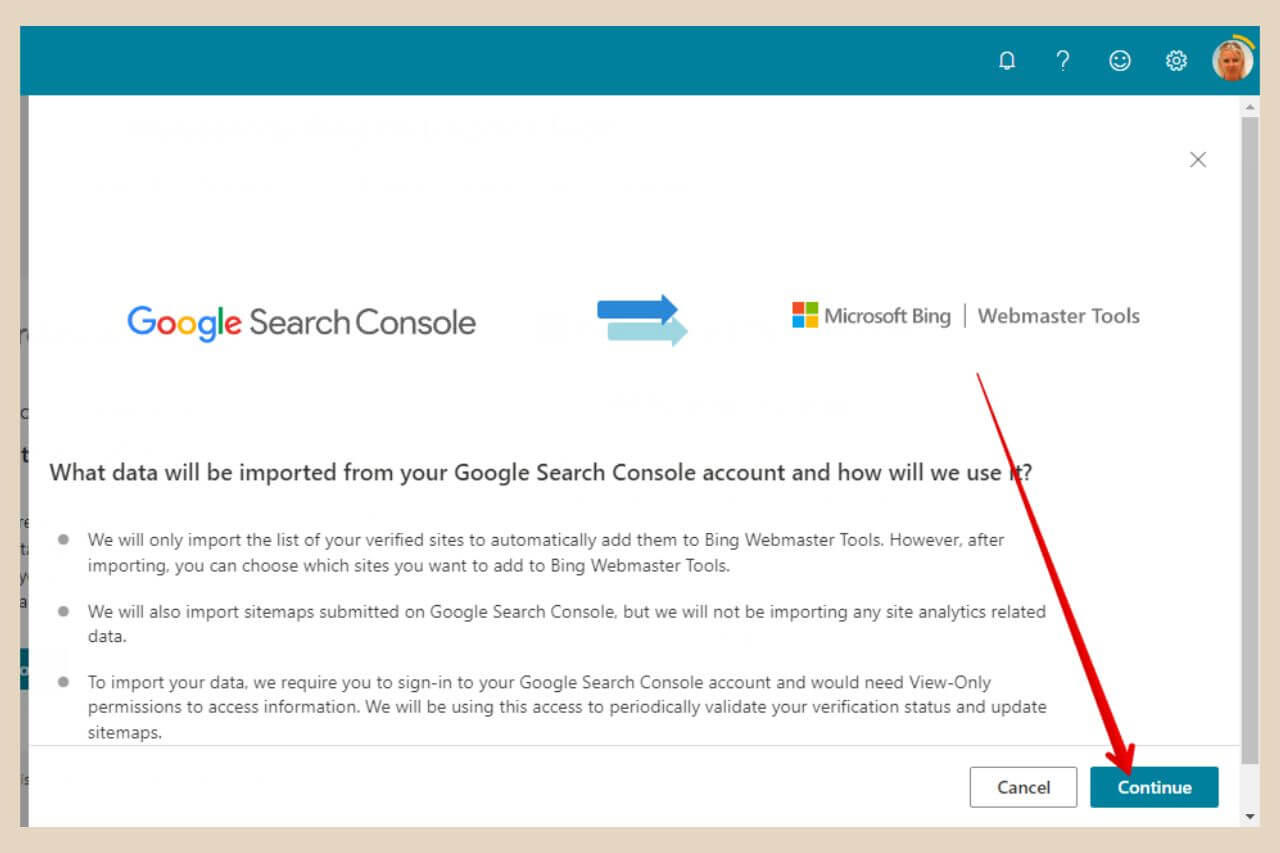
As you’ve already verified your Google Search Console, you’ll want to choose the first option which is importing your site from Google Search Console.
This is much quicker and easier because Bing will just import all the information across from Search Console including your sitemap and website owner verification so you won’t need to manually do anything else.

So, click the Import button and a pop-up window will appear confirming what data will be imported so click the Continue button to move forward.
You’ll now be prompted to sign in to your Google account again and Google will ask you to give permission for Bing to access your Search Console data so click Allow to continue.
You’ll now see a page where you’re website should be listed. If you have more than one website attached to your Search Console account, you’ll see them all listed here.
You can tick or untick the checkboxes next to each site if you don’t want to import them all but they will be all ticked by default.
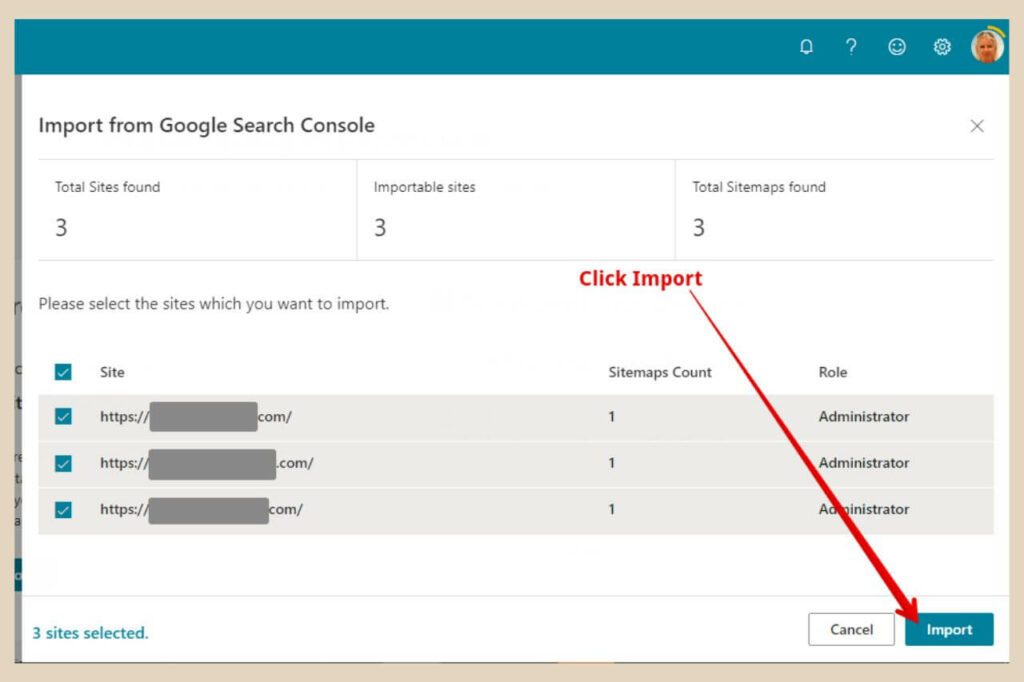
Once you’re happy, click the Import button to finish. Bing will take a few moments to add the site information and once it’s complete, you’ll be taken to the Bing Webmaster Tools dashboard.
From here, you’ll be able to see your new Bing Webmaster Tools account which is now set up and ready to go and that’s all there is to it. You should start seeing data within 48 hours.
Let’s Check Those Rankings
Now that you have Google Search Console (and Bing Webmaster Tools) set up, you’ll now be able to access a plethora of useful information that will help you monitor and improve your site’s performance.
I hope you’ve found this tutorial helpful but if you do get stuck or need any help, please let me know in the comments below and I’ll be happy to help you out.

Helpful Guides to Read Next
These beginner-friendly guides will help you keep building your blog step by step.
- How to Set up Google Analytics and Track Your Blog Traffic
- Get More Pinterest Visibility with Rich Pins
- Design Pinterest Pins in Canva That Actually Get Clicked
- How to Set Up Google AdSense to Start Monetising Your Blog Traffic
- How to Connect AdSense and Analytics to Uncover Your Highest-Earning Content
Ready to Scale Your Digital Footprint?
Publishing content is only half the battle. If you’re ready to amplify your reach, visit my Grow Hub for actionable deep dives on search engine optimisation, email list building, creating better content and graphics and sustainable traffic strategies.

Jessie
Founder, nomorerush.com
Hi, I’m Jessie — founder of No More Rush. I help beginners build profitable, beginner-friendly blogs without the overwhelm or unrealistic expectations you see online. Everything here is built around simple, structured steps so you always know what to do next.


