So you’ve just signed up to the Amazon Affiliate program and now you’re wondering how to use Amazon affiliate links. In fact, you’re probably looking at the Amazon Associates Central dashboard trying to figure out where to even start.
Well, the good news is that once you’re familiar with the process, you’ll realise that it’s actually a really easy thing to do.
Before you know it, you’ll be a dab hand at adding product links to your site and I’m going to show you step-by-step how to do it.
So fasten your seatbelts because, by the time we get to the end of this post, you’ll be an Amazon affiliate linking wizard.
Why Become An Amazon Affiliate
There are several reasons why becoming an Amazon affiliate is a good idea if you’re in the affiliate marketing world. The first one is that Amazon has one of the biggest affiliate programs out there.
They sell almost every product imaginable so you’ll be hard-pushed to find yourself in a situation where you can’t find the product you’re trying to link to. They’re also a hugely popular and well-known company so you’ll know that you’re sending your visitors to a trusted site.
As an added bonus, because people are always shopping on Amazon for pretty much everything, this gives you the opportunity to earn commission for any other purchases your visitors make within the 24-hour cookie window.
They may click on your link to a hairdryer, decide not to buy it but end up buying a really expensive piece of gym equipment instead.
You’ll actually get the commission for that or anything else they buy during the 24-hour cookie window just because they clicked on your affiliate link beforehand regardless of what they end up buying.
How Affiliate Links Work
When you sign up to an affiliate program, you’ll be given a unique ID that identifies you from all the other affiliates.

As an affiliate, every time you create an affiliate link for your site, your unique ID will be automatically embedded into it so anytime that link is clicked, the affiliate program/network will know it’s your link.
When someone goes ahead and makes a purchase after clicking your link, that purchase will be linked to your affiliate account and you’ll receive commission for that sale.
How To Use Amazon Affiliate Links
We’ll start with the product text links because these are the links you’ll probably be using the most often and they’re super simple to create. For all product links, you won’t actually be using anything within Amazon associates central.
Instead, you’ll be getting links straight from the Amazon shopping site. So before you begin, you’ll need to sign in to your Amazon associates account first. Once you’ve done this, you can head over to the Amazon shopping site and you should notice something new at the top of the page.
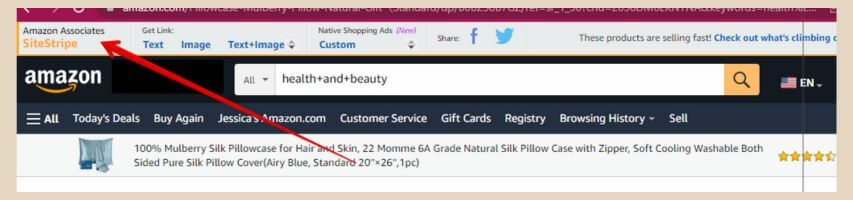
This is called Amazon Associates SiteStripe and this is where you’ll create all of your product affiliate links. If you don’t see the SiteStripe at the top of the page then this means that you’re not logged in to your associate’s account.
Once SiteStripe is showing at the top of the page, start searching for the products you’d like to link to just as you would if you were shopping away on Amazon. Once you find the product you want and you’re on the product page, you can now use SiteStripe to create your affiliate links.
Choose Your Product Link Type
There are 3 different types of links to choose from and they are text links, image links or text + image. The insertion of all three links is fairly similar and all 3 link types already contain your affiliate ID.
Text Links
Text links are literally as they sound. They are the links that you would add to existing text within your blog post. To add one, simply click the “Text” link in the Get Link section of SiteStripe and a small window will appear.
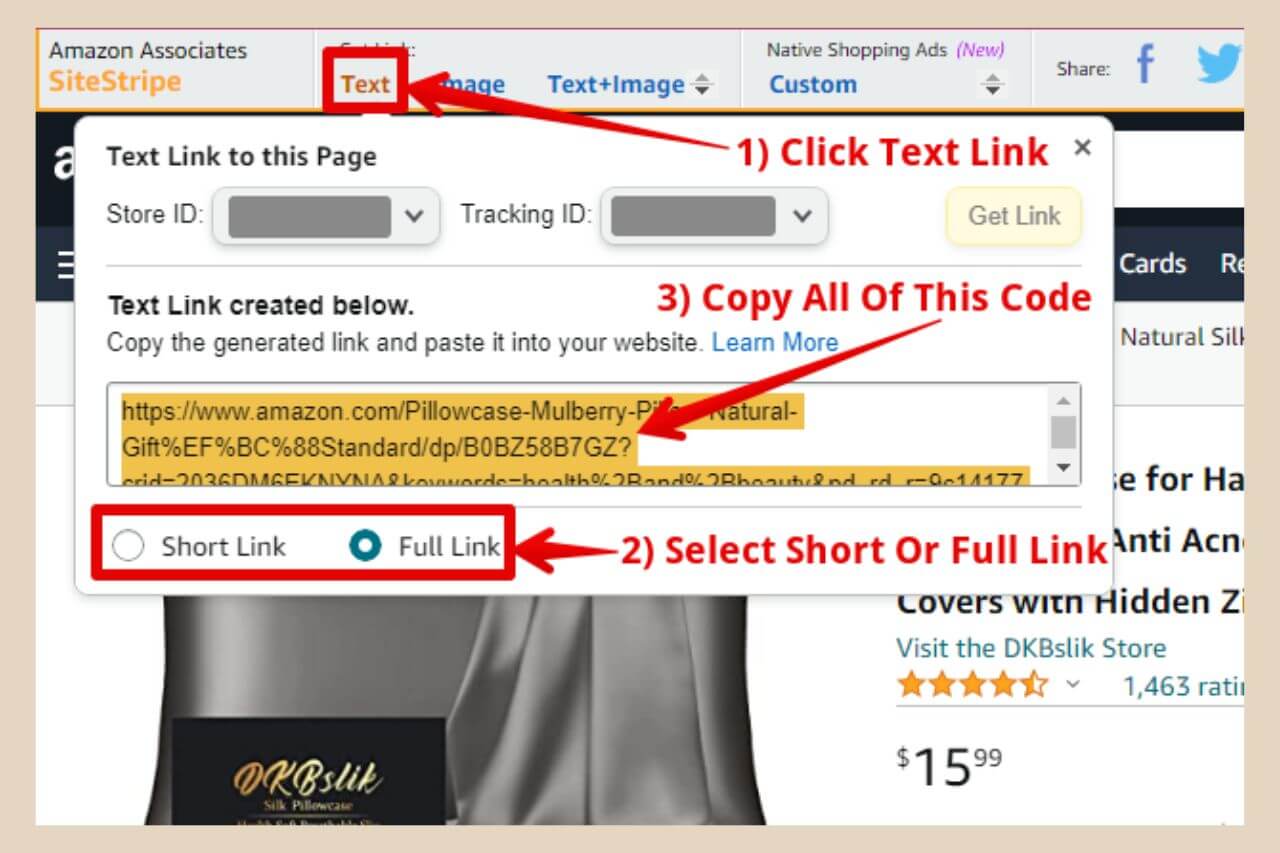
You’ll have the choice to either use a short link or a full link (more on those in a moment) but I always go for the full link. Copy the code from the box and head over to your blog post.
Highlight the piece of text that you want to become the link (usually the product name) and when the small edit box appears, click the “link” button as per the image below.
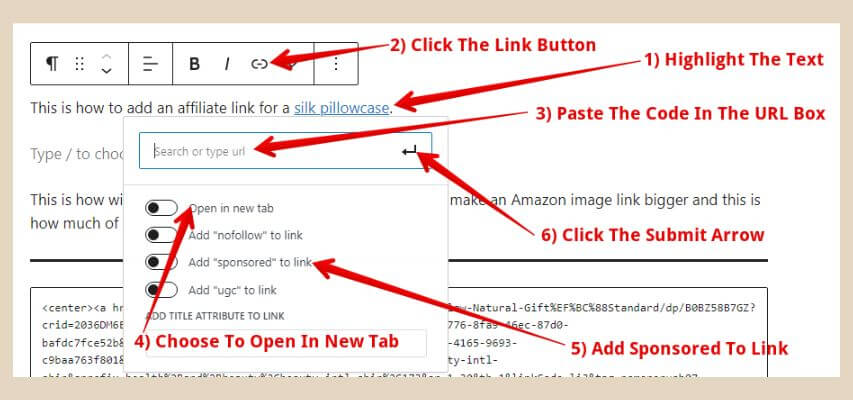
The next step is to paste your code into the URL box. You can also choose to open the link in a new tab by clicking the “Open in new tab” button.
If the option is there, click the “Add sponsored to link” button (more info on that below), then click the submit arrow. Ta-da, you’ve just inserted your first Amazon affiliate link.
Adding “Sponsored” To The Link
It’s very important that you add “Sponsored” to the link because that tells Google that this is an affiliate link. Depending on the SEO plugin you’re using, this may be an option under the “Open in new tab” section (I use AIOSEO). If it isn’t, then you’ll need to add it manually.
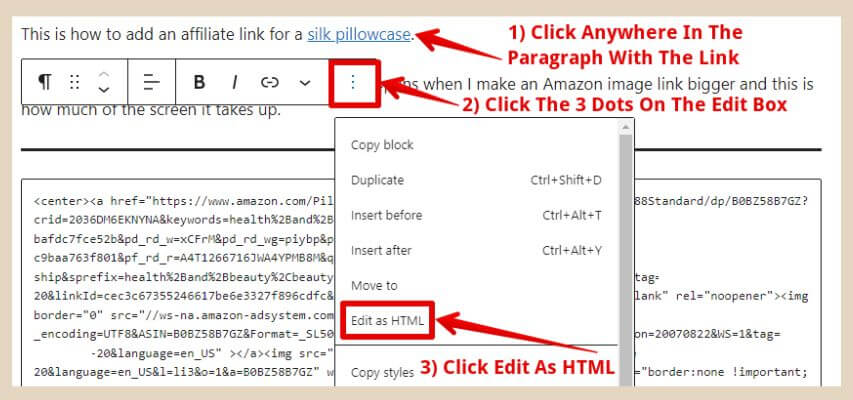
To do this, you’ll need to add the link first, then manually edit it afterwards. For this, you’ll need to click anywhere within the paragraph that contains the link to bring up the edit box for that block.
From here, you’ll need to click on the 3 dots as per the image above, then click “Edit as HTML” and this will show the block in HTML.
The below image is how the short sentence at the top of the image above looks when it’s changed into HTML. As you’ll notice, most of it is the code for your link.
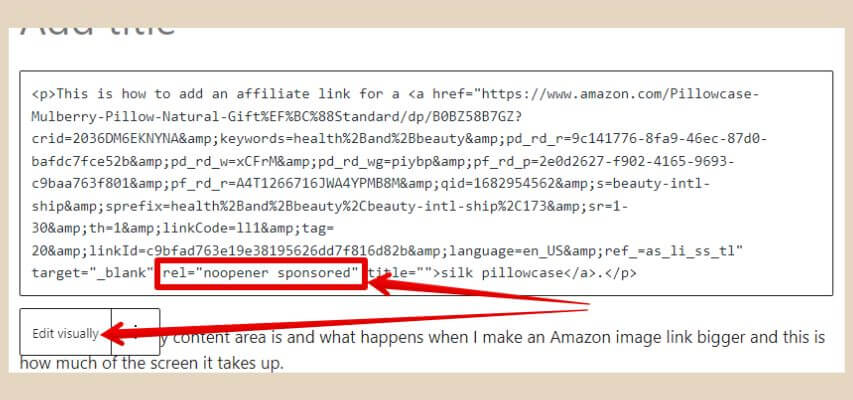
If you’ve never worked with code before, then the easiest way to do this (other than changing to an SEO plugin that has the button feature) is to enable the option for opening in a new tab, when you add the link.
This will add the rel=”noopener” to the code which you can see in the above image. This will be the place where you’ll want to add the words sponsored to the link. To do this, just place your cursor between the r and the “ and then press the space bar to create a space between them.
Now, type in the words sponsored so that it looks just like the image above and you’re all done. You can now click the Edit visually button to return the block to its normal form.
Image Links
An Image link is an image of the product you want to link to that will be clickable once you add it to your site and it will take the visitor to the exact same product page as your text link. If you’d like to add an image link, then click the “Image” link in the Get Link section of SiteStripe.

This time you’ll have the option to choose the image size so select your size of choice (we can actually make it much bigger which I’ll show you in a moment) and then copy the code as before. Head back to your blog post and insert a new block where you’d like your image to be added.
If it’s in between 2 paragraphs for example, place your cursor at the end of the first paragraph, hit enter on your keyboard which will add a new block, then click the plus icon to choose the type of block.
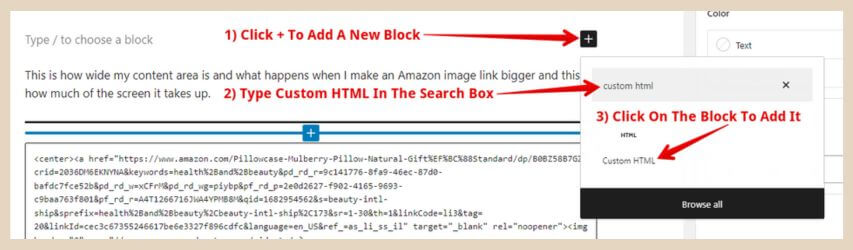
For this type of link, we need the “Custom HTML Block” so type in Custom HTML into the search box of the new small window that appeared. When it comes up, click on it to insert it into your post. Now you can paste the code and your linked image will be inserted.
To add sponsored to an image link, it has to be added manually so there’s no help from an SEO plugin with this one I’m afraid. The rel=”noopener” is already included in an image link so you’ll just need to find it within the code and add sponsored to it as we did before with the text link.
Text + Image Link
A Text + Image link is a small Amazon branded image that contains the product image, product name and the product price. This is actually one of the very few times in which you’re allowed to display Amazon prices on your site.
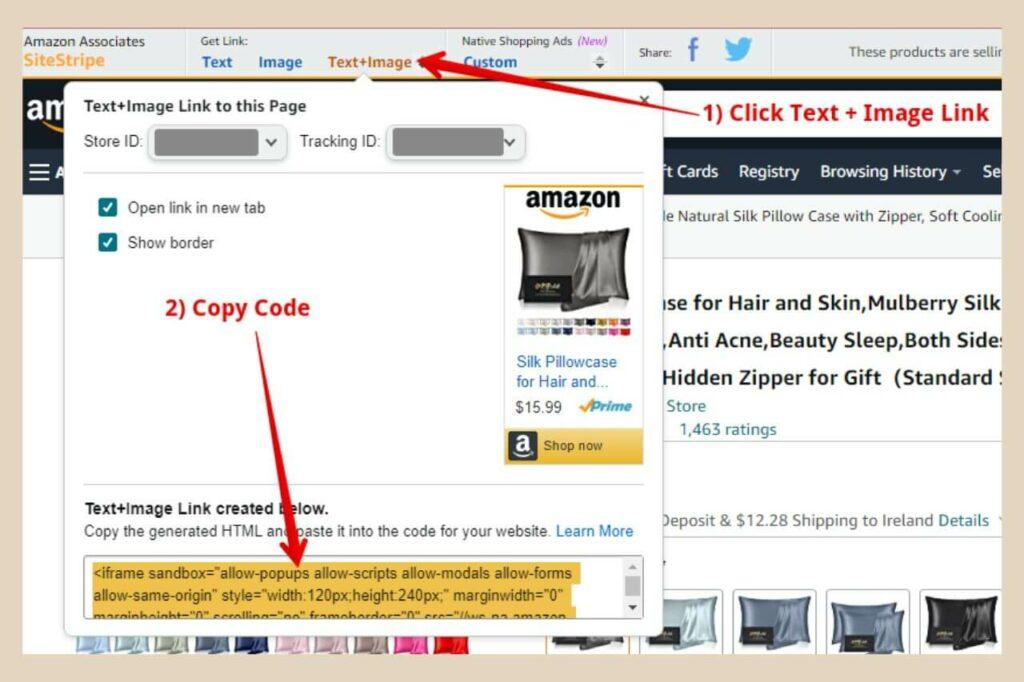
Because Amazon prices change so frequently, you’re usually forbidden from doing this but because the text + image link is synced to Amazon, the price on this link updates if it ever changes on the Amazon site.
Inserting one of these links is identical to the regular image link in that once you’ve copied the code, you simply paste it into a custom HTML block. The only difference here is that this is something called an IFrame so you can’t really change anything within the code.
How To Make Your Linked Amazon Image Bigger
One of the biggest drawbacks of image links from Amazon is that they are incredibly small, even the large ones but we can change this very easily.
Here is a screenshot of the full code and you’ll notice I’ve put a red box around a snippet of that code that says SL250.

This is actually the size of the image and all you need to do to change this is change that number. Depending on the size you choose when you copied the code, you will see one of three possibilities:
- If you choose a small image, you’ll see SL110
- If you choose a medium image, you’ll see SL160
- If you choose a large image, you’ll see SL250
By changing those 3 numbers, you can resize that image to whatever size you please. In the below example, I changed the numbers to 500 and this is how it looks on my site.
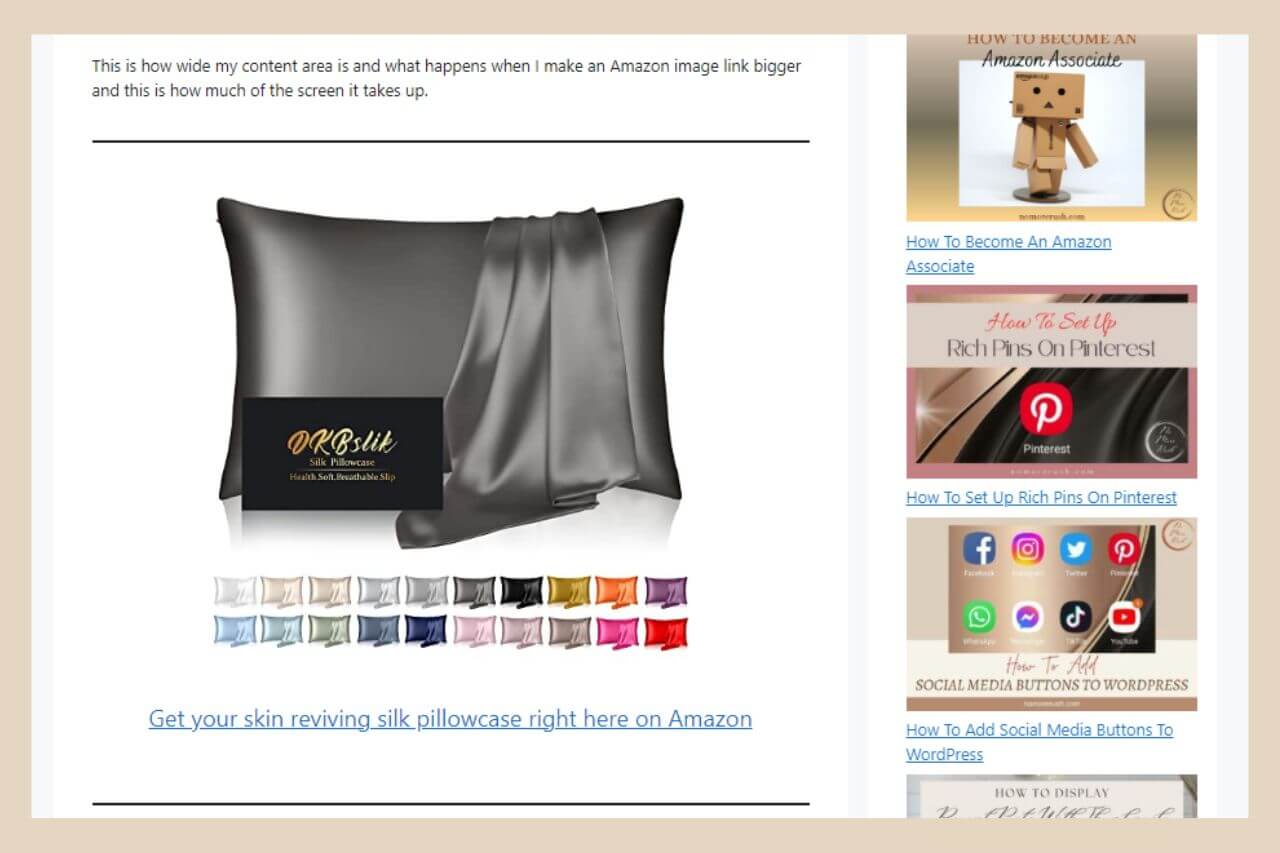
As all themes can have a different-sized content area, you can play around with this a little until you find the size you like the best.
How To Center Your Linked Amazon Image
By default, Amazon image links always sit to the left on a post but we can change that too by adding a tiny snippet of code to the beginning and the end of the affiliate code we just copied.
Simply add <center> to the beginning of the code and </center> to the end of the code and this will center align your image. If you look at the image used to show the SL250 code, you’ll notice where I’ve added them to the image link.
You can do this to center many custom HTML codes that you add to WordPress including the text + image link too. Even though it’s an IFrame, you can still wrap code around it in this way to make it do things like align to a certain position.
Want To Make It Look A Little Fancier?
If you want to make your image link a little fancier, you could also add a heading block just below the image and type in some catchy text. You could then highlight all of that text and add your text link to it.
The small edit box above the block will give you alignment options so you could center the text so that it matches the image.
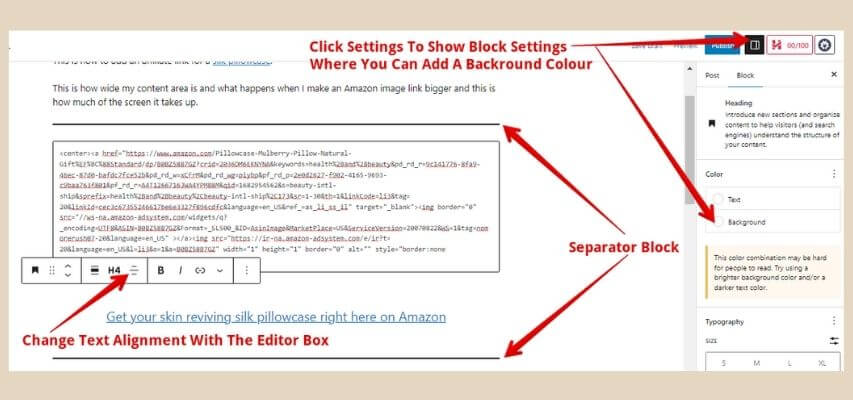
Finally, to finish it off, you could add a separator block right above the image and another one just below the paragraph which will make the whole thing look like one piece.
You can also add a background colour to the heading block too if you like by using the settings menu on the right-hand side of the page. This is how it looks with some background colour to the text.
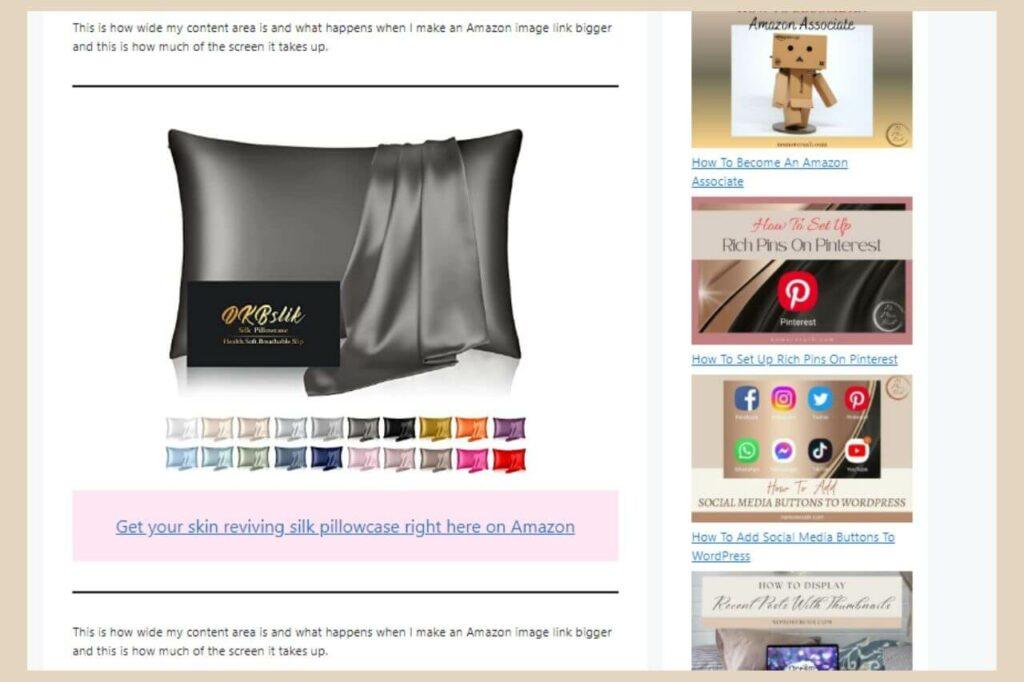
You don’t need to do any of these extras as the image link alone is perfectly fine but if you do feel like dressing it up a bit, those are just a few examples of things you can play around with.
Long Links Or Short Links
As I mentioned earlier, when you’re using text links, you do have the option to use either short links or full links. I personally always use the full links because they can be changed in bulk.
The short links, although tidier, have to be changed one at a time so although they work well when using them on social media, for website use, I prefer the full link.
A perfect example of this would be if you failed to make the 3 sales that Amazon requires in the first 180 days and your affiliate account gets closed.
You can reapply again instantly but it will be a new account with a new store ID and a new tracking ID so you’d need to change all of your existing links on your site. If you used full links, you can do that in bulk but if you used the short links, then you’d have to change each link one by one.
Download The Amazon Associates App To Your Desktop
To make it a little easier to view all your Amazon reports, you can actually install the Amazon Associates app straight to your desktop. It looks exactly the same as Amazon Associates in your internet browser but now you have it right on your desktop.
To install the Amazon Associates app, You’ll need to be on the Amazon Associate page in your internet browser.
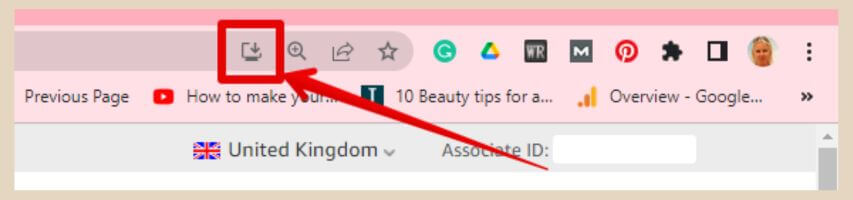
From here, simply click the “Install Amazon Associates” button on the right-hand side of the address bar at the top of your internet browser like the image above and that’s it. You now have it on your desktop.
If you’ve signed up to several Amazon associate programs in different countries, you’ll only need to install it once from any one of your Amazon associate’s dashboards.
You can then easily switch between countries in the app in the same way that you would in your internet browser by clicking the down arrow next to the country name.
Don’t Forget About Amazon OneLink
In case you don’t already know, you can actually apply for the Amazon Associates Affiliate program in several different countries and you can link them all with Amazon OneLink.
This is an awesome feature because it redirects your traffic to the Amazon site in their own country if you’ve signed up for it which means you never lose a commission.
As there are a few steps involved with this, I’ve created a separate tutorial for setting up OneLink as it deserves its own dedicated post.
Let The Linking Begin
Now that you’re, well essentially a linking wizard, let’s get those links added. You’ll be amazed at how it becomes second nature to you once you’ve added a few.
I hope you’ve found this post helpful but if you do get stuck or have any questions, please feel free to leave a comment below and I try my best to help you out.
Or if you just feel like sharing your own linking stories, please feel free to do that too.
Happy Linking!

Helpful Guides to Read Next
These beginner-friendly guides will help you keep building your blog step by step.
Ready to Turn Content into an Asset?
Transitioning from a time-consuming hobby to a reliable business requires a clear plan. Head over to my main Monetisation Hub to master affiliate marketing frameworks, digital product creation, and ad network optimisation.

Jessie
Founder, nomorerush.com
Hi, I’m Jessie — founder of No More Rush. I help beginners build profitable, beginner-friendly blogs without the overwhelm or unrealistic expectations you see online. Everything here is built around simple, structured steps so you always know what to do next.