Are you wondering how to add Amazon native shopping ads to WordPress? If you’ve just become an Amazon Associate, then native shopping ads are a great feature that you can add to your site to increase your affiliate marketing efforts.
They’re a great way to encourage your readers to click through to Amazon by showing a selection of post-related products that may be of interest to them.
You might have written an amazing post about a particular product and although your reader might need that product type, they may not be interested in the exact one you’re recommending so why not give them some additional choices at the end of the post?
They’re actually pretty easy to add so I’m going to show you, step by step, how to add them to your site.
What Are Amazon Native Shopping Ads
Amazon Native Shopping Ads are one of my favourite things to add to my sites and they actually have pretty good click-through rates. They are essentially ad blocks with a selection of products that relate to the category or options you select when you create them.
Let’s say you’ve just written a post all about cameras and the pros and cons of different types. You could create a native shopping ad unit with a selection of different cameras that your readers might be interested in that they could purchase from Amazon.
You can pretty much select any range of products that you like that fit in with your blog’s niche and you can even choose the individual products manually that will be displayed within the ad unit.
How To Add Amazon Native Shopping Ads
To add Amazon native shopping ads to your site, you’ll first need to sign in to your Amazon associates account. Once you’re on your account dashboard, you’ll need to hover over the Product Linking tab on the main menu at the top of the page.
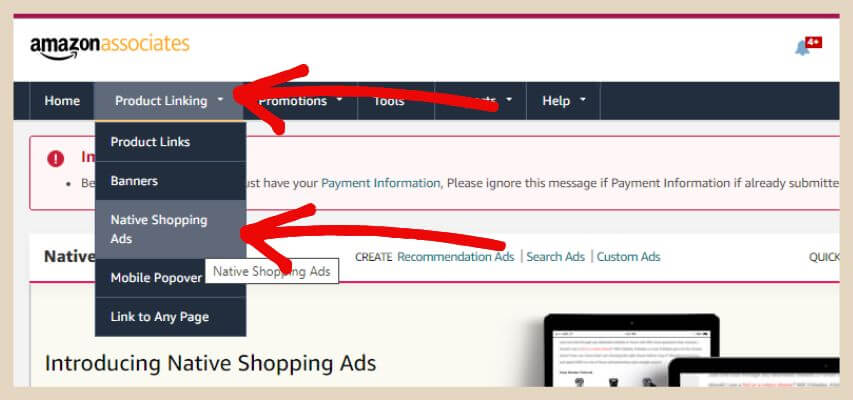
Next, click Native Shopping Ads from the drop-down menu that appears. This will bring you to the native shopping ads page and from here your next step will be to decide the type of ad you’d like to use.
The Different Types Of Native Shopping Ads
There are actually three different types of native shopping ads that you can choose from within Amazon Associates Central.
There is one more type available directly from SiteStripe and I’ll show you that one too but first, we’ll start with the three from Associates Central.
Recommendation Ads
Recommendation ads are based on your page content and visitors so they’ll display products that relate to both. These are probably the most simple to create because they’ll automatically show products that they think relate the best to your content and visitors.
They’re also the broadest and least filtered out of all the ad types and work well when you’re not looking for post-specific ads or when you want ads that you can add site-wide automatically.
Search Ads
Search ads give you a little bit more control because you can search for particular product types. These ads are more filtered because you get to choose the types of products that will be displayed within the ads.

Let’s say your site is all about golf. You could simply put “golf” into the search box so that your native ad shows a selection of golf products. Now let’s say you have a post all about golf bags.
This time, you could put “golf bags” into the search box so that your native ad shows a selection of golf bags instead. These ads are very handy if you want to create ads that are very specific to a certain post.
Custom Ads
Custom ads take a little longer to create but they give you full control over the products that are displayed in the ads. You literally get to hand-pick each product that will be displayed and you can also choose how many products to show within your native ad.
These are great if you’re in any way particular about the quality of products that are shown. What I mean by that is if you only want 4-star plus products or products with the most amount of ratings.
You might also know the exact products that compare the best to the one you’re reviewing so you might want to choose just those specific products to be displayed in your native ad.
How To Add Recommendation Ads
To add recommendation ads, click recommendation ads at the top of the page like the image below. Next, you’ll need to give your ad a name and make sure that the correct tracking ID is selected if you have more than one.
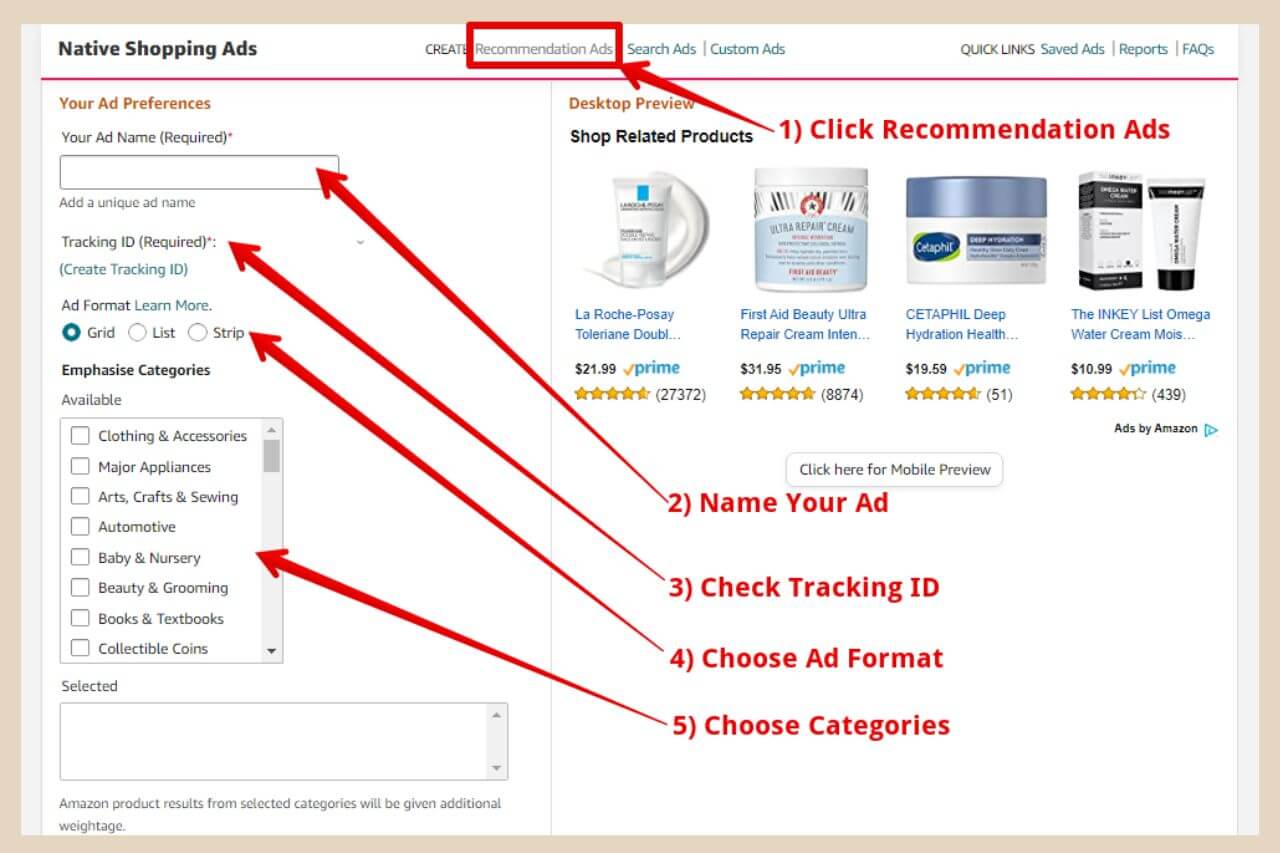
The next step will be to choose an ad format and you can choose between three different types.
- Grid – Large ad that usually contains 4 products in columns in one row (sometimes less), with images
- List – Text ad that usually contains 4 products in a text list (sometimes less), no images
- Strip – Similar to a grid ad but vertically thinner that usually contains 2 products in one row, with images
You can click on each type to get a preview of how they look to decide which one you like the best.
I personally like to use grid ads at the end of posts and strip ads in the middle of content (I never use list ads because I like my visuals too much) but you can use them where ever you like depending on your own preference.
Select Your Categories
Now, you’ll need to select one or more categories which Amazon will use to help make the ads more relevant to your content. You can also add fallbacks next if you wish and these are product keywords that will be used if no product recommendations can be found.
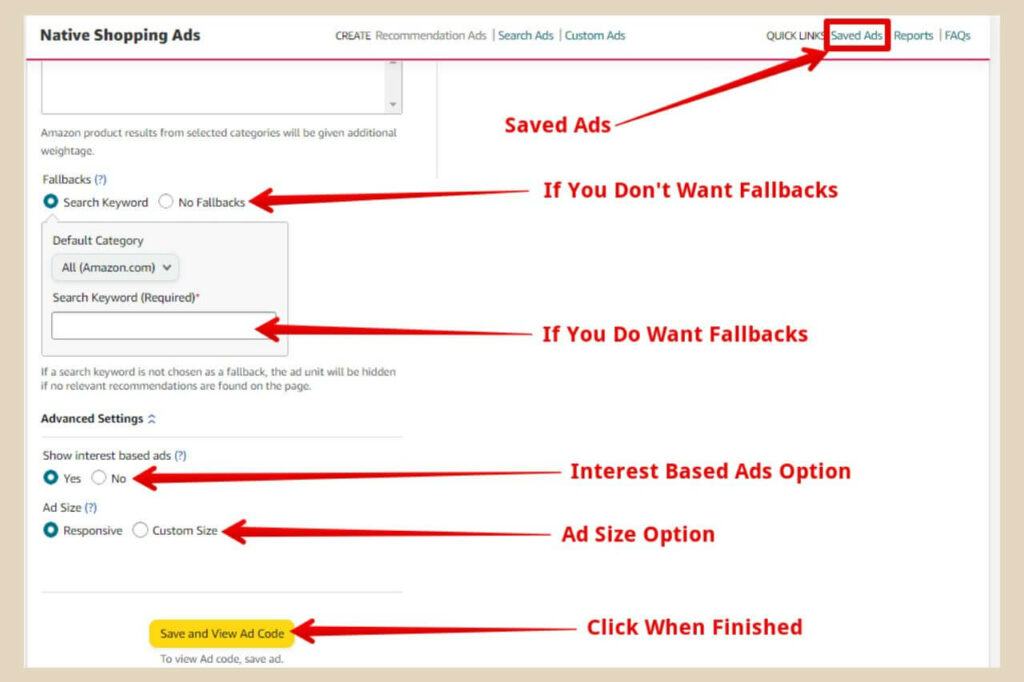
If you do decide not to add fallbacks, then the ad unit will be hidden instead when no product recommendations are found.
The last area is the advanced settings area where you can choose whether or not your ads are interest-based ads and whether or not your ads are responsive (resize when viewed on different devices) or custom.
By default, interest-based and responsive are already selected and these are the best options. Finally, at the bottom of the page, click the “Save and View Ad Code” button and a small window will appear where you can now copy your ad code.
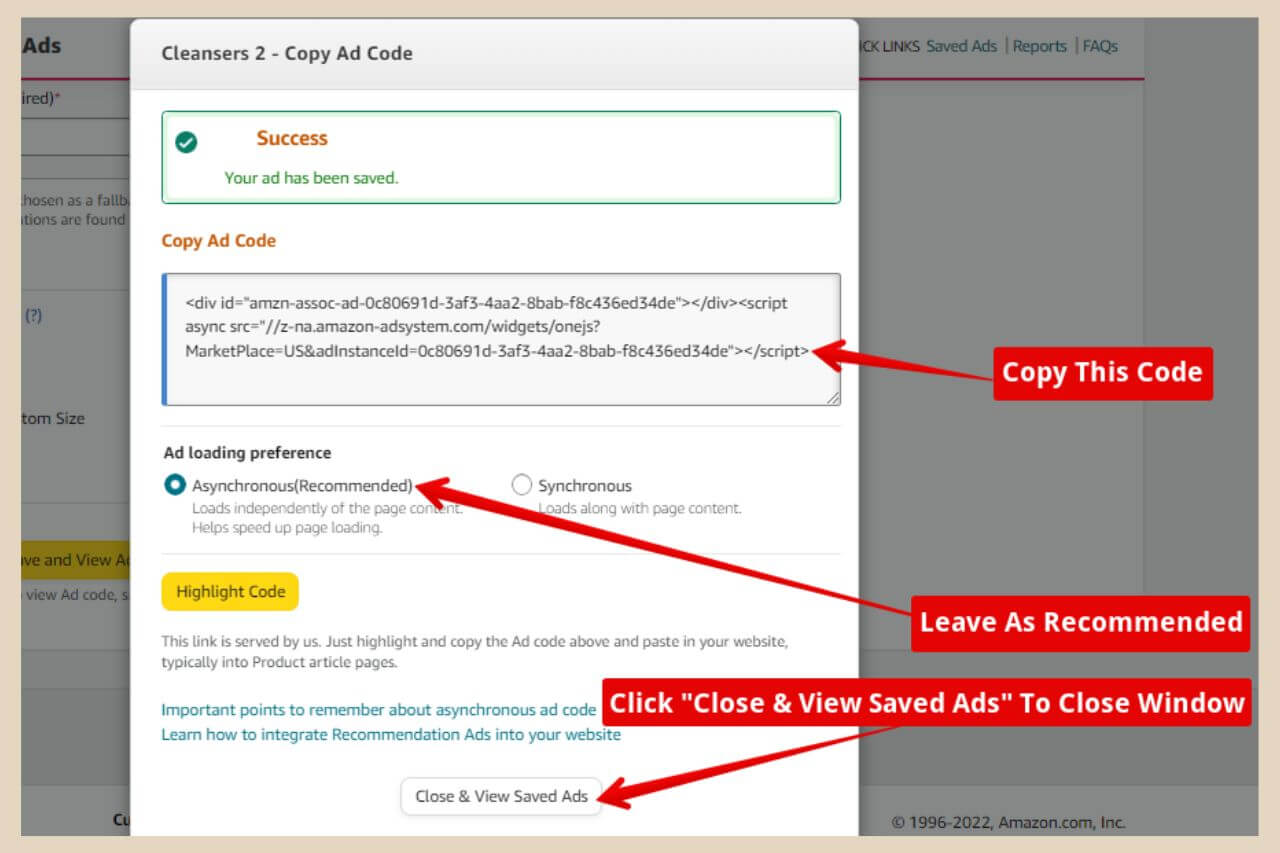
Your ad is now saved and can be viewed at any time from the “saved ads” link at the top of the page.
How To Add Your Ad Code To WordPress
To add your native shopping ad code to WordPress, simply place your cursor where you’d like to place your ad and hit enter on your keyboard to add a new block. You can now click the + sign that’s appeared to choose the type of block you want to add.

You’ll need a Custom HTML block for this code so simply types custom HTML into the search box that’s now appeared and when it shows up, click on it to insert it into your post.
You can now paste the code you’ve just copied into the HTML block and it will be live on your site once you click the publish/update button.
How To Add Search Ads
To add search ads, click search ads at the top of the page. Next, make sure your tracking ID is correct if you have more than one. The next step is to choose the ad format as before between grid, list or strip.
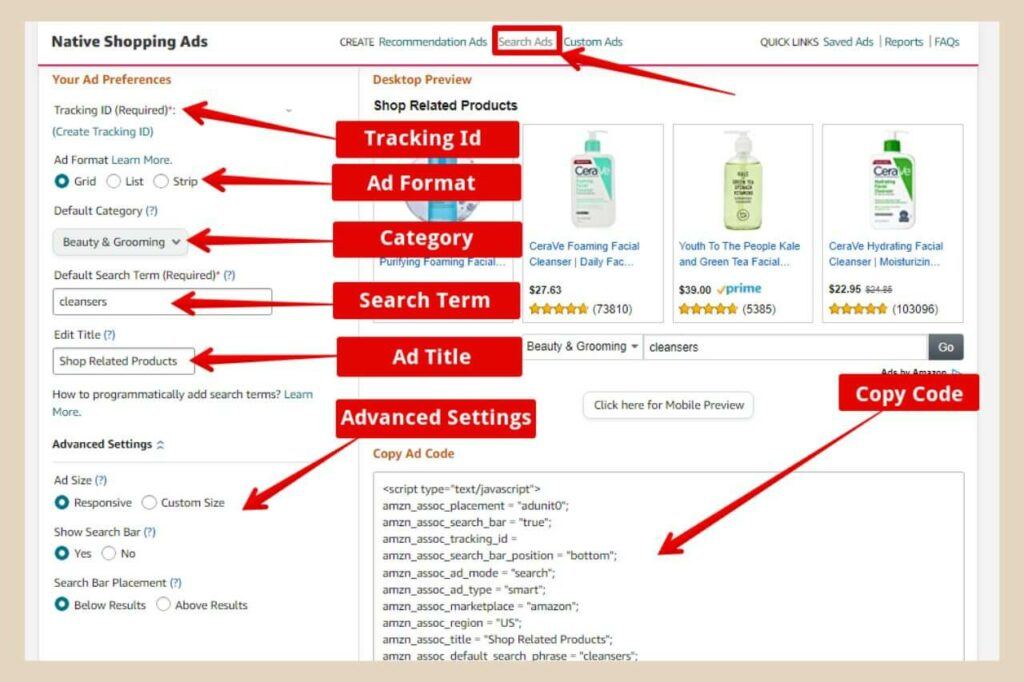
Now choose a category from the drop-down menu followed by the search term for the products you’d like to display, ie, golf or golf bag for example.
You can also edit the title that appears above the native ad to something more catchy if you don’t like the default “Shop Related Products” title.
The last option is the advanced settings where you can choose responsive or custom size, show or not show the search bar on the ad and show the search bar above or below the ad.
I tend to leave everything as default here which is responsive, show search bar and below results but you can change these if you please. The last step is to copy the code that has now been generated and paste it into your post in a custom HTML block as before.
How To Add Custom Ads
To add custom ads, click custom ads at the top of the page. As before, you can check/change your tracking ID, select the ad format and choose a category from the drop-down menu.
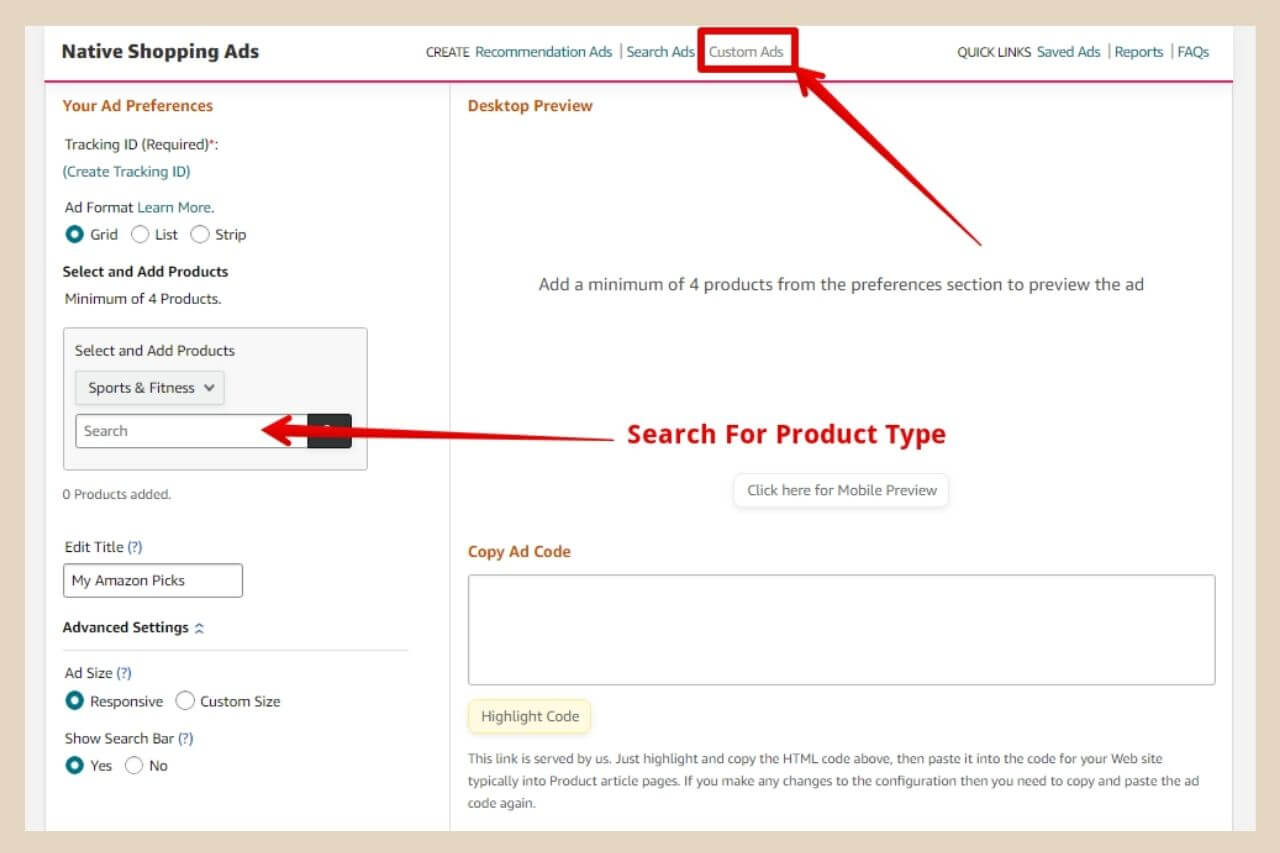
This time, however, you’ll notice a search box underneath the category menu and this is where you’ll search for the product type you’d like to display.
If you wanted to display golf bags in the ad, you would type in golf bags and a new drop-down menu would appear with a list of golf bags that you can scroll through to find products to add to the ad.
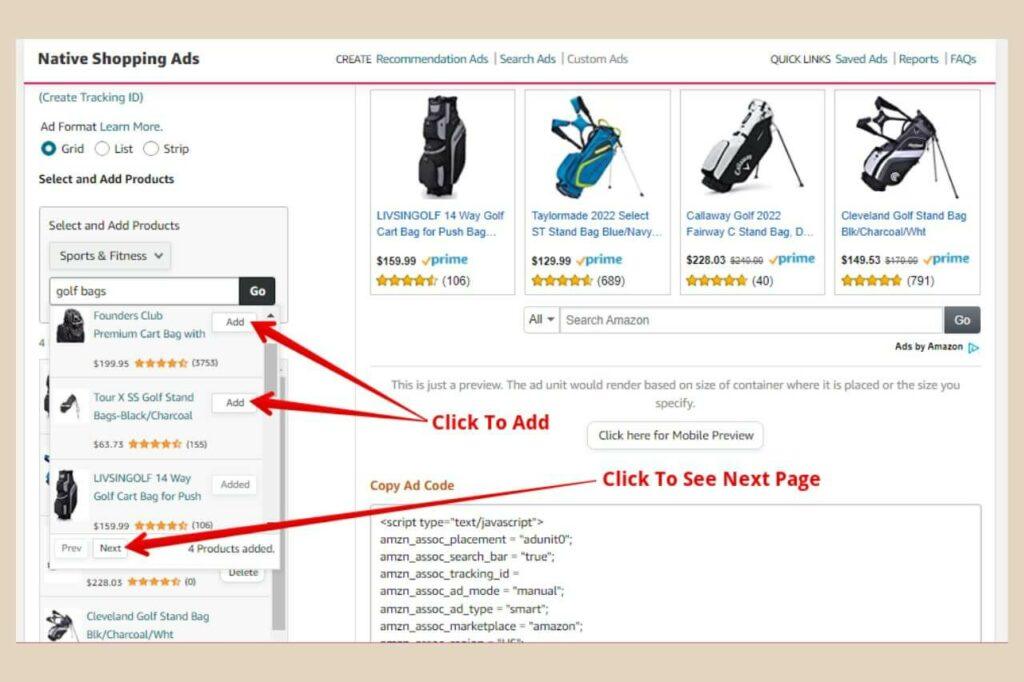
You need to add at least four products to the ad but you can add more if you like although ads with just four products look better. To add products, you just need to click the “add” button next to the product you like and it will be added.
Once you’re happy with the ad unit, you can now edit the title as before and in the advanced settings, you can choose your responsive and search bar options. To finish, simply copy the code and insert it into a HTML block as before.
How To Use Amazon Native Shopping Ads From SiteStripe
There is one more type of native shopping ad which is available directly from SiteStripe. For this one, you’ll need to be logged into your associate’s account but rather than getting it from your associate’s dashboard, this one you’ll be getting directly from the Amazon shopping site.
When you’re logged in to your associates account, you’ll notice something called SiteStripe at the top of the regular Amazon shopping site and this is where you’d go to create all your regular Amazon product links but you can also get a small one-product native ad from here too.
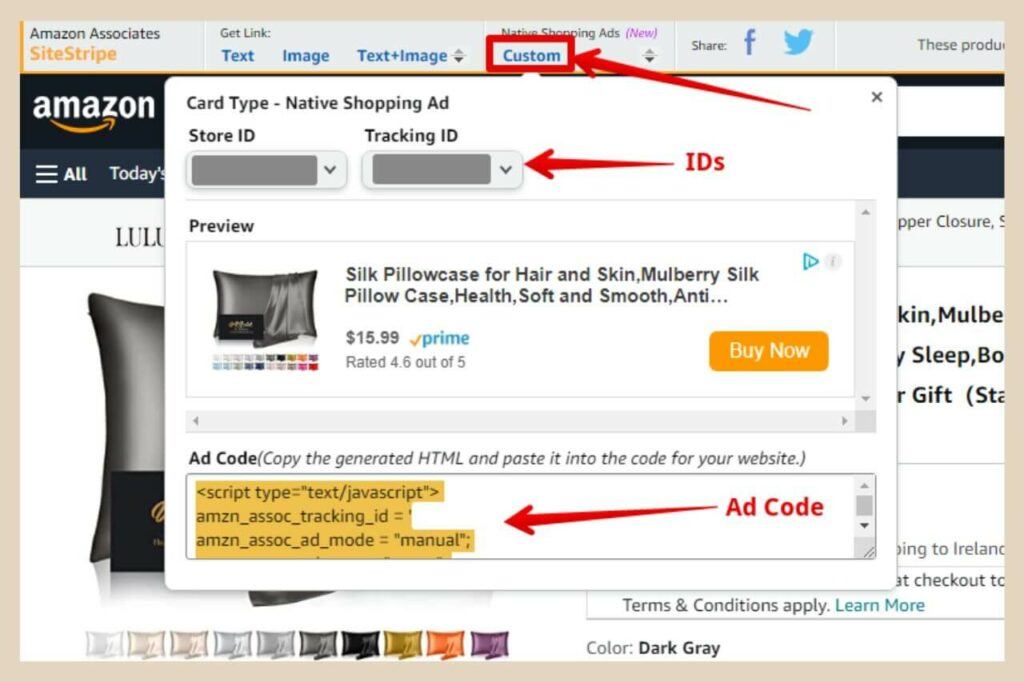
To do this, simply find the product you’d like to create a native shopping ad for then while on the product page, click “Custom” under the native shopping ads section of SiteStripe.
A small window will appear with a preview of the ad, your store ID and tracking ID (which you can change if you have more than one) and the ad code which you can now copy and paste into a HTML block within your post.
Do Amazon Native Shopping Ads Work In Other Countries
Unfortunately, no. Amazon native shopping ads are only available on the US (.com) affiliate dashboard and are only visible to your US visitors.
Even if you’ve set up global earnings with Amazon OneLink, it won’t make a difference because no one else in the world outside of the US will be able to see them.

advertisement
There was a time when Amazon UK had them and there were talks of them being added to Amazon CA but unfortunately, this is no longer the case and instead, they’re now only an Amazon US feature.
This is a little problematic for non-US affiliates because you won’t be able to see them on your site, not even as a preview in the WordPress editor.
A Work Around For All The Non-US Amazon Affiliates
I’m not in the US but up until this change, I was able to see the native shopping ads that I added because I would be shown a UK version. Now that things have changed, I can no longer see what I’ve added to my site and this doesn’t work well for me.

You could in theory just add them and hope for the best but personally, I don’t like leaving things to chance so there is a little work around here and it involves using a VPN (Virtual Private Network).
A VPN will hide your real IP address and show one from a country you’ve chosen so that you can see content that is usually only viewable to visitors who reside in that country.
They Are Legal – For Most Of Us
Just in case you’re wondering, they’re perfectly legal in most of the world because their prime use is for security purposes.
That being said, some countries have banned them, like Iraq and North Korea, for example, so there’s no harm in checking your country first just to make sure you can use one.
As much as people use them for security reasons, if we’re being honest here, many use them to stream content from streaming services in other countries. Have you seen how much more content Netflix US has compared to the rest of the world? I’m just saying.
Anyway, I don’t use one very often because they can slow down your internet speed and mine is shockingly slow at the best of times. However, I do have a free one set up on my laptop that I can turn on briefly whenever I want to check things of an affiliate link nature.
Using A VPN
I use PrivadoVPN which according to several authority sites is the best free one out there right now (free ones can be a little iffy if you choose the wrong one).
They do have a paid version if you plan on using more than the free versions 10GB a month but if you’re going to pay for one then I would also look at some of the top ones like NordVPN or ExpressVPN as well.
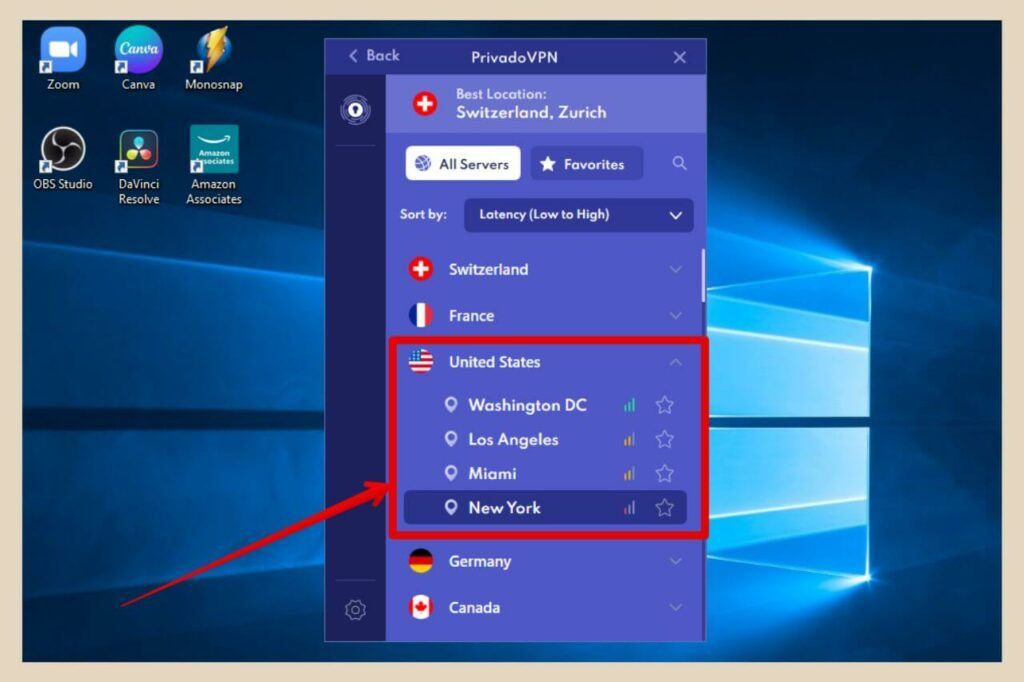
So to check how your native shopping ads look, simply turn your VPN on and pick any of the US servers so that it looks like your location is in the US because you’re using a US IP Address. The image above is an example of the type of server options you get with a VPN.
You may need to clear your cache first for the VPN to work or alternatively, if you have another internet browser that you’ve never used before, you could use that instead.
You can now head to your WordPress editor, add or reposition your ad unit whilst being able to see it and when you’re finished, turn off your VPN and carry on as normal. It’s a bit of a pain but it’s well worth it for the extra clicks.
Many people just stick to recommendation ads and use a plugin like Ad Inserter so that they only have to add the code once and set it to show up on every single post across their entire site automatically.
If you choose that route, you’d only have to check your site once with the VPN to make sure that they’re working so that’s another option.
Download The Amazon Associates App To Your Desktop
Just in case you’re not aware, there is actually an Amazon associates app that you can download straight to your desktop and the dashboard is exactly the same as the one you’d see in your browser.

To do this, you need to be on your Amazon associate’s dashboard. If you look at the address bar at the top of the page, you should notice a little icon on the right-hand side of the bar that looks like a little computer with a downward-facing arrow on it.
If you hover over it, it should say “Install Amazon Associates”. All you need to do is click that icon and the Amazon Associate App will be downloaded straight to your desktop.
If you have several Amazon associate accounts across different countries, you can access all of them from within the app by using the country drop-down menu in the same way that you would in your browser.
Let’s Add Those Native Shopping Ads
Amazon native shopping ads are an excellent way to give your readers more product options so they’re well worth adding for all Amazon associates, even those associates (like me) who can’t see them.
I hope you’ve found this post helpful but if you need any help or just feel like sharing your own stories, please feel free to do so in the comments below.

You May Also Like
- How To Display Recent Posts With Thumbnails In WordPress
- How To Add An Affiliate Disclosure To Your Posts
- What Is Wealthy Affiliate – Everything You Need To Know

