If you’re wondering how to add social media buttons to WordPress then you’ve come to the right place.
It’s a really easy and quick thing to do by just adding a simple and lightweight plugin that will add both social share buttons and social follow buttons to your site.
For this tutorial, we’re going to use the free plugin Sassy Social Share.
Why Should You Add Social Media Buttons
Whether you’re looking to add social share buttons or social follow buttons, both can add value to your website. Social share buttons give your visitors the option to share your content on their own social media platforms and that can bring a whole lot of extra traffic to your site.
It’s a great way to get your content out to a much bigger audience because now your reader’s followers will see your content and if they also share it, that’s an even bigger audience again.
Social follow buttons are also just as valuable. If your reader really enjoys your content and decides to follow you on social media, then that’s an added opportunity for them to see all your future posts.
Install The Sassy Social Share Plugin
The first thing you’ll need to do is install the Sassy Social Share plugin. From within your WordPress back office, click Plugins, then click Add New. From here you’ll need to type Sassy Social Share into the search box and it should be the first one displayed.
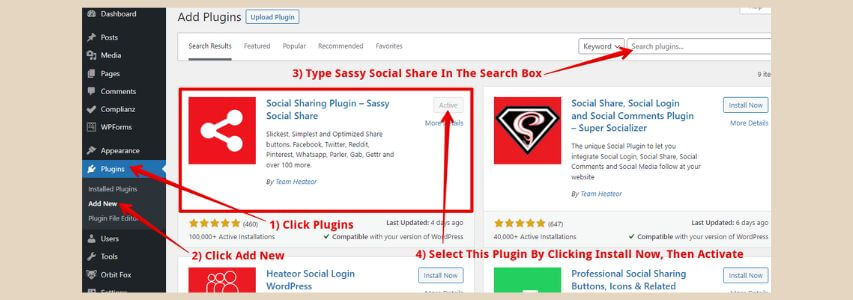
It’s by Team Heateor but you may notice a few similar plugins made by the same people so look for the one that looks like the image above. You’ll now need to install it and then activate it.
Once installed, you’ll be able to access it from either below the plugin in the plugins section or directly from the Sassy Social Share link that has now been added to the main WordPress menu.
How To Use The Sassy Social Share Plugin
When you select Sassy Social from the menu, you’ll notice that five other submenus appear. For the sake of set-up, you’ll only need to use the first one, “Sassy Social Share”.
The other four submenus require either add-ons or upgrading to one of the paid versions and in all honesty, you don’t really need to. The free version is more than adequate for getting your website set up with social share and follow buttons.
How To Add Social Media Share Buttons
The submenu you’ll need to set up is the “Sassy Social Share” menu which is where you’ll choose your social media buttons, their shape and size and where they’ll appear on your site.
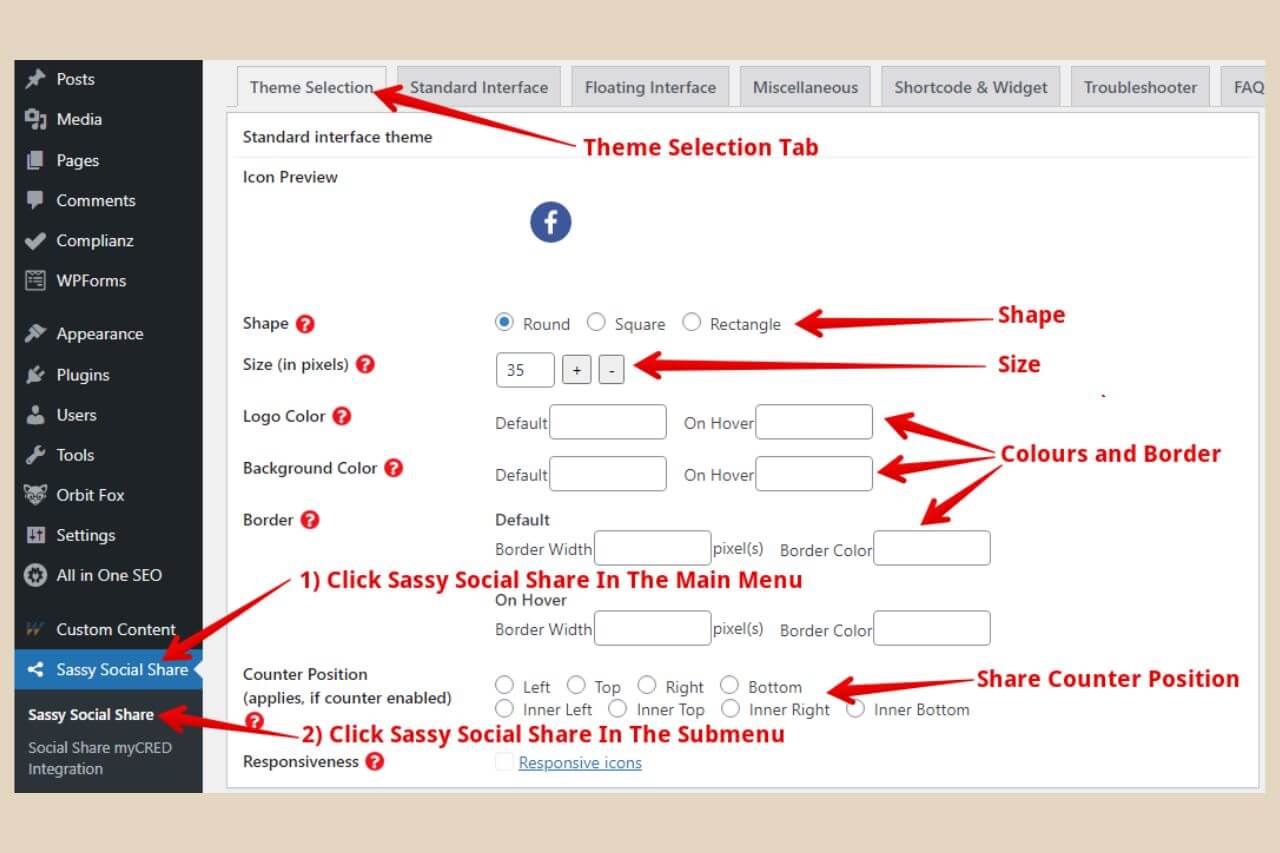
The first tab in this menu is Theme Selection and here you can choose your icon shape and size for both the standard interface (the buttons that don’t move) and the floating interface (the buttons that float and move with you as you scroll).
You can also change the icon colours and borders too if you like but I tend to leave these blank which keeps the icon’s default appearance.
If you choose to show the share counter from the other tabs, you can choose its position here. Once you’re finished, make sure you click the save changes button at the bottom of the page before moving to the next tab.
The Standard Interface Tab
The next tab is the Standard Interface tab and this is for the buttons that remain stationary on your site, above or below your content for example. It looks a little messy, but don’t worry, it’s pretty easy to set up.

The first thing you’ll need to do is ensure the “Enable Standard Sharing Interface” checkbox is ticked if you want the stationary buttons to appear on your site. You’ll also need to select the target URL which is the URL that will be shared when someone clicks the share button.
In my case, I have mine set to “Url of the webpage where icons are located” which is the default as I want readers to share the post they’re actually reading. You can also put a title above your social icons too if you wish.
There are a couple of premium layout options below this section which you need to upgrade to use so you can ignore these and scroll down until you see the large selection of social media checkboxes.
Choose Your Social Media Icons
From here you can tick the boxes for all the stationary social share buttons you’d like to add to your site. You can also add Like, Share, Tweet and Pin It buttons too and you can rearrange the order of the buttons by dragging and dropping them as per the image below.
There are a few more settings below this where you can change the horizontal alignment, where the button show (pages, posts, etc) and where on the page/post they show (above content, below content or both).
There’s also the ability to enable a share pop-up window, show share count, show total shares and enable or disable the more button (give readers the ability to pick another social platform that isn’t one of your chosen buttons). Again, remember to click save changes when you’re done.
The Floating Interface Tab
The third tab is the Floating Interface tab and this is for the floating buttons that move with you as you scroll. This tab is almost identical to the standard interface tab so just set it up as you did before on the standard tab if you’d like floating buttons as well.
Just remember to check or uncheck the Enable Interface checkbox at the top of both tabs depending on if you want both floating and standard buttons or just one type and click save changes at the bottom of the page when you’re done.
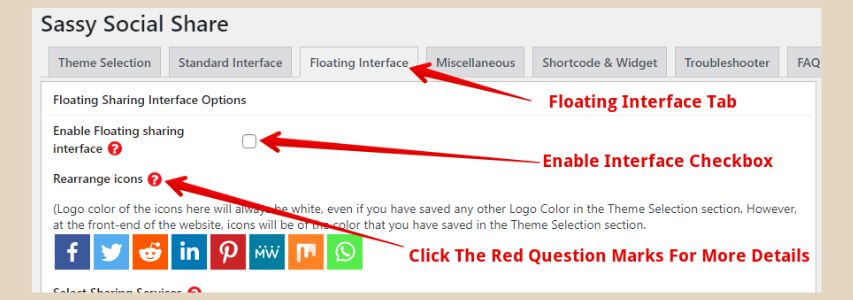
If you’re unsure about what any section does, you can click the red question marks for each area, like the image above and it will give you more details about what the section controls.
There are three other tabs plus an FAQ tab but you shouldn’t need to change anything else here, plus some of the options on these tabs are for the paid version only.
How To Add Social Media Follow Buttons
If you’d like to add social follow buttons to your site, you can also do this with the Sassy Social Share Follow Widget.
Some themes will already have this feature built-in like GeneratePress for example which is the theme I’m using. However, as I need the plugin anyway for the social share buttons, I’m using Sassy’s follow buttons instead because I prefer the way they look, the Instagram one in particular.

To get started, simply head to the Appearance menu in your WordPress back office and then the Widget submenu. From here, you’ll need to select the widget area where you’d like to place your follow buttons.
Choose Your Widget Area
I currently have mine in three different areas, on the right in the Top Bar, below my Recent Posts With Thumbnails Widget in the Sidebar and in the middle of the Footer area.
Once you’ve selected where you like to add them, click the down arrow to expand the widget area if it isn’t expanded already.
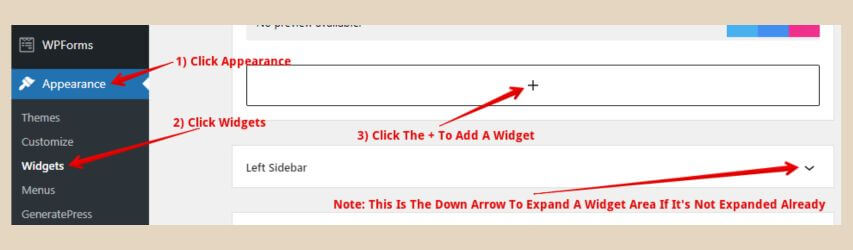
Next, click the + button (it says add block when you hover over it) to add a new block to the area. A small window will appear that will have a small selection of blocks/widgets to choose from.
You can now either enter Sassy Social into the search box at the top of the window or click the Browse All button at the bottom to display the full list of blocks/widgets available and search from there.
You’ll need the “Sassy Social Share – Follow Icons” widget so once you find it, click it to add it to the widget area. If the widget isn’t open automatically, click on it to open it up.
You can now add all your social media URLs to the corresponding boxes as well as change alignment, icon size, icon shape, etc and give the widget a title like Follow Me.
Once you’ve finished making your changes, click the Update button on the top right of the page to publish your brand new follow buttons.
Ta Da, You’re Ready To Be Shared And Followed
And that’s all there is to it. I hope you found this tutorial easy to follow and I hope you enjoy your brand-new buttons.
If you do come across any issues or need help with something, please let me know in the comments below, and I’ll try my best to help you out.

Helpful Guides to Read Next
These beginner-friendly guides will help you keep building your blog step by step.

Jessie
Founder, nomorerush.com
Hi, I’m Jessie — founder of No More Rush. I help beginners build profitable, beginner-friendly blogs without the overwhelm or unrealistic expectations you see online. Everything here is built around simple, structured steps so you always know what to do next.