Are you looking for a simple, easy-to-use AI image generator? Well, look no further than Freepik. In this post, I’m going to show you how to use Freepik AI image generator to create your very own unique AI images.
Although I use several free AI image generators, the Freepik AI image generator has to be one of the simplest ones to use and with its free plan, you can create up to 40 images a day which resets daily.
Each prompt will generate 4 images at a time so technically that’s 10 prompts daily and you can even use your images commercially.
Freepik has always been a very handy tool for bloggers like me with its vast collection of images, videos, icons and vectors (many of them free to use) and it even has its own Canva-like editor.
And now with the addition of its very own AI image generator, it’s become even handier. So sit back and enjoy this simple tutorial because AI image generating doesn’t get much easier than this.
How To Use Freepik AI Image Generator
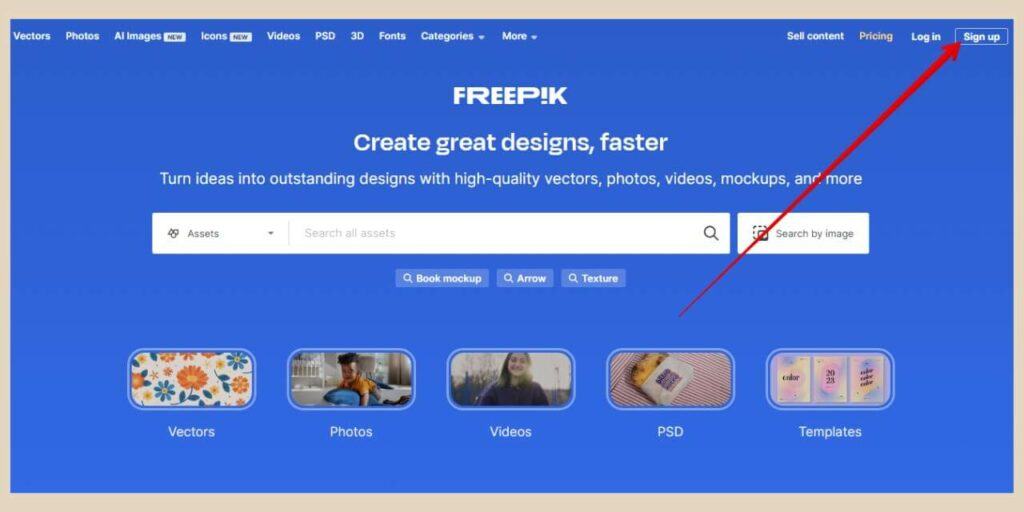
To get started, head over to Freepik and start by clicking on the Sign Up button in the top right-hand corner of the screen.
From here you can sign up using your Email, Facebook or Google account and once you’re signed in, you’ll be taken back to the Freepik homepage.
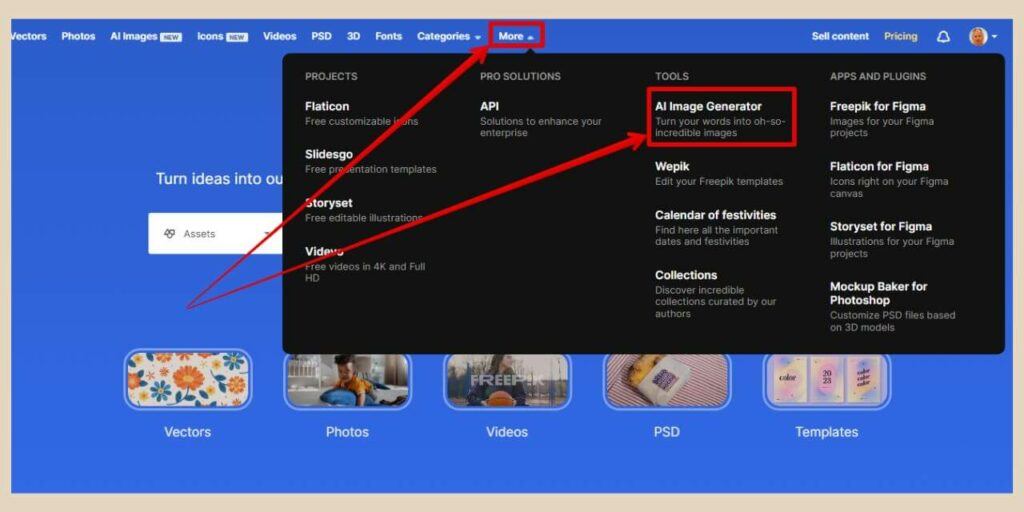
To get to the AI Image Generator, click the More button in the main menu at the top of the screen and when the new options appear, click the AI Image Generator option which will take you to the AI image generator page.
If you don’t sign up/sign in first and try heading straight to the AI image generator instead, you’ll actually end up in a weird loop.
This is because you always end up back at the Freepik homepage after signing in/signing up even if you were already on the AI image generator page when the sign up/sign in was triggered.
It’s a bit random and annoying so to save yourself from wasting five minutes of your time typing in your prompt and choosing a style, etc, only to be prompted to sign up and then sent straight back to the homepage where you have to start all over again, get the sign up part done first.
Describe Your Image
Once you’re on the AI Image Generator page, start by typing in a description of the image you’d like to generate using the large prompt box in the middle of the screen.
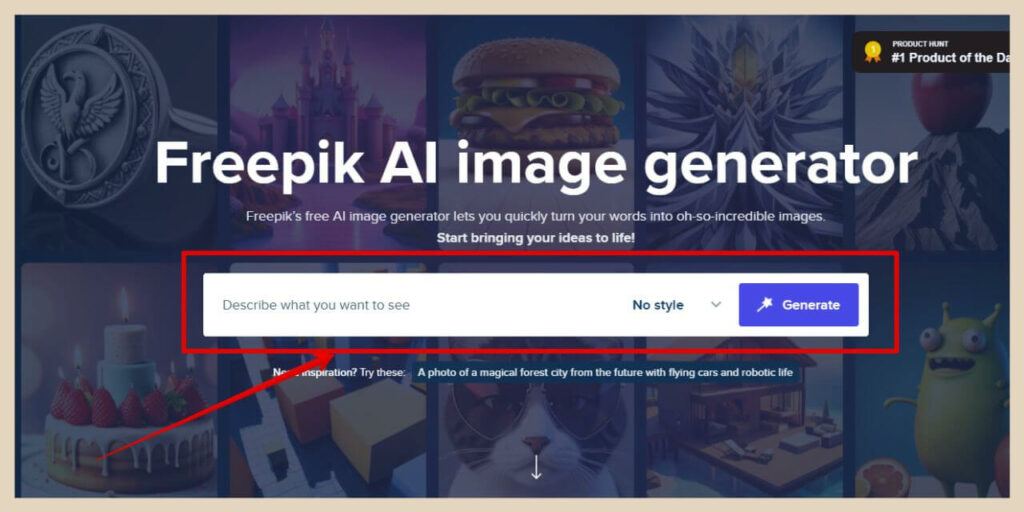
On the right-hand side of the prompt box, you’ll find a Styles dropdown box which you can use to choose a particular style for the images you’re about to generate.
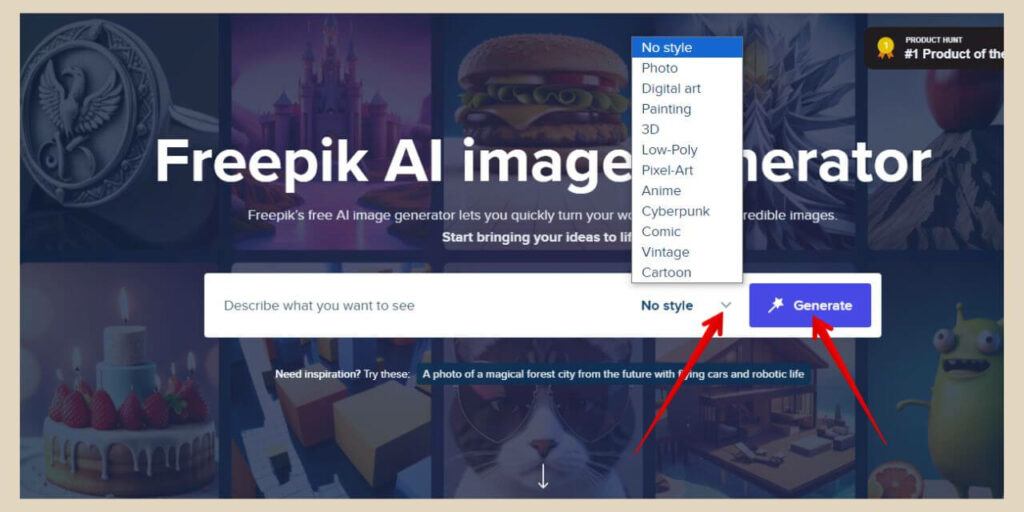
If you leave it set to “no style”, it will generate random styles of images but if you want something more specific like Photo, Painting, Cartoon, etc, simply click on the dropdown arrow to make your selection.
Then, once you’re ready, click the Generate button and this will take you to the AI image editor page where 4 images will be generated based on your prompt.
Using The Freepik AI Image Editor
Within the Freepik AI image editor, as well as the 4 image results and a prompt box near the top of the screen, you’ll also have more style options here for your next image generations and you’ll have some aspect ratio options too.
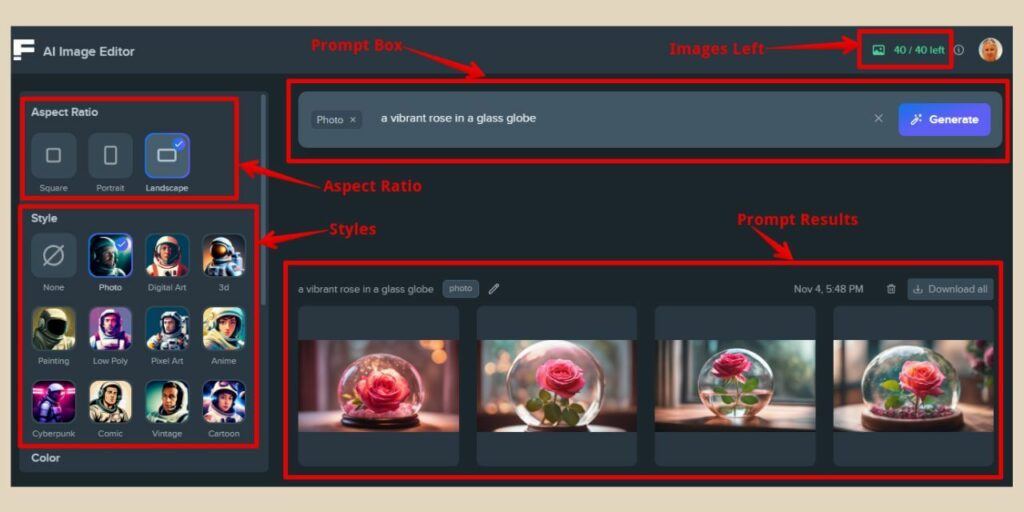
As I mentioned at the start of this post, you’ll get 40 images a day (10 prompts) but you’ve just used up 4 images (1 prompt) to get into the editor before getting the full image options.
So, with that in mind, it’s not a bad idea to bookmark the AI image editor page so that you can get straight to it going forward and get the full style and aspect ratio options right from the get-go.
By the way, you can always see how many images you have left for the day in the top right-hand corner of the editor and these will reset every 24 hours from the time of day when you first started using it.
So, the first option here on the left-hand side of the editor is the Aspect Ratio and you can choose between square, profile or landscape.
Beneath this is the main styles option area which has the same styles as the dropdown menu you used initially so Photo, Painting, etc.
Choosing Your Colour, Lighting And Framing Options
Directly beneath this is the Colour options area where you can choose between Black and white, Vibrant, Pastel, and so on for your image colour settings. (Use the arrow on the right of the options to scroll to see more).
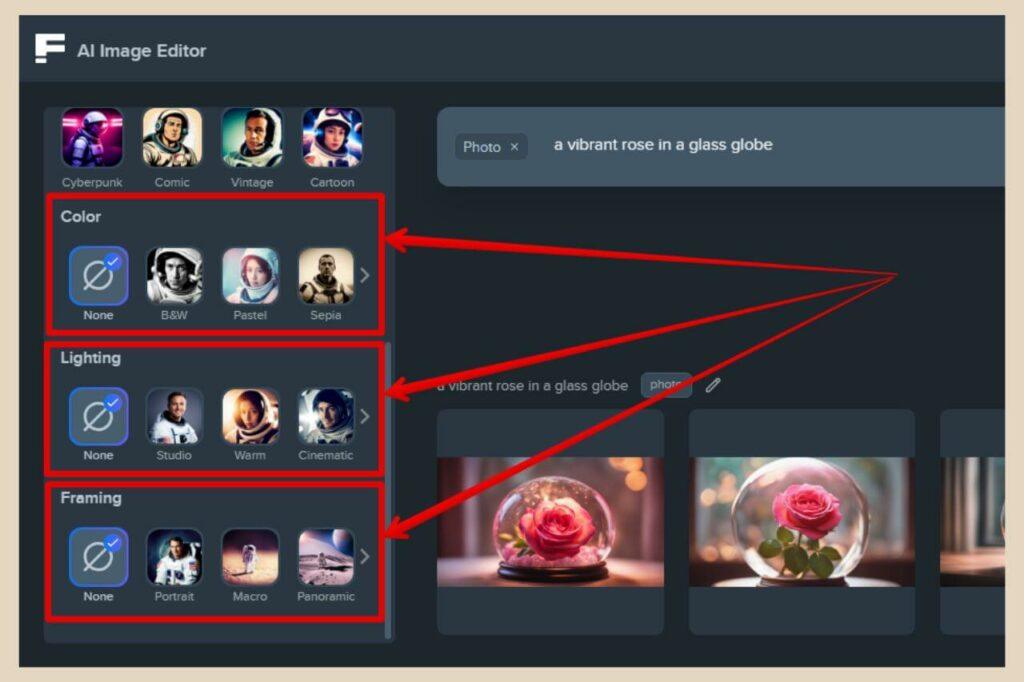
The next option down is the Lighting options and this gives you the ability to add lighting styles such as Studio, Cinematic, Warm, etc to the images you’re about to generate.
Lastly, there are the Framing options which give you the ability to change the framing to Panoramic, Aerial View, Close Up, etc depending on the look you want for your images.
All of these settings are set to none by default so choose the settings you’d like to use for your images and click the Generate button to the right of the prompt box to generate your next set of images.
And of course, change the prompt if you want to generate something different this time around.
Image Options
Once your images are generated, you’ll see a small selection of details across the top of each set of results starting with the prompt and styles/settings used to create that set of images.
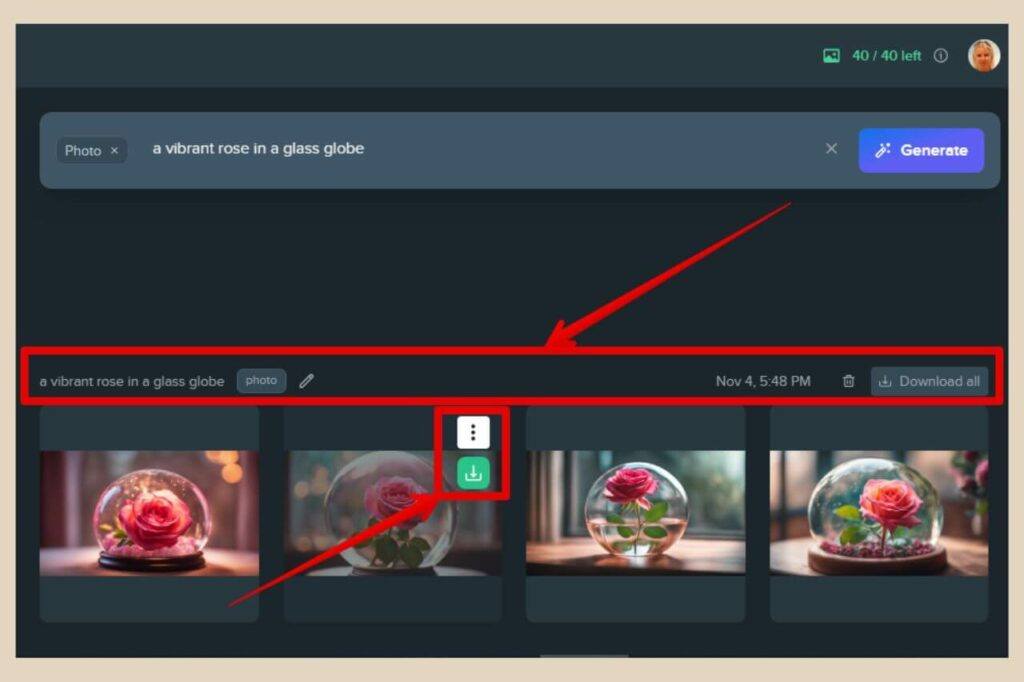
Next to this, you’ll see a little pencil icon which is the Use This Prompt icon if you want to reuse the same prompt again to get similar images.
This is followed by the date and time that the images were created, then a trash can icon to delete the set of 4 images and a Download All button to download the set of 4 images.
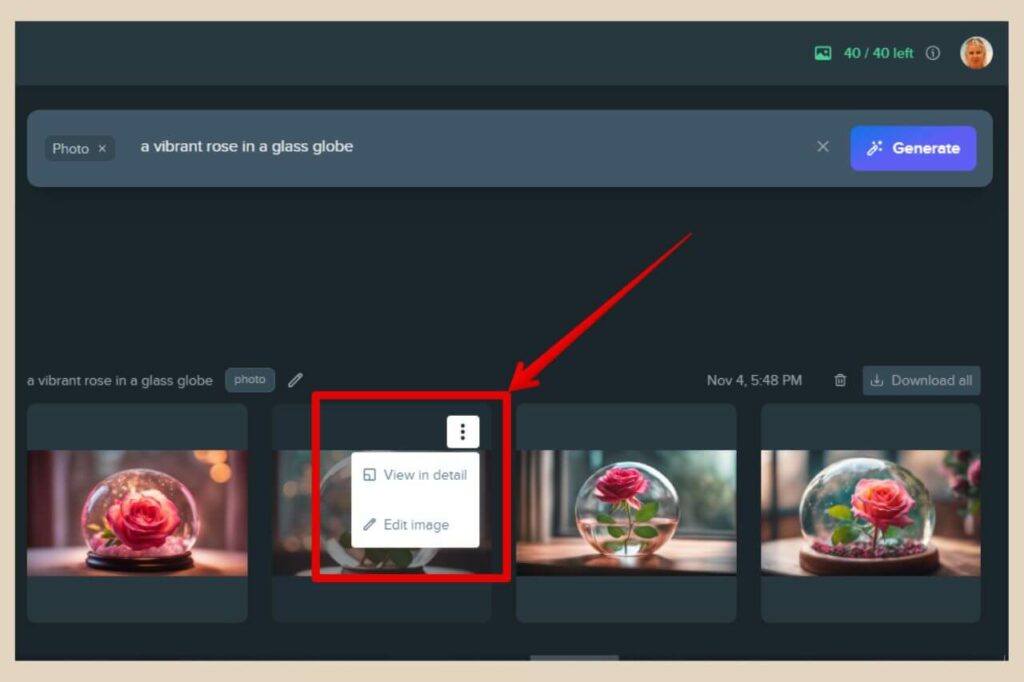
If you hover over one of the images, you’ll see a download icon to download that particular image only and a button with 3 dots which will give you 2 more options.
These 2 options will let you either View in Detail which opens up the image in a larger pop-up window or Edit Image which opens the image in the regular Freepik editor which is similar to Canva.
You can also click on an image to open it up in a larger pop-up window (same as View in Detail) and from here, you’ll see the same Download and Edit icons as before.
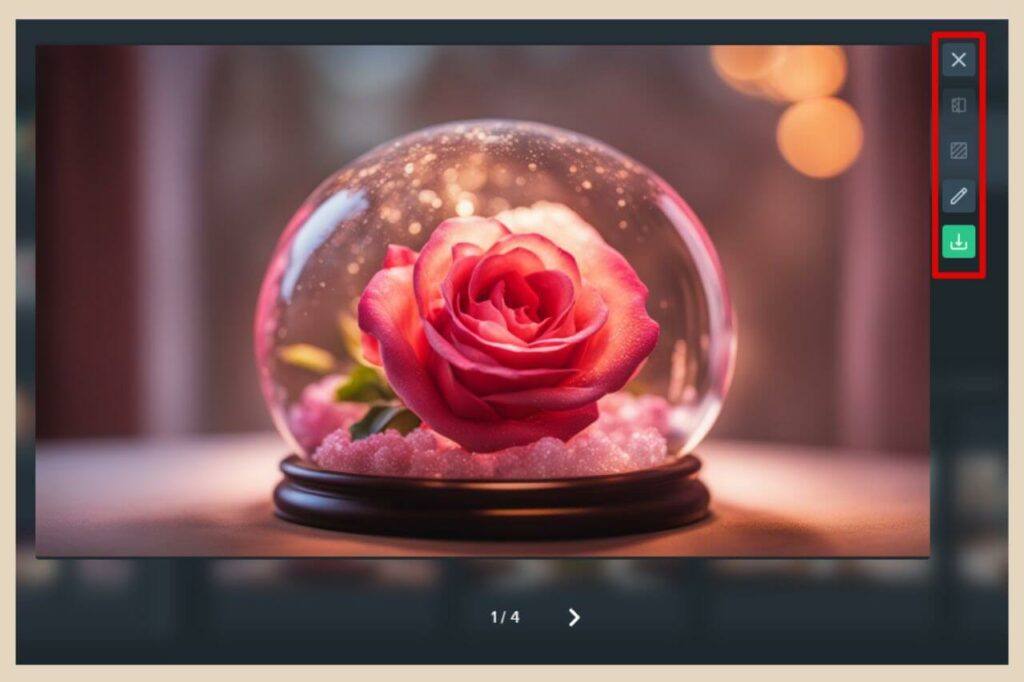
You’ll also notice 2 greyed-out options which are coming soon and they are the Remove Background option (you can actually remove the background in the regular Freepik editor) and the Outpainting option (extending an image).
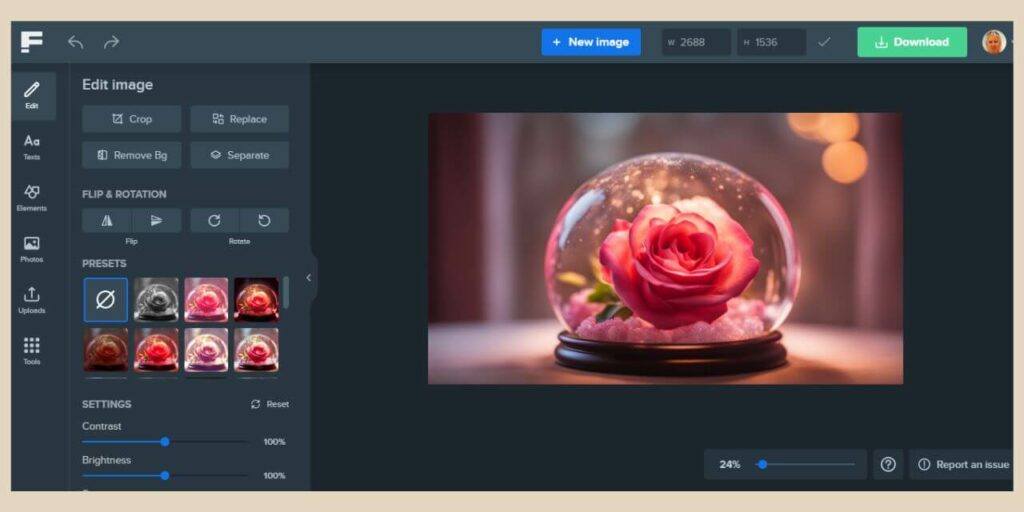
And if you choose to edit the image in the regular Freepik editor, you’ll be able to adjust the image settings, add preset filters, add other images, add elements and add text just like you can in Canva.
Let’s Get AI Image Creating In Freepik
And there you have it, it doesn’t get much easier than that. Freepik is one of the simplest and most straightforward to use image generators and that’s because it doesn’t really have any other tools other than the image generator itself.
If you’re looking for something with more options and tools like inpainting, outpainting, samplers, etc, then you may prefer to check out this Playground AI tutorial or this Leonardo AI tutorial instead.
But if it’s just a simple image generator that you need with no bells and whistles, then you can’t go wrong with the likes of Freepik to get you started with AI image creation.
So, why not give Freepik a try yourself and see what kinds of images you can generate? Once you get the hang of it, you may never need another stock image again.
I hope you’ve found this tutorial helpful and if you’d like to share your own AI image-generating stories, then please feel free to do so in the comments below. I’d love to hear all about them.
Happy Freepiking!

You May Also Like
- Is Microsoft Copilot (Bing Chat) Good For Bloggers
- Is ChatGPT Or Bard (Gemini) Better For Bloggers
- How To Use Google Bard For Epic Blogging

