Do you want to create your own AI images for free? Well, in this tutorial, I’m going to show you how to use OpenArt AI to generate your own AI images using their free plan.
It’s super simple to use and it’s up there with some of my favourite free AI image-generating tools.
So whether you’re looking to create images for your content or social media posts or just for a bit of fun, OpenArt AI is a great way to create your own unique imagery for all your creative needs.
So, let’s get straight into this and look at what we can do with OpenArt AI and how to use it to generate awesome images.
How To Use OpenArt AI
OpenArt AI is a little bit of a contradiction as a free AI image generator in that as a free user you can’t use most of the tools.
However, what you can do is create unlimited AI images because there’s no daily limit like many other platforms.
You’ll be limited to only four basic models but once you get the hang of things, you can still produce really good images and as many of them as you like.
Unfortunately, you need to upgrade to use the rest of the models and tools including the edit options but when you first sign up, you’ll get 50 free credits to use on all the premium features.
You can also get another 100 free credits by joining their Discord if you want to try out the premium tools even more but if you’re only looking to generate images then OpenArt AI is a great tool with its unlimited image generation.

So, to get started, head over to OpenArt AI and click the Start Creating Now button in the top right corner. From here, you’ll be taken to the homepage where you’ll now need to sign up.
To do this, you can click on the profile icon in the top right corner of the screen and then the Sign In option from the menu that appears.
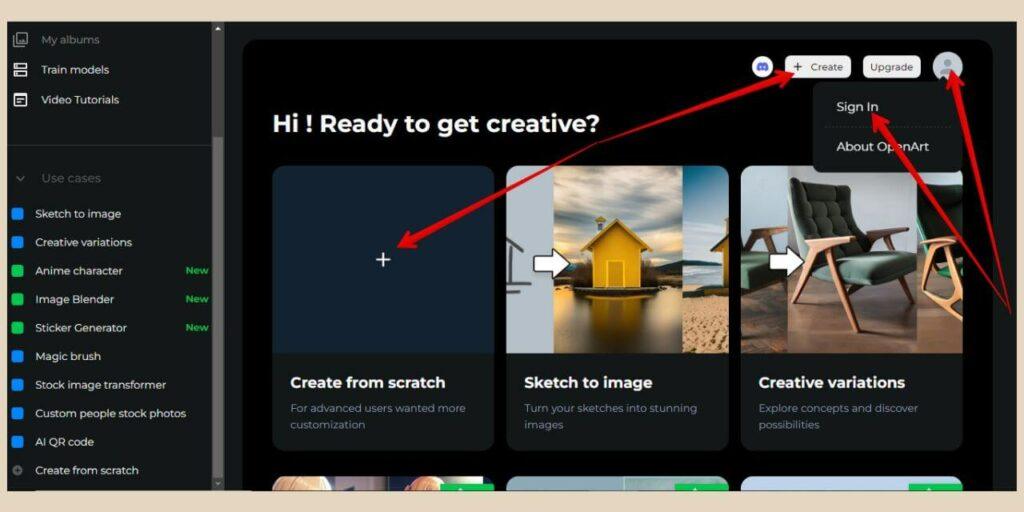
Alternatively, you can click the Create button or the Create From Scratch option which will ask you to sign up before you get started.
You can then sign up using your Discord or Google account and once you’re signed in, you can start creating your own AI images.
How To Create AI Images In OpenArt AI
If you’re not already on the image generation page, you can access it from the Create button or the Create From Scratch option mentioned above.
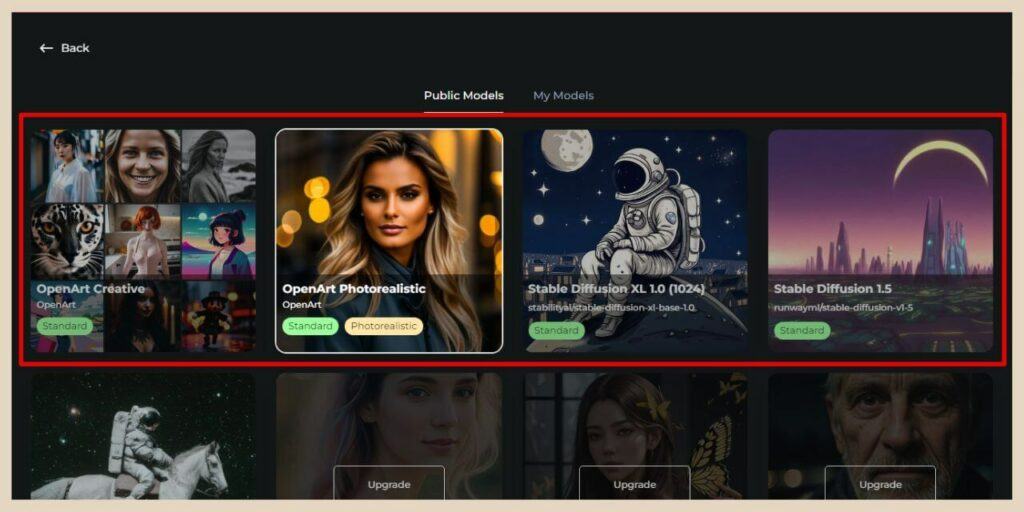
Once you’re on the page, the very first thing you can do is change the model so click the Switch button to open up the models area and select your model of choice.
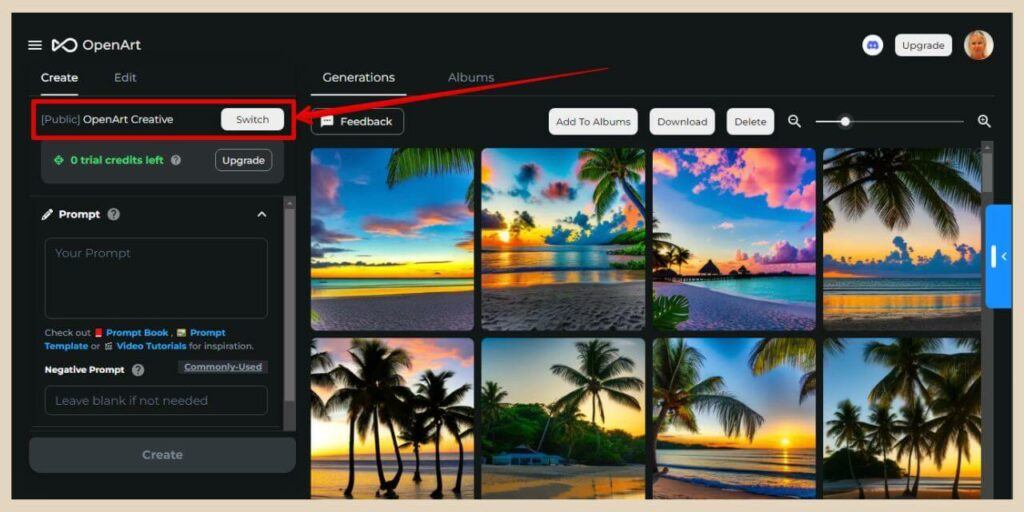
As a free user, you can only use the top four models although Stable Diffusion 1.5 can only be used with a 512 x 512 (1:1) aspect ratio.
To be honest, I get better image results with either OpenArt Photorealistic or Stable Diffusion XL 1.0 which aren’t restricted by the aspect ratio.
You’ll also have your free credits if you want to try out some of the premium models and you can keep tabs on how many you have left in the Trial Credits area directly underneath the Switch Models area.
Once you’ve selected your model of choice, the next step will be to enter a description of the type of image you’d like to create in the prompt box.
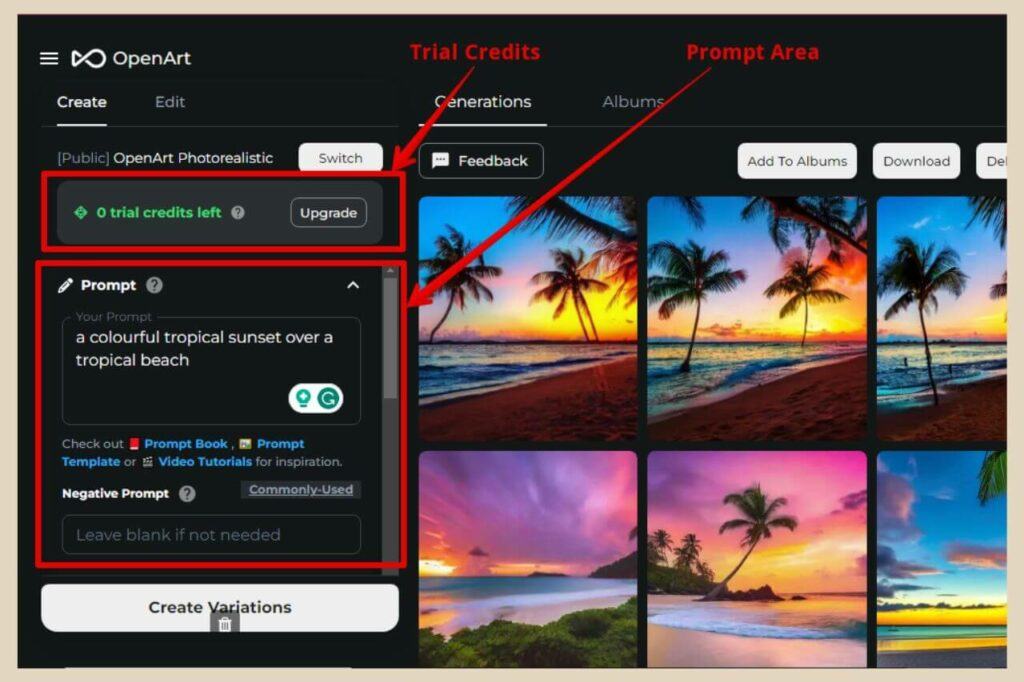
If you need some help with describing your images, you can always use the Prompt Book, Prompt Template or Video Tutorials for inspiration and you’ll find the links to these directly under the prompt box.
You’ll also find a Negative Prompt box and this is where you can add negative prompts which are basically the things that you don’t want to appear in the images.
Prompt Help
One thing I do want to mention is that, unlike many other AI image generators, you won’t find any style options in OpenArt AI so if you want to take your images to the next level, you’ll need to get creative with your prompts.
This is where the Prompt Book and Prompt Templates come in very handy because they give you detailed examples of descriptive prompts as well as the images you’re likely to create using them.
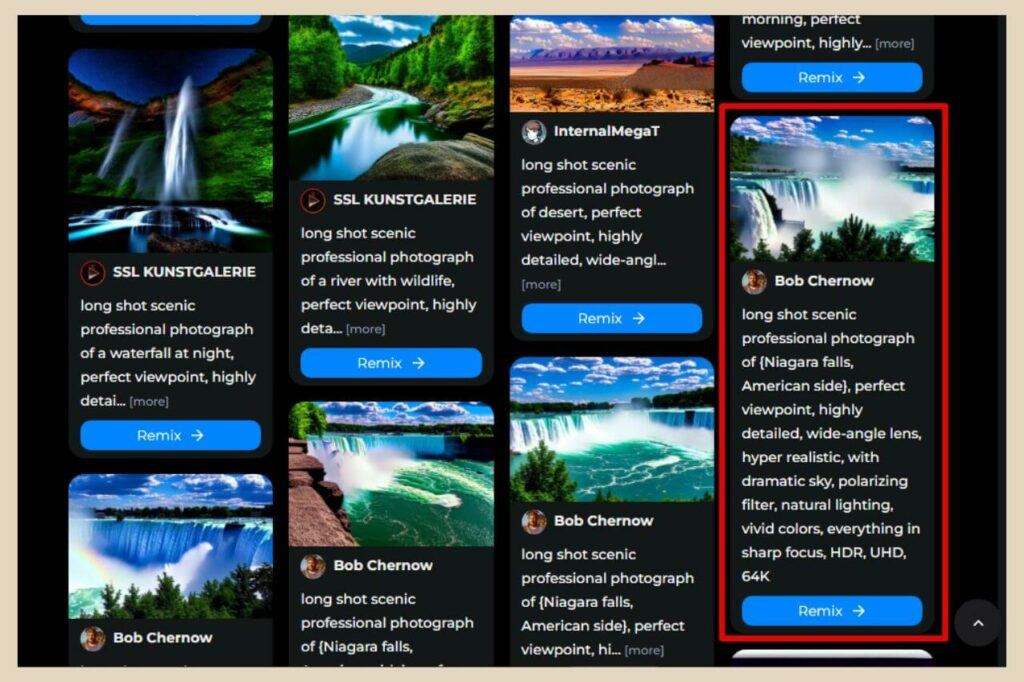
The Prompt Templates in particular are very handy because you can choose the type of images you’d like to create and then view all the prompt samples with images and copy them (or click the Remix button) to use or alter them to your own needs.
The Prompt Book on the other hand teaches you how to write descriptive prompts and includes prompt samples, modifier examples (photography styles, lighting, visual aesthetics, etc) and magic words (4K, 8K, highly detailed, etc) so it’s a great way to learn prompt engineering from scratch.
How To Use Image To Image In OpenArt AI
Below the Prompt area, you’ll find the Image To Image section and this is where you can upload one of your own images as inspiration for the prompt results.
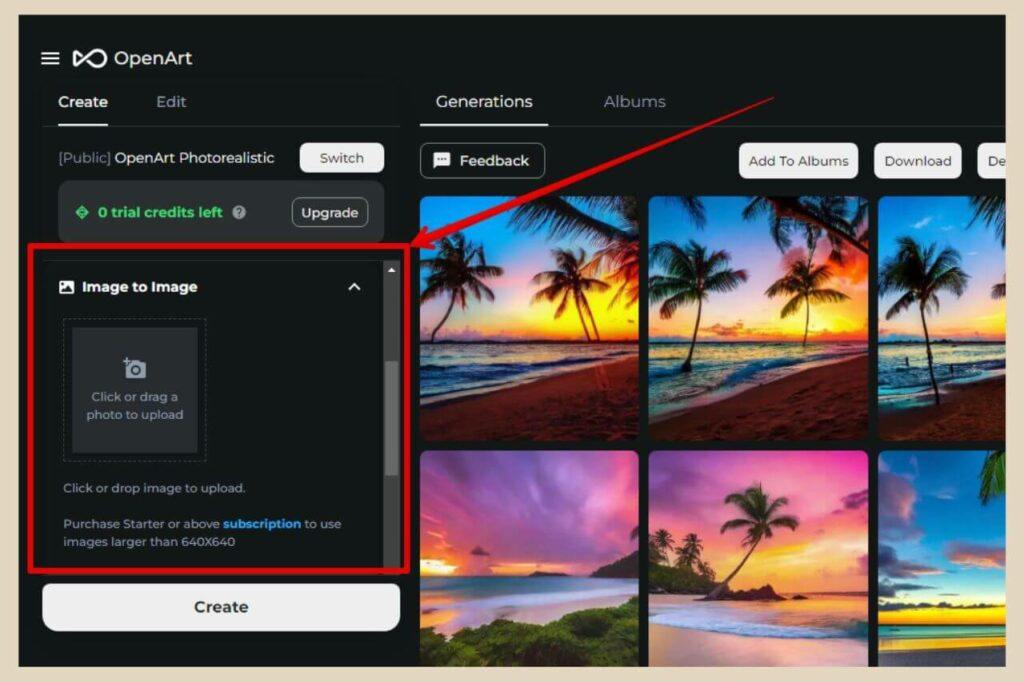
To use Image To Image, simply click on the empty image box to select an image from your device or if you’d like to use one of your previously generated images, you can click on the image and click the Img2Img button (I’ll show you that in a moment) instead.
Once you’ve selected your image, it will now be in the image box and a strength slider will appear beneath it which you can use to adjust how closely or loosely the image you generate looks to the original.
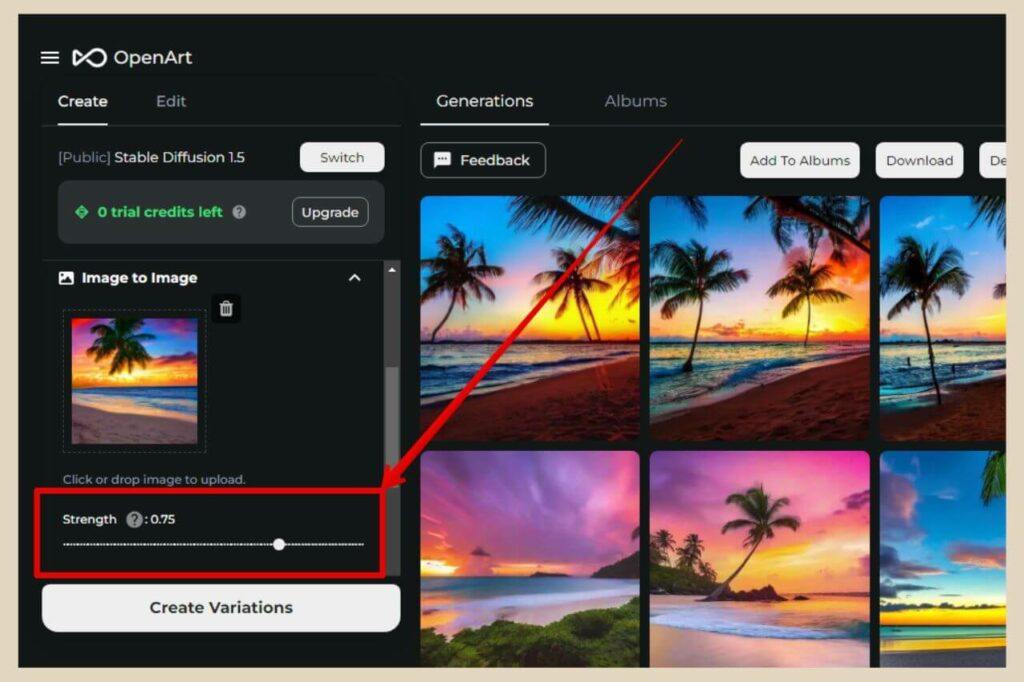
The lower the slider is set, the closer the generated image will look to the original whereas the higher it’s set, the more it will differ.
You can use this on the free plan but it is limited in that you can’t use images larger than 640 x 640 as a free user.
There’s also an area directly beneath this called ControlNet which is essentially a more powerful Image To Image generator.
It lets you use an image as inspiration just like the regular Image To Image tool but you can also copy certain traits like the pose of a person or the depth of objects/elements in the original image.
Unfortunately, though, this is a premium tool only so once your free trial credits are gone, you won’t be able to use it without upgrading.
The Generation Configuration Settings
Below the ControlNet Area, you’ll find the Generation Config area where you’ll be able to make some adjustments to your image generation settings.
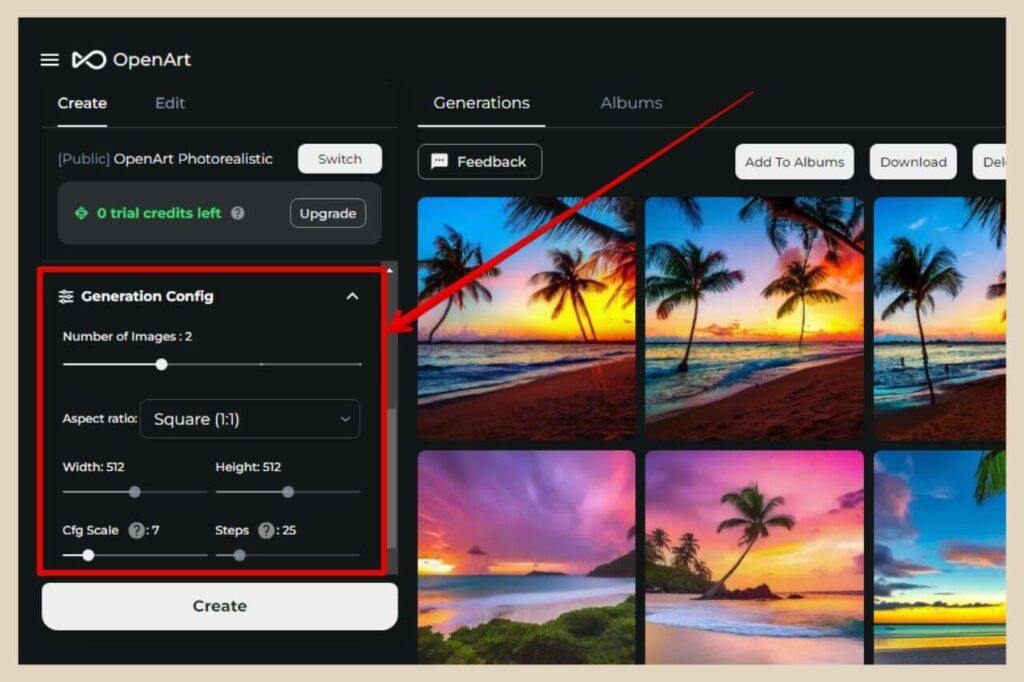
The first option here is how many images you generate at a time and you can use the slider to change between 1 to 4 images with every generation.
Next is the aspect ratio setting. As a free user, you can use the aspect ratio dropdown menu to select your aspect ratio of choice but if you want more custom size options, you’ll need to upgrade to one of the paid plans.
Below this is the Cfg Scale and Steps settings. The Cfg Scale lets you adjust how much the AI sticks to the prompt and by default it’s set for best results so I tend to leave it as is.
The Steps are how long the AI runs before generating the final image and again it’s set for best results although this one is a premium feature so you’d need to be on a paid plan if you did want to change it.
Sampler And Seed
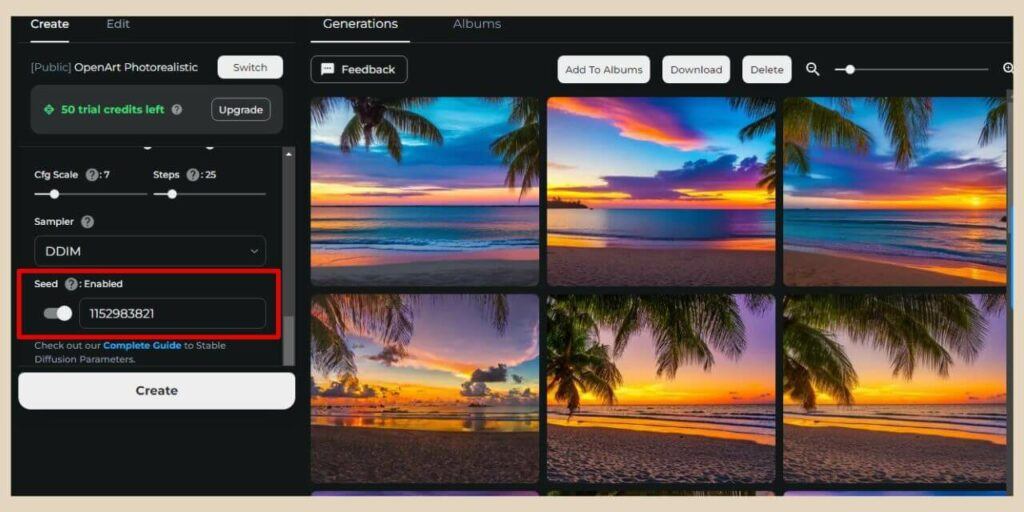
The next settings are the Sampler and Seed settings. Changing the samplers can create subtle differences in the images that you generate although some samplers will have a bigger effect than others.

There are some though where the effect is so subtle, that you might not even notice it at first glance so you may want to play around with these to see their effect.
You will get different sampler options though depending on the model you’re using as some models have a larger selection of samplers to choose from than others.
The Seed setting is a way for you to generate the exact same image again if you keep all the other settings exactly the same or variations of it if you tweak the prompt or other settings.
So say, for instance, you want to try out the different samplers above but you want to generate the exact same image each time so that you can really see the difference the different samples make.
Well, this is where AI image seeds come in. By default, the seed is set to random and that’s how you end up with different results every time you generate images even when you use all the same settings and the same prompt.
However, if you click the toggle just beneath, this will turn off random and you can paste the seed number of an image you like (I’ll show you where to find that in a moment) into the seed number box.
As long as all the other settings are the same, you should be able to generate the exact same image again.
Changing The Seed
You can also make slight alternations to the seed number if you’d like to see similar variations of the original images, for example, changing the first digit or last digit of the seed number.
In the image above, I’ve used the same seed for all three images on the bottom row but I’ve changed the sampler with each one.
As you can see, the two bottom images on the right are almost identical so changing the sampler had a very subtle effect.
The image on the bottom left on the other hand did change much more with that particular sampler so some samplers have a bigger effect than others.
With the three images on the top row, I made slight alterations to the seed number (changing one of the digits) and this is a great way to get variations of an image that you like if you want to see more similar.
Upscale And Enhance
The final settings here are the Upscale and Enhance settings although these are for paid users only. Using the Upscale option will give you the ability to upscale your images by x2 or x4 which makes them 2 or 4 times their original pixel size.
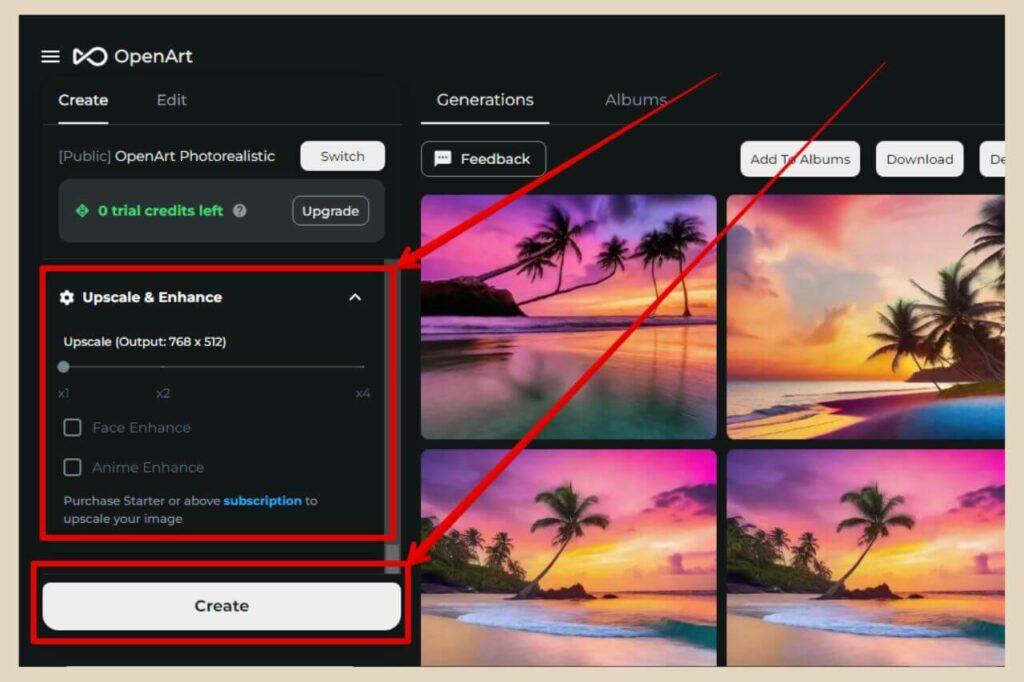
The enhance options allow you to use the Face Enhance option if there’s a face in your image or the Anime Enhance option if your image is an anime image.
And finally, at the very bottom of all the settings, you’ll find the Create button so once you’re happy with all your settings, you can go ahead and click the Create button to generate your first image.
Generated Image Options
Once you’ve generated your images, if you click on one of them, a new window will pop up with a larger version of that image plus the details of all the settings used to create it.
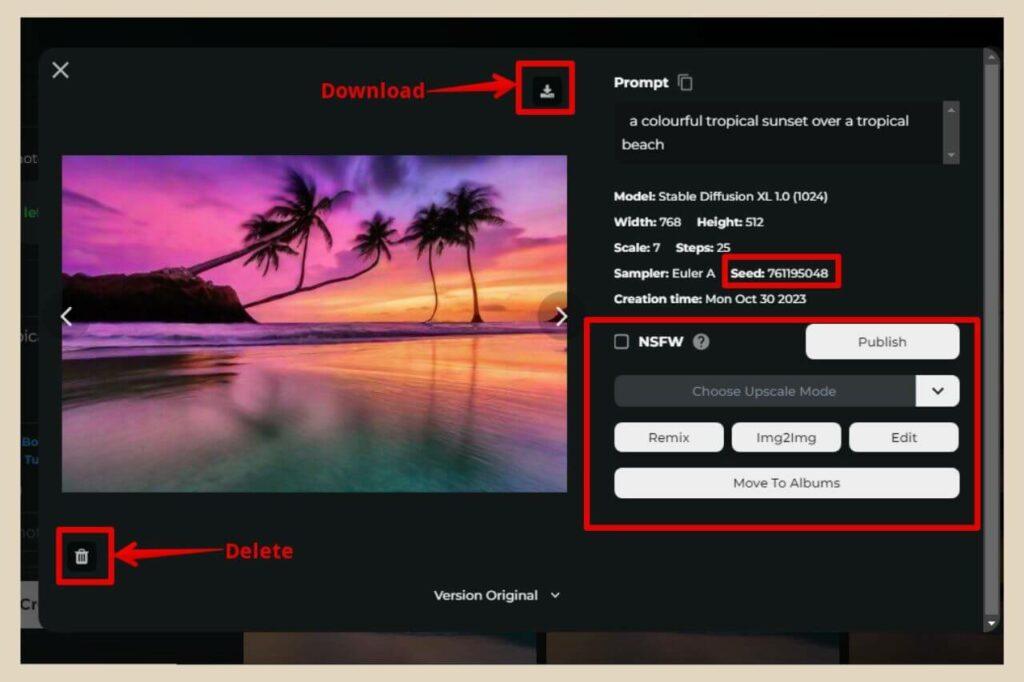
This is where you’ll find all the details including the prompt, model and sampler used as well as the seed number.
Below these details, you’ll also see a few buttons that you can use to do more with your image and they are:
- NSFW Checkbox – stands for “Not Safe For Work” which is any content that is inappropriate or explicit so check this box if that applies to your image.
- Publish – Publish your image to the OpenArt AI platform for others to see.
- Upscale – To upscale your image to a larger pixel size (paid tool).
- Remix – To use the same settings again for your next image (except the same seed).
- Img2Img – To use the image as inspiration in the Image To Image area.
- Edit – To edit your image further (paid tool).
- Move To Albums – Move your image to an album.
You’ll also find a Delete button to delete your image and a Download button to download your image although you’ll also see these two buttons just by hovering over an image as well.
Generation Area Options
You can also bulk download, delete or add to albums from the main image-generating area by using the corresponding buttons directly above the image-generation results.
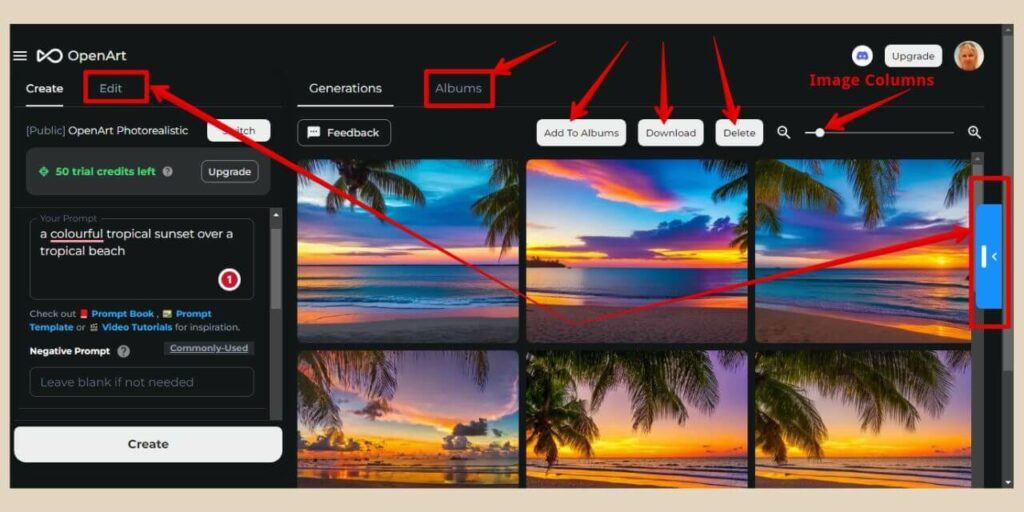
Just click the button for the action you want to take and a small checkbox will appear within each image. From here, select the images you want and click the corresponding button again to complete the action.
If you’re a paid user or using your free trial credits, you can also get to the edit area from here by clicking on either the Edit tab (next to the Create tab on the top left of the screen) or the blue tab on the far middle right of the screen.
If you’d like to create albums to keep your images organised, you can do that by clicking on the Albums tab which is to the right of the Generations tab above all your generated images. From here, you can create and view all your albums.
To change how many columns of images you see in the generation area, you can use the slider to the right of the Delete button (in the image above, mine is set to 3 columns) to increase or decrease the columns to your own liking.
Viewing All Your Images
To view all of your generated images, click on the OpenArt icon in the top left corner of the screen and a new menu will appear. From here you can click the Creation History option to view all of the images you’ve ever created.
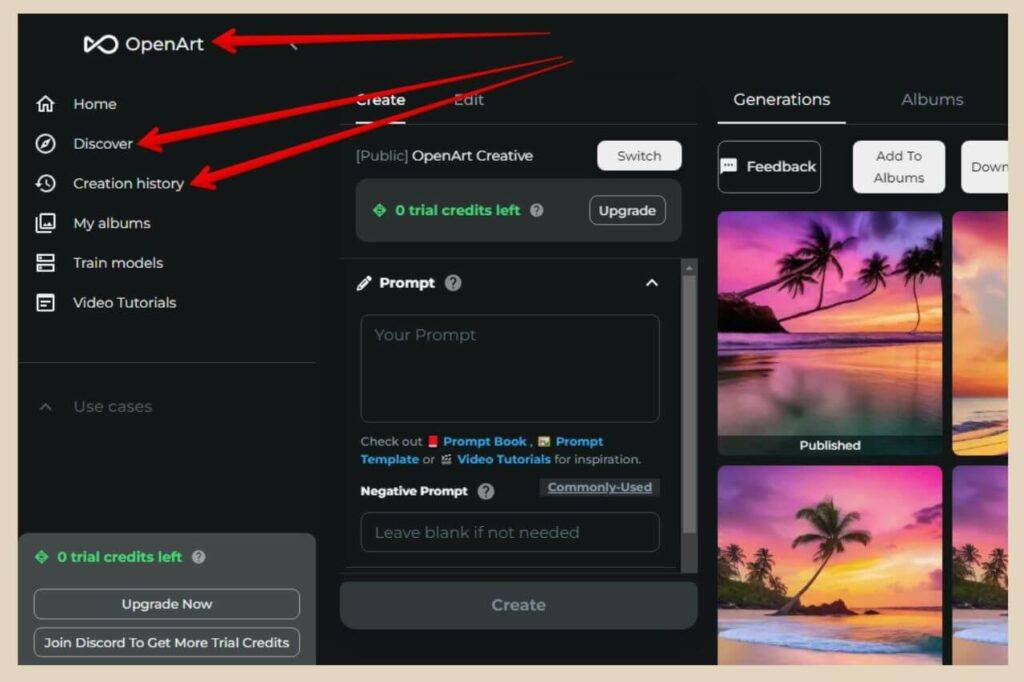
If you’d like to view other people’s creations, just click the Discover option instead to view all the creations other people have published on the platform.
When you click on any of these images, you’ll be able to see all the details of what was used to create them and you can even download or remix them if you want.
You can even train your own AI model here but as with most tools on the OpenArt AI platform, that’s a premium feature for paid users only.
Paid Tools
As I mentioned earlier, as a free user, you can generate as many images as you like until your heart’s content with the four basic models but pretty much every other tool on the platform is a premium tool.
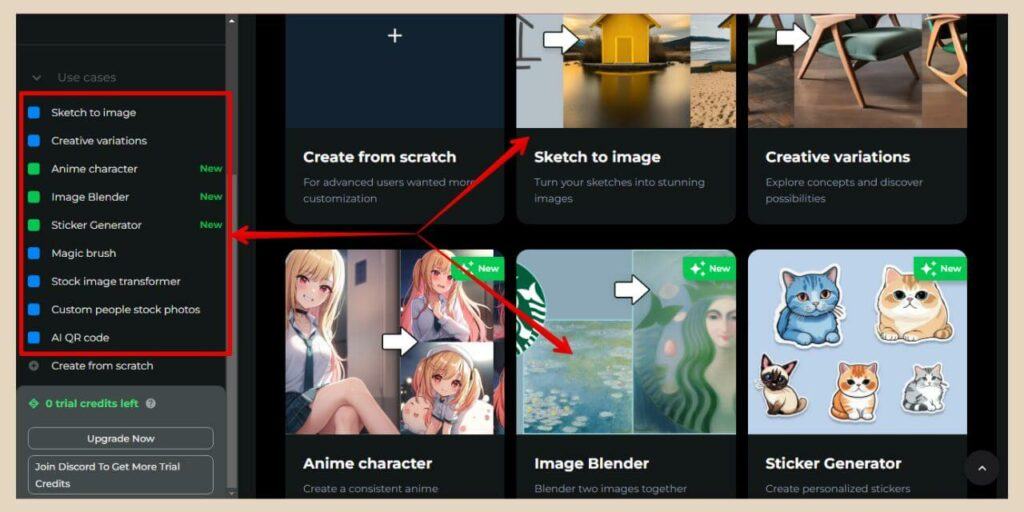
Of course, you can test them all out with your free trial credits, so as well as the premium models, these are the other premium tools that you can try out which you can access from the main menu or the home page.
- Sketch To Image – Upload your own sketches and turn them into AI-generated images.
- Creative Variations – Upload your image and let AI create various interpretations of it.
- Anime Character – Create your own anime character from a picture of yourself or from one of the platform’s characters.
- Image Blender – Mix two images together to create one blended image (this one is very cool and lots of fun).
- Sticker Generator – Create your own stickers with text prompts.
- Magic Brush – Brush over an area of an image and change or add things to it.
- Stock Image Transformer – Upload a stock image and let AI create trailered variations of it.
- Custom People Stock Photos – Create custom people stock images by selecting the type of person, what they’re doing and where they are.
- AI QR Code – Create your own custom QR Codes.
Some of them are pretty cool tools so, if you want to do more than just text-to-image, you’ll need to upgrade to one of the paid plans to continue using them once your free trial credits run out
Let’s Get Image Generating With OpenArt AI
If you’re only looking for an easy image-generating tool, then OpenArt AI is a great one to add to your AI tools arsenal.
It lets you generate an unlimited number of images and although you may need to get a bit more creative with your descriptions, it can generate some pretty epic images once you get the hang of it.
There’s also the added bonus of the Prompt Templates and the Prompt Book so you can literally learn how to write better prompts and test them out with unlimited image generation which is great if you’re a complete beginner.
So why not check out OpenArt AI for yourself and see what kinds of creations you can come up with? You might just master your prompt engineering skills while you’re at it.
I hope you’ve found this tutorial helpful and do feel free to share your own thoughts and experiences with OpenArt AI in the comments below. I’d love to hear your stories and what you think of the platform.
Happy Image Generating!

Helpful Guides to Read Next
These beginner-friendly guides will help you keep building your blog step by step.
- The Best Free AI Image Generators for Bloggers and Creators
- Why Bloggers Love Leonardo AI for Image Creation
- Create Blog Graphics Faster with Adobe Firefly AI
- How to Use AI Image Seeds to Create Perfectly Cohesive Images for Your Blog
- A Beginner’s Guide to AI Samplers: How to Easily Control Your Image Style and Realism

Jessie
Founder, nomorerush.com
Hi, I’m Jessie — founder of No More Rush. I help beginners build profitable, beginner-friendly blogs without the overwhelm or unrealistic expectations you see online. Everything here is built around simple, structured steps so you always know what to do next.