If you’re an Amazon Associate then you’ve probably heard of OneLink but what is Amazon OneLink and how do you set it up?
Becoming an Amazon Associate is pretty easy but if you have traffic from different countries visiting your site, then Amazon OneLink is a feature that you definitely don’t want to miss out on.
It’s a free feature that is relatively straightforward to set up and in this post, I’m going to show you exactly how to do it.
What Is Amazon OneLink
Amazon OneLink is a feature that redirects your international traffic straight to their local Amazon store. It’s an excellent way to increase your earnings as an Amazon Associate because your international visitors will be automatically sent to their own local Amazon site.
They’ll be able to shop with their own account in their own currency and language as well as utilise cheaper/free shipping, much faster shipping and Prime membership perks if they have that set up.
It also means that you’ll never lose a potential commission just because your Amazon links are sending your visitors to the wrong locality.
Don’t Lose A Possible Commission
Imagine your entire site is filled with US Amazon links and someone from the UK visits your site and clicks on one of those links.
They loved your content and you’ve convinced them that they should take the plunge and purchase that expensive item you’ve just written about. They click on the link with the full intention of making a purchase only to be taken to the Amazon US site.
As it’s Amazon, the chances are that the UK site sells the exact same product so you’re visitor will now probably close down that page and head to their own account on the UK site instead to make that purchase which means you won’t get commission for that sale.
If you imagine another scenario where 50% of your traffic is coming from different countries, that’s a lot of commission you could be losing if you don’t have a redirect feature like Amazon OneLink set up.
How To Set Up Amazon OneLink
The set-up itself is now pretty easy and although there once was a time when you needed to paste a snippet of code into the footer of your site, you no longer need to do this which has made the entire set-up process a lot simpler.
Currently, not every Amazon program in every country can use OneLink for global earnings but a good percentage of them can. There are two different ways to set up global earnings depending on the countries you’re adding so we’ll start with the easiest countries first and they are:
- United States
- Canada
- United Kingdom
- France
- Germany
- Italy
- Spain
- Sweden
- Poland
- Netherlands
You are a few more countries that you can add but these need to be set up in a different way which I’ll show you how to do further down.
Use One Amazon Country For All Your Links
The easiest way to set up OneLink is to do it through your US Amazon associates account as they have a new simplified way to do it that doesn’t involve signing up for each country’s Amazon associate program individually (well, at least not for the countries listed above).

Advertisement
This way you can use just the US associate program to add your Amazon affiliate links to your site and the redirects will be taken care of for you.
I’m not in the US but I still use all US links with OneLink set up as this is by far the easiest way to monetise all of your international Amazon traffic.
Some other countries including Amazon UK do have OneLink set-up options but they’re more limited and harder to set up (the new simplified way hasn’t been carried across).
Setting Up Amazon OneLink With One Store ID
Amazon has simplified the process of setting up OneLink for the above-listed countries by getting rid of the need to sign up for each one individually.
Instead, your US store ID is used to track any traffic that redirects to those countries’ Amazon sites and any purchases that take place without you needing to set up an Amazon associates account for that country.
So to set Amazon OneLink for the above-mentioned countries, you’ll need to be signed in to your US Amazon associate account first.
Once you’re signed in, hover over Tools from the main menu of your associate’s dashboard, then click OneLink from the drop-down menu that appears.
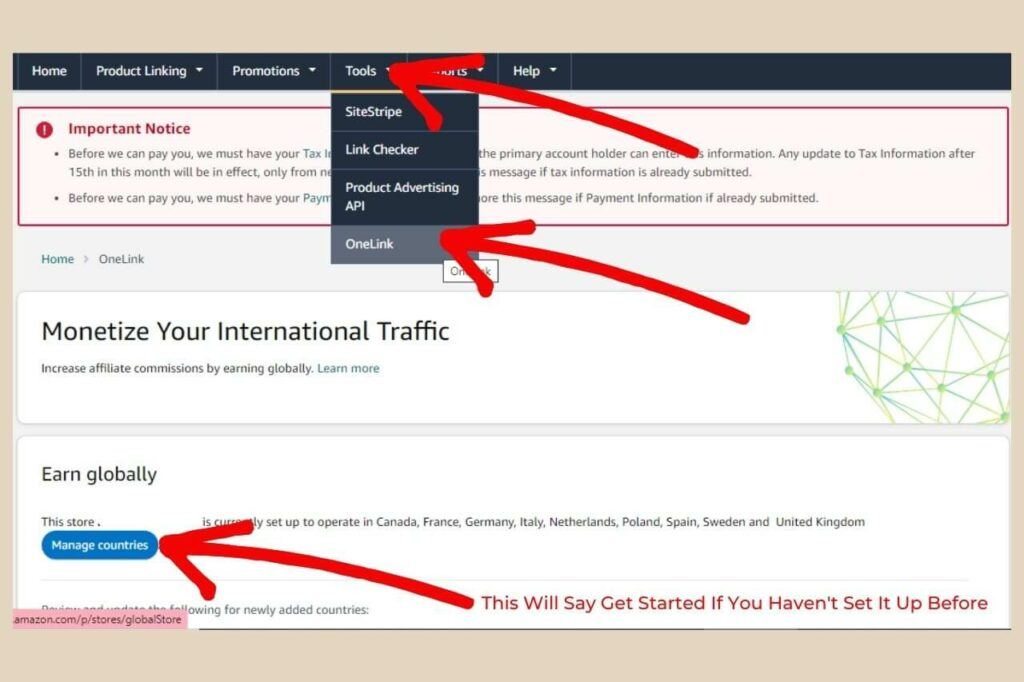
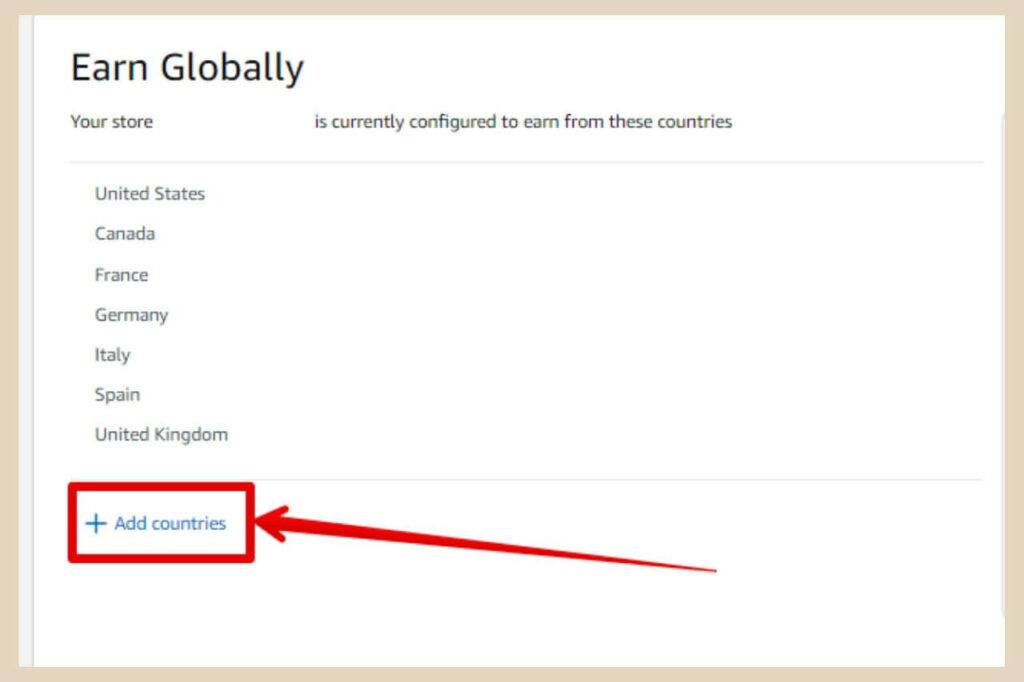
On the OneLink page, click the Get Started button (mine says Manage Counties as I’ve already set it up) to move on to the first step. On the next page that appears, you’ll notice that it says your store is currently configured to earn from these countries.
At this point, for you, it should only say United States so you’ll need to click the Add Countries button to add more.
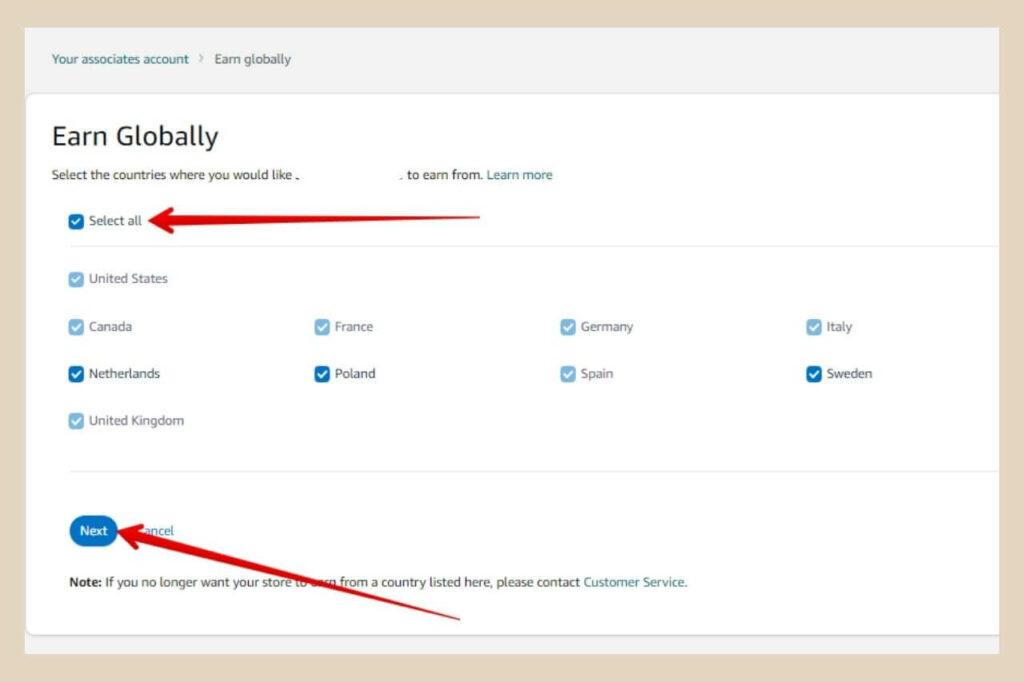
On the next page, you’ll see a list of all the countries I listed above. You can either choose all of them by clicking Select All or if you only want to monetise some of them, just tick the boxes for the ones you want to monetise and then click the Next button.
Don’t Lose Future Commissions
I recommend selecting all of them even if you don’t currently have traffic coming from all of them. You could have traffic from these countries in the future so why not have it already set up.
The next step is to agree to the terms and conditions for all the country programs selected. Simply click on the check box to agree and then click the Submit button.
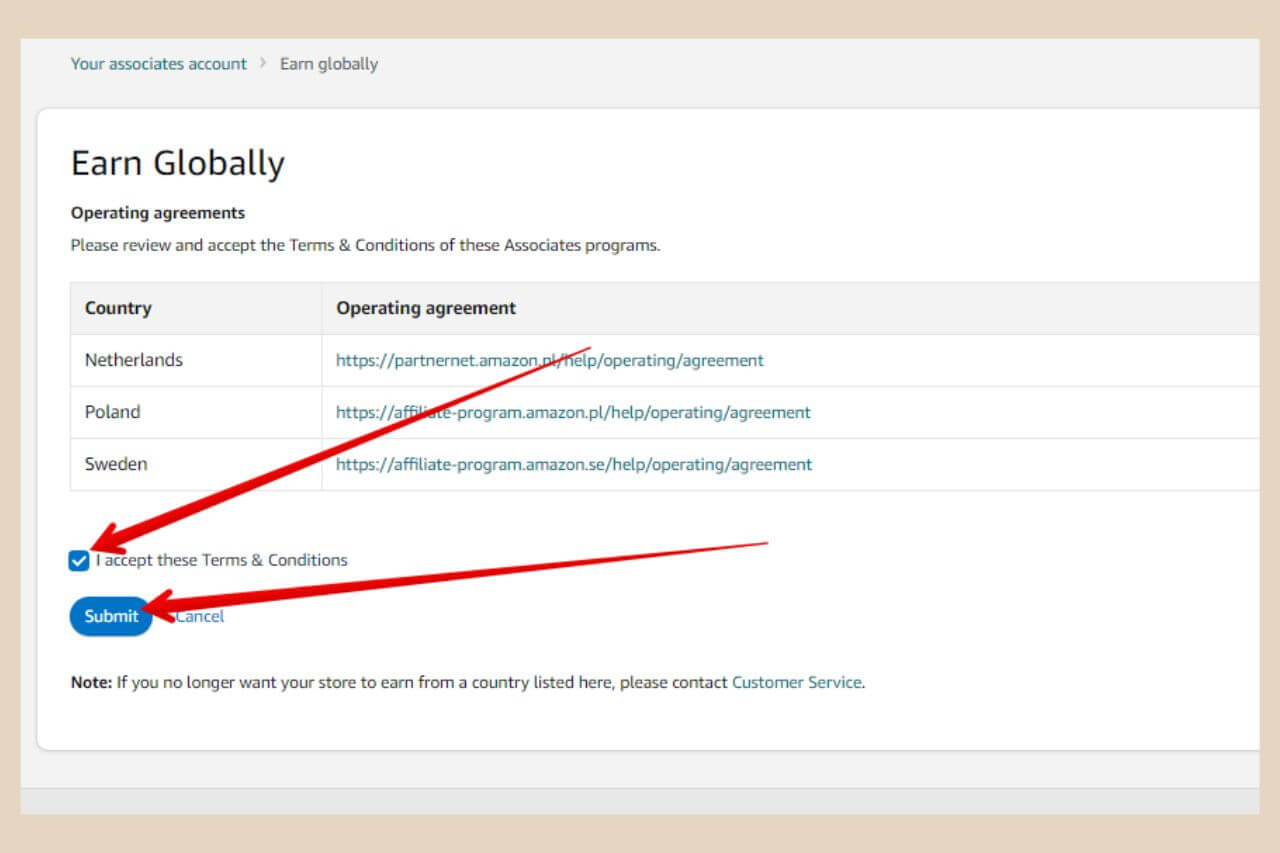
Congrats, you have now set up OneLink for the first batch of countries and can now earn from the ones you selected. The only thing you need to do now is to set up your payment method, tax information (if you picked Canada as one of the countries) and redirect preferences.
Setting Up Your Payment Method
To set up your payment method, simply click the “Update” link underneath Payment Method on the right-hand side of the OneLink page as per the image below.
Alternatively, you can click the Payment Information link from the Important Notice banner that is now at the top of the page. This banner will actually remain at the top of the page until you’ve completed all the important steps of the setup.
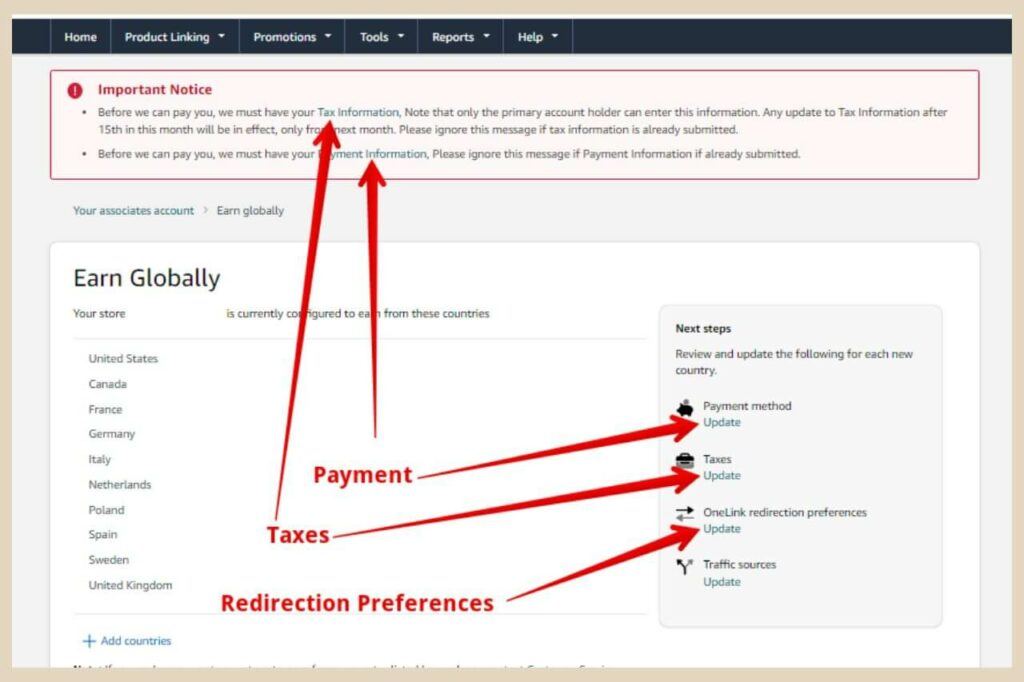
On a side note, if you lose the page above, you can get back to it by hovering over Tools in the main menu, then clicking OneLink from the drop-down menu, followed by the Manage Countries button on the OneLink page as per the first screenshot near the top of this post.
Once you’re on the payment method page, you will see a list of the countries you can now earn globally for. The easiest way to set this up is to add a bank account so that all country payments can be paid by direct deposit.
Set Your Method For Each Country
You’ll notice from the banner at the top of the page that Poland, Netherlands and Sweden have to be set up this way but the other countries do have the option of being paid by gift card (and cheque for the US).
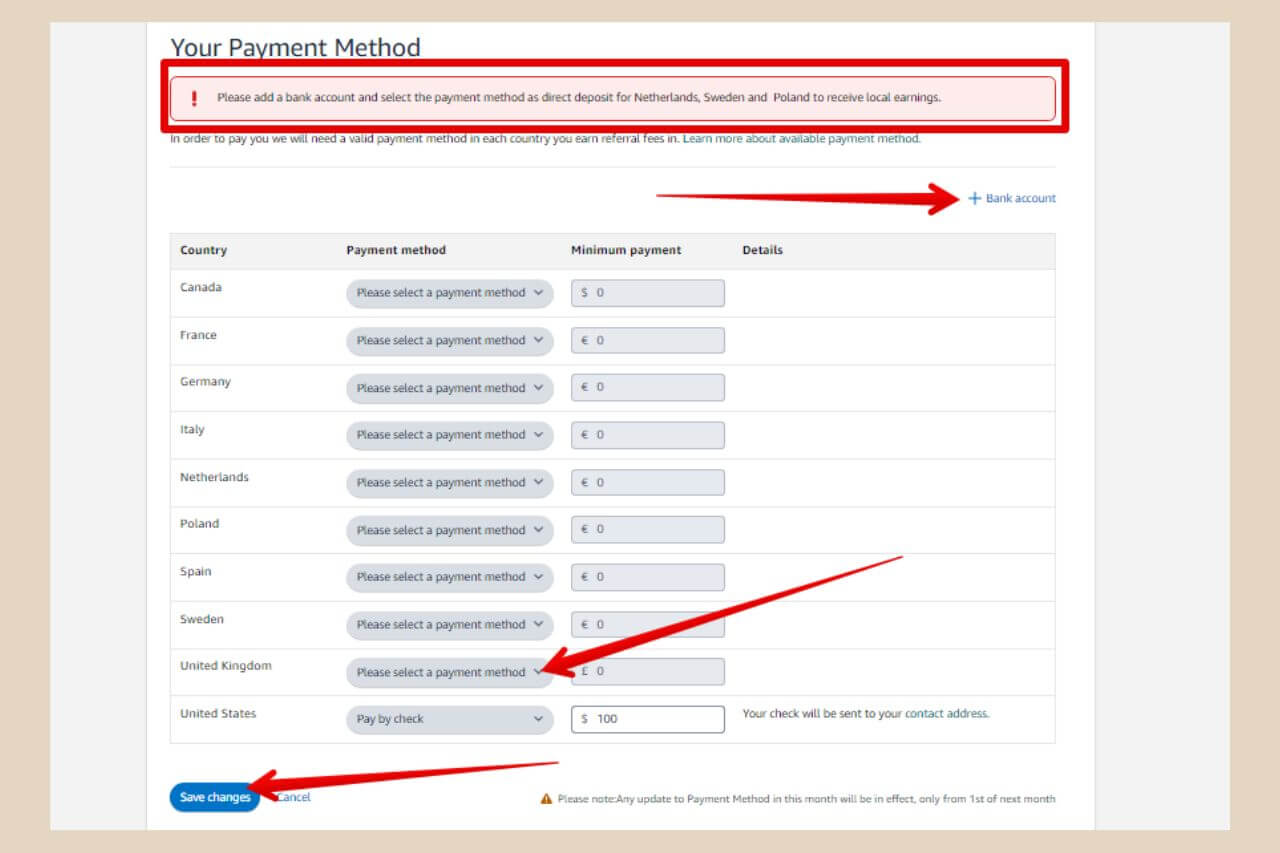
Do note though, that Amazon gift cards can only be used on the Amazon country site that they’re received from. For example, I use the Amazon UK site so I could in theory select gift card for that one and be able to use it on my local Amazon site.
However, if I select gift card for Canada, I’d only be able to spend it on the Amazon CA site which wouldn’t really make sense for me so bear that in mind when choosing your payment method. Once you’ve finished setting up your payment method, click Save Changes to finish.
Setting Up Your Tax Information (If Canada Was One Of Your Choices)
To set up your tax information (for Canada), simply click the “Update” link underneath Taxes on the right-hand side of the OneLink page.
This will take to you to your account settings page. From here, click the “Canada Current Tax Status” link as per the image below and this will take you to the tax dashboard page.
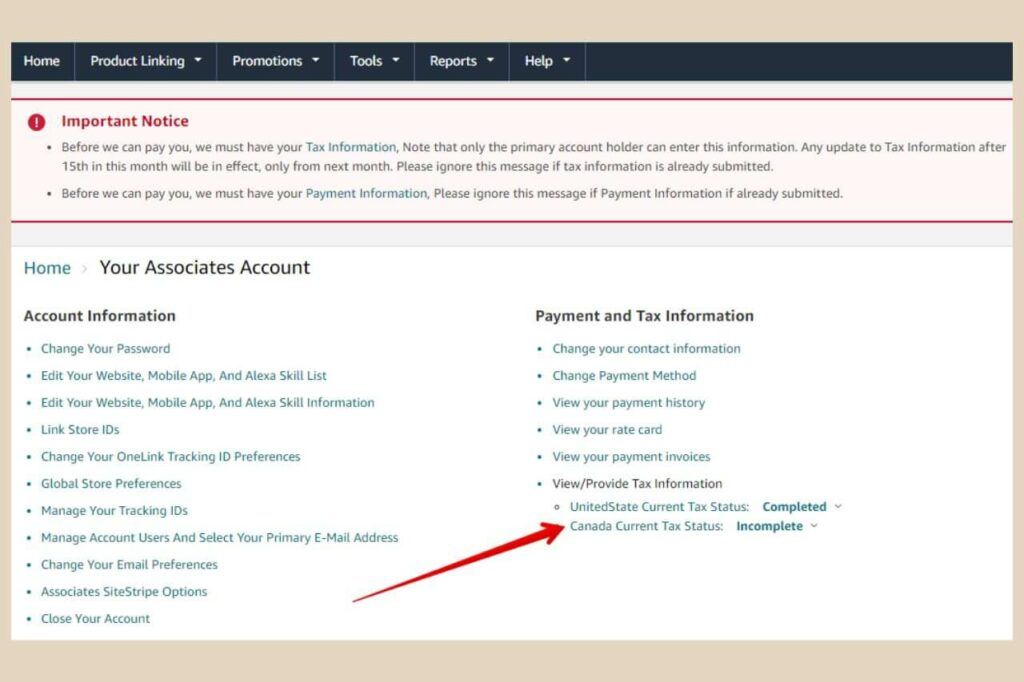
You can also access it by clicking the “Tax Information” link from the Important Notice banner at the top of the page and this will take you directly to the tax dashboard page. Simply fill out the form to complete the tax information section
Setting Up Your OneLink Redirection Preferences
To set up your OneLink redirection preferences, click the “Update” link underneath OneLink Redirection Preferences on the right-hand side of the OneLink page.
Once on the preferences page, you’ll have the option to select a preference for each country individually that you’ve set up for OneLink by using the Select Other Geography drop-down menu.
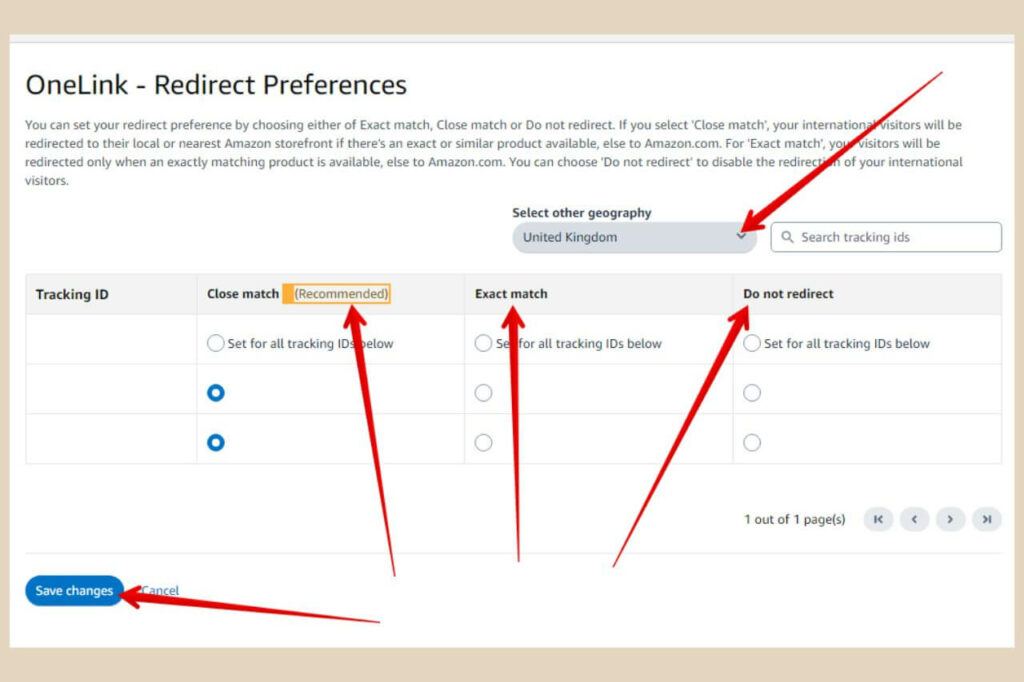
You’ll notice that the other few countries that we haven’t set up yet are there in that drop-down menu so you can go ahead and set them up now so that you don’t have to come back and do it later.
Choose Your Redirect Options
There are three redirect options available here and they refer to whether or not the product you’re linking to is available on your visitor’s local Amazon site and they are as follows:
- Close Match – Amazon will only redirect your traffic if there’s an exact product match or close product match available on your visitor’s closest Amazon store.
- Exact Match – Amazon will only redirect your traffic if there’s an exact product match available on your visitor’s closest Amazon store.
- Do Not Redirect – This will disable the redirect feature.
By default, Close Match is already selected for each country and this is the recommended setting so I personally always leave it that way.
With this setting, Amazon will send your visitors to close matching products even when the exact one isn’t available which means that it’s still possible for a sale to occur in the process.
advertisement
If you choose Exact Match and that product isn’t available on other Amazon sites, the redirect won’t happen and your visitors won’t even get a close match alternative to look at on their local site and you’ll lose the possibility of any sale.
To save any changes you make here, click the Save Changes button to finish. The final setting on the OneLink page is Traffic Sources but this is only for when you want to add more websites or apps to your Amazon associates account.
Setting Up The Remaining Countries For Global Earnings
There are actually 4 more countries that you can set up for global earnings but for these ones, you’ll need to sign up to their individual associate programs first.
It’s a little bit more work but it’s well worth it. Amazon says that more countries will be added in the future but for now, the following countries can be added:
- Australia
- Japan
- Singapore
- Saudi Arabia
Unfortunately, there are some country restrictions as to who can sign up for the above-mentioned countries. Japan seems to be available for almost every affiliate to sign up to but Australia and Singapore are limited to affiliates from only a handful of countries.
Affiliates in the US and the UK plus a few others can sign up but you’ll find out very quickly at the very beginning of the sign-up process if your country is included.
Saudi Arabia is only available for sign-up to affiliates in a couple of middle eastern countries at this time so most of us will be unable to use that one at least for the time being.
The easiest way to sign up for each of these countries is by clicking the country drop-down menu at the top of the page of your Amazon associates dashboard.
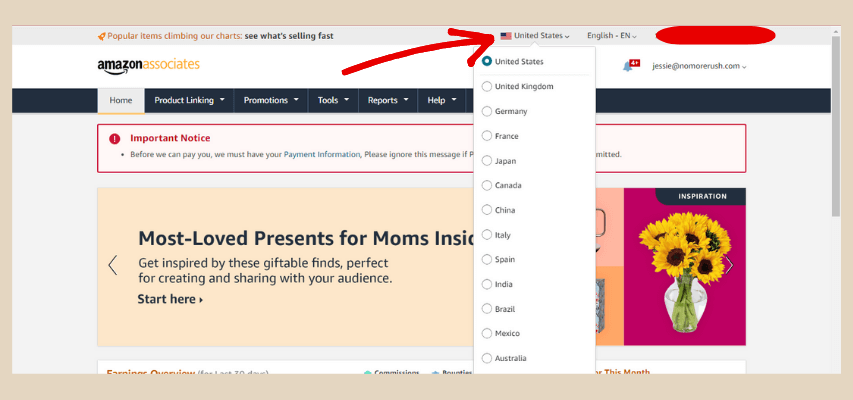
By clicking on any one of these countries, you’ll be taken to that country’s sign-up/sign-in page and from here you can complete the application process.
Some of these sites will be in a different language so just click the Google Translate button to translate the page to your native language (it should come up automatically).
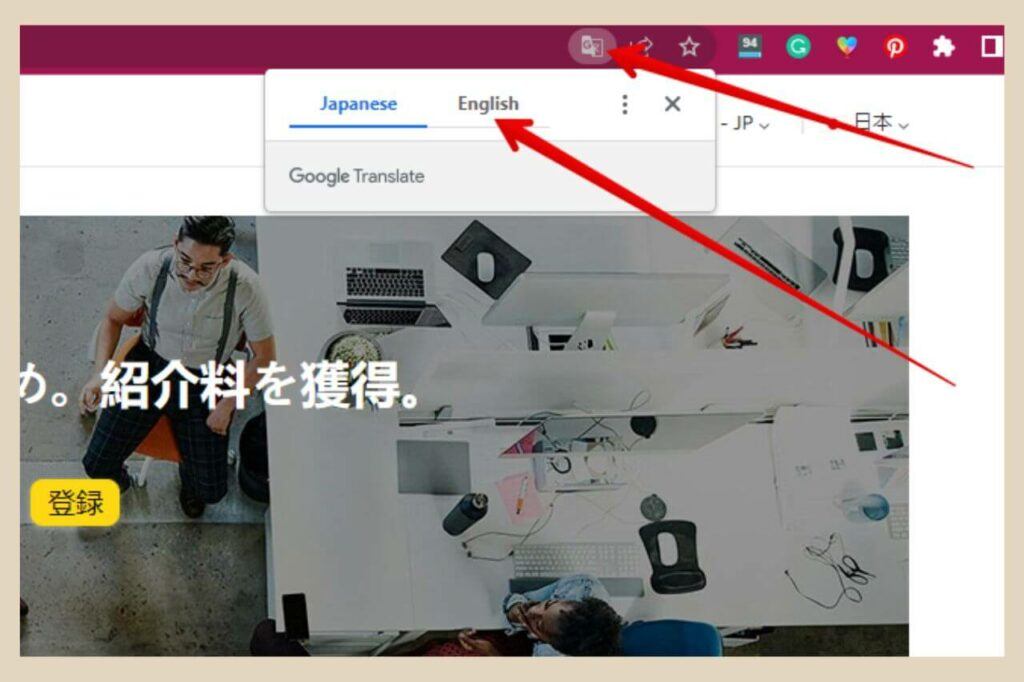
At the end of each application, a store ID will be generated and you’ll need to make a note of these as you’ll need them to set up your global earnings when you’re finished.
Adding Your New Countries For Global Earnings
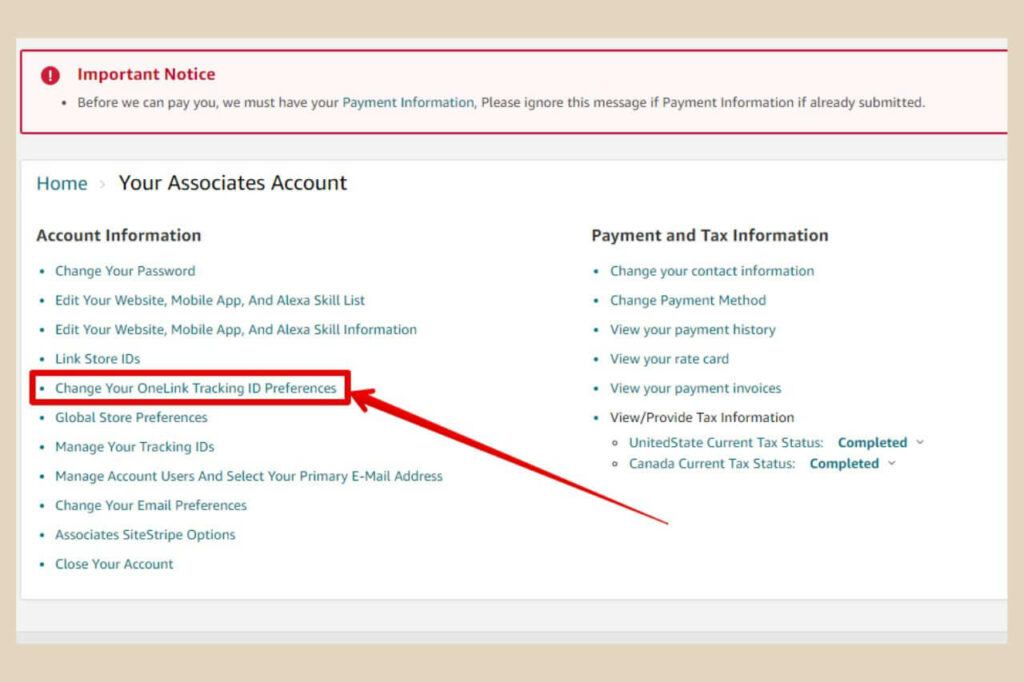
Once you’ve applied to the remaining countries, you’ll now need to add them to earn globally by linking the store IDs to your US associate’s account. To do this, hover over your email address at the top of the page, then click Account Settings from the new drop-down menu that appears.
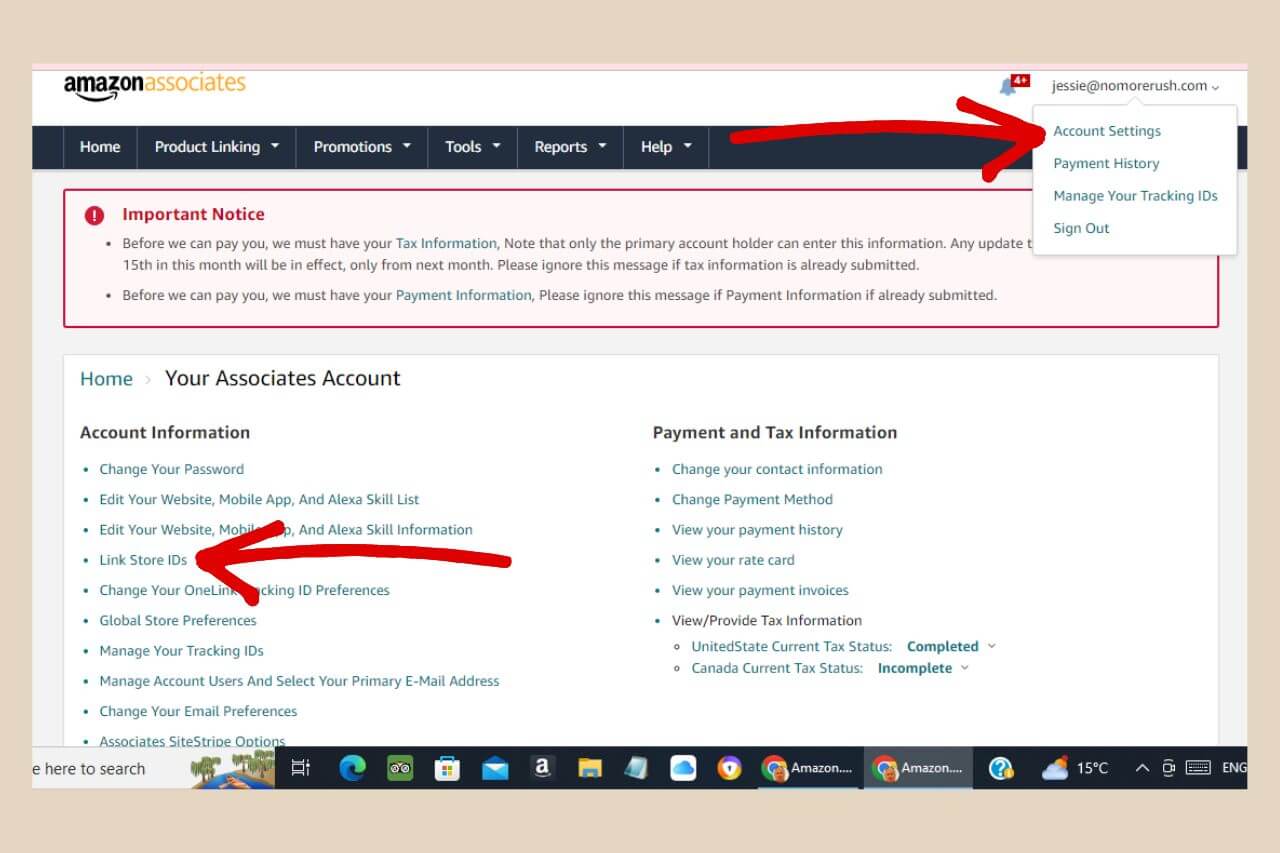
This will take you to the account settings page and from here, you’ll need to click “Link Store IDs” as per the image above.
On the next page, you’ll need to click the “Add Store ID” link and a small box will appear over it where you’ll be able to add one of our new store IDs.
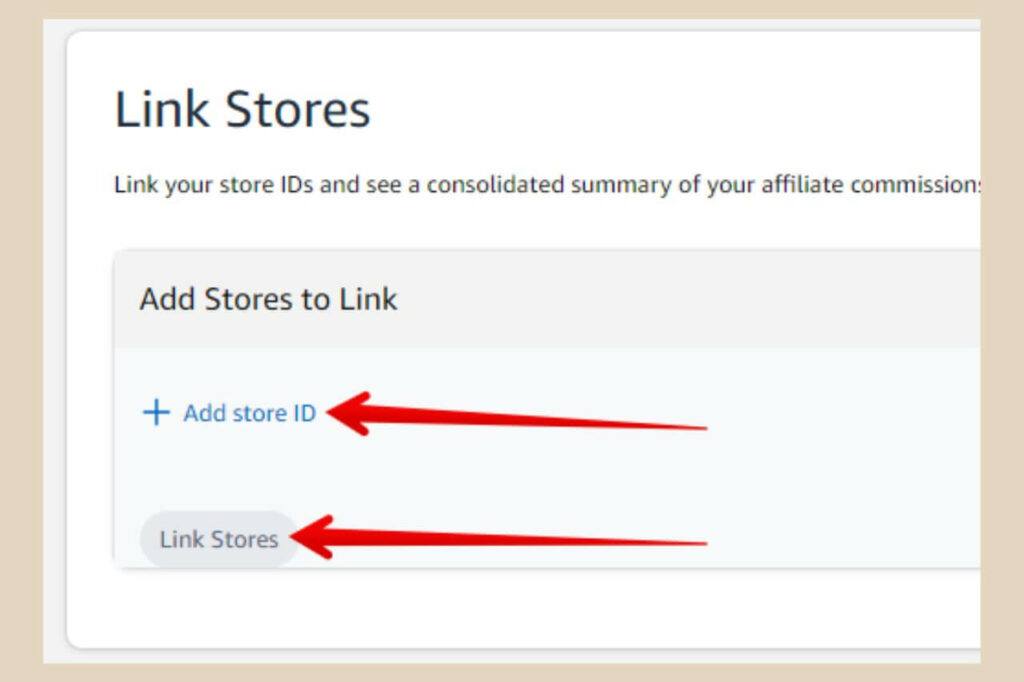
Next, click the Link Stores button (it will turn blue and become clickable once you enter a store ID) to link the store ID to your US associate’s account, then repeat the process for each store ID you’d like to add for global earnings.
You may be asked to verify the store link like the image below so just click the “Please Verify” link and you’ll be taken to the store in question where you’ll just need to click a verify button.

The final step is to make sure your default tracking IDs are set up correctly for each of the new stores you’ve just linked. To do this, just head to the accounts settings page again and this time click the “Change Your OneLink Tracking ID Preferences” link.
You’ll now be taken to the tracking ID page where you can use the drop-down menu to change your tracking IDs if you have more than one.
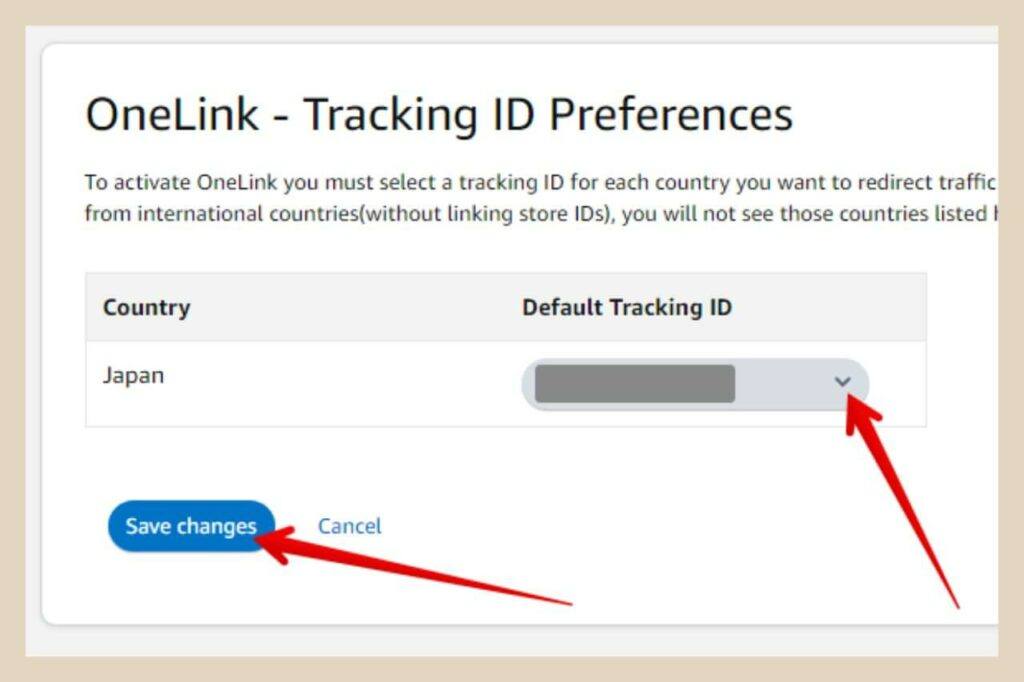
If you only have one tracking ID for each country, then it should be selected by default on each one. Once you’re happy that your IDs are correct, simply click the Save Changes button to finish.
Remember to keep your eyes on OneLink and the countries available for global earnings as Amazon plans to add more in the future.
How To Check Your International Earnings
Now that you’ve set up OneLink and linked your other store IDs for global earnings, you’ll now be able to see all of your international earnings from a consolidated report within your US Amazon Associates dashboard.

To view this report, simply hover over Reports in the main dashboard menu, then click Consolidated Summary from the drop-down menu that appears.
This will take you to a new page where you’ll be able to see any commissions that you’ve made from the countries you’ve just set up.
Download The Amazon Associates App To Your Desktop
To make things easier, you can actually download the Amazon Associates app directly onto your desktop so that you can check your earning reports with ease.
To do this, simply log into any of your Amazon Associate accounts and click on the “Install Amazon Associates” icon on the right-hand side of the address bar.

The icon looks like a little computer with a downward-facing arrow on it. Once you’ve clicked this icon, the Amazon associates app will be instantly downloaded onto your desktop.
Let’s Get Your Global Earnings Set Up
Setting up your global earnings is not all that difficult to do and once it’s done, you can relax in the knowledge that global traffic is now being monetised.
I hope you’ve found this post helpful but if you do get stuck on anything and need some help, please let me know in the comments below and I’ll be more than happy to help you out.
Happy global earnings!

You May Also Like
- How To Display Recent Posts With Thumbnails In WordPress
- How To Add An Affiliate Disclosure To Your Posts
- What Is Wealthy Affiliate – Everything You Need To Know


