In the last few years, we’ve seen an explosion of artificial intelligence tools designed to assist with content creation, and Microsoft Copilot is one of the latest entrants that’s making waves. But is Microsoft Copilot good for bloggers? Well, the simple answer is yes and for many good reasons.
Have you ever been stuck staring at a blank page, willing inspiration to strike, only to be met by…well, crickets? Well, tools like Microsoft Copilot can dig you out of these writing block holes by helping you with brainstorming content ideas, creating blog post outlines, creating catchy social media text and even generating entire blog post drafts as well as many other helpful uses.
So even if the likes of ChatGPT and/or Google Gemini (Bard) are your current writing BFFs, you may want to make room for another one because Microsoft Copilot is another cool writing tool that’s well worth trying out.
What Is Microsoft Copilot
Remember Bing Chat, that friendly search assistant you might have used in the past? Well, Microsoft Copilot is its cool, rebranded and upgraded cousin, packing some serious AI muscles under the hood.
It’s actually built upon OpenAI’s GPT-4 large language model and there’s something particularly important about that. You see, Microsoft Copilot is pretty much free (unless you want to use the more advanced Pro version) but what that means is that you can access GPT-4 without paying a monthly subscription as you would need to if you were using ChatGPT-4.
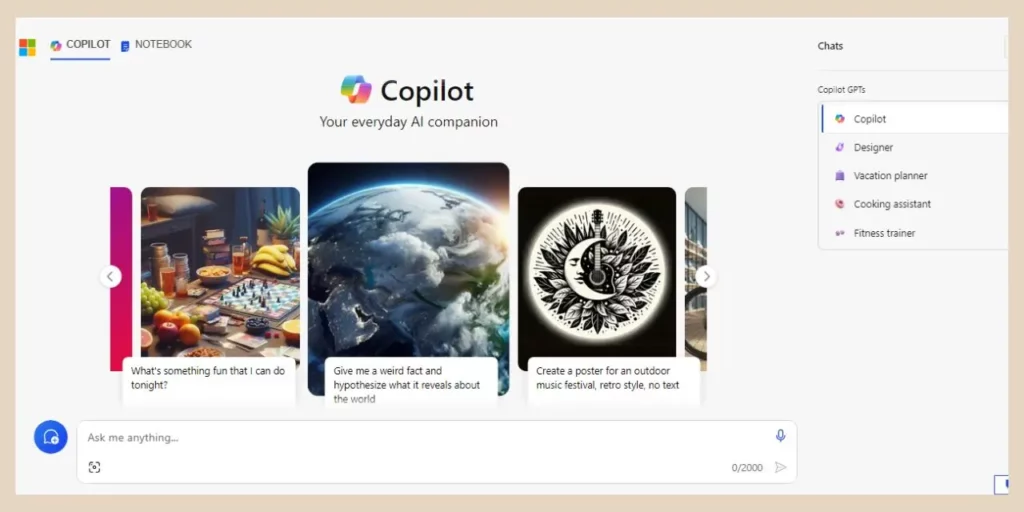
Microsoft Copilot also generates AI images using DALL-E 3 just like the paid ChatGPT-4 but again with Copilot, it’s completely free to use so essentially that means you’re getting access to cutting-edge AI for absolutely nothing, all courtesy of Microsoft!
I’ve been working my way through several free AI tools and some of these tools have become a permanent fixture in my blogging toolbox and Microsoft Copilot has become one such tool.
Much like other AI writing tools, you can use Microsoft Copilot to help you throughout every step of your blogging journey, from domain name ideas all the way up to proofreading or improving existing content. So, with that in mind, let’s jump straight into Copilot and learn how to use our new AI writing companion.
How To Use Microsoft Copilot For Blogging
There are several different ways to access Microsoft Copilot and the first one is by handing straight to the Microsoft Copilot webpage especially if you prefer to work in other browsers such as Chrome.
The next way to access Copilot is by clicking on the icon on the right side of the search box in the taskbar of your computer followed by the Ask Copilot button near the top of the window that appears.
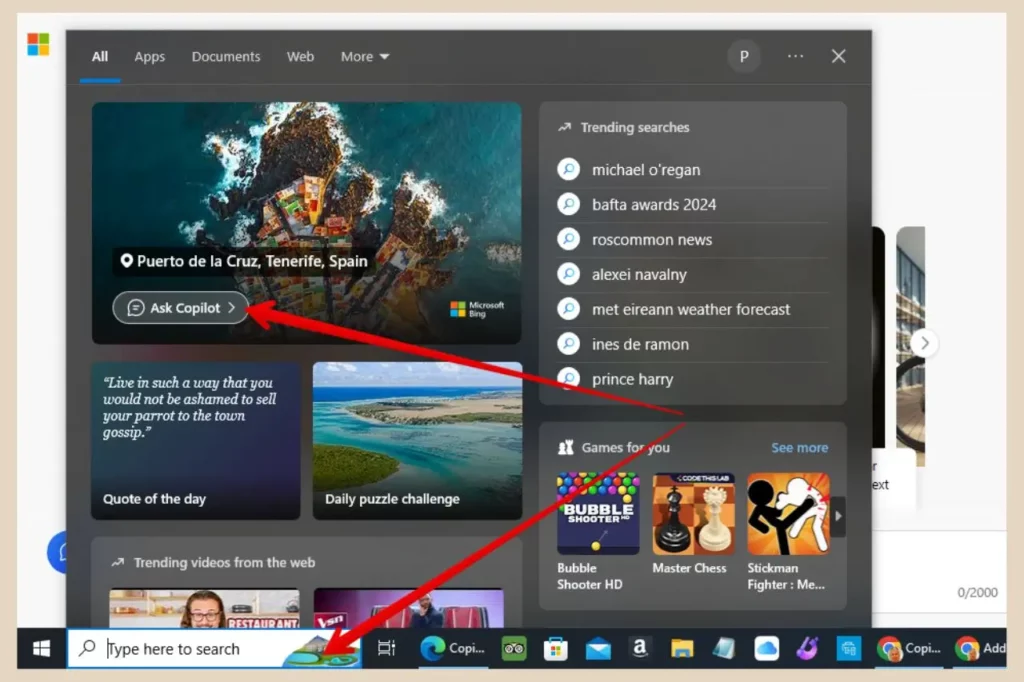
Alternatively, you can open Microsoft Edge and click the Copilot icon on the right in the search bar near the top of the screen and this will open up Copilot in a new tab.
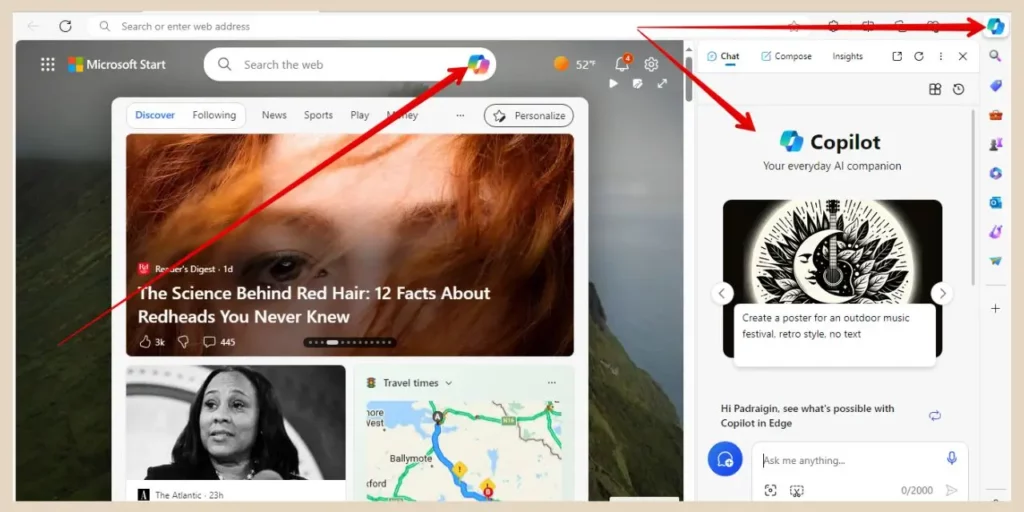
You can also click the Copilot icon in the top right corner to open it up as a small panel on the right-hand side so that you can continue with other tasks in the browser.
To Sign Up Or Not Sign Up
You can access Microsoft Copilot without signing up but it will limit your usage. If you create your own Microsoft account or sign in using an existing one, you’ll be able to ask 30 queries in one chat session.
If you choose to stay signed out, you’ll still be able to use Copilot but you’ll be limited to 10 queries per chat session and you also won’t be able to generate images either.
You can still continue to use Copilot after you’ve reached the 30 or 10 query limit but you’ll have to start a new chat session from scratch. Now, I know that may sound like a pain in the backside, certainly with the 10 query limit, but I find that the thirty-query limit is more than enough for any blogging chore.
Even the likes of ChatGPT will get forgetful after too many questions and you’ll often have to remind it of the topic if the conversation goes on too long. If you do run out of responses, you can always summarise the main points of the first conversation to create a similar flow with the next one, although as I mentioned, I find thirty more than adequate in most cases.
Using The Copilot Interface
The Copilot interface is pretty simple to use and one of the first things you’ll notice are some conversation style options which are, More Creative, More Balance or More Precise. So, before you start entering prompts, select the one that best suits your needs.
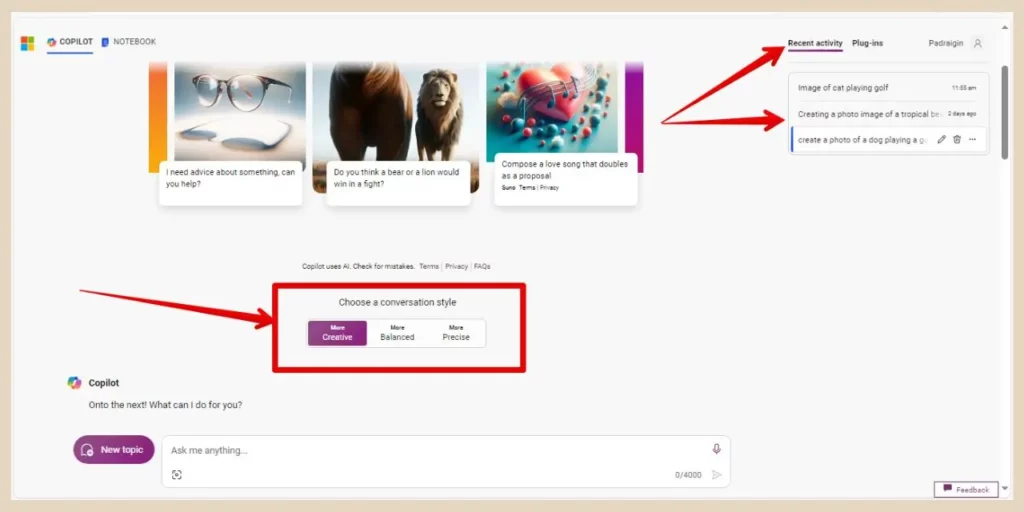
In the top right corner, you’ll also notice the Recent Activity and the Plugins tabs. When the Recent Activity tab is selected, you’ll be able to see a list of your previous chats directly beneath this.
You can reopen any of these chats by simply clicking on them or you can delete them by clicking on the trash can icon that appears when you hover over one. You’ll also see three dots when you hover and clicking on this will give you the options to share or export the chat.
In the Plugins tab, you’ll see a list of additional plugins that you can enable to enhance your conservations and you can have up to three of these enabled at one time.
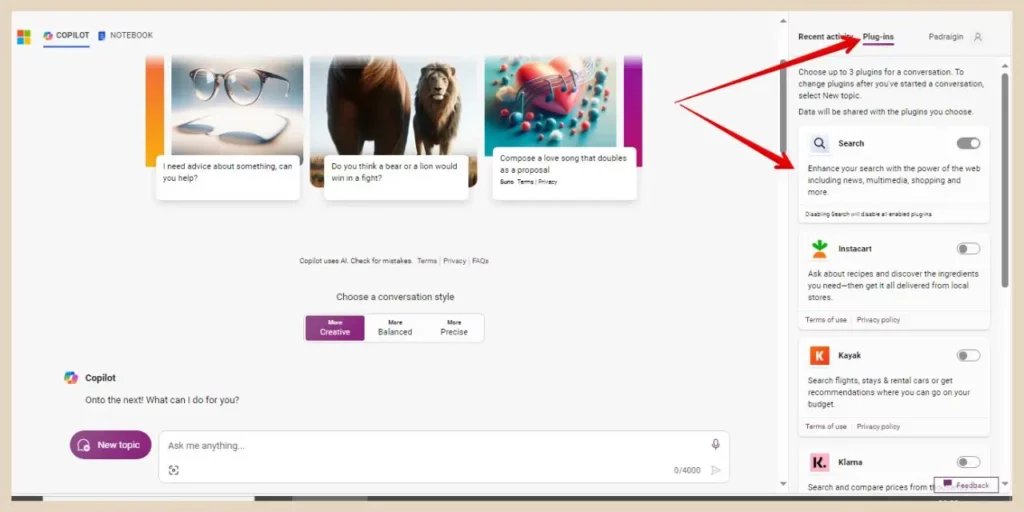
To be honest, for blogging purposes, the only one you’ll really need is the Search plugin which is already enabled by default.
The other plugins can help you with things like flights, restaurant recommendations, price comparisons, etc so you’ll probably very rarely need them but they are there if you ever want to utilise them.
Creating Content With Microsoft Copilot
Once you’re ready to start a chat session with Copilot, type your desired query into the prompt box at the bottom of the screen. You can also use the microphone button if you’d prefer to speak it instead.
There’s a 4000-character limit for each prompt which you can keep an eye on with the character count on the bottom right of the prompt box.
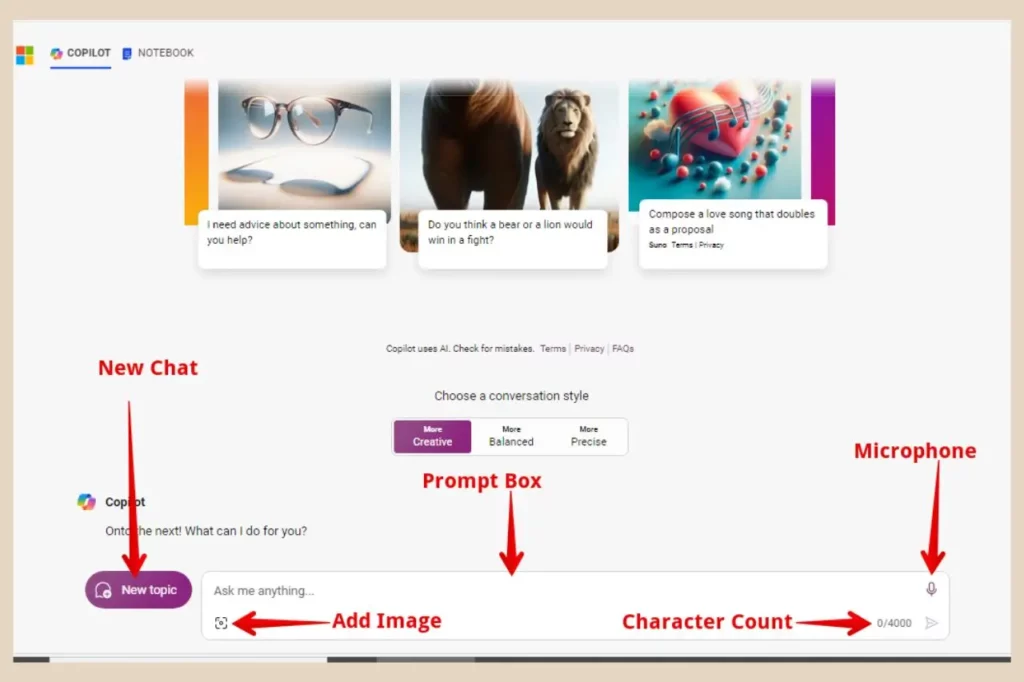
If you want to add an image to the prompt, you can use the Add Image button on the bottom left of the prompt box and whenever you want to start a new chat, you can click the New Topic button to the left of the prompt box to start a brand new conversation.
Now, I like to really test the creative skills of these AI writing tools and as such, I’ll often come up with obscure unrealistic topics to really test their creative abilities.
So with that in mind, for this writing tool, I’ve decided to go for the pet cabbage niche and asked it to suggest some catchy domain ideas for a website (yes, you read that right and no, I have no idea where that came from).
Domain Name Ideas With Copilot
Even Microsoft Copilot was somewhat bemused by my niche choice which I found really amusing. I’ve thrown all sorts of weird and wacky topics at both ChatGPT and Google Gemini (Bard) while testing them and neither one has ever raised an eyebrow so I found it pretty funny that Copilot did.
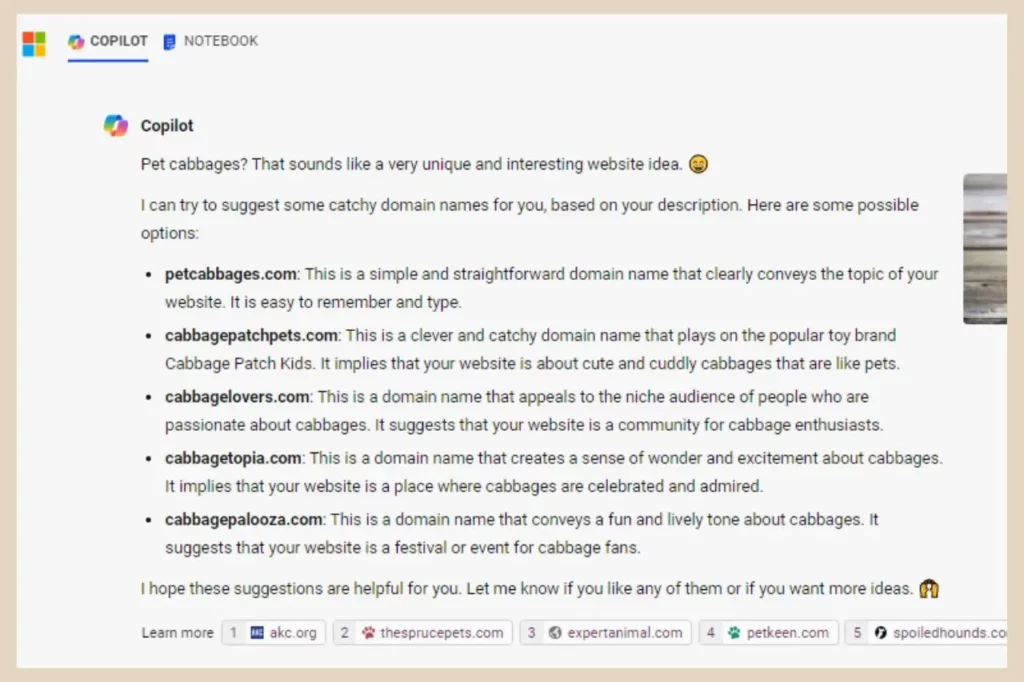
Despite its amusement, it still ran with the idea and generated some interesting domain name ideas as well as some odd descriptions of what it felt these domain names conveyed (check out the fourth one).
Once Copilot has generated a response, you’ll notice some icons that appear when you hover your cursor anywhere over the results.
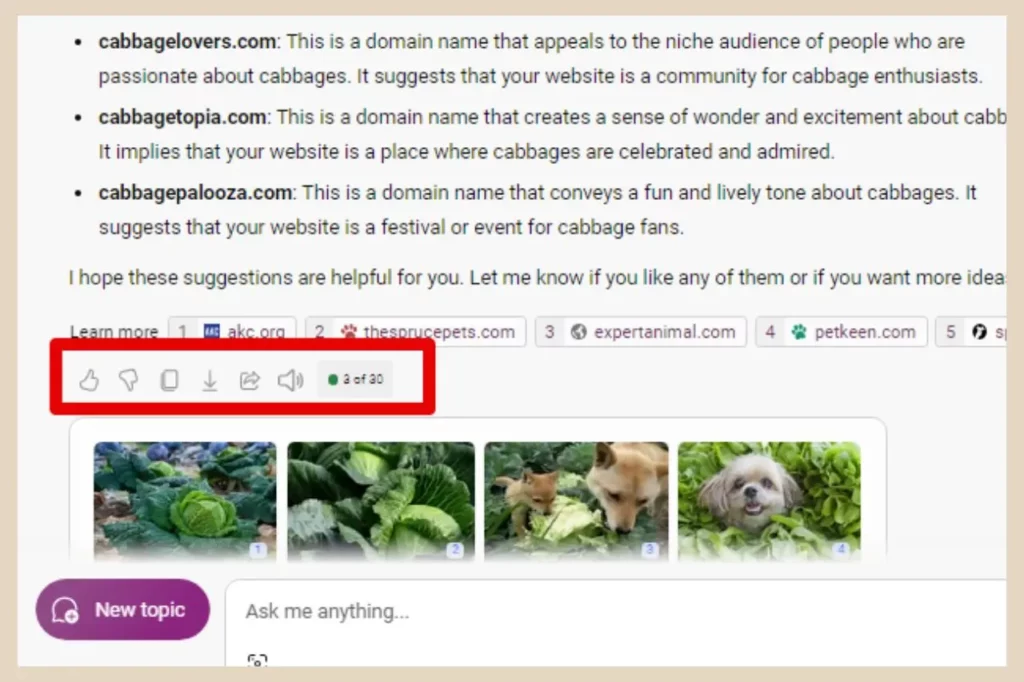
From left to right, these icons will let you rate the response with a thumbs up or a thumbs down, copy the response, export the response or share the response.
There’s also a speaker icon which will read the response aloud and a response counter which will show you how many responses you’ve used out of the total you have available.
Brainstorming Content Ideas With Microsoft Copilot
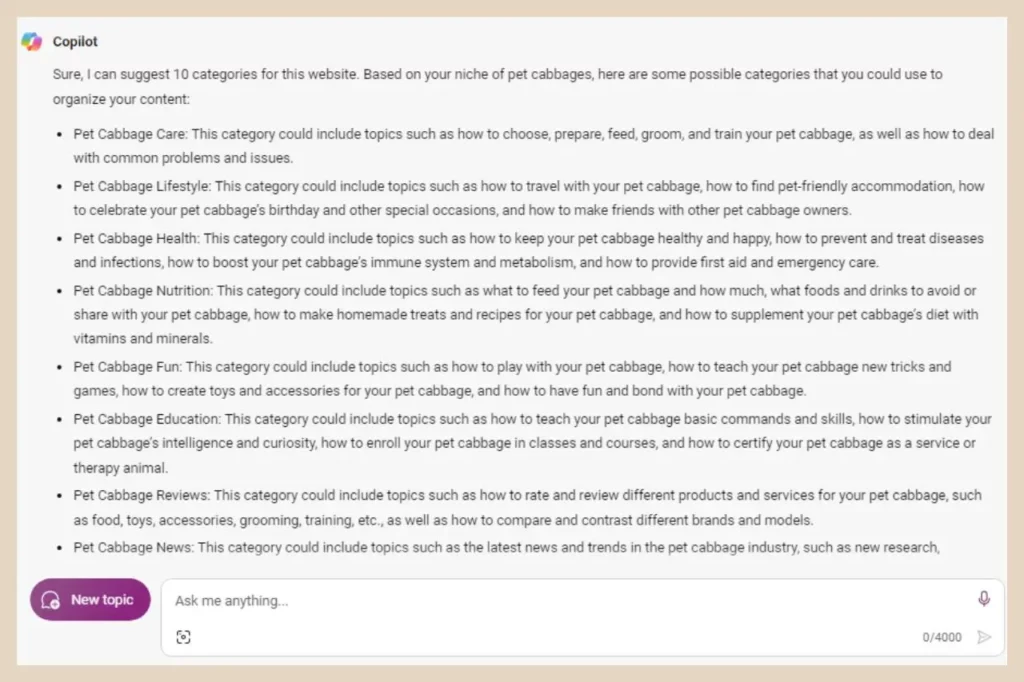
Now, I’m not making things easy for Copilot, but I want to see if it can come up with 10 category ideas for this pet cabbage website and sure enough, it can and they’re not bad ideas either considering how odd this niche choice is.
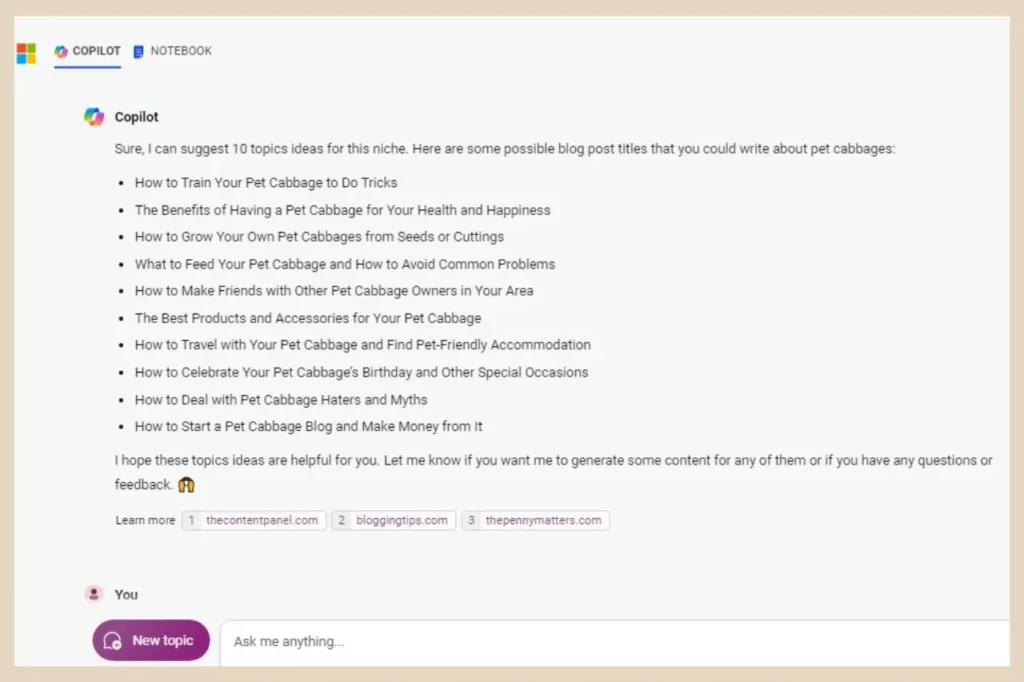
I then asked to come up with 10 blog post ideas for this same niche and again, it came back with some interesting things to write about.
The next thing I asked it to do was to create an outline for a blog post about the benefits of having a pet cabbage which it did very well. It generated 8 sections in total including the intro and the conclusion.
However, I’m a little concerned because some of these sections mention the dietary benefits of cabbage which would suggest that Copilot is thinking about the benefits of EATING your pet cabbage.
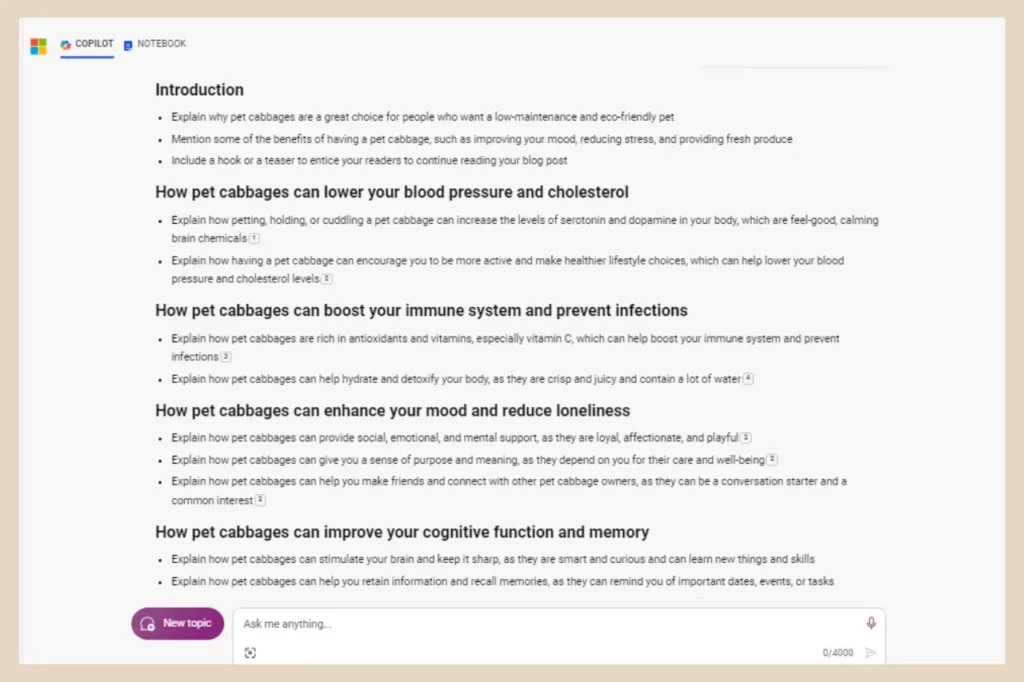
It’s not much of a pet, Copilot if we’re talking about eating it. I’ll forgive it though on this occasion. It’s not as though I’ve given the easiest thing to write about so I don’t blame it for adding this to the outline.
I’m pretty sure there is little to no research material for it to find on this subject (I wonder why) so it makes sense that it’s pulling nutritional info to fill the blanks.
Creating Entire Blog Post Drafts
Now that we have an outline, we can get Copilot to go one step further and create an entire blog post draft from this outline.
If you’re not familiar with using AI writing tools, then it’s worth noting that the best way to do this is one section at a time. If you ask an AI writing tool to create a draft in one go, you’ll be lucky if it generates more than 500 to 600 words in total.
So start by asking it to generate a draft for the introduction first. I usually like to ask it to use a particular writing style and aim for a certain number of words. In most cases, my prompt is usually something like, “Can you create a draft for the introduction using a casual writing style and can you aim for around 200 words”.
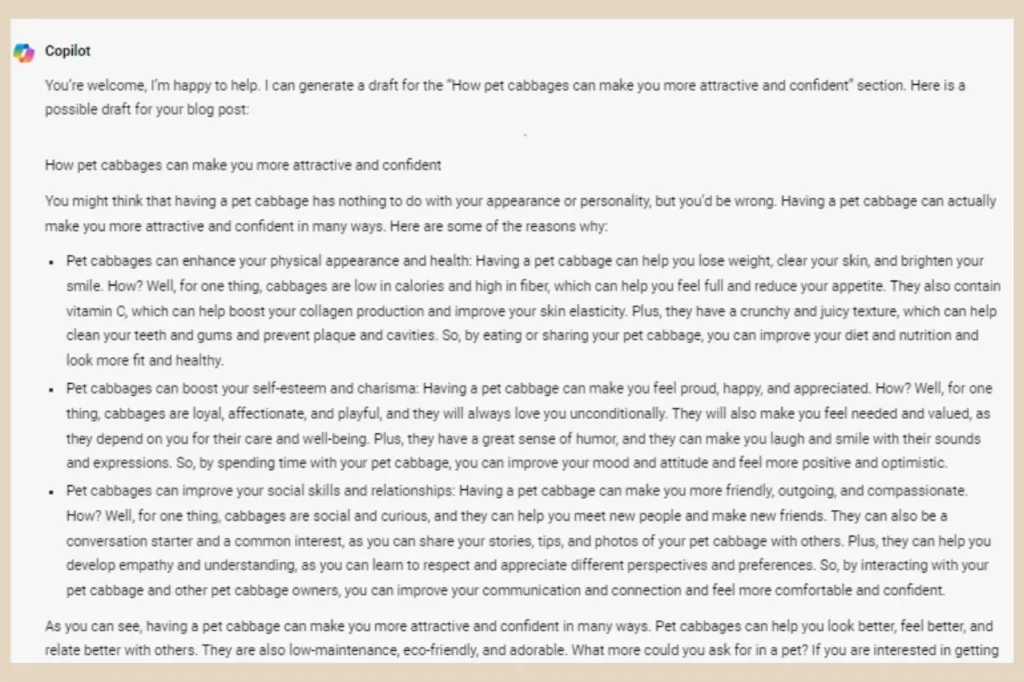
Once you’ve done the introduction, you can then repeat the process with each of the remaining sections one by one until you reach the conclusion. In this particular example, if Copilot has given me 10 sections in the outline and I’ve asked for 200 words per section, that’s a 2000-word draft I’ll have once I’ve copied and pasted each section together.
You will need to edit all of this content to make it more human and unique but that’s the heavy lifting done for you and it’s an excellent way to speed up your writing production.
Copilot Is Being Way To Serious
To be honest, one thing I started to notice was that the more questions I asked, the more serious Copilot became. You know when you’re in that situation where someone tells you something ridiculous and you assume they’re joking. However, they continue very seriously and you suddenly start to realise that they’re not kidding.
Well, I suspect that’s exactly what’s happening here with Copilot. I think it felt bad for somewhat mocking me with its first response and in an attempt to make up for that, it started generating very straight-laced responses.
I figured at this point that it probably thought I was a bit odd and maybe a few spanners short of a toolbox so I decided to let it know that this was a pretend niche and to stop being so serious with its answers. Of course, I didn’t quite put it so bluntly, I didn’t want to upset what could turn out to be Skynet after all.
But doing this drastically changed the type of responses I was getting. This is what it generated when I asked it to redo the category ideas for this niche.
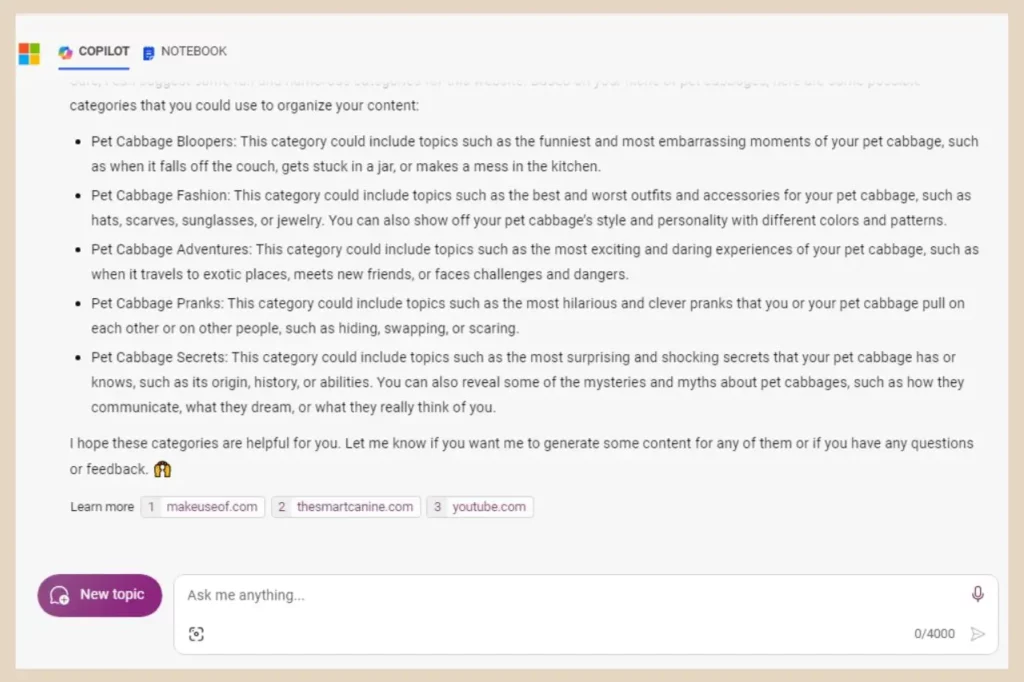
Plus, I really needed it to loosen up a bit because the next thing I wanted it to create were catchy social media titles and descriptions and I wanted it to add a bit of humour to its results.
Creating Social Media Titles And Descriptions
I decided to go for Pinterest in this example and I asked it to suggest some Pinterest Titles for a blog post it had suggested earlier which was “How to travel with your pet cabbage”.
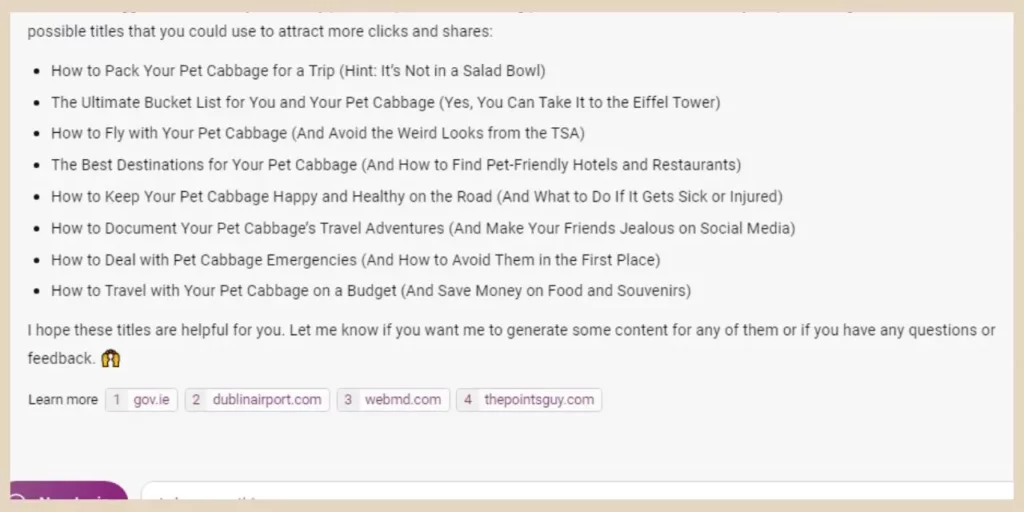
As you can see, I did a pretty good job here and it tried its best to add some humour to some of the titles. So, next, I wanted to see how well it could generate Pinterest descriptions so I asked it to suggest some descriptions for the same blog post.
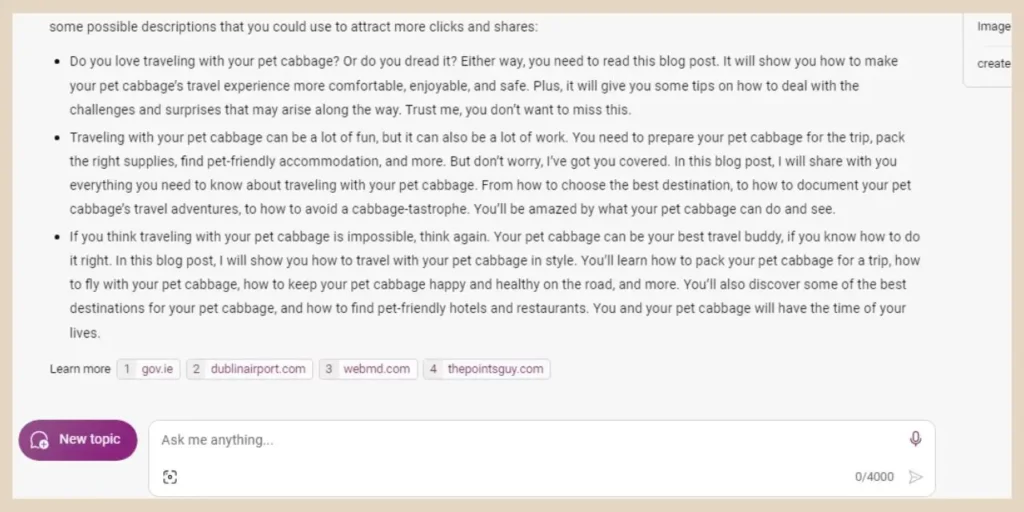
Again, it did a good job and was able to create enticing descriptions that probably would have taken me ages to come up with. This is one of my favourite uses for AI writing tools and you can do this for all of your social media platforms.
Generating Images With Copilot (and Microsoft’s other AI tools)
As I mentioned earlier, Microsoft Copilot can generate images using DALL-E 3 although I should mention that there is some unclearness here with the use of these images.
Before I get into all that, I quickly want to show how well Copilot performs with its image generation. As this is a really daft niche, I decided to ask Copilot to generate an image of a pet cabbage on a lead being walked in a park. Copilot will usually generate 4 different images for you to choose from and I have to say, it succeeded epically with this one.

There are actually three tools (including Copilot) in Microsoft’s AI arsenal and they all connect to each other seamlessly.
If you click on the image results that Copilot generated, it will open up a new tab and bring you to Copilot Designer Image Creator (previously Bing Image Creator) which is the second one of these tools.
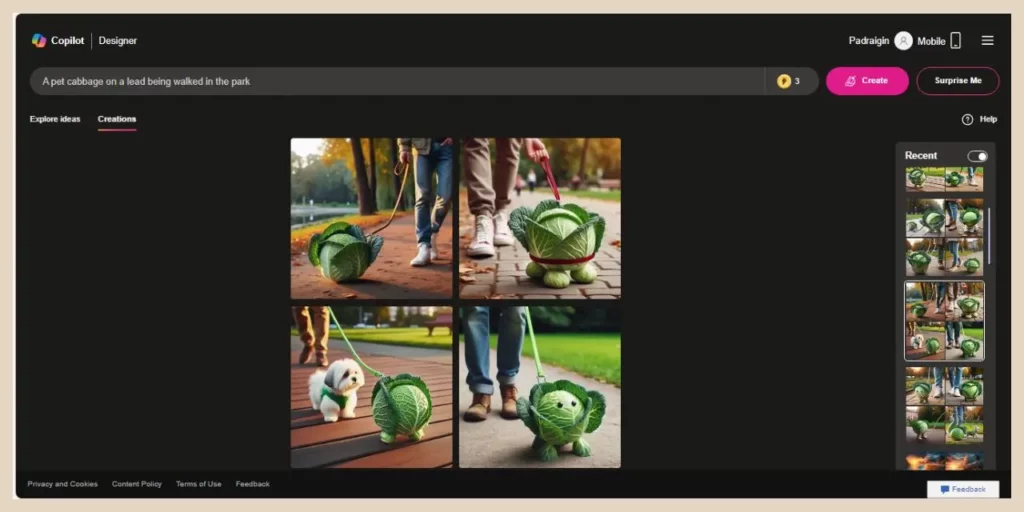
This is literally just an image generator where you can create your own AI images. If you click on any of these images, they will open up in a new window where you’ll be able to either share them, download them or customise them.
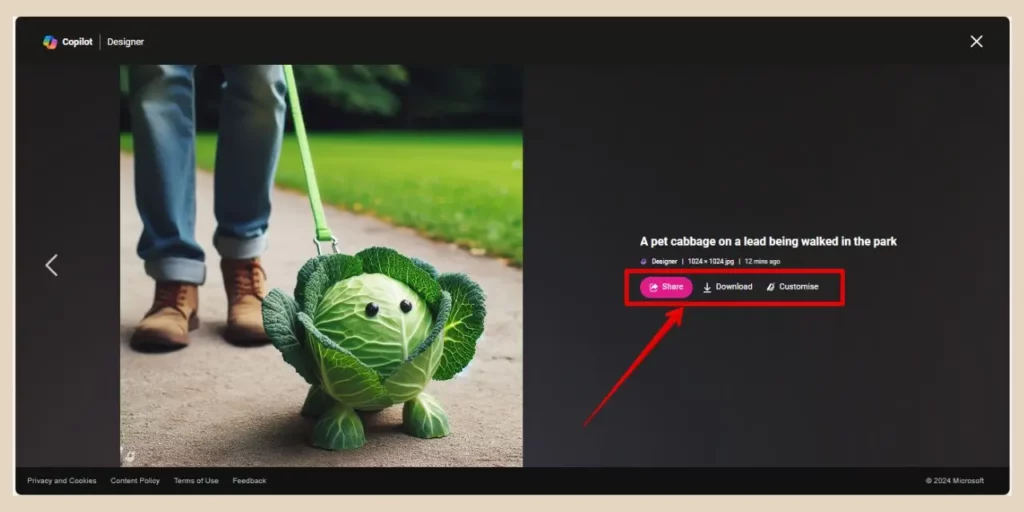
If you click on the customise button, this will open up another new tab and take you to Microsoft Designer which is the third AI tool.
The Microsoft Designer Tool
Your selected image will be brought over to the Designer editor which is a little bit like Canva but with nowhere near as many features. Here you can remove the background, add text, add other elements, etc but there are a few more tools here worth mentioning.
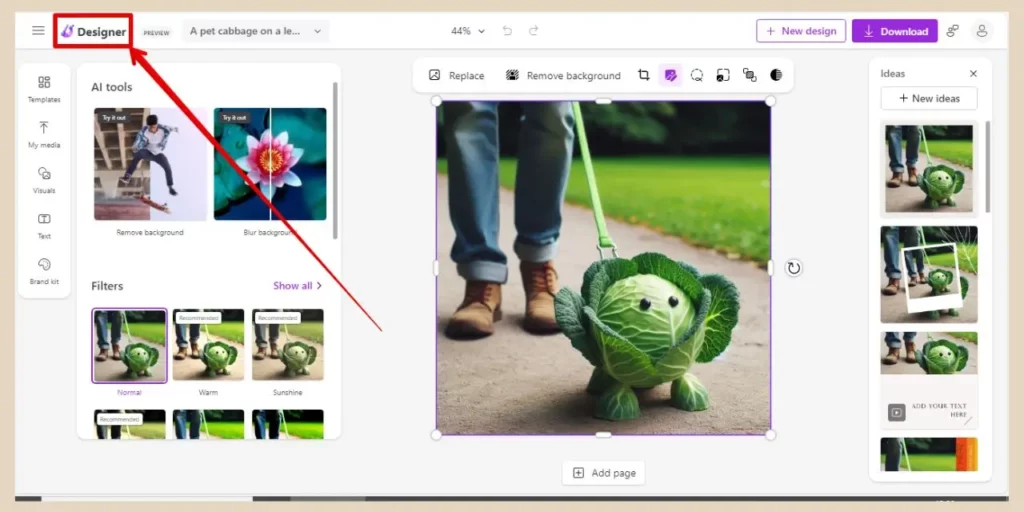
If you click the Microsoft Designer Home icon in the top left, it will bring you to a page where you’ll see several other tools once you scroll down.
The Image Creator tool here is pretty much the same as Copilot Designer Image Creator just with a different interface but there’s another tool here worth looking at and that’s the Design Creator Tool.
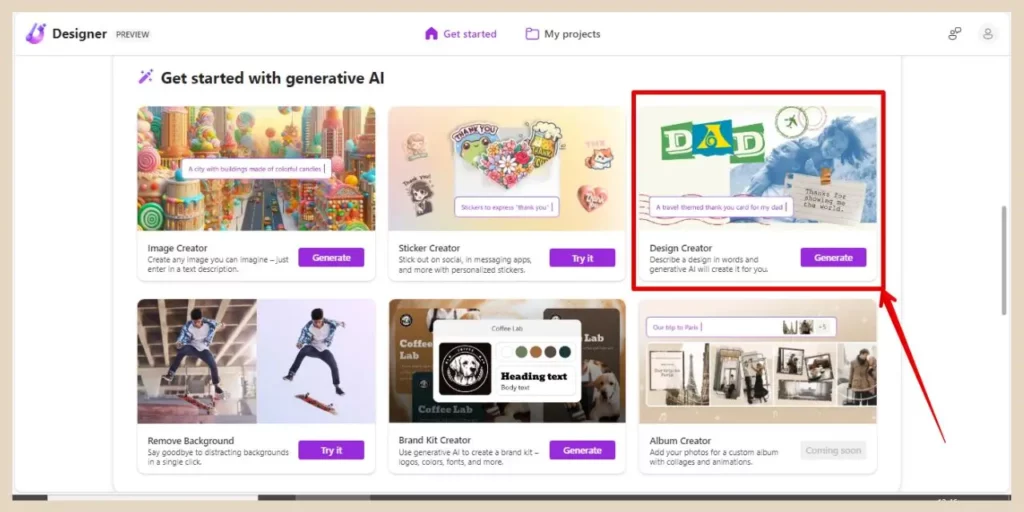
With this tool, you can create complete designs (think Canva Magic Design) with either images of your choice or images you create within the Design Creator tool.
The Design Creator Tool
Simply describe what you’d like to create, ie, a Pinterest Pin for a blog post called [Name of blog post], then either add existing media or let Designer generate a new AI image, then click the Generate button to see the results on the right of the page.
Note: To add images you’ve brought over from copilot/image creator into Designer, choose the My Media option after clicking the Add Media button.
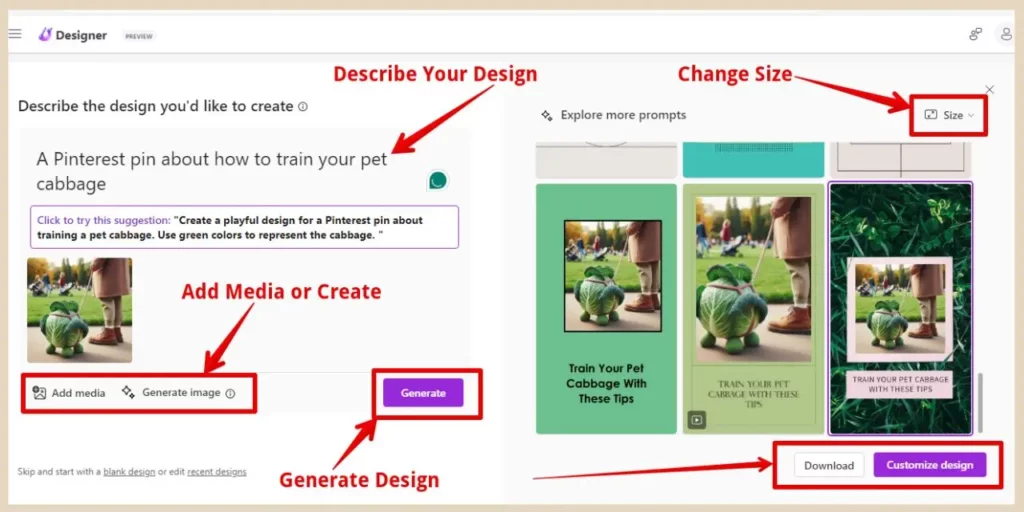
You can use the size option to change the size of your designs or use the prompt suggestion to get new results. You can also click the Generate button again to regenerate new results if you don’t like any of the ones provided.
Once you’ve found one that you like, you can either download it or customise it further in the Designer editor where you can move elements, change or add more text, change images or backgrounds, etc.
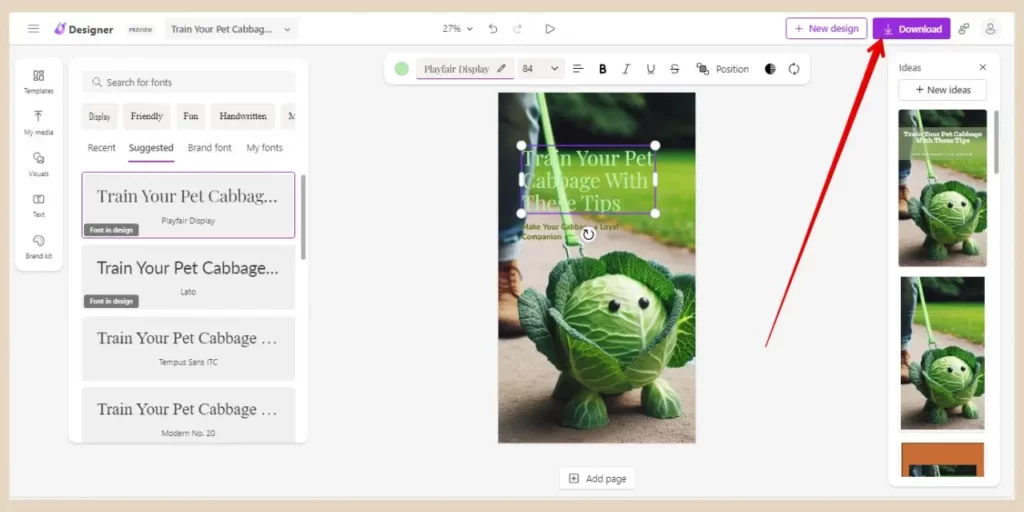
Once you’re happy with the final design, you can then download it by clicking on the download button in the top right-hand corner of the page.
The Use Of Copilot/Designer Images And Designs
Now here’s where things get a little complicated and unclear with the use of these AI images and designs. If you ask Copilot directly if you can use the images commercially, it will tell you that you can. However, if you read the Microsoft Designer Terms of Use, it states that you can use them for personal use only.
Since pointing this out to Copilot, it now states that you can’t use them commercially. But to complicate matters further, if you scroll down the terms of use, you’ll find another section (section 5) that states the following:
“Use of Images. Subject to your compliance with (i) this Agreement (and subject to the limitations in Paragraphs 1, 2, and 6) and (ii) the Microsoft Services Agreement, including the Code of Conduct, you may use Creations for any legal purpose.“
Well, paragraph 1 is the whole “personal use only” bit so that’s not really what I’d call “any legal purpose”. Confused yet? You will be. There’s also the fact that you can use DALL-E 3 images commercially when you create them in OpenAI.
The thing is though, it’s not the model (DALL-E 3) but the provider (Microsoft Designer, OpenAI, etc) that decides their own terms of use (which often differ from each other) and it’s Designer that provides the AI generated images in Copilot.
So, with that in mind, you may want to be cautious about how you use any of the images or designs you create here, both in Copilot and the other Designer tools.
How Do You Use Yours
I personally don’t use any images or designs created here on my monetised websites. I prefer to use a selection of free AI image generators that I know are commercial-use friendly (Playground AI being my favourite and the one I use for almost all of my featured images).
For social media designs, however, the entire Designer suite is excellent for this, especially the Design Creator tool.
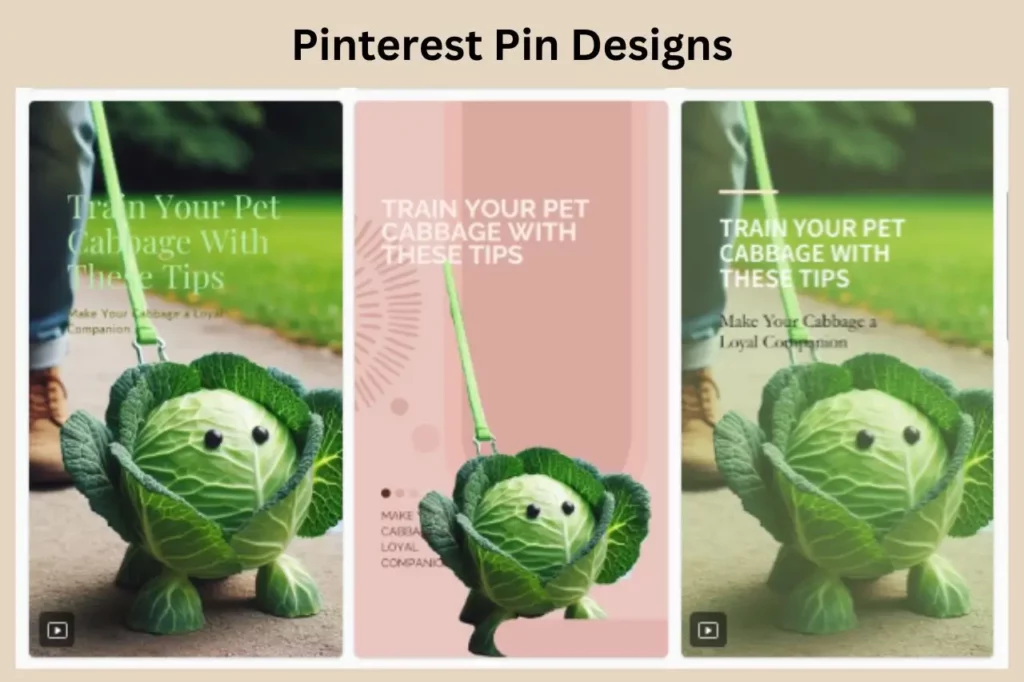
I’ve use it many times to create a variety of social media posts and it’s very good at coming up with really professional-looking designs which you can then edit and tweak to your own liking.
Other Uses Of Copilot For Blogging
There are also plenty of other blogging chores that Copilot can help you with whether that’s with new content or content you’ve already written and they include:
- Rewrite content.
- Summerise content.
- Offer suggestions to improve existing content.
- Keyword suggestions (although, you’ll want to check their viability with your own keyword tool but it will certainly give you plenty of ideas).
- Competitor research.
- Niche research.
- Trending Topics.
It can also help you with meta titles, meta descriptions and even code snippets if you’re trying to add functionality or design aspects to your website and don’t want to add yet another plugin.
Let’s Get Blogging With Microsoft Copilot
And there you have it. Another handy AI writing tool that also happens to have some image and design tools connected to it (even if the image/design usage is…well, complicated).
Whether it’s brainstorming content ideas, creating catchy social media titles or drafting entire blog posts, Microsoft Copilot can assist you every step of the way.
It’s an awesome way of speeding up your content creation and skyrocketing your production levels through the roof. So why not give Microsoft Copilot a try to see what you think? I may just become another essential tool in your AI writing arsenal.
And, if you’ve already tried Copilot, then please feel free to share your stories and experiences with it in the comments below. I’d love to hear all about them.
Happy Blogging!

You May Also Like
- Is Microsoft Copilot (Bing Chat) Good For Bloggers
- Is ChatGPT Or Bard (Gemini) Better For Bloggers
- How To Use Google Bard For Epic Blogging

