The significance of a profile picture and how it shapes your digital presence is pretty big so knowing how to add a profile picture to WordPress is something you should learn fairly early on.
It’s not an exaggeration to say that a profile picture can act as your virtual handshake in the online community. It’s often the first impression users have of you on your WordPress site, and it can heavily influence the way they perceive your content.
Whether you’re running a personal blog, a business site, or a bustling online forum, having your profile picture visibly displayed creates a sense of trust and approachability.
When you add a personal touch to your site, you’re not just sharing content, you’re building relationships. That’s going to include boosting credibility and encouraging interactions because establishing your identity online is pivotal to your success.
Luckily, WordPress user profiles are designed to be user-friendly and adding an image to your profile is super easy. So, let’s look at how it works and how to set up your WordPress profile picture.
Understanding WordPress Profile Pictures
You might wonder why you can’t just upload a picture directly to WordPress and call it a day. Well, there’s a method to the madness. WordPress uses a platform called Gravatar, which stands for ‘Globally Recognised Avatar’.
It’s a web service created by Automattic, the same company behind WordPress and it allows you to have a consistent profile picture across different websites. Pretty cool, right?
So how does it work with your WordPress site? When you comment on your blog posts or appear in a user list, WordPress checks Gravatar with your registered email.
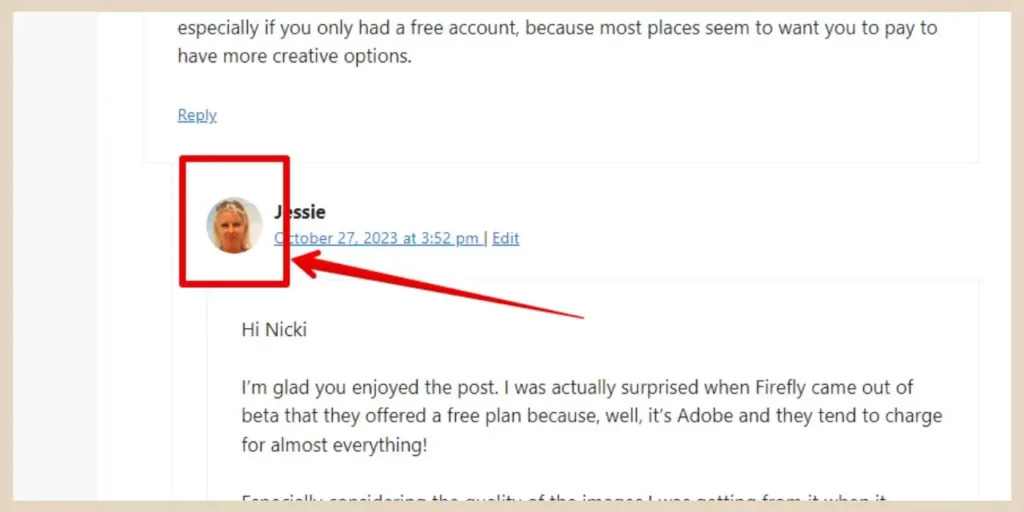
If you’ve uploaded a picture to Gravatar, it will automatically show up anywhere this email is used. It’s exceptionally useful for site managers and multi-author blogs.
And it’s not just your website or blog post comments either. Anywhere you use this email, this associated image will be pulled and used as your profile image automatically. This means that you only need to set it up once and your image will be added automatically going forward.
Step-By-Step Guide: How To Add A Profile Picture To WordPress
I’m going to walk you through adding your profile picture to WordPress, which can be done quickly with a few simple steps. This isn’t just about uploading a picture, it’s also about making sure your profile stands out on your site.
First up, you’ll need to get yourself set up with a Gravatar account. Why Gravatar? It’s the most seamless way to manage your picture across multiple WordPress sites so head over to the Gravatar website, sign up with the same user email you use for your WordPress website, and you’re halfway there.

To check the email associated with the WordPress user you’re setting up, you can hover over Users in the left panel of your WordPress back office and then click All Users.
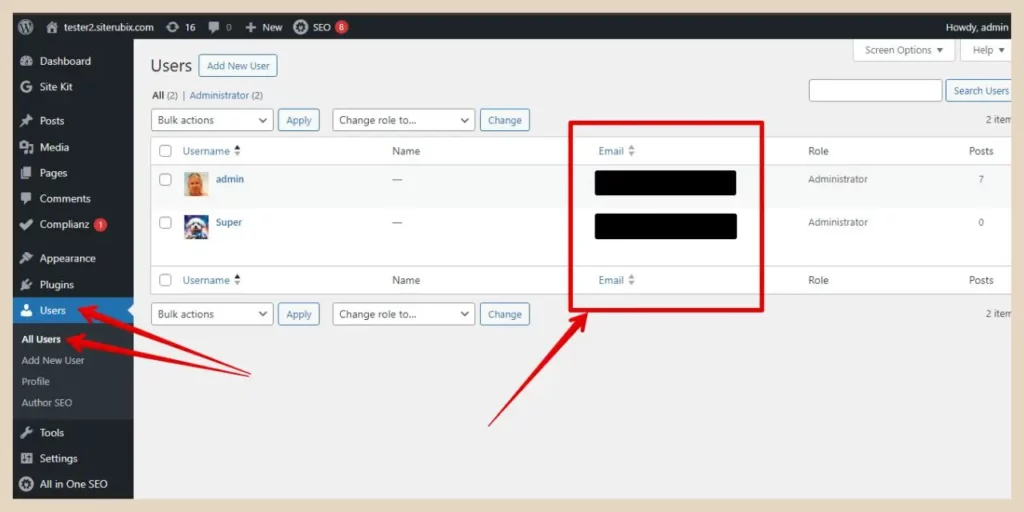
From here, you’ll be able to see the email associated with the user you’re about to set up. Once you’ve signed up to Gravatar with this email, you’ll be sent a verification link to complete the sign-up process.
When you click on this verification link, you’ll be taken back to the Gravatar website where you can now set up your Gravatar image.
Adding Your Image To Gravatar
Choosing your profile picture is critical. Select something that resonates with your professional identity. I recommend a clear, friendly, and appropriately professional image. Your photo should represent who you are and how you wish to be perceived online.
That snapshot of you from last weekend, three sheets to the wind probably won’t put out the best impression so keep that in mind when choosing your image.
Once you’ve selected the ideal image, it’s time to upload it to Gravatar using the Upload Image button. Alternatively, you can click the Use Camera button to take a brand new one.
After uploading your image, Gravatar will prompt you to crop and adjust your picture to fit perfectly. You can use the rotate, zoom, crop and move buttons to set your image to your own preference.
Once you’re happy with the image, click the Crop Image button and you’re all set. You can at this point continue to set up your Gravatar profile but this is your on-site profile on Gravatar so you don’t need to complete anything else unless you want to.
Now, your profile photo is out there! Each comment you make and each post you publish will now show your chosen image, solidifying your brand with each interaction. Remember, you can always change or update your profile picture anytime via Gravatar. It’s completely flexible.
Optimising Your Profile Picture For Best Results
Getting your profile picture up is just half the battle. The other half? Making sure it looks great and works hard for your personal branding. Let’s talk about optimizing that profile picture so you can make the best impression.
First up, image quality and dimensions are critical. You need a photo that’s crisp and clear at various thumbnail sizes. Typically, a square image of about 250px by 250px works well but you can always crop a larger one if needs be.
But don’t worry too much about the technical stuff. Most phones take pictures that are more than good enough. Just pick a photo where your face is visible, and you’re good to go. And if you ever want to change it, simply click the Avatars option in your Gravatar account to upload a new one.
Now, this isn’t just about looking good, it’s also about being consistent with your brand. If you want your image to be memorable, choose something that resonates with you and your work.
And if you want to get really brandable, that could mean wearing colours that match your website or opting for a background that speaks to your brand.
If you’re not comfortable plastering your own face on the internet, you could try using free AI image generators to create a cartoon/anime version of your image although to be honest, real genuine photos are always better and more trustworthy.
Next, let’s move on to what can go wrong and how to fix it. Because, trust me, issues do pop up and knowing how to handle them will save you a ton of time.
When Your New Profile Picture Doesn’t Appear
You’ve followed the steps to add a profile picture to your WordPress account, and you’re on your way to creating a more personal and branded user experience.
But sometimes, even when you think you’ve done everything right, things don’t work out as expected. That’s the moment for a bit of troubleshooting. If your new profile picture isn’t showing up, don’t panic. It’s fairly common and often comes down to a caching issue.

Clear your browser cache, as well as your site’s and then check your profile again. If that doesn’t solve it, make sure there aren’t any conflicts with your WordPress theme or active plugins. Also, double-check the email you’ve used for Gravatar and make sure it matches the one linked to your WordPress user.
Sometimes, unexpected issues can arise that seem baffling. When that happens, remember the supportive WordPress community you have at your disposal. The WordPress forums are full of seasoned WordPress users and developers who love to lend a helping hand. Don’t hesitate to post your queries there if you’re sticking on a problem you cannot untangle.
Let’s Add A Profile Picture To WordPress
And there you have it. It really is that simple. I hope this guide has made the process of adding your profile picture to WordPress as smooth as possible.
Your first attempt doesn’t need to be your last, so if the image doesn’t fit or feel right after some time, you can always change it. Stay true to your brand and choose a profile picture that resonates with you and your audience.
Remember, your profile picture is more than just an image; it’s a symbolic gateway inviting visitors to engage and connect with your content.
Do you have any tips or experiences to share about personalising your WordPress profile? I’d love to hear all about them, so please feel free to leave your comments below.
Happy Profile Picture Adding!

Helpful Guides to Read Next
These beginner-friendly guides will help you keep building your blog step by step.
- How to Create a Favicon That Makes Your Blog Look More Professional
- How to Optimise Large Images to Speed up your Blog
- Simple Design Tweaks That Make Your Blog Look More Professional
- How to Create a Professional Blog Logo Without Hiring a Designer Using Canva Free
- How to Create Clear Screenshots That Improve Your Tutorials

Jessie
Founder, nomorerush.com
Hi, I’m Jessie — founder of No More Rush. I help beginners build profitable, beginner-friendly blogs without the overwhelm or unrealistic expectations you see online. Everything here is built around simple, structured steps so you always know what to do next.