If you love adding a splash of colour to your designs, then you’ll love this tutorial because I’m about to show you how to create the ultimate gradients in Adobe Illustrator.
Adobe Illustrator is awesome for creating designs and its gradient tools are an excellent way to add some serious flare to any creation. You can create simple gradients or highly complex ones depending on where your design mood takes you.
They’re relatively easy to create and customise and there are several different ways to do it. So let’s take a look at how it’s done and learn how to create awesome gradient colours to dress up your designs.
How To Create Gradients In Adobe Illustrator
I’m going to start with the simplest way and that’s using the regular Gradient Tools and panels. These gradients can be added to almost everything whether that be simple shapes or as a fill for text to create cool text effects.
For this example, I’m just going to use a basic circle so add your shape, object, etc, to the artboard and from here, you can use one of four ways to add a gradient colour to it.
On a side note, if you’re relatively new to Illustrator, you’ll start to notice very quickly that there are multiple ways to do the same task. You’ll probably end up having a preferred way to do it but since you’re here, I might as well show you every which way so you can choose your preferred method.
Adding Gradients To Your Design
With that, I’ll start with the first one which is simply selecting your object and then clicking on the Gradient Tool in the Toolbar. Next, click anywhere on your object and the basic black-and-white gradient will be added to it.
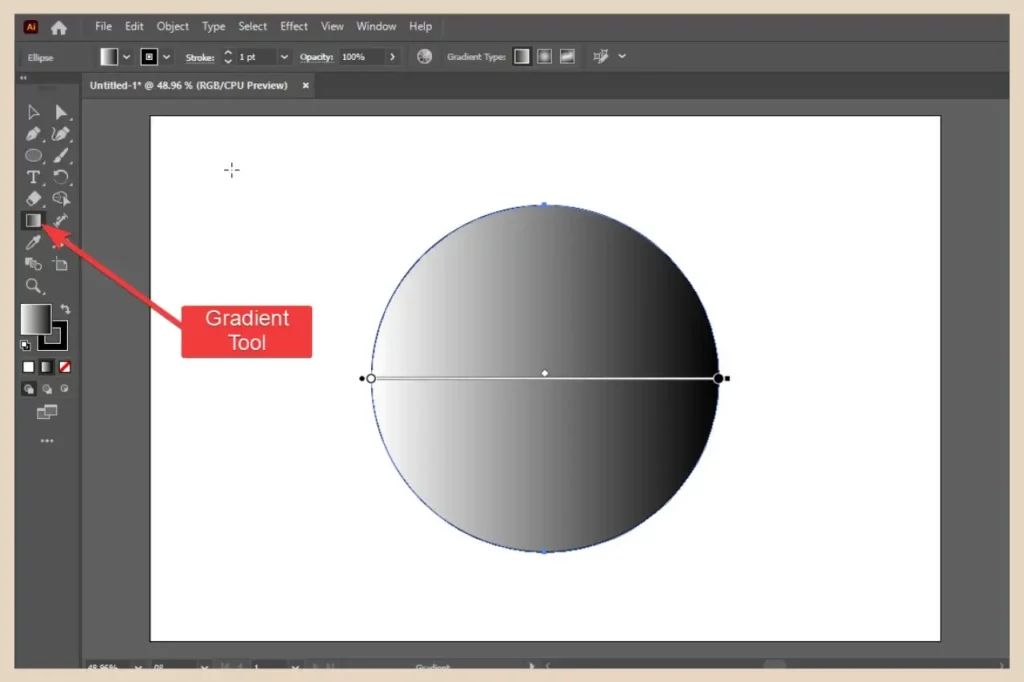
You’ll be able to customise this to your liking with your own colours and use the bar that’s just appeared across your object to change the position of the gradient which I’ll show you in a moment but for now, let’s move on to the next way of adding a gradient.
The second way is to select your object and then click on one of the fill icons from either the Properties panel or the Control/Options bar (if you have it showing).
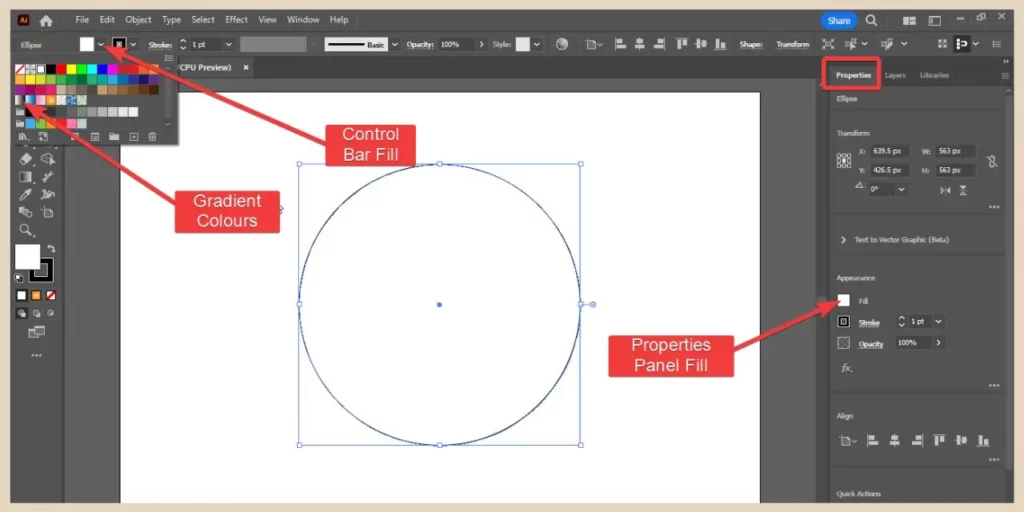
From here, you can choose from the small selection of gradient colours available on the swatches palette which again you can change to your own liking afterwards.
Using The Gradient Panel
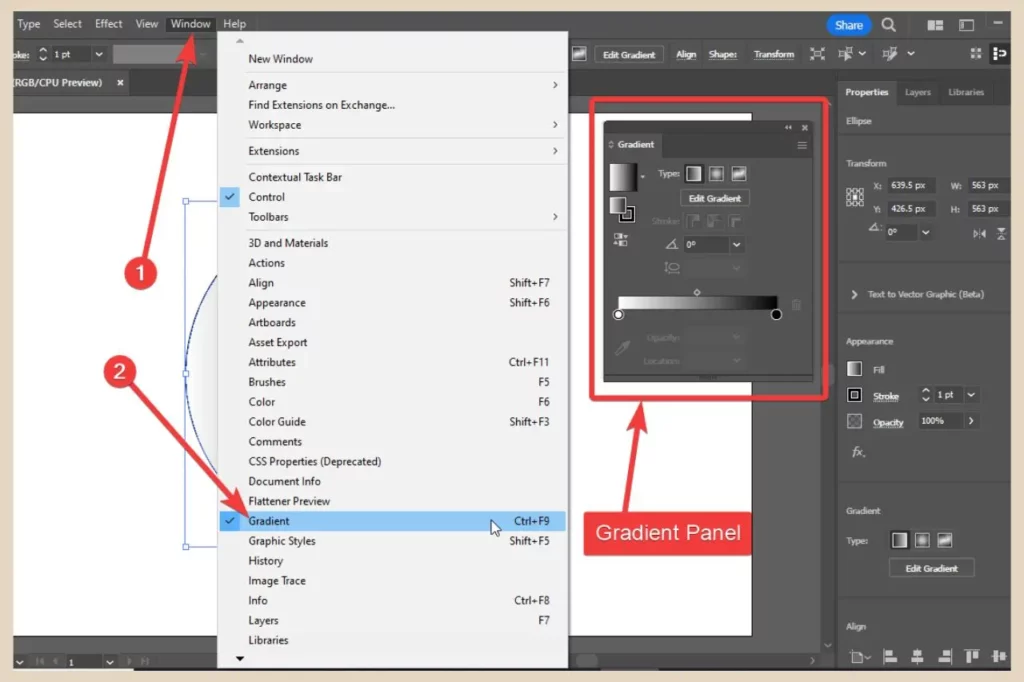
The next way is by opening up the Gradient panel which you can access by clicking the Window menu followed by Gradient.
This is my preferred method because this is where you’ll need to go to adjust or change the gradient to your own liking.
However, if you don’t fancy making your own gradient or you’re not happy with the small selection on the swatches palette, there is another way to add gradients to your design and that’s using the larger selection of existing gradient presets in the Swatches library.
Using Gradients From The Swatches Library
To access the Swatches Library, you can use one of two different ways. The easiest way is by simply clicking on the fill icon in either the Properties panel or Control bar. From here, you can click on the Swatches Libraries icon which is on the bottom left corner of the palette.

Alternatively, you can open up the Swatches panel instead. To do that, click on the Window menu then click on the small black arrow at the bottom of the menu options to scroll down. Once you see the Swatches option, click on it to open up the panel in your workspace.
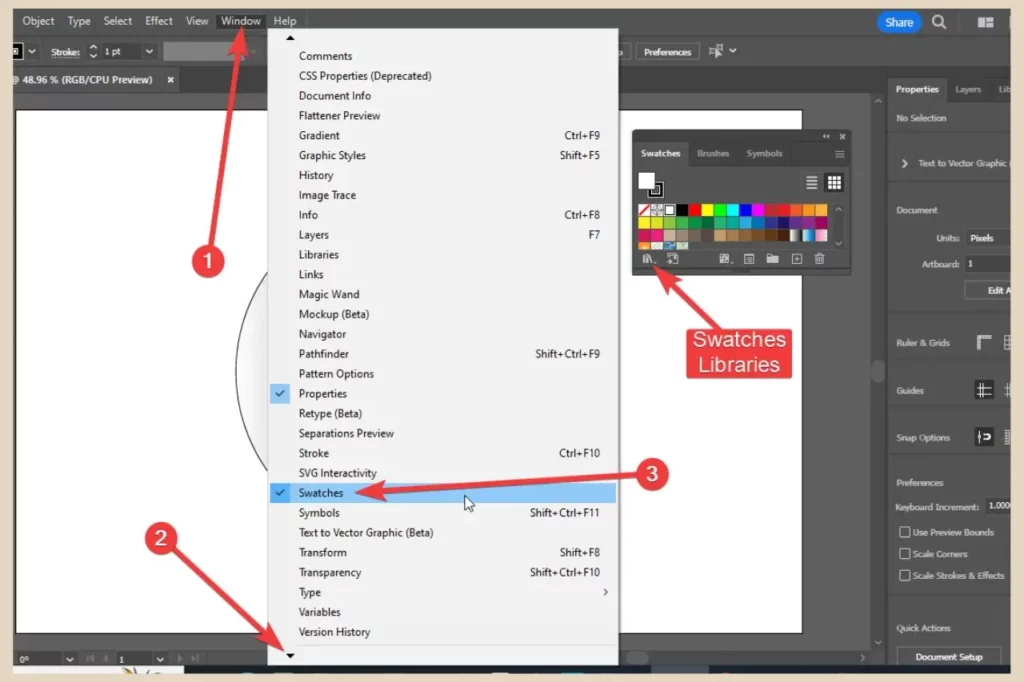
From here, you’ll find the same Swatches Libraries icon in the bottom left corner where you can access the full library.
Once you click on the icon, a new menu will appear with a list of swatch libraries so hover your cursor over the Gradients option and another menu will appear with a selection of gradient libraries for you to choose from.
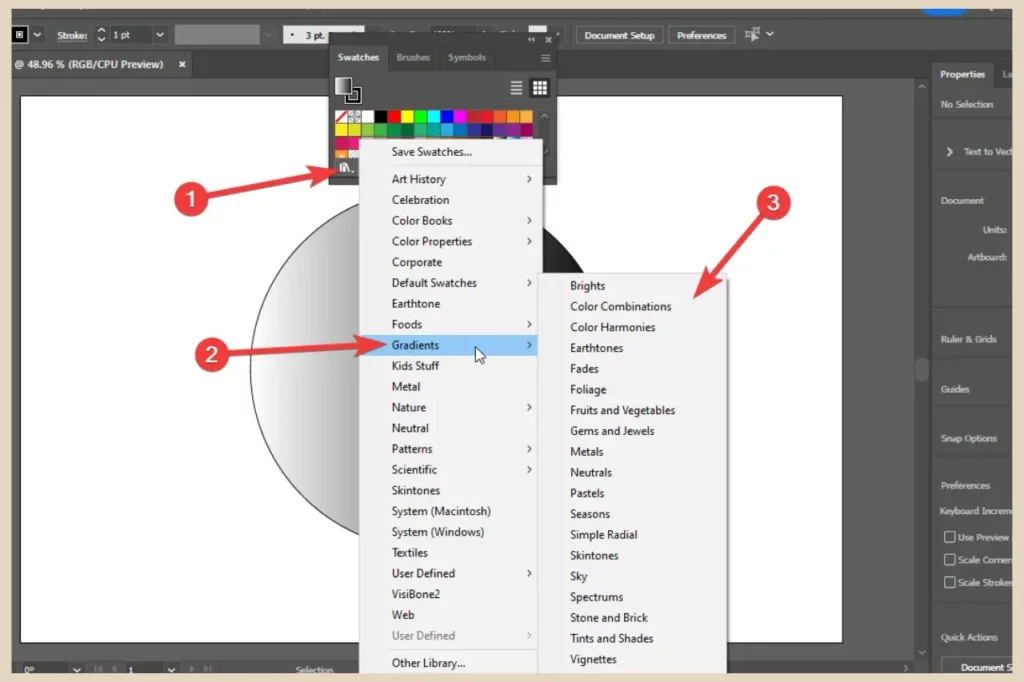
When you click on any of these, a small panel will open up containing the gradient selections for that library so simply click on any of them when your object is selected to add one as a fill colour.
This panel also has the Swatches Libraries icon in the bottom left corner so you can check out more libraries from here too.

You’ll also notice that if you select several different gradient libraries, they’ll be added to this panel across the top as new tabs so you’ll be able to switch between them easily without having to access the Swatches Libraries menu to access them again.
How To Make Or Customise Your Own Gradient Colours
Now if you want to create or customise your own gradient colours, then this is where the Gradient panel comes into play.
Regardless of whether you’ve used a preset gradient or not, all gradients can be customised from the Gradient panel.
advertisement
So select any gradient to start off with and then open up the Gradient panel from the Window menu as we did earlier.
Also, make sure the object with the gradient colour fill is selected so that you can see the changes to the gradient as you make them.
Changing Gradient Types
So starting with the gradient type, you can use the type icons at the very top of the panel to change between three different types of gradient.
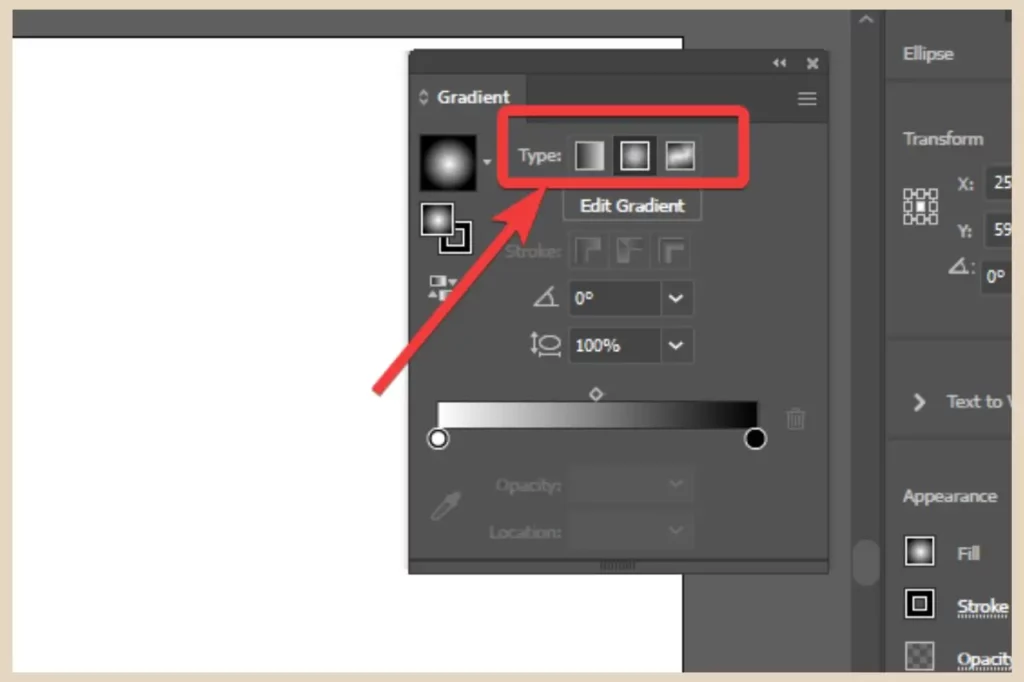
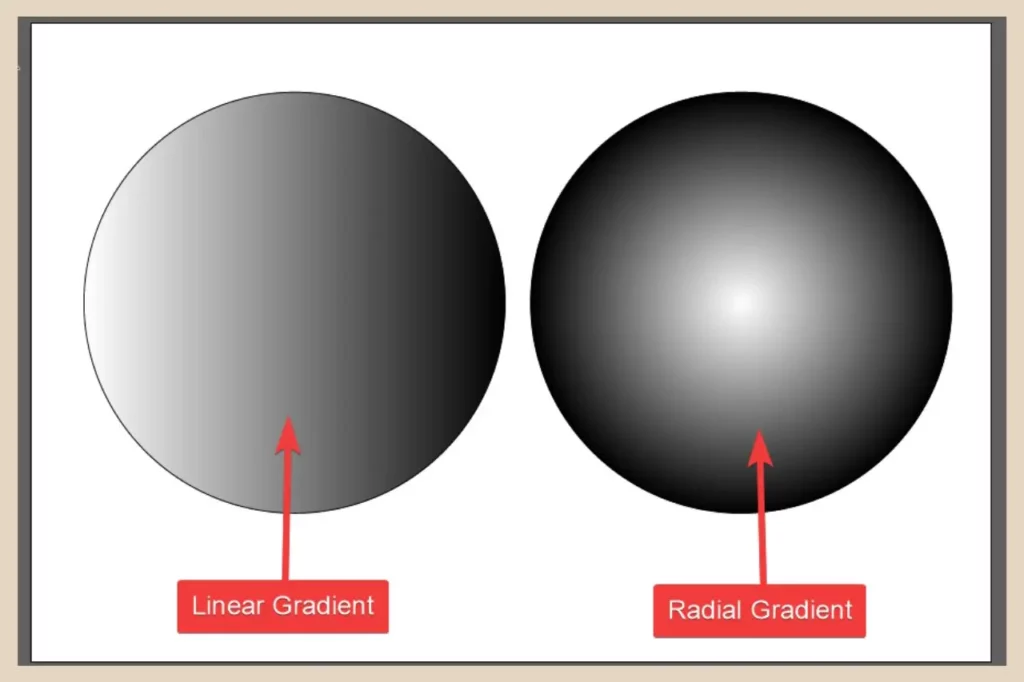
By default, the Linear gradient will be selected and this creates gradients in a line so from top to bottom, left to right, etc.
The next type is the Radial gradient which creates gradients in a circular motion from the centre of an object moving outwards.
The third type of gradient is a freeform gradient which lets you create your own highly customised gradient in freeform.
Customising A Freeform Gradient
When you select this option, you’ll notice small circles appear on your object and these are colour stops. Each one of these represents the colours that are being used in the gradient.
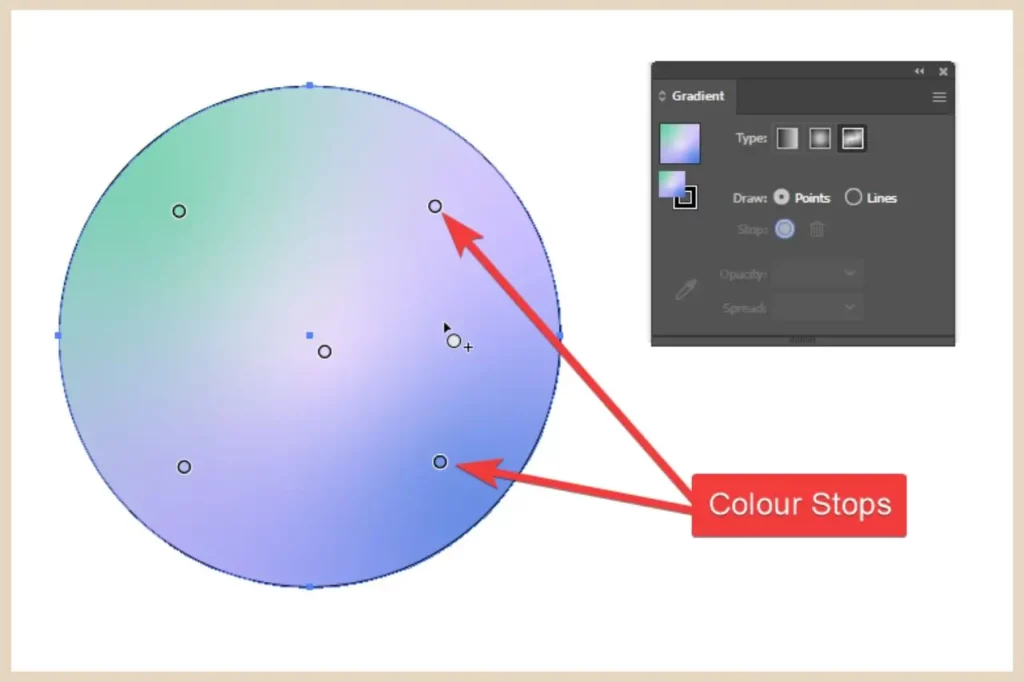
You can click and drag these around your object to change the position of that colour in the gradient. You can also add more colour stops by simply clicking anywhere within your object.
To change colours, click a colour stop within your object and then double-click the Stop icon in the Gradient panel.
This will open up the colour palette where you can change the colour to your own liking. If you want to delete a colour stop, simply select it and then click the trash can icon on the Gradient panel to delete it.
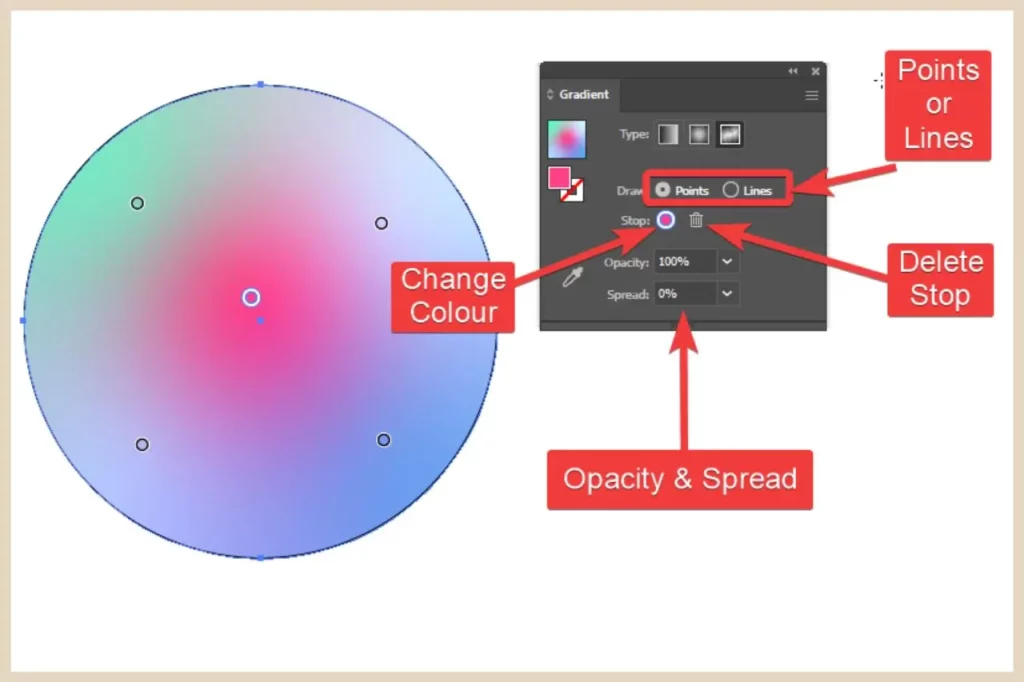
You can also switch from Points to Lines on the Gradient panel when adding new stops and this will create a different gradient effect so it’s well worth playing around with the types here to see what you can create.
The final thing you can do here with freeform gradients is to change the Opacity (transparency) of the colours or change the Spread (how far the colour spreads from the stop).
To do that, simply use the dropdown boxes beneath the Stop icon on the Gradient panel to adjust these to your own liking.
Customising Linear And Radial Gradients
Just like the freeform gradient, you can customise the linear and radial gradients in several different ways. If you want to change the gradient colours, double-click on a colour stop on the gradient slider to open up the colour palette to change the colour.
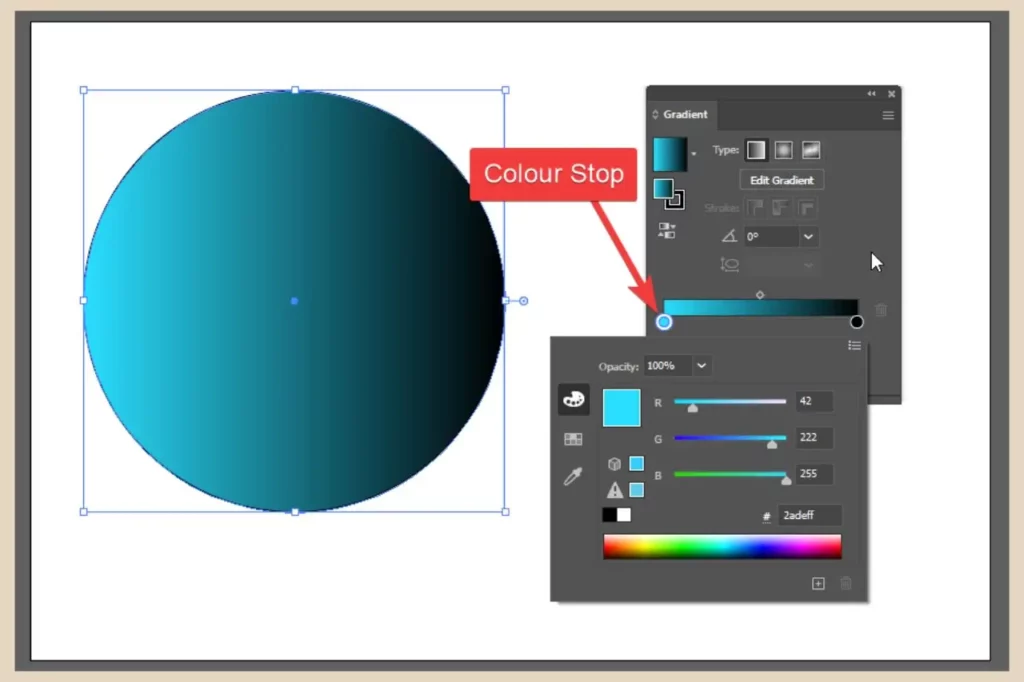
You can also change the opacity (transparency) of a colour using the Opacity option directly below the slider whenever a colour stop is selected.
These stops can also be moved across the slider by clicking and dragging them to change the position of the colour in the gradient design.
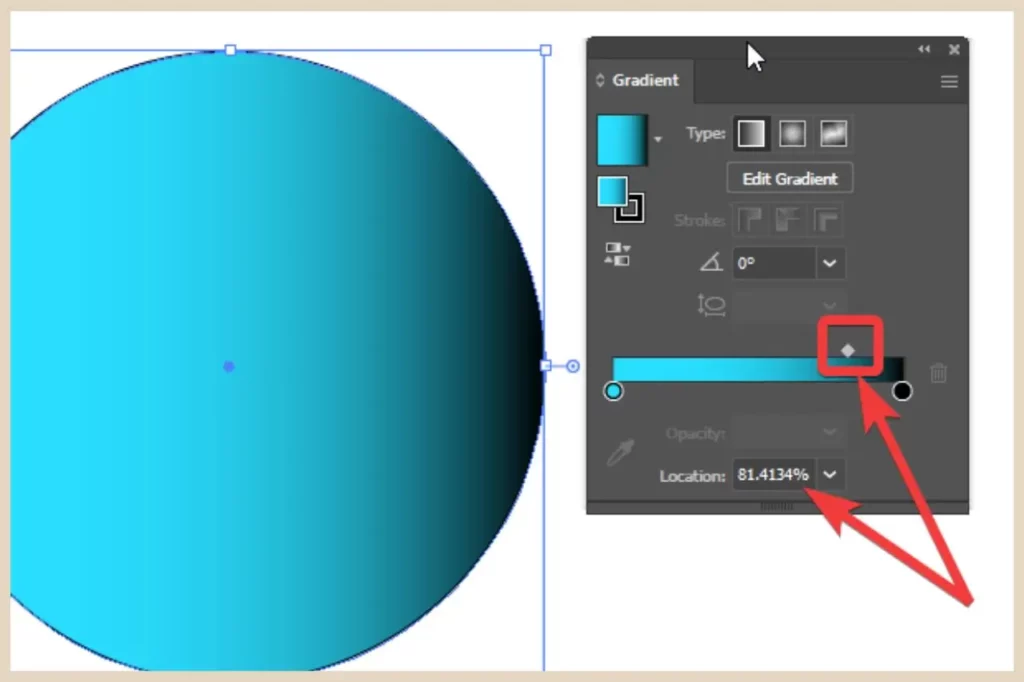
Adding/Removing Colours From Gradients
If you want to add more colours to the gradient, hover your cursor close to the gradient slider until it changes into an arrowhead with a small + sign beneath it.
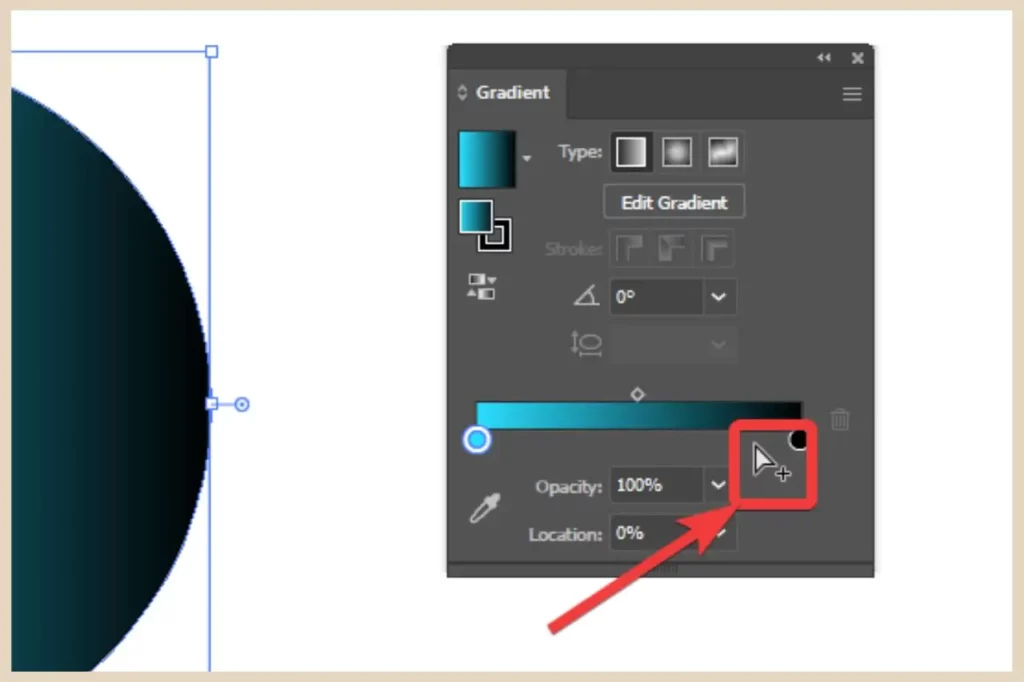
Once you see this, click with your cursor and a new colour stop will be added to the slider. If you ever want to delete a colour stop, click on it once to select it, then click the trash can on the right of the slider to delete it.
Alternatively, you can click and drag a colour stop away from the slider and once you release your mouse, the colour stop will be removed.
To change where the colours blend into each other, you can click and drag the location icon along the top of the slider or use the location options underneath the slider.
If you want to reverse the gradient colours, so let’s say from left to right to right to left, etc, you can do that by clicking on the Reverse gradient button which is just below the colour fill icon on the gradient panel.
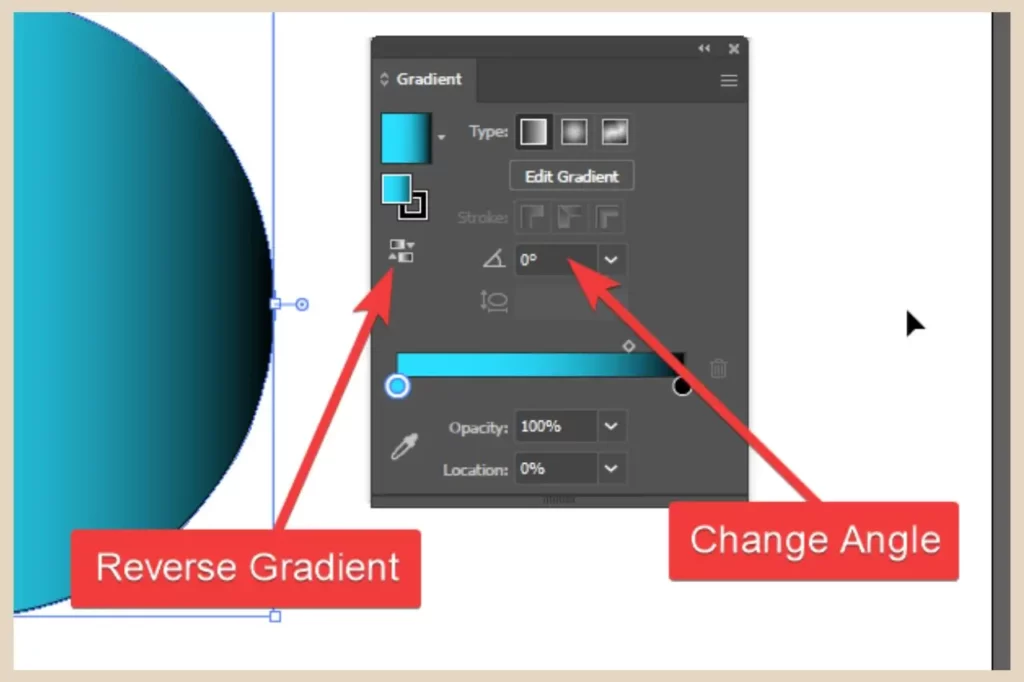
You can also change the angle of the gradient using the Angle options which is just off to the right of the Reverse gradient button.
Most of these options are the same for both linear and radial gradients except for one extra thing that you can do with radial gradients and that’s changing the aspect ratio.
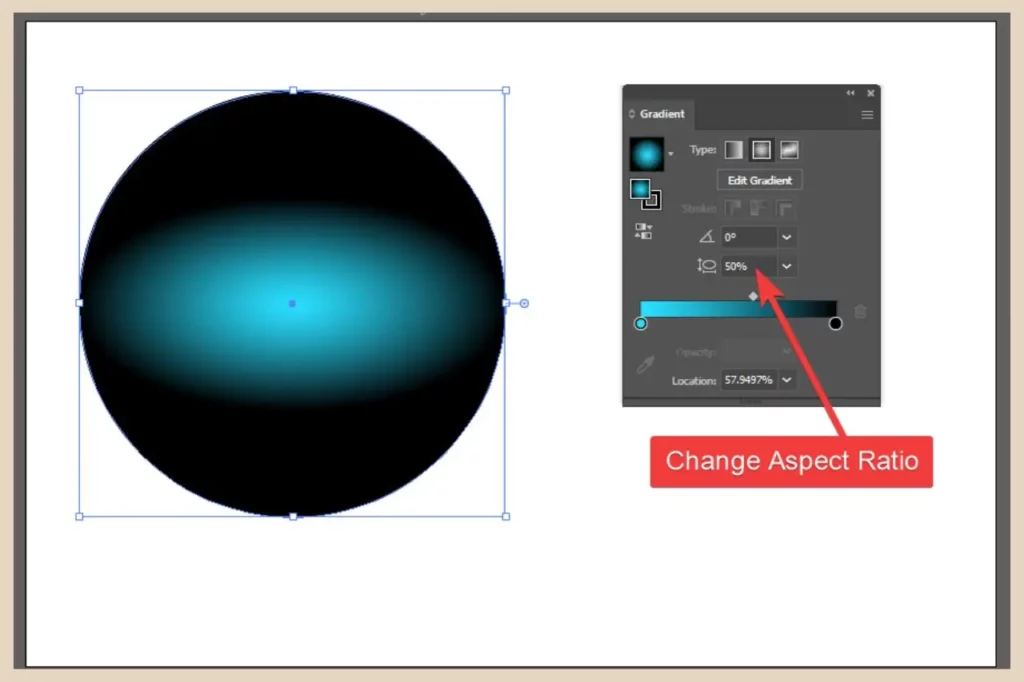
Simply use the dropdown arrow and choose a different percentage to alter the aspect ratio or click in the percentage box to type in your own custom value to alter the look.
Manually Editing Your Gradients
If you’d like a little more freedom to customise your gradient, then this is where the gradient tool comes in handy. You can select it directly from the toolbar or by clicking on the Edit Gradient button on the Gradient panel or the Properties panel.

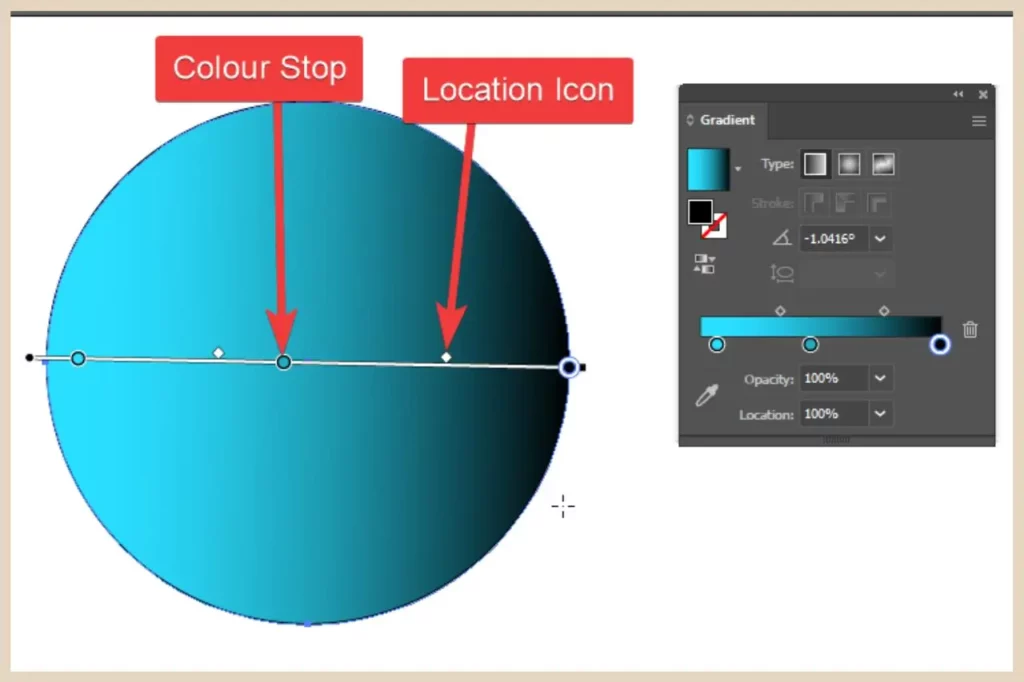
You may remember earlier that when you select the gradient tool, a bar appears across your object. Well, this bar can be used to customise your gradient in numerous ways.
Much like the slider on the Gradient panel, you can move the colour stops and the location icons on this bar to adjust the appearance of your gradient.
You can also click and drag on the circle end of the bar to move it along its length across your object so that only part of it is positioned over your object.
If you click and drag on the square end of the bar, this will allow you to shorten or lengthen it and doing either of these will alter the gradients appearance.
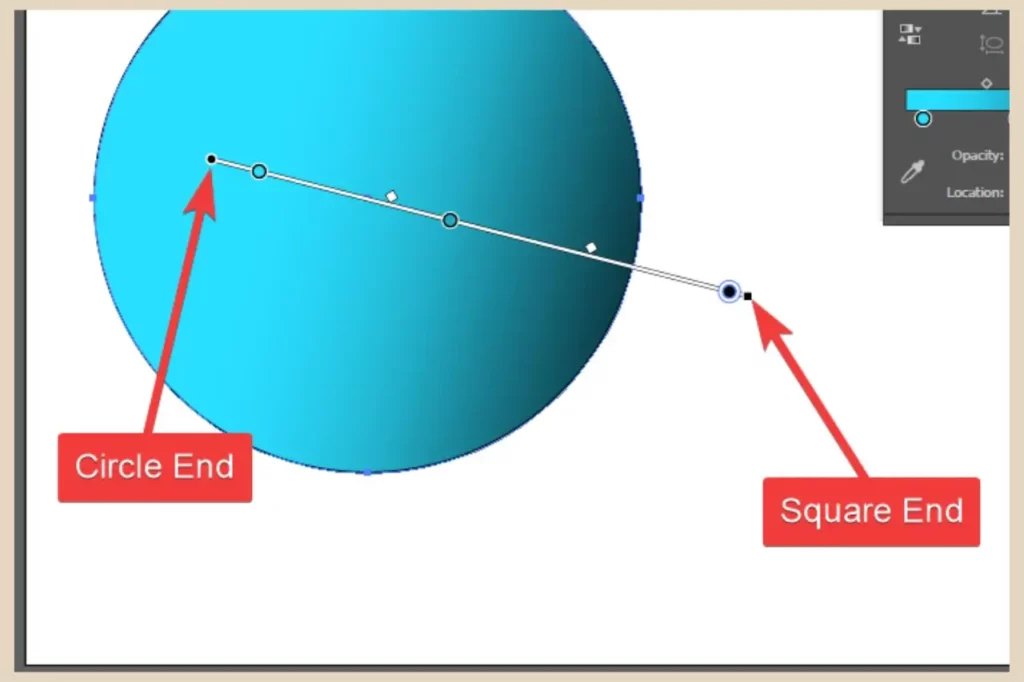
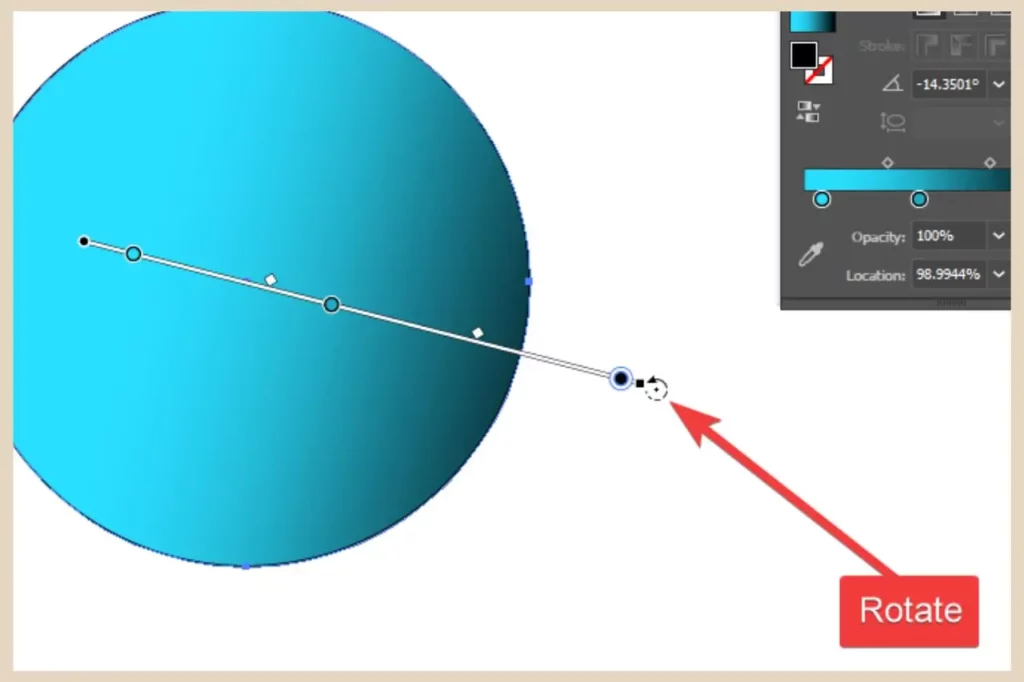
You can also change the direction of the gradient by hovering your cursor close to the square end of the bar until your cursor icon changes into a circled arrow.
Once you see this, you can click and drag to rotate this end of the bar in any direction to alter the gradient’s direction.
Alternatively, you can replace the existing bar with a new one in the size and position that you prefer by simply clicking and dragging anywhere on your object to create and replace the current one.
Adding Gradients To A Stroke (Border)
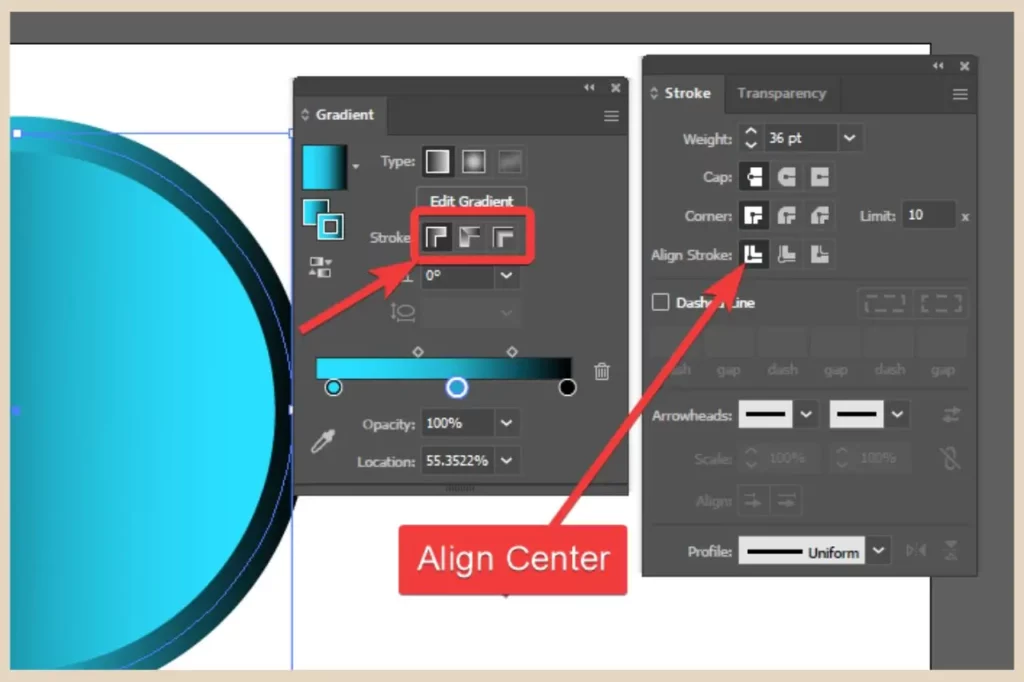
One final thing you’ll notice here on the Gradient panel is a selection of Stroke options which are grayed out by default. To use these options, click on the stroke colour icon which is partially behind the fill colour icon on the Gradient panel to bring it to the forefront.
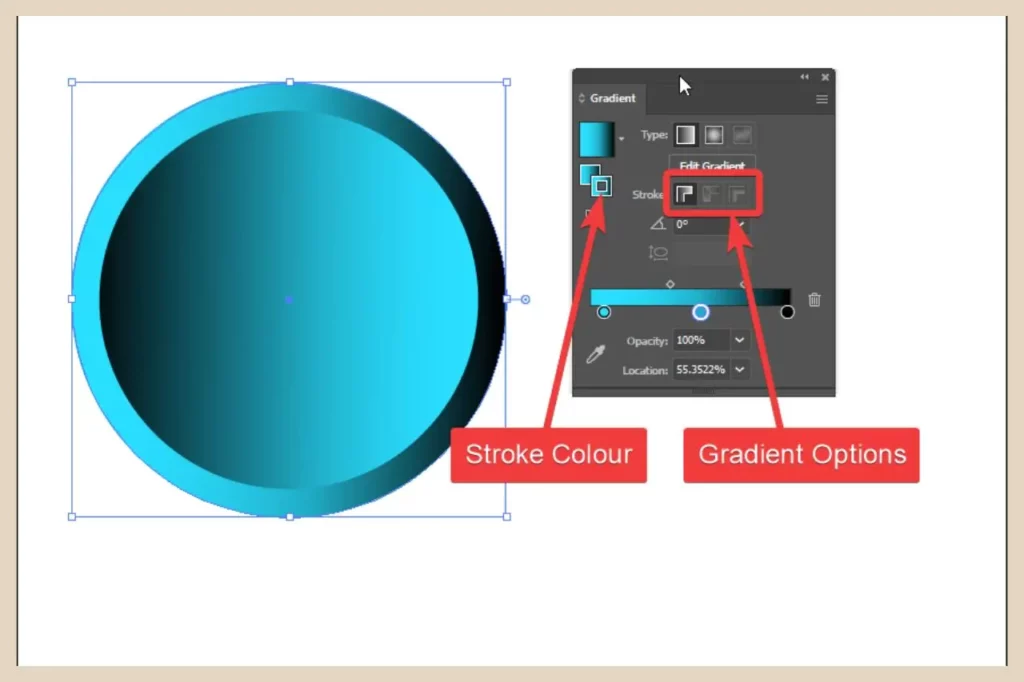
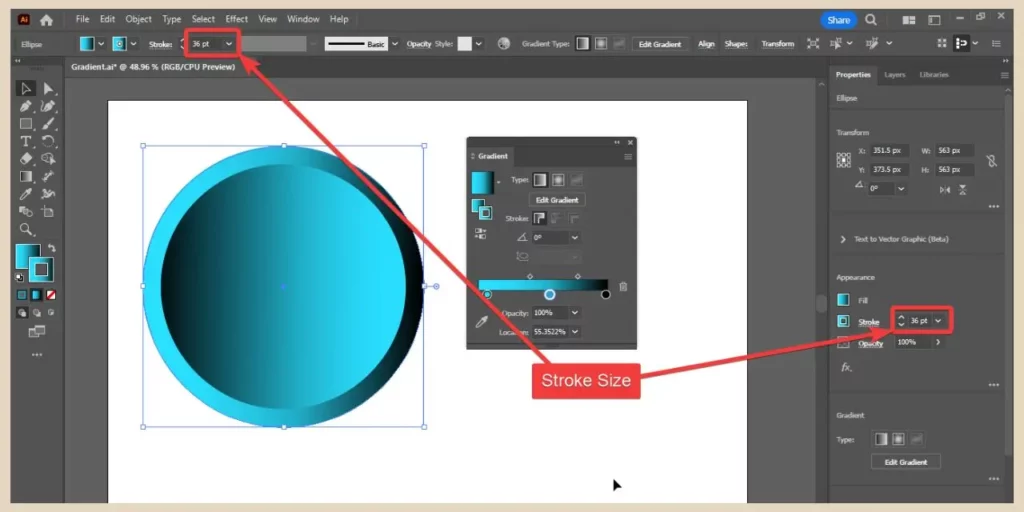
This will now allow you to play around with the stroke colour although you may want to make the stroke size much bigger from the Properties panel or Control bar as I have in the screenshot above so that you can see the gradient colours more easily.
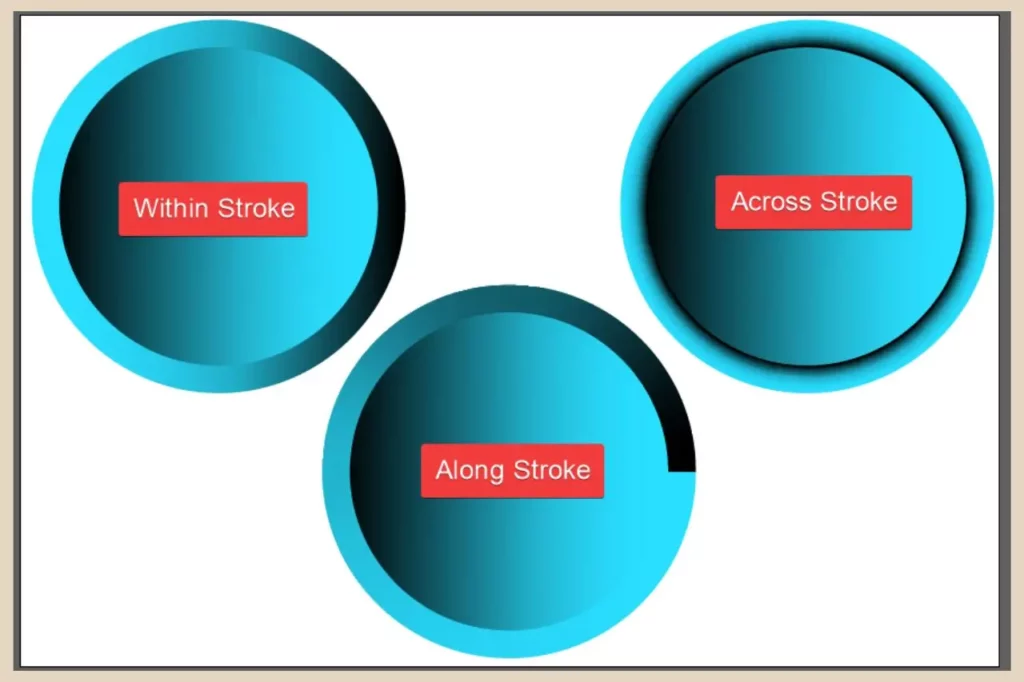
One thing you may notice is that depending on how your stroke is aligned, you may only be able to use the first stroke option (Align Gradient Within Stroke) because the other two will be greyed out.
How To Apply Gradients Along Or Across A Stroke
If you want to be able to use all three options (they do create different effects), then you’ll need to change the stroke alignment and you can do that easily using the Stroke panel which you’ll find by scrolling down the Window menu.

When the Stroke panel opens, it will be collapsed so to open it fully, click on the three lines in the top right of the panel and click the Show Options text that appears.
Once the panel is fully open, you’ll need to change the stroke alignment to Center and this will now make all three stroke options available on the Gradient panel.
From here, you’ll now be able to switch between the different stroke options on the Gradient panel to see the different effects they create.
Now for those of you who want to get really creative with your gradients, there is one more way to create gradients and that’s by creating a Gradient Mesh which lets you create highly customised gradients.
Creating A Gradient Mesh
Creating a Gradient Mesh is a little more complicated than creating regular Gradients and you’ll probably want to spend a bit of time practising to get the hang of it. However, once you get used to it, you be able to create some seriously epic gradient creations.
So start by adding your object to the artboard. You can choose to leave the fill empty or you can add a colour as a starting point.
In this particular example, I’m using a circle and I’m adding a blue fill to it just to get me started. With the object selected, click the Object menu and then click Create Gradient mesh.

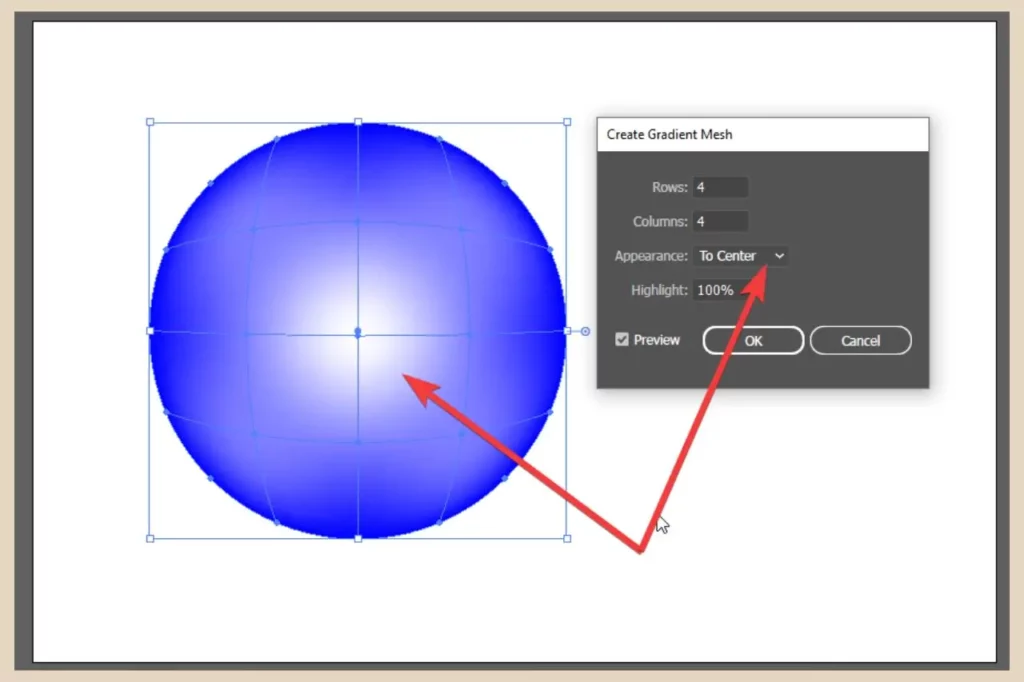
A small window will appear where you’ll be able to choose how many columns and rows your mesh contains. You’ll also be able to add a white highlight to the mesh by using the Appearance dropdown menu.
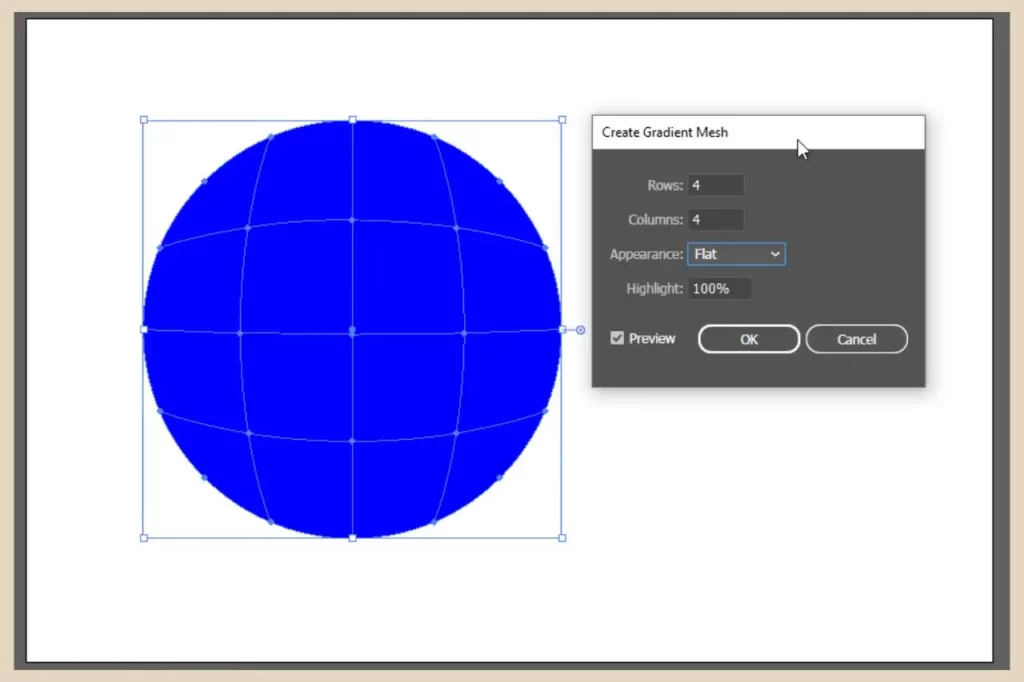
If you leave this set to Flat, no highlight will be added but if you choose To Center or To Edge from the dropdown menu, a white highlight will be added to the corresponding area which you can then change the strength of by adjusting the percentage in the Highlight box.
Once you’re happy with the settings, click the OK button to create your mesh. Alternatively, if you’d rather create your own unique mesh where you can place the mesh lines where you want them, you can use the Gradient Mesh tool instead. You can also use this same tool to add more columns and rows to your existing mesh.
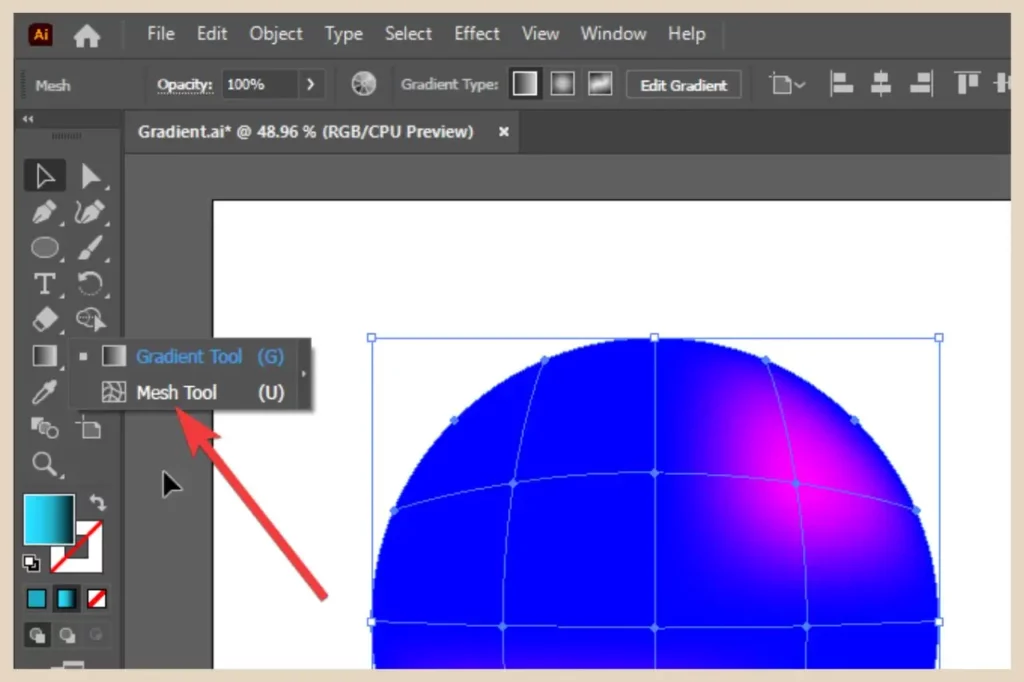
Using The Gradient Mesh Tool
To do that, either click and hold or right-click on the Gradient tool to show more tools which should reveal the Mesh Tool. Click it to make it the selected tool and then click anywhere on your object to add a vertical and horizontal mesh line.
You can also select a fill colour before clicking on your object to add that colour to the mesh point as you add it. I personally find it easier and much more effective to add the colours after the fact but it can be done this way too if you prefer.
You can add as many of these mesh lines as you please depending on how complex you want the gradient to be.
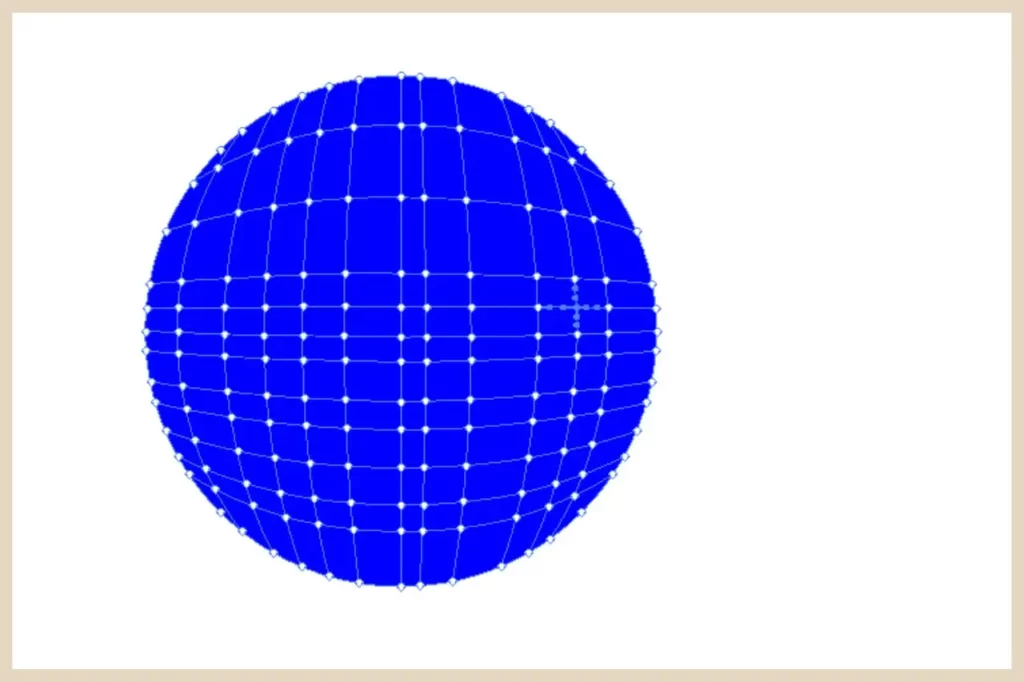
As you can see in the screenshot above, I’ve gone a little mesh-mad here but you get the idea. Once you’re happy with the mesh, it’s now time to start adding colours to it.
Adding Colours To A Gradient Mesh
The best way to add colour to a gradient mesh is by clicking and dragging one from the Swatches panel which you can open up from the Window menu as we did earlier.
From here, you can drop the colour either onto a mesh patch (the square areas that become divided up by the mesh lines) or a mesh point (the small circular points that mark all the intersections).
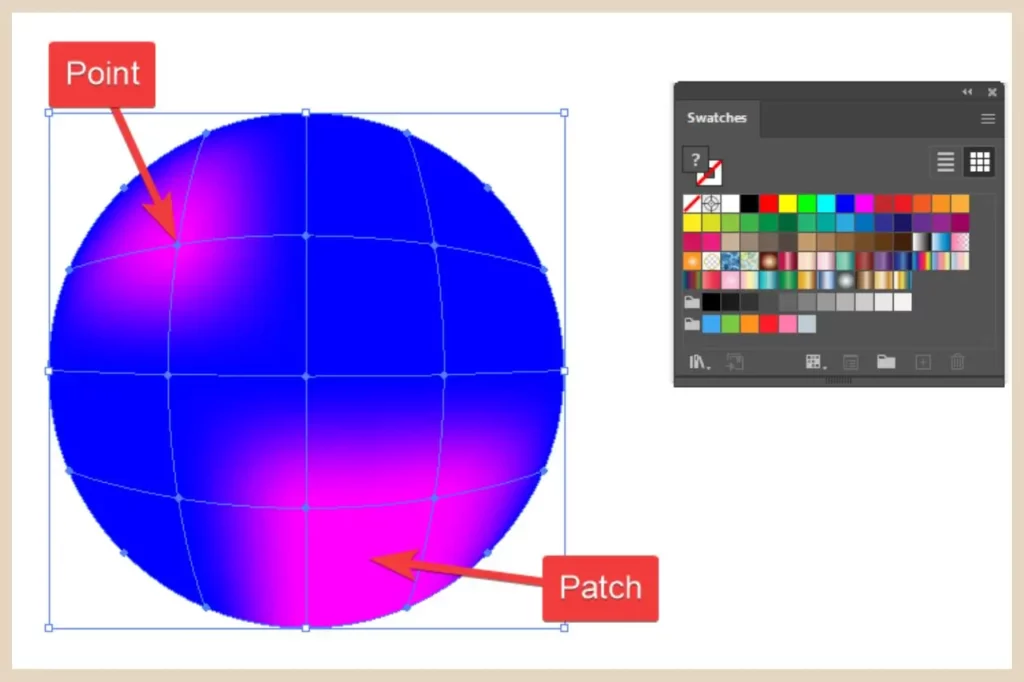
As you can see in the screenshot above, you’ll get a different effect depending on whether you add the colour to a point or a patch so you can combine these to create really interesting gradient effects.
You can also adjust the gradient even further by using the Direct Selection tool to move the anchor points (which are also the mesh points) or the handles (the small circles at the end of the lines that come off the anchor points).
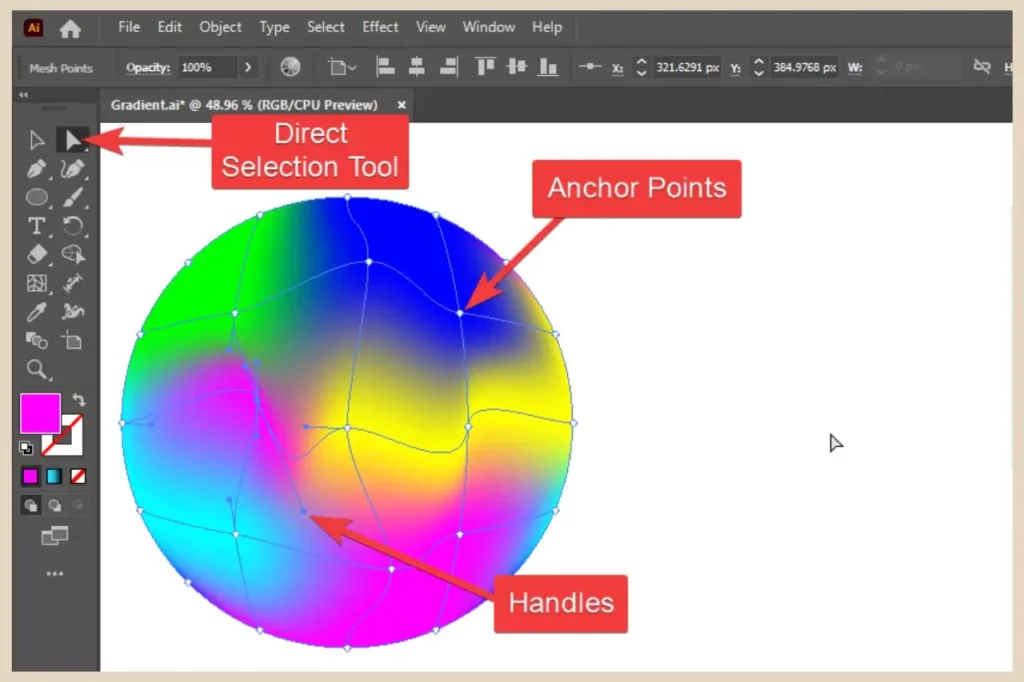
Clicking and dragging these into different positions will alter the curves and positions which can drastically change the appearance of your gradient designs.
The gradient mesh is a very cool tool for creating custom gradients but it can get very messy and unruly particularly when you start adjusting the handles.
So practice makes perfect with this one and remember, there’s always the Undo button when your adjustments don’t quite go the way you thought they would.
Let’s Get Gradient Making
And there you have it. If you want to add some serious colour to your designs then gradients are a great way to go about it.
With so many different ways to create and customise them, you’ll be able to create truly unique colour blends that will make your designs pop like never before.
So have fun creating and customising your gradients and if you get stuck, let me know in the comments below and I’ll be more than happy to help you out.
Happy Gradient Making!

You May Also Like
- How to Start a Blog for Free – Beginners Guide

- What to Look for in a Blogging Platform – Beginner’s Guide
- Best Blogging Platforms for Beginners – Free & Paid