Are you ready to jump into the world of AI image creation and learn how to use NightCafe Studio? Well, in this post, I’m going to walk you through the entire process step by step.
If you’re like me and you need images to add to your content (or for any purpose really) then the creation of AI image generating is a complete game changer.
Especially generators like NightCafe Studio that allow you to use your images for commercial purposes even with the free plan.
I’ve been using numerous free AI image generators and they’re a serious amount of fun to play around with as well as being super time savers when you need images for your content.
For this tutorial, I’ll be using the free plan although they do have paid plans for those who need more credits than the free plan offers.
There is the odd ad on the platform when you’re a free user but nothing that will interrupt or distract your workflow. So, let’s get straight into this and see what we can do with NightCafe Studio.
How To Use NightCafe Studio
To get started, head over to NightCafe and click the Create button on the top right-hand side of the screen.
You’ll now be asked to either log in with an existing account or create a temporary one to start generating images. So create a temporary one just to get the ball rolling.
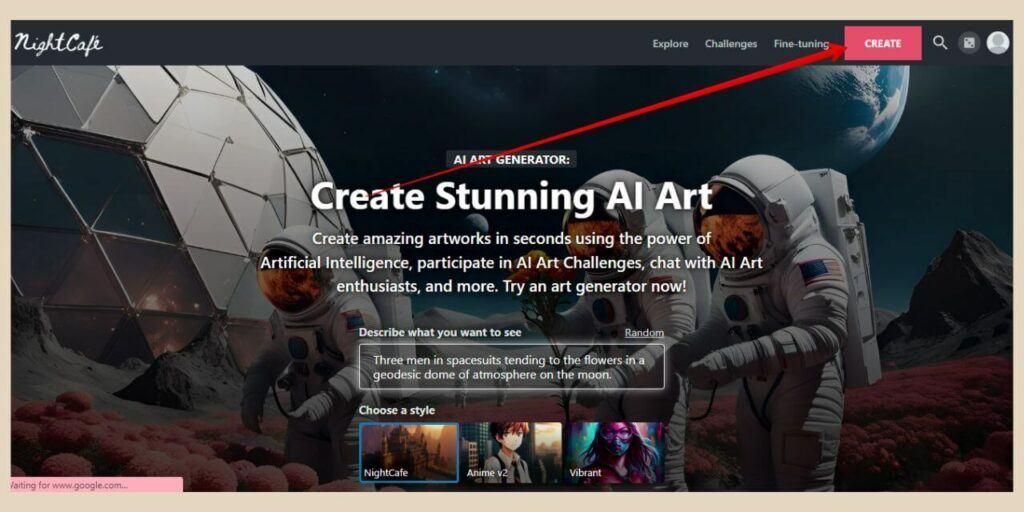
Once you click the create temporary account link, you’ll instantly be able to start creating images, however, it is a good idea to set up a proper account so that all of your creations are saved moving forward.
To do that, simply click on the profile icon on the top right corner of the screen and then click Account Settings from the menu that appears.
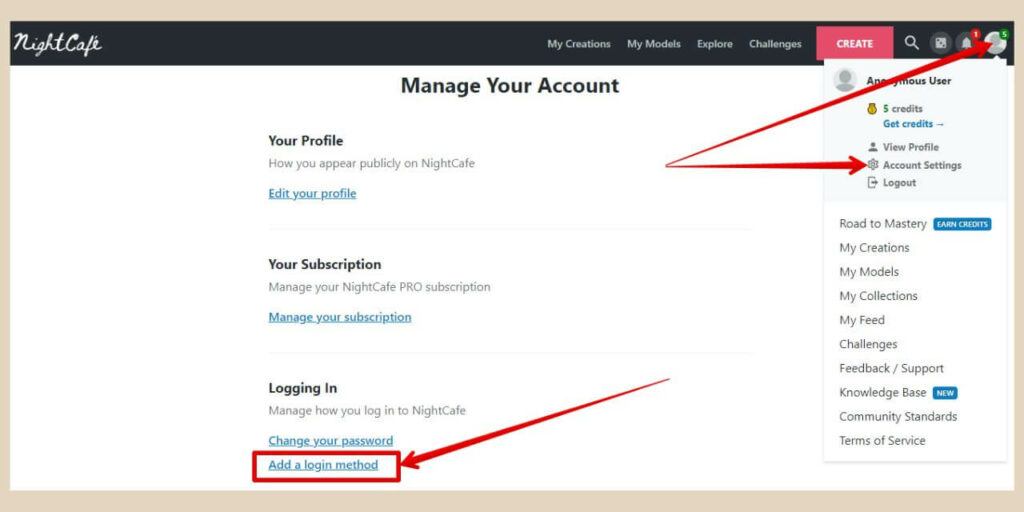
This will bring you to the settings page where you can click the Add a Login Method option which will allow you to choose your Google or Facebook account as your login method.
Credits In NightCafe Studio
Once you’ve set up your log method, you should be back on the create page where you’ll now be able to start generating images.
As a free user, you’ll get 5 free credits daily but unlike a lot of other AI image generators, these credits don’t reset daily so you won’t lose them if you don’t use them.
This means that you can build them up over time and there are several other ways of getting more credits for free by doing certain tasks on the platform.
For example, signing up to NightCafe’s email list, completing your profile, sharing one of your creations on social media, etc.
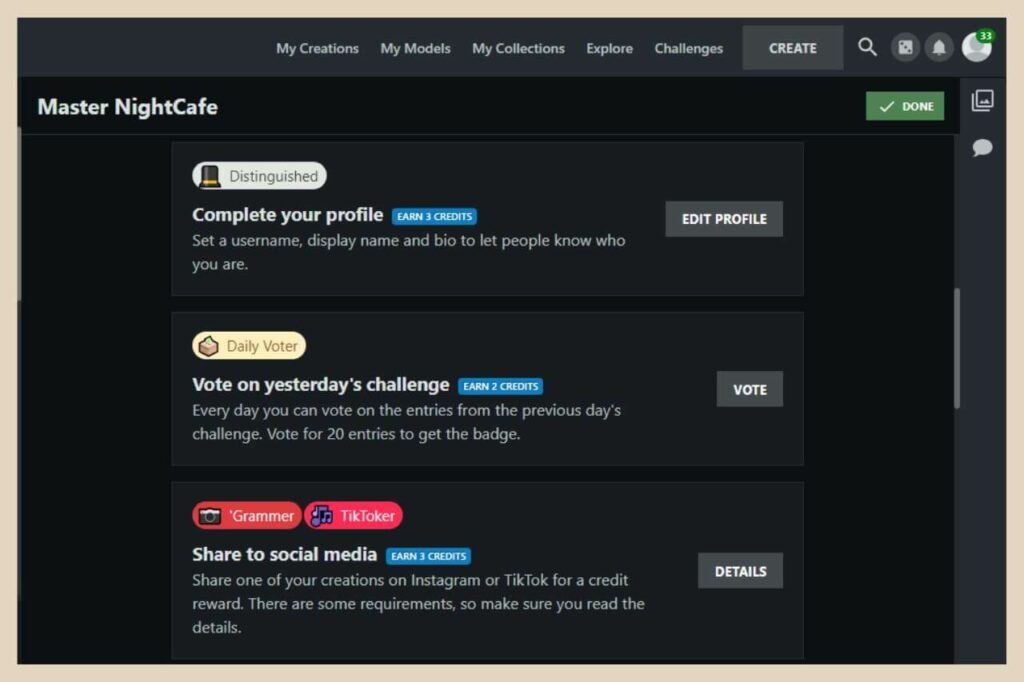
There’s also a daily community challenge based on different themes where you can submit your own image creation.
This gives you the chance to win anywhere from 5 credits to 250 credits depending on how well your image is rated by the rest of the community.
How To Create Images In NightCafe Studio
Creating images in NightCafe is really simple and you’ll have two choices here with how you’d like to generate your images and that’s in advanced mode or regular mode.
I’ll start with regular mode as it’s the easiest and most straightforward and it’s the default mode when you first land on the page.
So, to get started, leave the Advanced Mode toggle in the top left corner, in the default off position and click on the model option to select the model you want to use to generate your images.
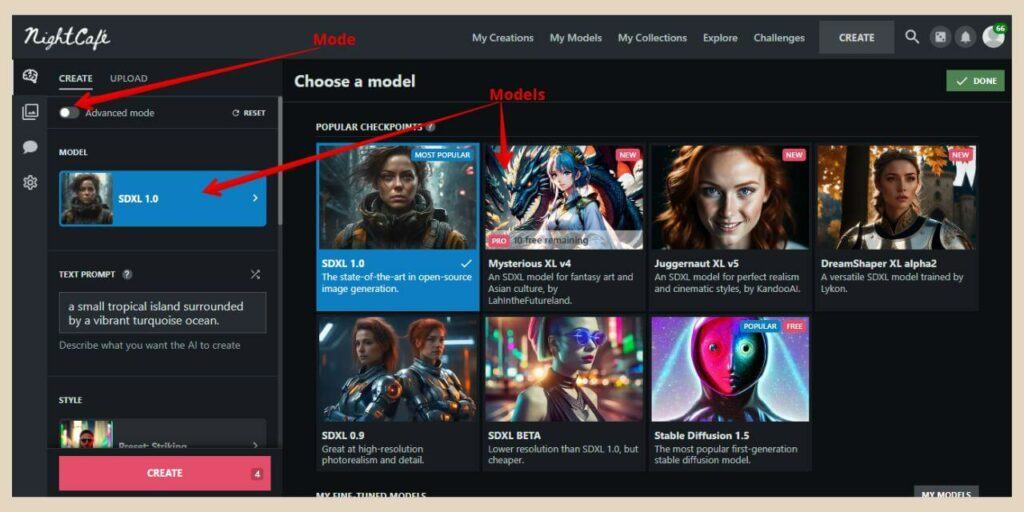
Different models will produce very different images so you can play around with these to find your own preferences.
Most of the models will cost one credit per image although Stable Diffusion 1.5 is completely free as long as you only generate one image at a time.
SDXL 0.9 on the other hand costs three credits per image so keep your eyes out for the token cost before you hit the Create button.
You’ll also notice a selection of Pro models which are available for paid users but as a free user, you’ll get 10 free pro model generations which won’t use any of your credits.
The Pro models also change as newer models become available such as the SDXL 1.0 which used to be a pro model but is now available for everyone to use.
So, don’t get too disheartened if you’re a free user and you find a pro model that you really like using because chances are that at some point that model will become a regular model as newer models are added.
Adding Your Prompt
Directly under the model area, you’ll find the prompt box and this is where you’ll type in the description of the images you’d like to create.
If you’re completely new to AI image generating then start with simple descriptions at first.
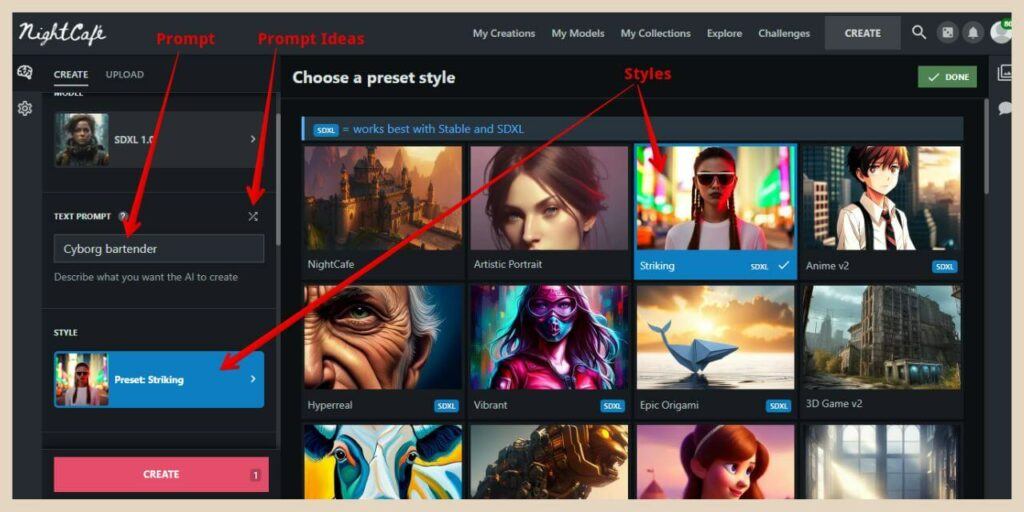
You can always add more details to the prompt to help get better results and the more you play around with these tools, the better you’ll get with your image prompts.
There is also a prompt shuffle icon that you can use to get prompt ideas and clicking it will add random prompts to the prompt box that you to try out.
If you’re really stuck, then maybe check out my Leonardo AI tutorial because they have a prompt generation tool that you can use to help you create better more descriptive prompts.
Once you’re happy with the prompt, you can move on to the next section which is the Preset Styles section.
When you click on this area, a selection of preset styles will appear and selecting any of these will drastically change the style of the images generated.
So, whether you’re looking for a comic, photo, anime or pop art style, there are plenty of options to choose from here to completely change the look of the images you generate.
Image Settings
The next section is the setting area where you’ll be able to change how many images are generated at a time.
If you click on the More Settings button, a few more options will appear in the main screen area but to be honest, I only tend to change the number of images and the aspect ratio.
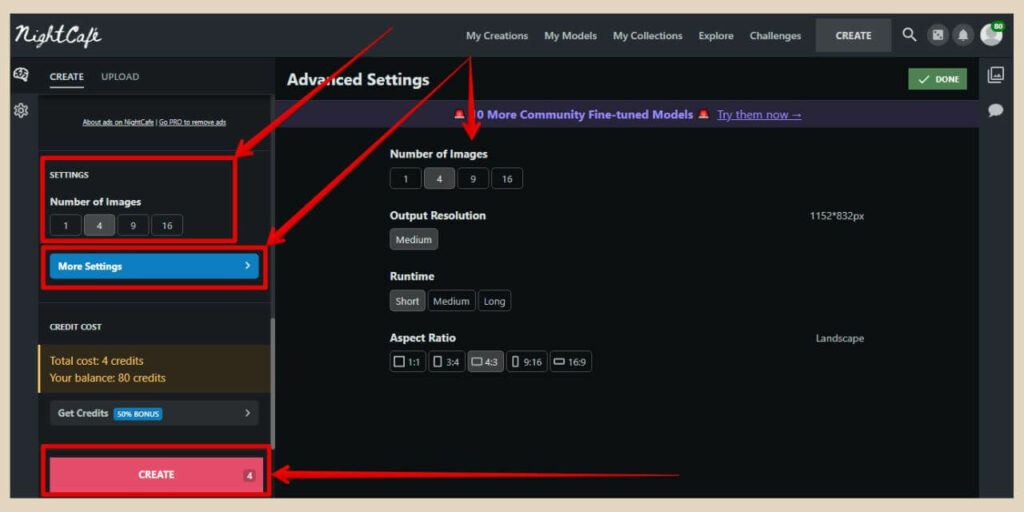
Just beneath this, you’ll see the credit cost area which will tell you how many credits you have left and how many credits it will cost you to generate images with your current settings.
Then finally, at the very bottom, you’ll see the Create button so when you’re ready, click it to generate your first images.
Generated Image Options
Once you’ve generated your images, you’ll have a few options as to what to do with them which I’ll cover next.
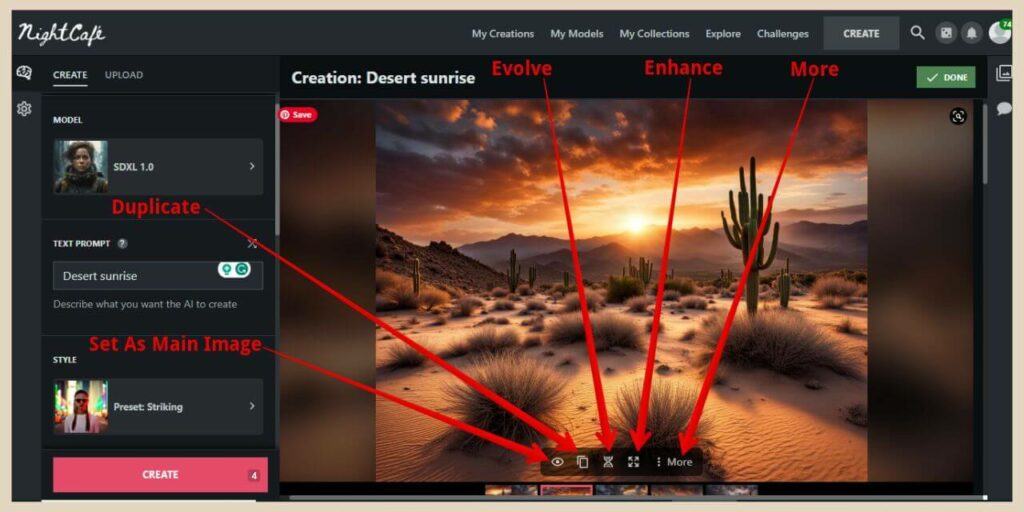
If you hover your cursor over the image, you’ll see a small selection of options at the bottom which will differ very slightly depending on if you’ve generated one image or several images at a time and they are:
- Set As Main Image – If you’ve generated more than one image at a time, you can set one as the main image.
- Duplicate – Duplicate the image (If you want to re-run an image after tweaking the settings or the prompt).
- Evolve – Use the image as a reference (image to image) to create a new image.
- Enhance – Upscale your image to a larger pixel resolution (costs credits).
You’ll also see a More button which will give you the same options again plus a few extra including a Download option (if you’ve only generated one image then you’ll see this when you hover instead of the Set As Main Image button).
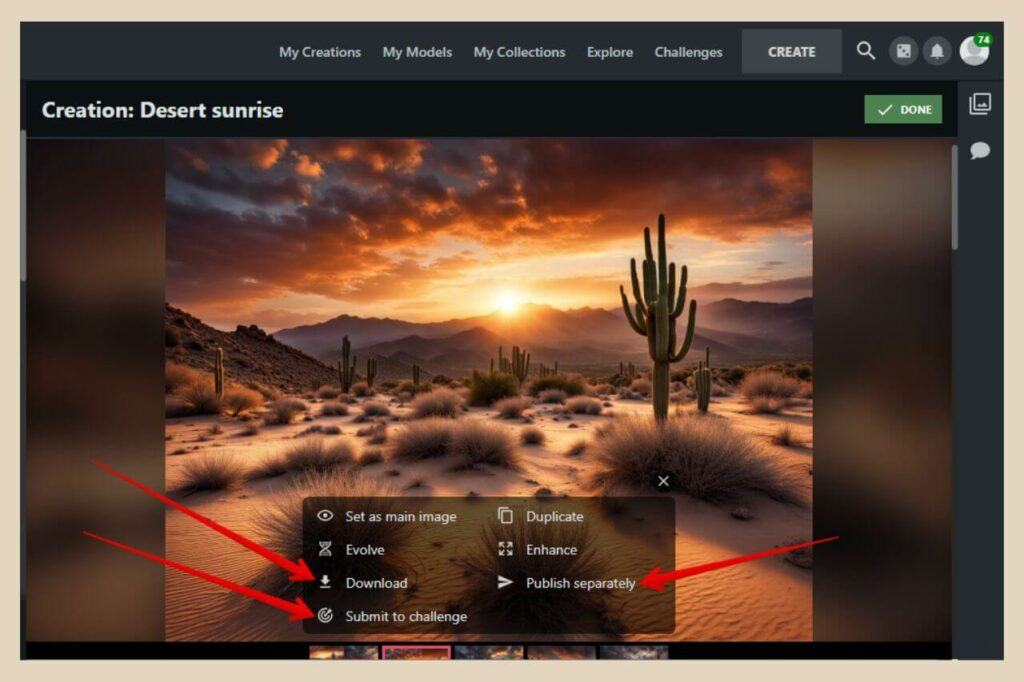
You’ll also have a Publish Separately option if you’ve generated more than one image at a time and you only want to publish one of the images to the community.
Then there’s the Submit To Challenge option if you want to submit it to the daily challenge.
By the way, if you’ve generated more than one image at a time, you’ll get something called a grid image as the first image which is one image containing all of the results.
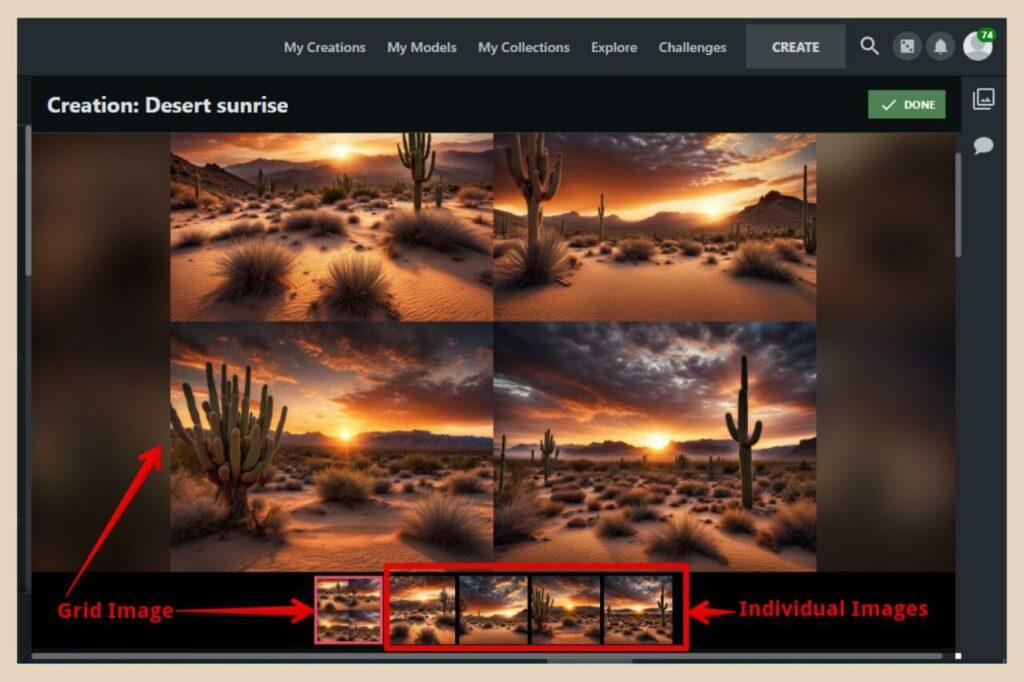
But if you scroll down, you’ll find all the individual images which you can then click on to see the full-size versions and hover over to see the options mentioned above.
Publishing And Sharing Your Images
When you scroll down further, you’ll notice a few more options underneath your generated images and from here, you’ll be able to do things like publish or share your images.
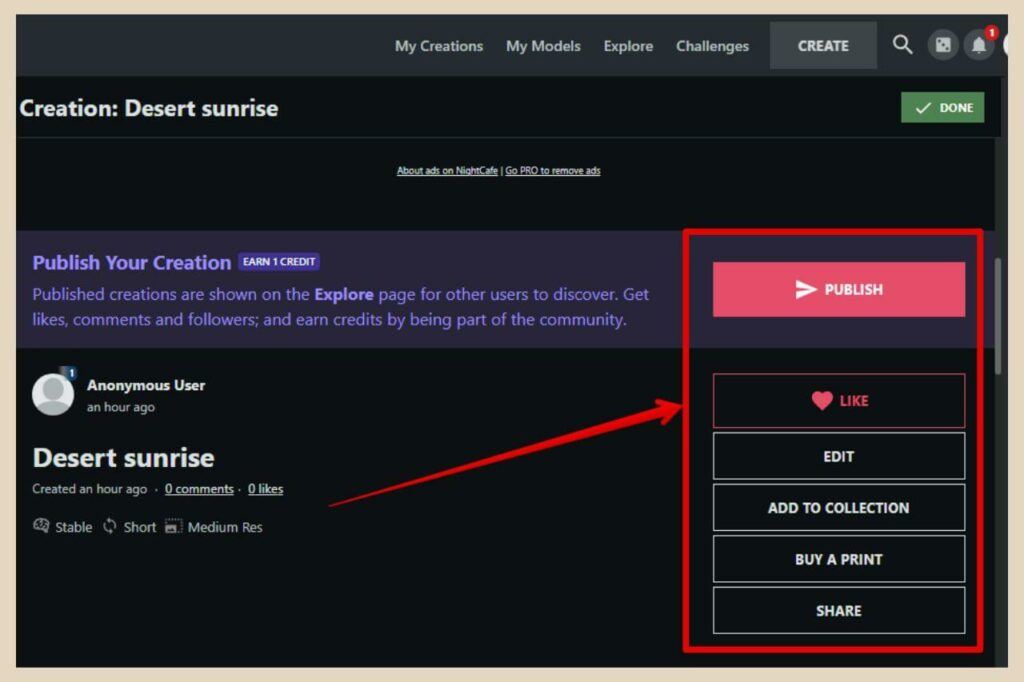
Just note that if you’ve generated more than one image at a time and you use the Publish button here, it will want to publish the entire creation which is the grid image and the individual images altogether as a gallery.
So, this is where the Publish Separately option above comes into play if you only want to publish individual images at a time rather than the whole gallery if you’ve generated multiple images at a time.
Organising And Sharing Your Images
Beneath the Publish button, you’ll find a small selection of options for organising and sharing your images and they are:
- Like – Give your image a like.
- Edit – Edit the image details like the image title, image description, etc.
- Add To Collection – Create collections and add your images to keep them organised.
- Buy A Print – Buy a canvas print of your image.
- Share – Share your image on social media or via email.
If you scroll further down you’ll find the Output Images area and this is where you can adjust your gallery settings if you generate multiple images at a time (this will look slightly different for single image creations).
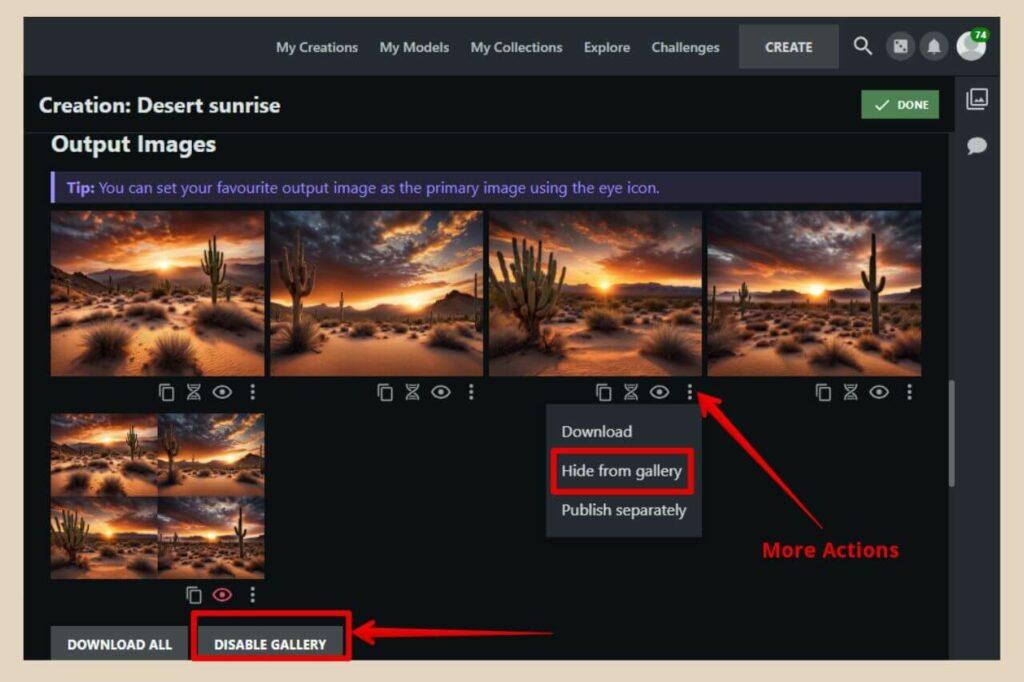
In this area, you’ll have the same Duplicate, Evolve and Use As Primary options for each of the images but if you click the More Actions button (the three dots) you’ll also get a Download, a Publish Separately and a Hide From Gallery option.
If you select the Hide From Gallery option, that particular image will be hidden both from your image results at the top of the page and the gallery if you publish it to the community.
If you click the Disable Gallery button then all of the images will be hidden in both areas except for the image you have set as the Primary. You can also choose to download all of the images in one go by clicking the Download All button.
Image Prompt And Setting Details
Lastly, at the very bottom of the screen, you’ll find all the image details and this is essentially everything that was used to create it.
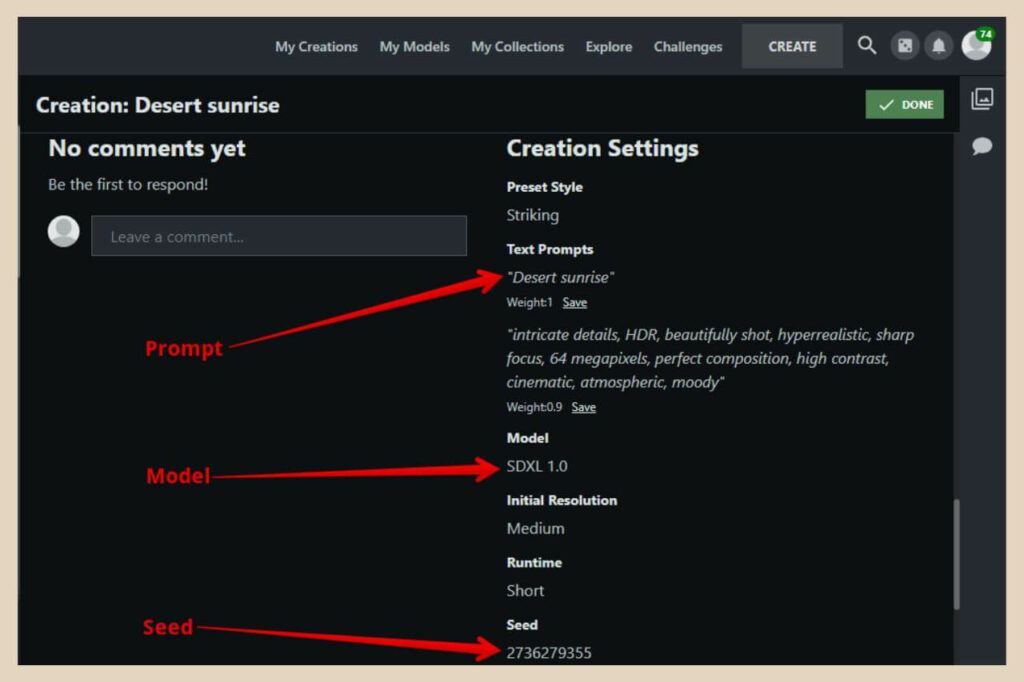
This includes the prompt, model and style used as well as the seed (I’ll explain that one in a moment) which can help you to recreate the same or similar images again.
You can also comment on your own image and see any comments that members of the community have left on that particular image if you’ve published it to the community.
Creating Images In NightCafe In Advanced Mode
If you’d like to have more control over the image generation settings then you can always switch over to advanced mode using the mode toggle on the top left of the screen.
Now to be fair, if you’re already familiar with AI image-generating tools then the chances are that you’ve already come across most of these settings which are pretty standard use in most other image generators.
But if you’re not then I’ll give you a rundown of what these extra settings do. You’ll still see all the regular settings like the model selection and the prompt box but there will be quite a few extras here so I’ll start with the prompt box.
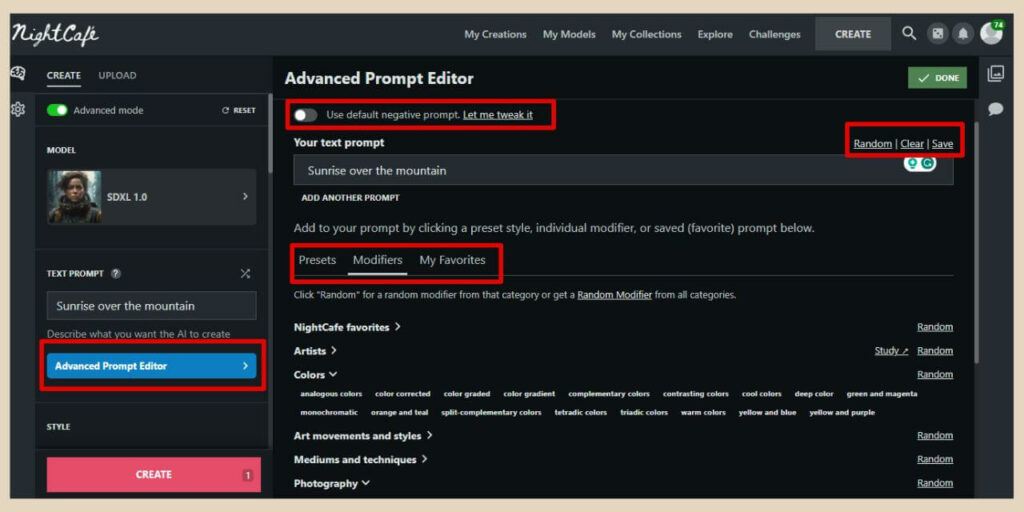
You’ll notice that one of the first new options is an Advance Prompt Editor option which is directly underneath the regular prompt box. If you click this, a whole new selection area will appear on the main screen area.
Using The NightCafe Advanced Prompt Editor
At the very top of this area, you’ll see a default negative prompt toggle button which will allow you to add default negative prompts (things you don’t want to see in your images like extra limbs for example).
You can also scroll down to the bottom of the modifier tab and select individual negative prompts if you prefer.
Beneath this, you’ll find the prompt box and you can use the options on the top far right of the box to either enter a random prompt, clear the prompt box or save the prompt to your favourites.
In the next area below, you’ll see three tabs, the Presets tab, the Modifier tab and the My Favourites tab.
The Presets tab is now where you’ll find all the style options (you can add more than one style now in advanced mode) and the My Favourites tab is where all your saved prompts will be stored.
Adding Modifiers
The Modifier tab (the one I have selected in the image below) is where you can add different modifiers to your prompt like photography styles or descriptive terms.
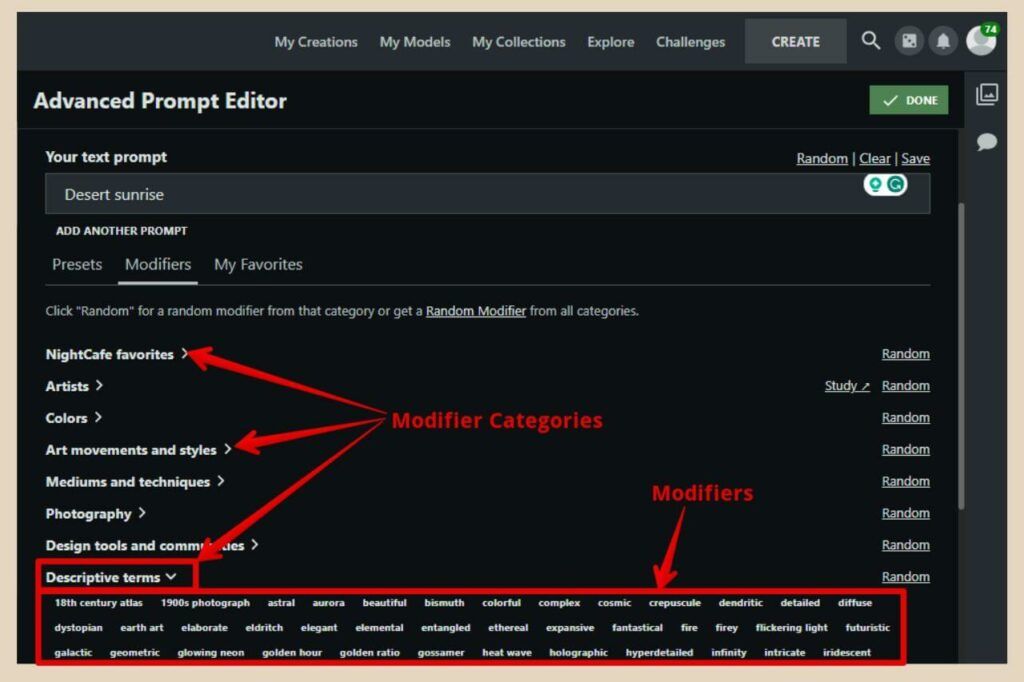
To do that, make sure you have an image description already in the prompt box and then add a space to the end of it.
From here, you can click on any of the main modifier categories and the area will open up to display a list of modifiers that you can add to your prompt.
Simply click on one and it will be added to the prompt and you can add as many of these as you like to describe the type of image you’d like to generate.
Just make sure that you add a space after each one otherwise they’ll all be added back to back like one long word.
You can also click the Random buttons on the far right of each category if you’d like NightCafe to add random modifiers from each one.
Using A Start Image
The next new setting is the Start Image setting and this is basically an image-to-image tool where you can add a reference image that NightCafe can use as inspiration.
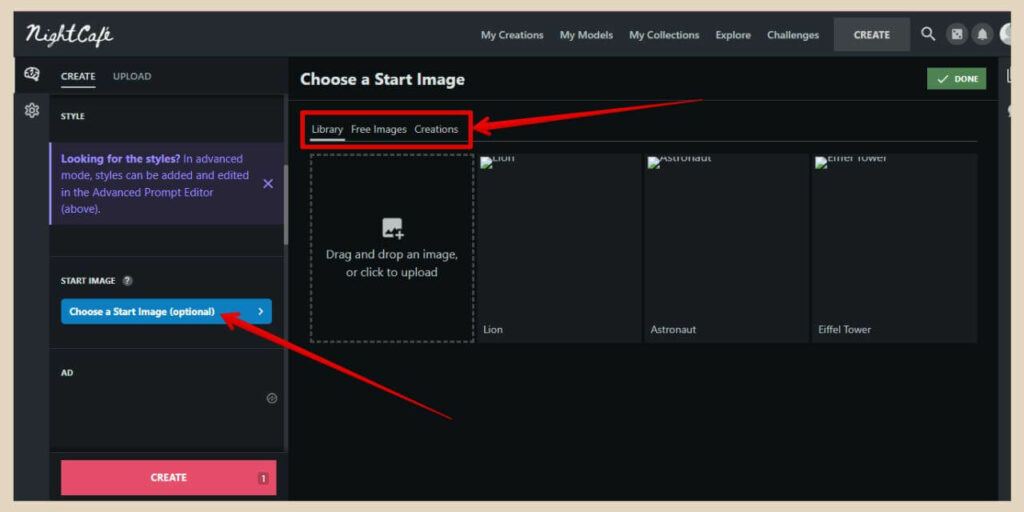
To add a start image, click the Choose A Start Image button to open up the start image options in the main screen area.
From here, you can use either the Library tab to upload an image from your device, the Free Images tab to use one of NightCafe’s free images or the Creations tab to use one of your creations.
Once you’ve selected an image, it’ll be added to the Start Image area and a Noise Weight slider will appear just below it.
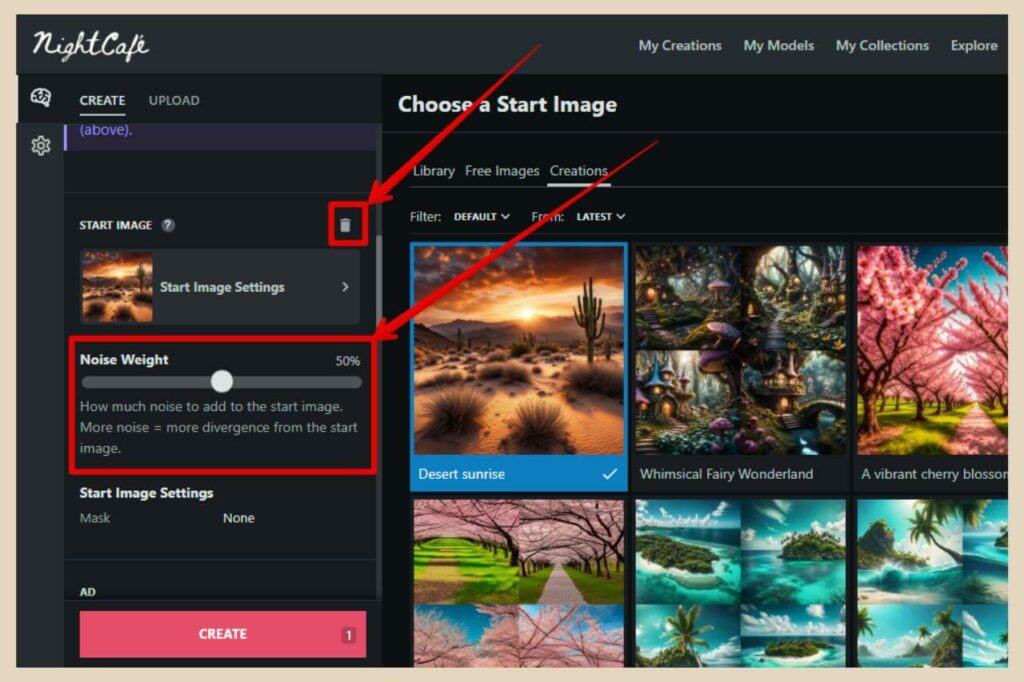
This slider can be used to adjust how much the generated image deviates from the start image. So, the lower the noise, the closer the generated result will be to the original.
To delete the start image, simply click on the trash can icon on the top right just above the start image box to go back to regular text prompt generating.
Prompt Weight And Refiner Weight
The next new settings are just below the number of images and aspect ratio options and they are the Overall Prompt Weight slider and the Refiner Weight slider.
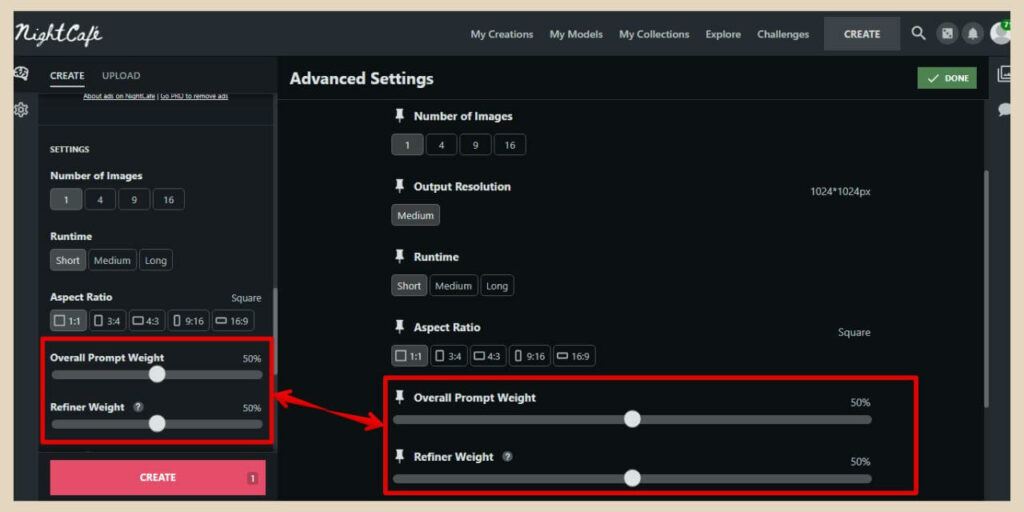
The Overall Prompt Weight slider determines how closely or loosely the generated images adhere to the prompt. The Refiner Weight on the other hand is all about details and vividness.
Both of these are set to 50% by default and for the most part, I usually leave them there but you can adjust and play around with these to see the effects they have on the images generated but I tend to get the best results when I leave them as is.
Seed Options
The next new option here is the Seed option and usually, if you’re using AI image seeds and keeping all your other settings the same, you should be able to reproduce the exact same images.
By default, the Use A Random Seed toggle is set to on and this is how you end up with different images every time you click the Create button even when you’re using all the same settings.
If however, you want to generate the exact same image again or slight variations of it, this is where the seed number comes in handy.
A great example of this would be if you’ve generated a few images with the same settings and none of them have really been what you were looking for.
Then out of the blue one image comes back that’s really close to what you want. By using the same seed and making slight changes to it or the settings, you’re essentially using a “more images like this” option.
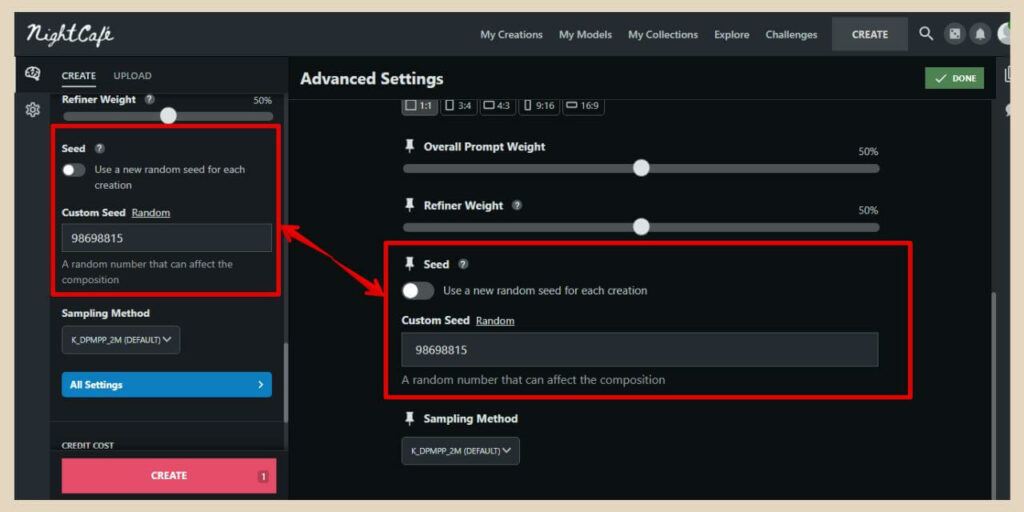
In the screenshot above, I’ve switched the random seed toggle to off and this has now added a custom seed number box underneath it.
To give you an idea as to just how handy a seed number can be, I’ve copied the seed from one of my earlier image generations and pasted it into the seed number box.
For the first image generation, I used the exact same settings as I did with the original and as expected, it produced the exact same image again.
However because I like this image, I’d like to tweak some of the settings to get similar variations of it.
Examples Of Using The Seed
For this particular example, I’d like to add more styles to it so in the images below, I’ve started with the original image and then I’ve added an additional style each time for the next generation of the image.
So, by the time I get to the fourth image, this image has three additional styles added to it.
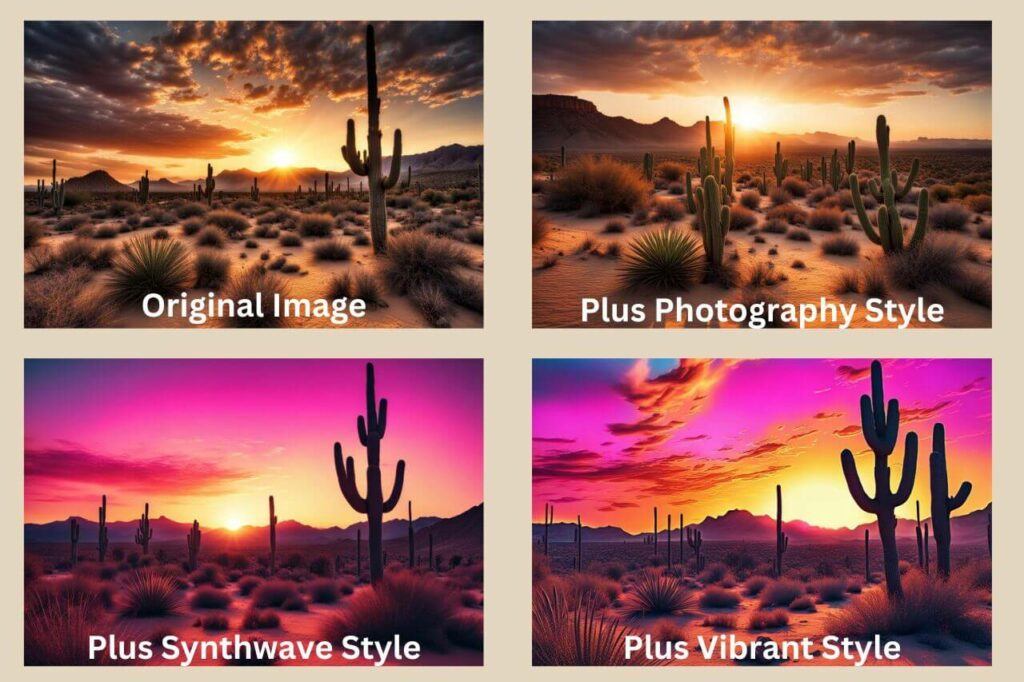
As you can see, it does change the image slightly but because I’m using the same seed, it does keep a similar look to the original. You can also make slight changes to the seed number to get variations of the original image.
The original seed number for the image I’m using is 1331547885 but if I make slight changes to it like changing the first or last digit, I can generate similar variations of the original image.
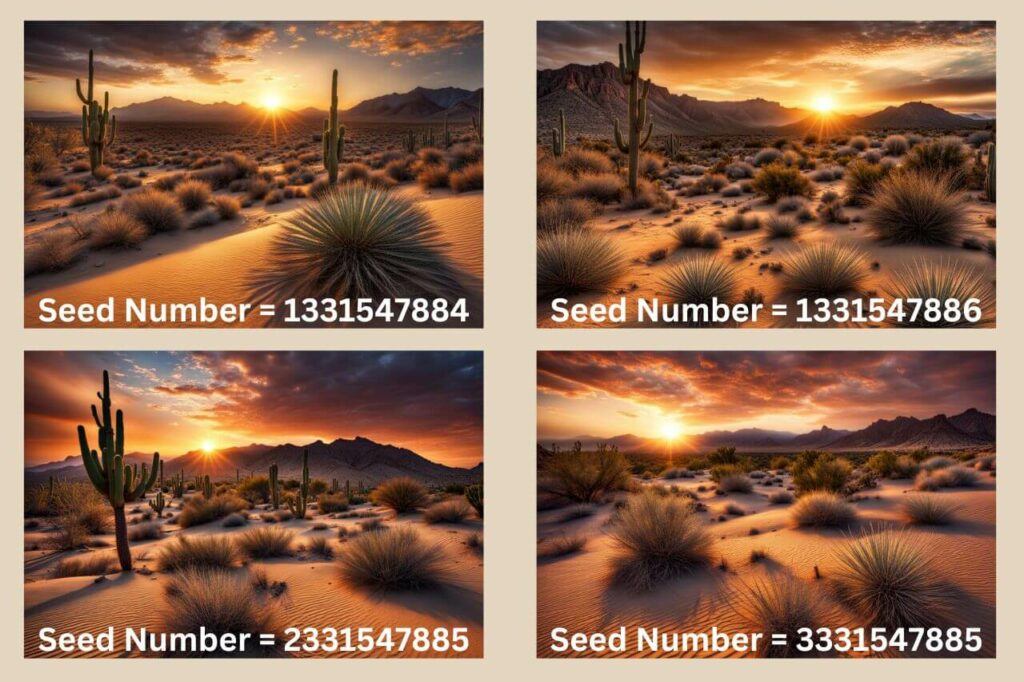
With the images above, I’ve changed the last digit with the first two images and then the first digit with the final two images.
This is a great way to get similar images of an image you like rather than rolling the dice and getting completely different images when the seed is set to random.
Sampling Method
The final new option here is the Sampling Method option and changing samplers will usually make subtle differences to the look of your images.
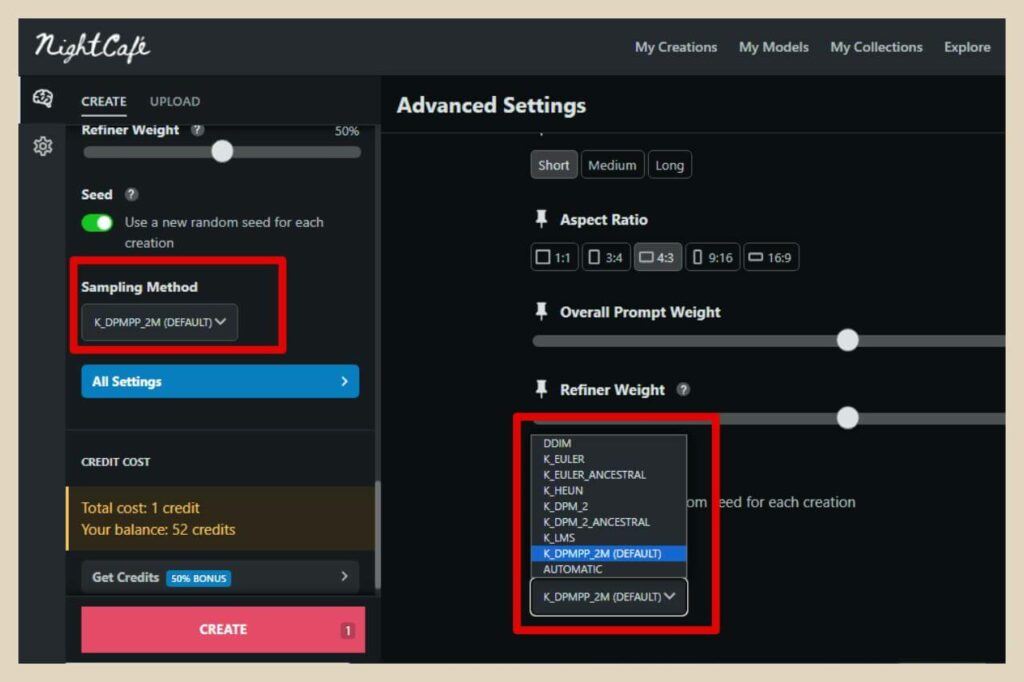
To be honest, these differences are sometimes so subtle that you might not even notice them at first glance depending on the sampler that you change to but some of them can add more drastic textures and looks to images.
The best way to test them out and see the differences they make is to regenerate the same image using the same seed and settings so you can truly see the effect they have.
Just use the Sampler Method dropdown menu in either the left panel or the main screen area to select the different samplers and then click the Create button to see the different results they generate.
By the way, if you click the All Settings button underneath Sampling Methods, you should see the same set of options from the left panel appear in the main screen area as well.
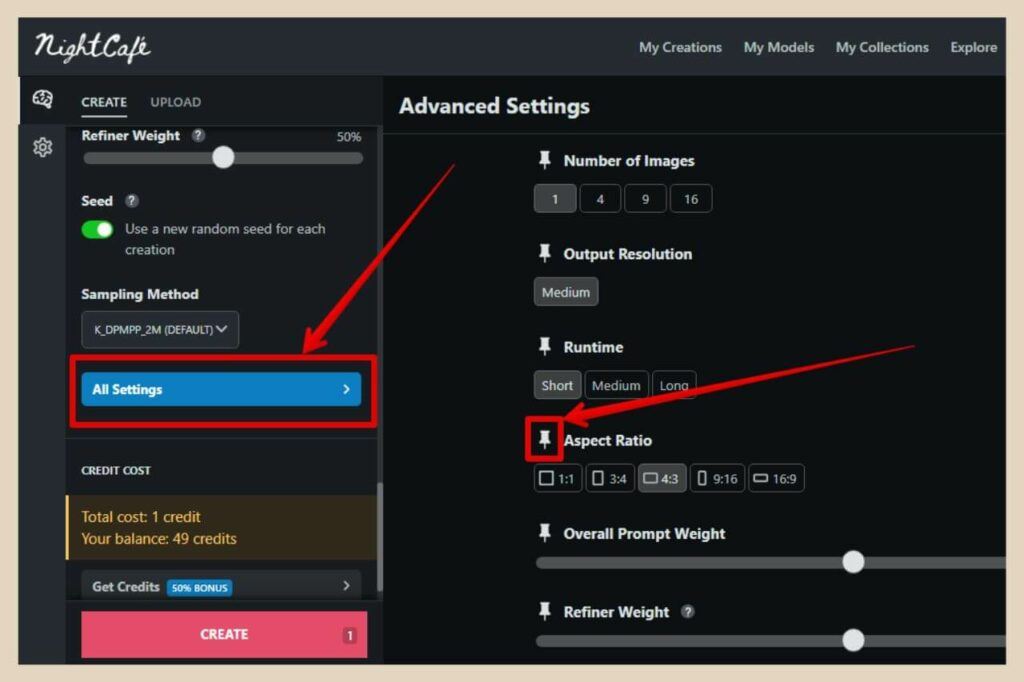
You can then use the small pin icons to select which options show up in the left panel although most of them are turned on by default.
Upload An AI Generated Image
There’s one final thing that you can do here in this area and that’s upload an image you’ve created in another AI image generator and share it with the NightCafe community.
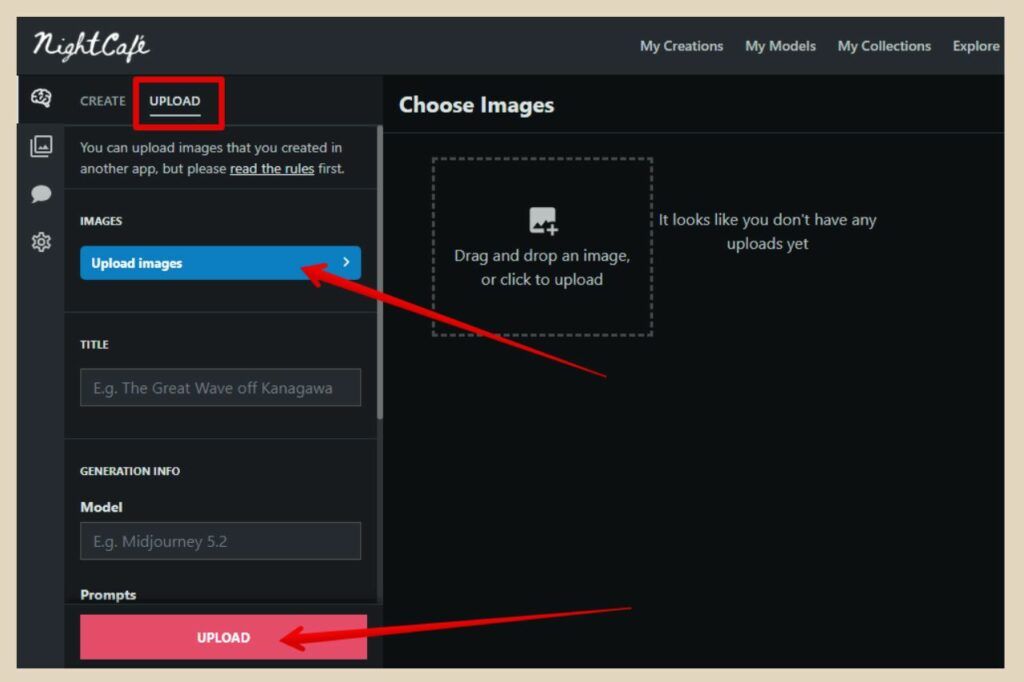
To do that, simply click the Upload tab which is right next to the Create tab at the very top of the left panel. Once you’re in the upload area, click the Upload Images button to upload your image from your device.
Next, type in a title and then fill in all the generation details including the model and prompt used to create the image (optional).
When you’re ready, click the Upload button to finish and you can now publish your image to the NightCafe platform.
Viewing All Your Creations In NightCafe
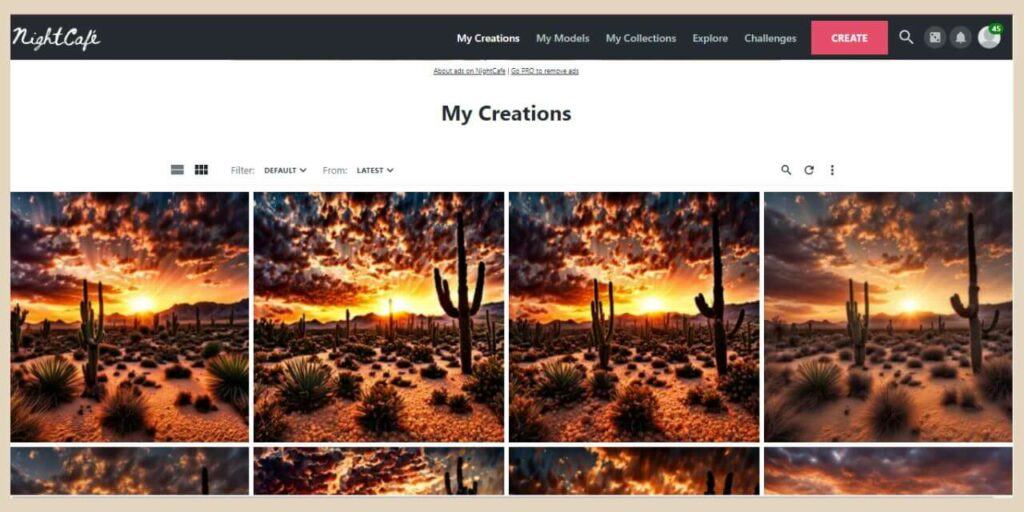
If you want to view all of your creations, you’ll find them in the My Creations menu at the very top of the screen where you can also download, publish, share, etc in the same way as you can in the Create area.
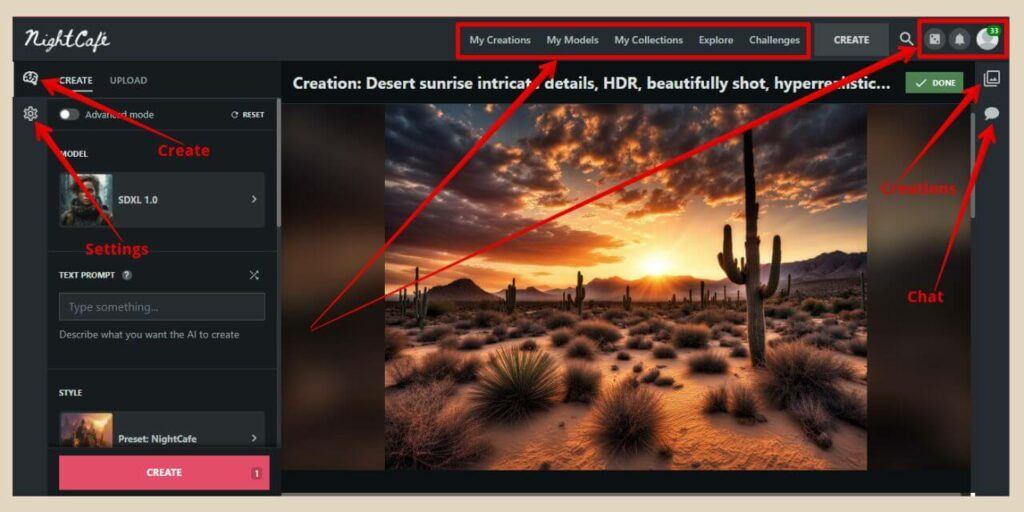
You can also view them by clicking on the Creations icon which in the screenshot above is on the right-hand side of the screen.
It does, however, have a tendency to move around and sometimes you’ll find it underneath the icons on the left instead along with the Chat icon which seems to enjoy moving around with it.
When you click on it, all your creations will open up in the left panel or a new right panel (when the icon is sitting on the right) where you can scroll to view them.
Navigational Menus
You’ll also see a Settings icon for screen settings and a Create icon on the left which will get you back to the Create area. Across the top of the screen, you’ll see a few more menu items which are:
- My Models – Where you can create and view your own models.
- My Collections – Where you can create and view your image collections.
- Explore – Where you can view other people’s images.
- Challenges – Where you can view and take part in daily and community challenges.
Then finally, in the top right-hand corner, you’ll find a dice icon which will let you access the chat or challenge area, a bell icon for all your notifications and a profile icon.
If you click on the profile icon, another menu will appear where you can access a lot of the same areas but also your account settings and profile settings.
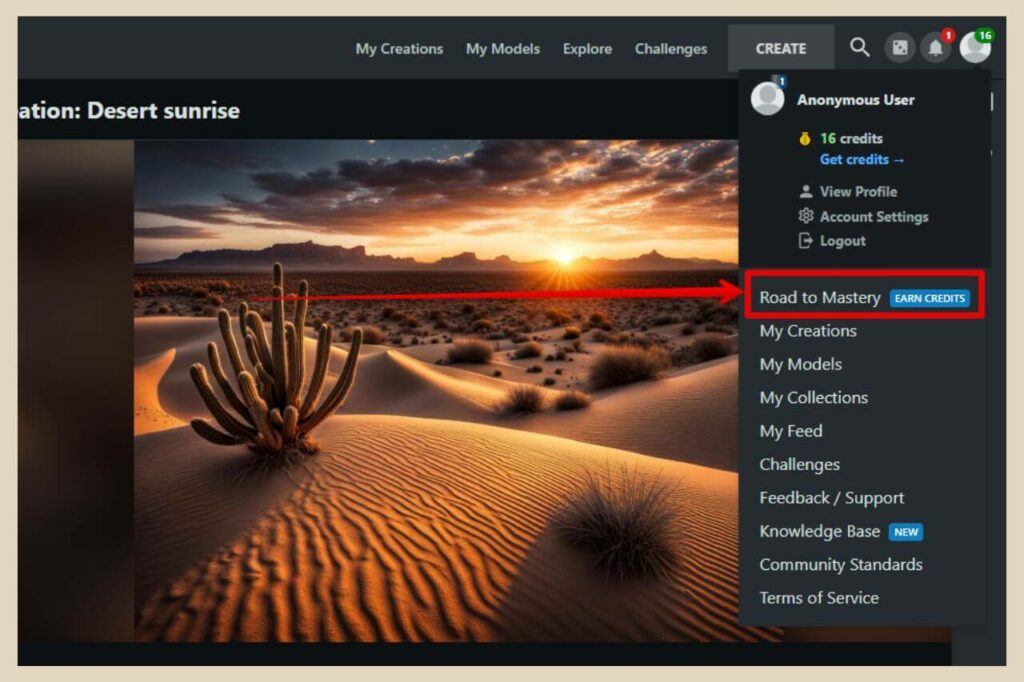
There’s also an area here called Road To Mastery which will tell you all the different ways in which you can earn more free credits.
Let’s Get Creating With NightCafe Studio
And there you have it, an easy way to create your very own unique images using the power of AI with even the simplest of prompts.
Even though NightCafe Studio doesn’t have the array of editing tools that some other AI image generators do, it’s one of the easiest and most straightforward ones to use, especially for complete beginners.
Plus, you can have a bit of fun testing out your skills with the daily and community challenges while you’re at it.
So, why not try out NightCafe Studio for yourself and see what kinds of creations you can come up with? You might just be blown away by how easy it is.
I hope you’ve enjoyed this tutorial and that it’s helped you navigate your way around the NightCafe Studio platform.
If you’d like to share your own thoughts and experiences of the platform, please feel free to share them in the comments below. I’d love to hear all about them.
Happy NightCafe Image Creating!

You May Also Like
- How To Display Recent Posts With Thumbnails In WordPress
- How To Add An Affiliate Disclosure To Your Posts
- What Is Wealthy Affiliate – Everything You Need To Know

