If you’re looking for a tutorial on how to use Getimg.ai, then you’ve come to the right place. I’ve been using this AI image-generating platform for some time now and it truly is a versatile tool for all your AI image creations.
I’ve been playing around with numerous free AI image generators and Getimg.ai is up there with some of the best. It’s a very simple platform to use and with so many additional features, it’s quickly becoming one of my favourites.
As a free user, you get 100 free credits a month and these reset monthly. With most image generations costing one credit each, that equates to 100 images every month for free. And if you do need more, there are a selection of paid plans to choose from.
There’s a lot you can do here with this AI image generator so this is going to be a pretty thorough tutorial that will cover it all. So let’s jump right in and get started with using Getimg.ai
How To Use Getimg.ai
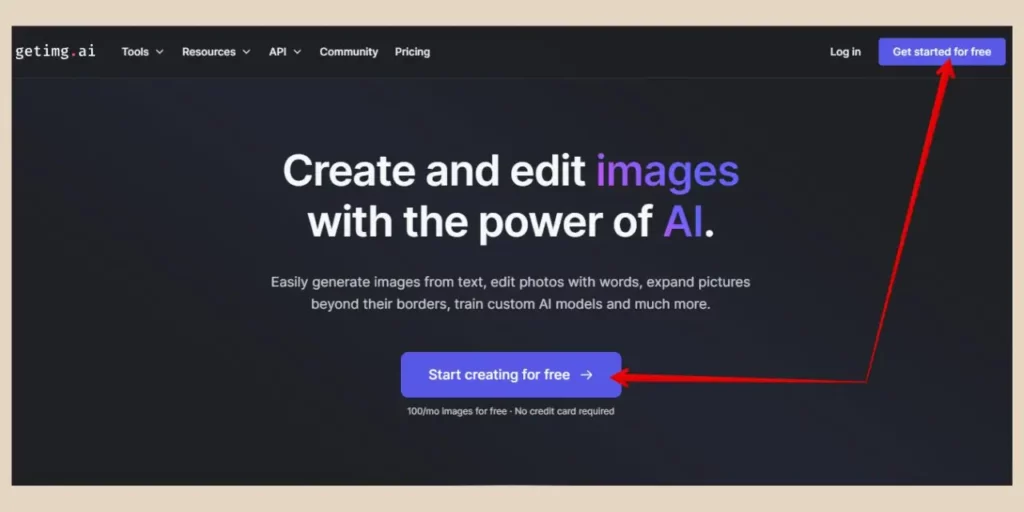
To get started, head over to getimg.ai and click either the Start Creating For Free button in the middle of the page or the Get Started For Free button in the top right corner of the page. Either one will start the sign-up process.
From here, a small pop-up window will appear prompting you to continue with Google. So, assuming you already have a Google (Gmail) account, simply select your account in the next window then confirm your sign-up.
At this point, you’ll be taken straight to the AI generator where you can jump right in and start creating your own AI images.
Credit Cost
For the most part, it will cost you one credit for one image but there are occasions where the cost can be higher.
Obviously, if you choose to generate more than one image at a time, the credit cost will reflect that number of images but setting higher parameters in certain settings will also increase the credit cost.
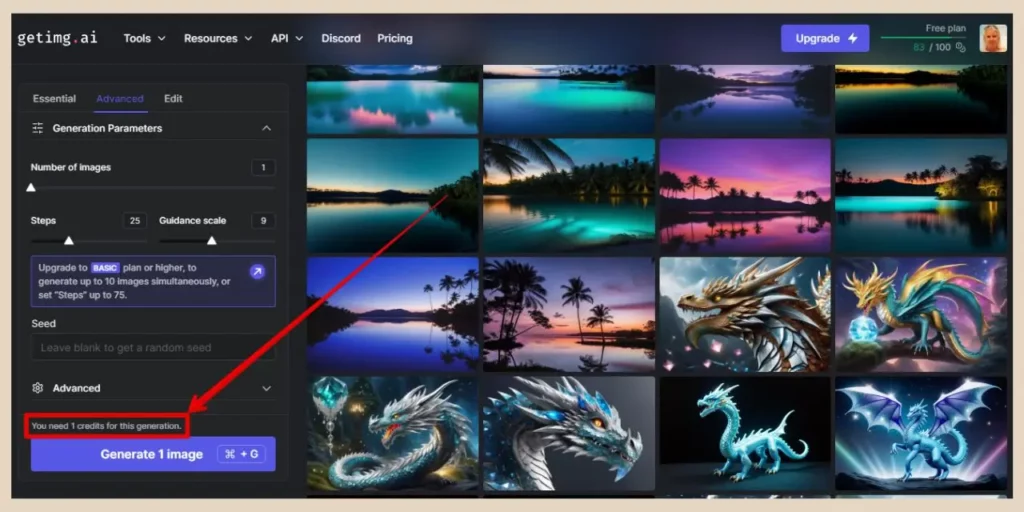
However, you’ll always be able to see how many credits you’re about to use just above the Generate button before you click it so you’ll always know how much your actions cost.
But, before we get into how to use the AI Generator, there are a few other tools that you can use here as a free user and they include
- Image Editor – To edit your images.
- AI Canvas – To edit and outpaint your images.
- Real-Time Generator – Creates images as you type.
You can access all of these and the regular AI generator from the Tools menu at the top of the page and I’ll show you how to use each of them as we move through this tutorial.
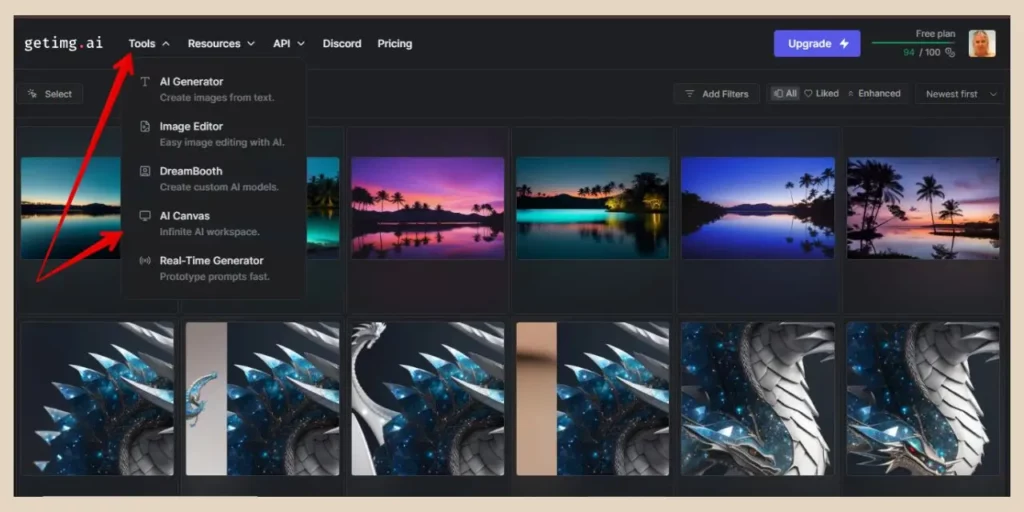
One other item you may notice in the Tools dropdown menu is DreamBooth which is where you can create your very own models but this is a paid feature so you’d need to upgrade to use it.
How To Use The AI Generator In Getimg.ai
I’ll start with the AI generator as this is where you’ll create all your AI images. You’ll notice that there are three tabs at the top of the panel on the left side of the page and these are Essential, Advanced and Edit.
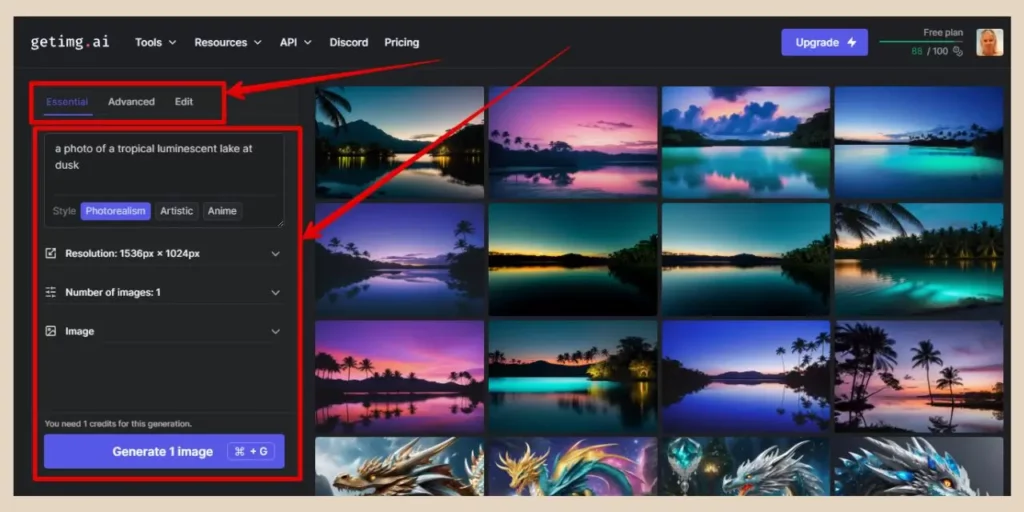
The Essential tab will be open by default and this is the simplest way to create your images but it does have very limited image options. In fact, you can’t even choose an AI model here so it really is the most basic option.
Using The Essential Tab
You’ll only have a few things that you can do here and the first one is the prompt box at the top. This is where you’ll type in the description of the images you’d like to create.
The next option just below the prompt box is the image style and you can choose between either Photorealism, Artistic or Anime. Beneath this, you’ll have the resolution settings so click the small down arrow and you’ll have seven different size options to choose from.
Next is the number of images you’d like to create and as a free user you can choose between either one or four images at a time. The platform will allow for up to ten images at a time but you need to be a paid user to do that.
Using An Image As A Reference
The final thing you can do here is add an image as a reference if you want to give the AI an idea of the type of image you’re looking for.
To do that, click the down arrow to expand the settings area, then either click on the image box to choose an image from your device or drag an image to the box to use it as a reference.
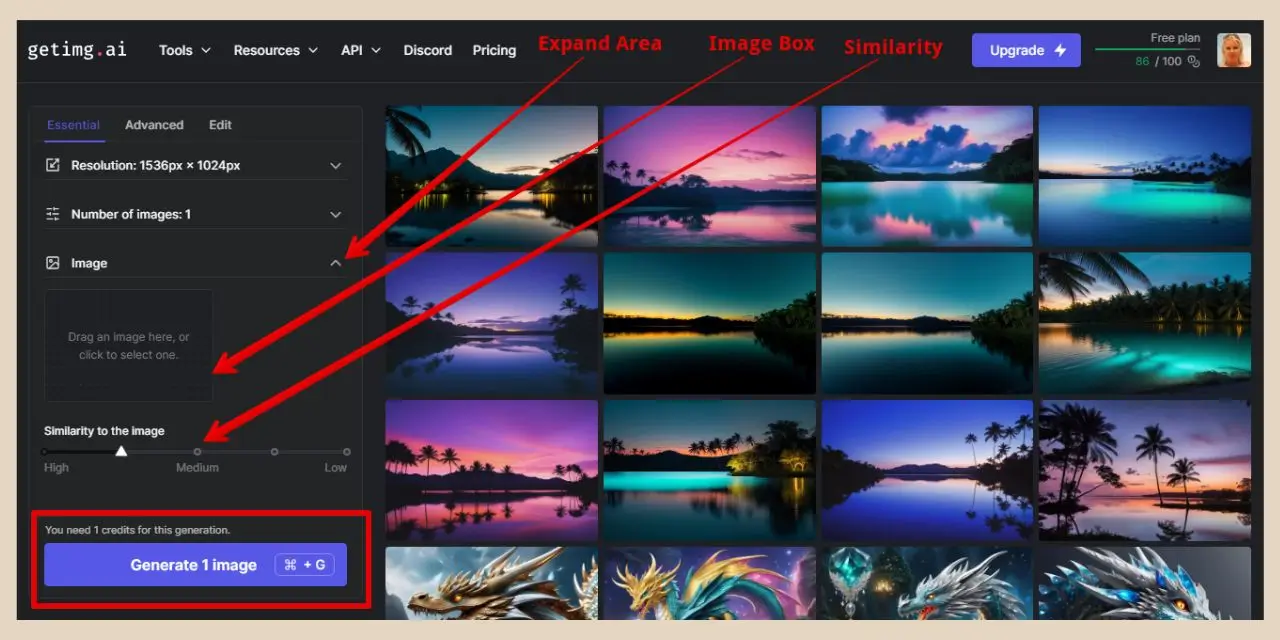
Once you have your image selected, you can use the Similarity slider to adjust how similar the generated image will be to it. The lower you have this set, the more the AI will follow the prompt whereas the higher you have this set, the more the AI will follow the image.
If you have this set in the middle, then the AI will take both into account equally. Once you’re happy with your settings, you can go ahead and click the Generate button at the bottom and your image will appear on the right in the main image area.
By the way, I should mention that there’s no scroll bar in the settings area so you need to click on a blank area within the settings and then use the arrows on your keyboard to scroll up and down. It’s slightly annoying but you get used to it.
Using The Advanced Tab
As much as the Essential tab is a nice simple way to generate images, I would strongly recommend that you use the Advanced tab instead. There’s a lot more you can change here which will help you generate much better images.
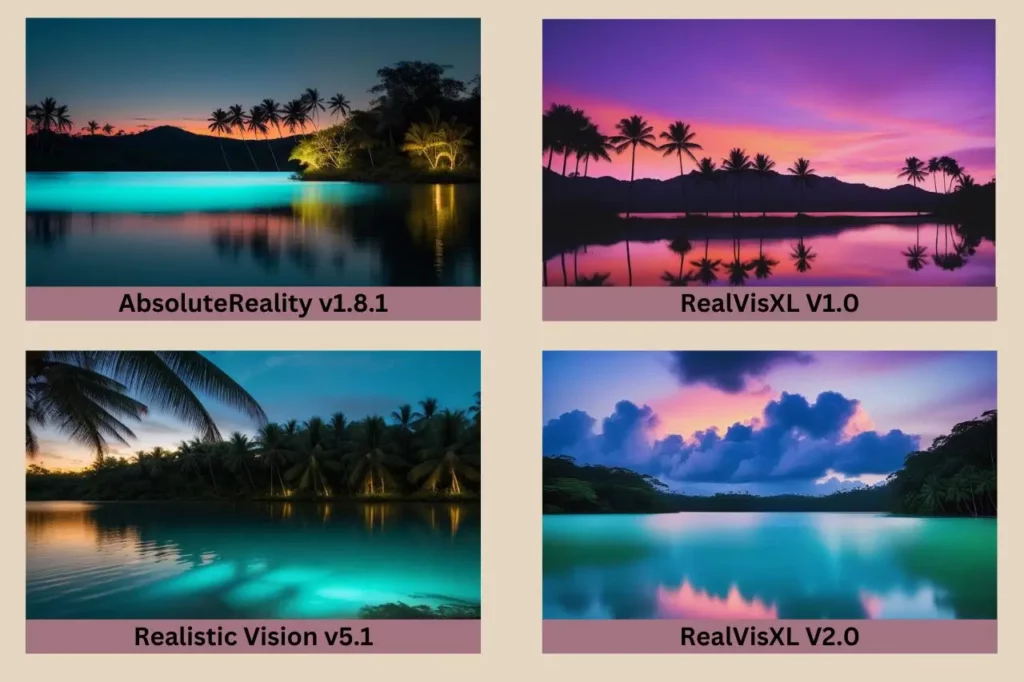
The very first new option is the AI Models and there are a lot of models to choose from. This one setting alone can make a huge difference to the types of images you generate.
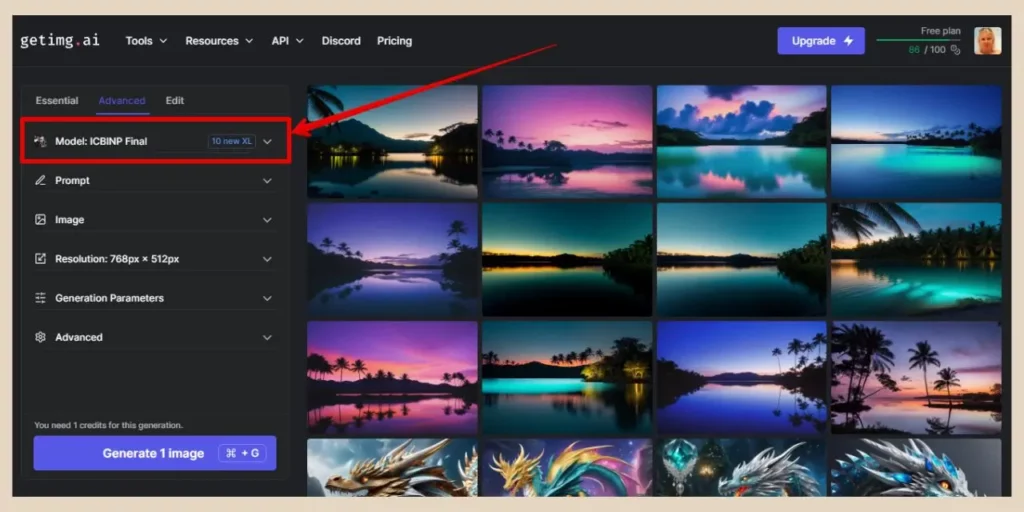
There are models for realistic-style images, anime-style images, cartoon-style images, etc so it’s worth trying a few of these out to see which ones generate the types of images you like the best.
The images below are a quick example of how the different models produce different results when the prompt and all other settings remain the same. The prompt used to generate these images was “A photo of a tropical luminescent lake at dusk”.
To access all the models, click the down arrow and this time, a pop-up window will appear with the full selection of models to choose from.
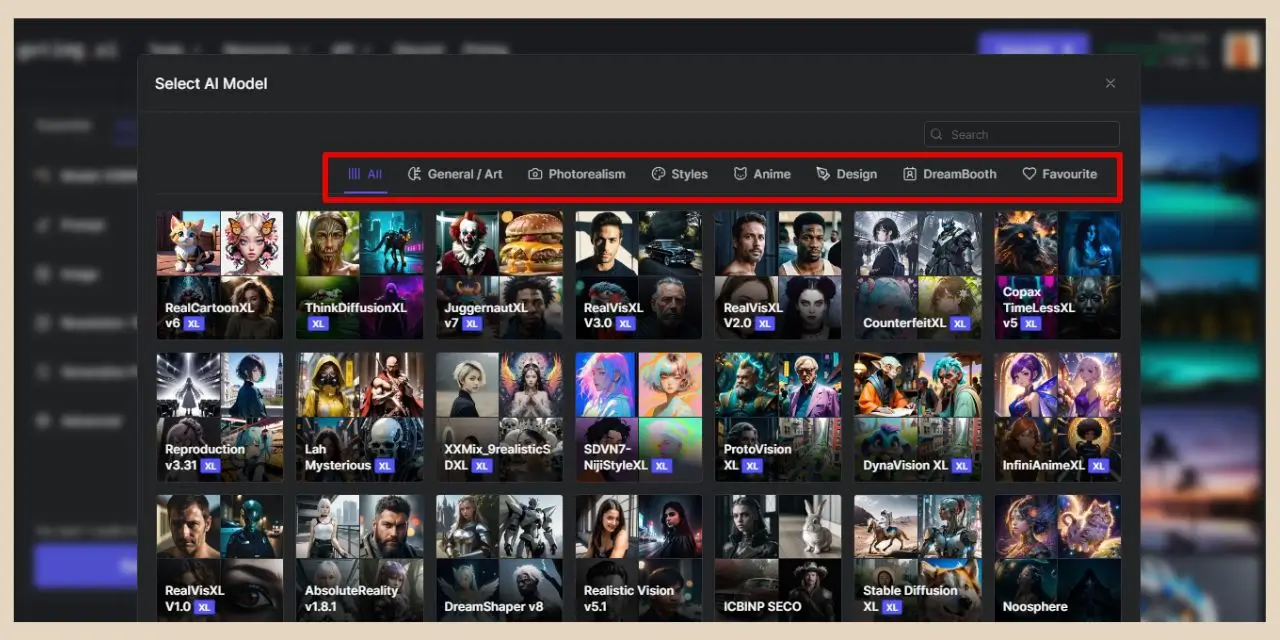
If you’re looking for a particular type of image, you can use the tabs across the top of the window to show only the models that generate that type of image. Alternatively, you can use the default “All” tab to see the full selection of models available.
Again, there’s no scroll bar here on this window so you’ll have to do the same click on a blank area and use your keyboard arrows trick again to scroll through the full selection which is 60+ models.
More Prompt Options
Below the models setting, you’ll find the prompt area again but In the advanced tab, you’ll have extra options here. The first new option is the Random button (directly under and to the right of the prompt box) which allows you to add random prompts to the box.
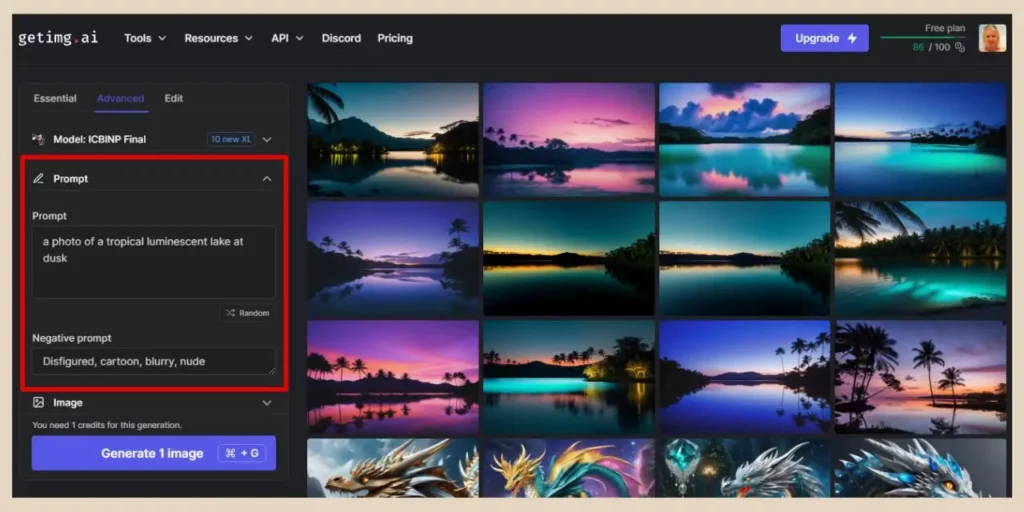
This is a great way to see examples of full descriptive prompts and the images they generate if you’re completely new to the whole AI image-generating game.
Beneath this, you’ll find the Negative Prompt box which is where you can add things that you don’t want to appear in the generated image, such as extra limbs, blurred images, etc.
Using ControlNet For Reference Images
The reference image area also has more options in the advanced tab. These include a checkbox for cropping and a new option called ControlNet.
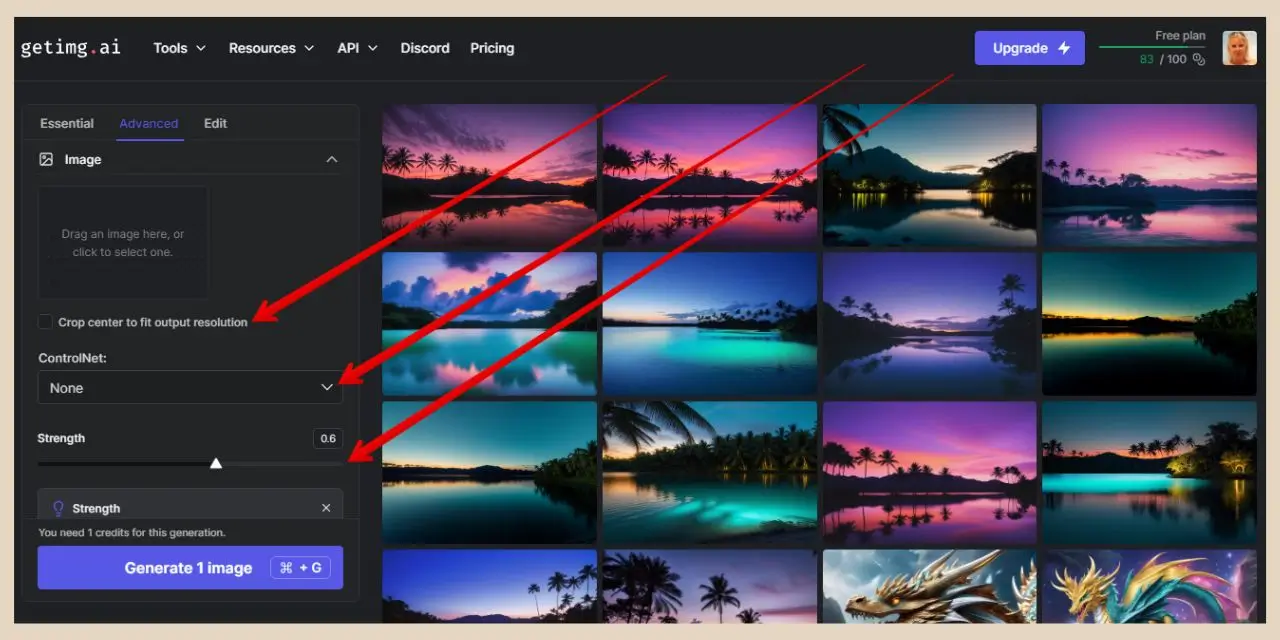
The Crop Center Checkbox can be used if you’re using a reference image that has a different resolution than the image you want to create. Checking this box will crop the image centrally to match the resolution of the image you’re trying to create.
The ControlNet option is a way for you to copy certain characteristics from the reference image that you’d like to see in the generated image.
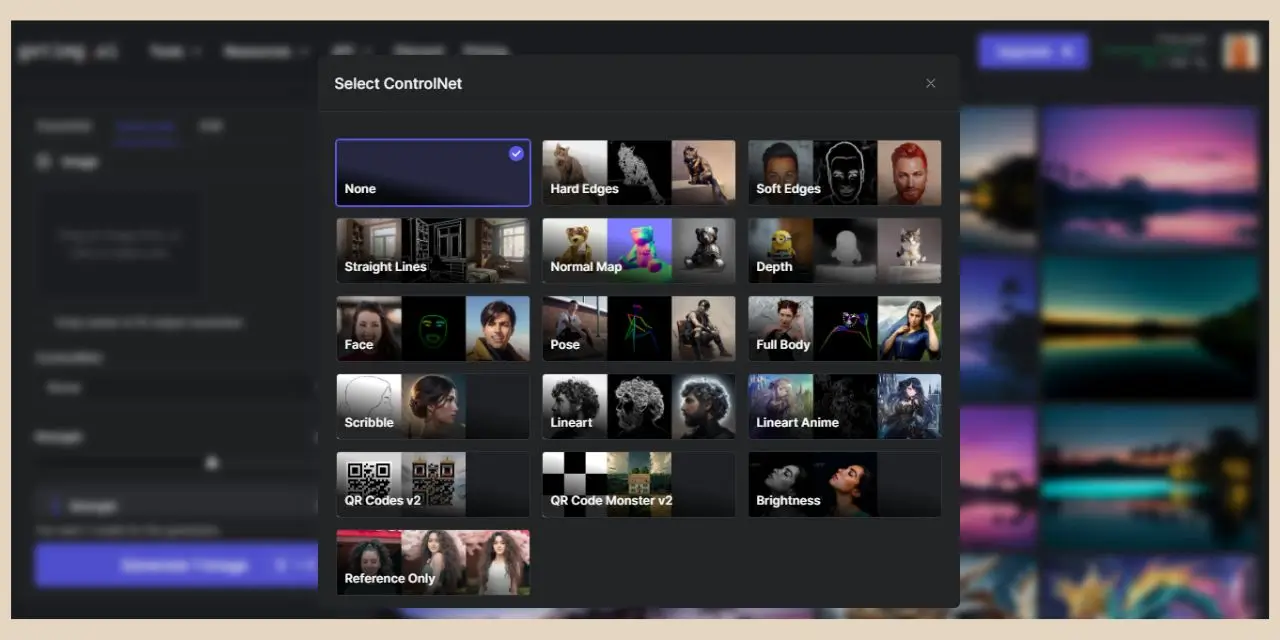
So, for example, if you wanted to create an image of a woman, and had a reference image of a man sitting in a particular way, you could use the ControlNets Pose option to copy this pose into the generated image so that the woman sits in the same pose.
Or if you want to copy the depths of an image or even facial expressions, then you can use the options in ControlNet to do this.
There’s also a ControlNet Strength slider which you can use to adjust the similarity level of the trait between the reference image and image you’re about to generate.
Advanced Resolution Options
The resolution area will look almost exactly the same except for the fact that there are now two tabs here. The Simple tab is where you’ll land by default which is almost the same as before except for the addition of a High-Res checkbox but you’ll now also have a new Advanced tab as well.
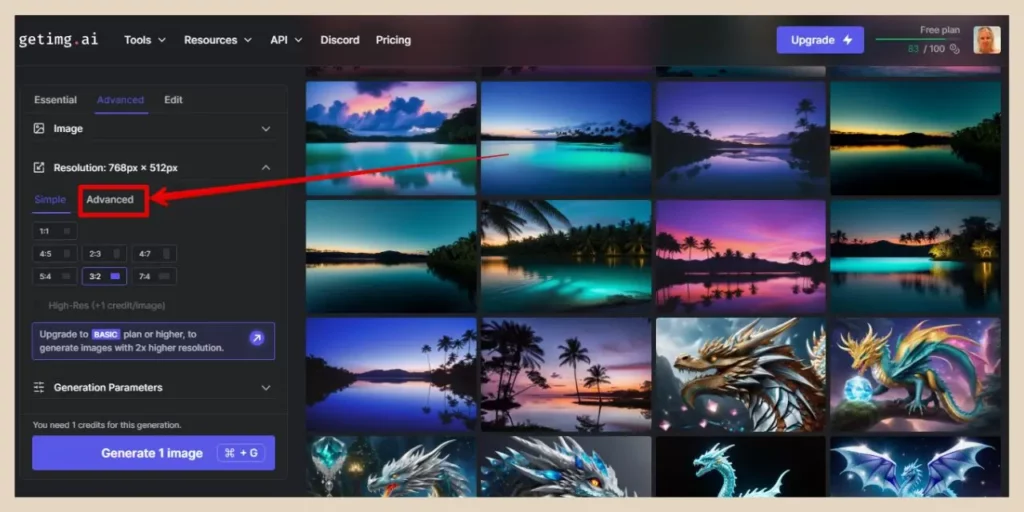
The High-Res checkbox is for paid users only but the Advanced tab is a way for you to set your very own custom image sizes.
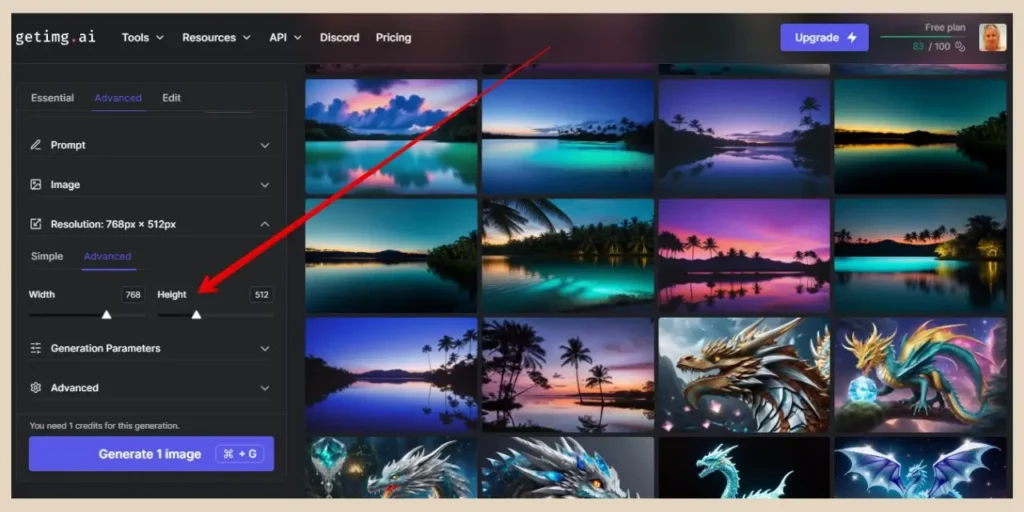
You can simply use the Height and Width sliders or the number boxes to change the size of the image you’re about to generate to your own custom values.
Generation Parameters Setting
The next setting area is the Generation Parameters area and it starts with the number of images which is exactly the same as the essential tab. However, there are a few new options here starting with Steps and Guidance Scale sliders.
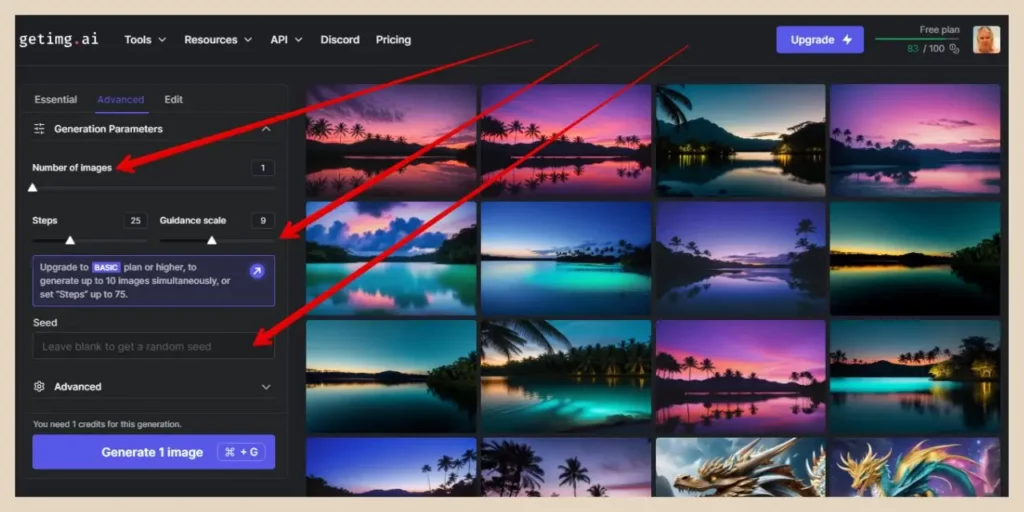
Steps are essentially how many steps the AI takes to create the image and by default, they are set at what Getimg.ai consider to be the optimal number of 25.
Usually, the more steps you use, the better the quality of the generated image. However, this also makes the image generation slower so I personally tend to leave this as is but you can play around with this to see how it affects your image results.
The Guidance Scale is how closely the AI follows the prompt so the lower the setting, the more the AI will veer from the prompt and the higher the setting, the closer the AI will stick to the prompt.
Again this is set to 9 which is a good number to stay at but you can play around with this to see the effect although usually, somewhere between 7 and 9 tends to yield the best results.
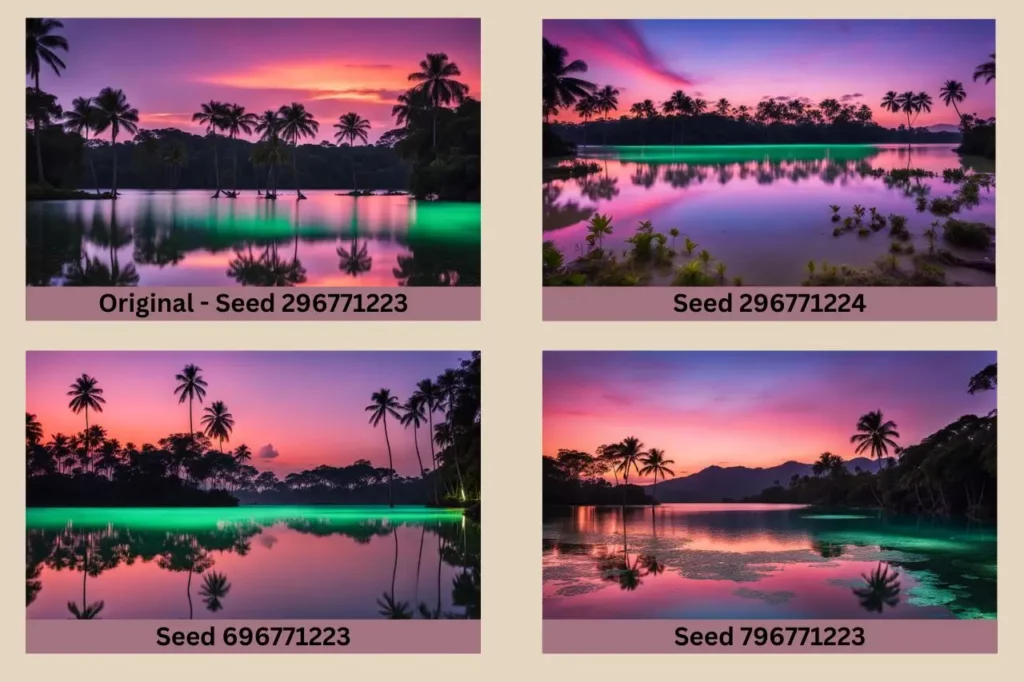
Using The Seed Setting
The next new area is the Seed setting and usually, this would be left blank so that you can generate different random images every time you click the Generate button even when all the settings and the prompt remain the same.
However, if you ever want to regenerate the same image again or make variations of an AI image you like, then this is where using the seed becomes very useful.
Every AI image you create has its own unique seed number (I’ll show you where to find it in a moment) and you can enter this seed number into the box here to regenerate the same image again.
You can also create variations of an image by making small changes to the seed number just like the examples in the image below where I’ve changed the last digit in some and the first digit in others.
This technique is essentially a way of creating similar images so in effect, it’s a “more like this” option.
You can create even more variations of your favourite images by keeping the seed number the same but making slight changes to the prompt or any of the other settings instead.
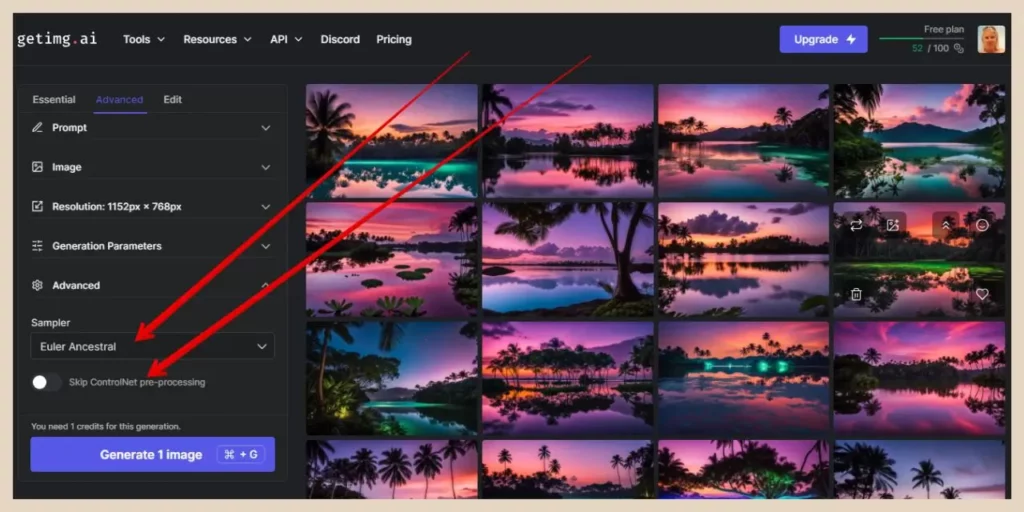
The Advanced Settings
The final new area here in the advanced tab is the advanced settings and this is where you’ll find Samplers if you’re model of choice allows you to change them.
Samplers help determine the final results of your generated images and changing them can create subtle differences to the final image that’s generated.
The best way to test these out is to regenerate the same image using the seed number and only change the sampler each time to see the exact effect each one has.
In the examples below, I’ve used the same seed and kept the prompt and all other settings the same. The only thing that has been changed each time is the sampler used.
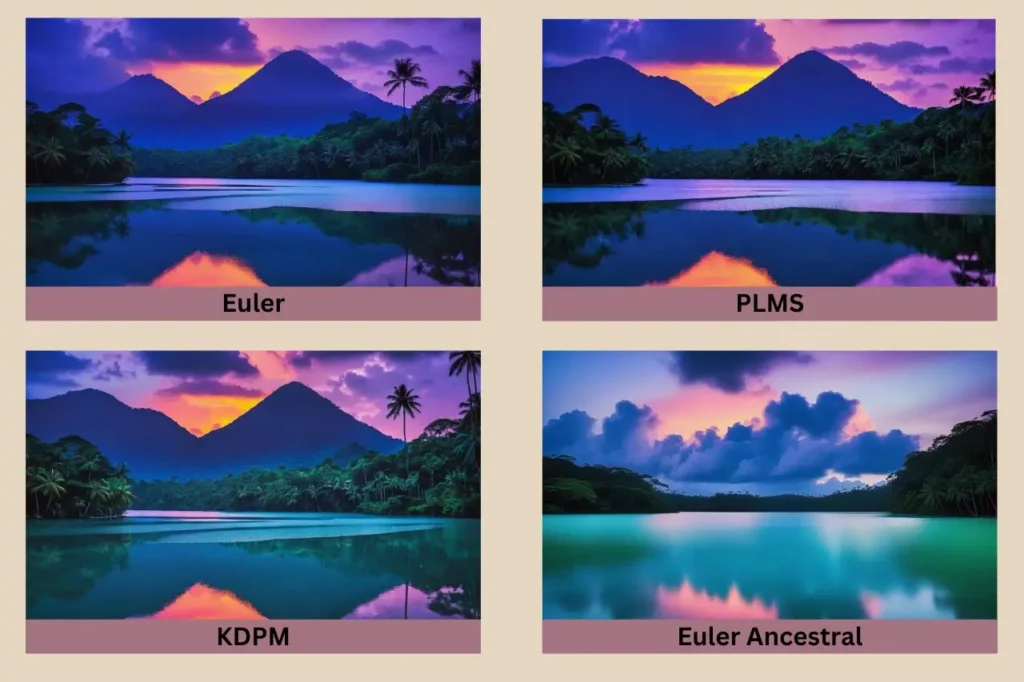
As you can see, for the most part, changing the sampler will create subtle differences in each image (sometimes so subtle that you’ll have to search for the differences).
However, watch out for the ancestral samplers as they do things a little differently and will often result in very different-looking images. Case and point if you look at the last image on the bottom right of the examples which is very different to the other three.
Most of the models will allow you to change the sampler but there are the odd few that don’t so if you’re not seeing a sampler option here then it’s your model choice that’s causing this.
The final setting you’ll see in this area is a “Skip ControlNet Pre-Processing” toggle button which you can turn on if you want to skip this step.
Image Options
Once you’ve generated your images, you’ll now have some options to do more with them. The first way you can see some of these options is by hovering over them.
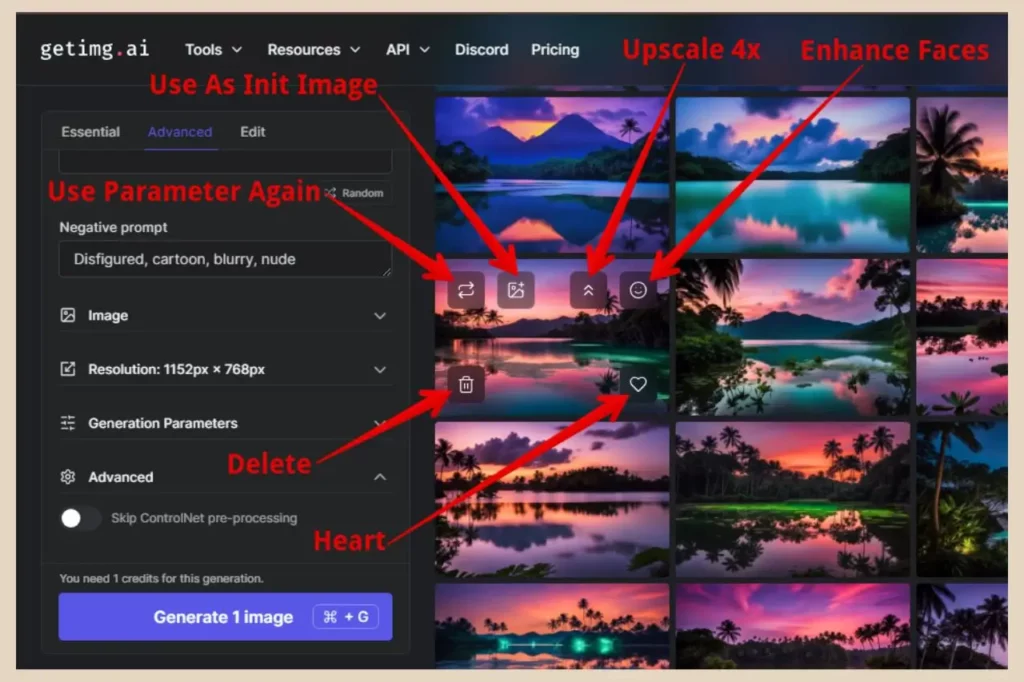
When you hover, you’ll notice a few icons appear over the image and you can use these to do the following:
- Use Parameters Again – Use the same settings again (prompt, model, resolution, etc).
- Use As Init Image – Use as a reference image in the image area.
- Upscale 4x – Increase image resolution by 4 (make 4 times larger).
- Enhance Faces – Enhance faces in your image if there are any.
- Delete – Delete the image.
- Heart – Like the image.
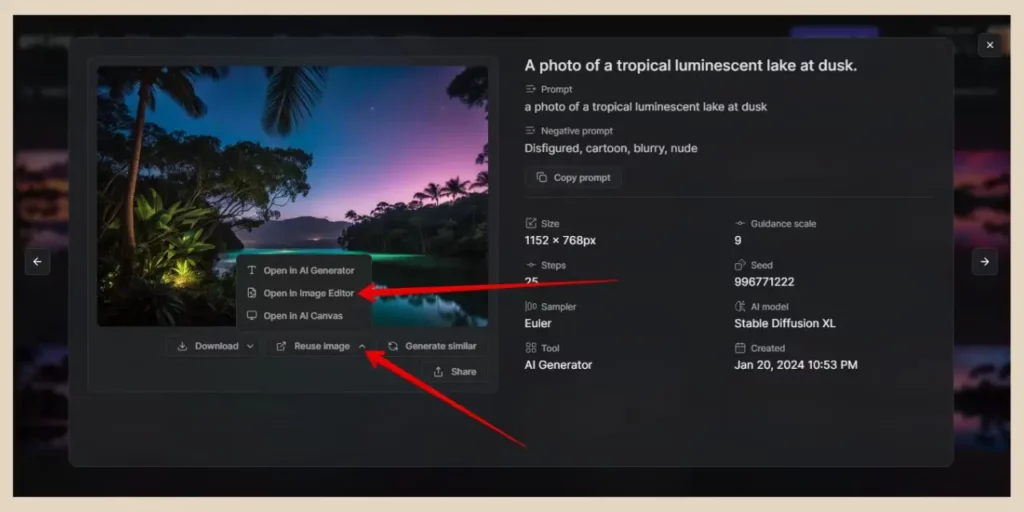
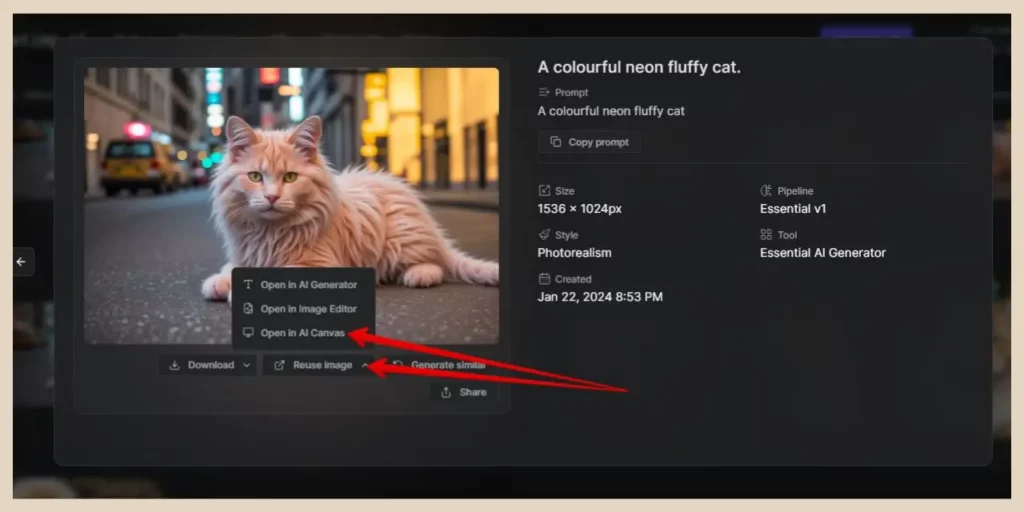
You can also click on an image and it will appear in a larger window with a few more options available. This is also where you can find all the settings used to create the image including the image seed number which I mentioned earlier.
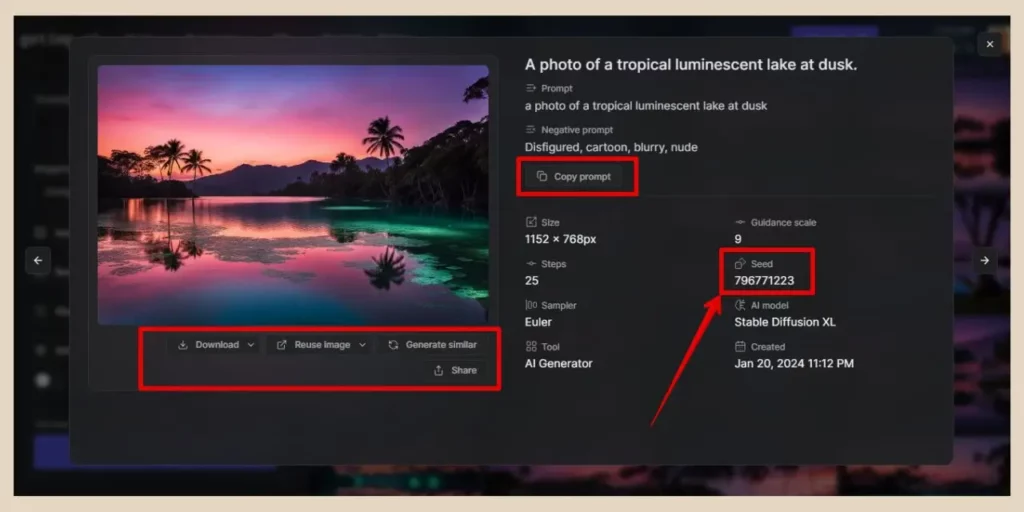
From this window, you’ll find a Download button which will give you the option to download the image in either JPEG or PNG format. There’s also a Reuse Image button that will allow you to use the image either in the AI Generator, Image Editor or AI Canvas.
You can click the Generate Similar button if you’d like to generate a similar image or the Share button if you’d like to share your image on your social accounts.
Then lastly there’s the Copy Prompt button if you’d like to copy the prompt into the prompt box of the AI generation and reuse it again to create more images.
Using The Edit Tab In The AI Generator
The last area within the AI generator is the Edit tab and this is where you can make certain edits to your existing images. The settings panel on the left uses pretty much the same settings as the other tabs however this time the prompt box is actually an instruction box.
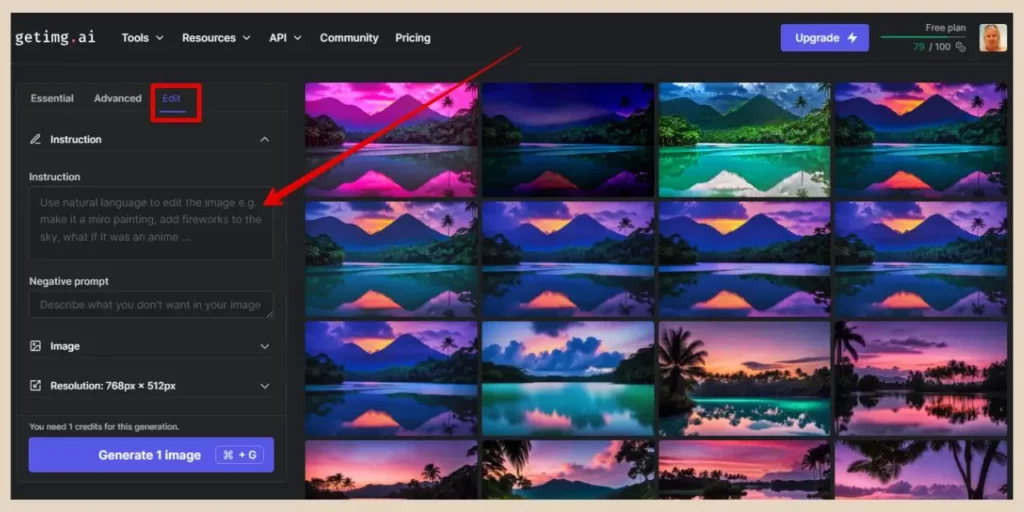
How this differs is that rather than describing an image you’d like to create, you’ll be describing things that you’d like to change in an existing image instead.
So, first, select the image you’d like to work on by either clicking the image box in the image setting area, dragging an image to the box or clicking the “Use As Init Image” icon when hovering over your image of choice.
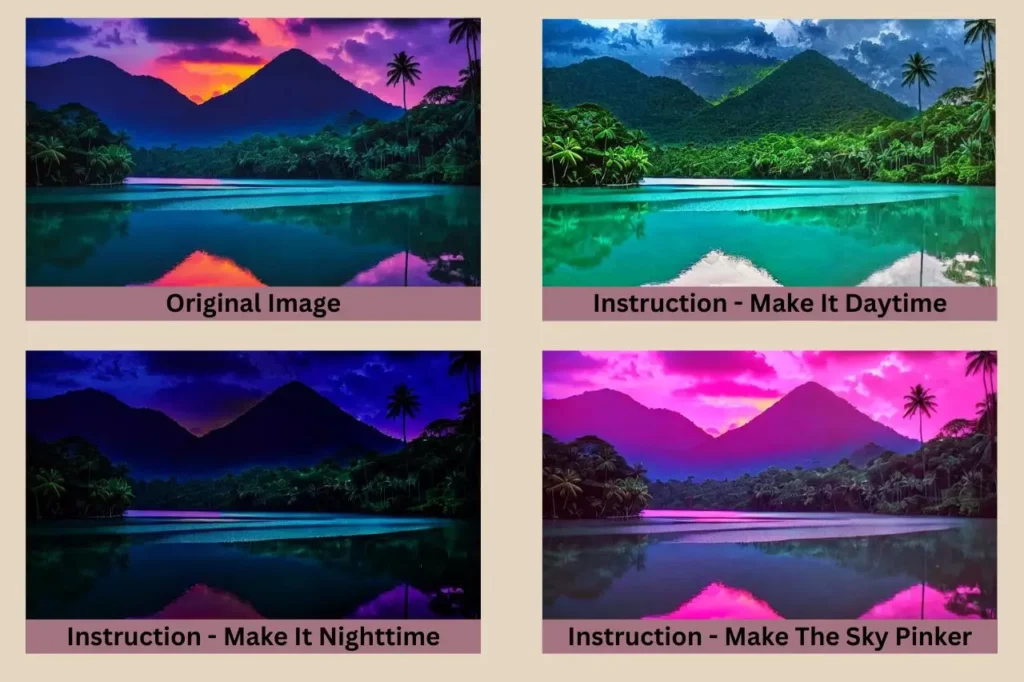
Next, type in what you’d like to change into the instruction box and click the Generate button to see the results. The images below are just a few examples of the instructions I’ve used and the resulting images that were generated.
There is an Image Guidance slider just beneath the image box if you’d like to adjust how much the original image is preserved but I tend to leave this set at the default for best results.
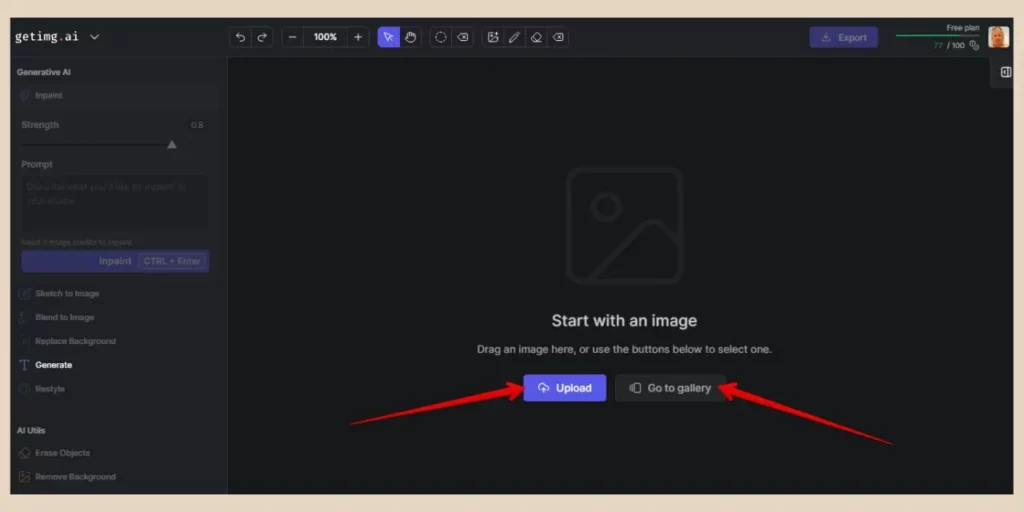
How To Use The Image Editor In Getimg.ai
If you’d like to do more advanced editing then this is where the Image Editor tool comes in and you can find it in the Tools area in the main menu.
Once you’re in the image editor, you can either click the Upload button to choose an image from your device or click the Go To Gallery button to choose one of your existing generated images.
If you take the gallery route, simply click on your image of choice from the gallery and when it pops up in a larger window, click the Reuse Image button and then select Open in Image Editor to bring it across.
By the way, you can also access the gallery by clicking on your profile image in the top right corner of the screen and selecting Gallery from the dropdown menu that appears.
Understanding The Top Of Screen Icons
Once your image is in the editor, you’ll have a lot of different options here so I’ll start with the icons across the top of the screen. I’ll Apologise now though for the next screenshot below, it is a little on the busy side.
So, starting from left to right, here’s a list of all the top screen icons and what each one will do.
- Undo – Undo the last action.
- Redo – Redo the last action.
- Zoom – Zoom in or out on the image.
- Select – Select the current image edited area (selected by default – you’d use this to set the area after playing with the pan tool below).
- Pan – Move around the image edited area (like an all-directional scroll bar of sorts).
- Masking Brush – For highlighting areas of the image you’d like to change (used with Inpaint).
- Clear Mask – To clear the highlighted areas of the image.
- Upload Image – To upload another image to the editor (used with Blend To Image).
- Draw – To draw things on the image (used with Sketch To Image).
- Eraser – To erase selected parts of drawings from the image.
- Clear Drawing – To clear all drawings from the image.
- Export – Download in PNG format.
- Advanced Options – Change the model, change the number of images, change the export format, etc.
Most of these icons are used in conjunction with the tools in the left side panel which we’ll have a look at next.
How To Inpaint In Getimg.ai
I’ll start with the first one which is Inpaint and this allows you to select an area of your image and make changes to it. As soon as you select the Inpaint tool, the masking brush will automatically be selected.
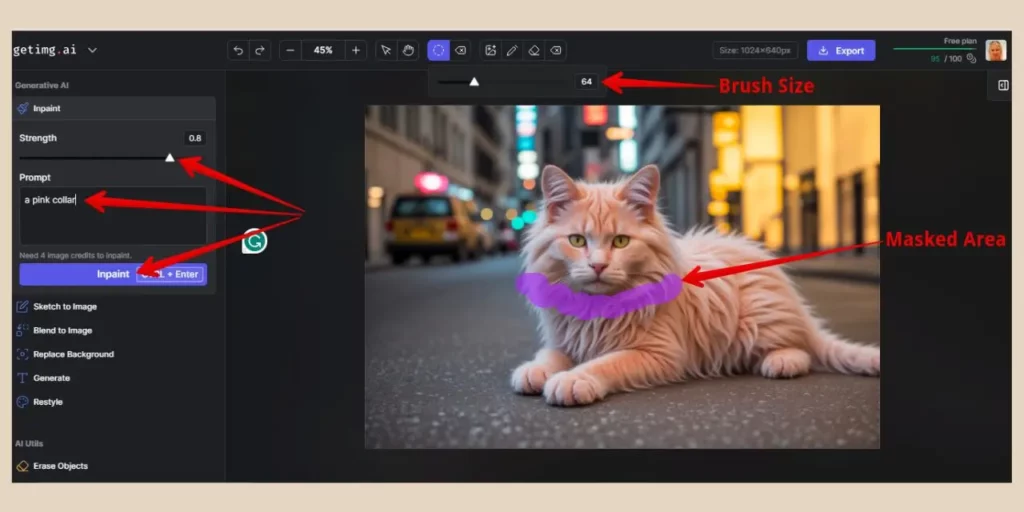
You can use the slider or number box just beneath the mask icon to change the size of the brush which you’ll now notice if you place your cursor anywhere over your image.
So, click and drag the brush over the area where you’d like to inpaint and then use the prompt box to describe what you’d like to change. You can also use the Strength slider to adjust how much you want to transform the masked area.
When you’re ready, click the Inpaint button which will cost you four credits to use but you will be given four results to choose from so simply click on each one to see the full-size image.
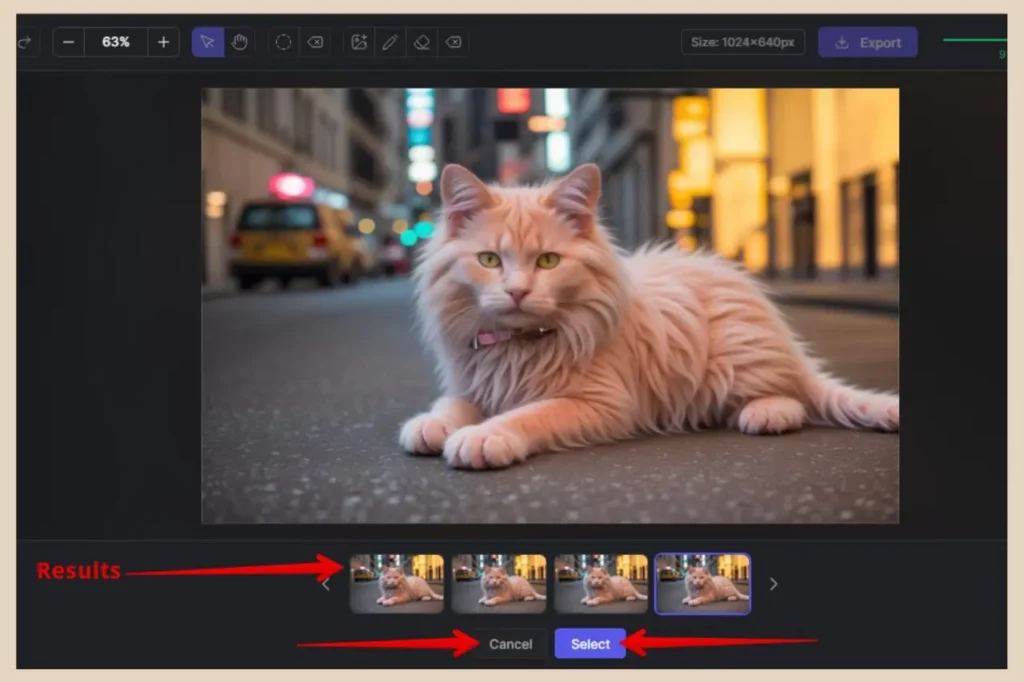
If you like one of the results, click the Select button and this new image will now replace the original one in the editor where you can then continue to edit it further.
If you don’t like any of the results, you can click the Cancel button and then click the Inpaint button again to generate another four results. However, it will still cost you the four credits even if you click the cancel button because all of these images will still be saved to your gallery.
How To Use Sketch To Image In Getimg.ai
The next tool is the Sketch To Image tool which works very similarly to the Inpaint tool but this time you’ll be drawing what you’d like to add to the image. When you select this tool, the draw icon will now automatically be selected.
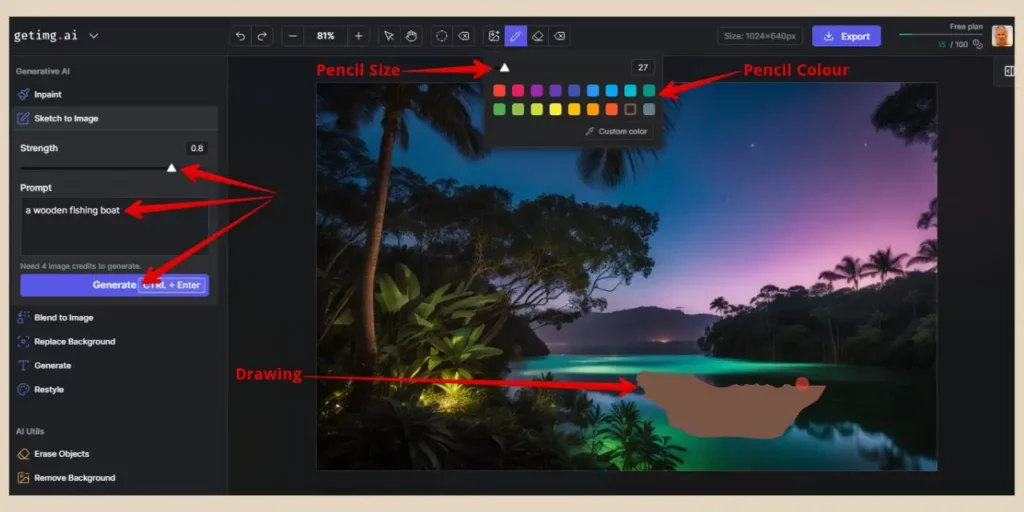
You’ll have the option to change both the pencil size and the pencil colour from the options that are now just below the draw icon. Now, I will mention that this is not the easiest tool to work with but try to draw what you like to add in the area where you’d like to add it.
Next, use the prompt box to describe what you’ve drawn and if you want to, you can use the Strength slider to adjust how much you want to transform your drawing.
Again, it will cost you four tokens to use this tool but much like the inpaint tool, you’ll be given four results to choose from so click the Generate button to see the results.
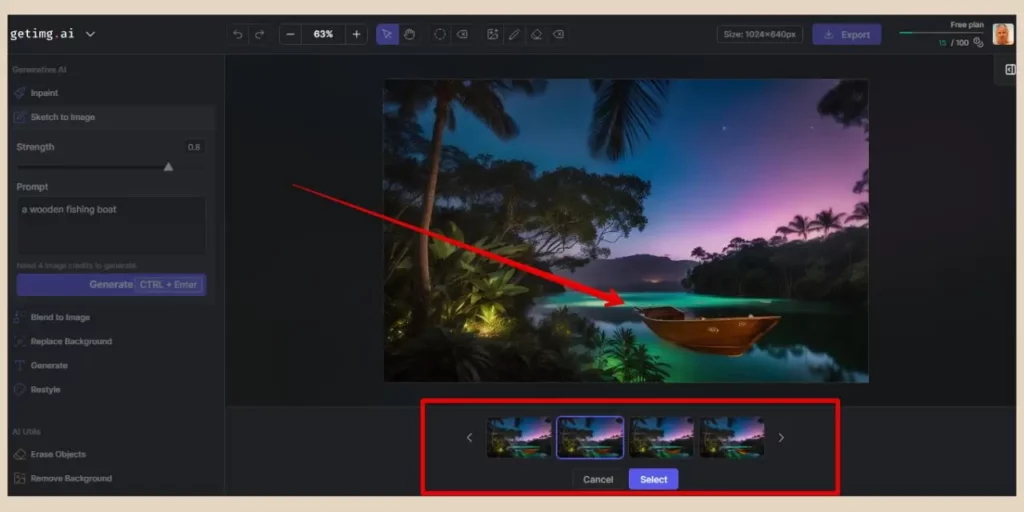
Much like before, you can click on each one to see the full-size image and use the Cancel or Select button to accept one image or reject them all to try again.
How To Use Blend To Image In Getimg.ai
The Blend To Image is the next tool here and this is a very cool tool to play around with. It allows you to upload other images and blend them into the current image you already have in the editor.

So to get started, click the Blend To Image tool, then click the Upload icon to upload another image from your device. Once your image appears in the editor, you can click the Remove Background button if you need to which will help improve the blending process.
You can also click and drag the corners to resize the uploaded image and move it to your desired position over the original image. From here, enter a description of the image/images you’ve added, adjust the strength slider if needed and then click the Blend button to generate the results.
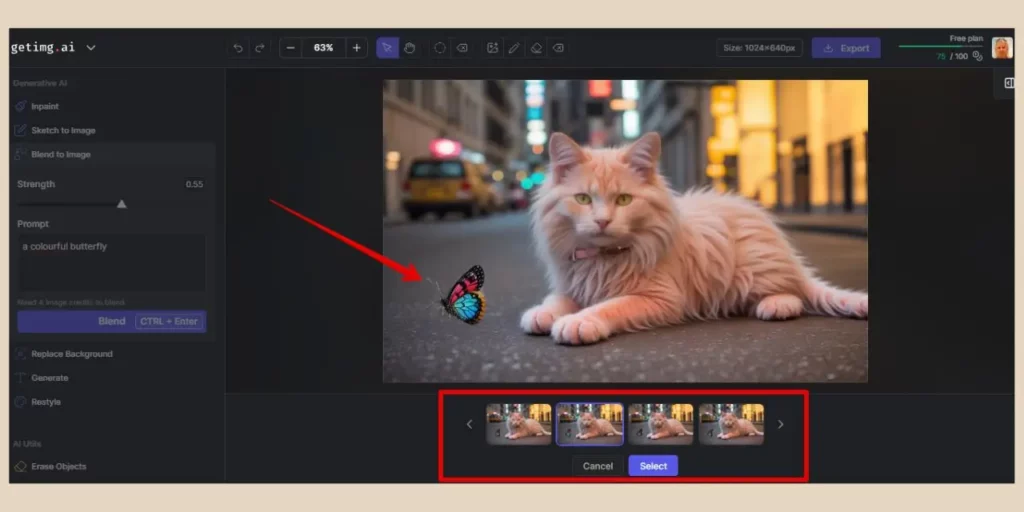
Four credits will be used and again, you’ll have four results to choose from. You can actually add numerous images here so don’t be afraid to get creative as this is a very fun tool to play around with.
Using The Replace Background Tool
The next tool is the Replace Background tool and this lets you replace the image background with anything you can think of whilst keeping the main subject intact.
So, type in the description of the background you’d like to see, adjust the strength slider if needed, and then click the Replace button to see the results. In this example, I’ve asked for “a colourful meadow with trees and flowers”.

This is another four-credit tool that will give you four results to choose from and as you can see in the image above, it does an excellent job with background replacement. It even kept my butterfly addition which I wasn’t sure it would.
Using The Generate Tool
The Generate tool is the next tool in this area and this allows to generate a new image rather than uploading one using the upload icon. This new image will appear as a small image which can then be used with the Blend To Image tool.
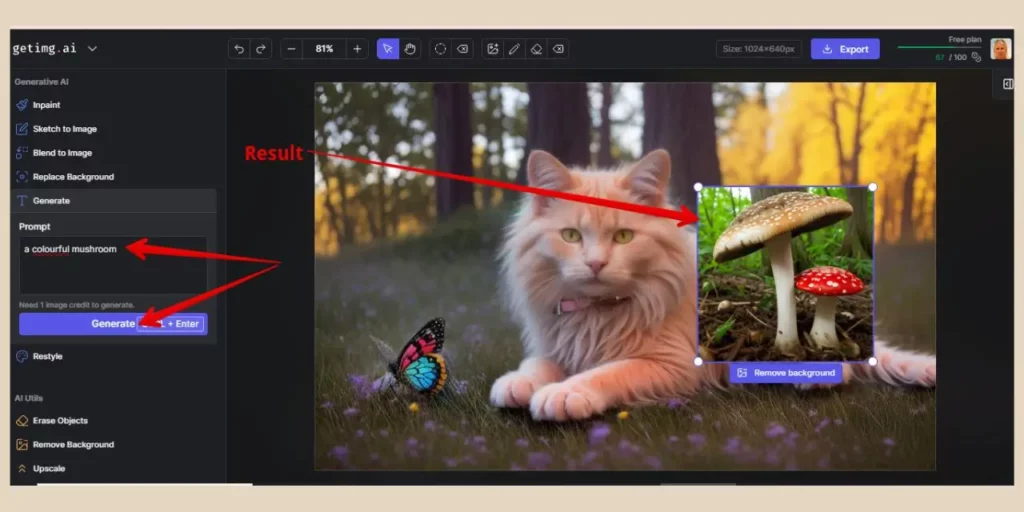
So, describe the image you’d like to create in the prompt box and then click the Generate button to generate the image. This image will now appear in the editor where you can remove the background if needed, resize the image and move the image to where you’d like it.
As this tool only generates one image at a time, this will only cost you one credit each time you use it and if you’re happy with the image result, you can then use the Blend To Image tool to blend it with your original image.
This particular tool is super handy because you could, in essence, create a multitude of additional images and add as many extra elements and details as you like to your existing image to create something completely new and unique.
Using The Restyle Tool
The last main tool in this area is the Restyle tool and this will let you change the style of the original image, so a photograph style to an anime style for example.
To use it, enter the description of the original image plus the new style you’d like to use, then click the Restyle button to see the results.
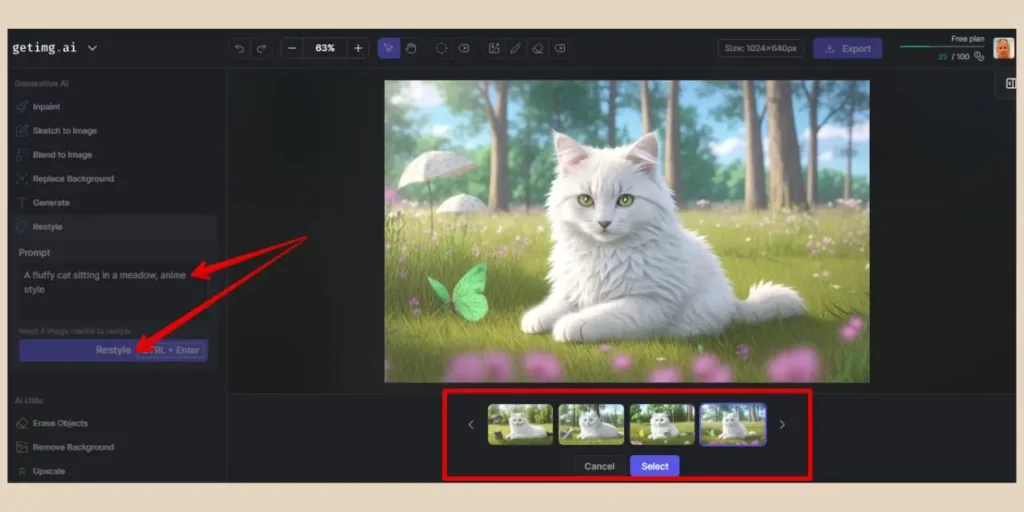
Restyling will cost you four tokens to use and you’ll get four results to choose from so click Select to use one of the images or click Cancel to revert back to the last image to try again.
Using The AI Utils Tools
Lastly, at the bottom of the tools area, you’ll notice a small selection of minor tools under the heading “AI Utils” and these are for simpler adjustments. Each one of these tools will cost one credit to use.
The first one is the Erase Objects tool which will allow you to erase objects from your image. When you select this tool, the masking brush will be automatically selected so highlight the objects you’d like to erase and click the Erase button to remove them from your image.
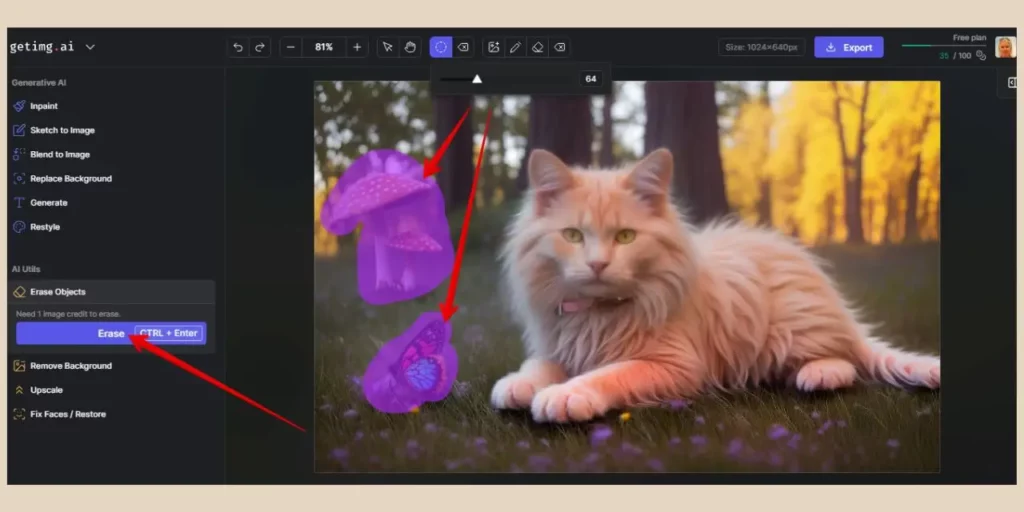
In the image above, I wanted to erase the mushroom and the butterfly from the image so I highlighted them both to remove them. The image below is the result I was left with after the removal.
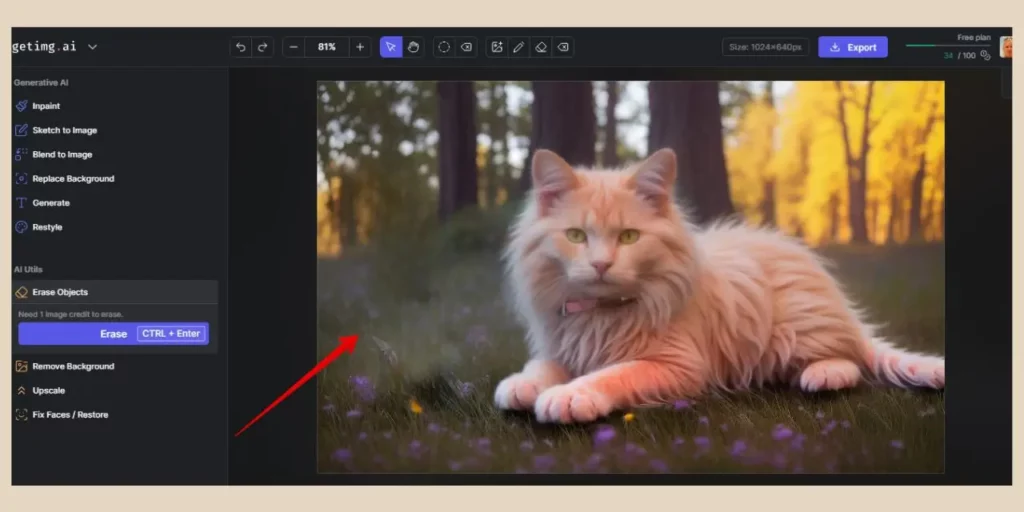
The tool did leave a slight blur behind where the butterfly and mushroom once were but as this image already had a slightly blurred effect in the background, the result was acceptable but watch out for this as sometimes it’s very obvious.
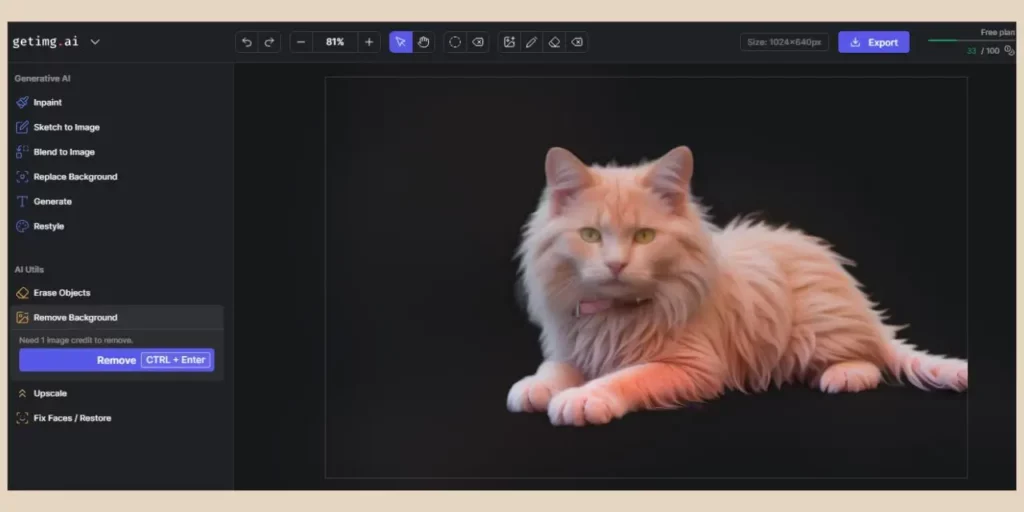
The next tool under this is the Remove Background tool which will remove the entire background from the image. The AI will automatically pick up on the background area so you don’t need to highlight anything here. Just click the Remove button and the AI will do the rest.
The last two tools are the Upscale tool to make the image size four times bigger and the Fix Faces/Restore tool which will enhance any faces within the image.
These can just simply be selected and the action button clicked and the AI will complete the action for you.
How To Use The AI Canvas In Getimg.ai
The AI Canvas is another area where you can generate and edit images but this one is slightly different to the regular AI Generator. Here you’ll have infinite space to work in and there’s a new feature called Outpainting that will allow you to extend your images.
You can access the AI Canvas from the Tools options on the main menu or by selecting an image in your gallery and clicking on the Open In AI Canvas option from the Reuse Image button.
If you choose to access it straight from the main tools menu, you’ll land on a page where you’ll need to click the “New AI Canvas Project” option which will bring you to a brand new empty canvas.
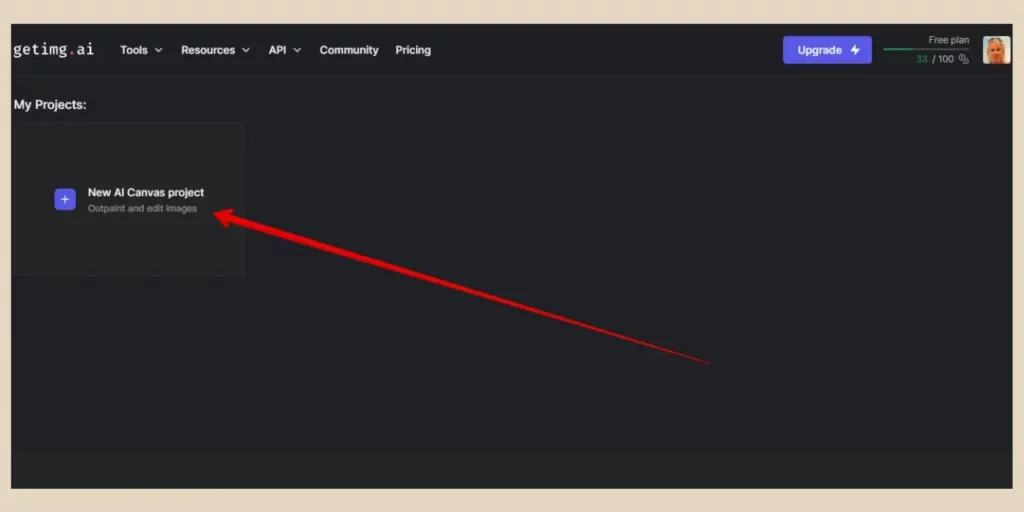
You can also access previously created canvas projects from this same area if you’d like to get back into one you’ve already created.
Working In The Canvas Area
For this example, I’ve chosen to reuse a gallery image in the AI Canvas so that the canvas opens up with my image of choice already there. This image will probably open up pretty big in the canvas so use the zoom options in the top right corner to adjust it to your liking.
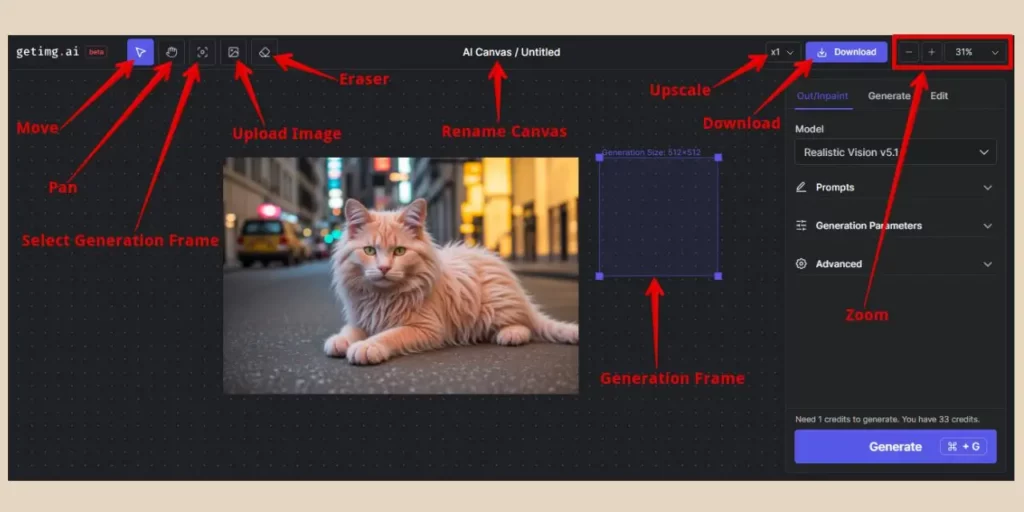
You’ll also notice some icons across the top of the screen and these are similar to those found in the Image Editor. Each one will allow you to do the following.
- Move – Move the generation frame around the canvas.
- Pan – Move around the canvas area (like an all-directional scroll bar of sorts).
- Generation Frame – Bring the generation frame into screen view (believe it or not, it can go missing off the screen if you have lots of images in the canvas).
- Upload Image – Upload an image from your device to the canvas.
- Eraser – Erase areas of your image.
- Upscale – Make your image resolution bigger.
- Download – Download your image.
- Zoom Controls – Zoom in/out of the canvas.
In the very top center of the screen, you can also rename your canvas to keep it organised. There’ll also be a transparent blue square box within the canvas area and this is the generation frame which is where everything you create will be generated.
Using The Right Panel Settings
On the right of the screen, you’ll notice a settings panel with three tabs across the top. This is where you’ll select the feature you’d like to use and these are Out/Inpaint, Generate or Edit.
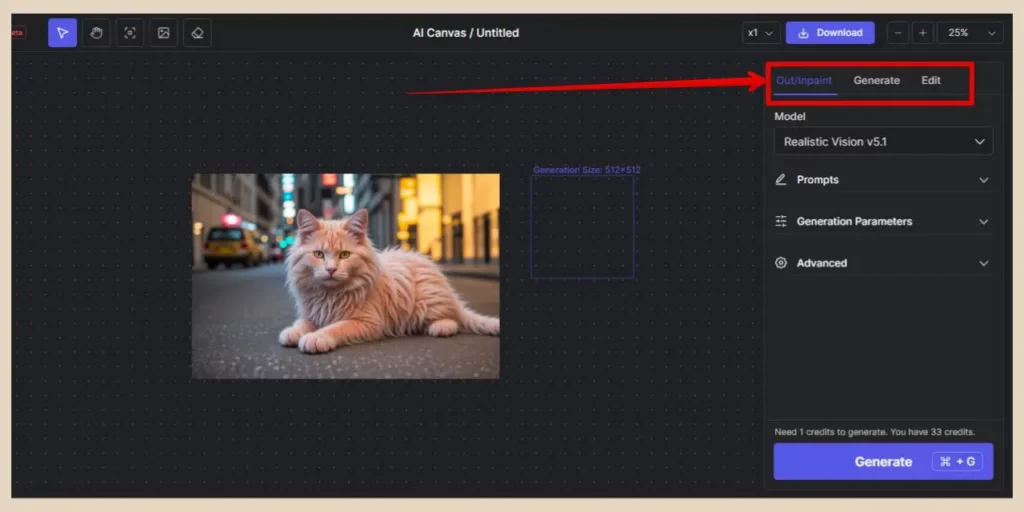
To be honest, I only really ever use the canvas editor for outpainting but you can generate and edit images here too. Each tab will have the same four settings options which are pretty much the same as those found in the AI generator and Image Editor tools.
The only new ones you’ll come across are the generation frame size in the Advanced area (although you can click and drag the frame corners to change the size manually) and the model options in the Edit tab which are:
- Instruct Pix2Pix – The same model used in the Edit tab in the AI Generator where you write instructions to change an image rather than to create one.
- Find & Replace – Type the item in your image you want the AI to find and then type what you’d like to replace it with.
- Face Enhancement – Enhance any faces you have within your image.
Almost everything here has already been covered in the other tools, however, using the canvas itself is a little different because now you’re working with a generation frame.
Using The Generation Frame
Everything you do here within the canvas will generate inside the generation frame so if you’re using the Edit tab, make sure the generation frame is over the image you want to work on.
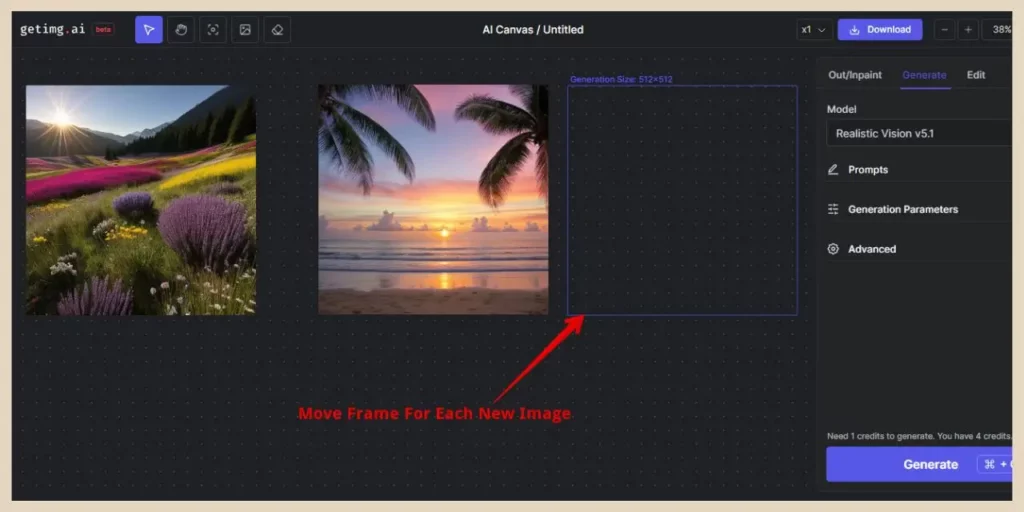
If you want to generate new images within the canvas, these images will also generate inside the frame so make sure you move the frame to a blank area of the canvas for each new image, otherwise, your images will generate on top of each other.
You can use the Pan icon or zoom out further if you start to run out of canvas area on the screen and if you ever lose the generation frame with all the panning and zooming in and out, you can click the Generation Frame icon to locate it (trust me, it happens frequently).
Do note that you can only generate square images in the canvas area, hence why I prefer to use the AI Generator instead, however, you can always use outpainting to change their size and aspect ratio which I’ll show you next.
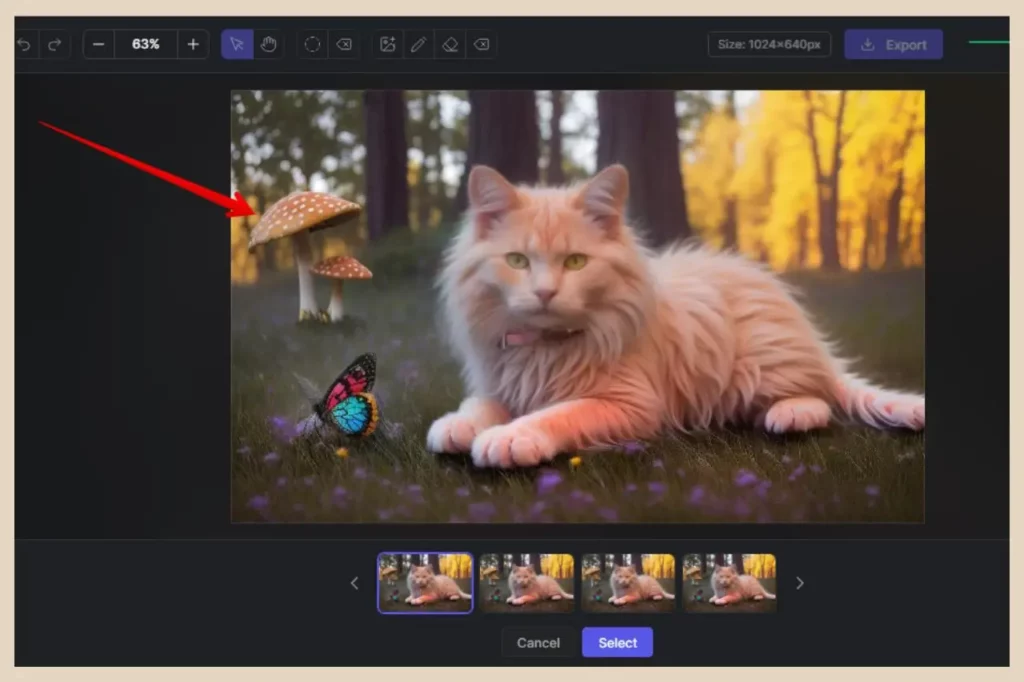
How To Outpaint In Getimg.ai
Outpainting is a very cool feature that allows you to extend beyond the borders of your original image with even more content.
You can use this to extend the size of an image with additional imagery around the borders or to even change the aspect ratio of an image if cropping would cut off essential parts of your image.
I’m going to use my cat image from earlier as an example because I’d like to see more of the meadow in this image so I’m going to upload it into the canvas using the Upload icon.
Once the image is in the canvas, the best way to outpaint is to work on small sections at a time and for this, you’re going to need your new friend, the generation frame.
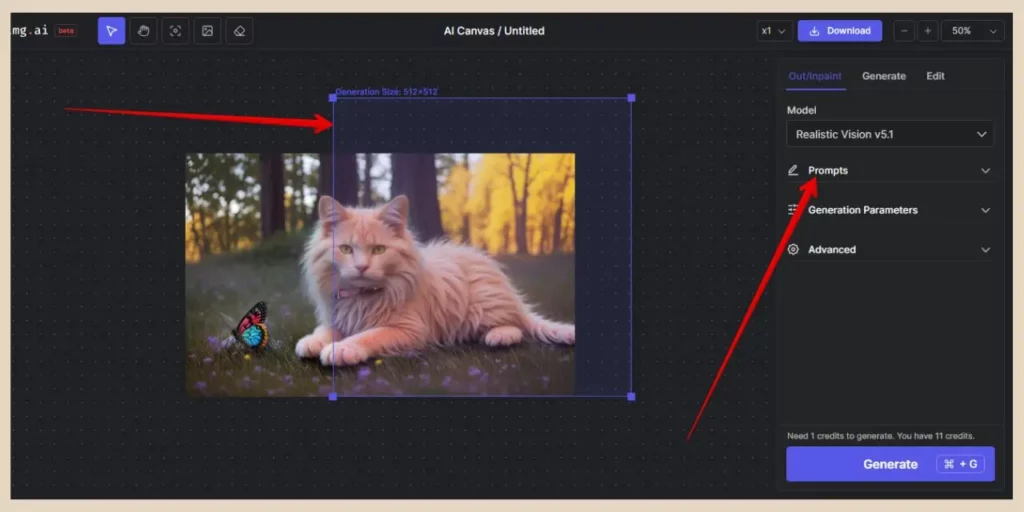
You’ll need to place the generation frame over the existing image but leave a section of it overlapping onto the blank canvas like the image above. This blank area of the frame is where you’re image extension will appear.
For best results, it’s better to keep as much of the original image within the frame as possible to avoid unwanted results that don’t match the original image.
Outpainting Settings
Next, you’ll need to enter a prompt to describe the image using the prompt box in the right side panel. In this particular case, I added “A Colourful Meadow” as this was the area of the image that was being extended.
If I’d described the entire image including the fluffy cat, the AI would have probably added more fluffy cats to the extended area so bear that in mind when you’re adding your text prompt.
By default, the number of images is set to four here so if you’d like to change that, you can access it in the Advanced area on the right.
The token cost will reflect whatever image number you choose here but once you’re ready, you can click the Generate button to see the outpainting results.
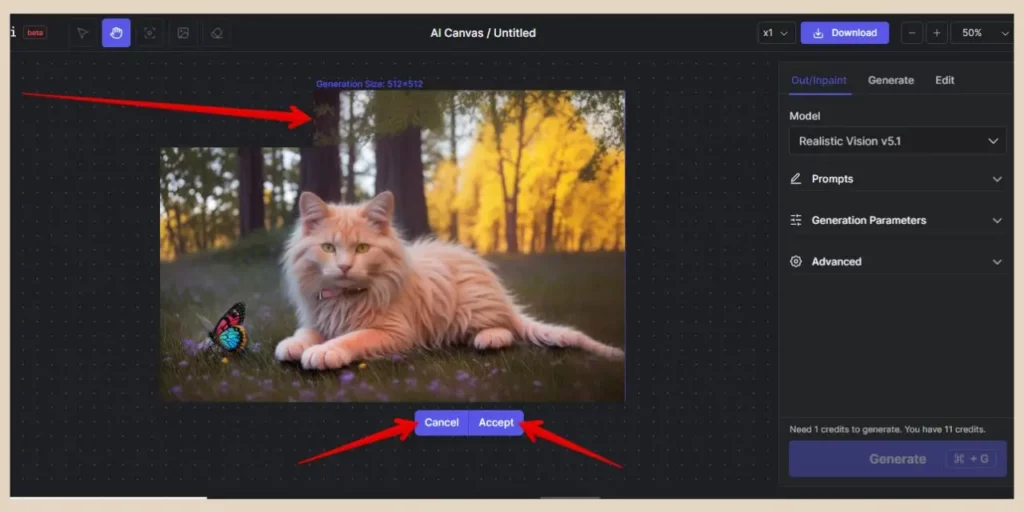
If you’re happy with the outpainting results, you can click the Accept button and the new area will become part of the image. If you’re not happy with the results, click the Cancel button and the outpainted area will be cleared and you can then try again.
The same applies if you’ve set the image number higher. You can simply click between the different results and hit the Accept button when the one you like the most is selected.
Once you’re happy with the first section, you can continue to outpaint the rest of the image section by section until you complete the image. This is how the final outpainted image looked compared to the original.

As you can see, you can extend an image as much as you like in any direction and you can use this tool on AI images, stock images or even your own photos.
How To Use The Real-Time Generator In Getimg.ai
The very last tool you can use in Getimg.ai is the Real-Time Generator which you can access from the Tools options in the main menu. This tool will create images as you type and you get 100 images a day to use for free (separate from your monthly 100 credits).
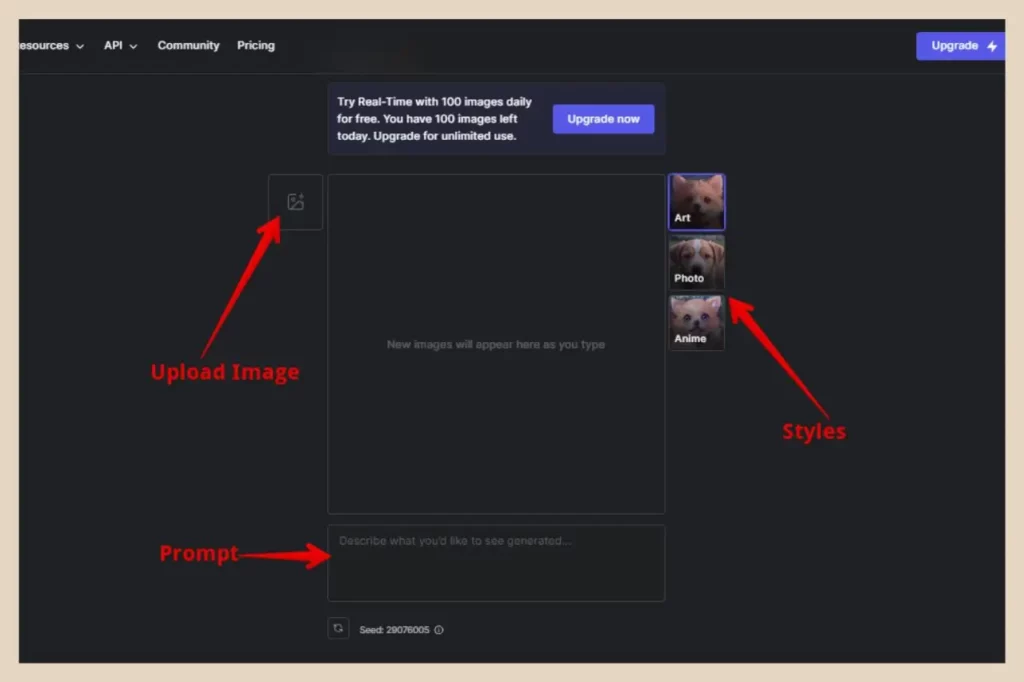
To use it, simply start typing a prompt into the prompt box and images will appear and change in the image area as you type. If you want your images to be in a particular style, you can select one of the three styles to the right of the image area.
You can also upload an image as a reference using the Upload icon to the left of the image area. When you use the upload icon, a small slider will appear beneath the reference image which you can use to adjust the strength given to the image.
To keep this nice and simple, I’m going to use the “A colourful meadow” prompt again as an example. With this simple prompt alone, it generated 24 different random images before I finished typing so you’ll use up your 100 daily images very quickly.
If you don’t like the image you’re left by the time you’ve finished typing, you can use the Change Seed icon beneath the prompt box to get a different image or you can keep adding to the prompt to see what else it generates.
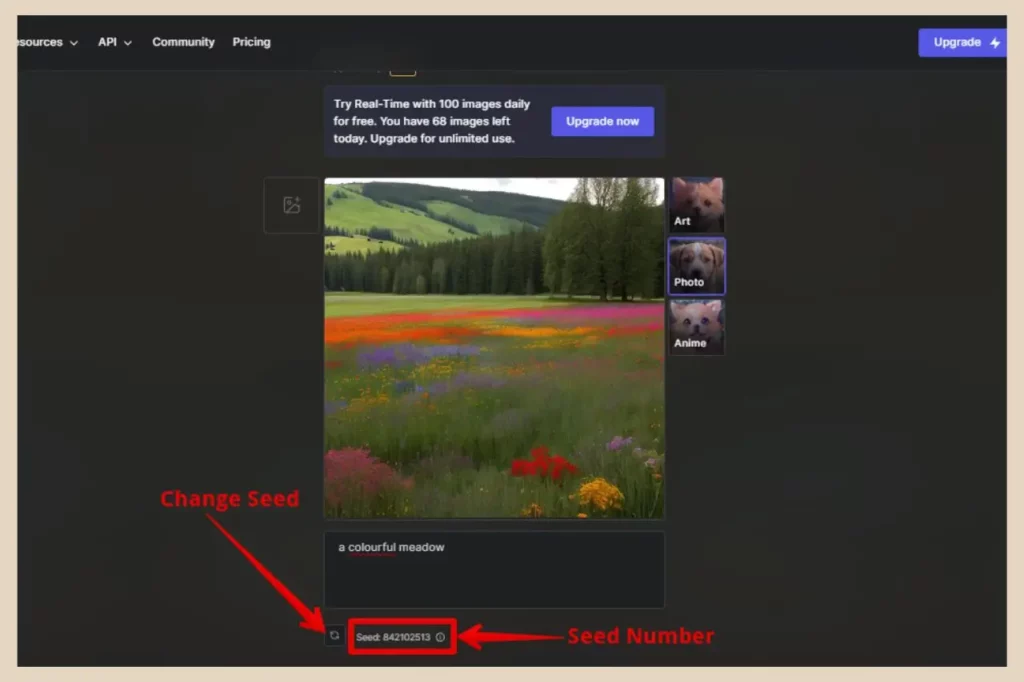
Any Images generated here won’t be saved and you’ll lose them as soon as you leave the page so if you do see an image that you like, you’ll need to copy the prompt and the seed number to recreate similar images in the regular generator.
Let’s Get Generating With Getimg.ai
And there you have it, a seriously versatile AI image-generating platform that’s easy to use and produces some pretty epic AI images.
Whether you’re a content creator looking to spruce up your site with some unique eye-catching imagery or just using it for some creative fun, Getimg.ai is an awesome tool for all your AI imagery needs.
So why not try Getimg.ai for yourself and see what image creations you can come up with? It may just become your new favourite AI tool to play with. I know it’s certainly become one of mine.
I hope you’ve found this tutorial helpful and if you feel like sharing your own thoughts or experiences with Getimg.ai, then please feel free to do so in the comments below. I’d love to hear all about them.
Happy AI Image Generating!

You May Also Like
- Is Microsoft Copilot (Bing Chat) Good For Bloggers
- Is ChatGPT Or Bard (Gemini) Better For Bloggers
- How To Use Google Bard For Epic Blogging