Last Updated: September 28, 2023
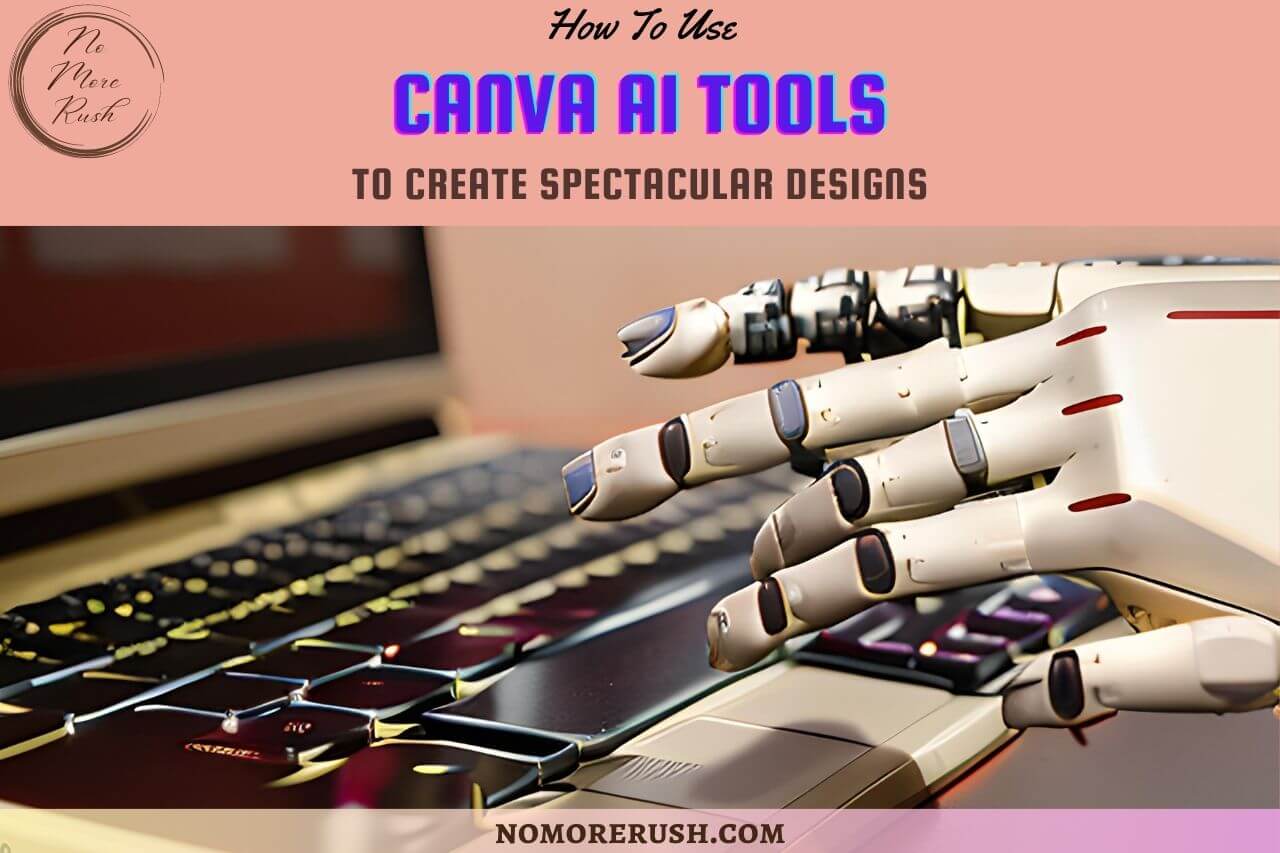
Ever heard of Canva AI tools? If you’re anything like me, you understand the exhilaration of crafting eye-catching visuals that leave a lasting impact.
But let’s face it, the journey from a blank canvas to a stunning masterpiece can sometimes be a tad overwhelming, especially if you’re just diving into the world of design for the first time.
Well now the whole process has been made a whole lot easier and it’s all thanks to these Canva AI tools and let me tell you, I’ve been having a serious amount of fun playing around with these tools and creating some seriously epic designs in the process.
Of course, there are several AI tools to help with our blogging needs but Canva’s AI tools are mainly dedicated to design.
They are equipped with a knack for suggesting the perfect colour palette, rearranging elements to perfection, and even tossing in some design ideas you might never have thought of.
Whether you’re a seasoned designer looking to up your game or a newbie eager to kickstart your creative journey, Canva AI tools are going to make it a whole lot quicker and easier to do.
So, are you ready to transform the way you design? Let’s jump straight into this and I’ll show you how to create dazzling visuals that’ll turn heads and spark conversations, all while making it look like you’ve got a design wizard up your sleeve.
What Canva AI Tools Are There?
So before we get into how to use these tools, I wanted to mention some of the Canva AI tools that you can use on the Canva platform. There are quite a few of them but they’re very easy to miss if you don’t know where to find them.
They’re also not all free to use either so depending on the Canva plan you’re using, you may not be able to use every single one of them.
However, even some of the Canva Pro AI tools are available for free users to try out for a limited number of uses. These Canva AI tools include:
- Text to Image – Free users get 50 lifetime queries and paid users get up to 500 queries per month.
- Magic Edit – Free to use (at least right now while it’s in Beta).
- Magic Design – Free to use (at least right now while it’s in Beta).
- Presentations Using Magic Design – Free to use (at least right now while it’s in Beta).
- Magic Write – Free users get 25 lifetime queries and paid users get up to 250 queries per month.
- Magic Eraser – For paid users only.
- Beat Sync – Free for manual sync and paid for automatic sync.
- Translate – Free users get 50 lifetime pages and paid users get up to 500 pages per month.
- D-ID AI Presenters – 20 credits free trial then paid D-ID membership needed for more.
Even if you’re not a Canva Pro user, you can still play around with most of these tools even if it is just for a limited number of uses but be warned these tools are seriously fun and very addictive!
How To Use Text To Image (50 free uses then paid)
The Text to Image tool is literally as it sounds, you type in the text and the Canva AI tool will try to create the image based on the text.
I’ve personally had a lot of fun with this one but the results can vary pretty drastically depending on the prompt you’ve typed in.
I’ve got some pretty impressive results with some prompts whilst others produced designs that left me wondering what the heck I was even looking at (I’ll show you some of those in a moment).
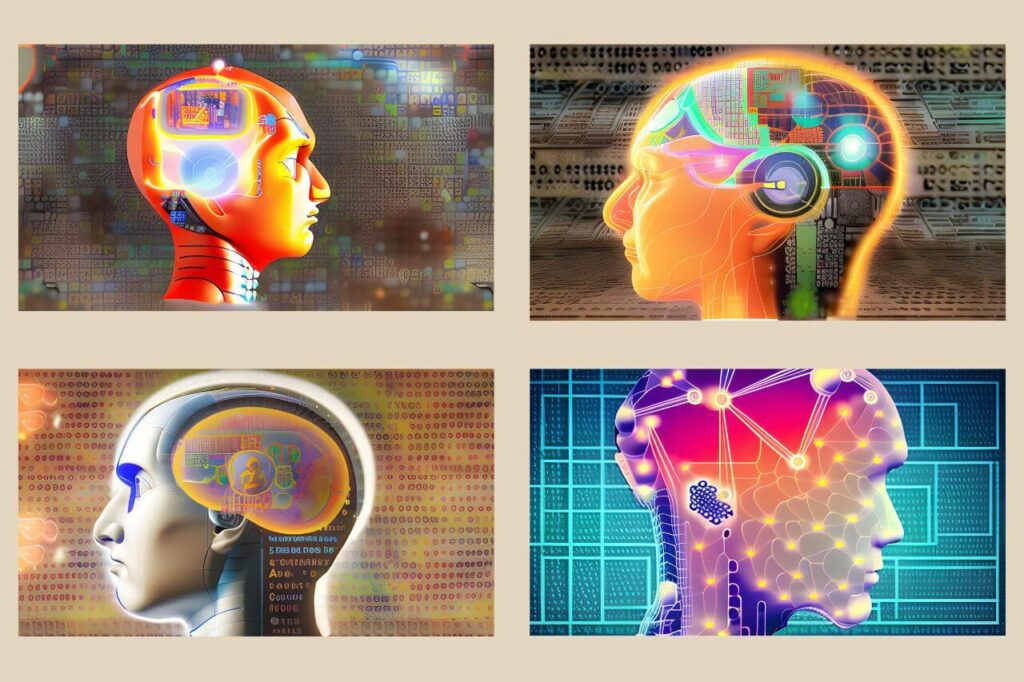
But all in all, the results were still pretty epic. For the image below I asked for “a depiction of an AI mind” and these are the four results I got from that prompt.
To use the Text to image tool, you can click on the Canva assistant button near the bottom right corner of the screen whilst editing a design. This is where you’ll find most of the Canva AI tools.
Using The Canva Assistant
When the Canva assistant box opens up, type text to image into the search area and hit the enter key on your keyboard.
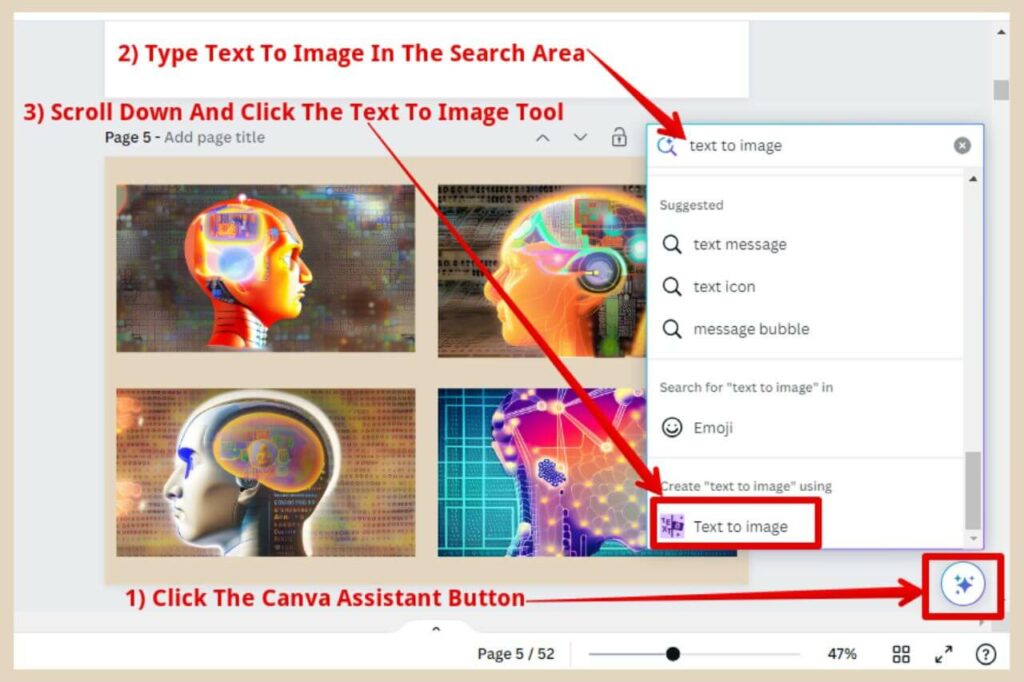
When the results appear, scroll down to the very bottom and you should see the Text to Image tool there.
You can also find it by clicking on the Apps tab in the main menu on the left-hand side of the editor page (it’s also in the main left-hand side menu on the homepage too).

In my particular case, it’s right there at the top of the results as a featured app but if you’re not seeing it, you can simply type it into the search box at the top instead.
By the way, once you’ve used the tool, it will be added to the Your Apps tab in the Apps area and to the bottom of the left-hand side menu in the editor so you can find it much more easily the next time you want to use it.
When the Text to Image tool opens up on the left of the page, start by typing in the text to describe the image you’d Canva to create.
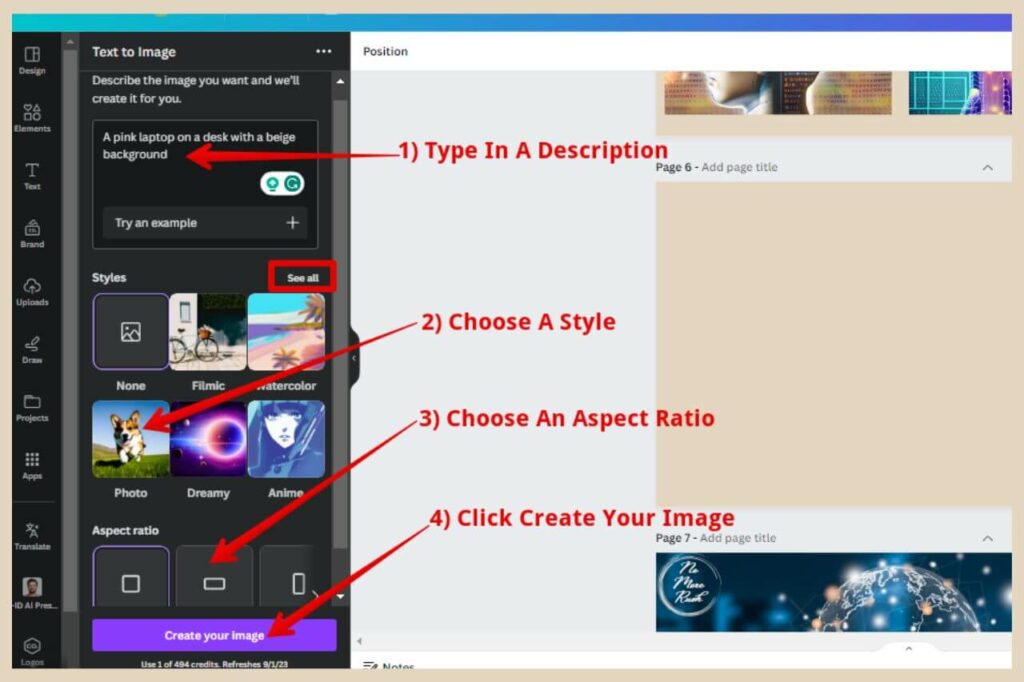
You’ll also have some style options underneath so click the See All button to see the full selection of styles available.
The last step will be to choose an aspect ratio and then you can hit the Create Your Image button.
Four Results With Each Use
Canva will create four finished options that you can choose from (or you can choose all four) so simply click each one you’d like to use and they will be placed within your design.
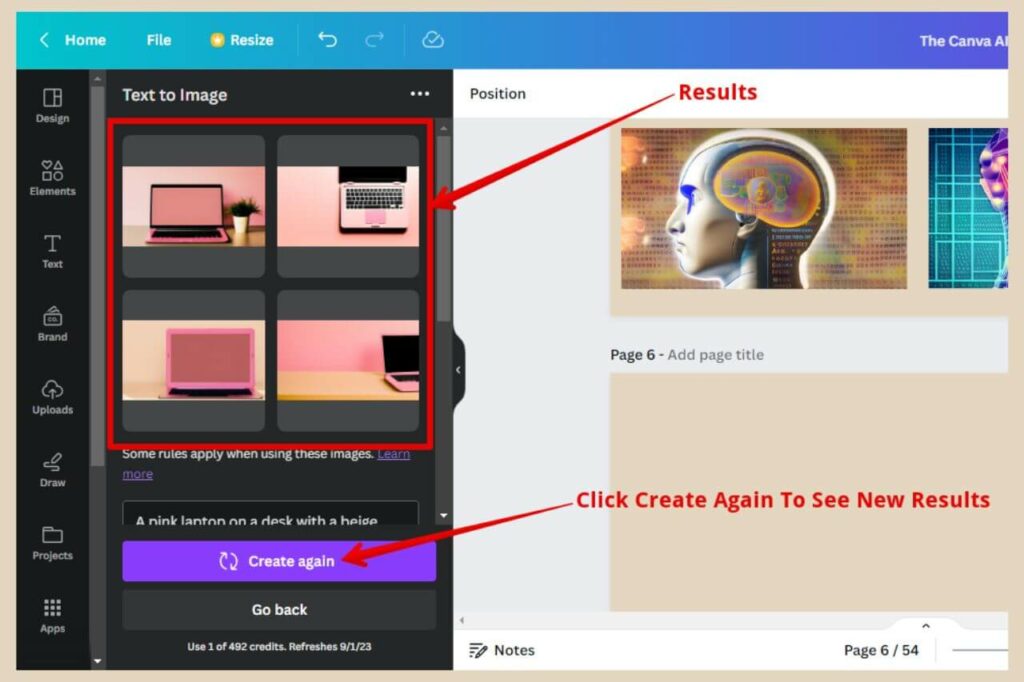
Clicking on these designs also uploads them to the Upload section where you can then use them at a later date if you wish.
You can also click the Create Again button to get four more new results and you can also change the prompt, style and aspect ratio options beneath the results to create different types of images.
The featured image at the very top of this post was created using the Text To Image tool but as I mentioned previously, sometimes the results are not quite what you asked for.
Here are a few examples of what it came back with when I asked for a robotic hand typing on a laptop keyboard.

As you can see, some results aren’t as good as others although, in fairness to the tool, I did eventually get what I was looking for. It just took a few attempts to get there.
And if text-to-image tools are what you’re looking for, check out my list of some of the best AI image generators out there that are completely free to use.
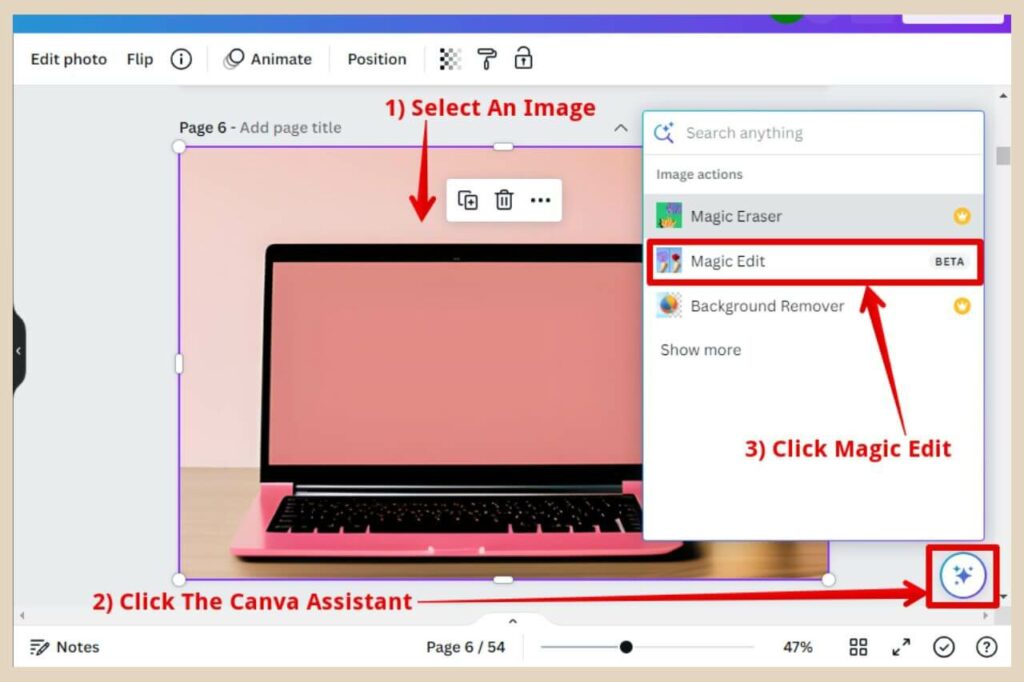
How To Use Magic Edit (Free – at least for now)
The Magic Edit tool is a pretty interesting one and also a lot of fun to use. It allows you to select an area of your image and either replace objects with something different or add something completely new to the area.
Just imagine the kinds of things you could do with this very handy tool. To access the tool, make sure you have an image selected, then click the Canva Assistant near the bottom right corner of the screen.
When the box opens, you should see Magic Edit as one of the options but if not, you can use the search area to search for it.
You’ll also find it by clicking on the Edit Photo button from the formatting menu at the top of the page.
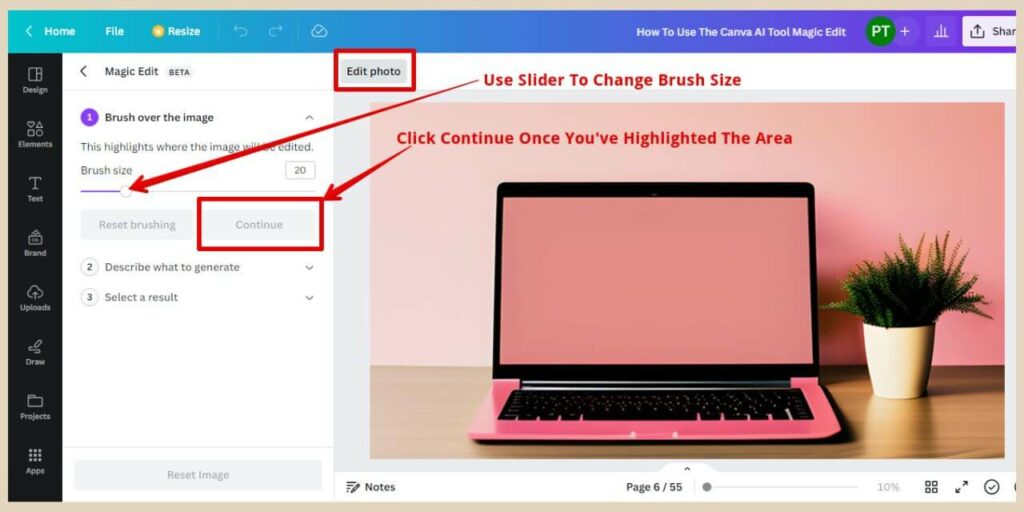
Once the Magic Edit Tool is open on the left side of the page, the first step will be to use the brush to highlight the image area you’d like to edit.
You can use the brush size slider to make the brush bigger if you’re editing a large area of your image.
In the image above, which I generated earlier with the Text To Image tool, I wanted to replace the plant and its pot with some colourful flowers in a gold vase.
It’s Not The Smoothest Of Tools
Now, I don’t know if this is an internet issue on my end but I find this thing a little erratic to work with because its movements are very jolty so it’s not the smoothest of tools to use.
However, that doesn’t seem to affect the finished result at least not so far anyway. Once you’re happy with the area selection, click the Continue button to move on.
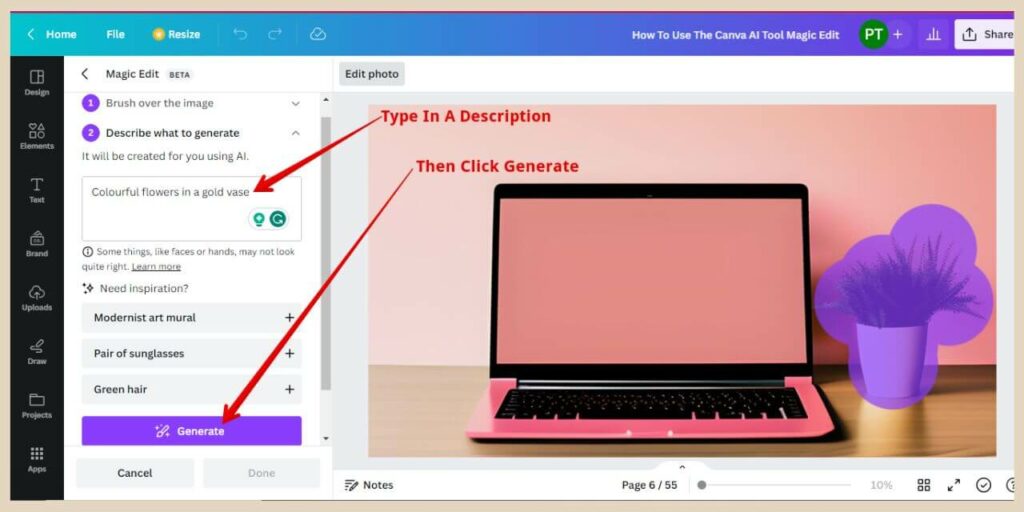
The next step is to type in a description of what you’d like to place in the area. Once you’ve finished, you can go ahead and click the generate button to finish.
Once again, Canva will generate four finished options so click on each one to see how they look. If you’re not happy with the results, you can click the Generate New Results button and Canva will generate four more new options.
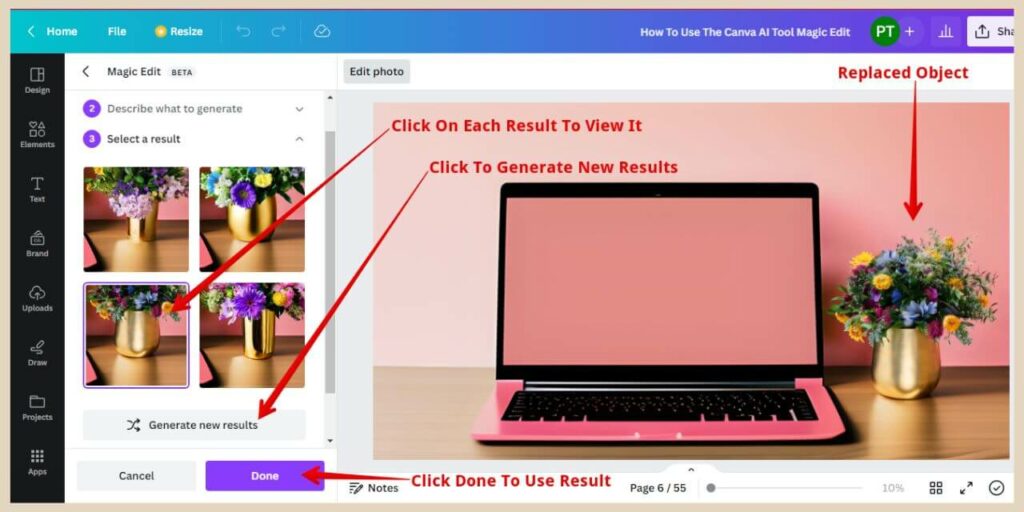
You can also click on any of the previous steps to start over or type in a different description. Once you’ve selected a result that you like the look of, click the Done button and the altered image will be saved.
I did have one slight issue here which was that the reflection of the original pot remained on the desk so I had to go for one of the larger vases to match the reflection but I was still able to make it work.
How To Use Magic Design (Free – at least for now)
Magic Design is where you upload an image to Canva and it will create templates based on the image you’ve uploaded.
It can create numerous templates including Instagram posts, Facebook posts, Pinterest Pins, Poster, and more.
This particular tool is handy for taking all the hard work out of coming up with designs from scratch and it’s a serious time saver.
To use the Magic Design tool, simply place your cursor in the search box at the top of the Canva homepage and that will prompt some recommendations to appear before you start typing.

Click on the Start From Media option at the bottom of these recommendations and a small window will appear where you’ll be prompted to upload a new image or select one from your previous uploads.
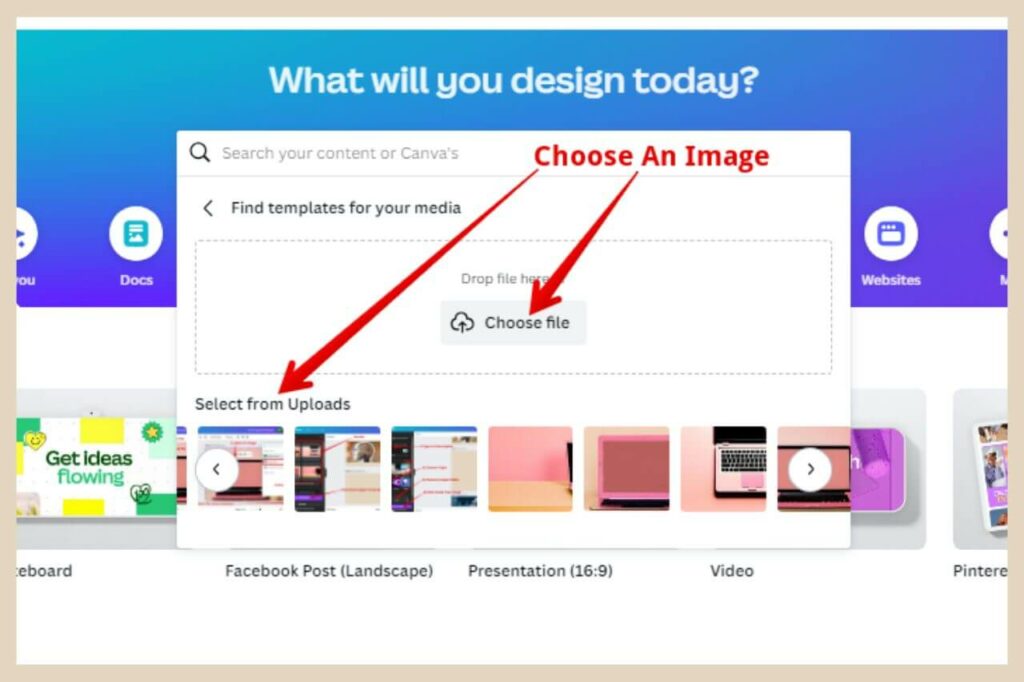
Once you’ve selected your image, you’ll be taken to the Templates page where you’ll see the Magic Design box at the very top.
Inside the Magic Design box, you’ll see a selection of predesigned templates that include your selected image and you scroll through these using the arrows on either side of the box area.
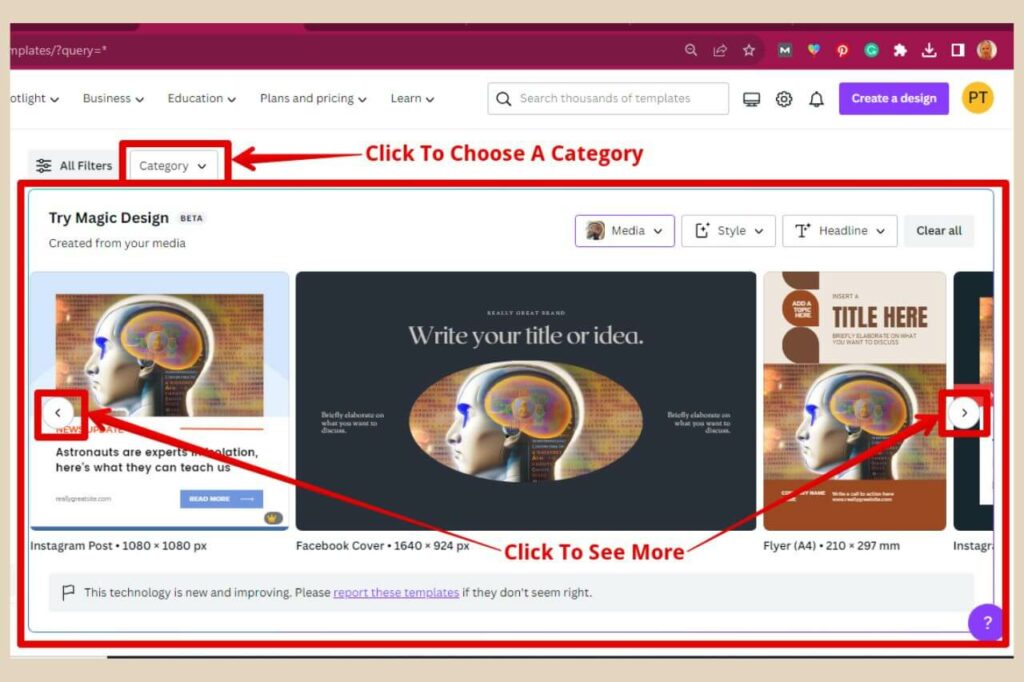
If you’re looking for a specific template, you can use the Category dropdown menu to choose a category that most closely relates to the template you’re looking for so Social Media or Video for example.
Changing The Results Of Your Magic Design
If you’d like to try a different image, you can click on the Media button to change it to something new. You can also click on the Style button if you’d like to change the style of the template.
From here, you’ll see two rows of options that you can change. The top row is the Vibe/Theme options and this will change the overall vibe/theme of the template.
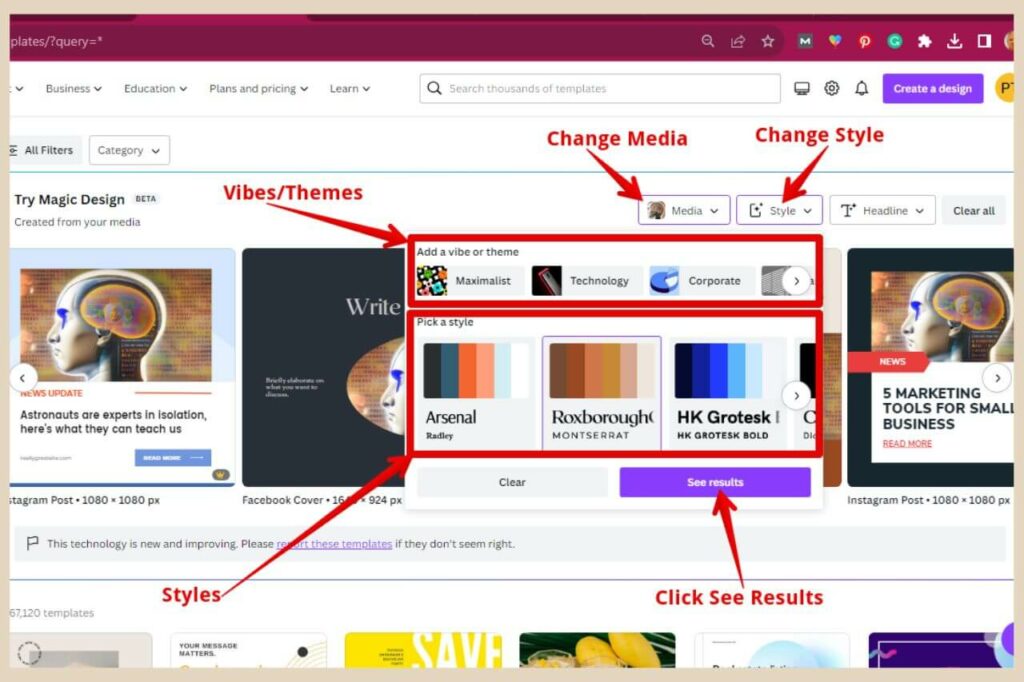
The second row is the Style options which lets you choose predesigned colour palettes and font styles so you can play around with these until you find a combination that you like.
Just click the See Results button to see how the different vibes/themes and styles look. To add a headline to your design, simply click the Headline button and a small window will open where you can add your own headline of choice.
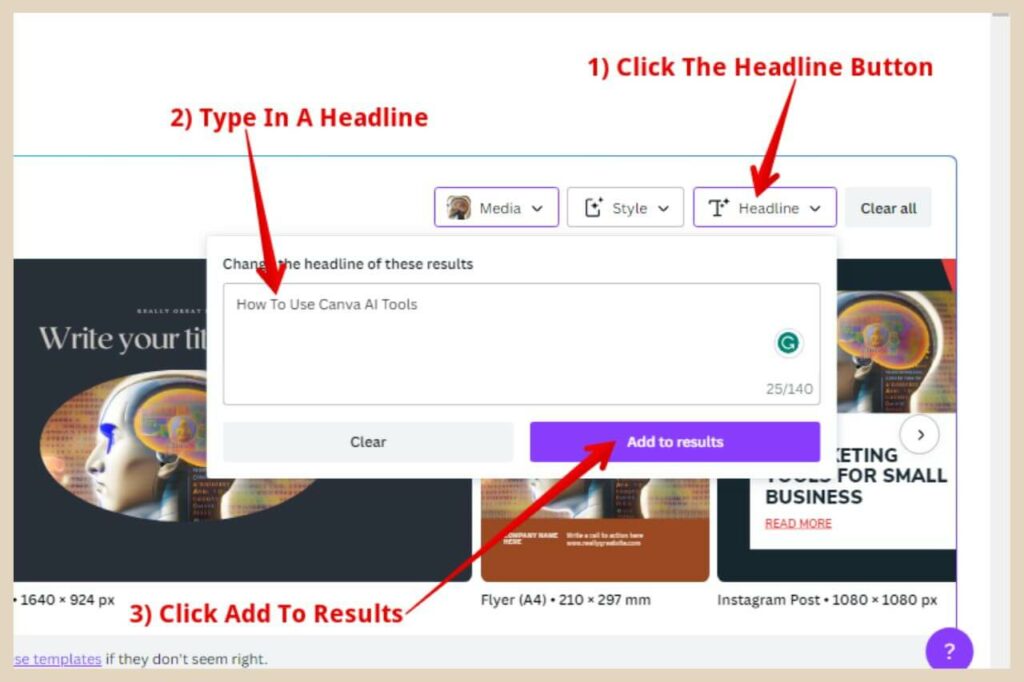
Once you’ve typed your headline, click the Add To Results button and the headline will be incorporated into all of the templates.
Once you’re happy with how the templates look, click on the one you’d like to use and then click the Customise This Template button in the larger window that appears.
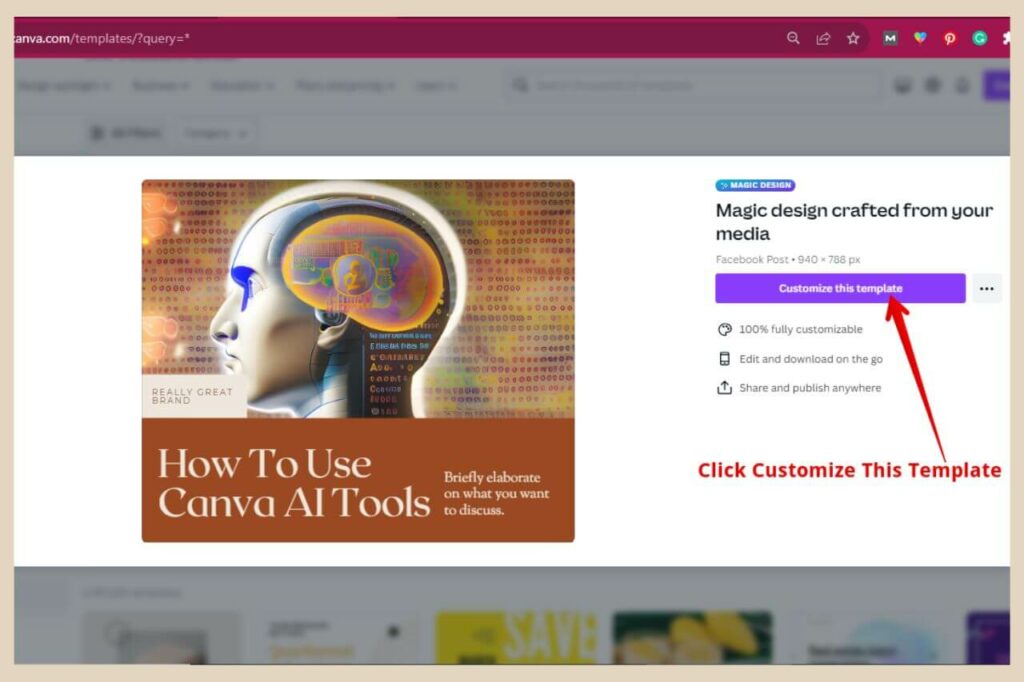
Your new Magic Design will now open up in a new tab and you can continue to customise it even further in the Canva editor as you would any other design.
How To Create Presentations Using Magic Design (Free – at least for now)
So this is another Magic Design feature that can create an entire presentation for you (well almost) in a matter of seconds or at least 10 slides of a presentation.
Yes, you’ll probably need to mess around with the text and images but Canva will try to add relevant images and text that represent whatever topic you’ve imputed at the start of the Magic Design process.
Sometimes, it’ll do a very good job with the text and images and other times, not so much but it still takes a good percentage of the work out of it for you.
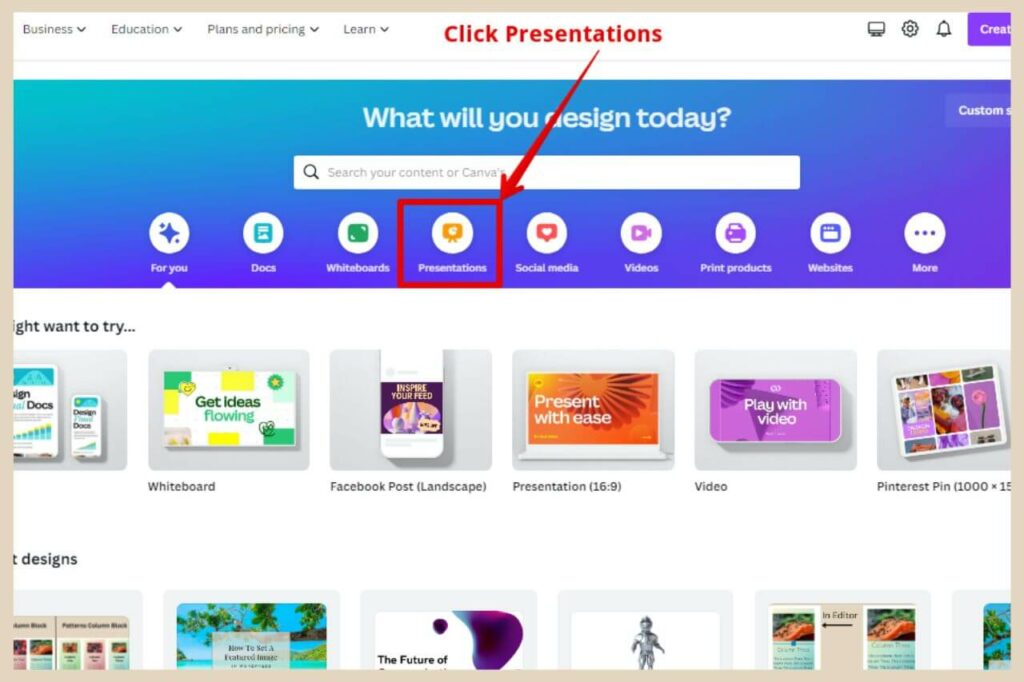
To create a presentation using Magic Design, click Presentations from the options underneath the search box at the top of the home page.
Choose A Presentation Template
Next, click on any template to open up a presentation in a new tab in the Canva editor. In the editor, click the Canva Assistant button and search Magic Design in the search area if it’s not already showing up as a recommendation.
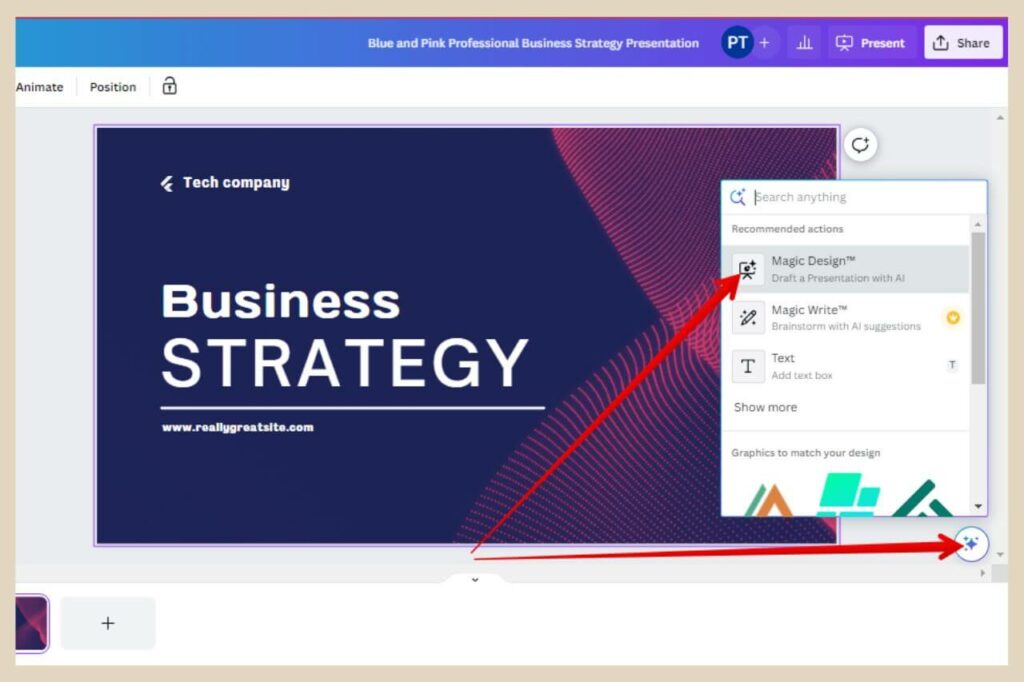
Once you click Magic Design, a small window will open up where you’ll be prompted to describe your presentation topic.
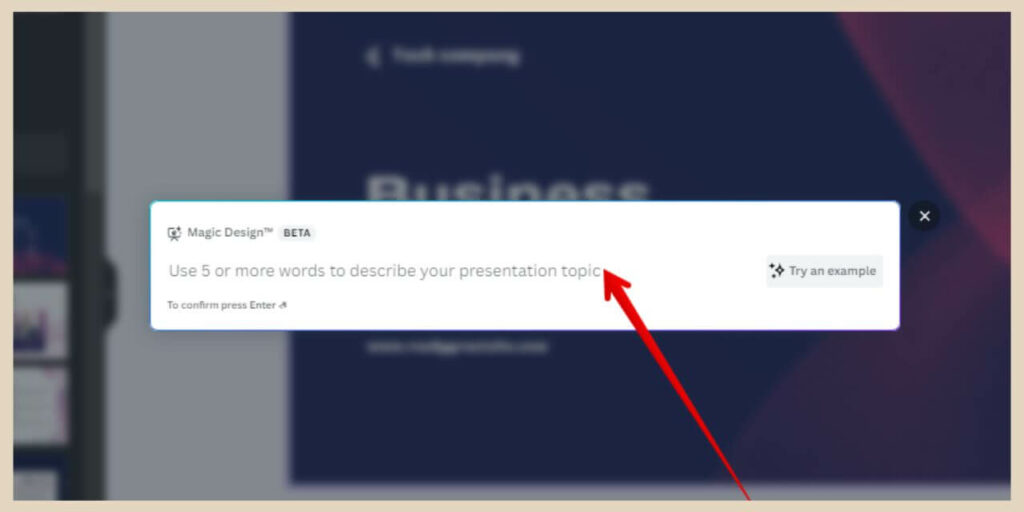
Type in your topic description and hit the enter button on your keyboard to continue. Canva will now design a number of presentation templates based on the topic you’ve typed in.
You can choose from several template styles or you can choose from the Your Style area which is based on your own previous design styles.
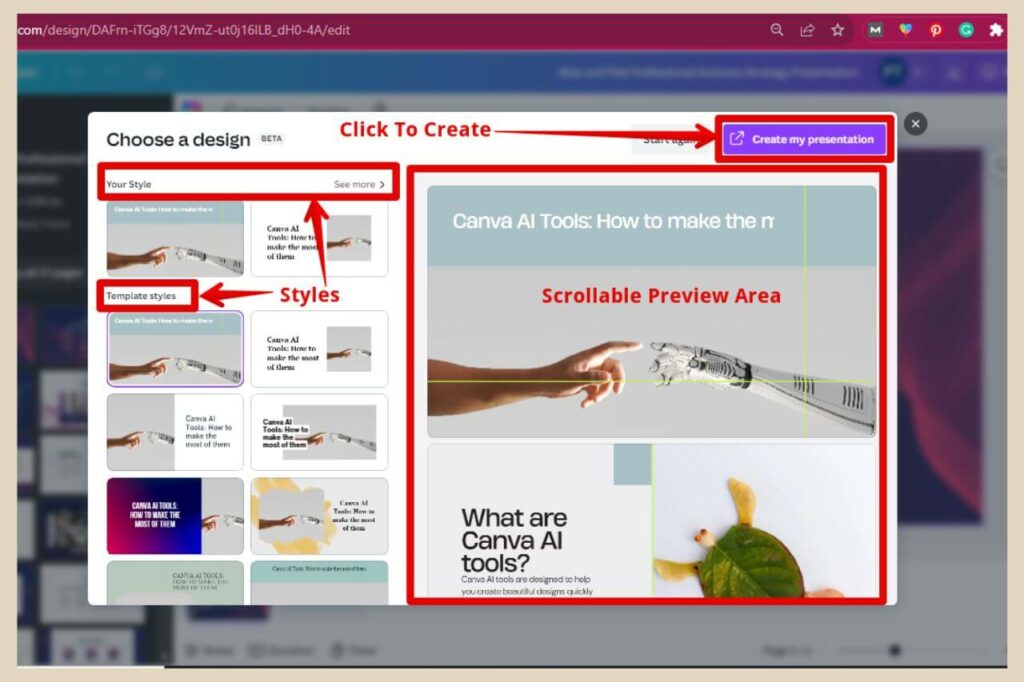
Clicking on each one will show the full 10-page presentation in the scrollable preview area so once you’re happy with your chosen template/style, click the Create My Presentation button and your new 10-page design will be created in the Canva editor.
You can then customise it further as you would any other design or add more blank slides to it if you need to.
How To Use Magic Write (25 free uses then paid)
Magic Write is a Canva AI writing tool and if you’ve already ventured into the world of ChatGPT, then this will be very familiar to you because the Canva Magic Write tool is actually powered by OpenAI.
So much like any other AI writing tool, you simply need to give it a description of what you’d like it to write and away it will go on a writing frenzy.
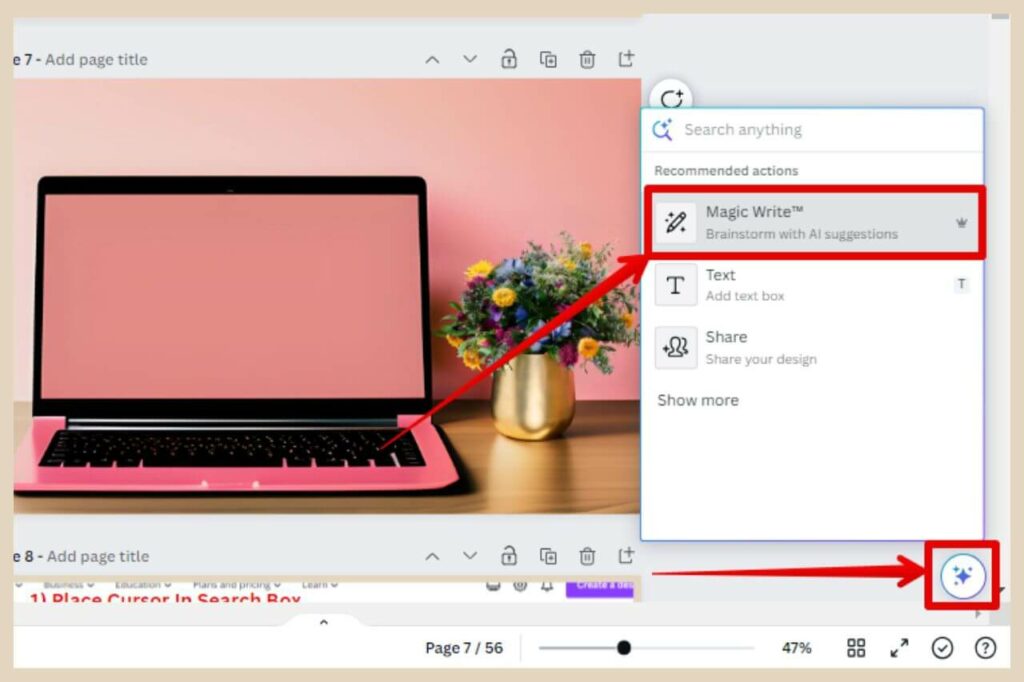
To use the Magic Write tool, click on the Canva Assitant and search for Magic Write in the search area if it’s not already showing in the recommended actions list.
Once you click on the Magic Write tool, a small window will appear where you can now describe what you’d like to write.
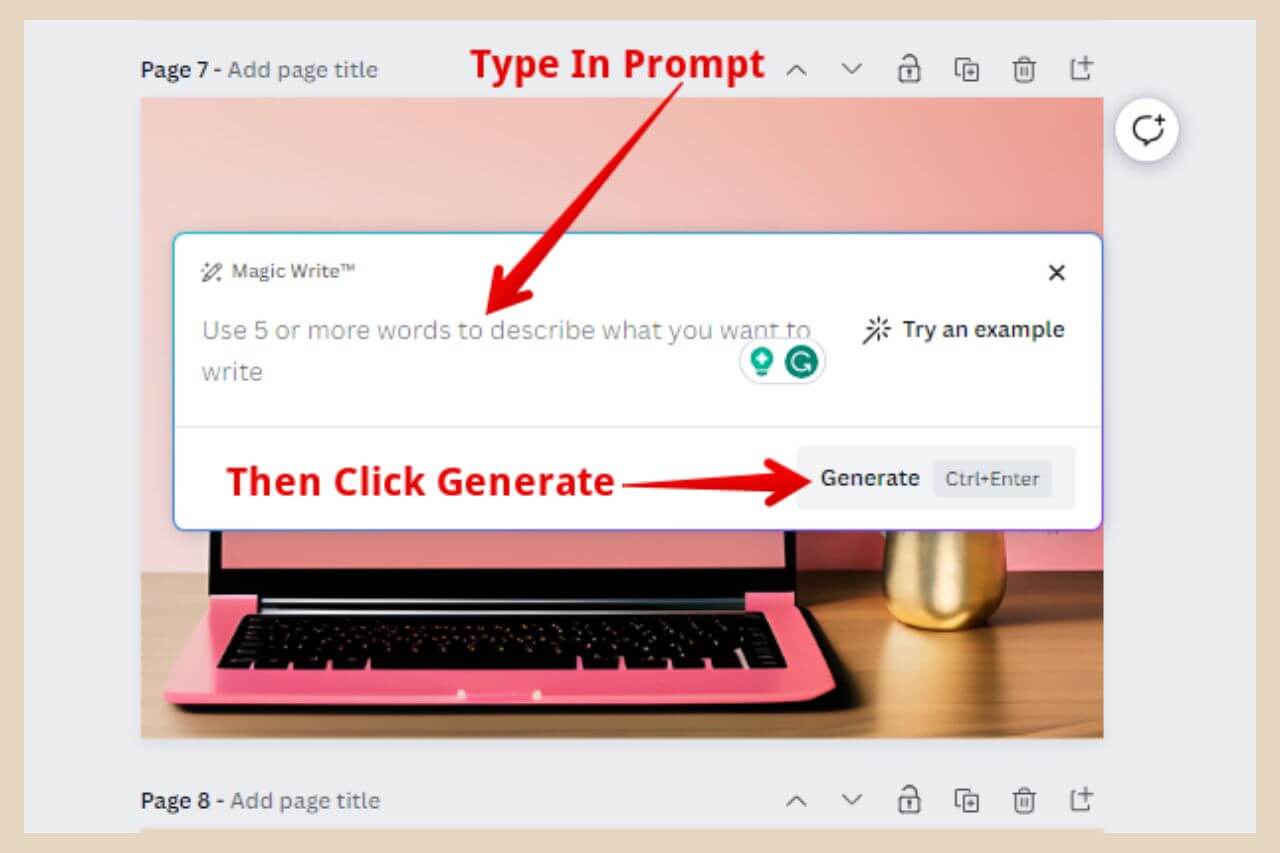
Once you’re finished, click the Generate button and viola, Magic Write will create the text for you.
How To Use Magic Eraser (Paid)
The Magic Eraser tool is a tool you can use if you’re looking for a way to erase objects from an image. Now, this particular tool is a little bit hit-and-miss and only really works well on plain backgrounds.
If there’s any kind of texture or multiple colours/shades around the object you’re trying to erase, it does tend to leave a weird blur behind.
To use the Magic Eraser tool, select the image you’d like to work on then click Edit Photo from the top menu (you can also find it by clicking on the Canva Assistant).
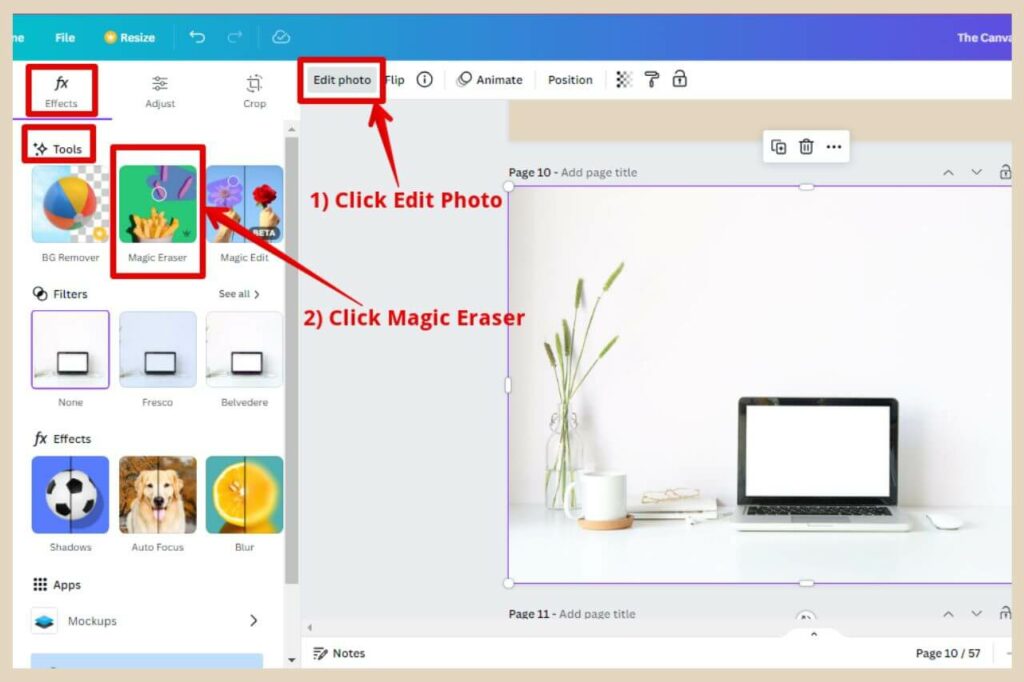
When the new section appears on the left-hand side of the screen, click Magic Eraser from the Tools area in the Effects tab.
When the Magic Eraser tool opens up, click and drag the circle that appears when you hover above the image, over the object that you’d like to erase.
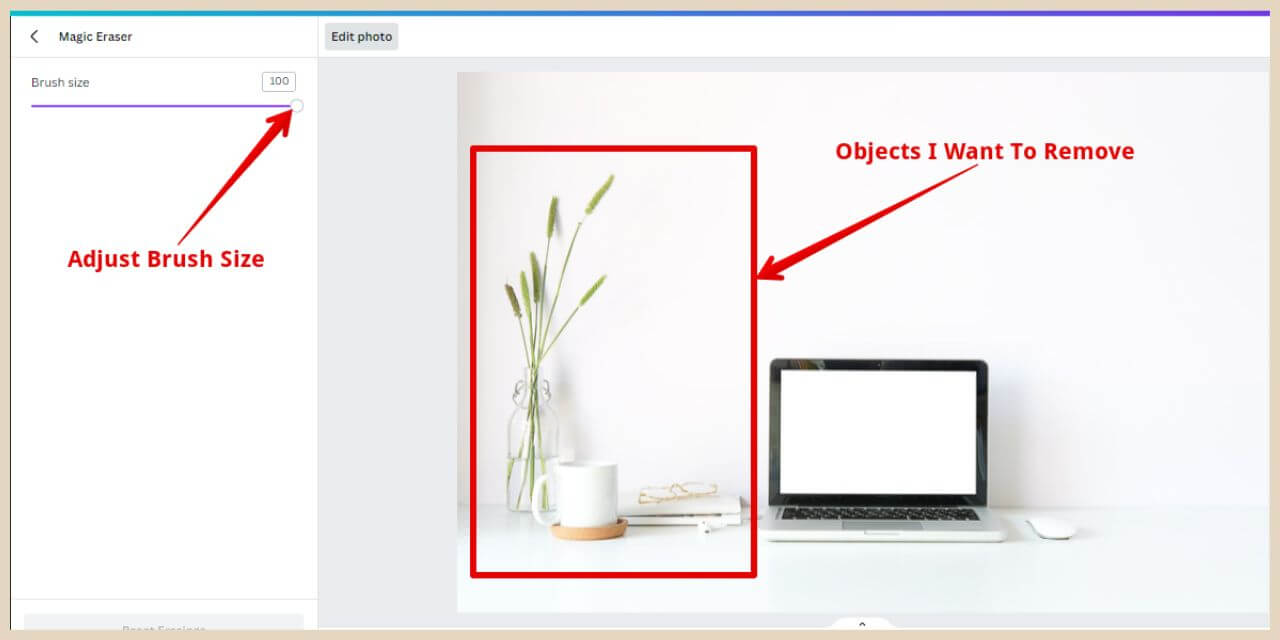
Again, you can use the slider to make the brush bigger if you need to. Once you’ve finished and released the cursor, the chosen object will be erased.
With this image, I wanted to get rid of all the objects on the left-hand side of the laptop and this is how the image looked afterwards.

If you look very closely and even more so if you look from certain angles (if you’re on a laptop, tilt the screen away from you), you can see a thick L shape distortion from the eraser.
As I said, it’s a bit hit-and-miss and this was with a very plain background but in its defence, other times, it does do a very good job but it will vary depending on the image.
Removing An Entire Background
If you want to get rid of an entire background, you can use the Background Remover (BG Remover) tool instead which you’ll find in the same Tools area.
To use the tool, select an image then click the Edit Photo button in the top menu. Click the BG Remover icon from the options on the left-hand side of the page and the tool will automatically erase the entire background of your chosen image.
Although, much like Magic Eraser, this is a paid tool only so you’ll only be able to use it if you’re on one of the Canva paid plans.
How To Use Beat Sync (Free for manual syncing and paid for auto syncing)
Whether you’re creating videos for Instagram, YouTube or TicToc, Beat Sync is a tool that you’ve probably always dreamed of.
It lets you sync music to your video creations effortlessly so that the beat matches your video flow seamlessly.
To use Beat Sync, start by creating a video template and add your choice of music to the template. Next, click on the waveform and you’ll see Beat Sync in the menu at the top of the page.
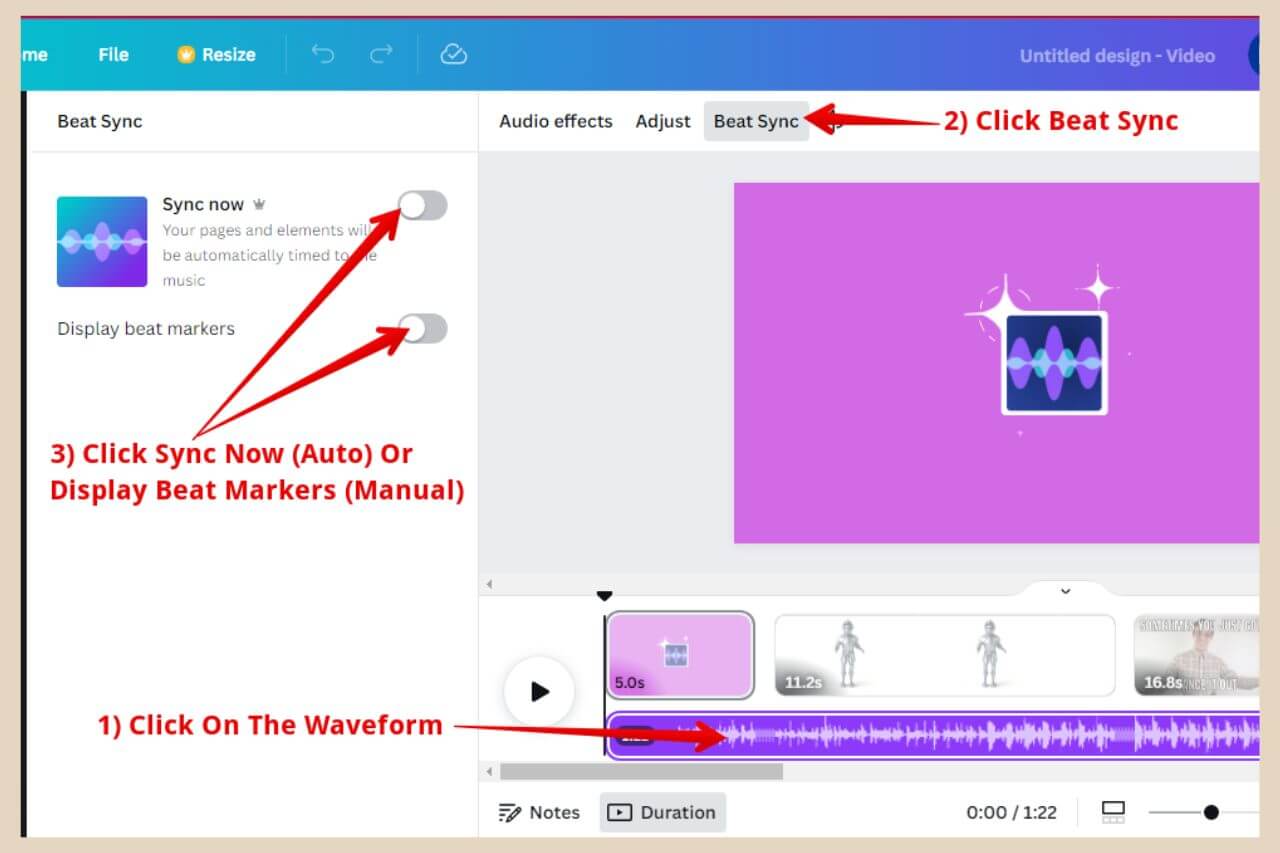
Once you click the Beat Sync tool, a new section will open up on the left of the page where you can either click the Display Beat Marker toggle to manually sync or click the Sync Now button to let Beat Sync do it for you.
How To Use Translate (50 free pages then paid)
Translate is exactly as it sounds. You can use it to translate all the text on your designs into different languages so if you have a worldwide audience you could essentially create, let’s say an Instagram post in multiple languages to extend your reach.
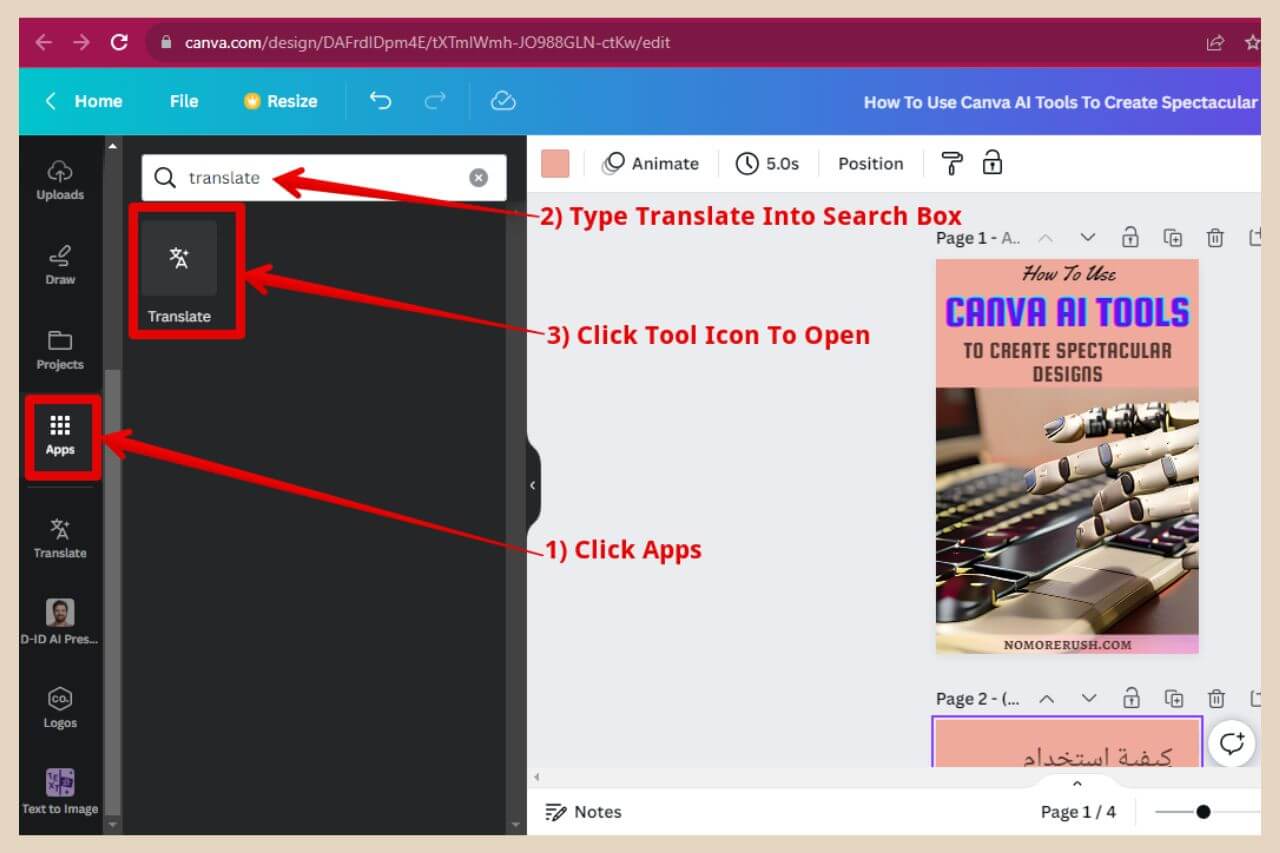
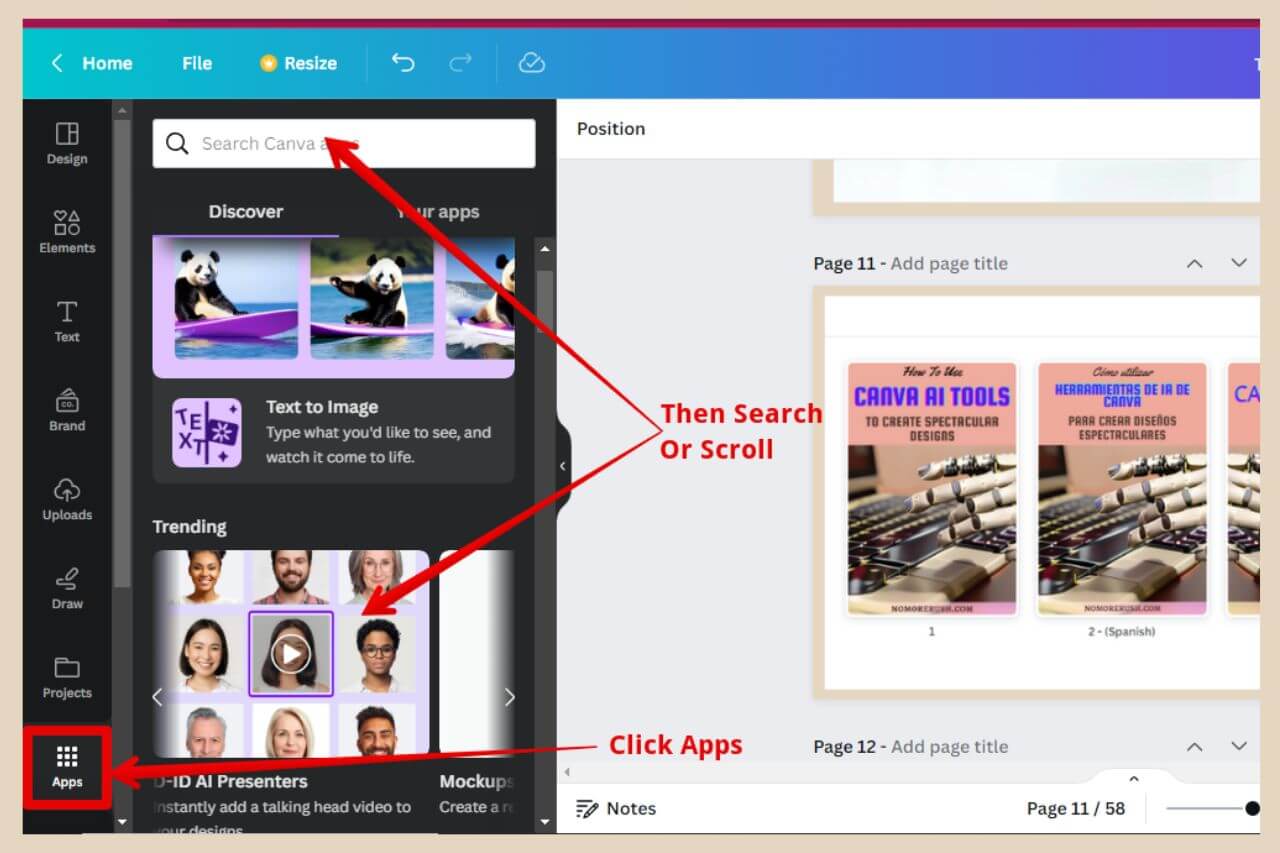
To use the Translate tool, simply click on Apps in the main left-side menu. From here, you can either scroll down to find it or you can type it into the search box at the top.
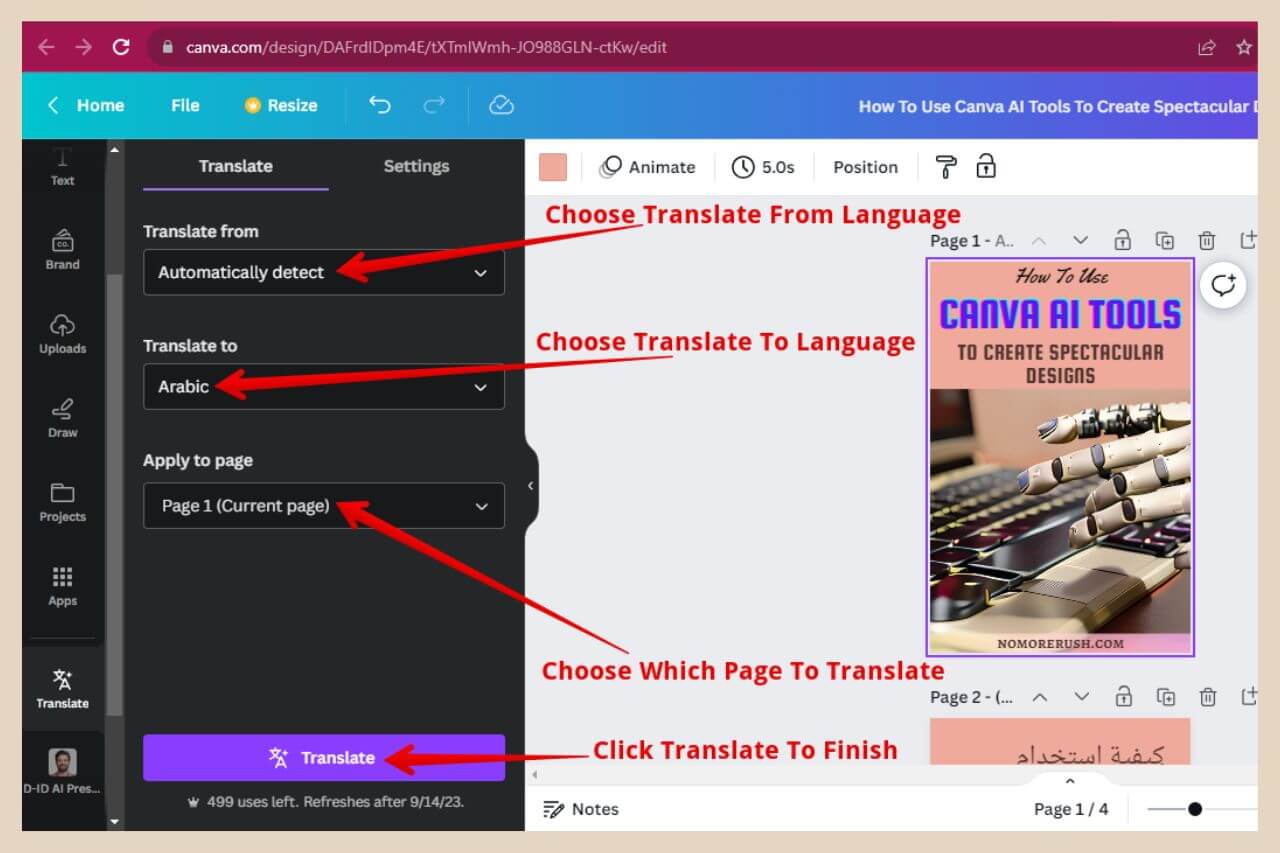
Once you click on the tool, a new section will open up and you can use the dropdown menus to choose the different translate options.
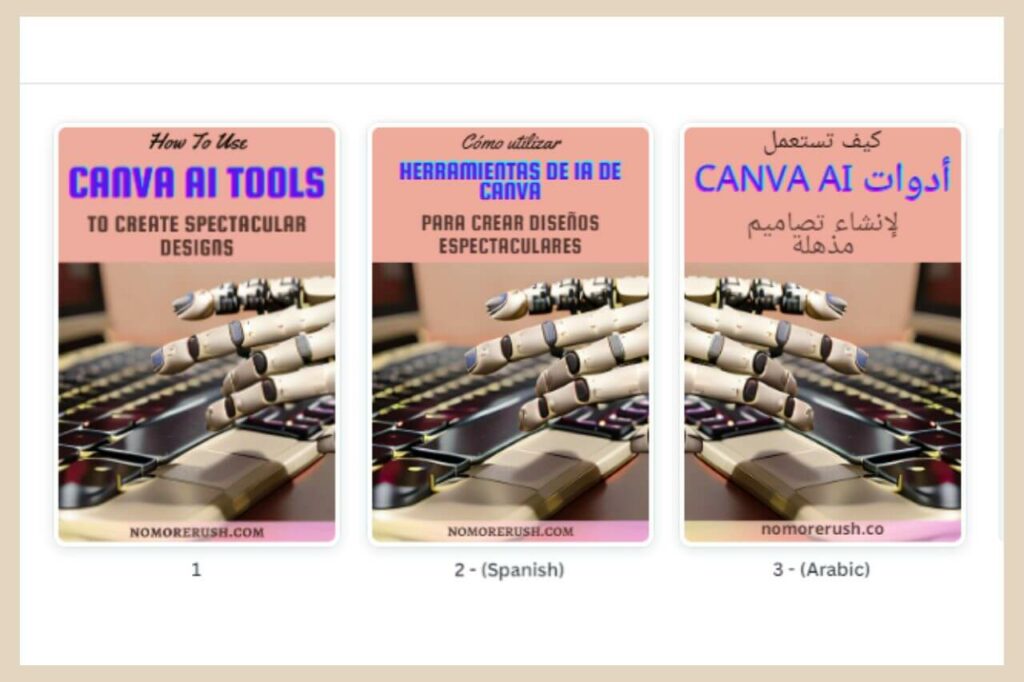
When you’re ready, click the Translate button and a brand new page will be added to your design with a translated version of the page you’ve chosen.
How To Use D-ID Presenters (20 credits free trial then paid)
Last but not least is the D-ID Presenters tool. So not only are you camera shy but you’re also microphone shy too but you don’t need to worry about this anymore.
With the D-ID Presenters tool, you’ll be able to add an AI talking head presenter to your designs and they’ll do it all for you.
Now, this particular tool is a little different because it’s a feature that’s been incorporated into the Canva platform but you need to create an account with D-ID to use it.
To use the D-ID Presenters tool, click on Apps in the main left-hand side menu. From here, you can either scroll down to find it or use the search box at the top (in my case, it was in the trending area).
Once you’ve opened the tool, you’ll need to make a few selections so start by choosing a presenter. You can click the See More button for more options.
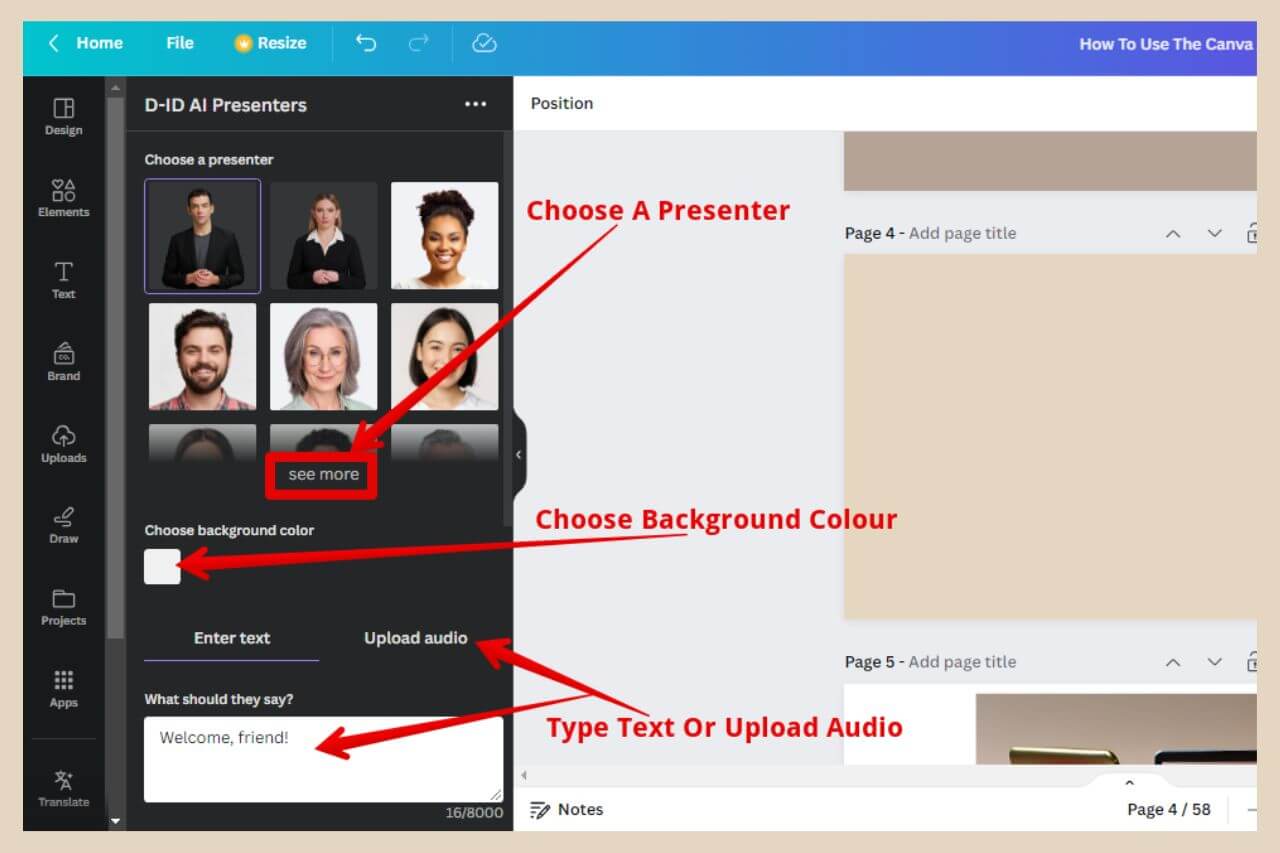
If you choose one of the first two presenters, you also be able to change the background colour. The next step is to type in what you’d like them to say or alternatively, you can upload audio instead.
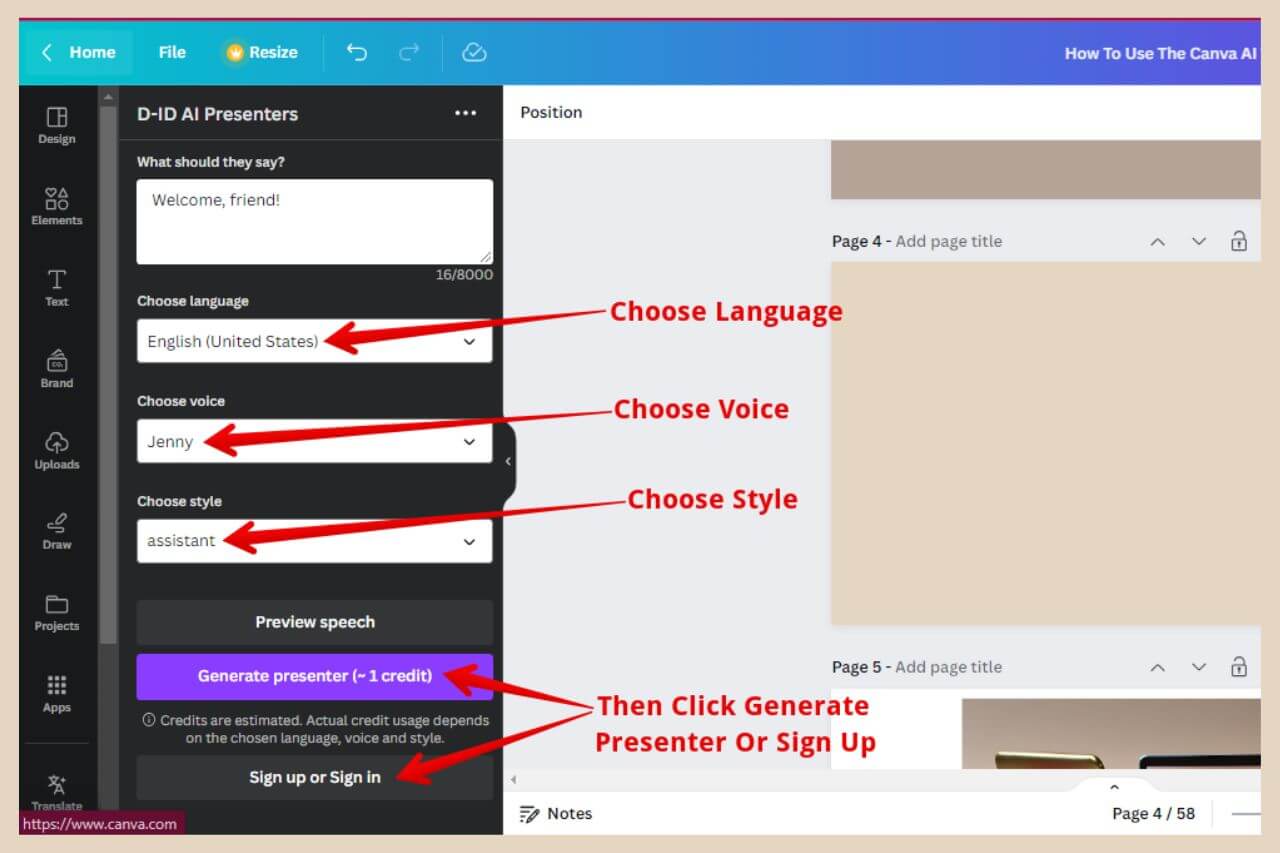
Scroll down to see the next set of options and the next one will be the choose a language (accent and all). Next, you’ll need to choose a voice followed by a style.
Some languages will have more styles than others but they may include anything from cheerful to excited to terrified and you can click the Preview Speech button (just above the Generate Presenter button) to see how each one sounds.
Connecting To D-ID
Once you’re ready, click either the Generate Presenter button or the Sign Up/Sign In button and you’ll be prompted to connect your account so click the Connect button to continue.
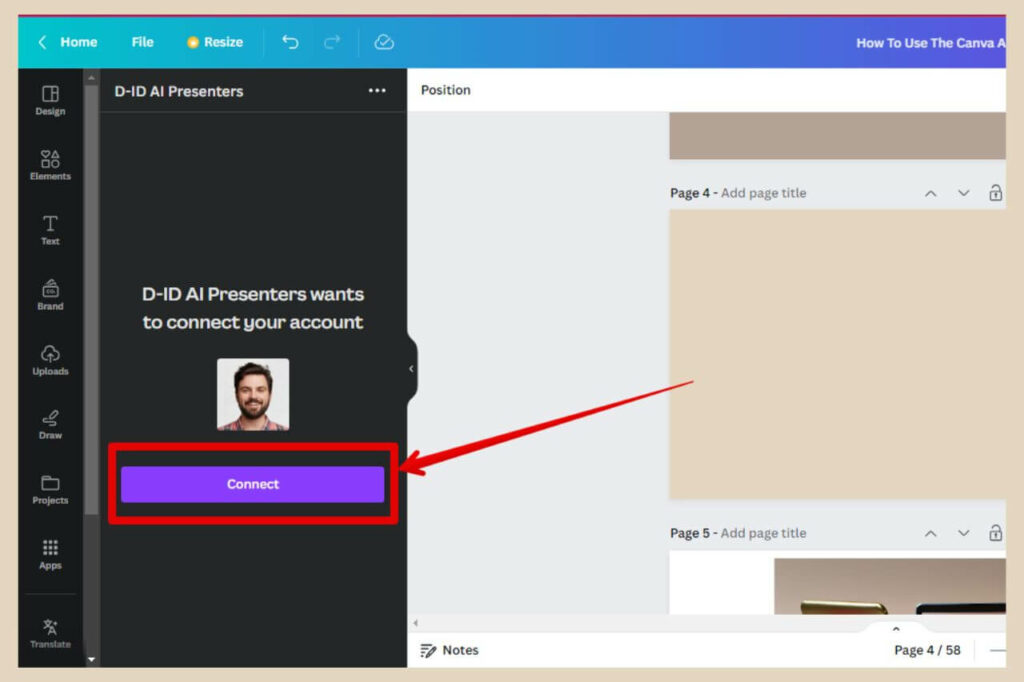
From here, a small window will appear where you’ll have a few options to sign up. Signing up with your Google account is the quickest way but choose your preferred option and when the window closes, you’ll be back on the Generate Presenter area.
This will automatically sign you up for a trial account with D-ID which gives you 20 free credits. Each credit is worth 15 seconds of video but if you’d like more, you can click on the D-ID link beneath the Generate Presenter button where you can view their account plan options.
Otherwise, you can now go ahead and click the Generate Presenter button and your (creepy) AI Presenter will be created.
Let’s Create Some Designs With Canva AI Tools
And there you have it, a selection of Canva AI tools that will make your designing efforts a whole lot quicker and easier.
Now, I’m not gonna lie, this is probably one of the most enjoyable and fun tutorials I’ve ever done and if you haven’t tried any of these Canva AI tools then I highly recommend that you give them a try.
Not only are they huge time savers and immensely efficient but they’re incredibly fun to play around with too.
So why not have a go for yourself and see what kind of epic designs you (and your new AI friend) can come up with?
As always, I hope you found this tutorial helpful but if you do get stuck and need any help, please feel free to let me know in the comments below and I’ll be more than happy to help you out.
Happy AI Design Creating!

You May Also Like
- How To Display Recent Posts With Thumbnails In WordPress

- How To Add An Affiliate Disclosure To Your Posts

- What Is Wealthy Affiliate – Everything You Need To Know