Last Updated: May 22, 2023
If you’re using social media to promote your blog then you’ll probably want to know how to set up rich pins on Pinterest. Pinterest can be an excellent source of extra traffic to your website and if you set up rich pins, you can increase that traffic even more so.
I’m not a massive fan of social media but I do love Pinterest. It’s easily my favourite by far and it’s also the one that brings me in the most amount of social traffic so it made sense to set up rich pins.
And it’s so simple and quick to set up that, much like me, you’ll wonder why you didn’t do it sooner
Why Use Rich Pins On Pinterest
Rich pins are great a way to gain more followers and create more engagement on your Pinterest pins and there are a couple of reasons for that. The first one is that rich pins show more information than regular pins which helps them stand out more.
They show more content to the pinners so they get a better idea of what the pin is about. Rich pin titles tend to be bolded and they include your Pinterest profile image and name beneath them when you see them in the feed.
Rich Pins Sync To Your Website
Rich pins are also synced to your site so they pull all the important information directly from the post like the meta title, meta description, etc. This also means that if you make any changes to your meta title, meta description, etc, those changes will also update on your pins as well.
A good example of this would be if you’re in the habit of updating the year of your posts so for example, best trainers 2022. If you updated that to Best Trainers 2023 on your post, those changes would take effect on your pins too if you’ve set up rich pins.

One of the best features of rich pins is that they retain all the rich data no matter how many times they’re repinned and that includes the title, description and the original pinner’s details.
A rich pin includes a follow button for the original pinner and that follow button always remains regardless of how many repins. That means that if the reader likes your pin, they can follow you rather than the person who repinned it.
How To Set Up Rich Pins On Pinterest
There are 4 steps to setting up rich pins and they’re all really simple and quick to do. In fact, most bloggers will probably already have the first 3 done and as long as you’re using an SEO plugin, you won’t need to copy any codes into your site’s files either.
The entire adding open graph/schema markups to your site was one of the reasons it took me so long to enable rich pins in the first place. I love Pinterest, I really do but their instructions for enabling rich pins are way more complicated than they need to be.
The whole process only takes a couple of minutes to do if you do it the easier way. Actually, it only takes a few seconds to do if you already have the first 3 steps done which most bloggers do.
Step 1: Make Sure You Have A Pinterest Business Account
In order to enable rich pins, you’ll have to have a Pinterest business account first. Pinterest business accounts are completely free and have a few extra features that a regular account doesn’t.
One of the most important ones is an analytics tab which shows you how well your pins are doing from how many times they’ve been saved to how many times a user has clicked through from the pin to your website.
Business accounts also let you run ads so if you want more people to see your pins, you can promote them using the ads feature.
How To Set Up/Convert To A Pinterest Business Account
To set up a new Pinterest business account, simply log in to your existing personal account and click the down arrow to the right of your profile picture.
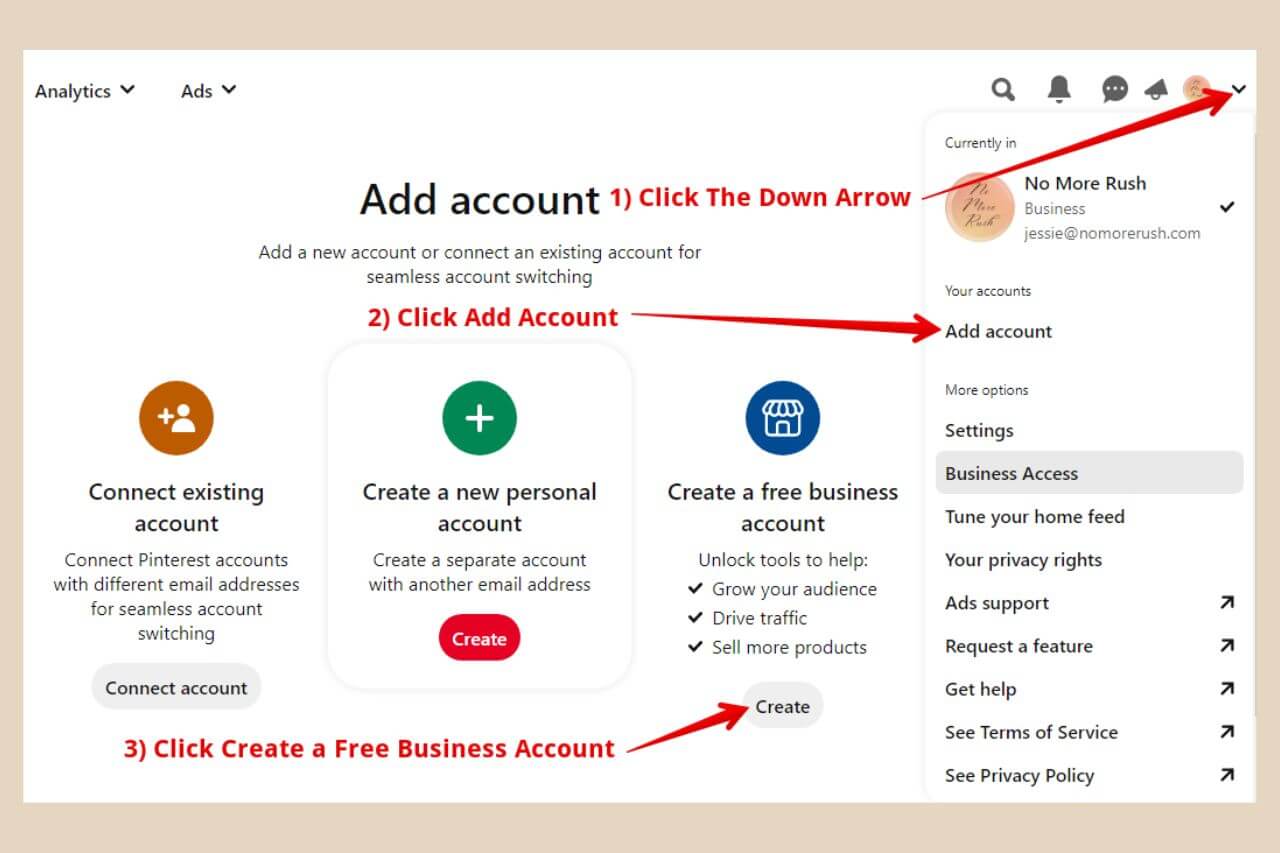
From here, click Add Account, then choose “Create a Free Business Account” and follow the onscreen instructions to set up your new account.
To convert an existing personal account to a business account, click the same down arrow as before and you should see “Convert To Business” just underneath the Add Account link.
Follow the onscreen instructions to set up your business account and don’t worry, you won’t lose any of your followers or pins. Everything from your personal account will be carried over to your converted business account.
Step 2: Claim Your Website On Pinterest
The next important step is to claim your website. You should get the option to do this during the business account set up but if you missed it, it’s easy to do it after the fact from the settings menu.

Simply click the down arrow to the right of your profile picture and select settings. Next, click Claimed Accounts from the new menu on the left-hand side of the page. From here you’ll need to click the Claim button on the right-hand side of the text “Websites”.
A small window will now appear giving you 3 ways to claim your site.
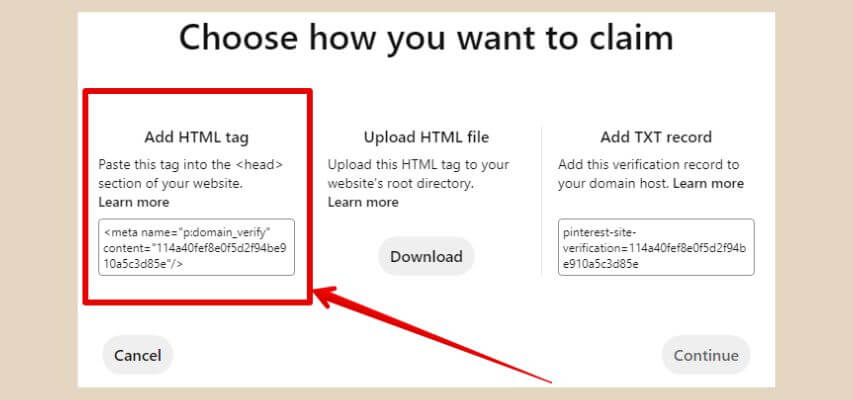
The easiest way is the first option, the “Add HTML Tag” option and this is the one we’re going to use in this tutorial.
Adding HTML Tags To Your Website
This snippet of code needs to be placed into the head section of your site and although there are several ways to add HTML tags to your website, the easiest way is with a plugin.
Most SEO plugins have a Pinterest section where you can add this code or you can use a header/footer plugin like WPCode or Ad Inserter.
I use Ad Inserter for all of mine because it has so much functionality including using it to display an affiliate disclosure on every post but you can use whichever one you prefer.
Once you’ve copied and pasted the code on your site (click the “add HTML tags to your website” link above for a full tutorial), head back to Pinterest and click the continue button. A small Verify window will now appear prompting you to enter your website URL.
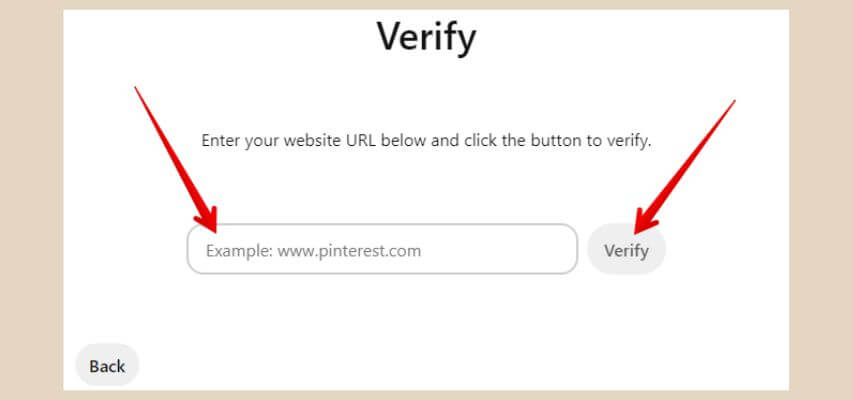
Once you’ve entered the URL, click the Verify button and if all is well, your site should now be verified and claimed on Pinterest.
Step 3: Adding Open Graph Markup
Now here’s the bit that sends many people running for the hills because it sounds so complex and scary. The thing is though that if you’re using certain SEO plugins, then it’s simply just a matter of toggling a button to the on position if it isn’t already.
Two common SEO plugins are Yoast and AIOSEO and although I’m an AIOSEO user as per the next few screenshots, the process for Yoast is pretty much the same.
I don’t use RankMath but from what I can gather, just adding the Pinterest verification code to the plugin is all that is required but don’t quote me on that one. I don’t use it so I can’t confirm.
Check Your SEO Plugin
If you have a different SEO plugin to the ones mentioned, see if it has a similar setup and social menu options. These next steps may work for your rich pins in the same way.
With AIOSEO, click on All In One SEO in your website’s back office menu, then click Social Networks. Next, click the Facebook tab and ensure that “Enable Open Graph Markup” is switched on and that’s all there is to it.
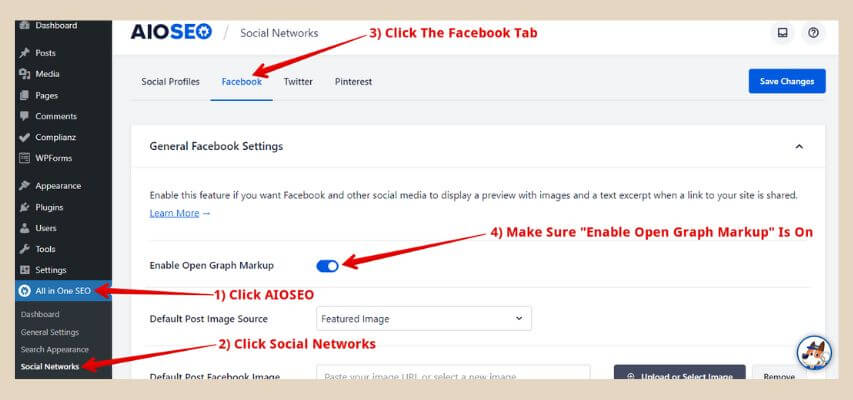
For all of my sites, it was already on so I assume that in the AIOSEO plugin, this is the default but double-check it just in case it’s off. If it is off, click it on and make sure you click the Save Changes button on the top right of the screen to finish.
Step 4: Validate Rich Pins On Your Site
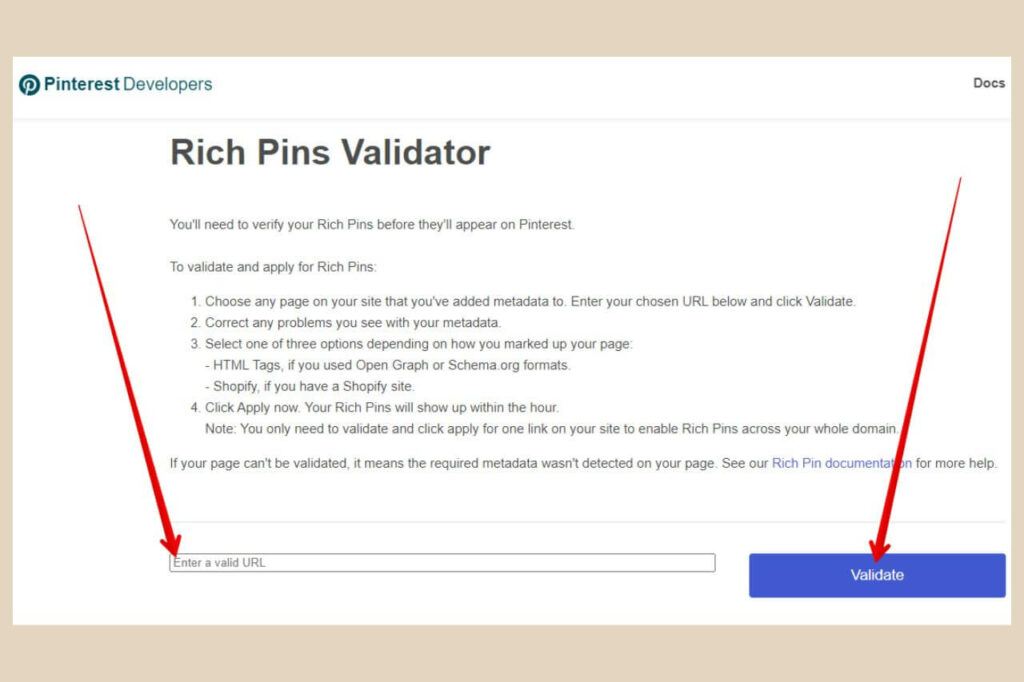
The final step is to validate rich pins on your site with Pinterest. To do this you’ll first need to go to the Rich Pins Validator page.
Next, you’ll need to copy the URL of one of your blog posts from your website (not the homepage) and paste it into the URL box. The next step is to click the validate button and if all is well, you should get a congratulations message that your rich pins are approved and on Pinterest.
You only need to do this once with one blog post and this will enable rich pins across your entire site so all other previous pins will now become rich pins and all new pins you create moving forward will also be rich pins.
The Instructions On The Page Seem Outdated
You may notice that the instructions on the validator page don’t seem to happen as they’re written. In fact, steps 2 to 4 don’t seem to occur anymore at least not for anyone I’ve spoken to.
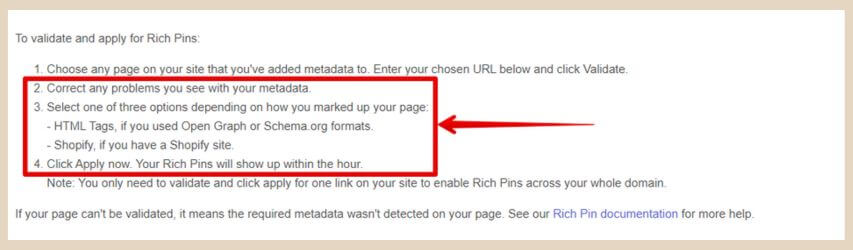
Some say they only happen the first time you use the validator but the very first time I ever use it for rich pins, steps 2 to 4 still never happened and have never happened since either and I’ve done this multiple times on several websites.
I can only assume that the instructions on the validator page are now outdated, either that or most of us are just getting really lucky and sailing straight through after step 1.
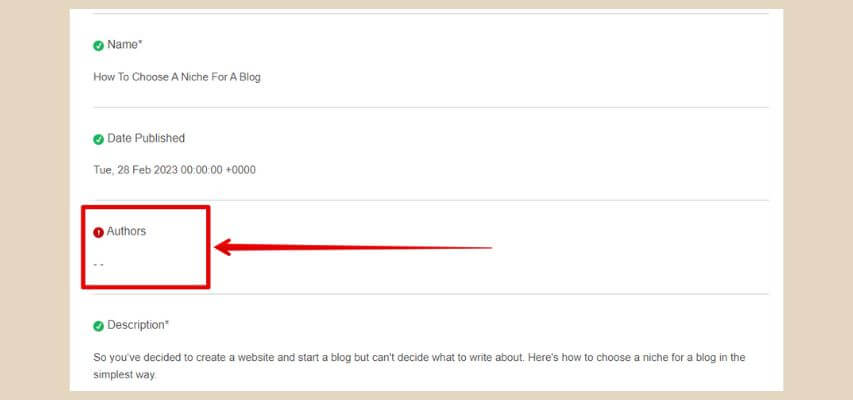
The Missing Author Field In The Rich Pins Validator
If you only know how much time and effort I wasted trying to figure out this little issue! If you scroll down the page after your rich pins have been approved, you’ll notice some information fields at the bottom that have green ticks next to each of them.
You’ll also notice that one of those fields, the author field has a lovely red exclamation mark next to it. Well, I don’t know about you but my OCD wasn’t pleased to see that.
I spent weeks searching Google for a solution to this one and quickly discovered that this was a really common issue that no one seemed to know the answer to. I didn’t want to publish this post until I had a solution so I reached out to Pinterest and this is a screenshot of their response.

It turns out that this is no longer a feature of article rich pins so you can now ignore this field (btw, this is referring to the author on the website and not your Pinterest profile details).
They also stated that rich pins can take up to 14 days to take effect (I’ve seen it take longer) and that includes all new pins you create and any changes you make to posts on your site.
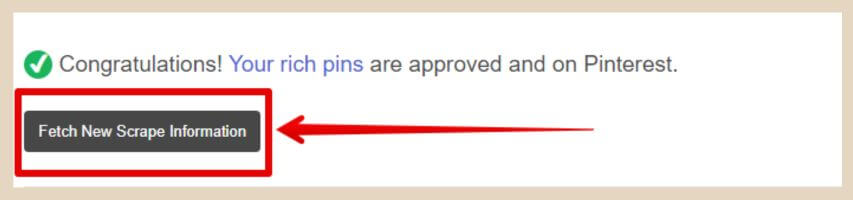
If after that time, you still have pins not displaying rich information, you can use the validator tool again to re-validate the URL that the pin is linked to, then click on “Fetch New Scrape Information” to refresh the linked pin.
If You Manually Create Your Own Pins
If, like me, you manually create your own pins in Canva rather than pinning directly from your site, whatever information you manually type in for the title and description, will eventually be replaced with the metadata from the post if it’s different.
I used to add a little extra to both the title and description but obviously, with rich pins enabled, this is now a pointless task.
For me, personally, rich pins are more beneficial than the ability to add extra text to the pin’s titles and descriptions but I thought it was worth noting in case you’re wondering how rich pins work with manually created pins that you’ve added extra information to.
It’s Time To Get Your Rich PIns Enabled
Now, it’s time to get your own rich pins enabled. I hope this tutorial has helped but if you do have any issues, please feel free to use the comments below and I’ll try my best to help you out. Or if you just feel like sharing your own Pinterest/rich pins story then I’d love to hear them.
If you’re using a different plugin than the ones mentioned in this post, I’d love to know if this technique worked for you so please feel free to share.
Enjoy your rich pins.

You May Also Like
- How To Display Recent Posts With Thumbnails In WordPress

- How To Add An Affiliate Disclosure To Your Posts
- What Is Wealthy Affiliate – Everything You Need To Know