Have you ever wondered how to display recent posts with thumbnails in WordPress? You’ve probably seen numerous websites with recent post widgets in the sidebar displaying all the beauty of the featured images right beside them.
Well, it’s actually very simple to do and the best part about it is that you don’t need a plugin to do it. It’s already a feature built into WordPress.
Why Display Recent Posts With Thumbnails
I don’t know about you but my eyes always hover over to the recent posts widget if it’s accompanied by some striking imagery.
When someone lands on your site to read one of your blog posts, why not entice them with something else to read afterwards?
A recent post widget in the sidebar is a great way to do this but one with imagery stands out even more so especially if you’re showing your eye-catching featured images with it.
You should want to keep visitors on your site for as long as possible so giving them more content to explore is one way to achieve this.
And because we humans are very visual by nature, including featured image thumbnails with your recent post is a great way to grab your reader’s attention to read more of your content.
No Plugin Needed
I remember a time when unless your theme had it built in, you would have to install numerous plugins to enable certain types of features on your website.
Thankfully, WordPress has come a long way since then and these types of features are now built in right within the WordPress Editor.
So before we get started, make sure you already have a featured image set for each and every one of your blog posts as this will be the image that is used for the thumbnail.
How To Set A Featured Image For Your Posts
If you don’t already have featured images on your posts then you’ll need to add them one by one to all of your existing posts and new ones moving forward. If you’re not sure where to find free-to-use images then try Pexels or Unsplash. They’re by far my favourites.
To add a featured image, you will need to edit the post in question. Once in the editor for that post, you’ll see some settings on the right-hand side of the editor.
If there are no settings on the right of the editor, you will need to click the settings button which is at the top of the screen on the right-hand side next to the publish button.
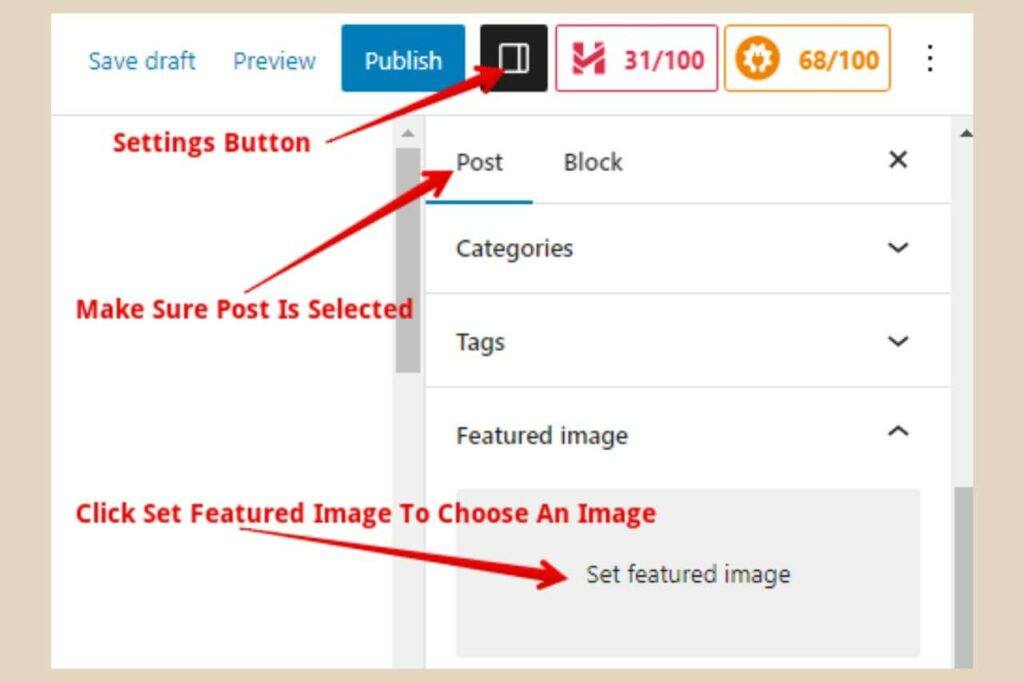
Once you see the settings, you’ll notice it says post and block at the very top so make sure post is selected as this is where your featured image is set.
Scroll down until you see the featured image section, then click Set Featured Image and from here you can add your image of choice in the same way you would add any other image to the post.
This featured image will now be inserted at the top of your blog post automatically so you won’t need to add another one manually. You won’t be able to see it at the top of your post in the WordPress editor but it will be there on your live site.
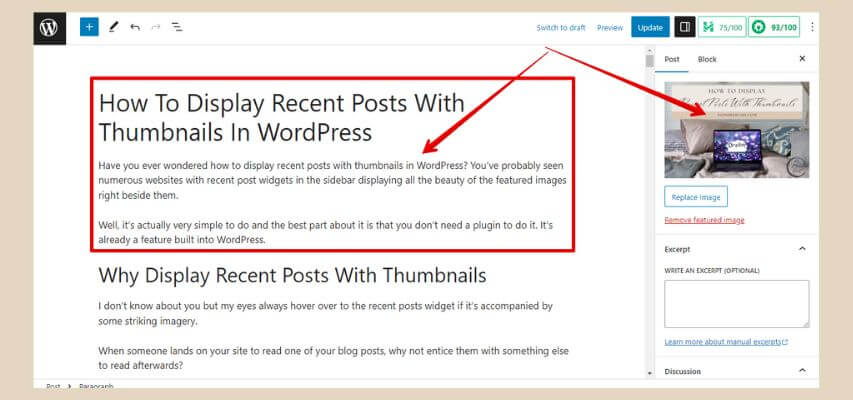
As you can see in the above image, this is how the post you’re reading looks in the WordPress editor. My featured image is set and you can see it at the top of this post live but you can’t see it at the top of the post in the editor.
This is completely normal but you can simply click the Preview button at the top of the page (to the left of the Publish/Update button) to see how it looks on your site.
If you like a more in-depth tutorial on how to set a featured image, I have an entire post dedicated to it.
How To Display The Recent Posts Widget
As long as you have your featured images set up, the recent post widget will be able to generate a thumbnail of that image which will make your widget look even more appealing.
To add it, simply select appearance in your WordPress back office, then widgets. On the widget page, click the down arrow on the widget area you’d like to use. For the purpose of this post, I’m adding it to the right sidebar.

Next, click the + sign (it says Add Block when you hover over it) to add a widget. A small window will appear with a small selection of blocks to choose from.
You can either type Latest Posts in the search box at the top of the window or you can click Browse All at the bottom of that window.
The browse all button will open a new window with the full selection of blocks/widgets available which will be displayed on the left-hand side of the page.
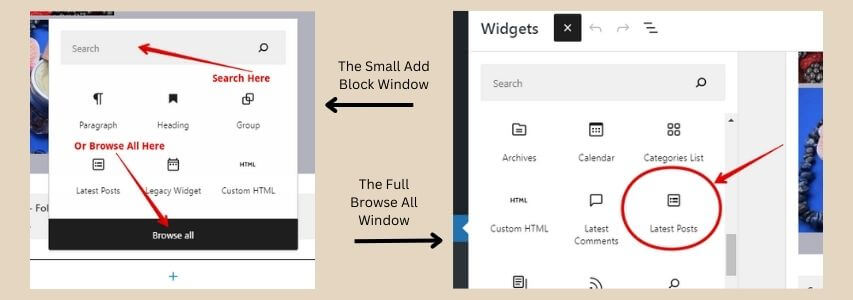
Scroll down until you find the Latest Posts widget or alternatively type it into this windows search box. Click the Latest Posts widget to add it to the sidebar (this will be just text at this point).
How To Display The Thumbnails
To display thumbnails on your new widget, you will need to click the settings button which is the cogwheel at the top right of the page next to the Update button.
This will now show a few extra options on the right-hand side of the page. Make sure that Block is selected at the top of the settings, then scroll down to the featured image settings and toggle the Display Featured Image button to on.
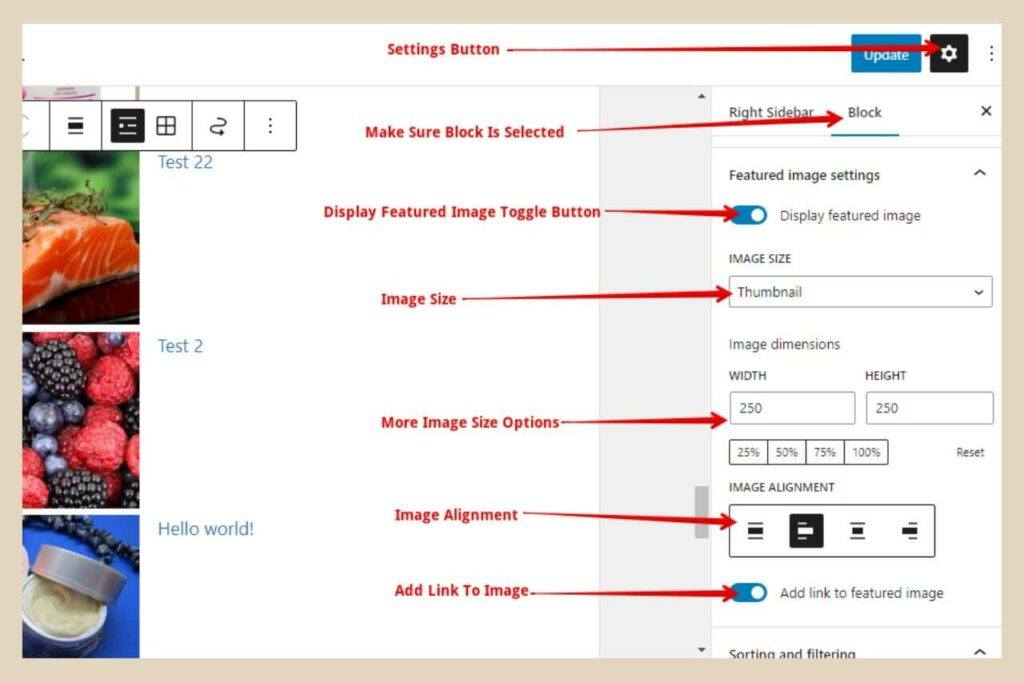
From here, a few more options have now appeared. You can now choose the size of the image, the image alignment and whether or not to add a link to the image.
Once you’ve finished customising your widget, click the Update button on the top right-hand side of the page and your widget will be published. Ta-da, your new recent post widget with thumbnails is now live.
Customise Your Widget Even Further
There are a few more customisation options available other than just adding a thumbnail. You can also add the post excerpt, the post author and the post date to the widget.
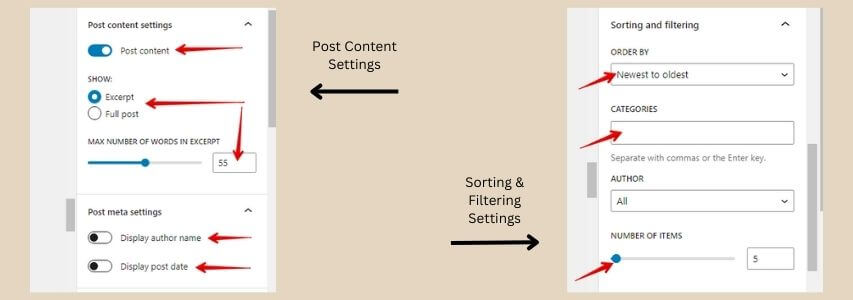
You can actually add the entire full post content too but why that’s even an option is beyond me. You can also choose different sorting options from newest to oldest or A to Z for example. There’s also the option to only show posts from certain categories too.
If you look at the very bottom of the settings, you’ll also find an option to choose how many recent posts you’d like to show.
Changing The Background Colour
If you’d like a coloured background for your widget, you can also do that too. Simply scroll to the top of the settings and click the half-shaded circle that says styles when you hover over it.
From here, you can change the background colour of the entire widget. You’ll also notice a text colour option and some typography options too (click the 3 dots for more typography options).
The typography options will work perfectly well here but the text colour option won’t because this is linked text.
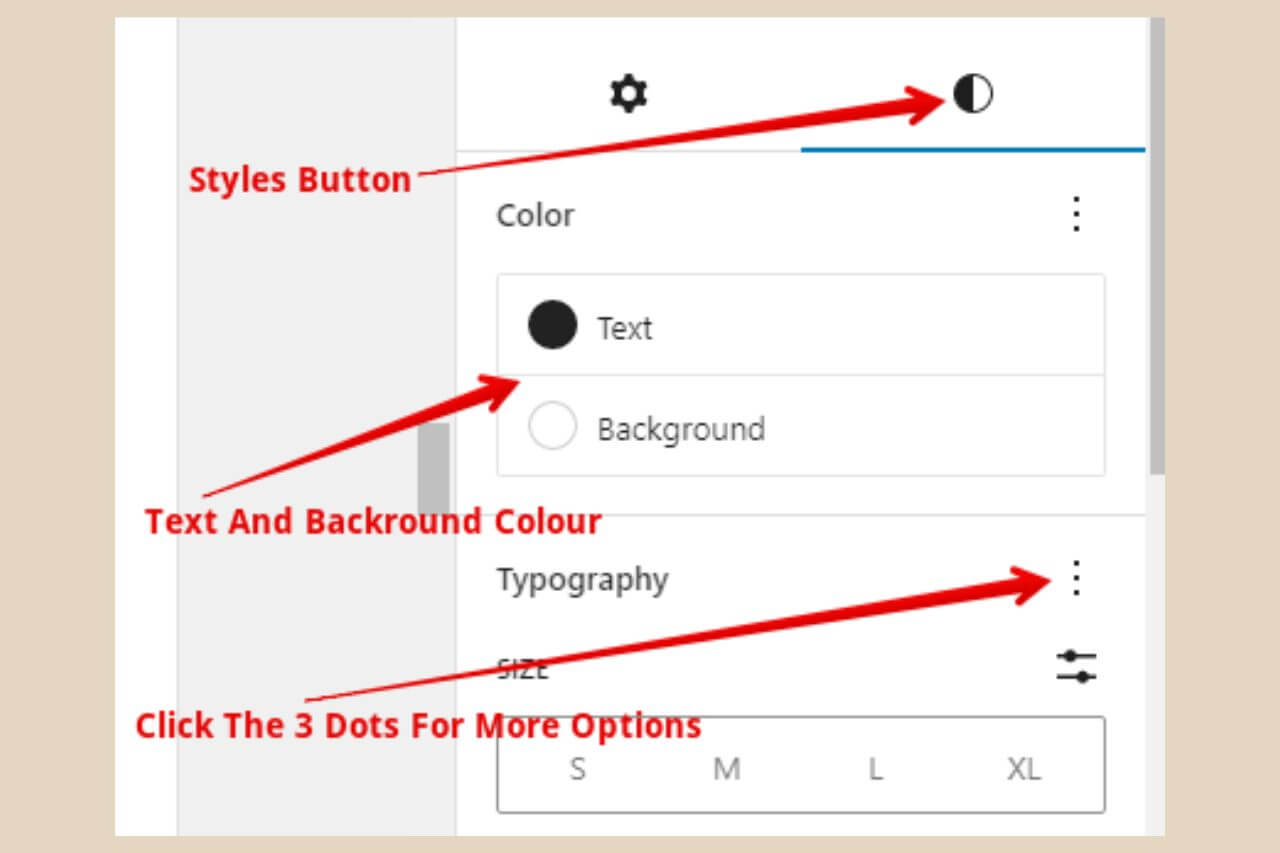
The only way to change this is by changing the link text colour of all your widgets in the Appearance, Customise area of your site, if your theme allows it.
Adding A Widget Title
Unfortunately, this widget doesn’t give you the option to give it a title, like Latest Posts, for example, so the only way to do this is by doing it manually as I’ve done here on my site.
To do this, simply add a heading block to the sidebar widget area and place it directly above the latest post widget. Type in your name of choice, latest posts, recent posts, etc and group this block together with your latest post widget so they become one.
You may have noticed that anytime you have a block selected, a small box appears usually just above it that will let you make some minor changes to it.

This is usually for aligning it, moving it up and down the sidebar to different positions, deleting it or grouping widgets/blocks together. For the sake of this next part, I’m just going to call it the widget format box.
Grouping Widgets/Blocks Together
You can group widgets/blocks together by holding down the shift key on your keyboard and selecting both widgets/blocks, then clicking the furthest left icon (it should say the name of the widget when you hover over it) on the widgets format box and then clicking Group.
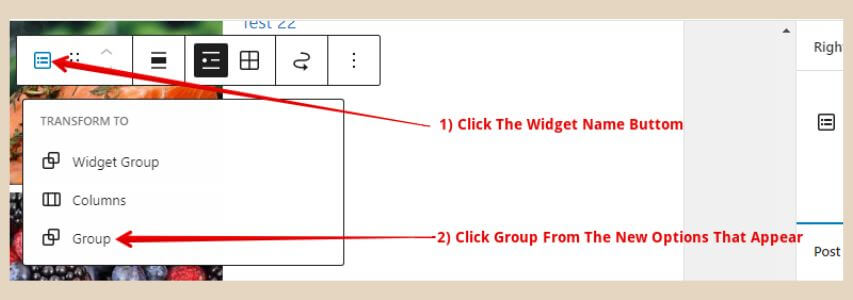
If your new title seems too close together with the recent post widget, then place your cursor at the end of the title and hit the enter key on your keyboard.
This will insert a new empty block that should create a line of space between the title and the recent posts lists. You won’t really be able to tell in the editor, so you’ll have to click Update and check it on your site live.
The “widget format box” for your heading block gives you the option to change the heading size, use bold, italic, etc.
With this block, you can actually change the text colour this time, in the settings area on the right-hand side and of course the background colour and typography as before.
Using Your Recent Post Widget At The Bottom Of Posts
This widget can also be used in other areas around your site too like the bottom of posts for example. For this, you just need to add the widget to the bottom of your post by clicking the + button and formatting it to your liking as before.
On this site, for my below posts widget, I’m using large-size images and I’ve set the number of posts to 3. This way, they fit nicely on one line across the bottom of my post although this is theme dependent. If your theme uses a wider content area, you may be able to fit more.
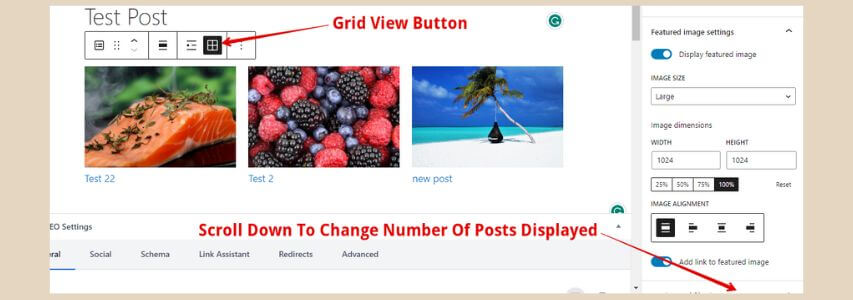
To show them horizontally across the page rather than the default vertically, simply click the four boxes icon (it says grid view when you hover over it) on the widget format box.
You can, like before, also add a heading block above it if you like but I don’t group them together in this instance because on a post they look better and are spaced better when they’re in separate blocks.
There is unfortunately a slight flaw to this because if you’ve set the widget to display your most recent posts from newest to oldest and your reader happens to be viewing one of your 3 most recent posts, the post they’re reading will also be shown in the widget at the bottom of the page.
You can choose to sort them in other orders like A to Z, Z to A or oldest to newest so you could change it up a bit to stop that from happening.
Make Your Widget A Reusable Block
To save time moving forward, you can now save your finished after-post widget as a reusable block so that it’s ready to go any time you want to add it moving forward.
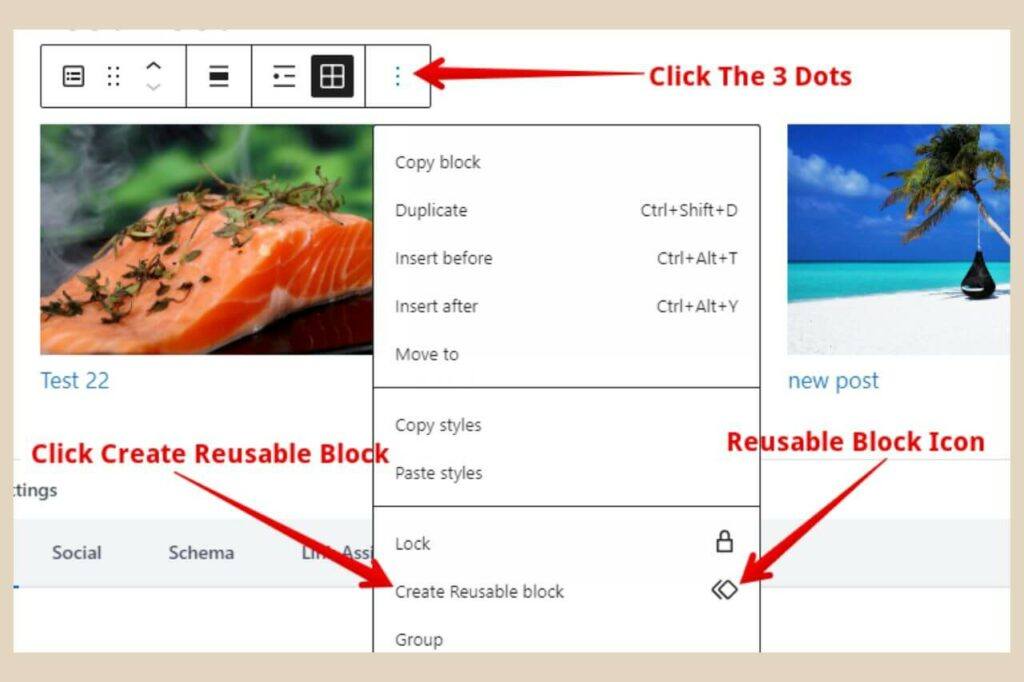
To do this, you’ll need to click on the three dots on the far right of the widget format box (it says options when you hover over it), scroll down the new menu that’s appeared and select Create Reusable Block.
Next, give your block a name in the new small window that appears and click save.
Now anytime you want to use that block, you either type the name into the search box when you’re adding a new block or click the reusable block icon underneath the search box to show all your reusable blocks.
Note: As I don’t group the heading block and latest post widget block together, I actually made the heading block a reusable block too because I did make some changes to the text style so you may want to consider doing the same if you’re following suit.
Use It As A Related Posts Widget
In theory, you could actually use the latest post widget as a related post widget instead, at the bottom of your posts.
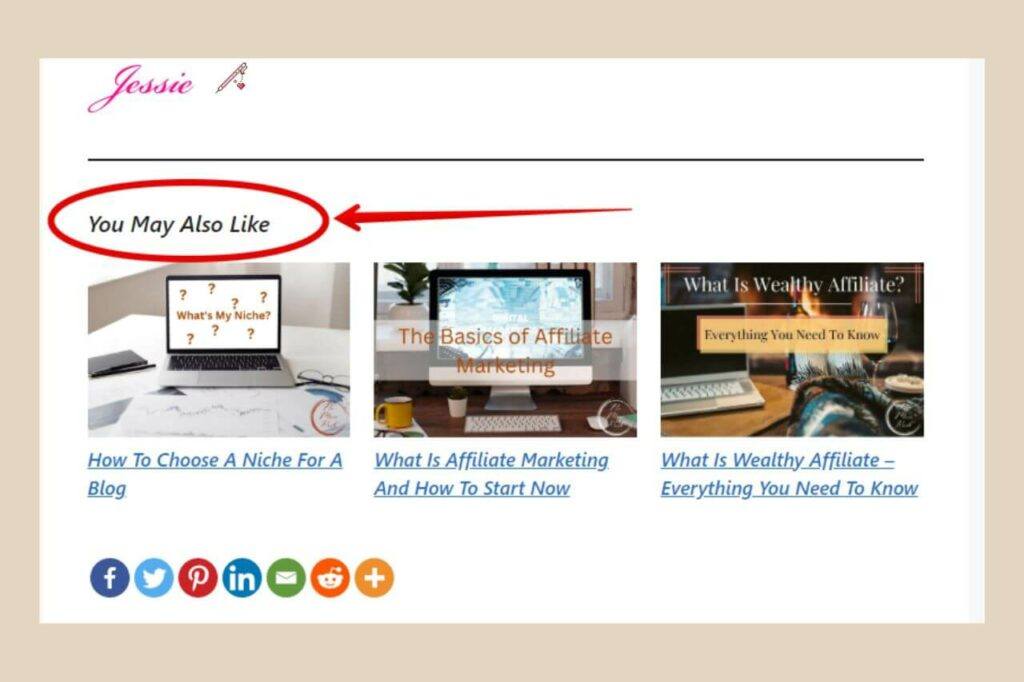
If you’d like to do that then simply give the widget a different heading, scroll down to the Sorting and Filtering section in the settings on the right-hand side and type in the category that matches the post you’re adding the widget to.
For example, if the post you’re adding the widget to is in a category called WordPress and you select that WordPress category for your widget, only posts in that category will show up.
This is in essence exactly how a related post plugin does it, although don’t forget that flaw I mentioned earlier. You may have to do some switcharoos with the sorting options to avoid that.
Use It As A Featured Post Widget
You may even have certain posts that you want to drive more traffic to like monetised posts for example if you’re doing something like affiliate marketing.
You could easily make a category just for those posts alone and use that category so that it’s those posts that show up in the widget, whether that be the sidebar widget, the one at the bottom of your content or both.
There are so many ways in which you could format the widget and hopefully, this post has helped show you how to do that.
If you do get stuck or need any help, please let me know in the comments below and I’ll be more than happy to help you out.

You May Also Like
- How To Display Recent Posts With Thumbnails In WordPress
- How To Add An Affiliate Disclosure To Your Posts
- What Is Wealthy Affiliate – Everything You Need To Know


