Last Updated: January 16, 2024
If you’re looking for a free unlimited AI image generator then Mage Space might just be the one you’re looking for. In this tutorial, I’m going to show you how to use mage space to create your very own unique AI images all for free.
It’s a super simple AI image generator to use and you can use all of your images commercially even if you’re on the free plan.
It does have some feature limitations as a free user but the amount of images you can generate isn’t one of them.
It also produces some pretty epic images even with the simplest of prompts so, let’s jump straight in and get this tutorial going to learn how to use this very cool free AI image generator.
How To Use Mage Space
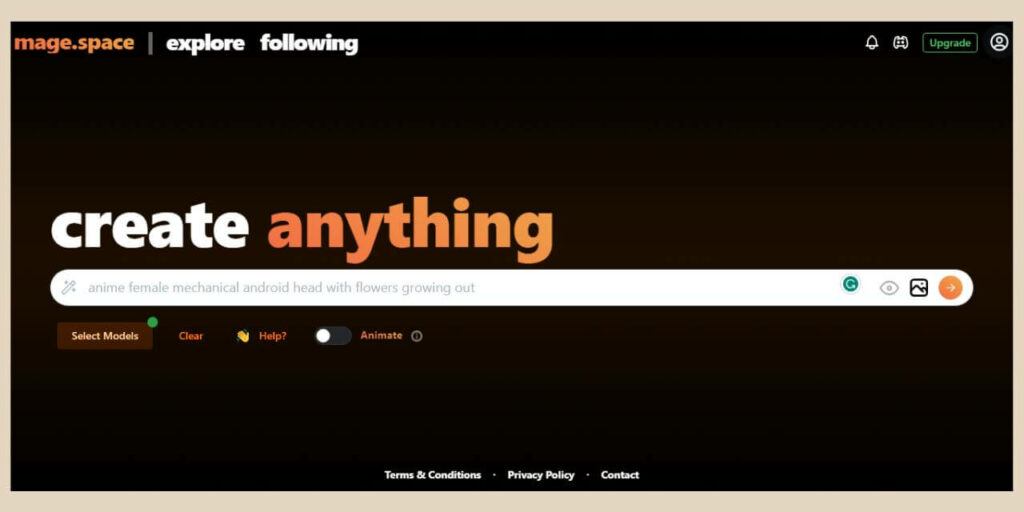
Mage Space is one of those AI image generators that is both limited and unlimited all at the same time. I say that because as a free user, you can only use 3 out of a possible 160+ base models.
That being said, the 3 base models that you get to use are pretty good ones (well 2 of them are, in my opinion) and I’ll show you a few examples of what they can generate throughout this tutorial.
There are a few other features that you can’t use as a free user and you’re also limited to just one image generation at a time but, and it’s a big but, there are no image limits at all so you can just keep generating images over and over again as many times as you like.
That alone makes Mage Space a very handy tool for creating your own AI images, especially for beginners who need practice with their prompt skills.
It’s also the reason why I’ve included it in my best free AI image generators list because it truly is unlimited images for free.
Signing Up To Mage Space
So, to get started, head over to Mage Space but before you start generating images, get signed up first with your Google, Twitter (I mean X, although we all still call it Twitter) or email account so that you can unlock all the free options (some will be greyed out if you’re not signed in).
Signing up also means that all your generated images will be saved in your profile if you want to view or download them at a later stage.
To sign up, simply click the profile icon in the top right corner of the screen and then click the Login option at the bottom of the menu that appears.
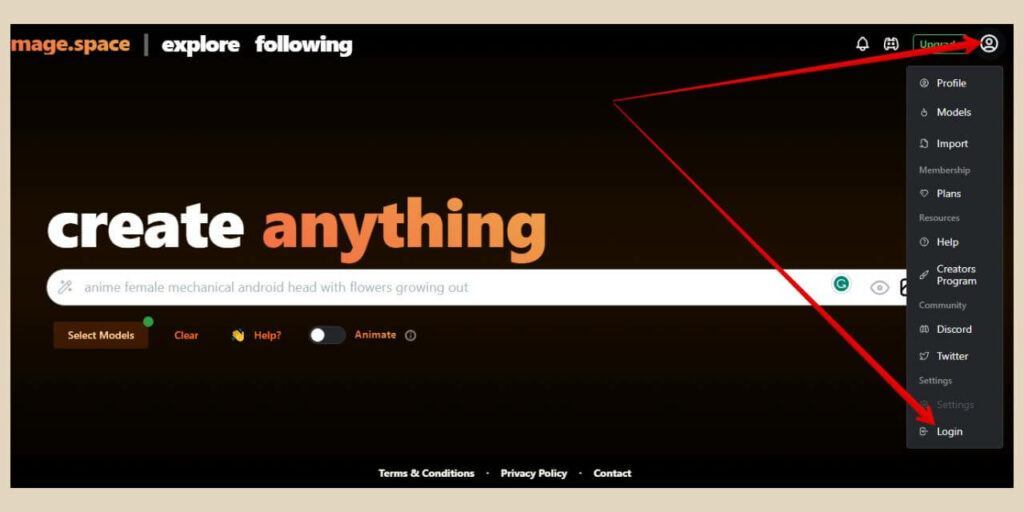
From here, a small pop-up window will appear where you can sign up using one of your account options as just mentioned so choose your preferred account and now you’re ready to start creating images.
Generating An Image In Mage Space
Mage Space is one of the more simplistic AI image generators in that there’s not a whole lot you need to change to generate decent images.
Obviously the more descriptive the prompt, the better the image results will be but even the simplest of prompts can generate share-worthy images.
So, start by typing a description of the image you’d like to create into the prompt box. Try to be as detailed as possible but if you’re new to AI image-generating then you can start simple and then add more details with each attempt until you get the results you’re looking for.
Remember, you have unlimited image generations with Mage Space so you can play around with it again and again to master your image prompt skills.
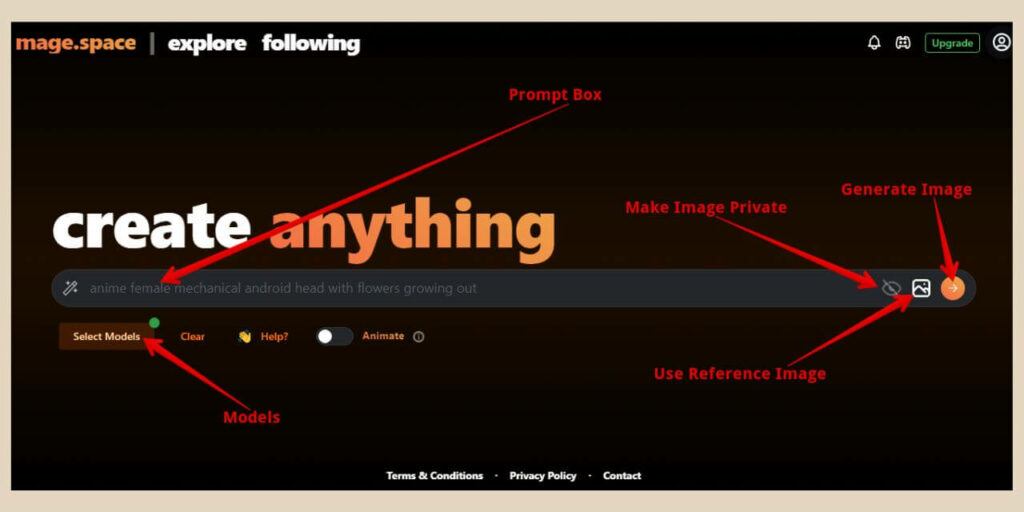
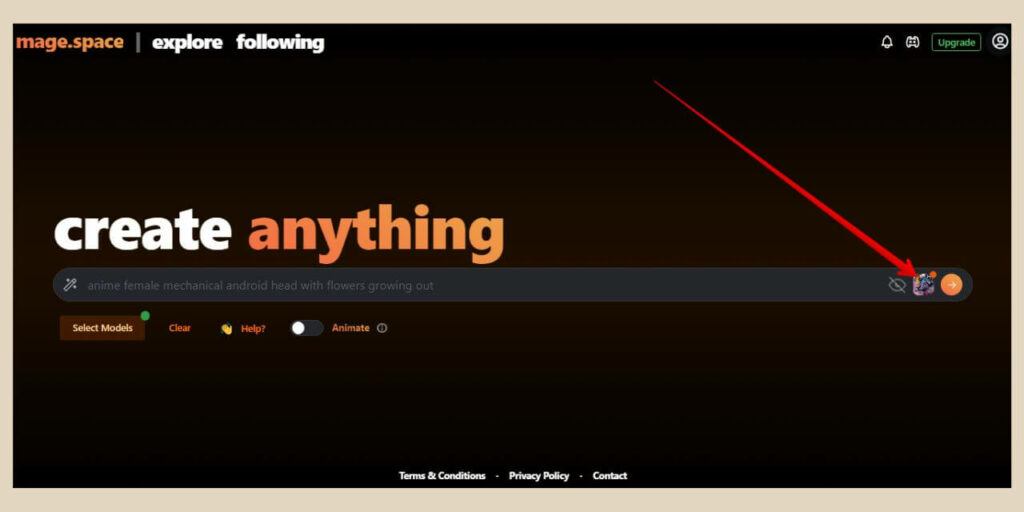
If you’d like to add an image as a reference to use in combination with your prompt (image to image), you can do that by clicking on the Reference Image icon on the right side of the prompt box next to the Generate button.
You’ll also see an eye icon to the left of the image icon which lets you choose whether or not your generated images are private or public.
Choosing A Base Model
Right beneath the prompt box, you’ll see a Select Models button so click this to open up the Models tab area underneath.
As I mentioned earlier, as a free user, you can only use one of the first 3 models which are SDXL, Stable Diffusion v1.5 and Stable Diffusion v2.1.
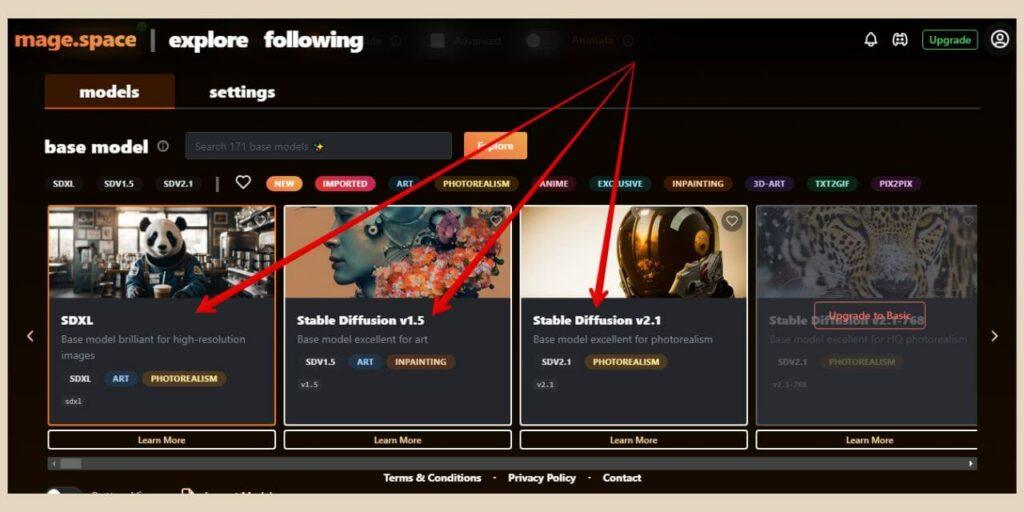
To be honest, I only really like using SDXL and sometimes Stable Diffusion v2.1 but that’s because I’m always looking for realistic images and I find Stable Diffusion v1.5 a little hit-and-miss.
It’s also the one that tends to produce the most flawed images like multiple limbs, blurry features, etc but try them out for yourself to see which one you prefer because it does depend on the types of images you’re trying to create.
For example, for this particular tutorial, I’m using the very simple prompt of “A photo of an iridescent tiger”.
Now, my prompts would usually be a lot more detailed than this but I wanted to give you an idea as to what it can do with even the most basic of prompts. So, here are some examples of what each base model came back with.
Stable Diffusion v1.5 Example
I used Stable Diffusion v1.5 for the image below and it didn’t do a bad job with the tiger although it didn’t really pick up on the iridescent part of the prompt.
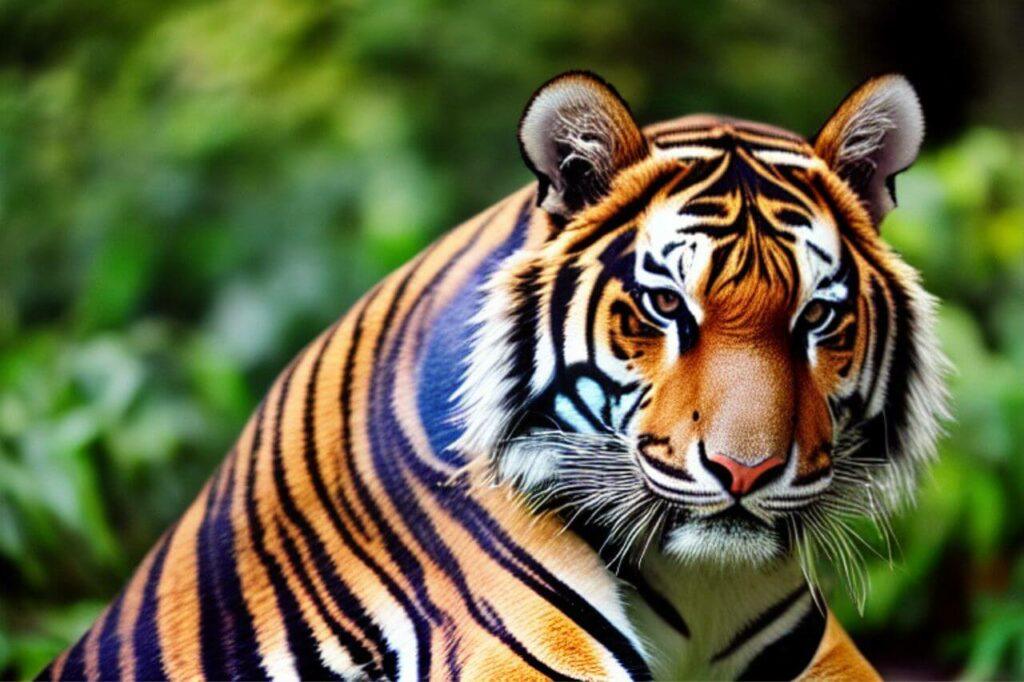
However, if I’m being completely honest, it took several attempts to get this image because the 4 or 5 attempts previous to this came back with what I can only describe as mutated tigers with way more limbs than the average tiger and some seriously distorted faces.
Stable Diffusion v2.1 Example
The next image below was created using Stable Diffusion v2.1 and this base model did a much better job at keeping the distortions and the extra limbs to a minimum.
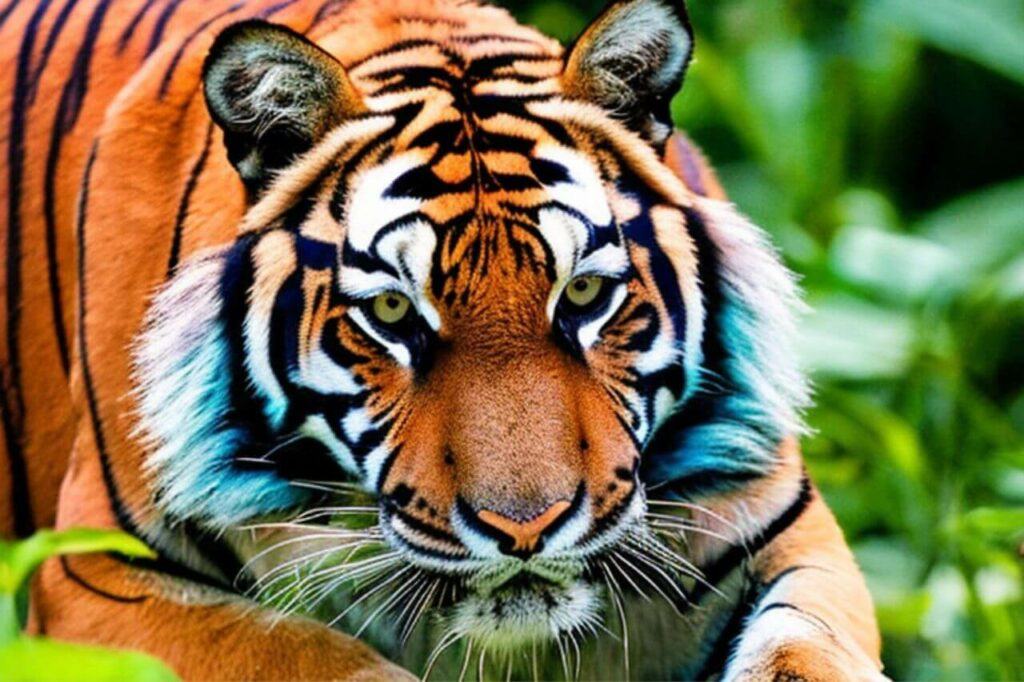
However, no matter how many times I generated the image, once again it didn’t really do much with the whole iridescent part of the prompt but it does produce far fewer faulty images than its 1.5 counterpart.
SDXL Example
The final image below was created using SDXL and this was my first attempt with this base model. With this one, it got it right straight out of the park and actually took notice this time of the iridescent part.
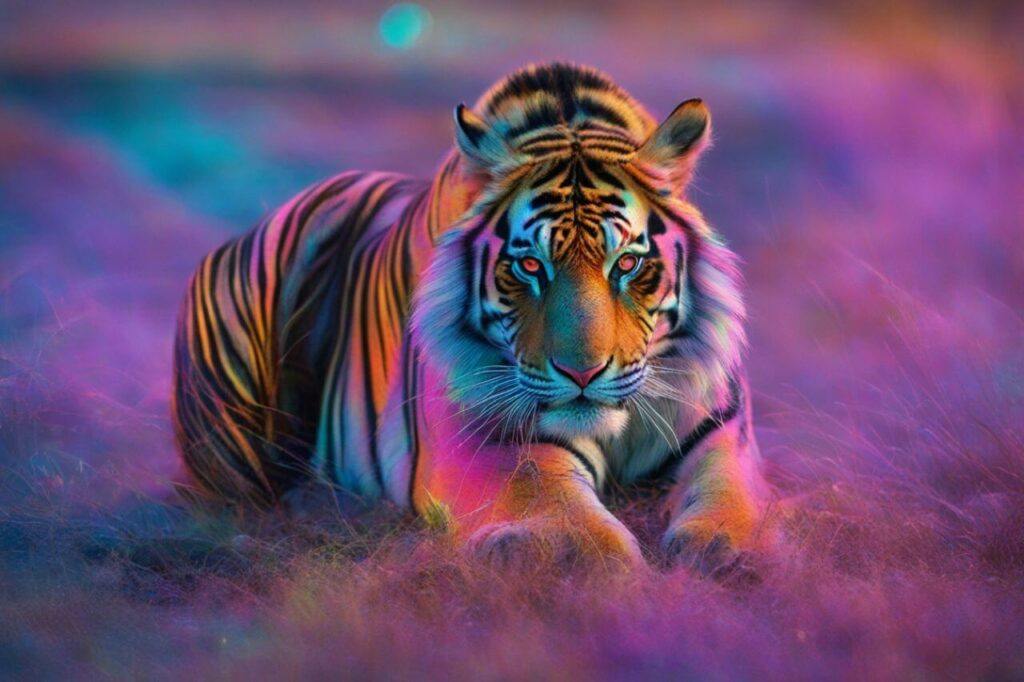
As I mentioned earlier, SDXL is the one I use the most because it produces the kinds of images I’m looking for but that’s my personal preference. You may get better results with the other models if you’re looking for a different style of images.
Generation Settings
Next to the Models tab, you’ll see a Settings tab and this is where you can make some adjustments to your generation settings.
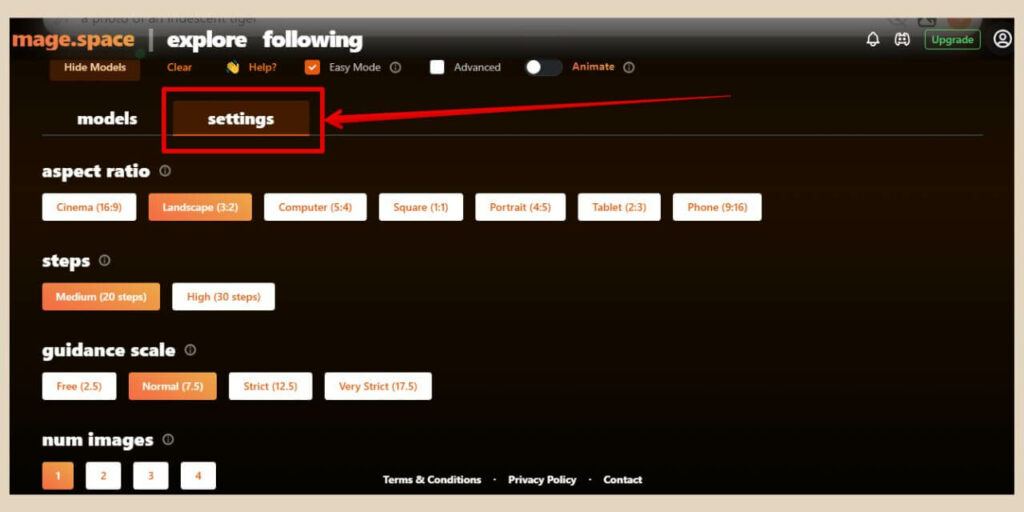
By default, you’ll only see 4 settings here to begin with and they are as follows.
- Aspect Ratio – Change the images you generate to landscape, portrait, square, etc.
- Steps – How many artistic steps the AI takes to generate an image (Set for best results by default so I tend to leave it there).
- Guidance Scale – How closely or loosely the AI follows your prompt (Set for best results by default so I tend to leave it there).
- Number of Images – How many images are generated at one time (Free users can only set it to 1).
Just above the Settings tab, you’ll see another selection of options which include the Clear button which will clear all settings back to their defaults.
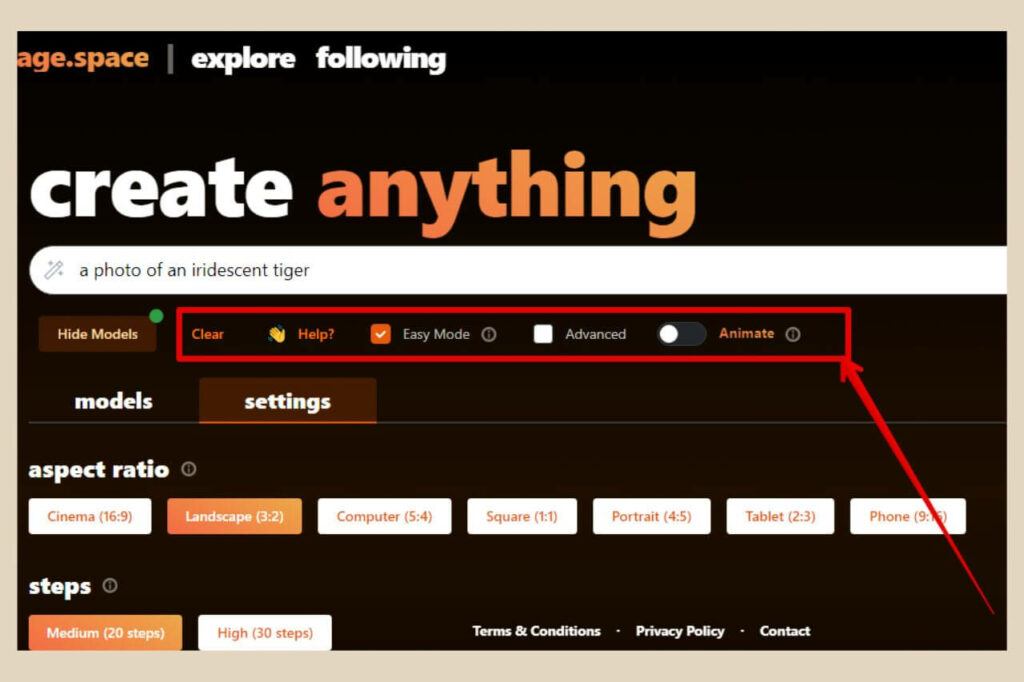
The Help button will give you some options that can help you with your prompt descriptions including a prompt builder which can help you build the perfect prompts.
The Easy Mode option is selected by default and this allows Mage Space to add common sense settings to your generations for better results.
This also includes adding default negative prompts which are things that you don’t want to appear in your images. This next option is the Advanced option which will add extra settings to the Settings tab.
Then lastly the Animate option which is a paid feature that will allow you to create a GIF instead of an image.
Using The Advanced Option
If you’d like to have more setting options for your image generation, then simply click the Advanced option checkbox and some extra options will be added to the settings tab.
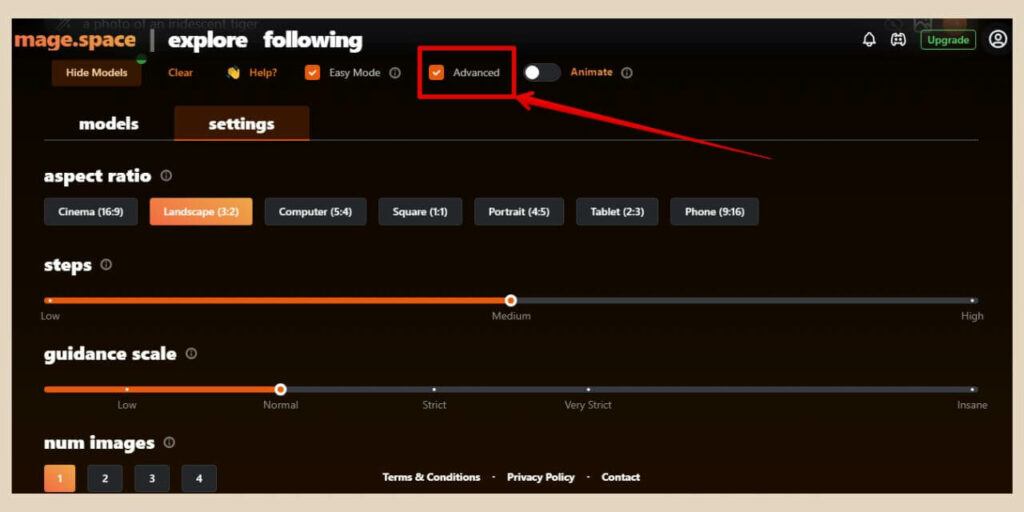
The first 4 options will be the same as before only now the Steps and the Guidance Scale will both be sliders rather than buttons so that you can have more control of the settings if you wish to change them.
However, if you scroll down, you’ll now find some new advanced options that you can use if you want to make more adjustments to your image generation settings.
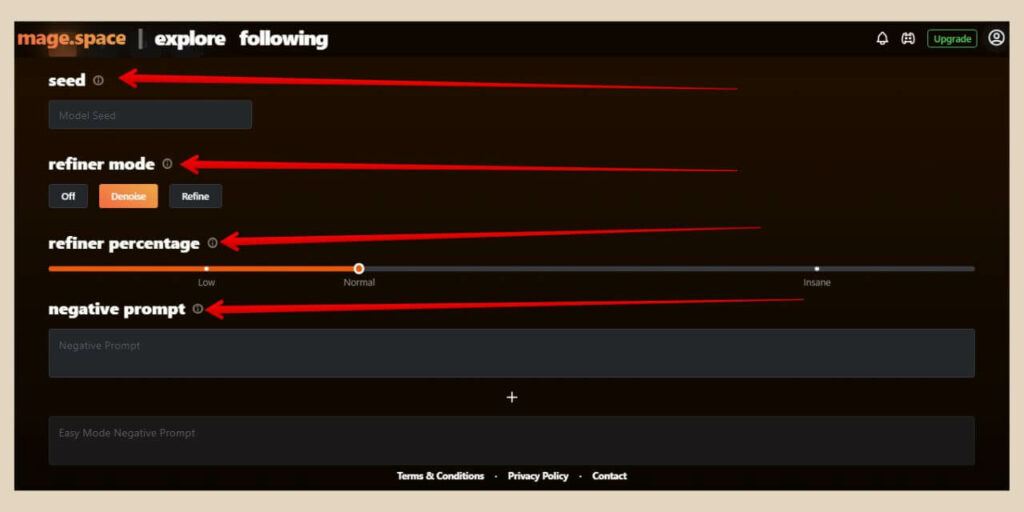
The very first new one you’ll see is Seed and this can be used if you want to generate the exact same image again or variations of it which I’ll show you some examples of in a moment.
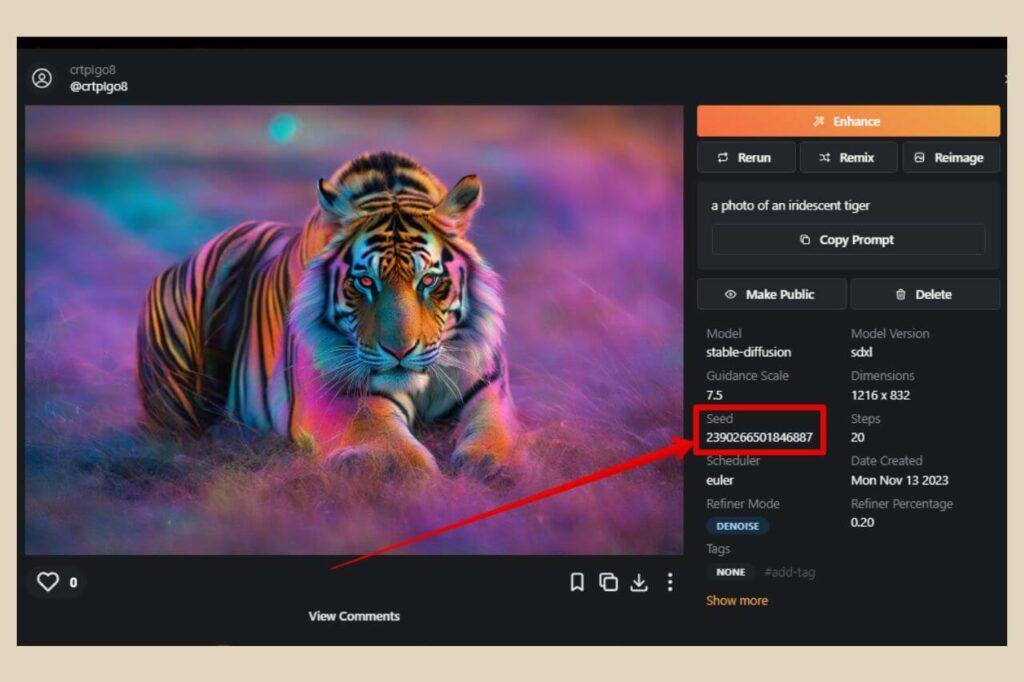
By default, the seed number box is empty but if you wanted to duplicate an image, you could paste the seed number for that image into the box and Mage Space would be able to generate the exact same image again if all the other settings and prompt remained the same.
You can find the seed number for your images in the details area to the right of your image in the pop-up window that appears when your image is generated.
The next options are the Refiner Mode and the Refiner Percentage which help fix image details. Much like the Steps and Guidance Scale, these are set for best results so I tend to leave them as is.
Beneath this, you’ll find the Negative Prompts area and this is where you can manually add your own negative prompts so basically the things that you don’t want to appear in the images, for example, extra limbs, blurry faces, etc.
Using Schedulers (Samplers)
The next option is the Scheduler (Aka Sampler) option and these are used to help turn random noise into a coherent image during the creation process.
Changing the scheduler can make subtle differences to the images you generate although some schedulers make more of a difference than others.
Also, before I get into the schedulers, you’ll also see a privacy toggle button which you can turn on if you want to keep your image creations private (same as the eye icon in the prompt box).
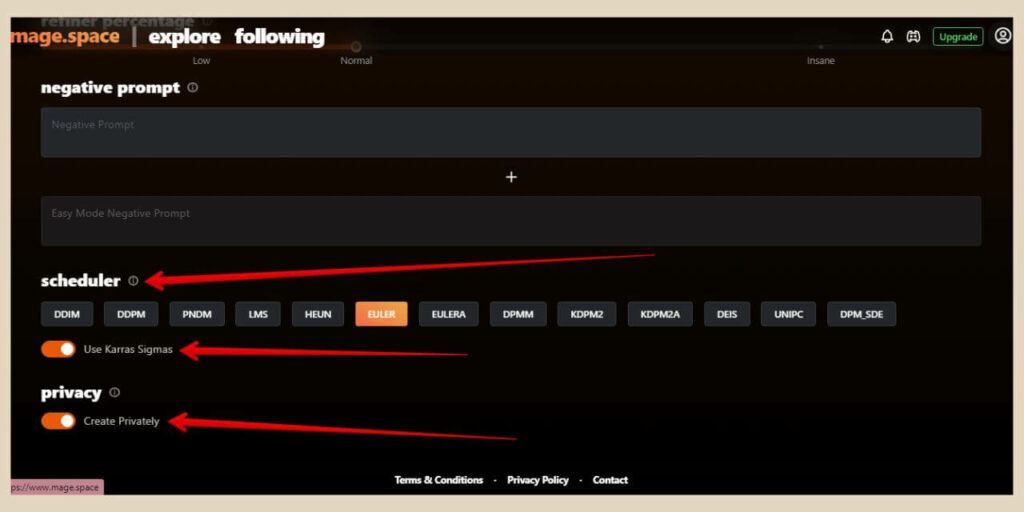
With the schedulers, the easiest way to see the difference these schedulers make is to find a generated image you like and use its seed number in the seed area of the settings to generate it again with the same settings and prompt.
You can then keep generating the same image over and over and only change the scheduler so that you can see the difference each one makes.
Scheduler Examples
This is what I’ve done with the images below and you can see the difference each scheduler makes.
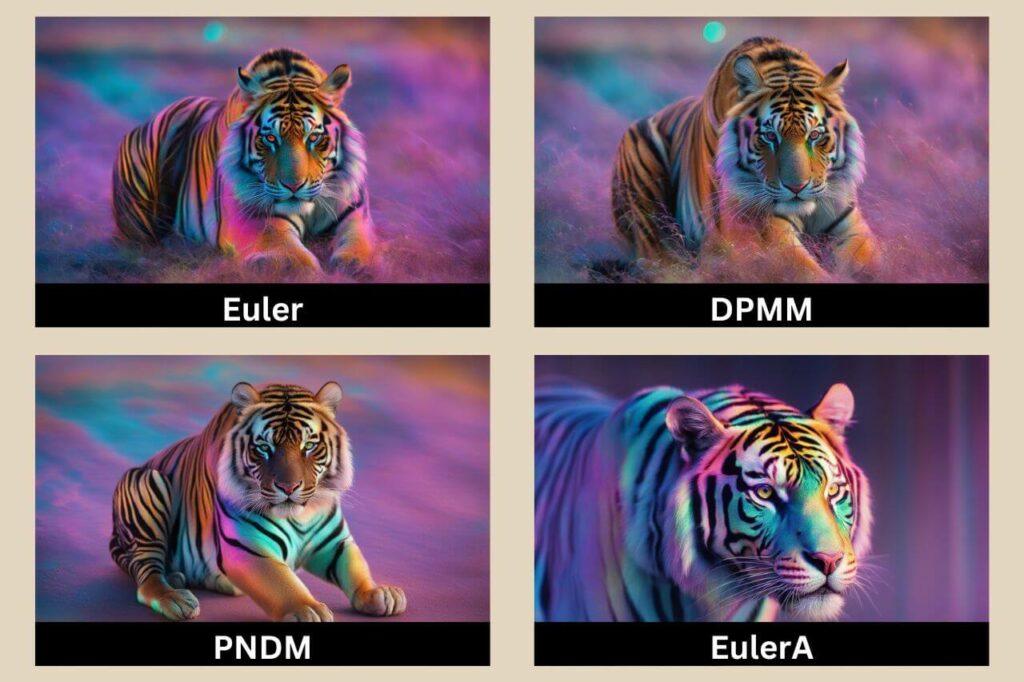
The first image is the original image I generated earlier and Euler was the scheduler used to create it.
With the second image, I’ve changed the scheduler to DPMM and although it hasn’t made a huge difference, if you look closely, you’ll notice that the tiger’s back is more hunched up and the image is not as sharp as the original.
For the third image, I changed the scheduler to PNDM and this made quite a noticeable difference in that the image is less detailed in certain areas and parts of it are on the verge of looking a little cartoony (its front legs).
Then the final image, I changed the scheduler to EulerA and this produced a very different image and a really good one at that so changing the scheduler can make subtle to significant changes to the types of images you generate.
You can also switch on the Use Karras Sigmas toggle button which will also alter the look of the images you generate.
Creating Image Variations Using The Seed
As I mentioned earlier, using AI image seeds is a great way to duplicate or make variations of images you like, much like what we did above with the schedulers.
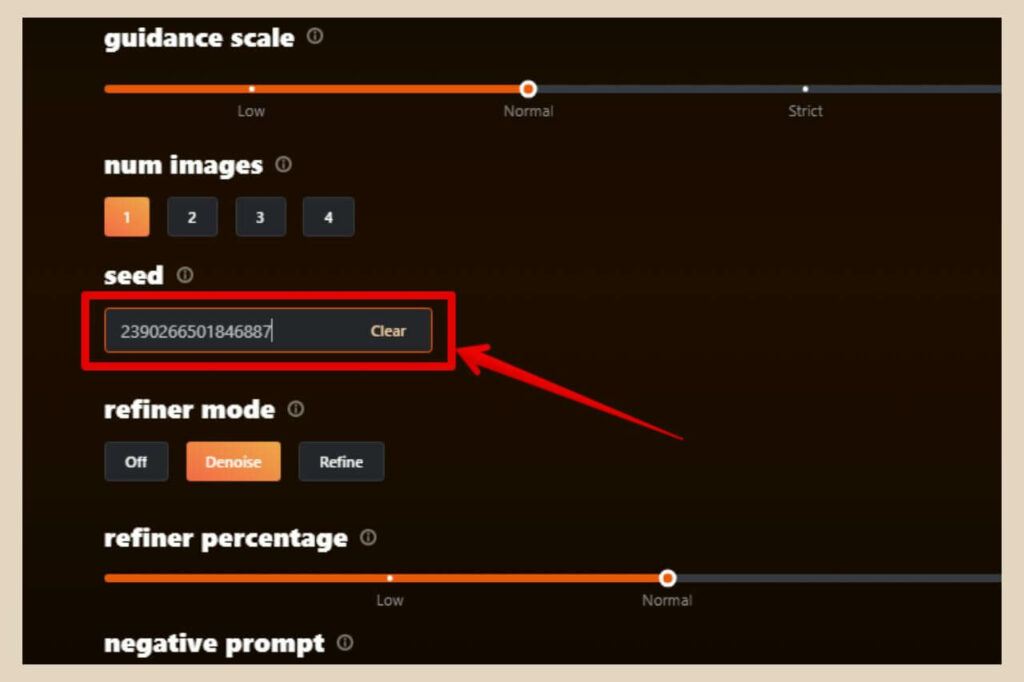
By default, AI image generators use a random seed every time you generate an image and this is how you end up with different image results every time even when you use the same prompt and same settings.
However, by adding a seed number in the settings you can not only duplicate an image but also make variations of it by making small changes to the seed number, so essentially it’s a “more like this” option.
To do that, simply change a random digit in the seed number and you should be able to create similar variations of the original image like the examples in the image below.
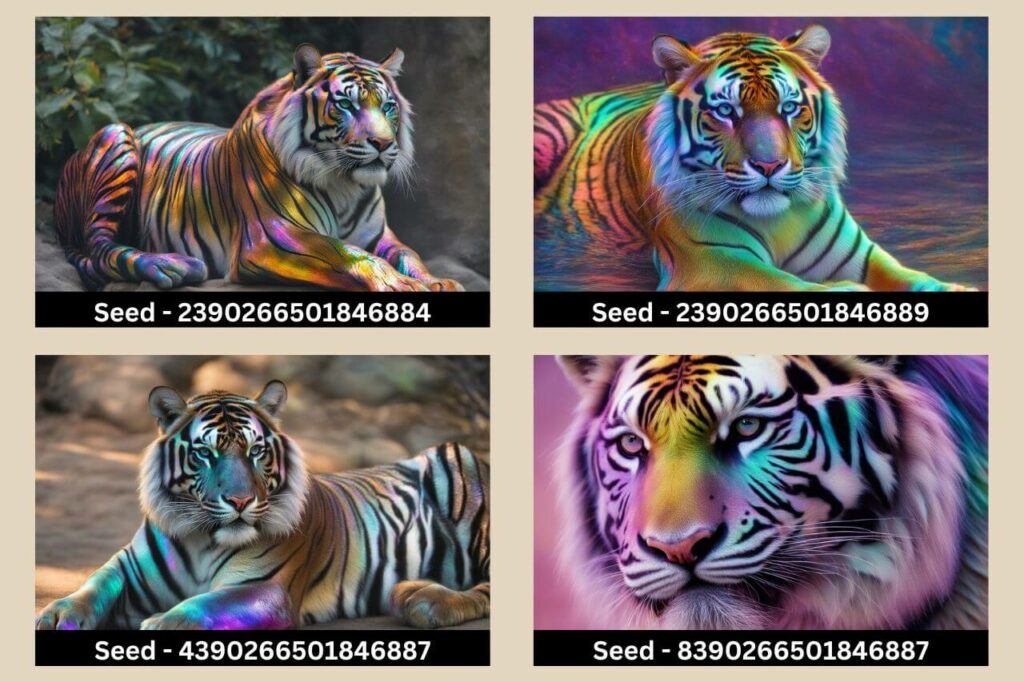
I used the seed number 2390266501846887 which is for the same original image that I used in the scheduler example. For the 2 images on the top row, I change the last digit of the seed with each one.
For the 2 images on the bottom row, I changed the first digit of the seed with each one and as you can see, it generated similar variations of the original image so it’s a great way to get similar results of an image that you like.
You can also keep the seed number the same and make changes to the prompt or other settings instead to make variations that way too.
Image Options
As you generate images, a pop-up window will appear with your image result and this is where you’ll have further options as to what to do with your generated image.
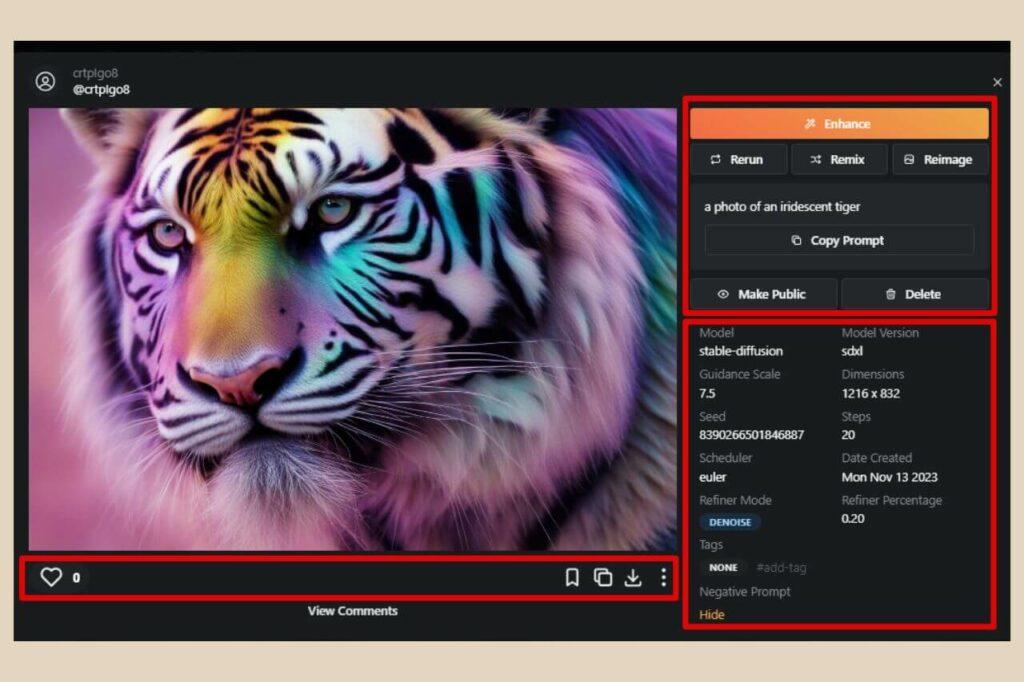
Directly underneath the image, you’ll find a few icons which are from left to right:
- Heart Icon – To like your image.
- Bookmark Icon – To bookmark your image.
- Copy Link Icon – To copy your image link.
- Download Icon – To download your image.
- Three Dots Icon – To report your image if it’s inappropriate.
To the right of your image, you’ll find all the details of the settings, seed and prompt that were used to create it and a selection of buttons that will allow you to do a few more things within the Mage Space generator and they are:
- Enhance – As a free user, you can upscale (increase the pixel size of your image) and face fix (improve facial details).
- Rerun – Regenerate another image using all the same settings and prompt except for the seed number.
- Remix – Reuse all the same settings, prompt and seed number and tweak to your own liking before generating a new image.
- Reimage – Use as a reference image (image to image) or do some inpainting (modify parts of the image).
- Copy Prompt – Copy the prompt to your clipboard.
- Make Public/Private – Make the image public/private.
- Delete – Delete the image.
With the reimage option, the image will be placed into the image box on the right of the prompt box where you can now use it as a reference image.
Inpainting In Mage Space
If you want to inpaint instead then simply click on the image once it’s in the prompt box and a new small window will appear where you’ll be able to use the inpainting tool.
From here, you can choose to select the background, the foreground or a custom area to inpaint. You can also use the Prompt Strength slider to adjust how much weight is given to the text prompt vs the image.
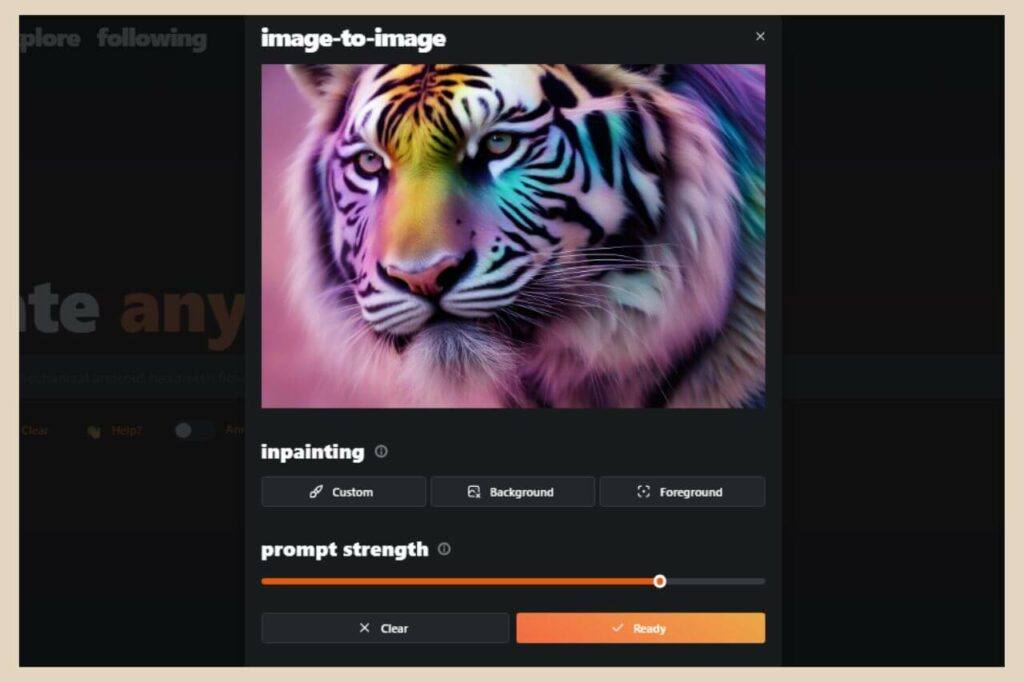
Once you’ve selected the areas you’d like to inpaint, use the prompt box to describe what you would like to generate and Mage Space will modify the selected area whilst leaving the rest of the image intact.
Viewing All Your Generated Images
To view all your generated images, click the profile icon in the top right corner of the screen and then click the Profile option from the menu that appears.
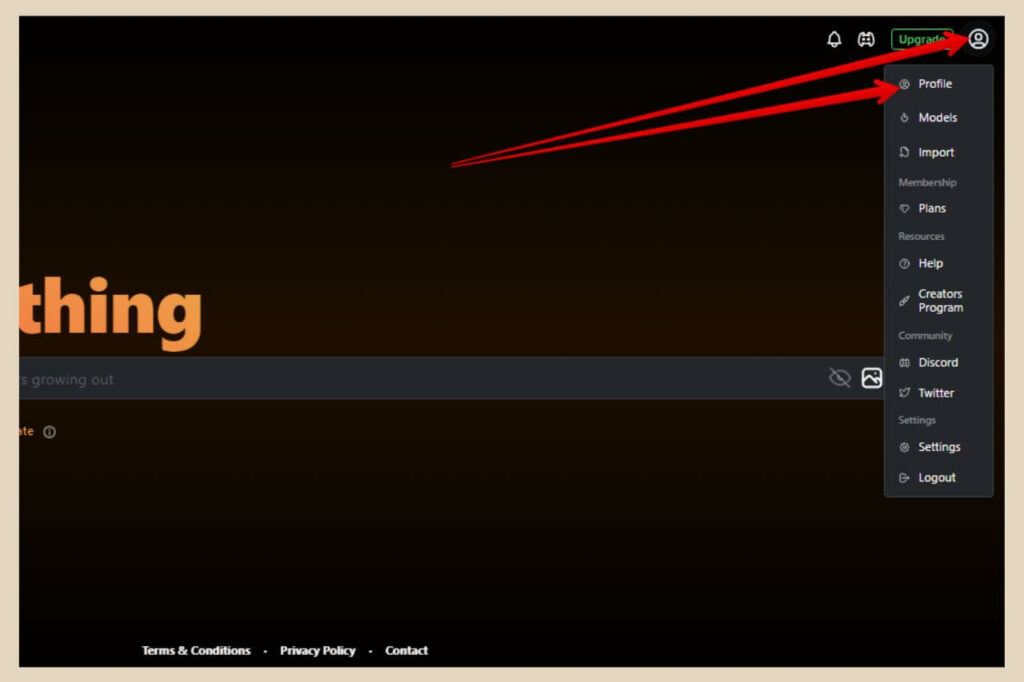
This will take you to your profile page where you’ll be able to see all of your generated images.
You can also use the top row options to view only certain images that you have saved in particular areas so your liked images or bookmarked images for example.
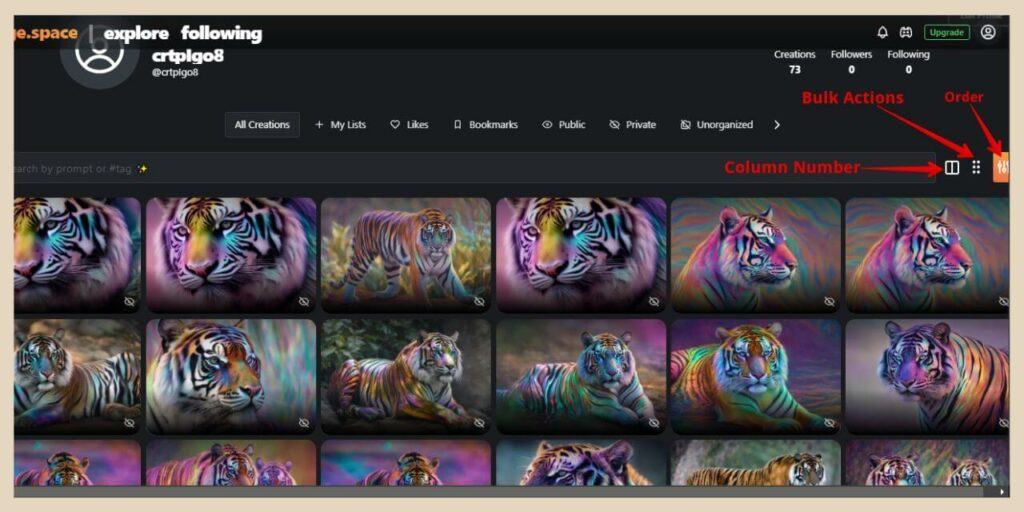
If you’d like to organise your images into lists, simply click the My Lists option to create your own lists and those lists will be added to the options on the top row.
You’ll also find an order button on the far right of the screen where you can order your generations by newest or oldest as well as a column number button to adjust how many columns of images are displayed.
If you’d like to make bulk selections such as adding images to a list or deleting images, etc, you can do that by clicking the six dots button on the top right of the screen.
This will add a new row of options that will appear above the images where you can select your images of choice followed by your action of choice.
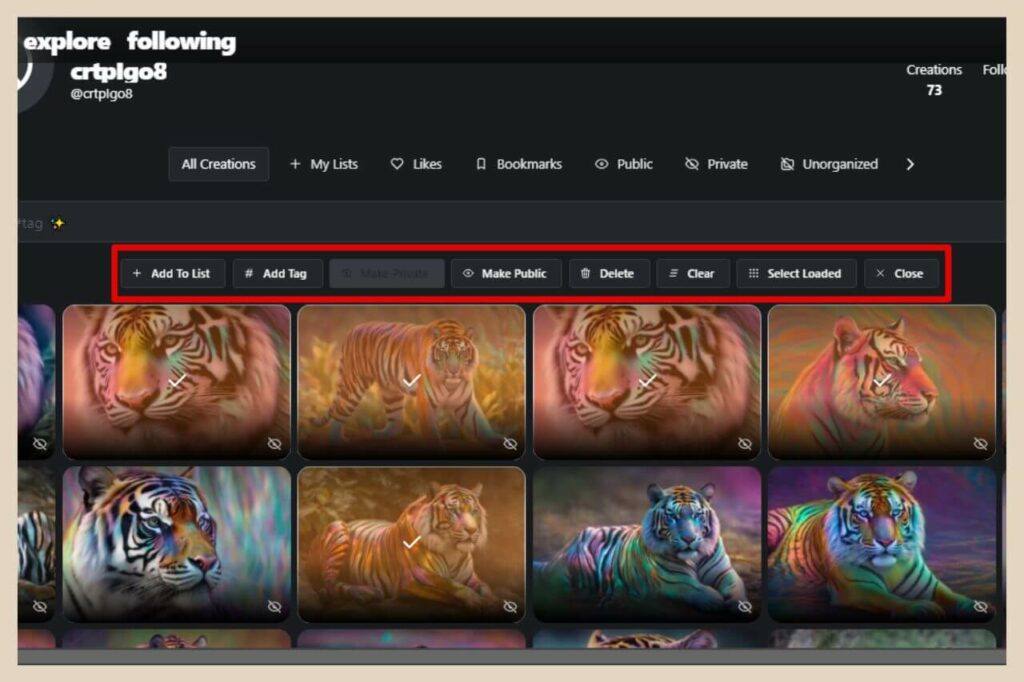
And finally, clicking on an individual image will bring up the same pop-up window that you saw when the image was first generated where you can click the download, rerun, and reimage options as before.
Viewing Other Member’s Images
To view other member’s images, simply click on Explore at the top of the screen and this will take you to the public images area.
From here, you can click on images that you like where you’ll be able to see all the settings and the prompts used to create them.
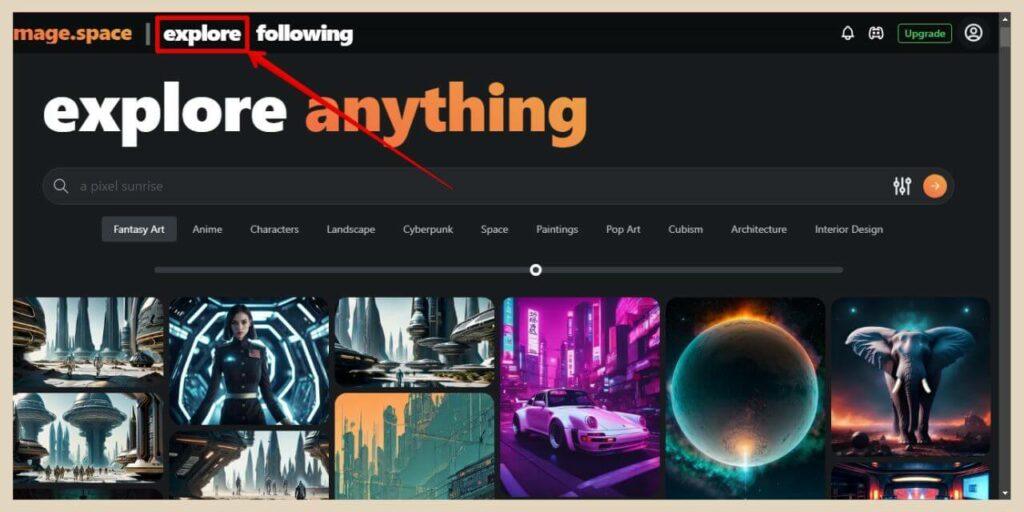
And much like your own images, you can download, rerun, copy prompt, etc although rerun, remix and reimage will be greyed out if the member used premium models and/or features to create the image.
You can also follow the member if you really like the images they’re generating by clicking on their profile image and then clicking on the Follow button on their profile page.
Once you’ve done that, you’ll be able to find them and all the images they create by clicking on Following at the top of the screen.
Let’s Get Creative With Mage Space
And that’s all there is to it. Mage Space is a super easy AI image generator that truly is free to use even if you are limited to only 3 base models.
But as you’ve seen, those base models produce pretty decent images and that was using the simplest of prompts with very few details.
It may not have a lot of the extra features and editing tools that many other AI image generators have, but I still like it. It’s simple, straightforward, free and unlimited image generations so it’s a very handy tool in my book.
So, why not try out Mage Space for yourself and see what kinds of images you can come up with? You’ll be surprised at just how easy it really is.
I hope you found this tutorial helpful and if you’d like to share your own AI stories and experiences then please free to share them in the comments below.
Happy AI Image Creating!

You May Also Like
- Is Microsoft Copilot (Bing Chat) Good For Bloggers
- Is ChatGPT Or Bard (Gemini) Better For Bloggers
- How To Use Google Bard For Epic Blogging

