Hey there, fellow affiliate marketers! If you’re looking to take your online earnings to the next level, then the Rakuten Affiliate Network offers a fantastic opportunity to achieve your goals.
Today, I’ll be sharing with you a step-by-step tutorial on how to join and use the Rakuten Affiliate Network and start raking in those sweet commissions like a pro.
In this tutorial, I’ll walk you through every step of the process. From signing up for the network and the individual programs within it to creating your all-important links and tracking your earnings.
You’ll have all the knowledge to maximize your Rakuten affiliate success. And trust me, with a bit of dedication and creativity, the sky’s the limit.
So buckle up and get ready to embark on a journey towards boosting your online income with the Rakuten Affiliate Network. It’s time to scale your affiliate marketing partnerships up a notch so let’s dive right in!
What Is The Rakuten Affiliate Network
Alright, before we jump headfirst into the action, let’s take a moment to understand what the Rakuten Affiliate Network is all about. Consider this your crash course in all things Rakuten!
So, what exactly is the Rakuten Affiliate Network? In a nutshell, it’s a partnership between you, the affiliate marketer, and Rakuten, the affiliate network giant.
As an affiliate, your mission (should you choose to accept it) is to promote products from Rakuten’s vast network of merchants on your website or blog.
When your audience clicks on those affiliate links and makes a purchase, you earn yourself a nice juicy commission.
And let me tell you, the commissions can be pretty sweet! Oh, and in case you’re wondering, like most other affiliate programs/networks, the Rakuten Affiliate Network is completely free to join.

Being up there with the largest and most reputable affiliate networks globally, the Rakuten Network provides access to a wide range of top brands and merchants, making it an ideal platform for both seasoned marketers and newcomers alike.
What You’ll Find Within The Rakuten Affiliate Network
The Rakuten Network is a pretty big one. They’ve built an expansive affiliate network that partners with many merchants across various industries.
From fashion and beauty to electronics, home decor, and everything else in between, you’ll be spoilt for choice when it comes to the merchants you can partner with and the products you can promote to your audience.
Some of their merchants include Macy’s, Calvin Klein, Asics, Microsoft and Clinique, just to name of few.

Rakuten has an arsenal of tools to help you skyrocket your affiliate marketing game. From a user-friendly dashboard to a wide array of promotional materials such as text/email links and banners/image links, they’ve got you covered.
An Easy To Navigate Dashboard
Whether you’re a tech-savvy guru or a beginner trying to figure it all out, Rakuten’s user-friendly dashboard is super easy to navigate.
Their dashboard will be your control centre and will give you access to your performance metrics, reports, and those all-important affiliate links and banners.
You can also use their deep linking tool so that you can handpick products that perfectly align with your audience’s interests.
Now, you might be thinking, “How do I even get started with this whole Rakuten thing?” Well, fear not, because the sign-up process is a breeze.
Before you know it, you’ll have your shiny new affiliate account ready to roll so you can unleash your earning potential.
Signing Up For The Rakuten Affiliate Network
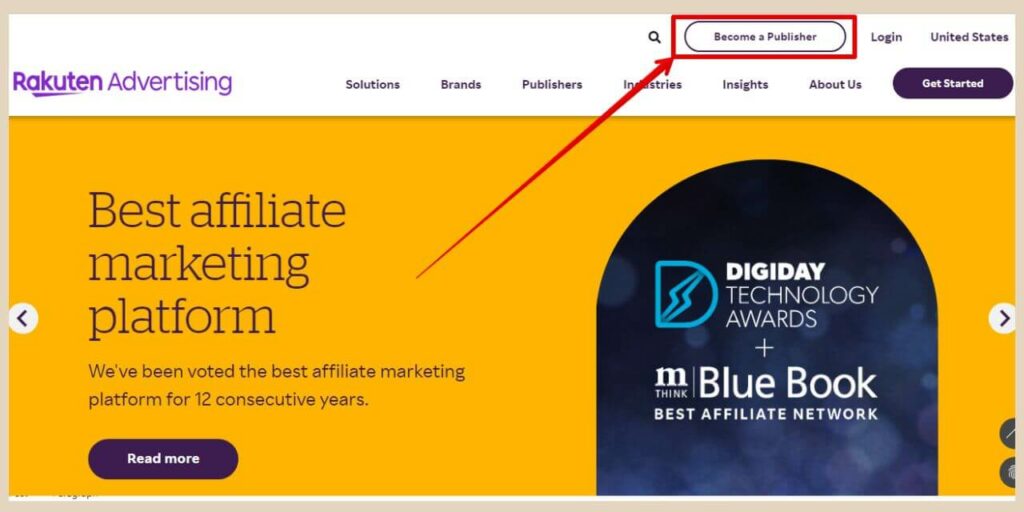
To kick things off, you’ll need to head over to the Rakuten Affiliate Network website. Once you’re there, click the “Become A Publisher” button at the top of the page and a new tab will open up which will be the Publisher Registration form.
Creating your Rakuten affiliate account is pretty easy and you’ll find the application form user-friendly and simple to complete.
You’ll first be asked for some company info like company name (website name for us affiliate marketers) and company address (use your own address here).
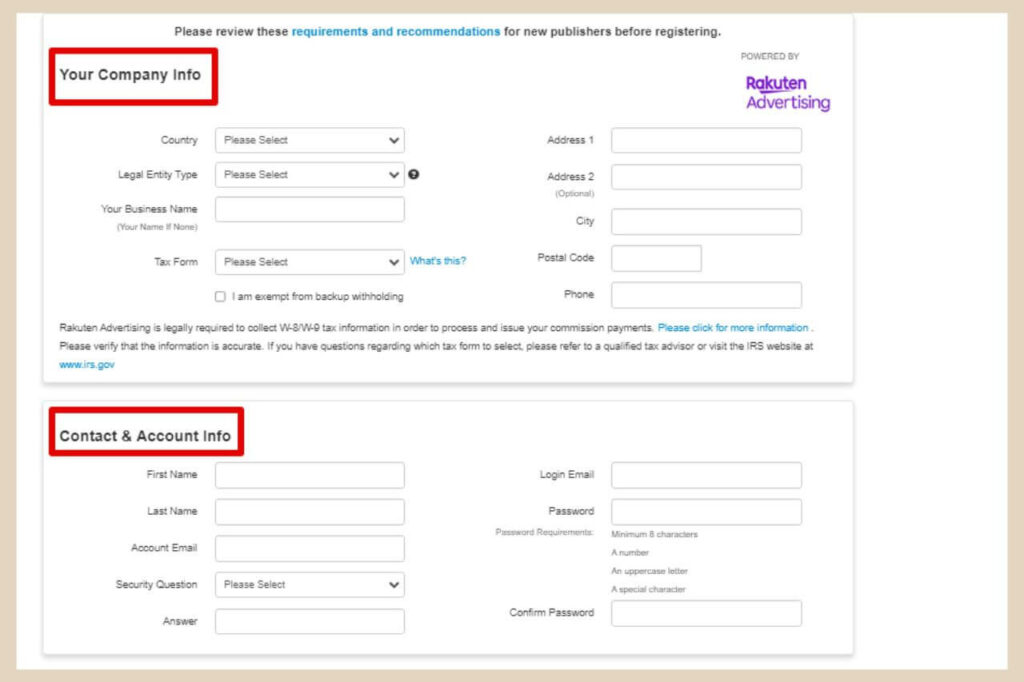
Next, you’ll need to fill in your contact details and some account info like your chosen password to keep your Rakuten account secure.
Adding Your Website Details
In the next section, you’ll need to provide some information about your website. This will include things such as your website URL, a short description of what your website is about and a rough idea of your monthly visitors and page views.
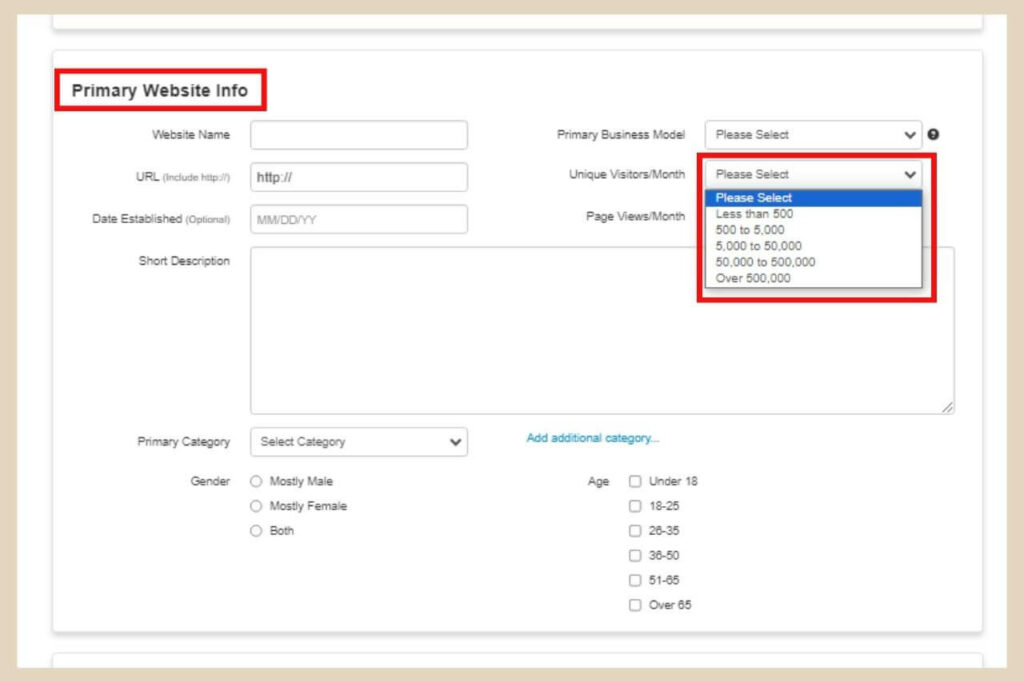
Don’t freak out too much about the monthly numbers here because it’s a dropdown menu with options such as “Under 500” and then “500 to 5000” with the next one being “5000 to 50000” so there’s a pretty big window with the numbers.
In the last section, you’ll need to specify a minimum threshold (the minimum amount you need to earn before you get a payout).
50 is the lowest you can choose and that’s already in there by default but you can change it to a higher amount if you wish.
You’ll also need to choose your Language Preference and Email Subscriptions then finally at the very end of the application, you’ll see the Membership Agreement.
So, take a moment to read and understand the terms of services and agreement and once you’re happy, click the checkboxes at the bottom of the application.
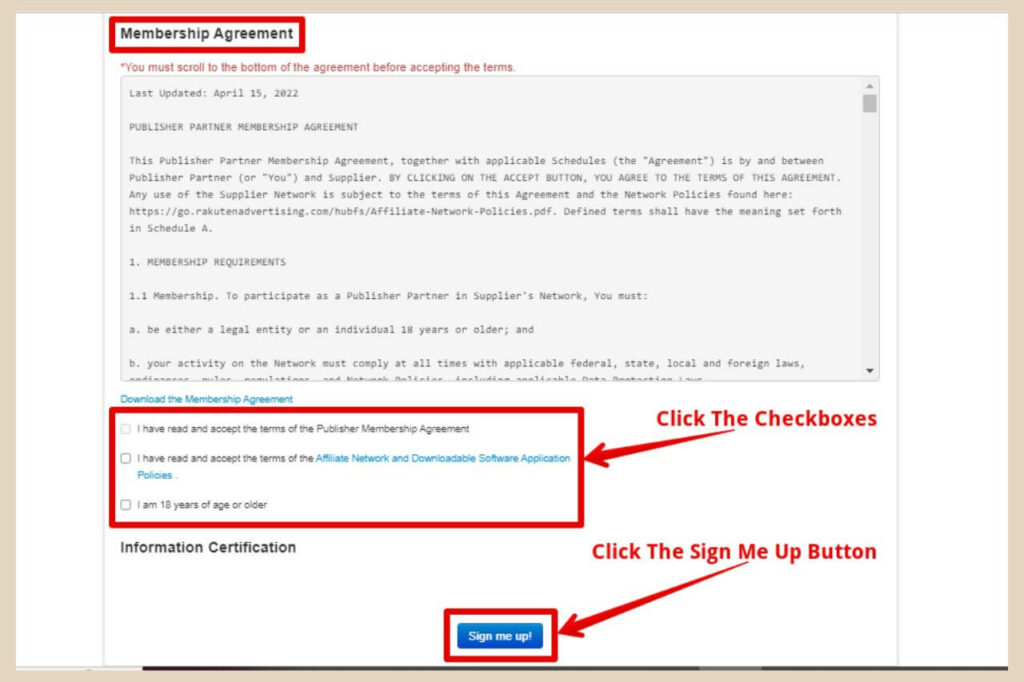
Now, once you’re happy that all the details are correct, you can go ahead and click the Sign Me Up button to finish and just like that, you’ve officially joined the ranks of the Rakuten Affiliate Network – welcome to the family!
Waiting For Approval
Now, before you go charging ahead, Rakuten will review your application first to ensure that it aligns with their program policies.
Fear not though, this is a standard process to maintain a high-quality network and it shouldn’t take more than a few days. Once you do get the green light, you’ll be granted access to your shiny new Rakuten affiliate account.
And there you have it, registering for the Rakuten Affiliate Network made easy-peasy! Now that your account is created and approved, it’s now time to have a look around the dashboard.
Navigating the Rakuten Affiliate Network Dashboard
Welcome to the nerve centre of your Rakuten journey – the mighty Rakuten Affiliate Network Dashboard.
The dashboard’s homepage is your mission control, presenting you with an overview of your affiliate performance. At a glance, you’ll see key performance metrics such as clicks, conversions, and commission earned.
Now before you get excited and start searching for merchants to partner with, your first step should be to complete your account profile and payment preferences. To do this, click on “My Account” from the main menu at the top of the dashboard.
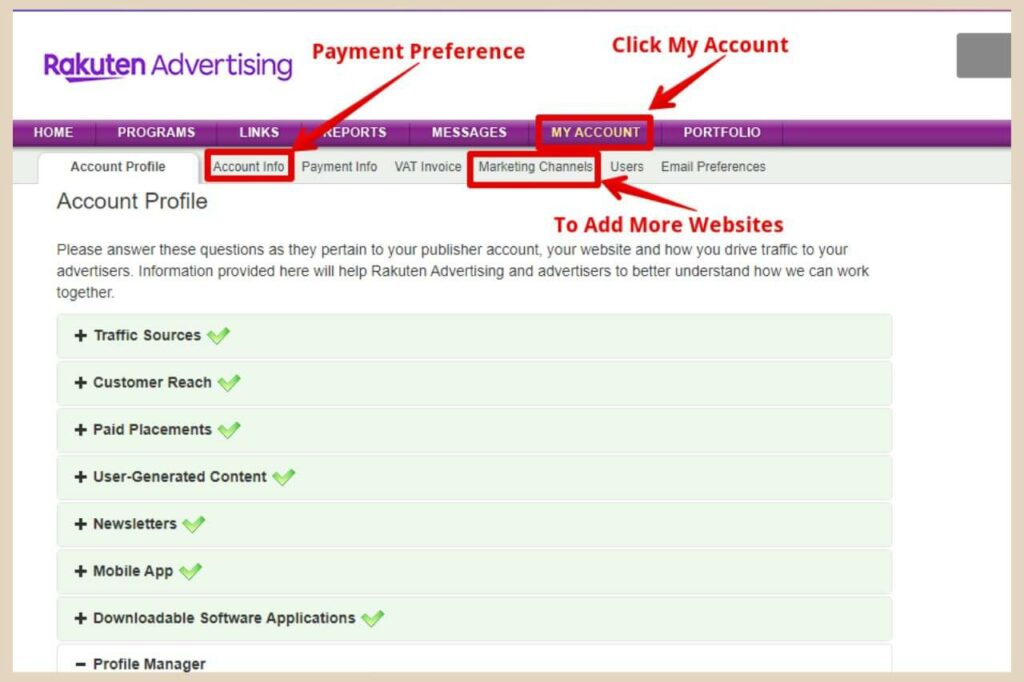
You’ll now see a few tabs here so take your time and work your way through these, filling out any information required.
For payment preferences, you’ll find that in the Account Info tab at the very bottom of that page under Payment Settings and you can click the Edit button to make changes.
If you have more than one website, then you can add any additional ones to your Rakuten account from the Marketing Channels tab.
On a side note, anything really important that needs to be completed (like tax info, payment preference, etc) will show up in a little area called “Things To Do” on the right-hand side of your home page dashboard.
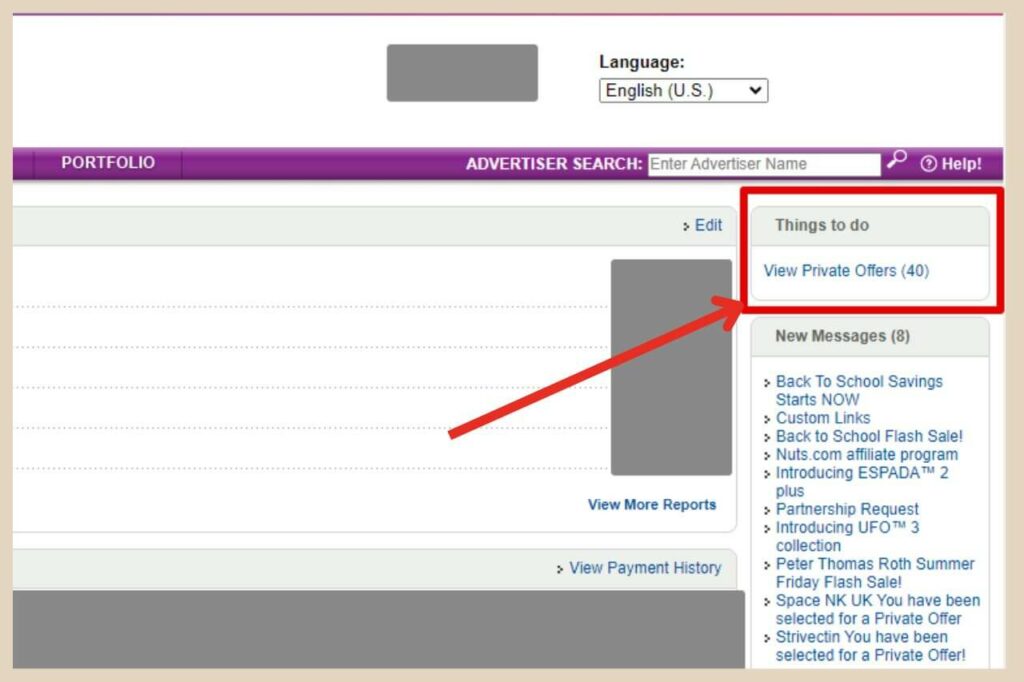
As you complete these tasks, they’ll disappear from the “Things To Do” area so you’ll never miss anything important that needs your attention.
Now that you’ve completed the account setup, it’s time to start searching for merchants that you can partner with.
Searching For Merchant Programs
There are a few ways that you search for merchants on the Rakuten Affiliate Network. You can use the search box on the top right-hand side of the page and type in the company/brand name to see if they’re on the network.
Alternatively, you can click/hover over Programs in the main menu at the top of the dashboard.
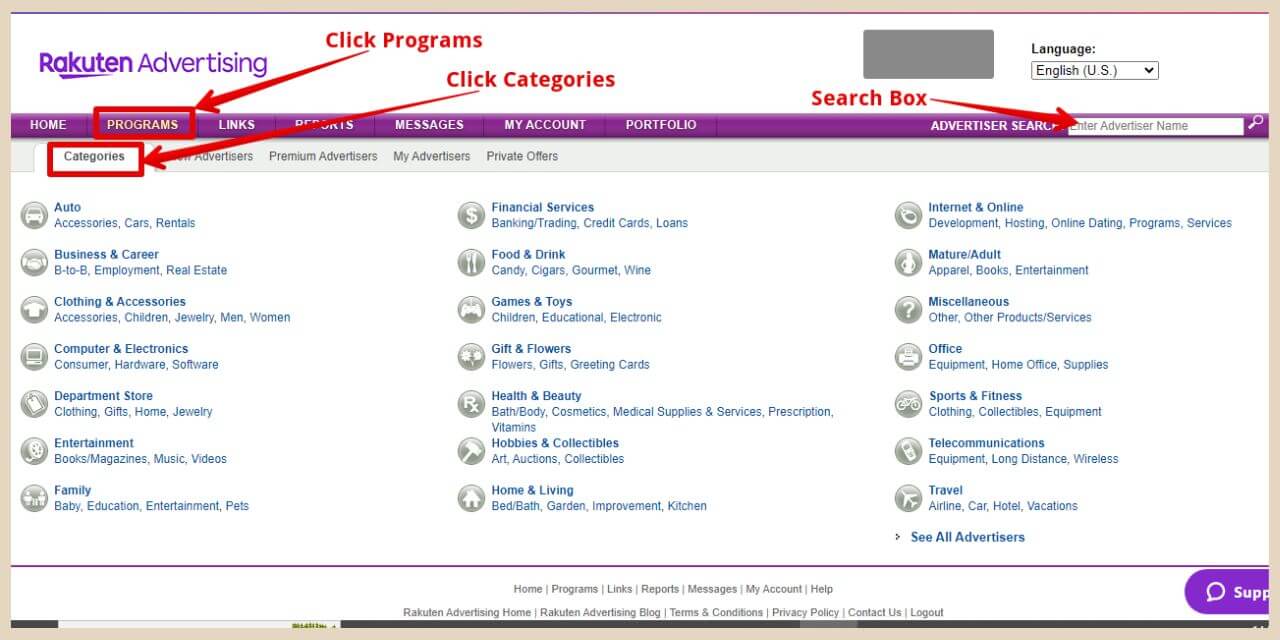
When you use the Programs menu, you’ll have a few different ways to search for merchants. The easiest way is to use the Categories option because this way, you can select a category that matches your niche.
Once you’ve selected a category, you’ll be taken to a page that contains a list of all the advertisers within that category but brace yourself because you’ll probably find several hundred that you’ll need to scroll through.
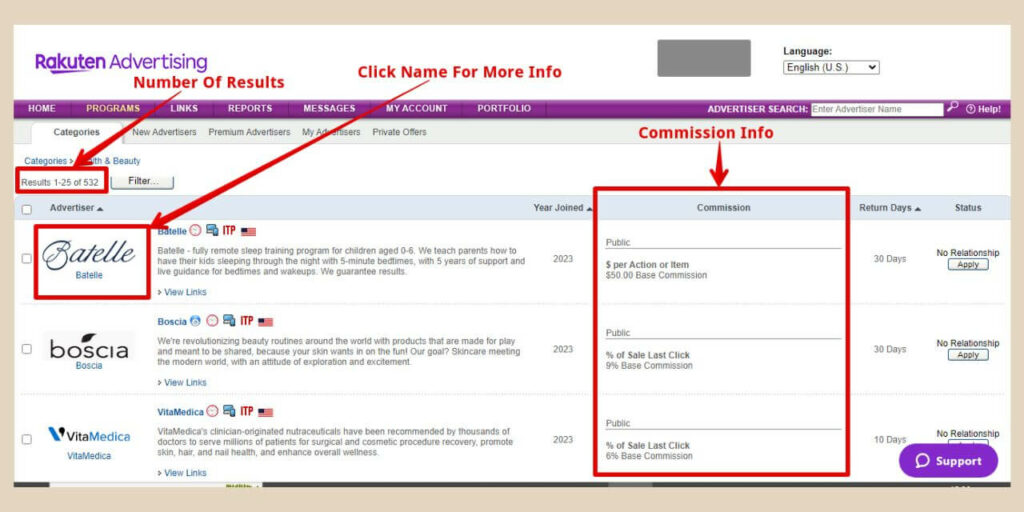
You’ll also notice a little area here where it gives you a brief look at the advertiser’s commission structure but if you’d like more information about each advertiser, ie, cookie window, etc, click on the advertiser’s name.
This will open up a new page that will give you full details of the advertiser’s program.
Joining Merchant Programs
Once you’ve found a program that you’d like to join, click the Apply button to the far right of the advertiser’s name.
A small window will now appear where you’ll be asked to accept the advertiser’s terms and conditions so click the checkbox to agree and then the OK button to confirm.
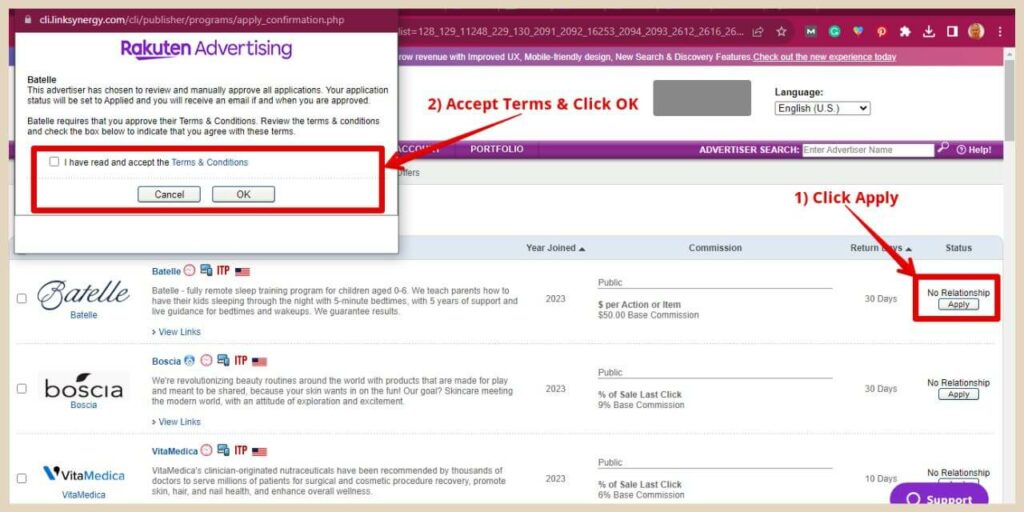
Now, here’s the biggest thing when it comes to affiliate networks. Even though you’ve been accepted into the Rakuten network, you still need to apply individually to all the affiliate programs within it.
Some of these advertisers will accept you into their program immediately but most will want to review your application first and this usually means reviewing your site, content, traffic levels, etc depending on the prerequisites of the particular program in question.
In fact, some advertisers will have prerequisites set up automatically at the apply stage so if you get an instant “Declined” then this means that your site doesn’t meet the requirements (either yet or not at all – more on that in a moment) to even apply for the program.
While most other advertisers will accept or decline your application within a matter of days, some are very slow with the process so your patience muscles may get a little stretched here but don’t fret, just move forward with your approved programs in the meantime.
Temporary Declined Or Permanently Declined?
If you do get declined, it will be in one of two ways. It will be either Declined (temp) which means it’s a temporary decline and you can reapply after 15 days or it will be a Declined which means it’s a permanent decline and you can’t reapply.
To see the status of all your programs, click on Programs from the main menu and then click My Advertisers.
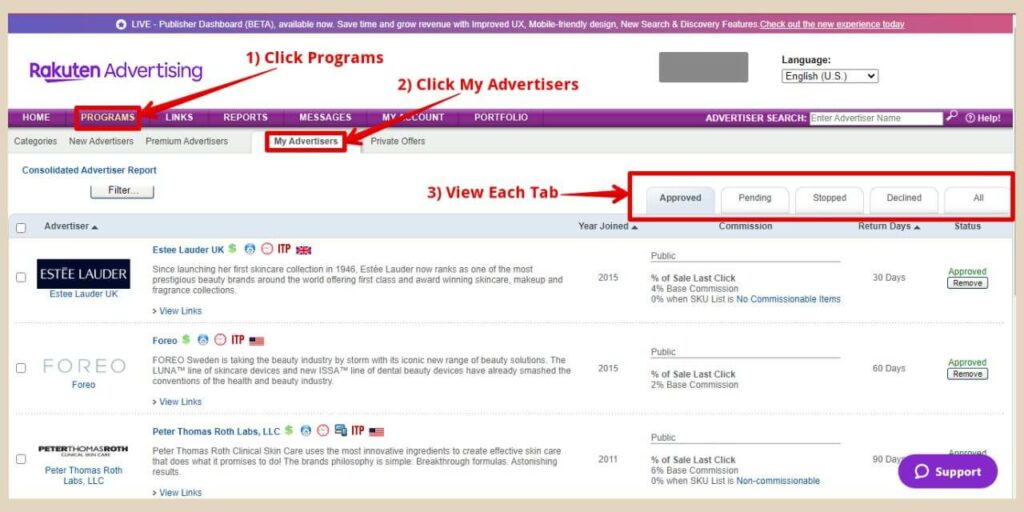
From here, you’ll be able to see a selection of tabs including Approved, Pending and Declined so you can click on each tab to see the application status of all the programs you’ve applied for.
Creating Links And Banners On The Rakuten Dashboard
Now, let’s talk about the heart of the Rakuten Affiliate Network Dashboard – your affiliate links! This is where the magic happens, and this is where you’ll probably be spending most of your time.
There are several ways to find your advertiser’s links but the easiest way by far is by heading to the Approved section of the My Advertiser area from the Programs menu option.
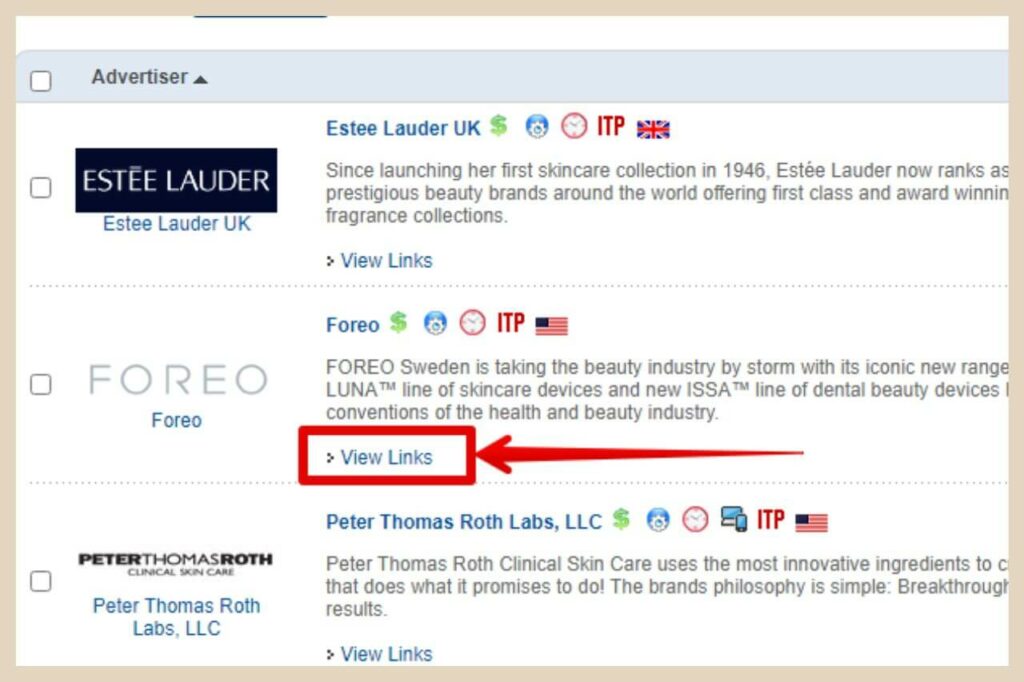
From here, click View Links for the advertiser you’d like to use and this will take you to a new page where you’ll find a selection of numbers representing the amount of different link types available for that particular advertiser.
Not all advertisers will have the same type or amount of links but you should see either Text/Email links, Product Links, Banner/Images links or a selection of all three.
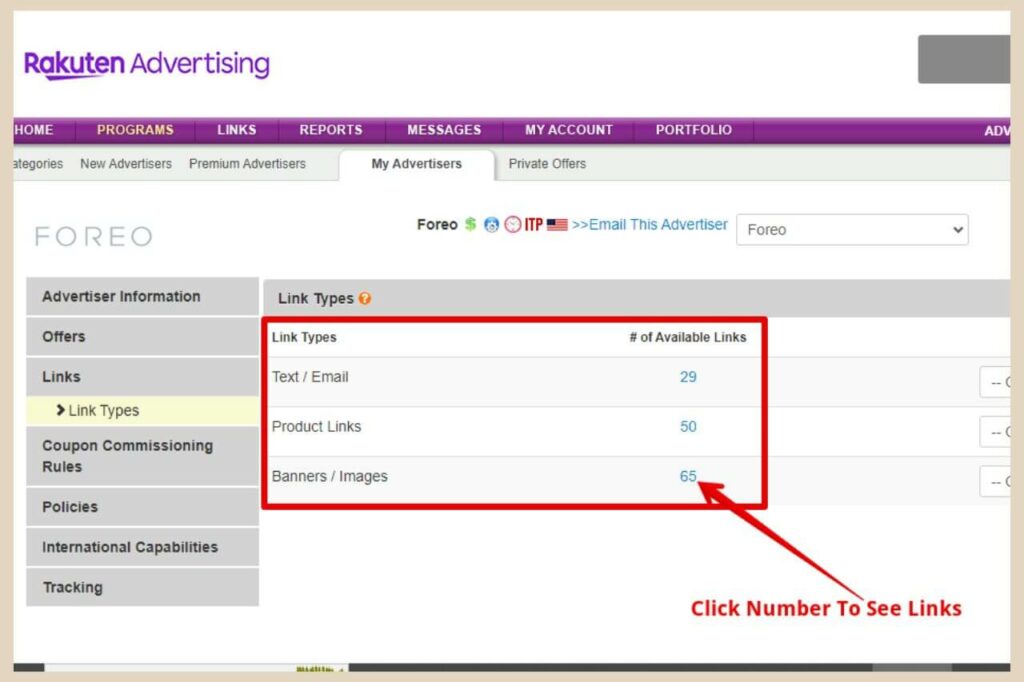
To see the actual links, click on the number next to the type you’d like to view and you’ll be taken to another page where you’ll now be able to see the actual links listed.
In this particular case for this tutorial, I’ve chosen to look at Banners/Images.
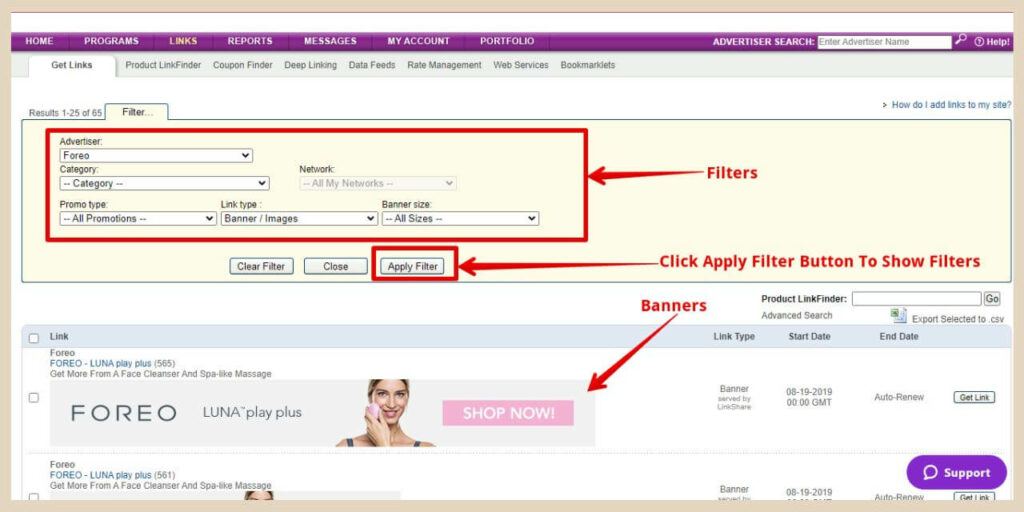
On this page, you can also use the dropdown menus at the top of the page to apply filters to the results or to change the type of links or the advertiser you’re viewing.
You can also change the sizes if you’re viewing banners. Just make sure you click the Apply Filter button for the filters to take effect.
Getting Your Link Code
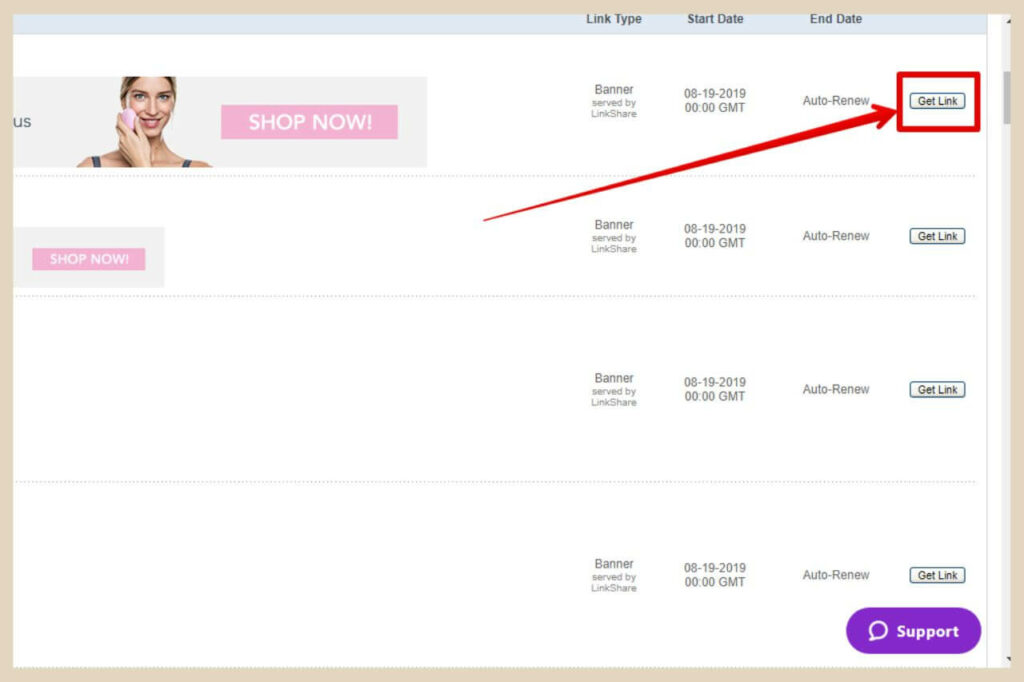
Once you’ve found a link that you’d like to use, click the Get Link button to the far right of the link preview and this will open up a brand new page containing your link code.
At the top of the link page, you’ll see your link code and there’ll be a small summary about the link beneath it.
There’s also an “Open Link In A New Window” checkbox underneath the summary so click this checkbox if you’d like your link to open in a new tab.
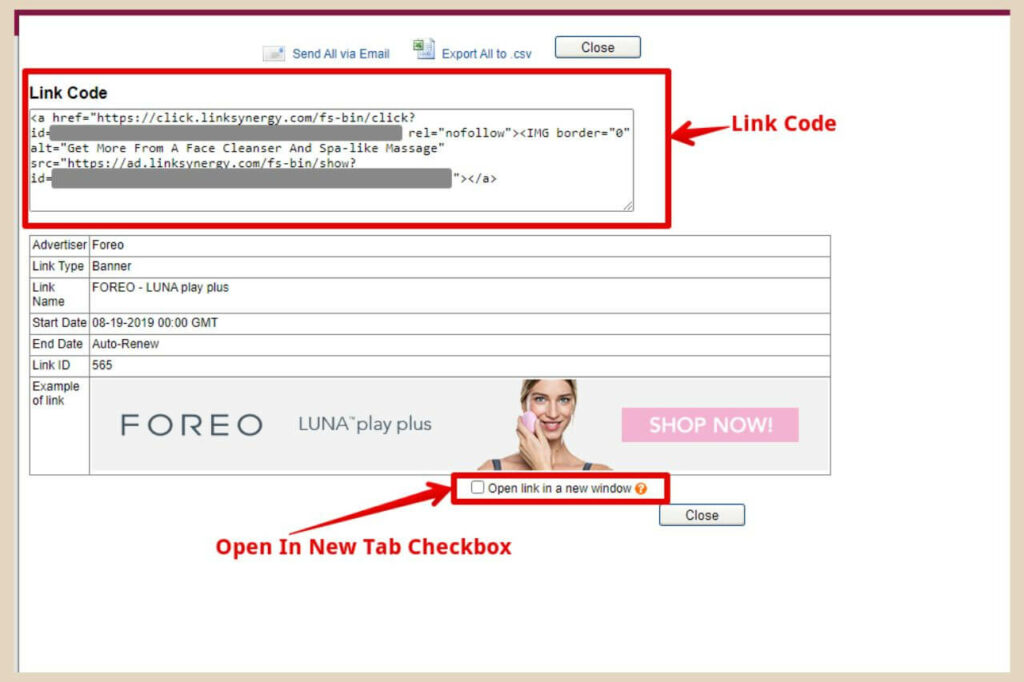
Now you can simply copy the link code at the top of the page and paste it into your site in the desired location.
If you’re new to affiliate marketing and you’re not sure how to add links to your site, here’s a complete tutorial on how to do that.
You can also check out this post, which is all about the training platform that thought me everything I know if you still need help navigating the affiliate marketing/website building world.
But what if you’re writing a review about a particular product and you want a direct link to that exact product page? Well, this is where deep linking comes in and I’ll show you how to do that next.
How To Use The Rakuten Deep Linking Tool
To create a deep link to a particular product page, you’ll need to use the deep linking tool which you’ll find in the main menu.
So, hover or click on Links in the main menu, then click Deep Linking from the dropdown menu (when hovering) or the Deep Linking tab (when clicked).
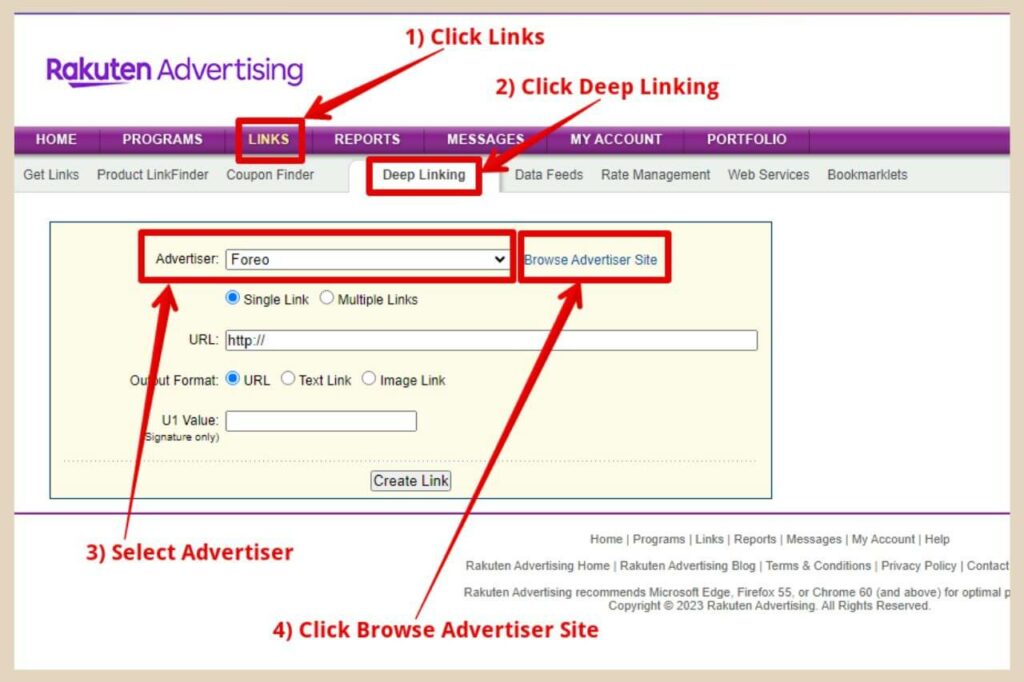
This will take you to a new page where your first step will be to select the advertiser you’d like to use.
Once you’ve selected the advertiser, click the Browse Advertiser Site button and this will take you to the advertiser’s site where you can now search for the product you’d like to link to.
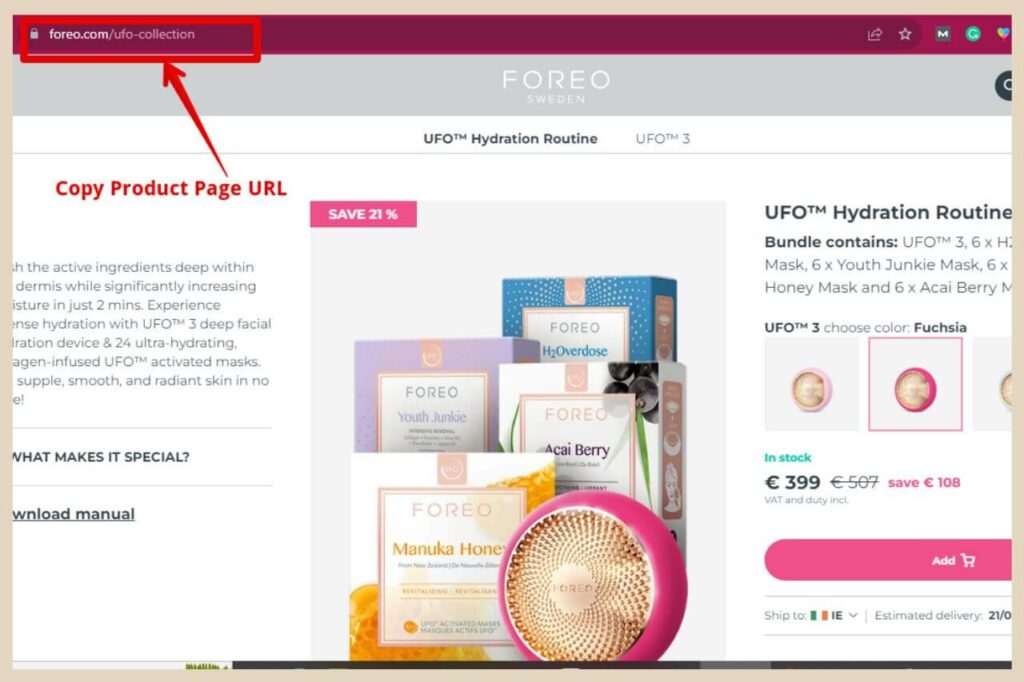
Once you’ve found the product on the advertiser’s site, copy the page URL from the address bar and paste it into the URL box in the deep linking area of your Rakuten dashboard.
Create Your Deep Link
Beneath the URL box, you’ll have some output format options but I find it much easier to leave the URL option selected here as the Output Format.
This way I can just add the link to whatever text or image I want in my site editor but you can use the other options to build the entire link if you’d like.
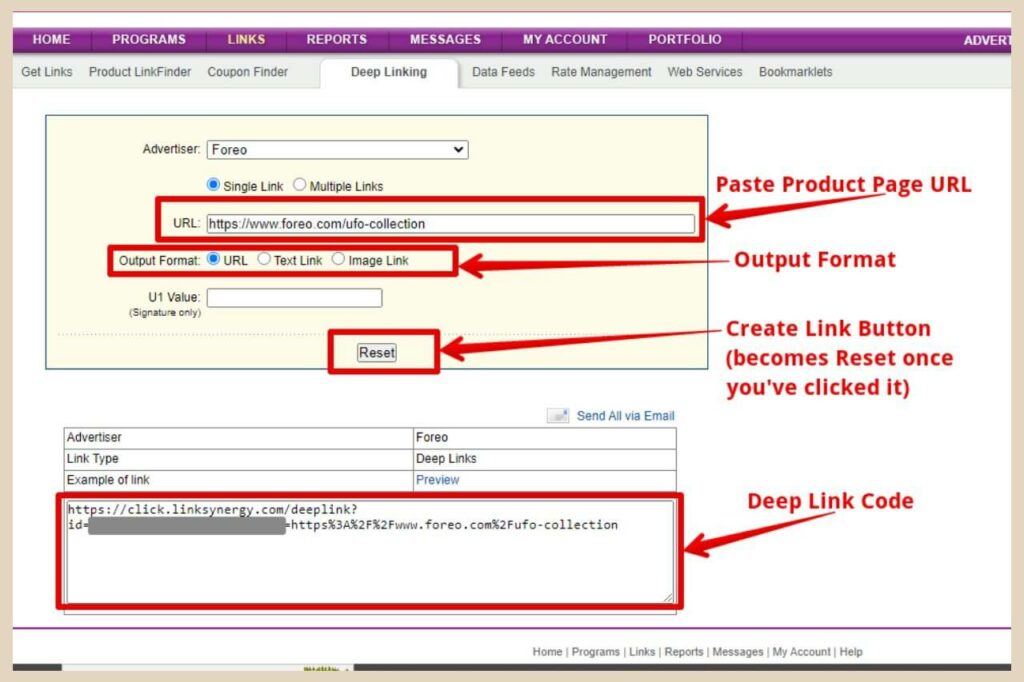
Once you’re ready, click the Create Link button and your link code will appear in a box underneath. Now you can simply copy the link code and paste it in the desired location on your site as you would any other link and that’s all there is to it.
You can now take those affiliate links and sprinkle them into your blog posts, social media, and email campaigns like a seasoned pro.
As your promotions take flight, keep a close eye on performance metrics through Rakuten’s dashboard. On the main homepage dashboard, you’ll be able to see an overview of your clicks, conversions, and earnings to fine-tune your strategies.
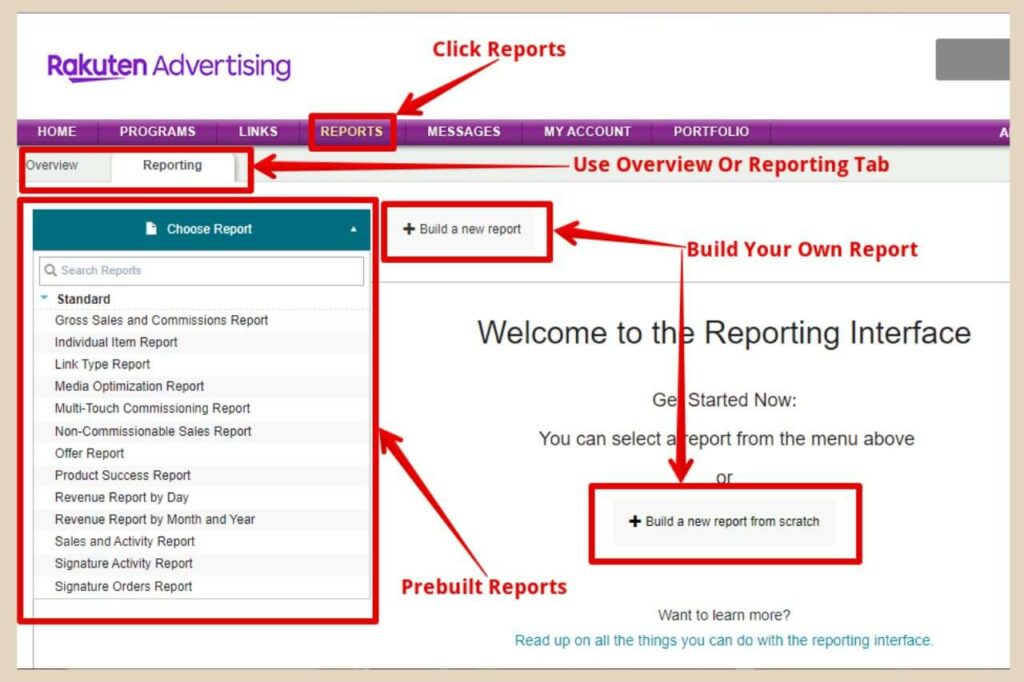
If you want to dig even deeper into your data, you can click Reports on the main menu and click the Reporting tab.
From here, you can view a selection of prebuilt reports or even build your own report to analyse your own selection of data.
Let’s Get Our Rakuten Accounts Set Up
Joining the Rakuten Affiliate Network opens up a world of opportunities for online marketers seeking to expand their earning potential.
Joining affiliate networks such as Rakuten that have huge quantities of affiliate programs is a great way to expand your affiliate partnerships.
So why not get started with Rakuten Affiliate Network yourself and discover a lucrative path to monetising your online presence?
As always, I hope you’ve found this tutorial helpful but if you do get stuck on anything, please feel free to let me know in the comments below and I’ll be more than happy to help you out.
Happy Rakuten Joining!

You May Also Like
- How To Display Recent Posts With Thumbnails In WordPress
- How To Add An Affiliate Disclosure To Your Posts
- What Is Wealthy Affiliate – Everything You Need To Know


