Last Updated: May 30, 2023
Have you ever wondered how to add a table of contents in WordPress? You’ve probably seen them on many sites and they’re a pretty neat feature to show all your readers the important sections of your post at a glance.
They provide a link that will take your readers instantly to the sections of your post that they find the most interesting and this believe it or not can actually keep them on the page longer.
They’re also super easy to add and in this post, I’m going to show you step-by-step how to add them to your posts using either the free AIOSEO plugin or the free Easy Table of Contents plugin.
The Benefits Of Adding A Table Of Contents
There are several benefits to adding a table of contents to your post. The first one is that they improve your reader’s experience because your reader can see the breakdown of your content and instantly navigate to the sections they find the most important first.
A lot of readers will get bored and abandon a page if the content is really long and they can’t find the answer they’re looking for after several minutes of scrolling.
A table of contents is a great way to highlight the important sections of your content so that a reader will know instantly if they’re in the right place to find the answers they’re looking for.
They’re also good for search engines because they show them your important sections and this can help you show up in the search results for related keywords.

Search engines also sometimes use them to display rich snippets of your post in the search results, plus they give a nice organised look to your post too so that’s an added bonus.
How To Add A Table Of Contents
There are actually a few different ways to add a table of contents in WordPress and in this tutorial, I’m going to show you two ways to do it.
The first way is by using the AIOSEO plugin which comes with a built-in Table of Contents block. This way is handy if you’re already using AIOSEO as your SEO plugin because it means that you don’t need to add another plugin.
The second way is by using the Easy Table Of Contents plugin. Both ways will add a table of contents to your posts but one way is a lot more customisable than the other and I’ll go into that in more detail as I go through each method.
How To Add A TOC With The AIOSEO Plugin
This is actually going to be a very short section because there’s very little to do here to add this table of contents. There is a downside to this however because this table of contents is very basic and there are almost no customisation options available to change its appearance.
However, If you’re only looking for a very simple plain table of contents, then AIOSEO’s version should be more than adequate. For this method, I’ll assume that you’re already using the AIOSEO plugin.
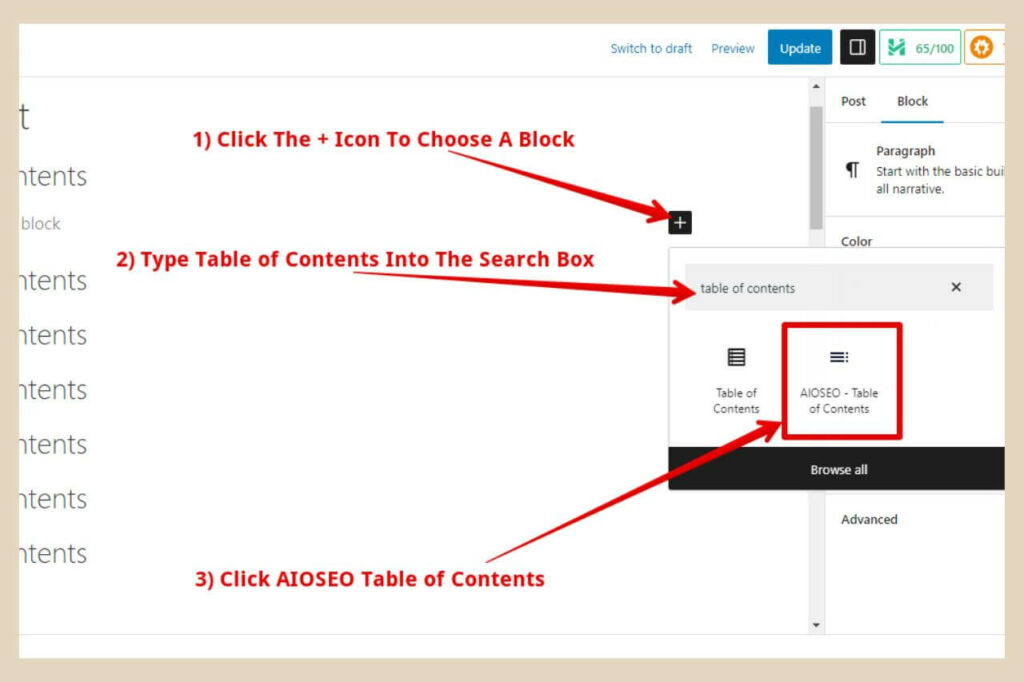
To add a table of contents, you’ll first need to be in the post that you’d like to add one to. Once you’ve decided where you’d like it to be inserted, place your cursor at the end of the section before it then hit the enter key on your keyboard to insert a new block.
Next, you’ll need to click the + icon to choose the type of block you’d like to add. When the small window appears, type “table of contents” into the search box and the AIOSEO Table of Contents block should come up. Simply click on it and it will be inserted into the post.
Customising Your AIOSEO Table Of Contents
From here, there isn’t really a whole lot you can do to customise it. You can reorder the headings, choose numbered or bullets for the list, change the heading names, change the heading links and you can choose to hide individual headings if you like.
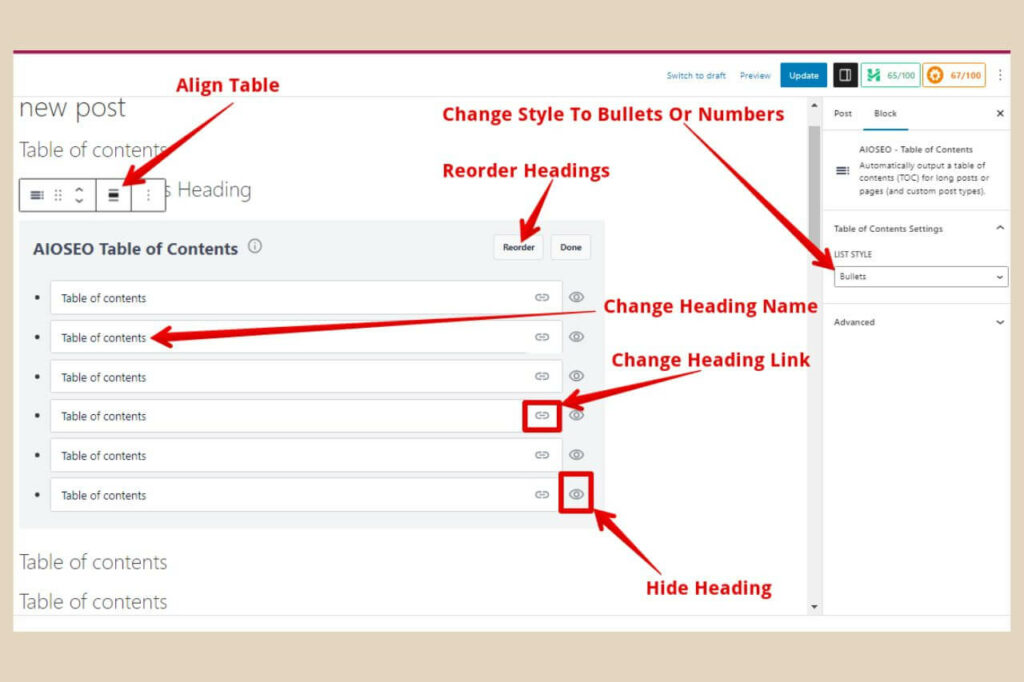
If you don’t see the block settings menu on the right-hand side of the page like my image above (for bullets and numbers), just click the button on the right-hand side next to the Publish/Update button to show the settings menu.
The only other customisation that you can make is the alignment of the table which you’ll find on the small block toolbar that appears whenever the block is selected.
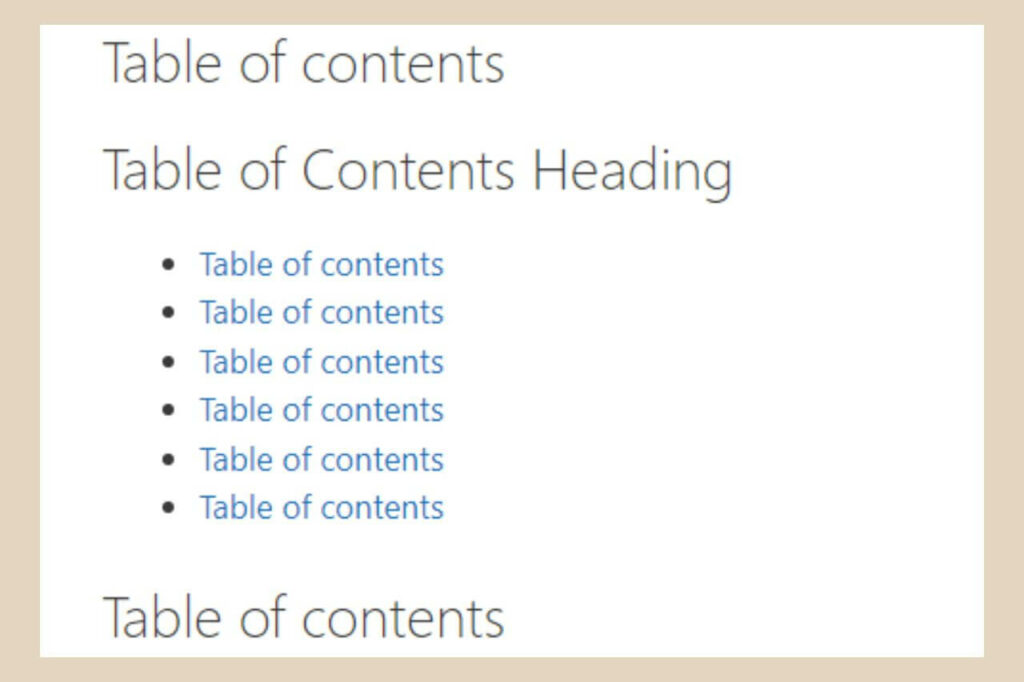
There’s also no table heading with this method so if you’d like to add one, you’ll need to insert a heading block above the table of contents to give it a title manually. The below image is how it looks on a live site.
One other downside is that there’s no automatic insertion with this method either so you’ll have to manually add one to each post on your site.
For a plain table of contents, this method works perfectly well but if you’re looking for something that you can really customise with coloured backgrounds, etc, then you may prefer the next method.
How To Add A TOC With The Easy Table Of Contents Plugin
The Easy Table of Contents plugin is actually the one I’m using here on this site and it’s by far my favourite one to use because I can change pretty much everything to my own liking.
To use this method, you’ll first need to install the plugin so hover over Plugins in the main WordPress menu on the left side of the page, then click Add New from the side menu that appears.
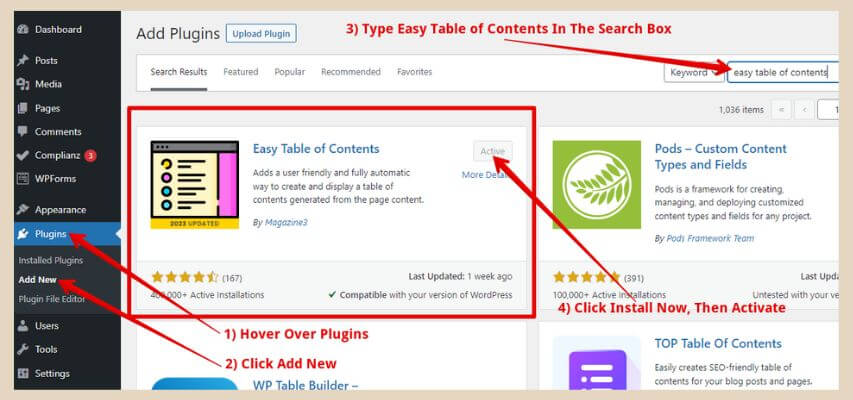
In the search box, type in Easy Table of Contents and when it shows up, click the Install Now button followed by the Activate button (the Install Now button will become the Activate button once the plugin is installed).
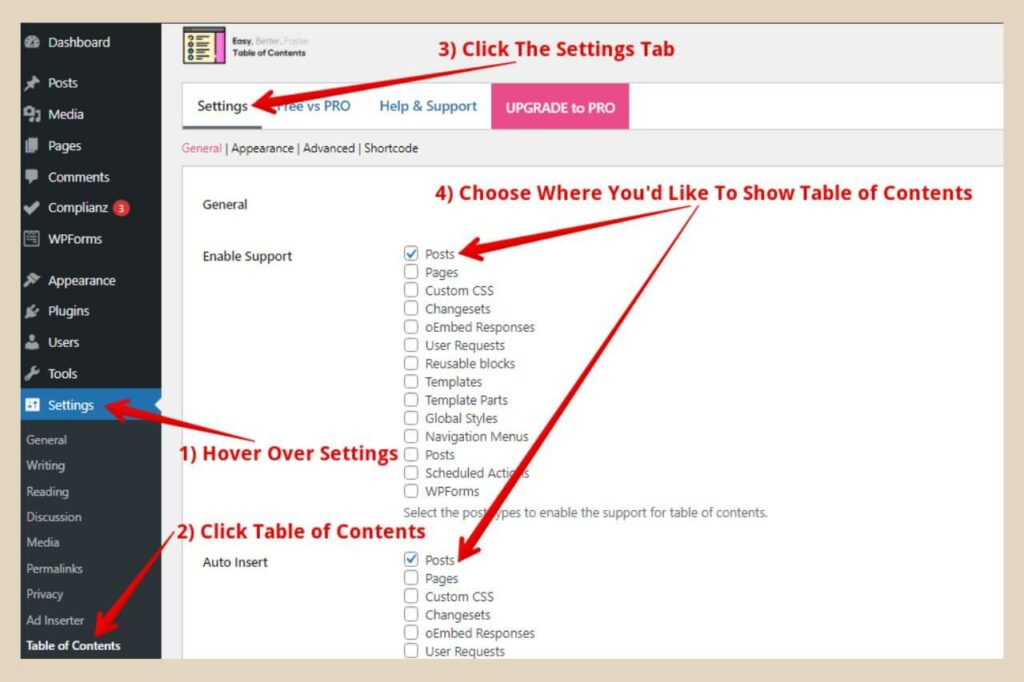
Once activated, hover over Settings in the main WordPress menu on the left-hand side of the page, then click Table of Contents from the side menu that appears and this will bring you to the plugin settings page. Next, click the Settings tab to start customising your table of contents.
Customising Your Easy Table Of Contents
The first section is the General section and the first thing you’ll need to decide is where you’d like your table of contents to show. To do this, use the checkboxes to make your selections in the Enable Support and Auto Insert sections.
If you’d rather manually insert your tables, leave all the boxes blank in the Auto Insert section and use the shortcode instead at the bottom of the page. I’ll show you how to do this in more detail further down.
On a side note, when you use the auto-insert method, much like when you set a featured image or automatically add social icons to your post, you won’t be able to see the table of contents in your WordPress editor but it will be there on your live site.
You also have the option to disable your automatic table of contents on individual posts. To do this, simply head to the post where you’d like to turn off the table.
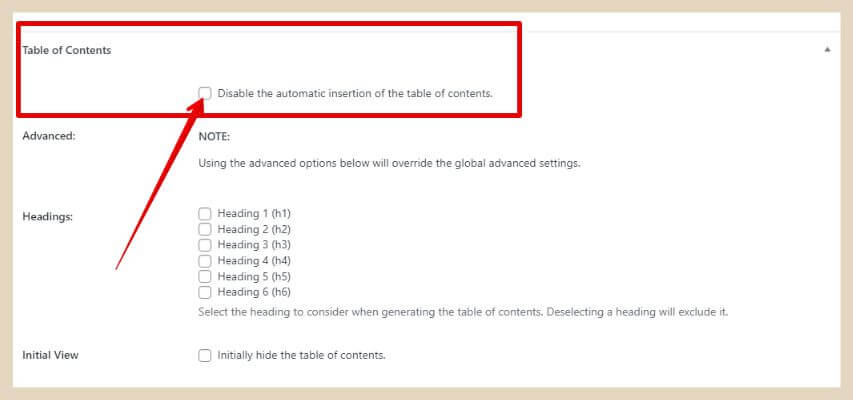
Scroll all the way down to the bottom of the WordPress editor until you see the table of contents section. From here, you can disable the table on just this post only by clicking the checkbox as per the image above.
However, do note that anything else you change here below this checkbox will change your global settings for your tables across your site.
The General Section
In the next few sections, there are quite a few things that you can customise so to make this a little easier, I’ve numbered each important setting in the image below and included a list beneath it with details of what each setting does.
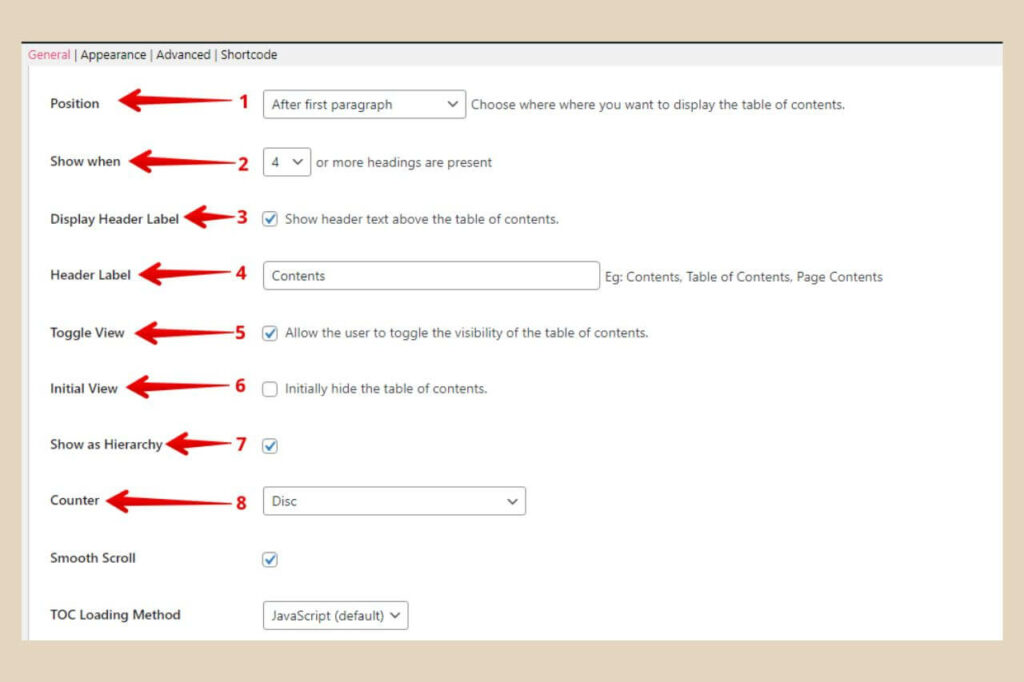
- Setting 1 – Choose where your table will be inserted on the page (top of post, before first heading, etc).
- Setting 2 – Choose how many headings your post needs before a table is automatically inserted.
- Setting 3 – Enable a header above your table of contents.
- Setting 4 – Choose a header name.
- Setting 5 – Allow a show/hide button so that your readers can collapse/expand the table of contents.
- Setting 6 – Have the table of contents hidden (collapsed) by default. (If you click the button on the top right-hand side of my table of contents, you’ll see how it looks when it’s collapsed).
- Setting 7 – If you use different-sized headings and enable hierarchy, your headings will indent further to the right with each smaller heading size used.
- Setting 8 – Choose how your headings will be listed in the table, ie, numbered, Roman numerals, arrows, dots, etc.
The next two settings are set to their defaults (Smooth Scroll and TOC Loading Method) so you can leave these as is.

advertisement
There’s also one more setting in this section that allows you to add a small tab to the side of your page that will reveal a smaller table of contents if your readers click on it. It’s disabled by default but if you click the box to enable it, a few more options will appear where you can customise it.
The Appearance Section
The next section is the appearance section and this is where you can change the background colour, text size, text colour, etc. As before, I’ve labelled each setting in the image below followed by a list of what each one does.
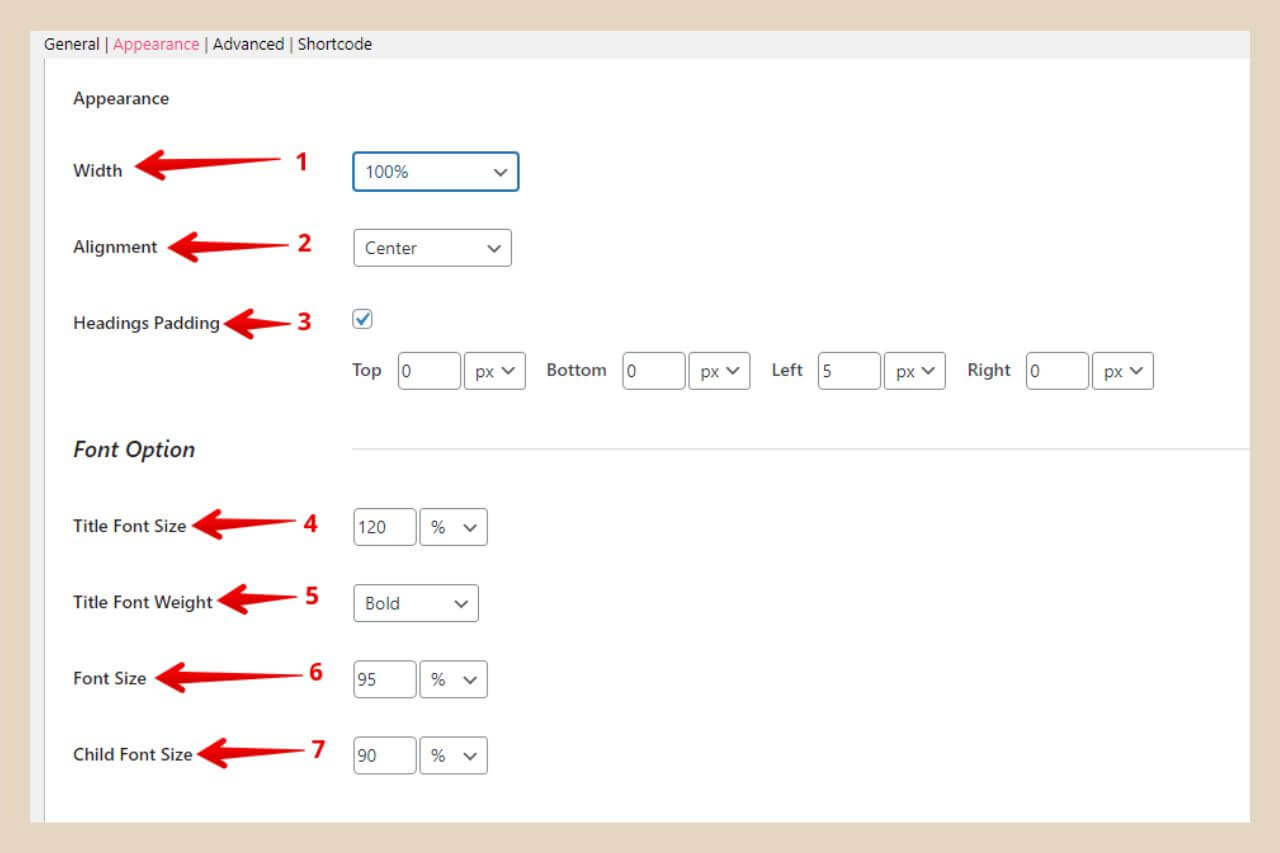
- Setting 1 – Choose the width of your table (100% will fill the full width of your content area).
- Setting 2 – Choose the table alignment.
- Setting 3 – The headings padding lets you make the space around your headings bigger.
- Setting 4 – Choose the size of your title.
- Setting 5 – Choose the weight of your title (normal, bold, etc).
- Setting 6 & 7 – Choose the size of your headings.
The next section is where you can change all the table’s colours. If you’d just like to change the overall basic colour scheme, you can use the regular options to change between the different preset colours.
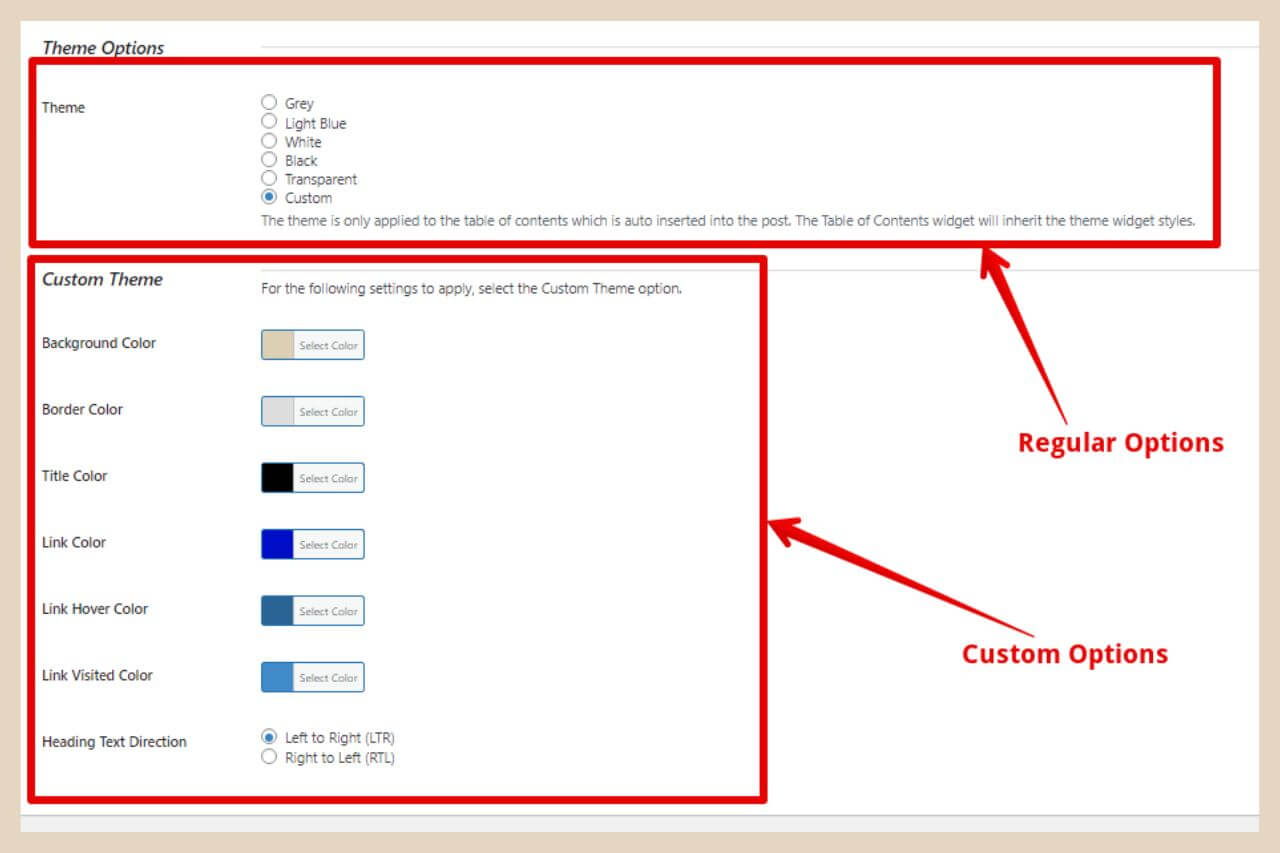
If you’d like to customise the entire table to your own liking, you can use the custom options to change different aspects of the table individually.
The Advanced Section
The next section is the advanced section and there isn’t really anything here that needs to be changed other than possibly the Headings section. If you’d like to disable certain sized headings from appearing in your table, then this is the section where you can control that.
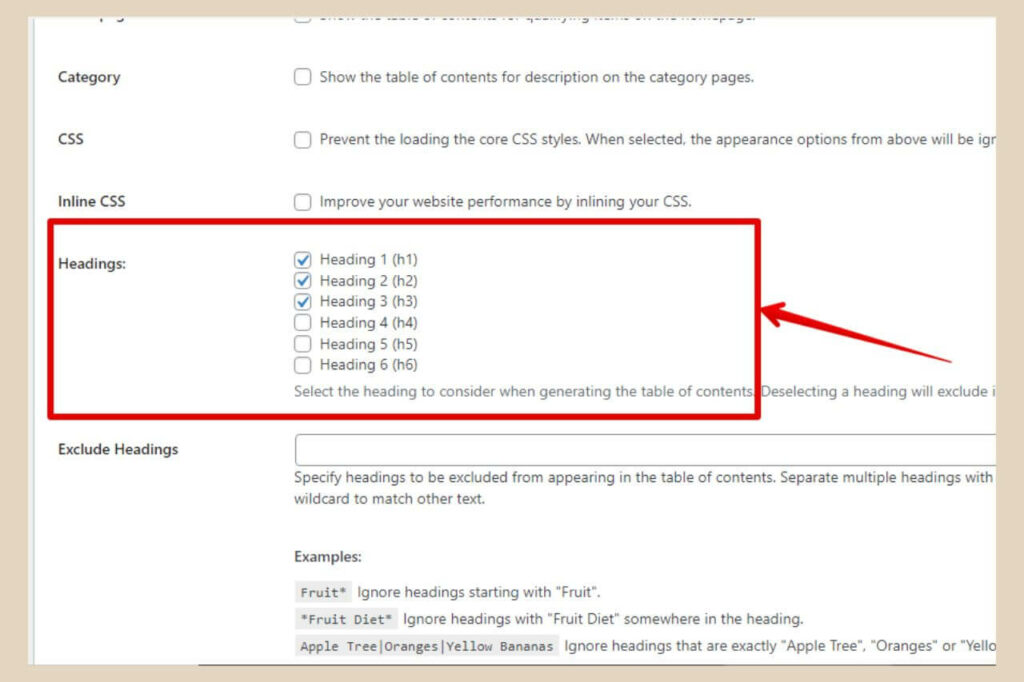
By default, all heading sizes are enabled but if you like to stop smaller headings from being added to the table, you can simply uncheck the checkboxes for the ones you’d like to exclude.
A good example of why you might want to do this is when you have a very long blog post that contains many headings. I have one post on this site that is over eight thousand words long and it contains many different heading tags from H2s to H5s.
As you can imagine, the table of contents on this post was astronomically huge, so much so that it took more than two full scrolls just to get past it.
To tidy up this issue, I excluded my H4s, H5s and H6s so that only my main important headings are shown in the table of contents which then keeps my tables smaller.
If your posts are relatively short, you can probably leave this section as is but if you need to, the option is there for you to omit heading sizes from your table of contents.
How To Manually Add Your TOC With The Easy Plugin
The last section is the Shortcode section and this is very handy if you don’t want to use the auto-insert feature and prefer to add your table of contents manually to each post.
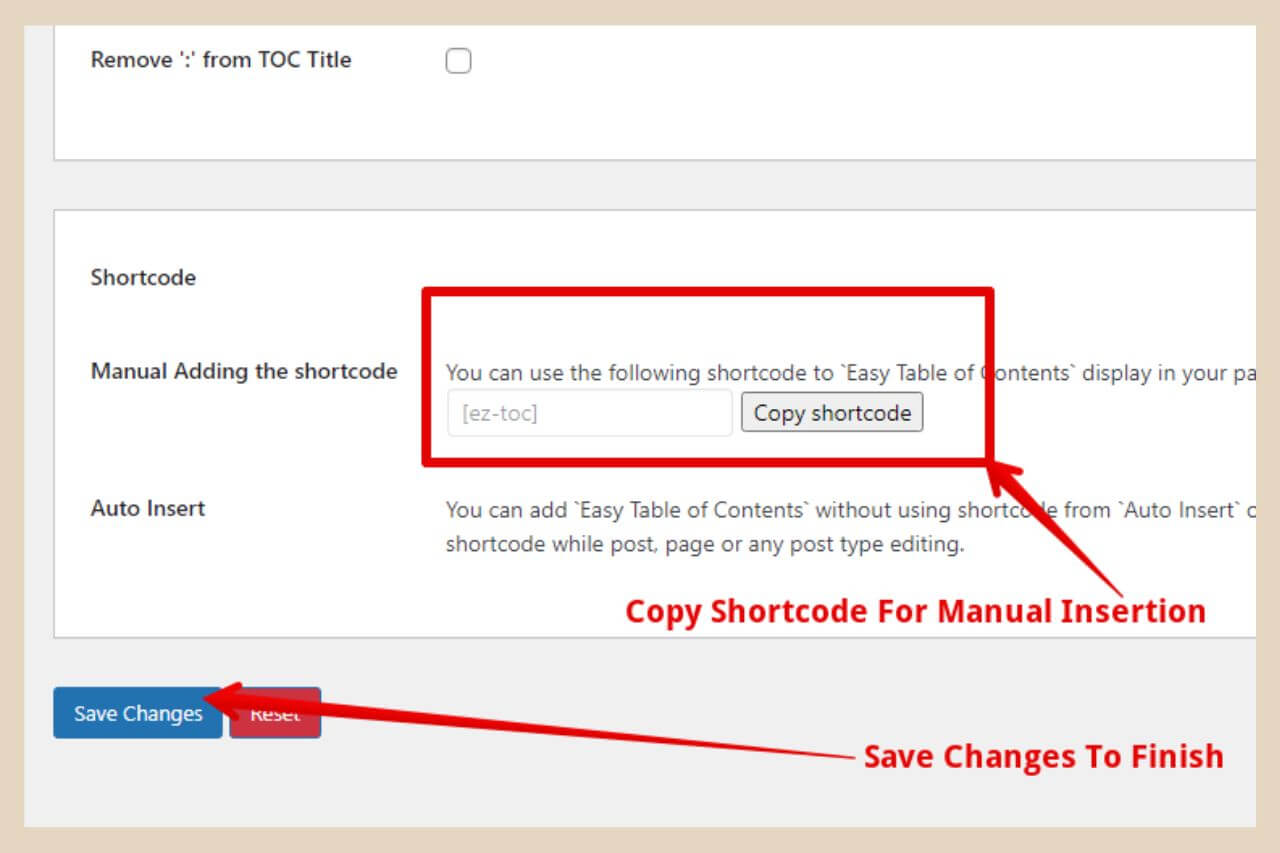
At this point though, as there are no more settings to change, you can now click the Save Changes button to save all your preferences.
To insert your table of contents manually, you’ll first need to copy the shortcode. Next, head to the post where you’d like to insert your table and insert a new block where you’d like to place it.
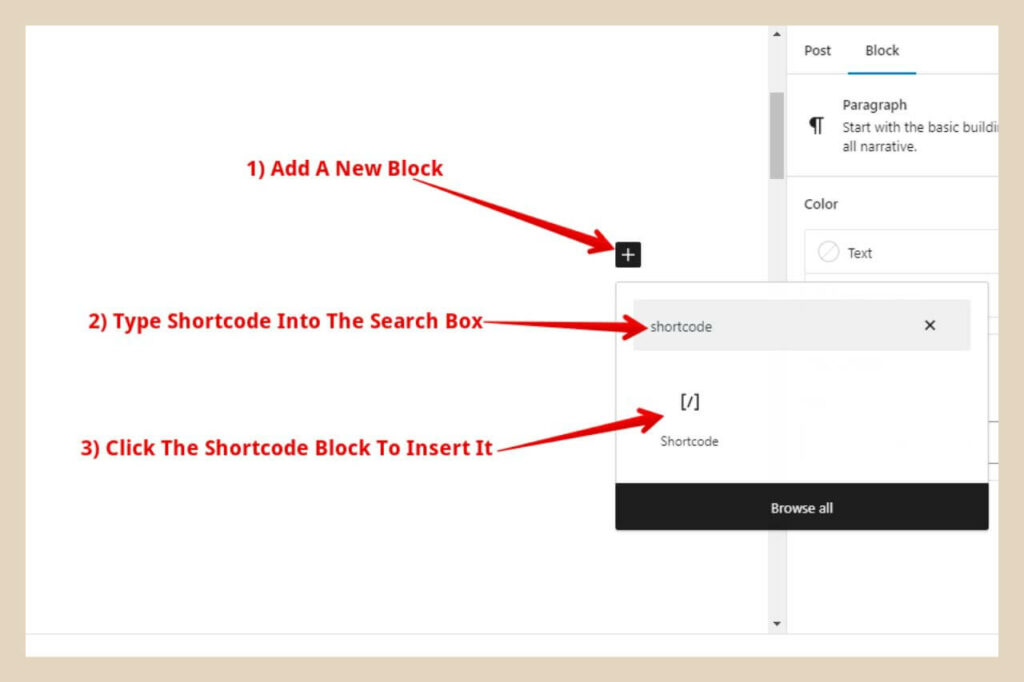
To insert shortcodes, you’ll need to use the Shortcode block so search for shortcode in the block search box then click on it to insert it once it comes up.
Once the block has been inserted, you can now paste the shortcode into it and your table of contents will be manually added.
Turn Your TOC Shortcode Block Into A Reusable Block
To save time in the future, you could now make this a reusable block so that you don’t have to keep copying the shortcode every time you want to add a table of contents.
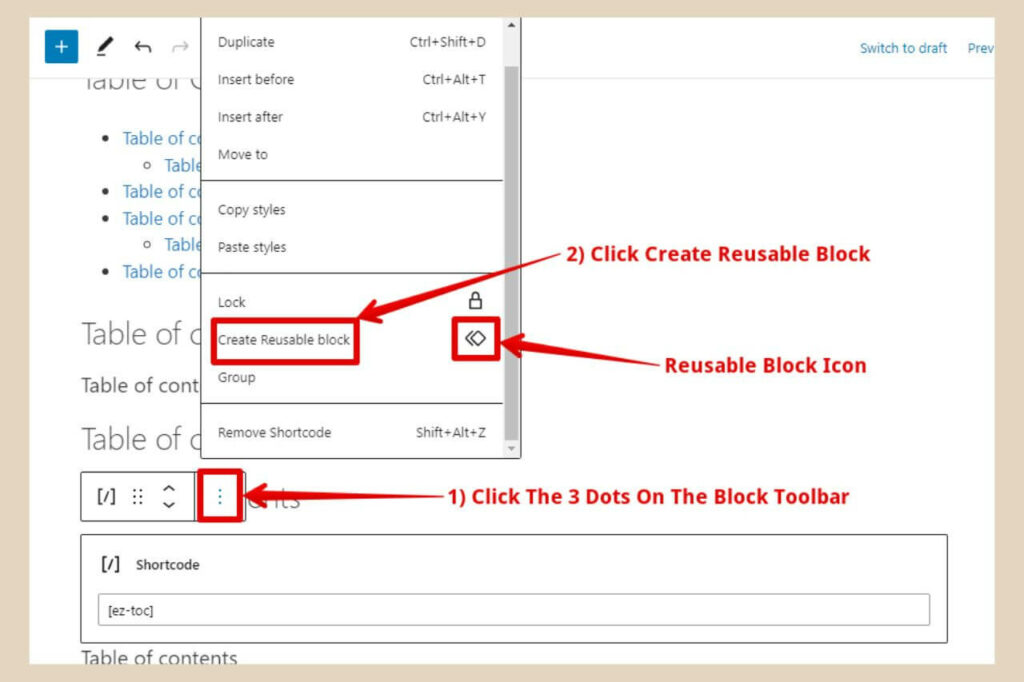
To do this, simply select the shortcode block, then click the 3 dots on the block toolbar that appears. A small menu will appear where you’ll need to scroll down until you see “Create Reusable Block”.
Click Create Reusable Block and a small window will appear where you can give this block a name. Click the Save button when you’re done and you can now search for this block by the name you’ve given it every time you want to add it.
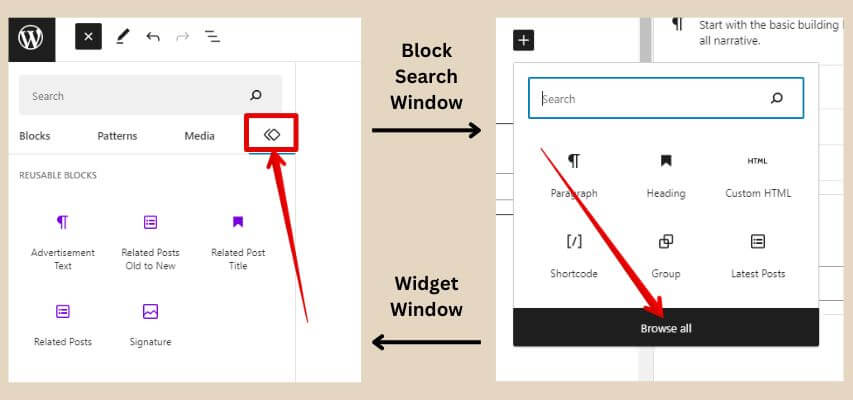
You can also find all your reusable blocks by clicking the Browse All button in the block search window, and then clicking the reusable block icon on the right-hand side of the widget window that appears.
Note: If you have auto-insert enabled and then manually insert a table of contents as well, the manual one will override the automatic one on that post so that there’s only ever one showing on each post.
Get Your Table Of Contents Added
Adding a table of contents is a great way to help improve your reader’s experience and let them jump to sections of your post with ease. If you don’t already have one, then they’re really worth considering to amp up your posts.
I hope you’ve found this tutorial helpful but if you get stuck on anything, please let me know in the comments below and I’ll do my best to help you out.
Happy TOC adding

You May Also Like
- How To Display Recent Posts With Thumbnails In WordPress

- How To Add An Affiliate Disclosure To Your Posts

- What Is Wealthy Affiliate – Everything You Need To Know