Put your hand up if you love playing around with Adobe design tools (me – hand firmly raised). Put your other hand up if you often find yourself screaming obscenities at your laptop because you can’t get a tool to do what you want it to (Adobe pen tool anyone?). Well, with that in mind, let’s learn how to use the clipping mask in Adobe Illustrator and kiss those mouse-throwing days goodbye (well, with the clipping mask at least).
I love using Adobe Illustrator for many of my blog designs because there’s just so much you can do with it to customise your designs, especially with tools like the clipping mask which are awesome for creating unique effects.
Now as much as the clipping mask doesn’t hold a candle to the likes of the pen tool on the frustrate-o-meter, it’s still irritating when it doesn’t work the way you planned. So let’s end that shall we and learn how to use the clipping mask like a pro.
What Does The Clipping Mask Do In Adobe Illustrator
The best way to describe a clipping mask would be to compare it to a frame. Imagine placing a shape or even text for that matter over the top of your design so that only the parts of the design that are within that shape or text are visible.

That is essentially what a clipping mask does. It removes everything that is on the outside of the mask and only shows whatever is inside of it.
It’s a very easy way to create uniquely cool designs but there are a few rules that you need to follow to get it to work for you the way it should.
Some Rules For Using The Clipping Mask
First things first, there are two parts to a clipping mask and they are the mask itself and then everything else within it.
The object or text that you’re using as the mask must be above all the other objects you want within it and you’ll want to check your layer panel to make sure of it.
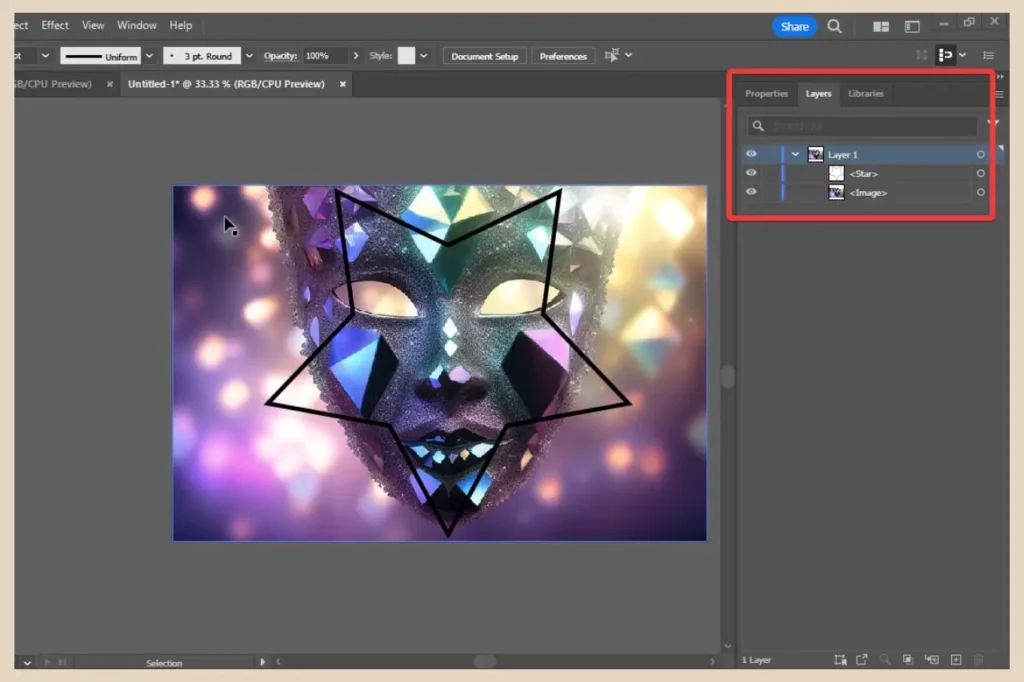
So, for example, if I wanted to place a star over the above image and create a clipping mask with it, the star layer would need to be above the image layer in the layer panel.
Only Use One Object/Path As The Mask (although, there is a workaround)
You can also only use one object/path as your mask and it has to be a vector graphic (shape, text, etc so not an image). You can’t use grouped objects as a mask either because grouping them together won’t make them one individual object/path so that won’t work.
There is, however, a workaround if you do want to use several objects as the mask such as a variety of shapes, for example. To do that, you’ll need to combine them all into a compound path first which can be easily done with a simple menu click and I’ll show you how to do that in a moment.
advertisement
As for what’s within the mask, you can have as many objects as you like and it doesn’t matter whether they’re grouped, if they’re images, text, shapes, etc. Pretty much anything goes for the objects within the mask.
Just make sure you select everything you want to include in the clipping mask by holding down the Shift or Ctrl key on your keyboard before clicking the Make Mask option.
I hope that makes sense so far but don’t worry if it doesn’t. I’m about to create a few different variations of this step-by-step with screenshots included so you’ll have this down to a fine art by the end of this post.
How To Use The Clipping Mask In Adobe Illustrator
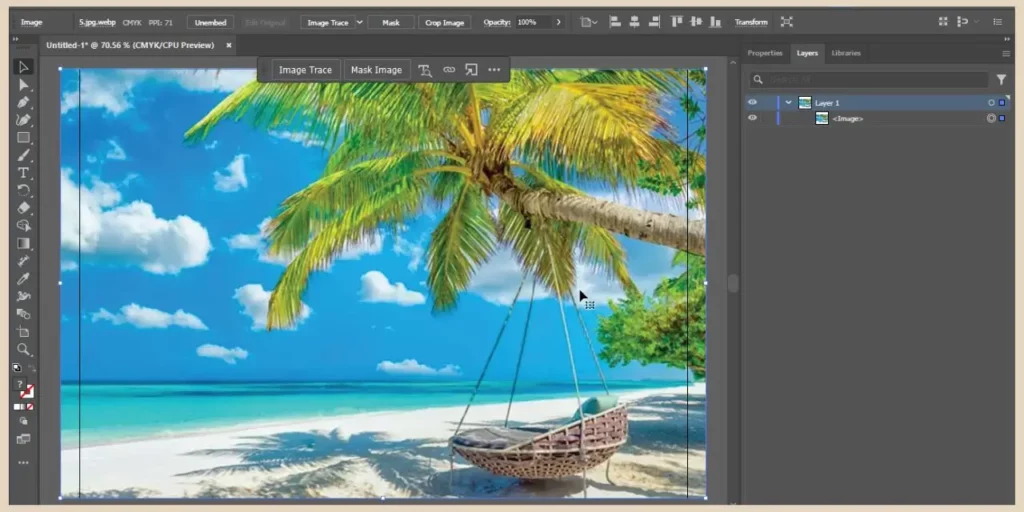
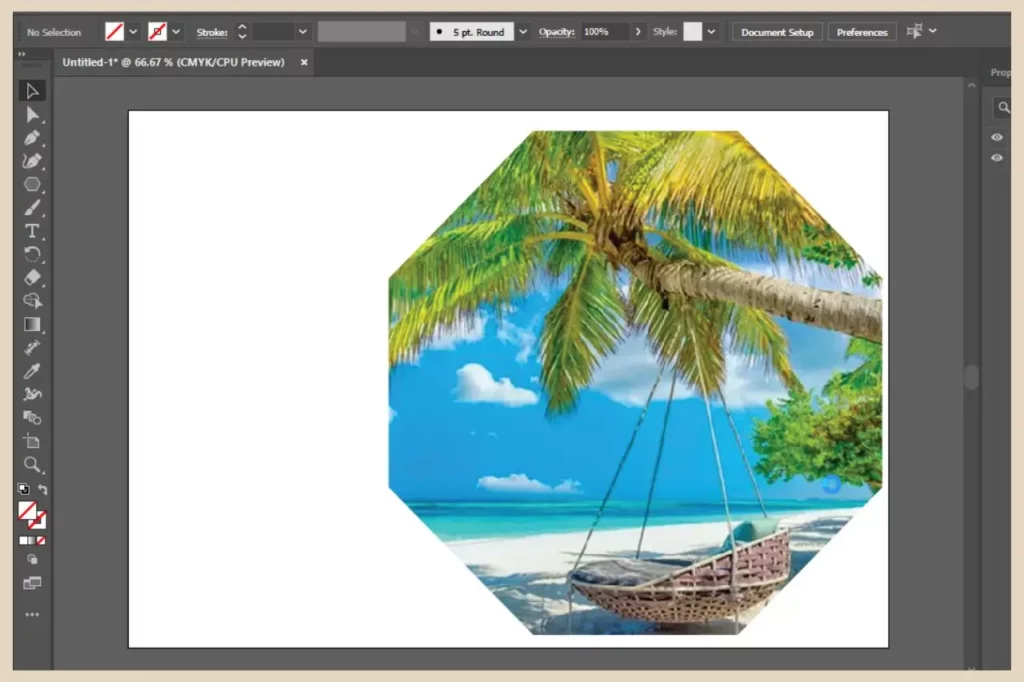
So let’s start with a simple two-object clipping mask. It’s a beautiful 23°C sunny day here on the west coast of Ireland (it’s a rarity here in the summer let alone this time of year in May) so I’m feeling kinda tropical. So for this, I’m going to start by placing an image of my favourite place in the world, the Dominican Republic.
The next step is to add a shape to the design so on this occasion, I’m going to add a large polygon. As this is the most recent item I’ve added, it’s automatically at the top above the image so I don’t need to move any layers around here.
If you do need to move your layers around, you can simply click and drag on them to change their position (remember, the mask object needs to be above everything else you want within the clipping mask).
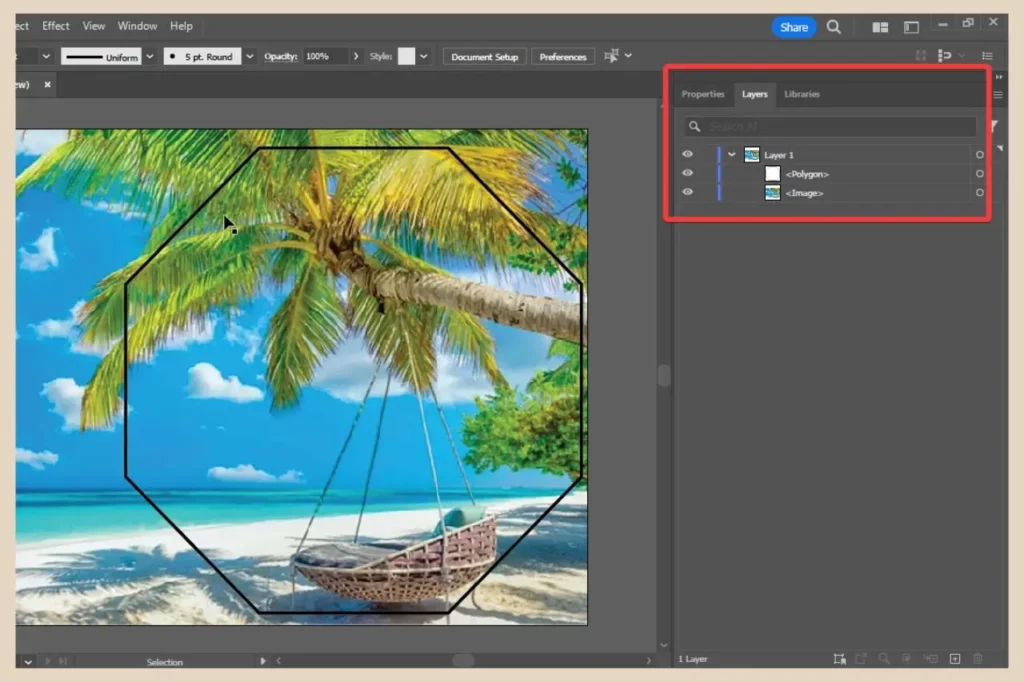
By the way, the object you’re using as the mask will lose its fill and stroke (border) colour once you’ve made the clipping mask so don’t worry about those things too much here.
Making The Clipping Mask
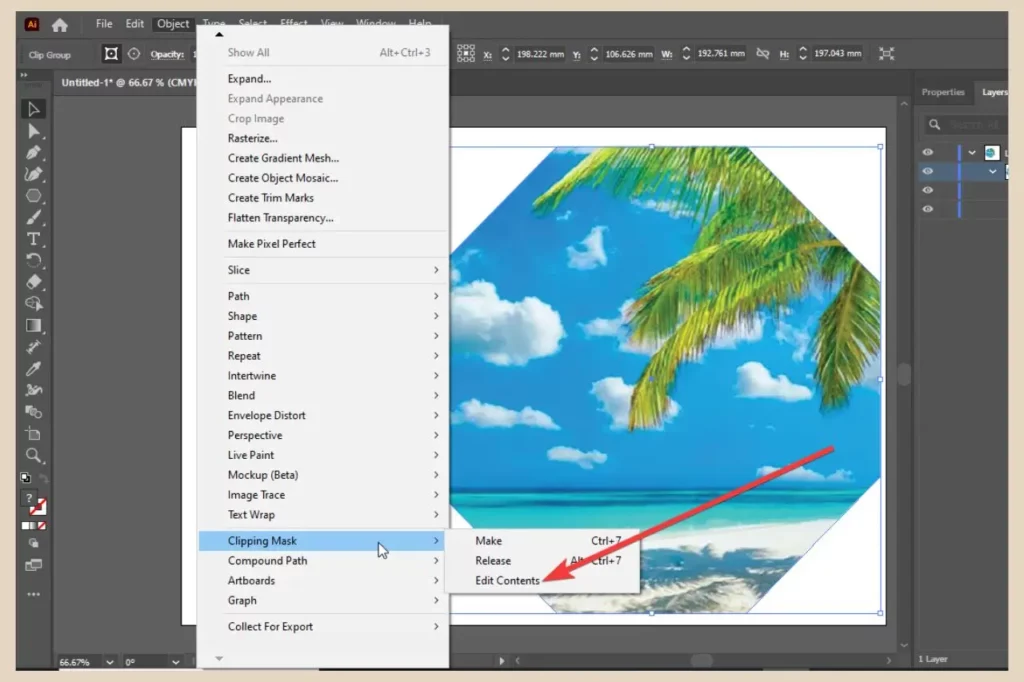
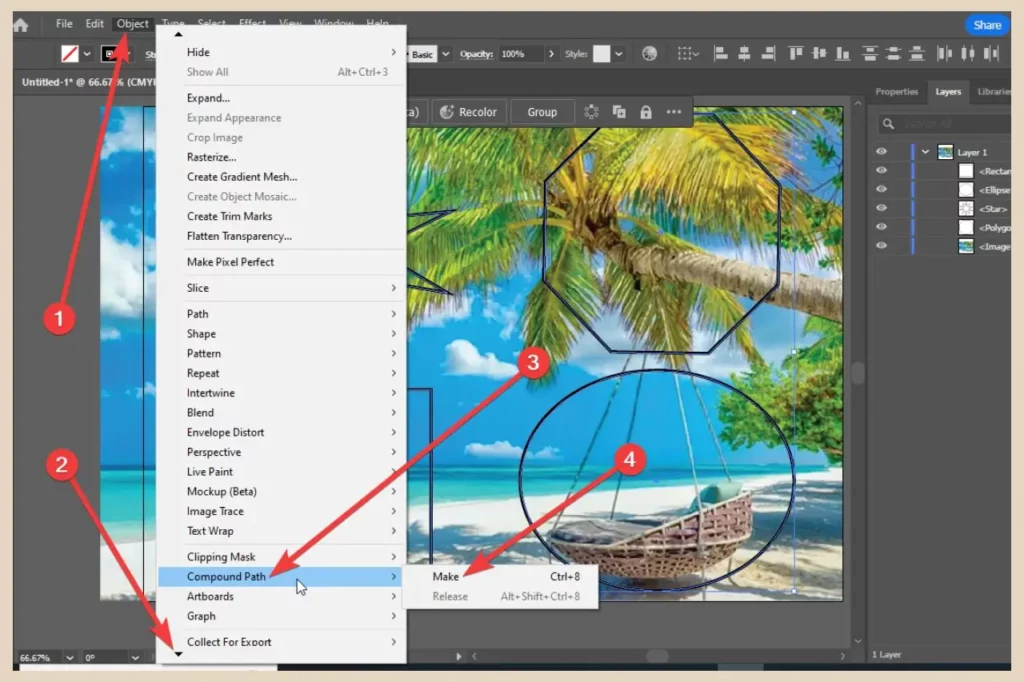
Seeing as everything is where it needs to be, you can now move on to the final step which is making the Clipping Mask. To do that, you’ll need to select all the objects you want to use (in my case, I’ll need to select both the image and the polygon) and then click the Object menu.
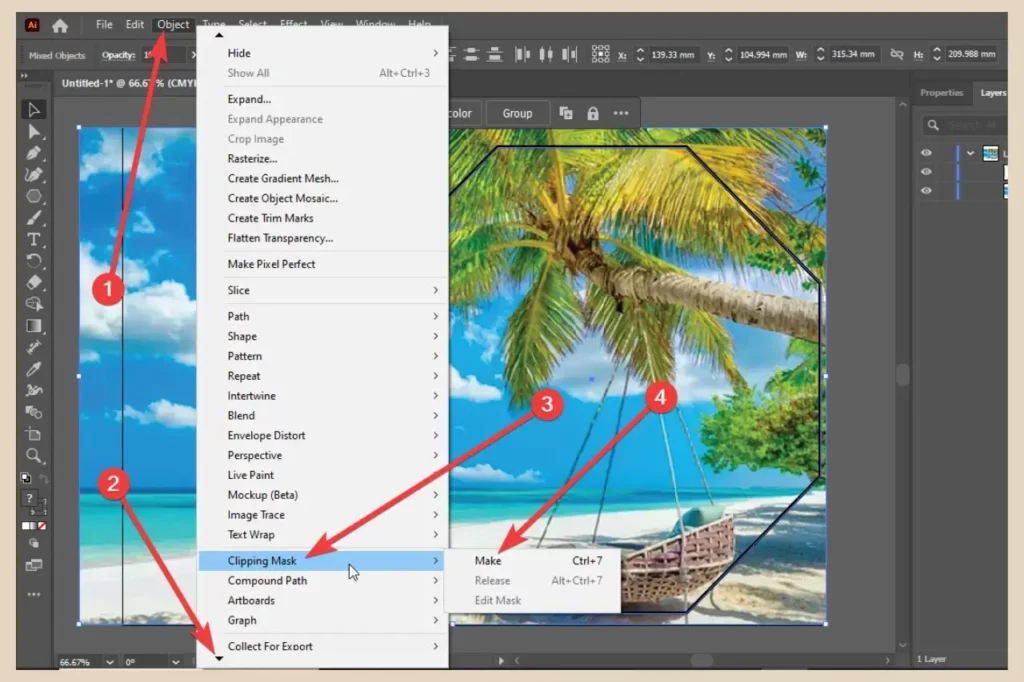
As the Clipping Mask option is further down the menu options, you’ll need to click the small black arrow at the bottom of the menu to scroll down further.
Once you see the clipping mask option, hover over it and then click Make from the options that appear and viola, your clipping mask is created. Easy, right?
If you’re not happy with the placement of the design within the mask, you can easily adjust it by clicking back on the object menu and then Clipping Mask but this time clicking Edit Contents instead of Make.
This will now allow you to click and drag the design around behind the mask to adjust which part is visible. As you can see in the image above, I’ve moved the image across so that the swing seat is no longer visible so you can play around with this to perfect the appearance.
Using Multiple Objects As A Mask
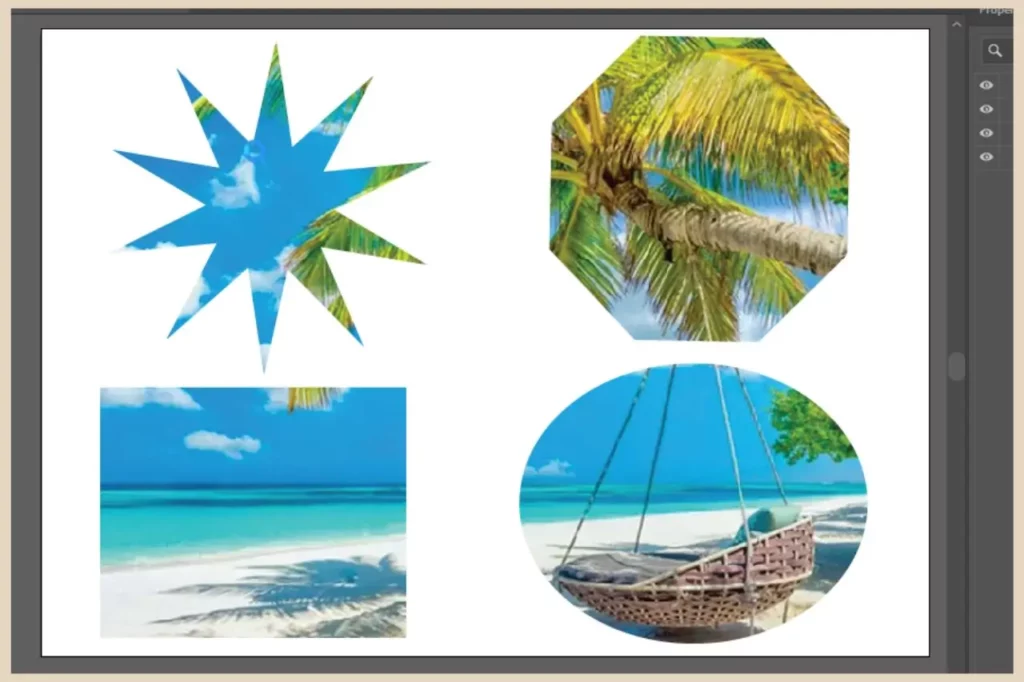
Now, let’s try doing this again but this time using multiple objects as the mask. I’ll keep this nice and simple by just adding a selection of random shapes to the design.
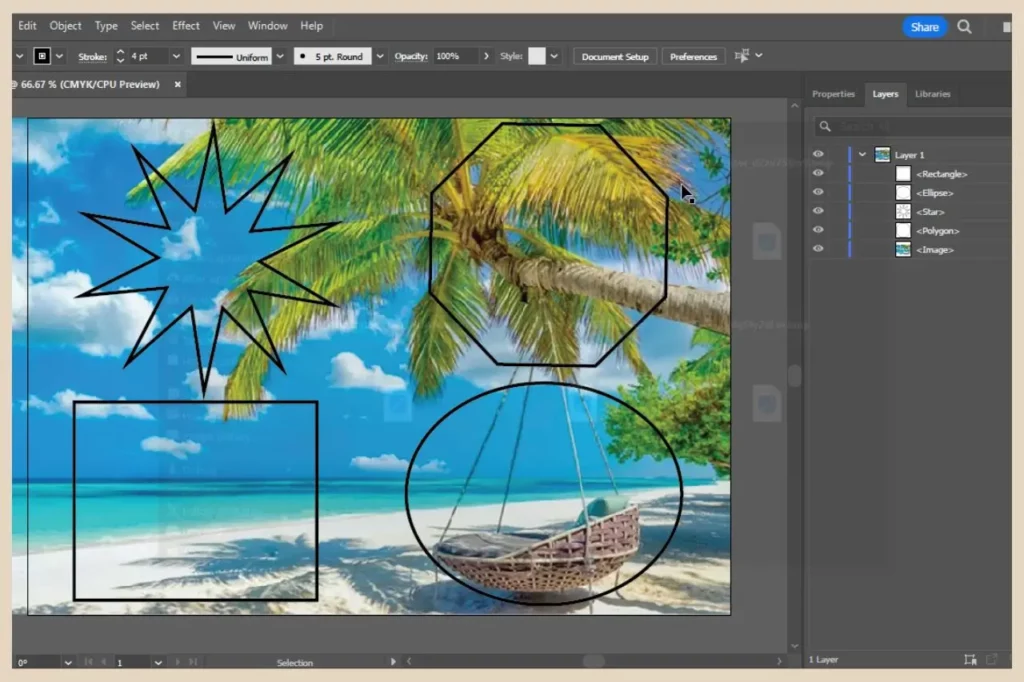
As I mentioned earlier, you can only use one object/path as the mask so in order to use all four of these shapes as the mask, I’ll need to combine them all into one object/path.
Right now, each one is a separate object/path in its own sublayer and even if I grouped them all together, this would only group them together in their own sublayer with each one still having its own sub-sublayer beneath that like the screenshot below.
As you can see, all four objects are still separate meaning that only the top one would be used as the mask if I were to create a clipping mask at this point. It also creates a weird effect and doesn’t work properly because the mask object is part of a group.
Creating A Compound Path To Combine Objects
So, to get around this, I’ll need to create a compound path which will combine all the objects together into one path and it’s super easy to do it.
Simply select all the objects you want to combine, then click the object menu. Scroll down until you see the Compound Path option (directly beneath Clipping Mask), then hover over it and select Make from the options that appear.
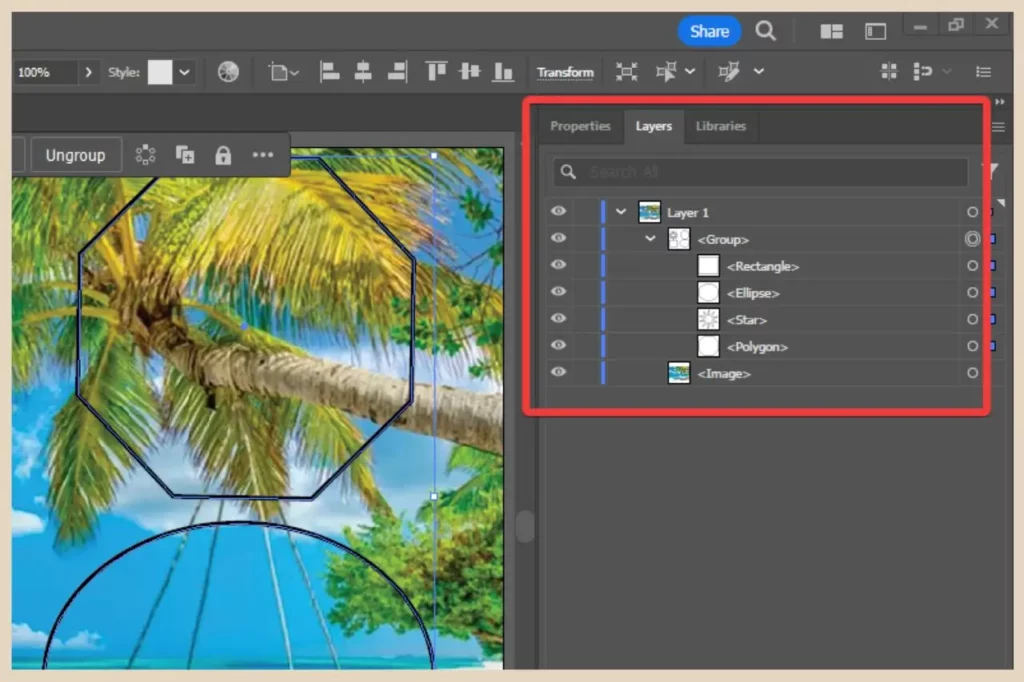
This will now combine all the objects together without changing their appearance or position in the design. If you check out your layer panel, you’ll notice that all four objects are now one object/path in one layer/sublayer just like the screenshot below.

So now that these four objects/paths are technically one object/path, you can now go ahead and create a clipping mask with them as your mask just like before which should create something like the screenshot below.
Again, just make sure you select everything you want to include and that the object you’re using as the mask is above everything else you want within it in the layer panel.
Using Text As A Mask
Now let’s get really fancy and do this one more time but with text as the mask rather than shapes. This is one of my favourite ways to use the clipping mask tool and it can produce some really awesome design effects.
There are actually two different methods that you can use to do this depending on how much control you want over the appearance of the text. The first method is by using basic text in a font that’s big enough and thick enough for you to see the design within it.
So simply add your text as you would normally, then change the font type and font size as needed and make sure it’s above the objects you want to use within it in the layer panel.
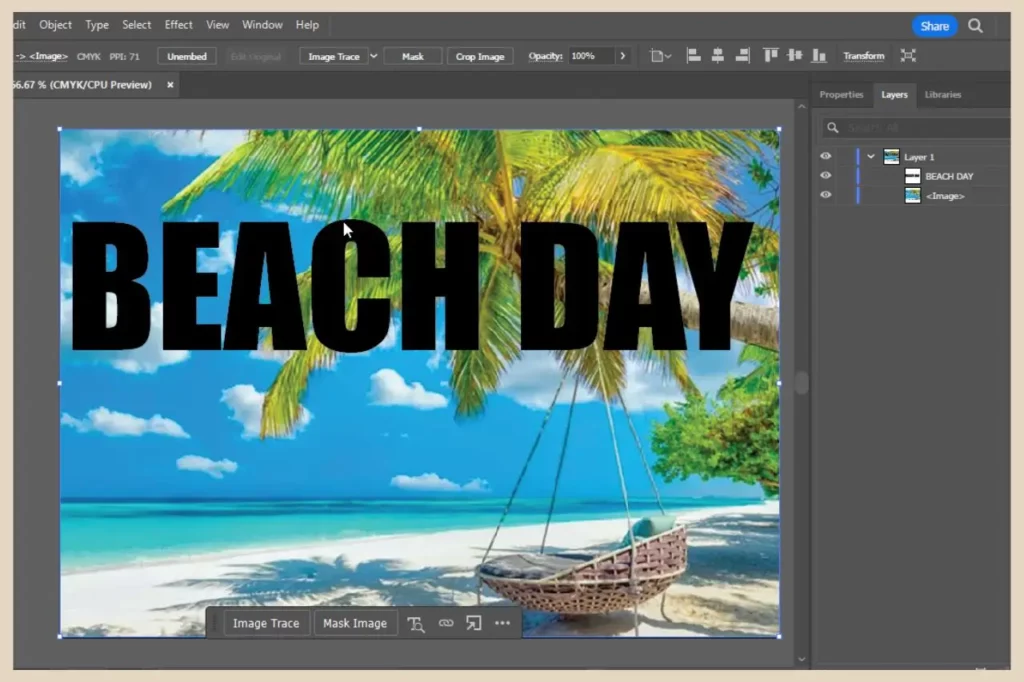
As a plus, all text within one text box is considered one object/path so you can now go right ahead and click the Object menu to create a clipping mask with it no matter how much text it contains.

However, sometimes basic text just isn’t big enough or thick enough to mask your design in the way you want it to and this is where the second method comes in handy.
Converting Your Text Into Graphics
The second method involves converting your text into graphics and this will let you completely manipulate every single letter to whatever size you require and again it’s super easy to do it.
The only thing to note here is that once you’ve converted your text into graphics, it will no longer be editable so you won’t be able to correct any typos if you’ve made any errors so double-check it first before you convert it.
Once you’re happy that you’re text is correct, simply select it, then click the Type menu and click on Create Outlines from the menu options.
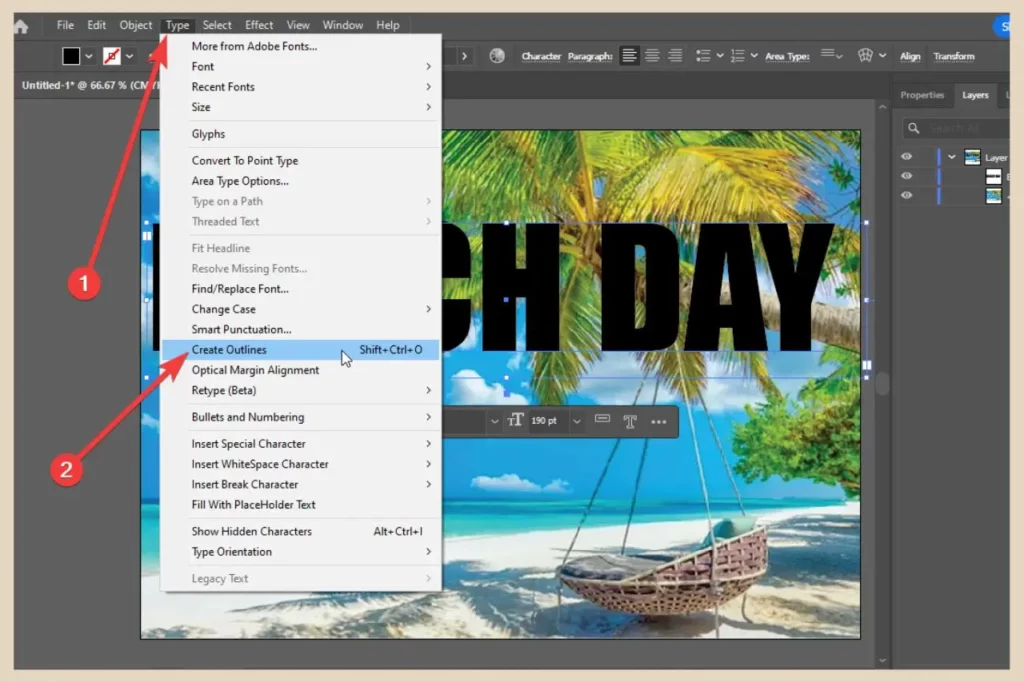
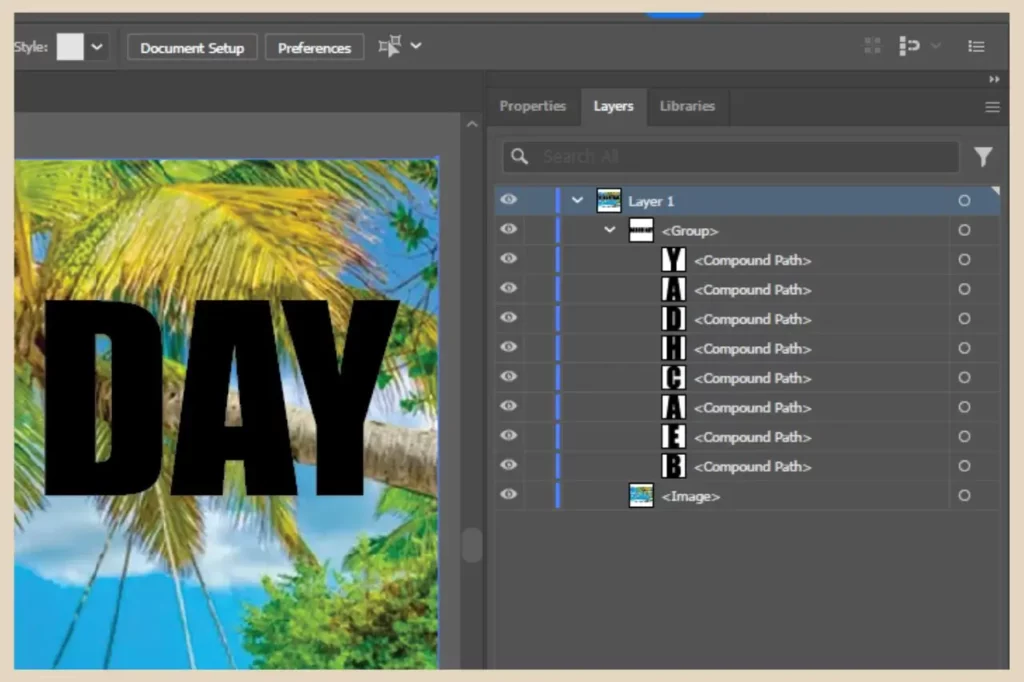
This will now convert your text into a group of objects with each letter being its own object as you’ll now notice within your layer panel.
To select a single letter to change its appearance you can double-click on the group and then double-click again on a letter to put it into isolation mode where you can then change its size.
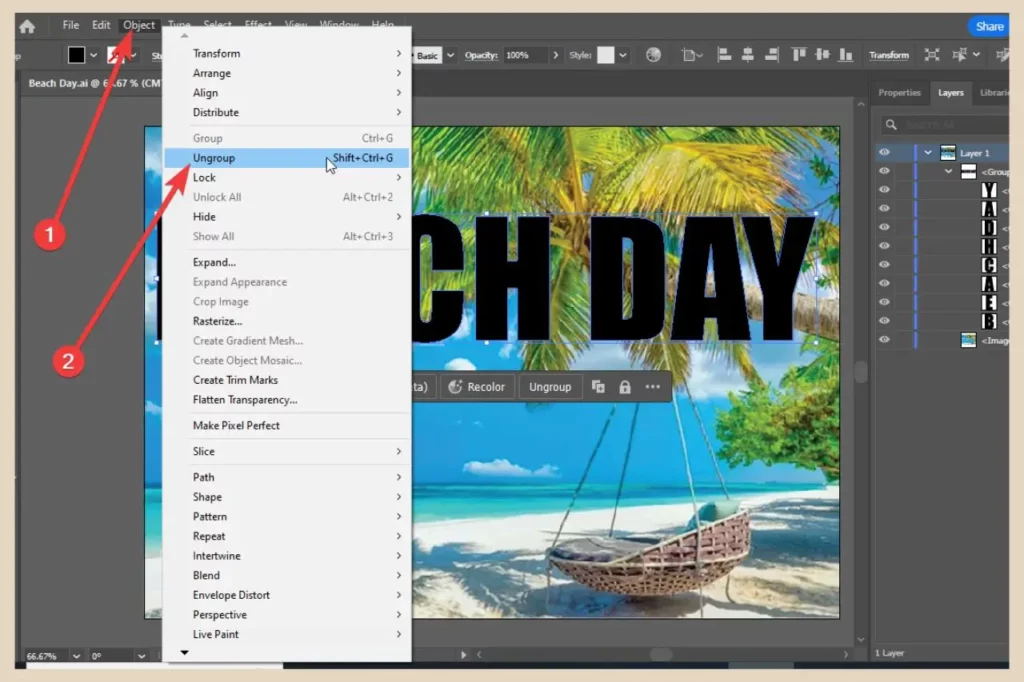
Alternatively, you can ungroup the objects from the Object menu so that you can select each letter in the normal way with one click.
Changing The Appearance Of Text
Once you’ve selected a letter, you’ll be able to change its size, width, or length by clicking and dragging on the different anchor points (the small white boxes). You’ll also be able to move it around the design without affecting or moving any of the other letters so you can create something totally unique.
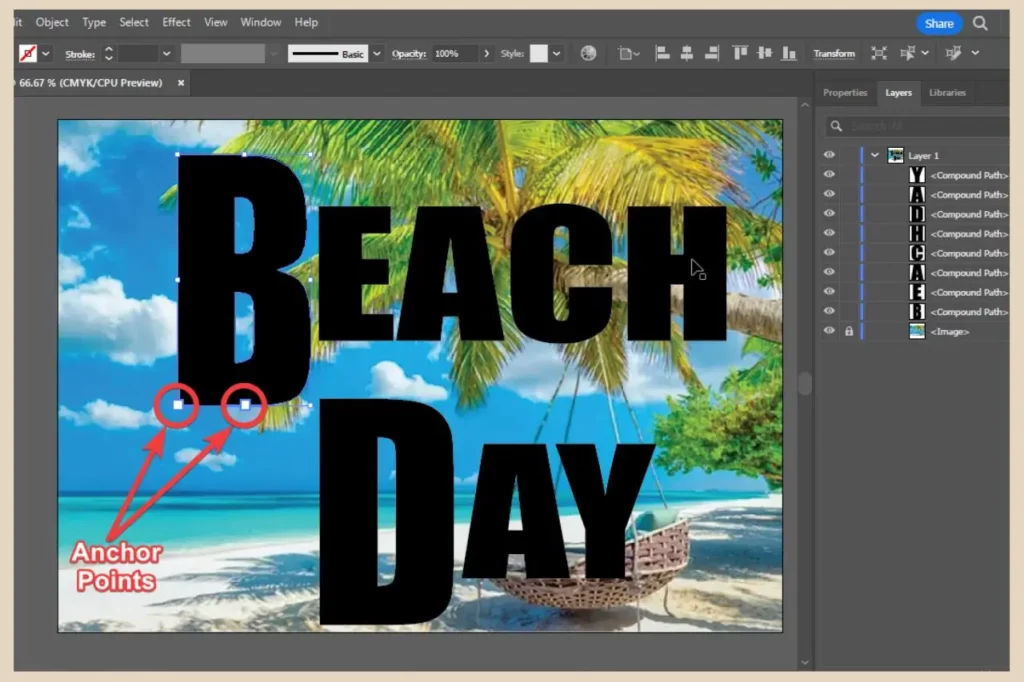
As you can see in the image above, I’ve moved the DAY text beneath the BEACH text, made all the text bigger and made the letter B and letter D bigger and longer than all the other text so there’s a lot of customisation that you can do here.
Once you’re happy with how your text looks, you can then combine all the letters back together into one object/path using the Object menu, Compound Path, Make method we used earlier which will then allow you to use it as the mask for your clipping mask.

And remember, even though I’ve only used one image under the mask in these examples, you can create a clipping mask with many objects underneath it.
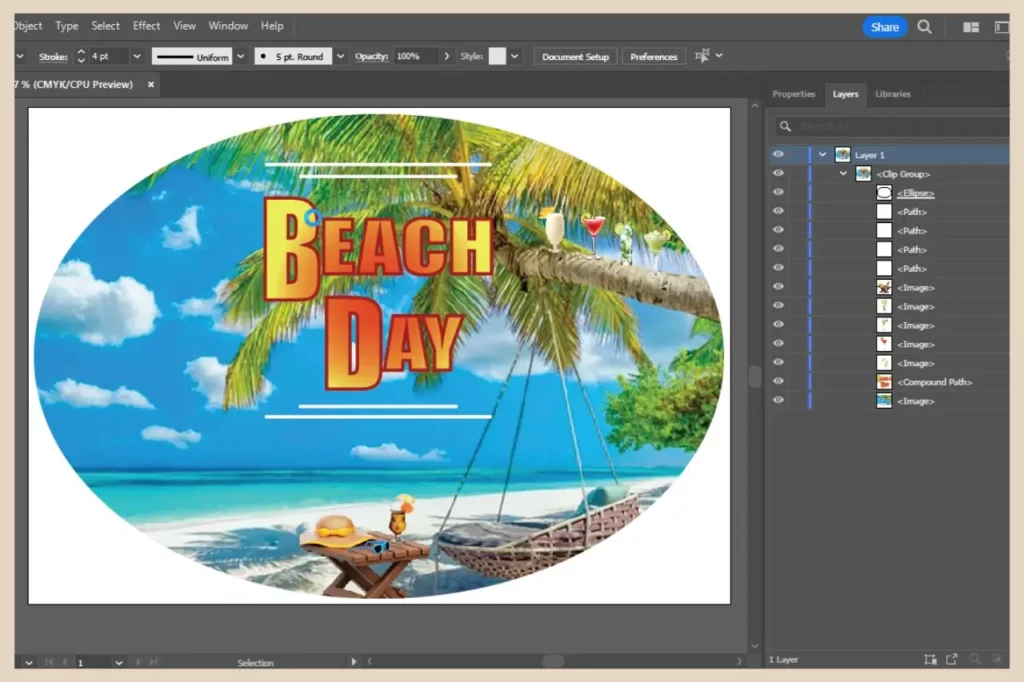
As you can see in the screenshot above, I’ve used several images, the text design and several lines above and below the text which have all been included in the clipping mask so you can get as busy as you like with your design.
Just make sure your mask object is at the top of your selection and you should be able to make your clipping mask issue free.
Let’s Get Masking
And there you have it, you’ve just mastered the clipping mask, an awesome tool for creating uniquely epic design effects.
I hope you’ve found this tutorial helpful but if you get stuck or run into trouble, let me know in the comments below and I’ll try my best to help you out.
Happy Masking!

You May Also Like
- How to Start a Blog for Free – Beginners Guide

- What to Look for in a Blogging Platform – Beginner’s Guide
- Best Blogging Platforms for Beginners – Free & Paid