Are you wondering how to add categories in WordPress? Categories are a great way to keep your content organised and well laid out and they’re super easy to create and manage.
In this tutorial, I’ll show you how to create them, how you can structure them and how to add your posts to them.
What Are Categories In WordPress
Categories are used to organise your content so that it’s easier for your readers to find the topics that they’re most interested in.
By grouping your content together into different categories, you’re creating groups of related content that your readers can view by selecting the category that the group belongs to.
This can actually help keep visitors on your site for longer periods of time because it gives them a selection of related articles to read that they may not have found if you didn’t have them sectioned into categories.
Categories are also a great way to build out your site’s navigation too because they can be used to create menus across your site.
You can create category blog roll pages as part of your menu that will show all the posts assigned to that category in a blog roll format.
Parent Categories And Child Categories
When setting up categories, it’s worth noting that there are actually two types of categories that you can create and they are parent categories and child categories (also called subcategories).

Parent categories are your main categories and they’re usually fairly broad in nature so you shouldn’t need too many of them. I’ll use one of my other sites as an example here and it’s a skincare site.
For the parent (main) categories, I would use categories such as Face Care, Body Care, Eye Care, Homemade Skincare, etc and I would have around 10 or so of these main categories.
Child categories would be narrower and more specific and I would have much more of these. The number of main categories and subcategories that you have will really depend on how much content is on your site and how diverse your niche is.
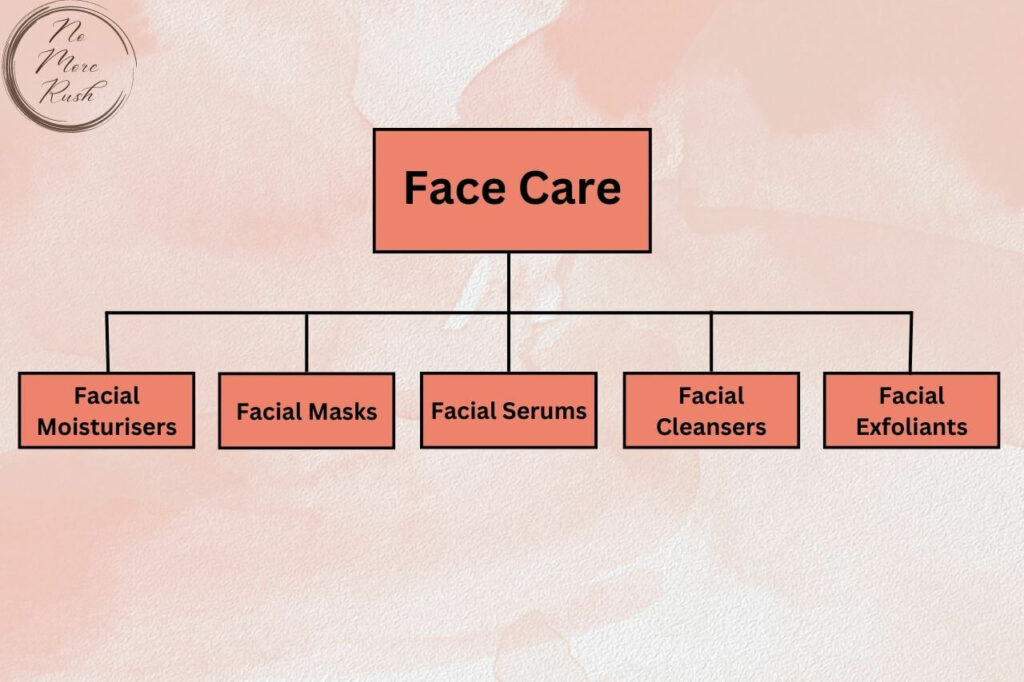
As a rough example, for face care, I could have child categories such as facial moisturisers, facial masks, facial serums, facial exfoliants, facial cleansers, etc.
For this site, my face care category structure would look something like this and I could do this for each parent category so that they all have this kind of structure.
I can then also add another level of child categories to my existing child categories to get even more specific.
Structuring Your Main Categories And Subcategories
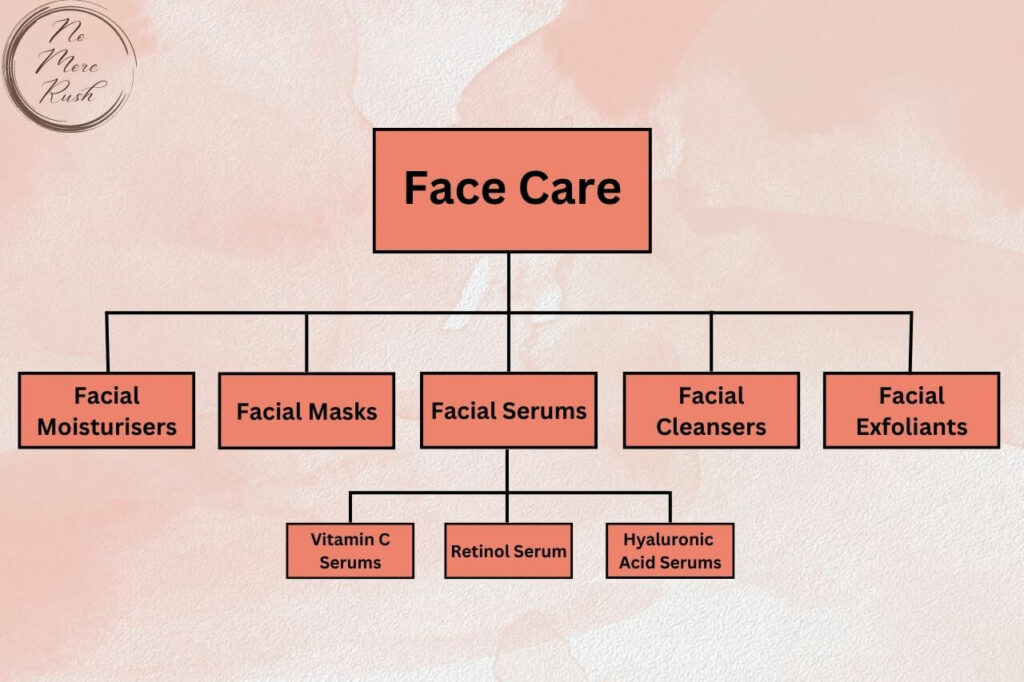
If you imagine one of my main categories of face care which has a child category of facial serums. I could add another level of child categories to the facial serums child category to categorise the types of serums.
In this example, I could add child categories such as vitamin C serums, retinol serums, hyaluronic acid serums and so on. My structure for the face care category would then look something like this.
I could then repeat this with the other child categories so that all of my categories and subcategories have the same structure.
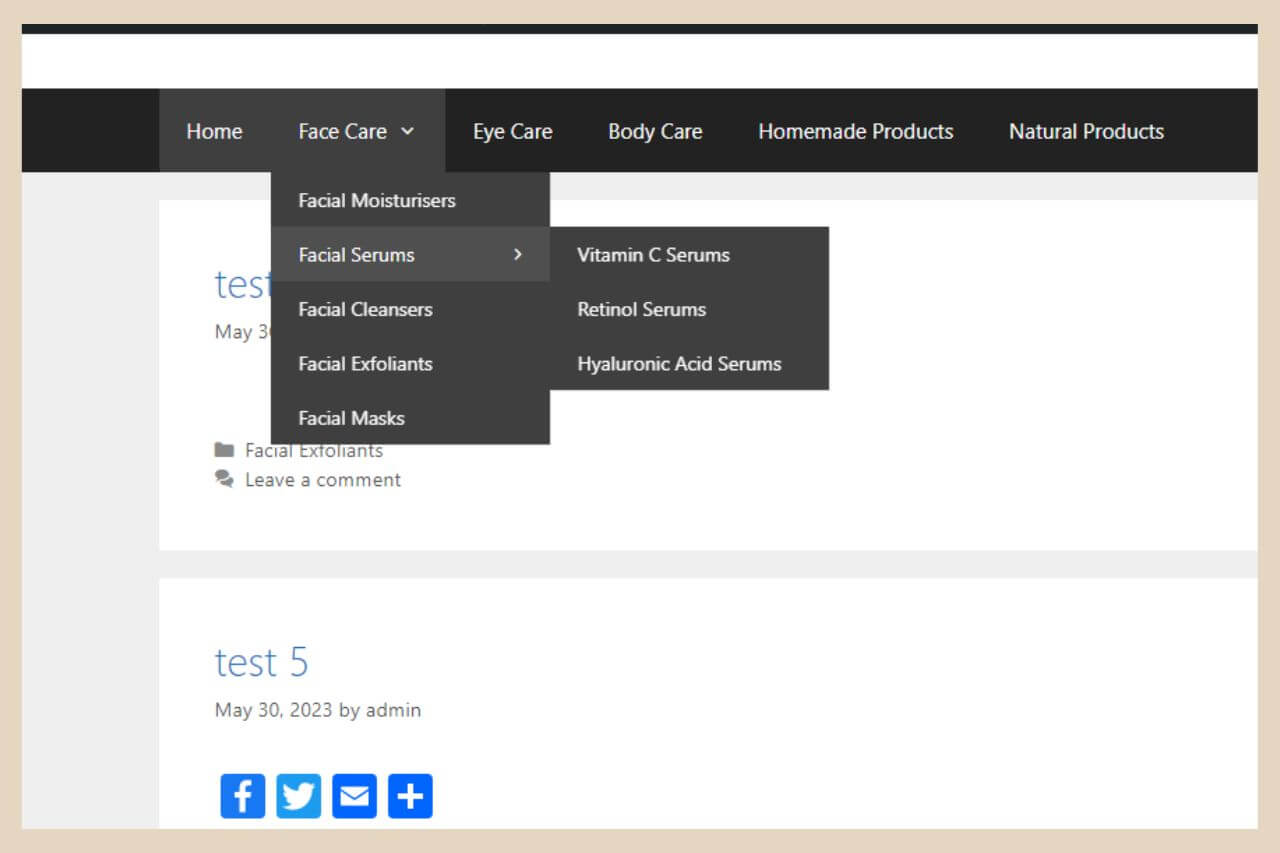
If I’m planning to use categories in menus, I could set my menus up using this same structure so that my menus look something like this.`
By default, WordPress also has a category widget already in the sidebar when you create a new site and this is where readers can browse your category section.
This gives readers an easy way to find certain posts just by selecting the category or subcategory that they’re most interested in.
It also allows you to keep your content organised in the process and build entire menu structures with them if you want to.
How To Add Categories In WordPress
There are two ways to add categories in WordPress. The first way is while editing a post and the second way is in the Categories page.
Both ways will result in the creation of categories but the categories page does offer a few more options that the in-post method doesn’t.
Adding Categories In The Post Editor
To add categories while editing a post, you’ll need to use the post settings on the right-hand side of the page.
If you don’t see any settings there, you’ll need to click the settings button which is to the right of the Publish/Update button (it will say “Settings” when you hover over it).
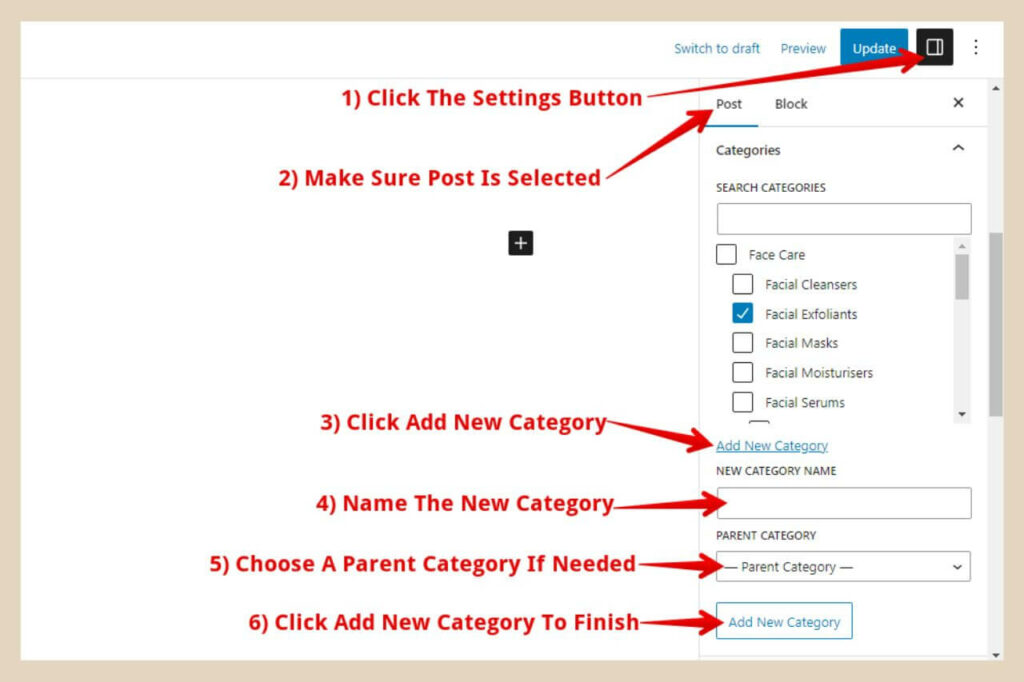
Make sure that Post is selected at the top of the settings, then scroll down until you see the Categories section. From here, you’ll need to click the “Add New Category” link.
Once you’ve clicked this link, you’ll be able to name your new category. If this is a parent category, leave the Parent Category drop-down box as is and click the Add New Category button to finish.
If you’re creating a child category, use the Parent category drop-down box to select its parent category then click the Add New Category button to finish.
By default, when you create categories while editing a post, the post you’re editing will be automatically assigned to the newly created categories but you can uncheck them if you need to.
Adding Categories In The Categories Page
The second way to create categories is in the Categories Page which you’ll find in the submenu if you hover over or click on Posts in the main menu on the left-hand side of the WordPress editor.
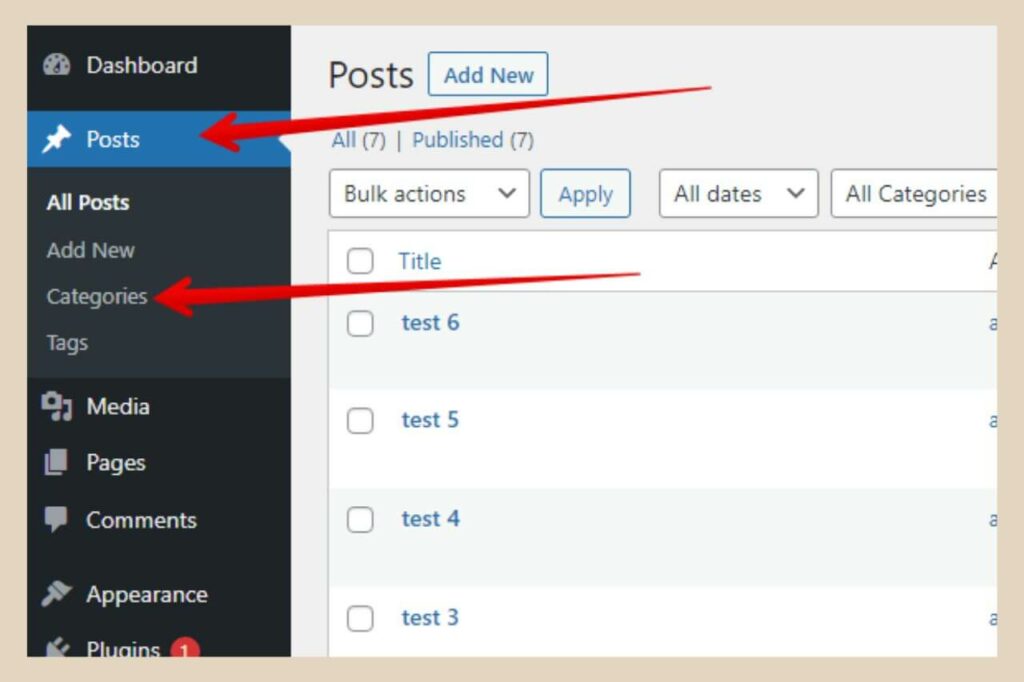
Once you’re on the categories page, you’ll be able to create new categories but you’ll have a few extra options here that you don’t get in the post editor.
You’ll be able to name your category and add it to a parent category if you wish but you’ll also be able to change the slug (the category name that appears in its URL) and add a description too if you want to.
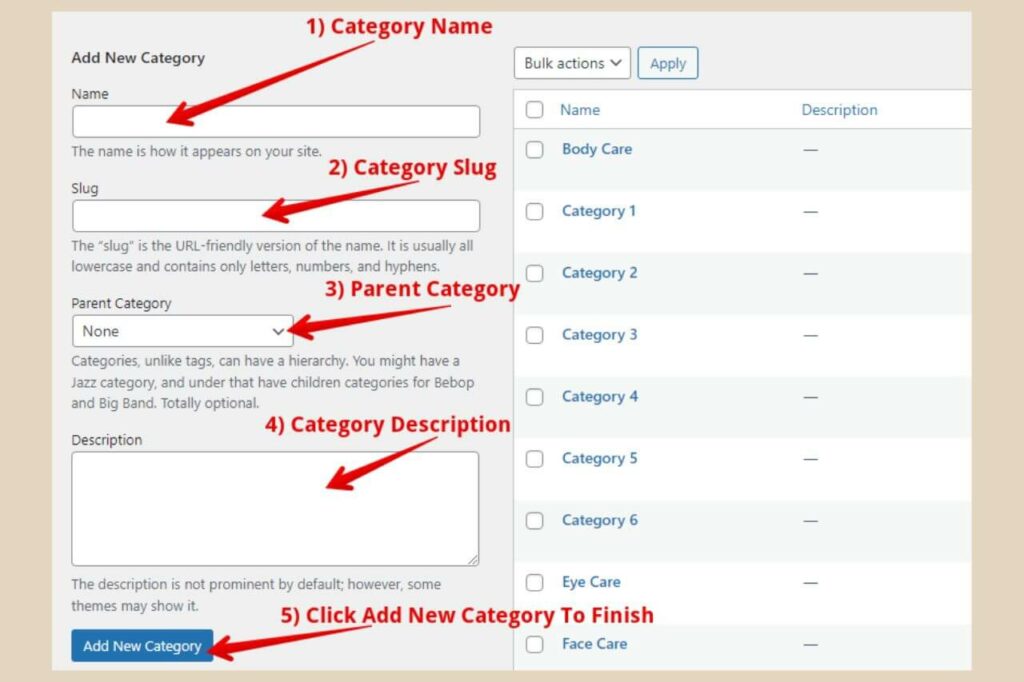
You can also edit and delete categories from this page too. To edit an existing category, you can simply click on the category you’d like to edit and make the changes required.
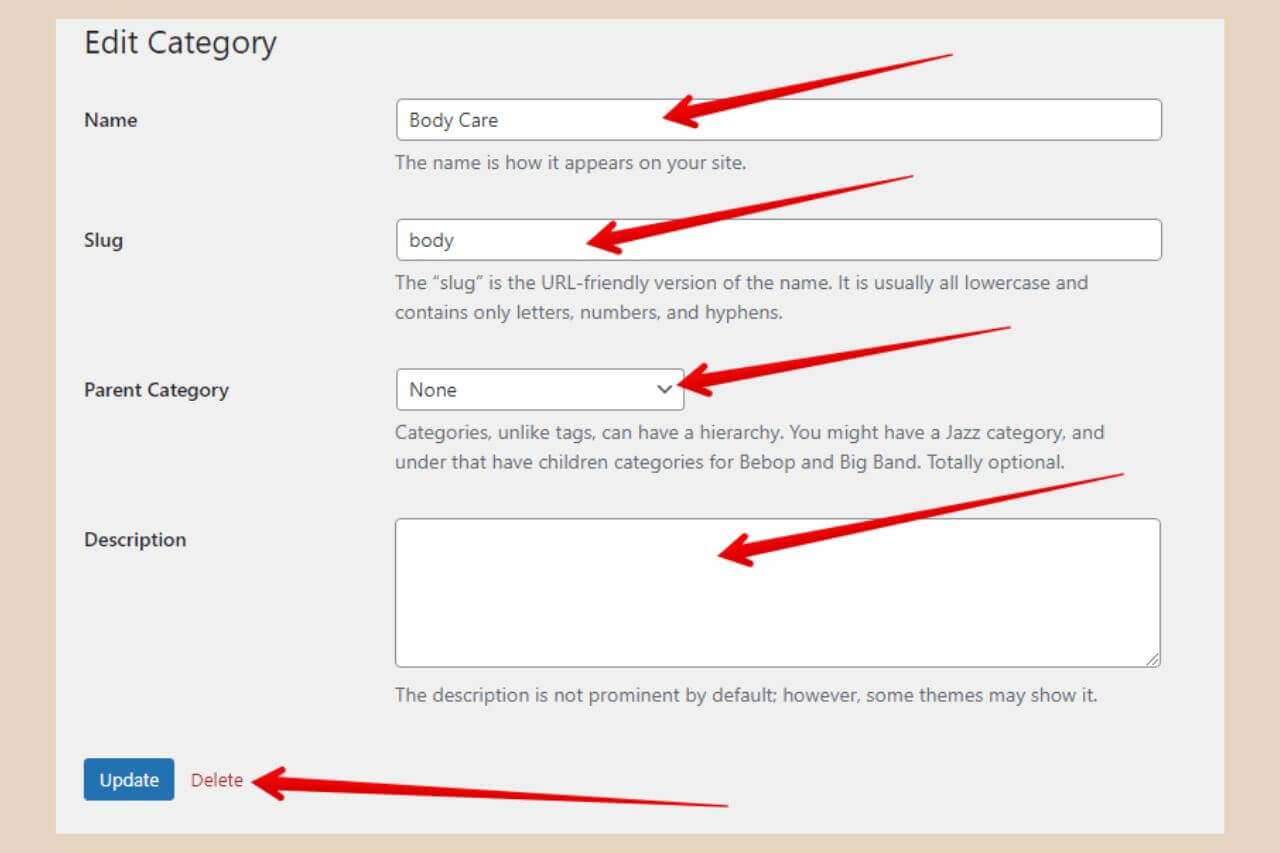
You can change the name, slug, parent category (or make it a child category if it isn’t one already) and description or you can delete the category completely.
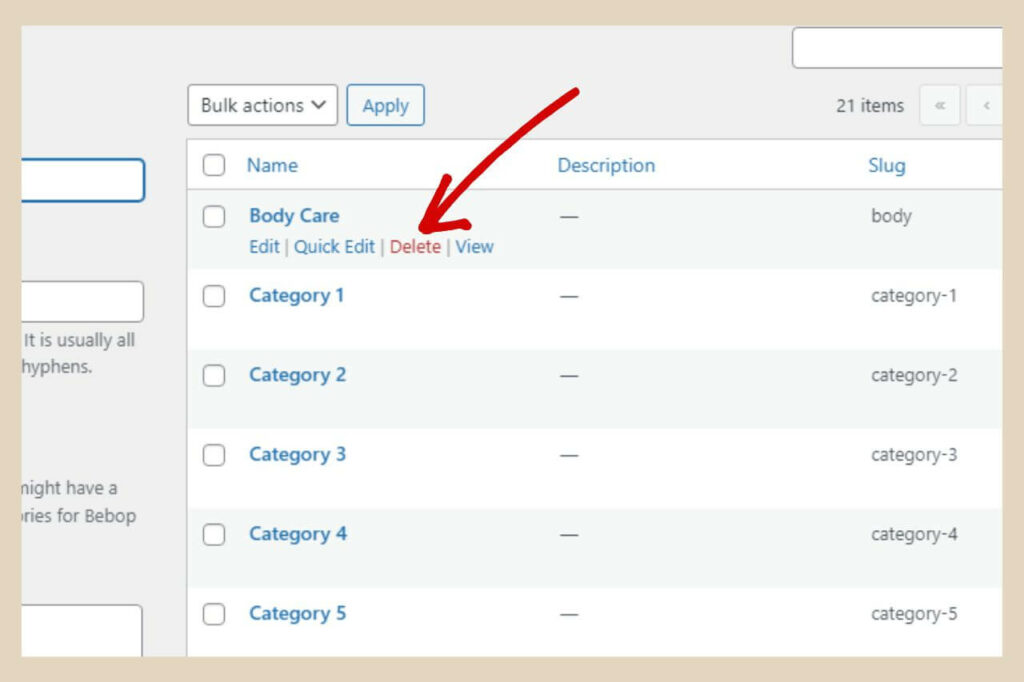
You can also delete the category by hovering over it on the main category page and clicking the “Delete” link on the mini menu that appears beneath it.
How To Add A Post To A Category In WordPress
Adding a post to a category can be done in two different ways. The first way is by assigning the post to a category whilst in the post editor.
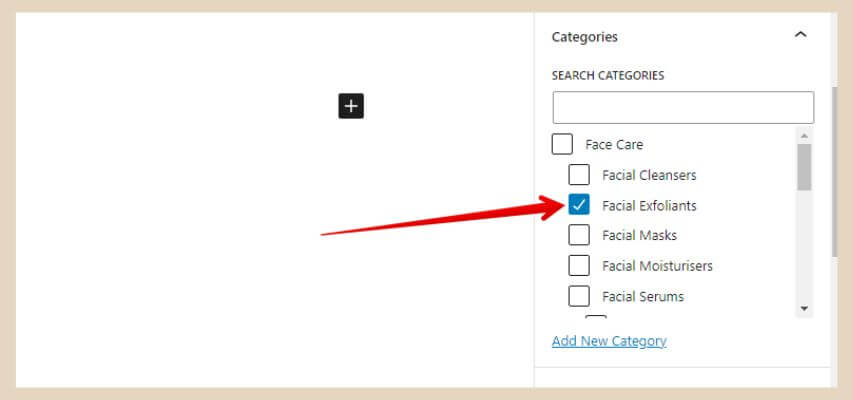
To do this, you simply need to check the box of the category you like to assign your post to using the category section in the post settings on the right-hand side of the page.
The second way to do this is by clicking on Posts in the main WordPress menu which will take you to the main posts page showing all of your posts.
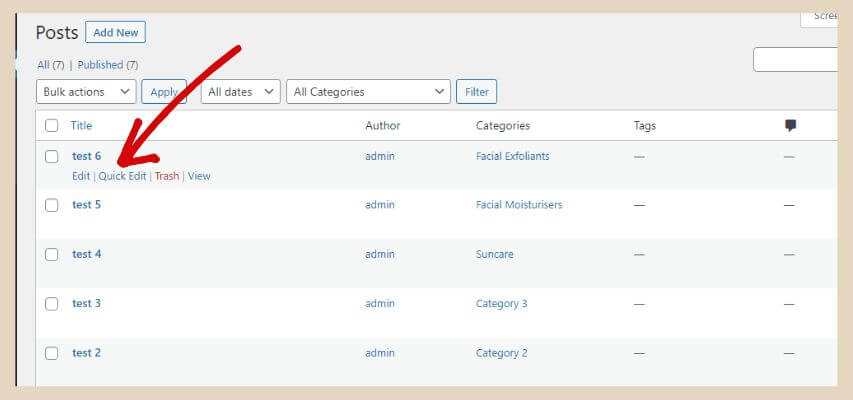
Simply hover over the post you’d like to add to a category and click the “Quick Edit” link from the mini menu that appears below it.
When the quick edit section appears, you can now click the checkboxes to add the post to the desired categories and then click the Update button when you’re finished.
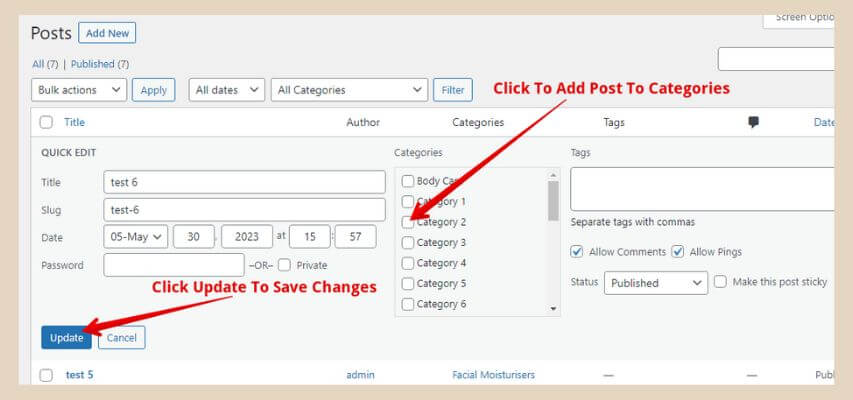
This is a handier and quicker way to do it if you have several posts that you want to add to categories in quick succession.
On a side note, when you add a post to a child subcategory, you don’t need to add it to the parent category as well.
This is because, by default, all posts added to child categories will also be viewable in their parent category too regardless of whether you’ve checked the parent category box or not.
Let’s Create Some Categories
Now that you know how to create and structure categories, why not try adding some to your site?
I hope you’ve found this tutorial helpful but if you need any help with anything, please let me know in the comments below and I’ll try my best to help.
Happy category adding.

You May Also Like
- How To Display Recent Posts With Thumbnails In WordPress
- How To Add An Affiliate Disclosure To Your Posts
- What Is Wealthy Affiliate – Everything You Need To Know

