If you’re an affiliate marketer then it’s vital that you know how to add an affiliate disclosure to your posts. If you don’t add one then you could find yourself in quite a bit of trouble because it is a legal requirement.
Luckily it’s a pretty easy thing to do in WordPress and with the help of the very handy free plugin Ad Inserter, your affiliate disclosure can be automatically added to every post you’ve already written and every post you write moving forward.
Why Do You Need An Affiliate Disclosure
Anyone in the affiliate marketing world who is using affiliate links within their posts is required by law to disclose that fact to their readers.
We’ve all heard the stories of influencers getting in trouble for promoting products but not disclosing the fact that they get some kind of monetary reward for doing so to their viewers/readers.
With that in mind, to protect yourself and your website, it’s really important that you always disclose your affiliate relationships every time you write a post with affiliate links added.
You should always have a disclosure that clearly states that you receive a commission when someone clicks and makes a purchase through your links.
Where Should You Put An Affiliate Disclosure
Your affiliate disclosure needs to be clearly visible and readers shouldn’t need to scroll to find it. In fact, they should be fully aware of your affiliate relationship before they reach the first affiliate link on your post.
For this reason, most people will have several across their sites but one of them should be before and as close to the first affiliate link that you place within each post.
Just putting one in the footer or sidebar alone probably won’t cut it. So, the best way to do this is to have a full detailed Affiliate Disclosure page and a short affiliate disclosure at the very beginning of your posts.
This ensures that it’s the first thing your readers see before they even start reading your content.
It’s also a good idea to add a link from your short disclosure to your full affiliate disclosure page for anyone who wants more details. On this site, I actually have affiliate disclosures in 3 different places.
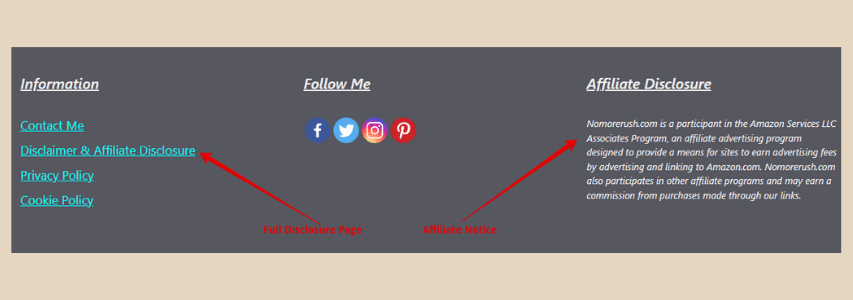
I have a full affiliate disclosure page in my footer with the rest of my legal/informational pages. I also have an affiliate notice in my footer and I have a short affiliate disclosure at the very top of all posts that contain affiliate links (see the top of this post).
This short top-of-page disclosure is the one that I’m going to show you how to create today and how to add it automatically to any post that needs it using the Ad Inserter plugin.
Other Helpful Uses Of The Ad Inserter Plugin
Before I go any further, I just wanted to mention that the Ad Inserter plugin can do a lot more than just adding an affiliate disclosure to all your posts.
If you ever need to add header or footer codes to your site for verification purposes, ie, Google Analytics, Search Console, Pinterest, affiliate network codes, etc, Ad Inserter can be used to do that too.
You can also use it to insert ads and banners (this is actually its main intended purpose) to your site or any other snippets of code, text or design that you’d like to add automatically to your site. The plugin is definitely not a one-show pony.
For what we’re doing in this post, the free version of the Ad Inserter plugin is more than adequate but If you do want more functionality then there is a premium version which is Ad Inserter Pro.
Installing The Plugin
First things first, before we start, you’ll need to install the Ad Inserter plugin on our site. So, in your WordPress back office, select Plugins, then select Add New.
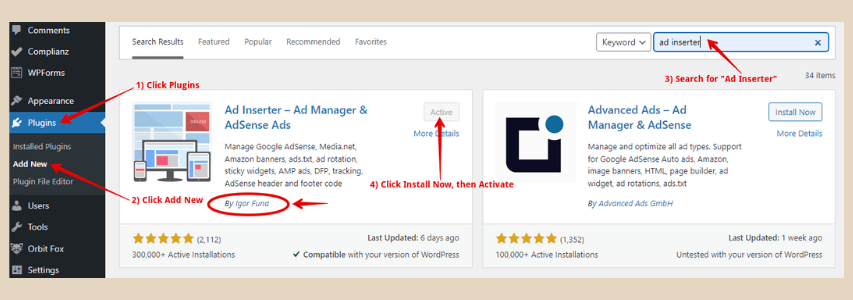
From here you’ll need to search for Ad Inserter in the search box. It should be one of the first ones at the top and it’s by Igor Funa. Once you’ve found it, select Install Now and when it’s ready select Activate.
You can now access the plugin from two areas. The first way is to select Plugins, then Installed Plugins, and then under the Ad Inserter plugin, select Settings.
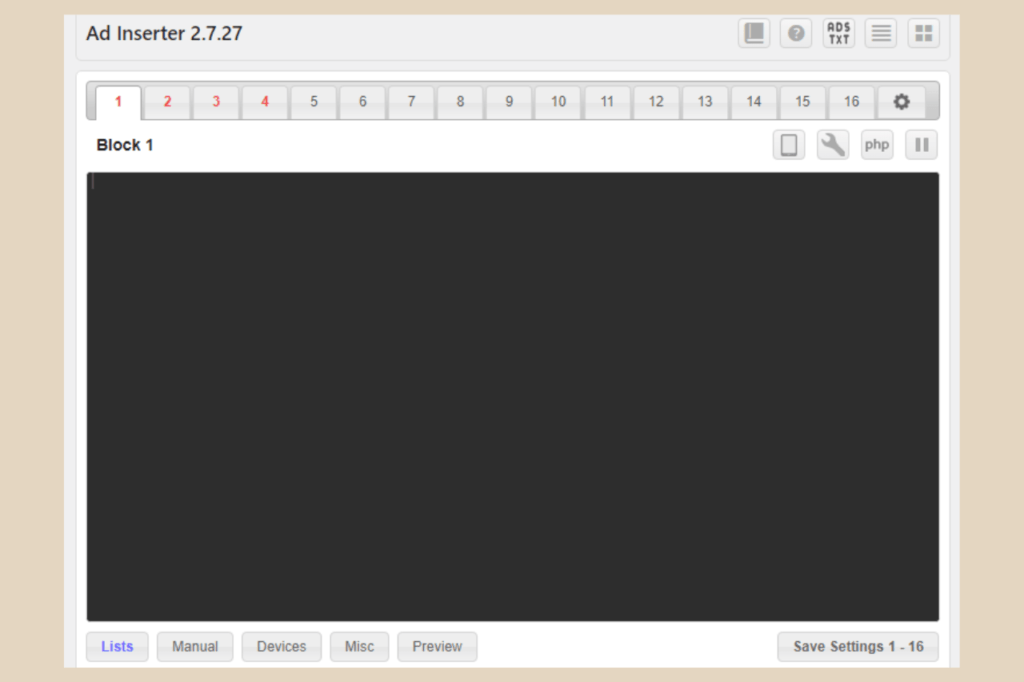
The second way is directly from “Settings” in the main WordPress menu on the left of the page, where you’ll find Ad Inserter now added to the list. The below screen should appear and now we’re ready to start creating our top-of-page affiliate disclosure.
A Plain Text Disclosure Or A Fancier Boxed Disclosure
I’m actually going to show you how to create two different types of disclosures. The first one is a plain text disclosure and the second one is a fancier boxed disclosure just like the one at the top of this page.
Both are pretty easy to do although the boxed one does require adding some code around the text but don’t worry, I’ll share the full complete code here so you can simply just copy and paste it.
How To Add An Affiliate Disclosure – Text Only
So this one is really quick and easy to do because it involves nothing more than typing your affiliate disclosure text and then choosing where you want to show it. Here is a step-by-step guide for how to do it:
Step One:
Write or paste your text of choice into the black boxed area of the editor. You can copy mine below and amend it to your liking.
This post may contain affiliate links and I may earn a small commission when you make a purchase through those links at no extra cost to you. Also, as an Amazon Associate, I earn from qualifying purchases. You can read my full disclosure here.
Step Two:
If you wish to edit the text, ie, font type, font size, alignment, add a link to your full disclosure (more on adding a link further down), etc, then click the spanner icon (it says toggle tools when you hover over it) above the editor and this will open up more icons.
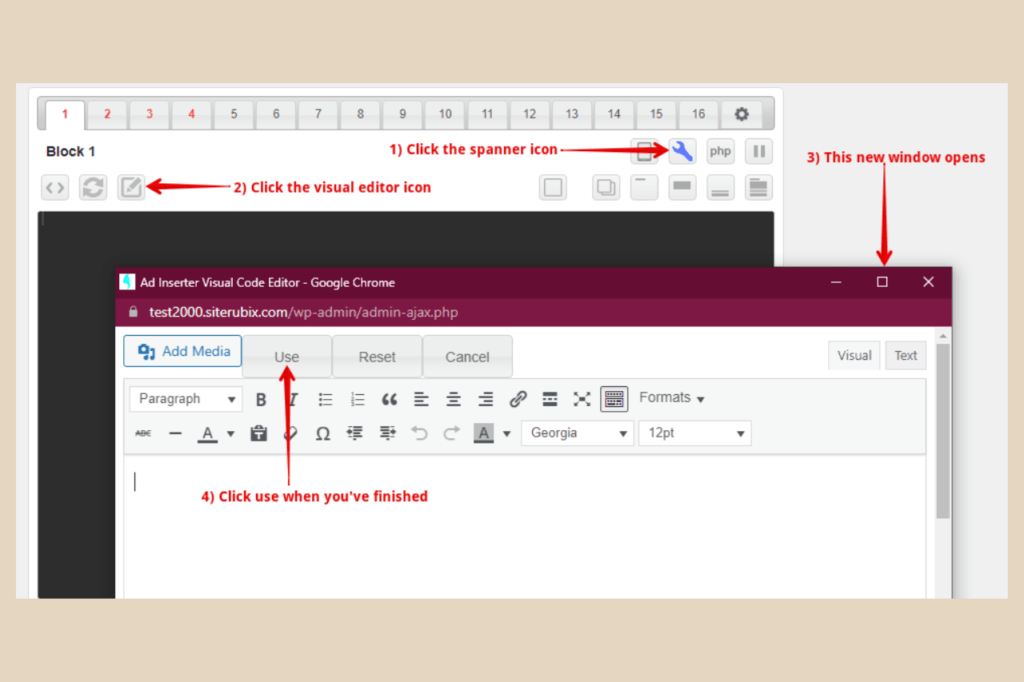
Click the icon third from the left that looks like a pencil in a box (it says open visual HTML editor when you hover over it). This will open up a new small window which looks much like Word or Google Docs where you can now edit your text.
Click the use tab when you’re finished (your text will now have some HTML around it from the changes you just made).
Step Three:
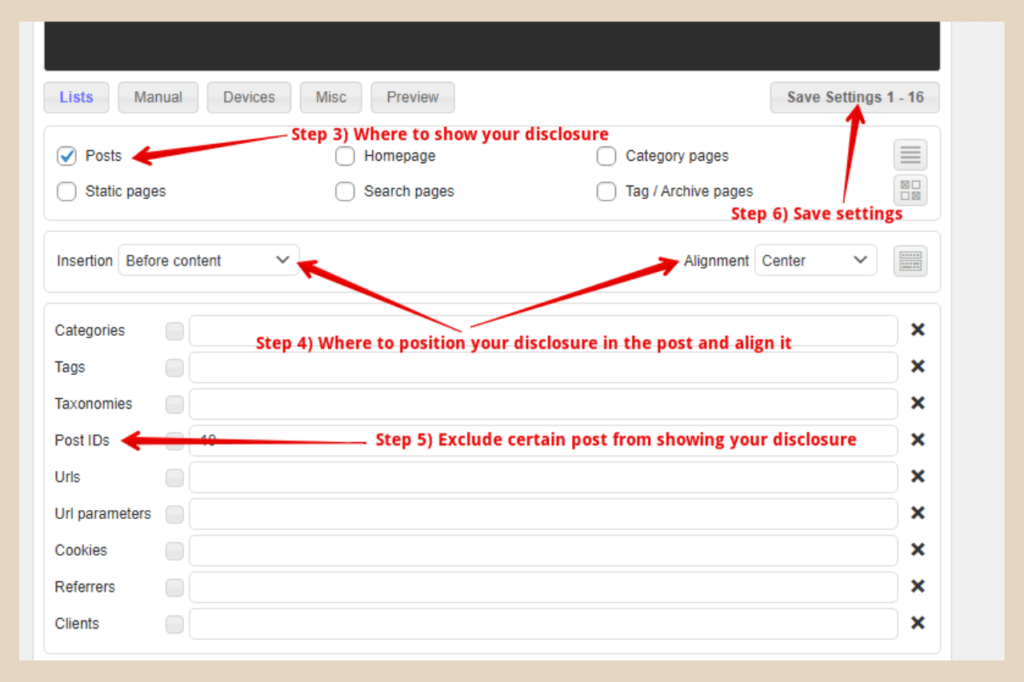
Decide where you want your disclosure to show by scrolling down below the editor and checking the boxes where you want your disclosure to be displayed (posts are already selected by default and for most people, this is the only one they’ll need selected).
Step Four:
Decide where you want your disclosure to be positioned in the post, ie, before content, after content, etc by using the drop-down Insertion box as per the image above (mine is set to before content). You can also select alignment here too.
Step Five:
If there are any posts that you want to exclude the disclaimer from (ie, posts with no affiliate links or an about me post), then click the Lists button (first button on the left directly under the black box editor) and an extra box of options will appear below.
You can now choose which posts you don’t wish to display your disclosure on. As there are a few ways to do this, see “Step five in more thorough detail” in the next section after step six below.
Step Six:
Click “Save Settings” and you’re all done. If for any reason you’re unhappy with the space above or below the disclosure (it’s too close to other text, for example) you can change this in the preview section of the plugin.
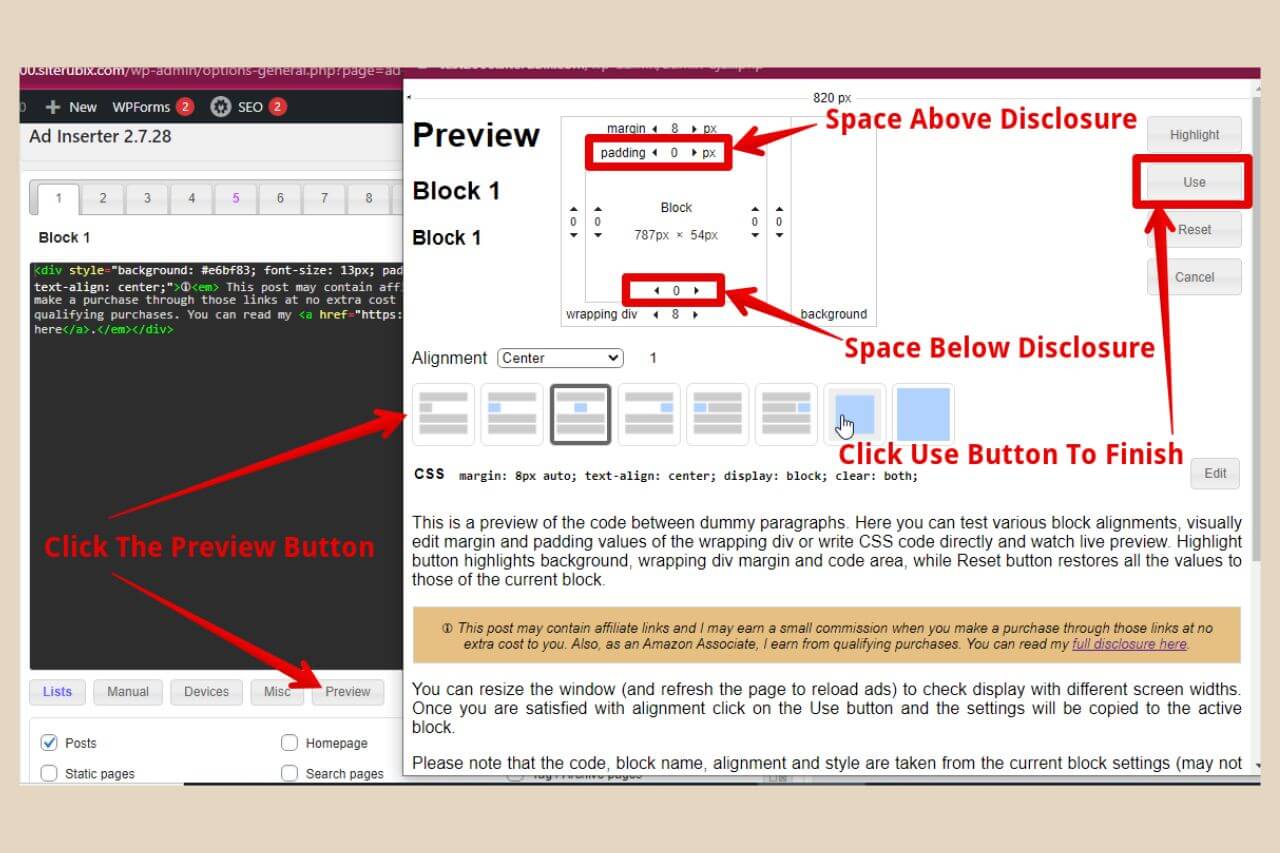
To do this, simply click the Preview button and a new window will open as per the image above. Click the padding arrows to increase or decrease the gap above or below the disclosure and when you’re happy, click the Use button to close the window followed by the Save Settings button.
Step Five In More Thorough Detail
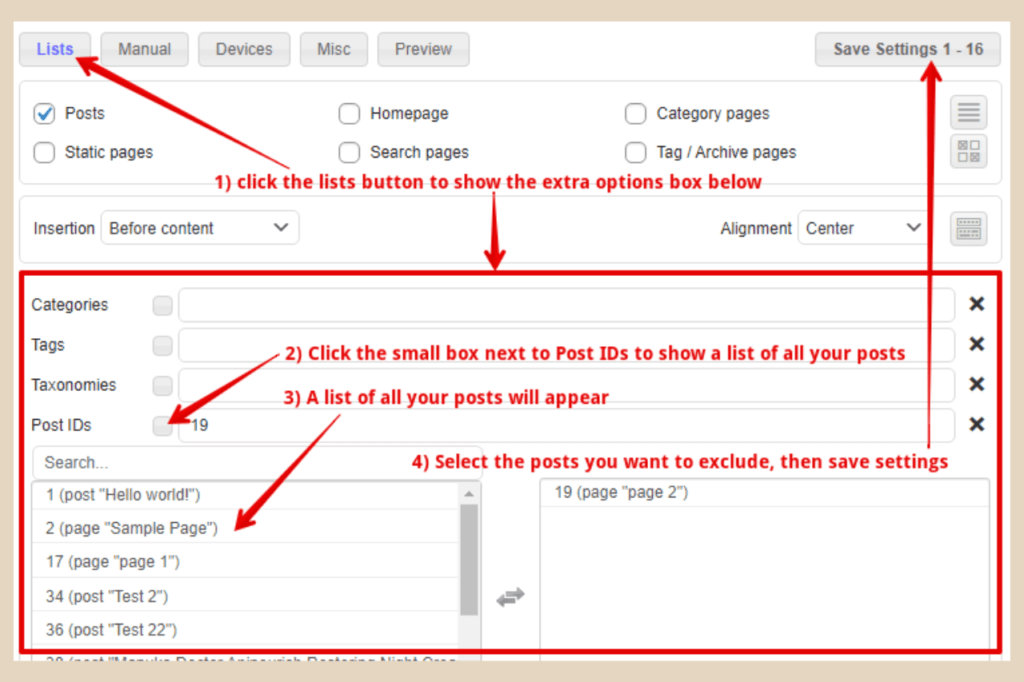
As I just mentioned, there are a few ways to hide your disclosure on certain posts so I’ll go into more detail here about how to do that. First, make sure you’ve clicked the lists button so that the extra options appear.
Manually Excluding Posts
Once you see these options, the first way is to manually exclude posts individually by using the Post IDs” section. Simply click the small box to the right of “Post IDs” and a list of all your posts will appear.
Click the ones you don’t want your disclaimer to appear on and they will be added to the list by post id number.
Black List And White List
At the end of each box, you’ll notice a big black X. If you click on that X, it will change to a Tick. These are called black lists and white lists.

An X means any post you add to this box will be excluded (black list). A tick on the other hand means only the posts in this box will show your affiliate disclosure (white list).
By default, the X is shown but you could do this the other way around if that’s easier and create a white list instead but for the purpose of this post, I’m using black lists.
Automatically Excluding Posts
If you don’t fancy having to manually exclude non-promotional posts every time you write one then you could choose to create a category or tag instead and exclude posts that way.
You could simply create a category or tag called “non-affiliate” for example and use that category or tag for all your non-affiliate posts. Then rather than using the Post IDs box, you could use the Catagories or Tags box instead.

Just click the small box to the right of Categories or Tags depending on which one you’ve chosen to use, select the name of the category or tag you want to exclude and you’re done.
As long as you use that category or tag going forward on all new non-affiliate posts, they will be automatically excluded without you having to go back to the Ad Inserter settings to do it manually.
Oh, and don’t forget to click “Save Settings” when you’re done.
How To Add An Affiliate Disclosure – Boxed Text
Now for the fancy pants version. To make this nice and easy, I’m going to share the full snippet of code that I use for my disclosure which you can copy.
Don’t worry if you don’t like the colour or font size etc, I’ll show you how to change all that in a moment but don’t panic, it’s really easy. Here’s the full code I use:
<div style="background: #e6bf83; font-size: 13px; padding: 10px; border: 1px solid lightgray; margin: 1px; text-align: center;">🛈<em> This post may contain affiliate links and I may earn a small commission when you make a purchase through those links at no extra cost to you. Also, as an Amazon Associate, I earn from qualifying purchases. You can read my full disclosure here.</em></span></div>
And this is what it looks like on the page:

Now all you have to do is copy and paste the code, follow the rest of the steps above and you’re good to go unless you want to change it, that is.
How To Alter The Code To Change Colour, Text Size, Etc
If you’re completely new to using HTML code, don’t worry. It’s actually really simple to alter once you know which pieces of the code do what and I’m going to show you exactly how to do that now.
If you just want to change the wording of the text or delete parts of it, you can simply do that manually either in the black box editor or the visual HTML editor as per step 2 above.
You can also edit the font colour, font style, etc while in the visual HTML editor too (for changing font size, see below). Just make sure that you highlight all the text first for it to work.
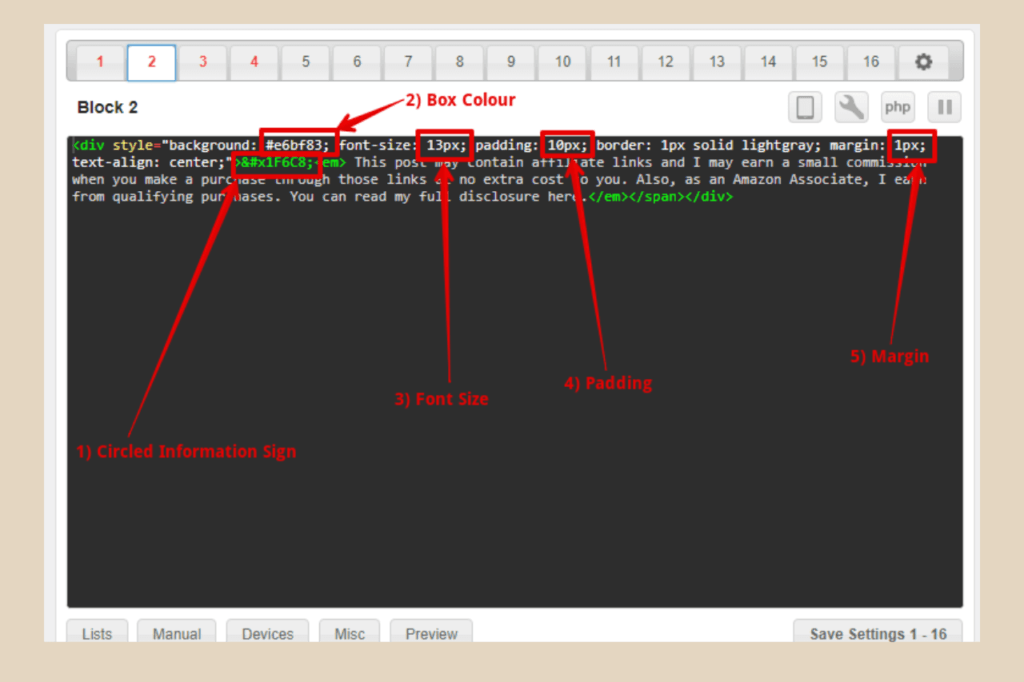
I’ve labelled the above image with numbers 1 to 5 and I’ll show you how to change each part if you’d like to do so.
label 1) Information Symbol
If you’d like to get rid of the circled information symbol, simply delete that snippet of code as shown in the image above, which is 🛈 and the semi-colon at the end of it.
Label 2) Font Colour
If you want to change the colour of the box then simply change the six-digit code after the # as per the image above. All colour codes start with a # so you can leave that there but don’t delete the semi-colon after it, just the six-digit code.
The colour I’m using is #e6bf83 but you can change that to any colour you like by simply finding the code for your desired colour.
Here is a great website for finding HTML colour codes and if you’re anything like me, you’ll probably be playing around with these for hours trying different colours until you find the one you like.

As in this screenshot from the website mentioned above, simply find a colour you like, copy the code and replace mine with the new code.
So if you wanted Blue Orchid for example like the image above, you would use the code #1f45fc (btw, they’re not case sensitive). As you’ve already left the # there, you’ll only need the 6-digit code after it.
Label 3) Font Size
If you want to change the font size, simply change the number, as shown in the above image, to the size you like.
Label 4) Padding
The padding is the distance between the text and the edge of the box and this can also be altered by changing the number as per the image above.
advertisement
Label 5) Margin
The margin is where the width of the box ends against the width of the area you’ve placed it in. For example, if you imagine an A4 piece of paper that you want to draw a box in.
The smaller the margin, the closer the box will be to the edge of the paper. To change this, simply change the number as per the image above.
You can actually play around with all of these so that you can see the difference each one makes until you’re happy with the look of your design. Don’t worry if you mess up and delete important bits of code, you can just recopy the code above and start again.
How To Link Your Top Of Page Disclosure
If you have a full affiliate disclosure page on your site (it’s a good idea to also have a more detailed disclosure) then you can also link to it from your short top-of-page disclosure.
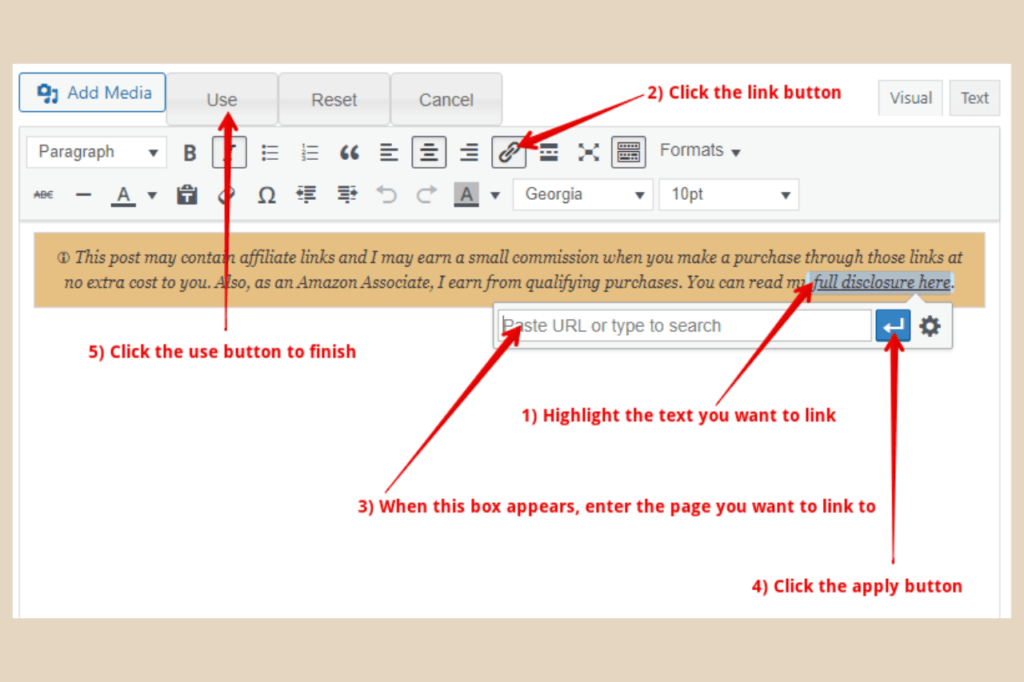
All you need to do is open the visual HTML editor, highlight the text you’d like to link, click the link button, add the page you’d like to link to and click use when you’re finished.
Once you click save settings in the main editor, your new short disclosure with a link to your full disclosure page will now be live.
Why Use A Plugin
In theory, you could just write your disclosure at the top of every post manually or even use a reusable block in WordPress to automatically add it every time you need it.
However, the problem with that is it messes with your SEO and your post excerpts because that snippet of text becomes your first paragraph. There are ways around it but it’s much easier to use a plugin and automate the entire process.
Get Your Disclosure Added
If you have an affiliate site, then it’s so important to have an affiliate disclosure to notify your readers of your affiliate relationships. Hopefully, this post has helped you learn how to add one and customise it to your own liking.
You also got a quick lesson in HTML too while you were here and I bet you weren’t expecting that when you started reading. Either way, I hope it all helped.
If you do have any issues or if you just want to share how you got on with your disclosures, please feel free to let me know in the comments below. I loved to know how they went ?.
Enjoy your new affiliate disclosures.

You May Also Like
- What Is Affiliate Marketing And How To Start Now
- What Is Wealthy Affiliate – Everything You Need To Know
- How To Add An Affiliate Disclosure To Your Posts


Wow this is awesome. I have been manually adding the affiliate disclosure to each page. What a waste of time! So glad to have found out now that there is a plugin that can do this automatically for me. The only problem is that it will probably double up on the disclosures I already have on the site. Is there a way around this?
Hi Michel
You’d either have to manually delete all of the manually inserted disclosures one by one to prevent the double-up or you could use the blacklist feature in the Ad Inserter plugin to stop the automatic disclosure showing up on the posts/pages you’ve already done.
I hope that helps.
This article providing guidance on incorporating an affiliate disclosure into your content is a valuable resource for bloggers and content creators involved in affiliate marketing. It stresses the significance of transparency regarding affiliate partnerships and the potential for earning commissions from recommended products or services. Are there specific legal obligations or recommended guidelines to adhere to when including an affiliate disclosure? What steps can bloggers take to ensure their affiliate disclosure is straightforward, brief, and in accordance with relevant regulations? Your insights into upholding ethical and transparent standards in affiliate marketing are greatly appreciated.
Hi Kiersti
I’m glad you found the article valuable. When it comes to affiliate disclosures, there are indeed legal obligations and recommended guidelines to follow. Here are some steps bloggers can take to ensure their affiliate disclosure is clear, concise, and compliant:
1. Be Transparent: Always be upfront with your audience about your affiliate relationships. It’s essential to let your readers know that you may earn commissions from the products or services you recommend.
2. Placement: Place your disclosure prominently and preferably at the beginning of your content. This makes it easily noticeable and sets the tone for transparency.
3. Use Clear Language: Keep the language simple and straightforward. Use clear and concise terms to explain your affiliate relationships. Your short disclosure should be just that, short and to the point.
4. Disclaimer Pages: Consider creating a dedicated “Disclaimer” or “Affiliate Disclosure” page on your website where you explain your policies in more detail and ideally link your short disclosure to it.
5. Specificity: If possible, provide specific details about the affiliate programs or partnerships you’re involved in. For example, you can mention the company names or networks you work with, which could be included in your full-page detailed disclosure. Amazon for one, are very particular about this one even with the short disclosures.
6. Follow Legal Requirements: Familiarize yourself with the affiliate marketing regulations in your jurisdiction, as they can vary. In the U.S., for instance, the Federal Trade Commission (FTC) has guidelines for affiliate disclosures.
7. Stay Updated: Keep yourself informed about any changes in regulations or best practices related to affiliate disclosures. This ensures that your practices remain compliant over time.
The key is, to be honest right from the outset and provide your audience with information that helps them make informed decisions while maintaining transparency about your affiliate relationships.
I hope that helps.