If you’ve just created a WordPress website, then one of the first things worth learning is how to add a menu in WordPress. Menus are an extremely important part of any website so knowing how to set them up correctly is really important.
Whether you’re looking to create basic menus, category menus, drop-down menus or menus in other areas of your site, like footer menus, etc, this tutorial will show you step-by-step how to create them.
Why Are Menus So Important
Navigation is so important on a website because if your visitors can’t navigate around your site easily, that could be the difference in whether or not they remain on your site.
Poor navigation can actually affect your rankings in the SERPs (search engine results pages) because it affects your user’s experience (UX) and UX is a ranking factor that search engines use when deciding how to rank the posts/pages of your site.
By having well-laid-out navigation on your site, you’re not only improving your user’s experience and improving your bounce rate, but you’re also increasing the time that visitors spend on your site and improving your rankings in the process.
How To Add A Menu In WordPress
To add a menu to your site, the first thing you’ll need to do is to hover over Appearance on the left-hand side of the page in your WordPress editor.
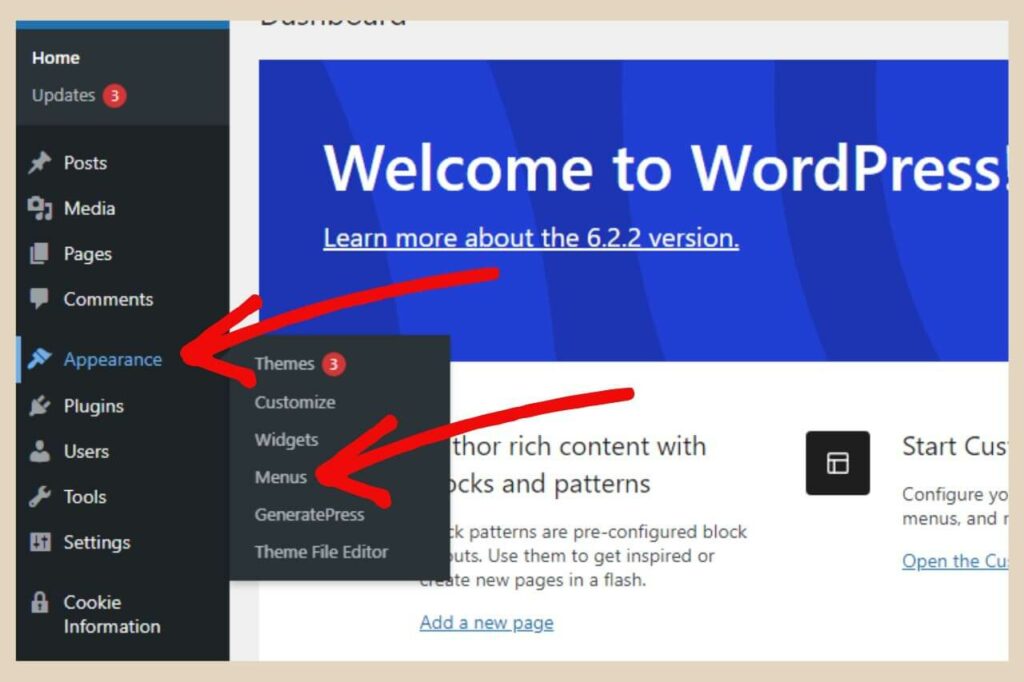
From here, you’ll need to click Menus from the new menu that appears. This will take you to the menu page in WordPress where you’ll be able to create all your menus moving forward.
How To Add A Primary Navigation Menu
As your primary navigation menu is one of the most important, we’ll start with this one. This is the menu that you usually see at the top of most websites and there are several ways to build this out.
Before you start building it out though, you should give your new menu a name first. As this is your main menu, you should call it something that you’ll easily recognise, like main menu or header menu, etc.
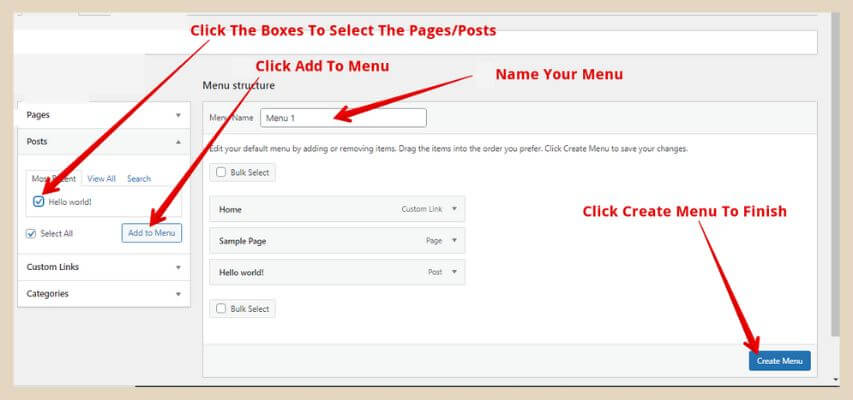
Once you’ve named your menu, you’ll notice on the left-hand side of the page, that there are a few different things that you can add to your menu and these are Pages, Posts, Custom Links or Categories.
We’ll start with pages and posts so to add them to your menu, you simply need to click the checkboxes next to the posts and pages you’d like to add, then click the Add To Menu button to add your selection.
Organising The Order Of Your Menu Items
Once your selection is added, you can now move these items around to display them in the order you’d prefer.
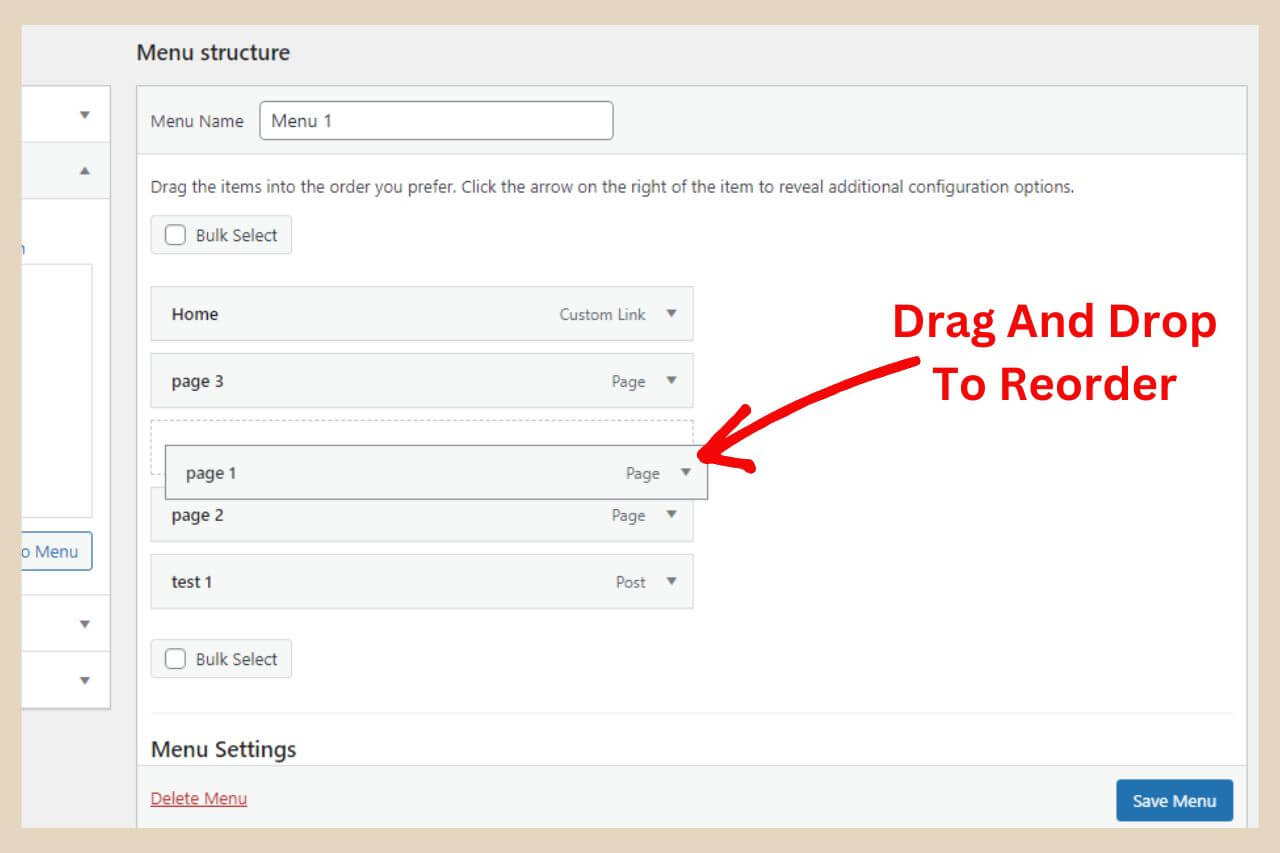
To do this, simply click and drag the page/post and drop it in the position where you’d like it to be and do this with each item until you have them in the order you’d like them to appear on your site.
Once you’re happy with the order, click Create Menu to finish. Once you’ve created a menu, the Create Menu button will change to Save Menu so if you add any new items to your menu in the future, click the Save Menu button to activate the changes on your site.
Manage Your Menu Locations
After you’ve created your first menu, a new tab will appear near the top of the page called Manage Locations. Click this tab and make sure you select your new menu here as the primary menu then click Save Changes to finish.
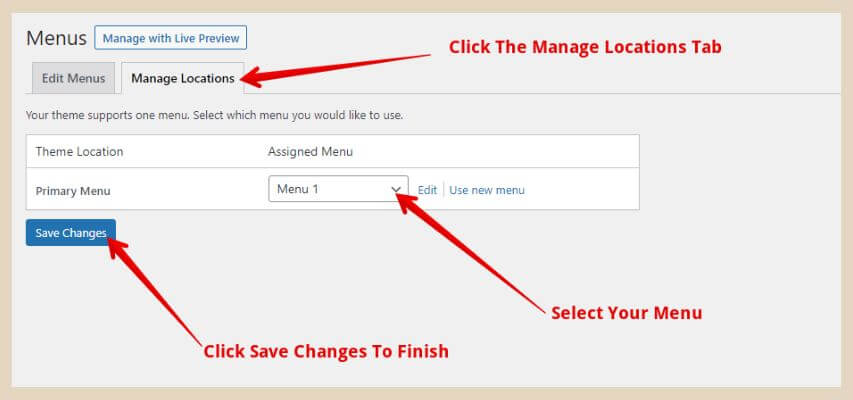
As you can see, this theme only has one menu location (the primary menu location) but some themes will give you more locations. You can also add menus to several other different locations using widgets and I’ll show you how to do that further down.
On a side note, it’s worth mentioning that you should keep your menus on one line. What I mean by that is if you ever look at big professional sites, you’ll notice that their menus only take up one line.
From there, they usually use drop-down menus to expand their navigation even further. The reason for this is that menus that go beyond one line tend to look overcrowded and can be very confusing to visitors so bear that in mind when you’re creating your primary navigation menu.
If your menus end up going onto a second line then that’s the time to consider implementing drop-down menus which I’ll show you how to do in a moment.
How To Add Categories To Menus
If you’d like to add categories to your menu then there are two ways in which you can do this depending on how you’d like to lay your site out.
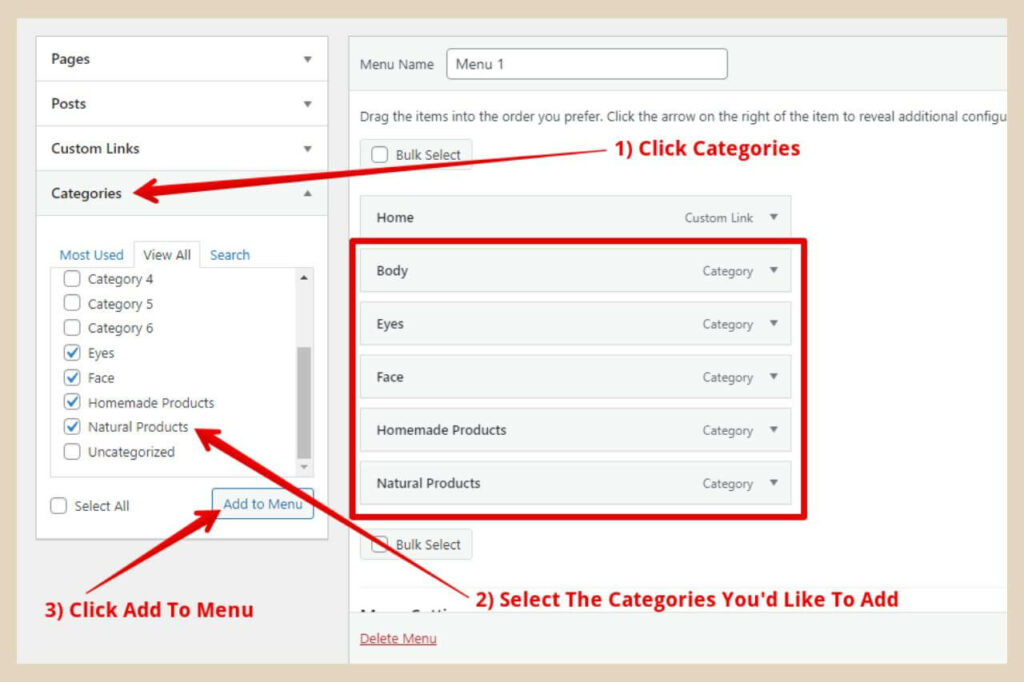
In the first example, let’s imagine you have a skincare site and you’ve set up categories for different posts in the following way:
- Category 1 – Body
- Category 2 – Face
- Category 3 – Eyes
- Category 4 – Natural Products
- Category 5 – Homemade Products
You can actually use each of these categories as menus in your primary navigation menu by adding them in the same way as you added pages/posts to the menu previously.
When you do this, if your reader clicks on let’s say the Body menu, it will take them to a page that has all your posts relating to body skincare (assuming that you’ve already set up categories for your posts).
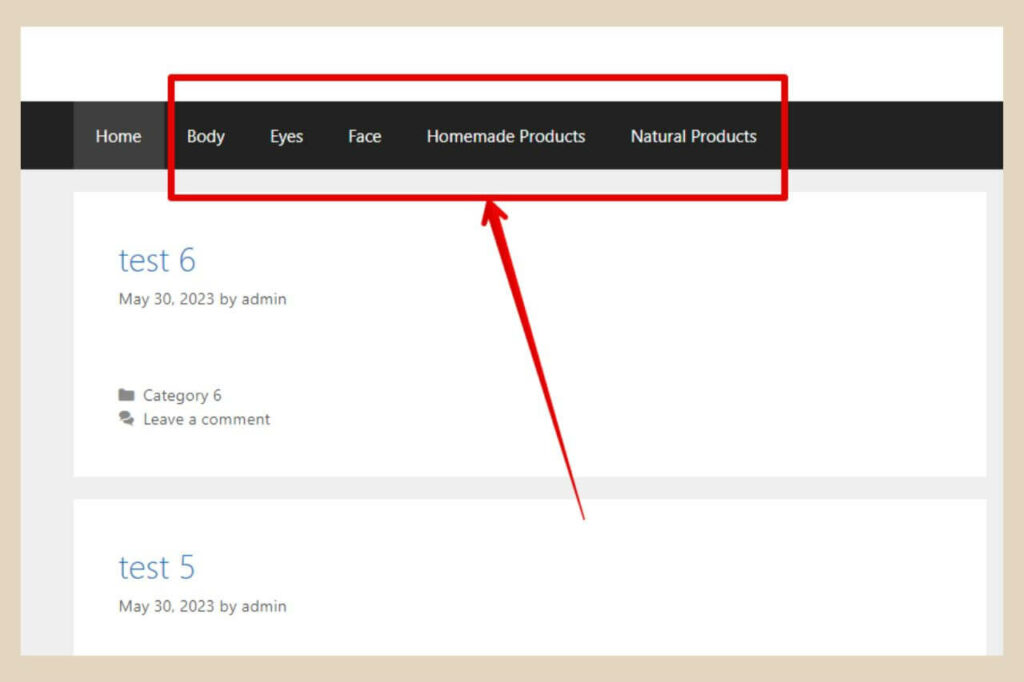
The second way to do this is to just have one of your menu items called categories that drops down to show your list of categories (see method 2 below) and for this, you’ll need to create a drop-down menu.
How To Create Drop-down Menus
Drop-down menus are actually really easy to create and although in this example, I’m using categories, you can use pages and posts as well to create your drop-downs.
Again, there are actually two ways to do this depending on whether or not you want the top menu item to be clickable.
Method 1 – Top Menu Item Is Clickable
If I use the same examples as before, you could use the face category this time as one of your menus, however, you may have other categories that you’ve used to organise your posts even further like face moisturisers, face exfoliants, face suncare, etc.
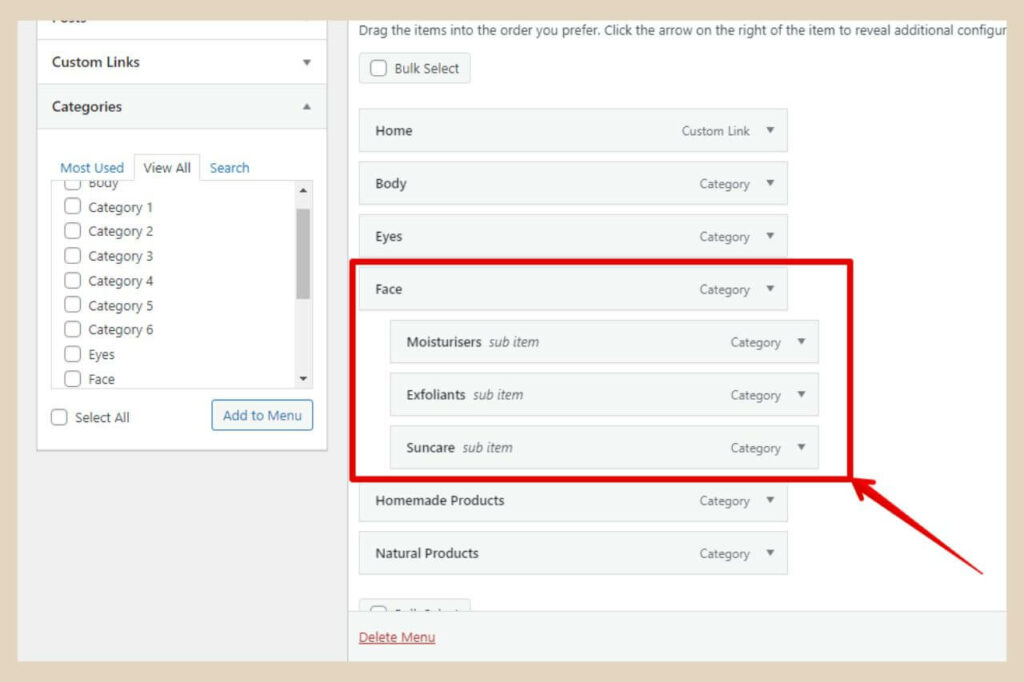
To create a drop-down in this instance, you would select all the categories that you would like to add to the menu just like before.
However, this time, you would drag the categories that you would like to appear as a drop-down over slightly to the right beneath the main category and this would create a drop-down as per the image above.
In this particular example, the face category would be the main menu item and moisturisers, exfoliants and suncare would be dragged over to the right beneath it to become the drop-down menu items.
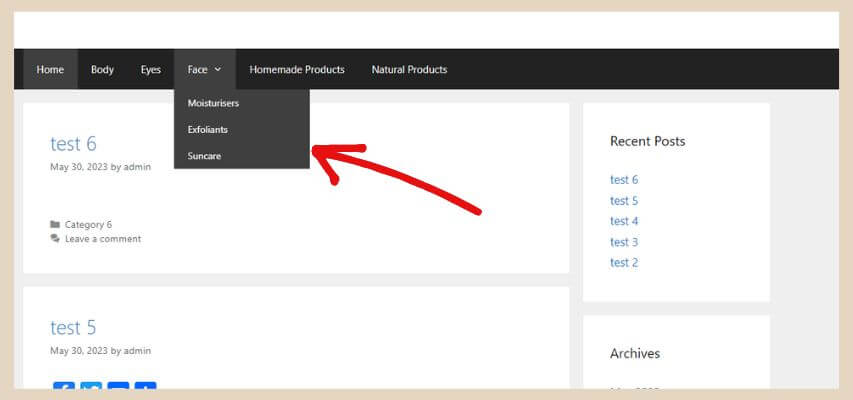
If you make a mistake and pull something over that you didn’t want to be part of the drop-down, simply drag it back fully to the left again and it will no longer be part of the drop-down. Remember to click Save Menu when you’re finished.
Using this method, your main menu item is still clickable (the drop-down appears when your readers hover over it) so if someone wants to see all the posts relating to Face, they can still just click Face and ignore the drop-down.
Creating Drop-down Menus Within Drop-down Menus
You can actually make drop-downs within drop-downs too by dragging an item further to the right beneath a menu item that’s already a drop-down and this will create another menu to the side of it as per the image below.
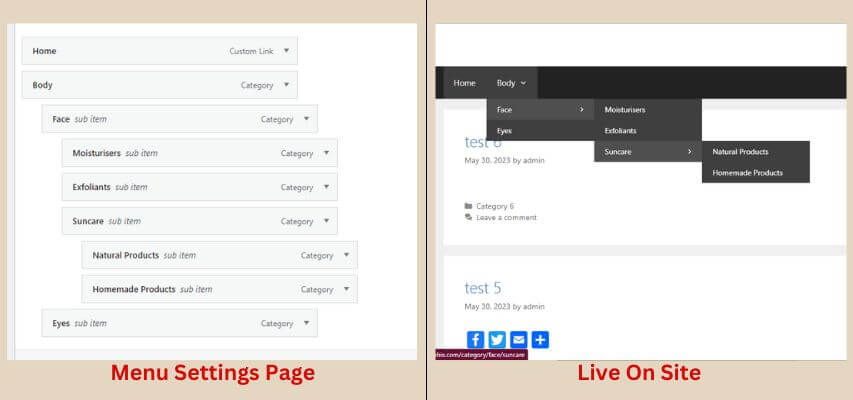
A word of warning though, don’t get too carried away with menus within menus within other menus. You should keep your menus simple, straightforward and easy to use.
Using too many menus within other menus can make your navigation messy and overly complicated so be careful that you don’t add too many.
Method 2 – Top Menu Item Is Not Clickable
The second way to do this is by using a custom link that doesn’t actually go anywhere (not clickable) as your main menu item with your drop-down underneath it.

advertisement
The second way of adding categories that I mentioned earlier is a great example of when you’d use this method. If you imagine that you want to add a list of categories as a drop-down menu but you need a main menu item first to attach the drop-down items to.
You don’t actually have a page or post that lists all of your categories like the face example above so what you need here is some random non-clickable text that describes the menu.
This text doesn’t link anywhere other than displaying your drop-down menu when someone hovers over it. To do this, you’ll need to click on Custom Links.
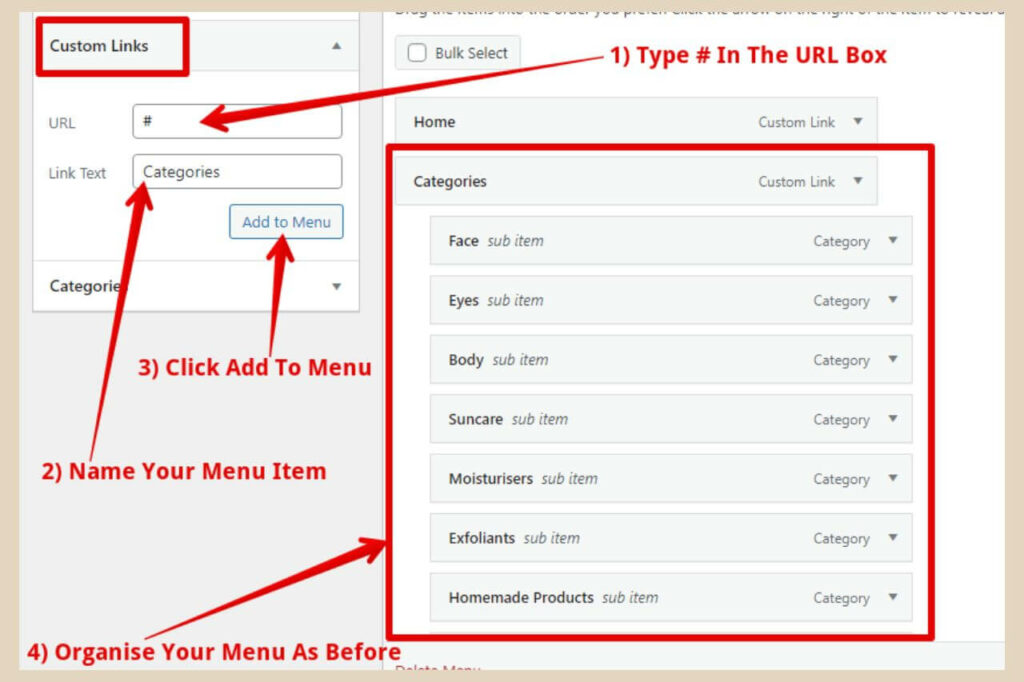
Once the custom links section is open, type # into the URL box. Putting a # here creates a non-clickable menu item. The next step is to give your menu item a name.
In this particular example, we know that we want to display all our categories here so we’d probably call this menu “Categories”. So, simply type in the name you’d like to display in your menu in the Link Text box, then click the Add To Menu button.
From here, you can now add your categories (or whatever items you’re adding) beneath this menu item and drag them one by one to the right to create this drop-down menu.
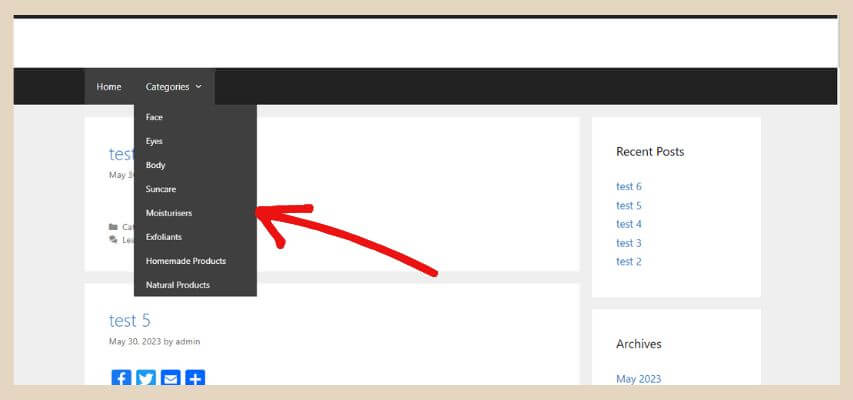
The main menu item (in this instance, “Categories”) won’t be clickable but your drop-down menu will appear whenever anyone hovers over it.
How To Create A Custom Links Menu
The next type of menu you can add is a custom links menu that will take your visitors to certain areas of your site, other sites, your social media profiles, etc. To add this type of menu simply copy the URL of the destination where you’d like the menu item to go to.
Once you’ve copied the URL of this area from the address bar, paste it into the URL Box in the Custom Links section.
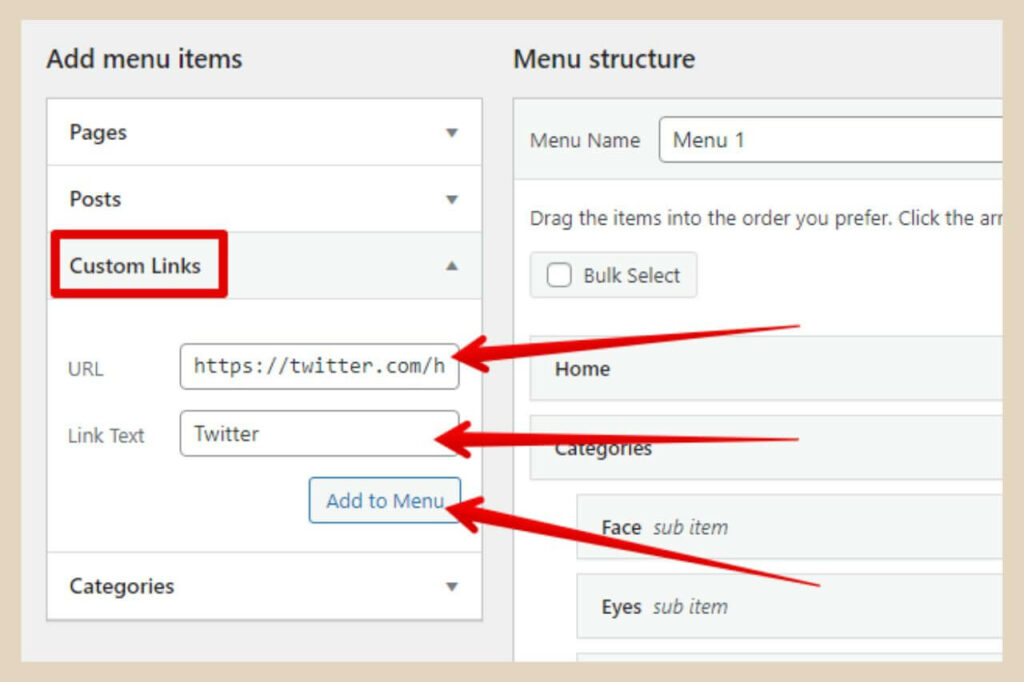
Lastly, give this menu item a name in the Link Text box to give your visitors an idea as to where this menu item will take them, then click the Add To Menu button to add it.
By default, anytime you add a new item to the menu, it automatically goes to the bottom so drag and drop your menus to position them in the order you’d like them then click Save Menu to finish.
How To Remove Items or Delete Entire Menus
If you’ve added an item to your menu that you no longer want there, simply click the arrow on the far right of that menu item to open up more options.
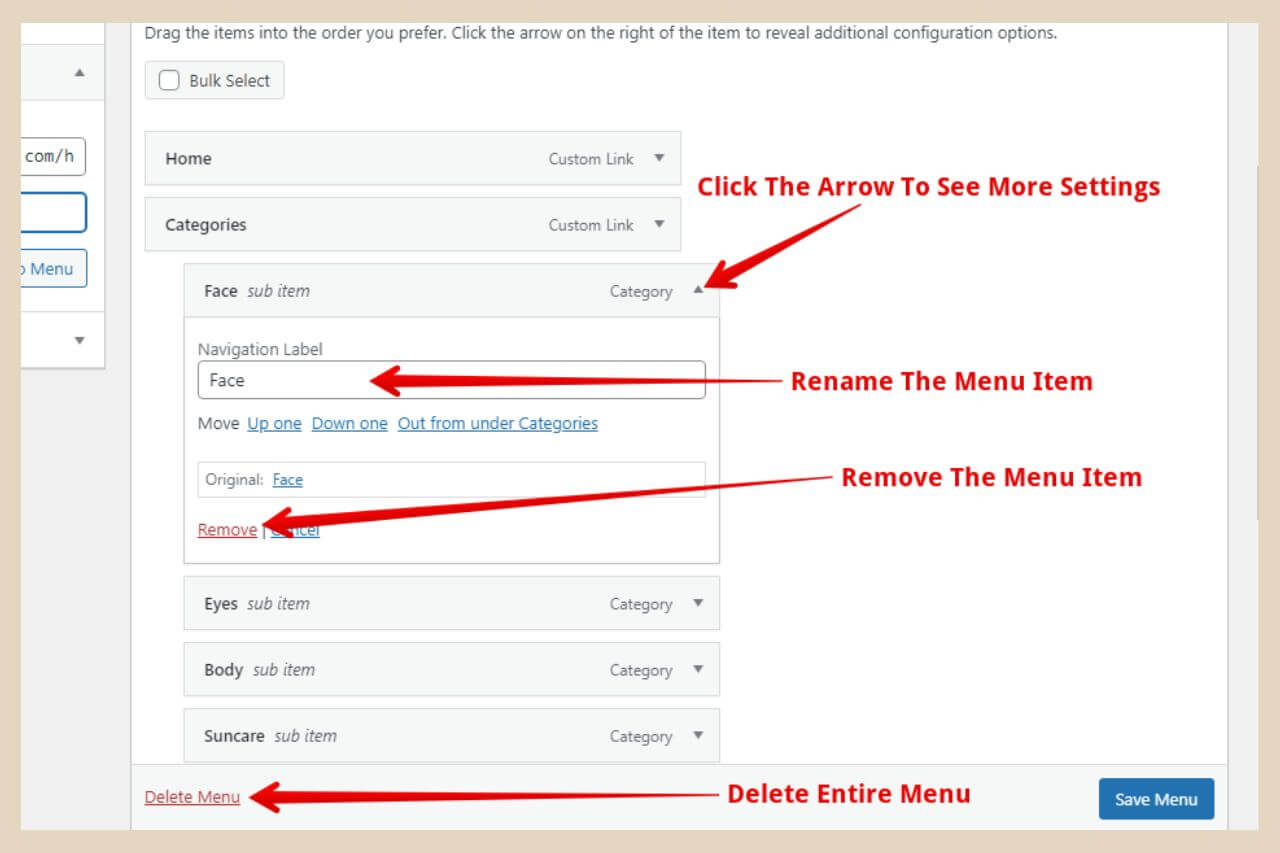
From here you can simply delete this item from the menu by clicking the “Remove” link (you can also change the label name for the item here too).
If you’d like to delete an entire menu, simply click the “Delete Menu” link at the bottom of the page whilst in the menu you’d like to delete.
How To Create Other Menus On Your Site Like A Footer Menu
Most sites will use their primary navigation menu for all their content and then use separate menus in other areas for legal/informational type pages. A footer menu is one such example of this where you’d often find pages like a privacy policy, a disclosure, an about page, etc.
If you’d like to create more menus like this on your site, you can do that here too. To do this, you’ll need to click the “Create A New Menu” link near the top of the page. Next, you’ll need to give this new menu a name.
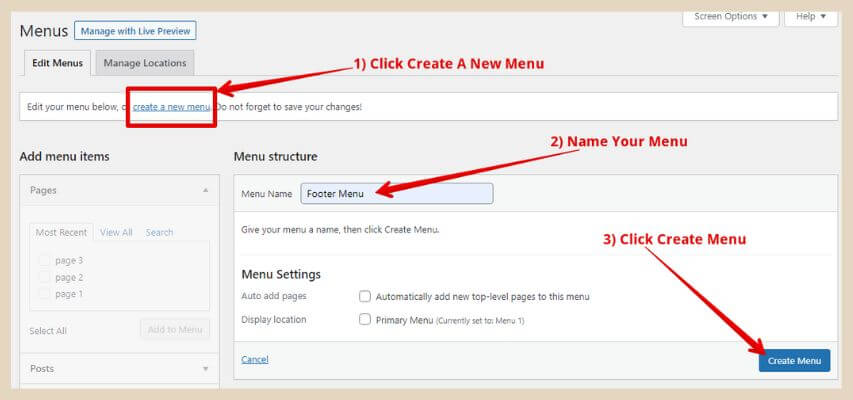
I tend to name my menus by the location where I plan to put them so if I’m using this new menu in the footer, I’d call it Footer Menu or if it’s for the sidebar, I’d call it Sidebar Menu and so on.
Once you’ve named it, click Create New Menu and you can now start adding items to it in the same way as before. Once you’re happy with your menu, click Save Menu to finish.
The next step is to add the new menu to your desired location and for this, you’ll need to use widgets. In this example, I’m going to be using the footer area but you can use these same steps to add it to any widget area that you’d like.
Adding Your Menu To A Widget Area
To add your menu to a widget area, hover over Appearance on the left-hand side of the page in the WordPress editor, then click Widgets from the new menu that appears.
Depending on the theme you’re using, you’ll probably have different widget areas available so choose the one where you’d like to add your menu.
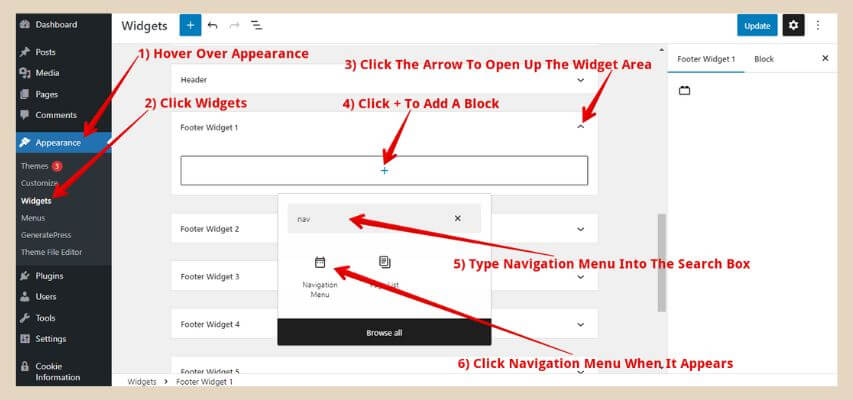
To expand a widget area if it isn’t expanded already, click the down arrow on the far right of the widget to open it up. Next, click the + icon to add a block to the area.
In this instance, you’ll need a Navigation Menu block so type Navigation Menu into the search box of the small window that appears. Once the block shows up, click on it to add it to the widget area.
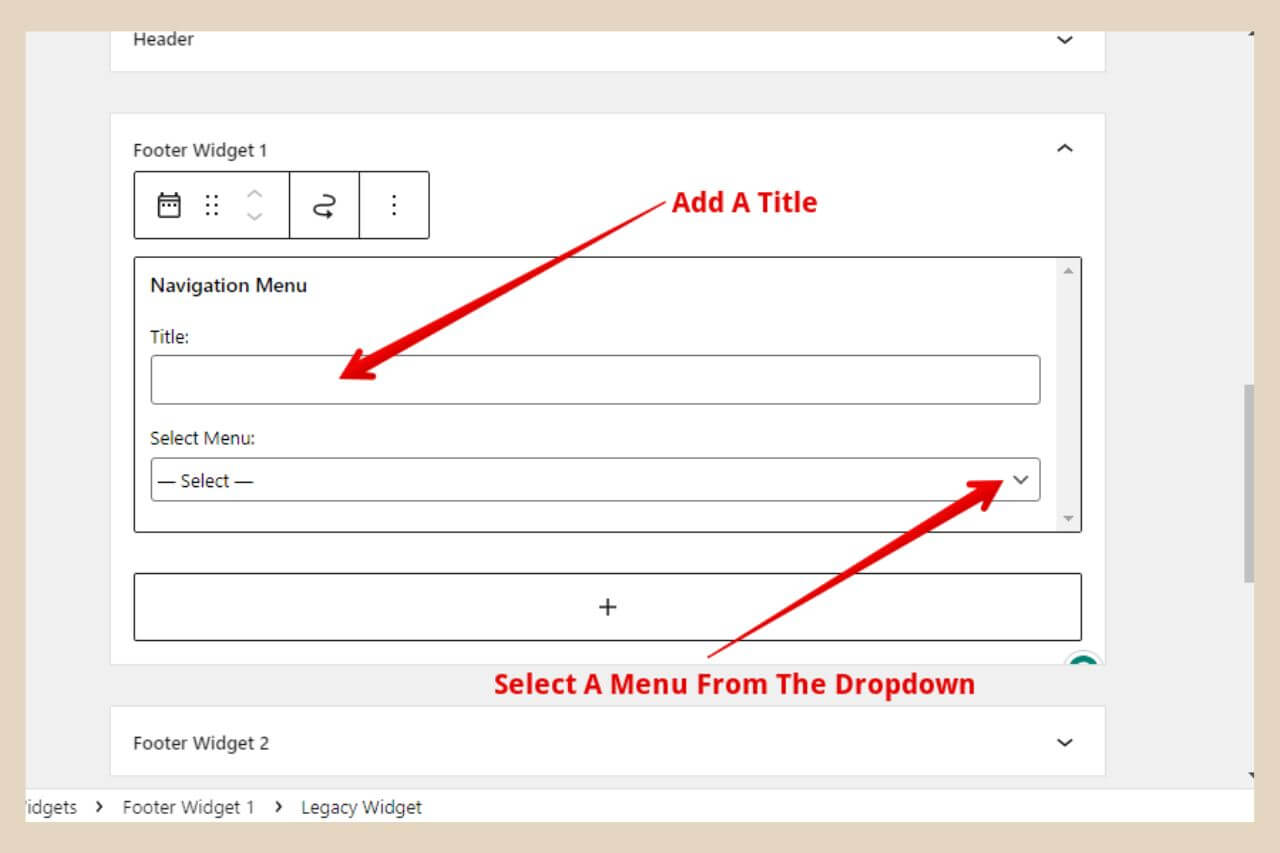
On the navigation menu block, use the drop-down menu to choose the menu you’d now like to add. Any menu you create on the menu page will be available on the navigation menu block. You can also add a title here which will appear above the menu.
If you’re using other blocks within the same widget area that don’t give you the ability to add a title (meaning you have to add one manually if you want one by adding a heading block above it), you could just leave the title area on this one blank.
You can then add a heading block above this menu block so that you can keep the title font styles the same throughout your widget area. Once you’re ready, click the Update button on the top right-hand side of the page to finish and your new widget area menu will be live on your site.
Let’s Get Those Menus Added
You can add menus to any area of your site that allows you to add blocks so now that you know how to add them, it’s time to get those menus added.
I hope you’ve found this tutorial helpful but if you do get stuck anywhere and need some help, please let me know in the comments below and I’ll be more than happy to help out.
Happy Menu Adding

You May Also Like
- How To Display Recent Posts With Thumbnails In WordPress
- How To Add An Affiliate Disclosure To Your Posts
- What Is Wealthy Affiliate – Everything You Need To Know

