Last Updated: July 26, 2023
Want to learn how to add columns in WordPress? Well, you don’t need to add any code or even use a plugin to do it.
All you need is the columns block that is already built-in to the WordPress block editor and it’s very simple to use.
With this block, you can create your own columns or you can also use some predesigned ones that WordPress already has built-in within its Patterns area.
In this tutorial, I’ll show you how to use and customise the columns block and I’ll also show you where to find predesigned column patterns which you can also customise in the same way.
How To Add Columns In WordPress
There are several reasons why you may want to use columns in WordPress. You may want to create two side-by-side comparisons of a product or service.
You may want to create buttons that you want to sit side by side to send your visitor off to different retailers for the same product.
Maybe your just looking to create a magazine-style layout on your site. Well, a Columns Block can achieve all of those things for you.
So to get started, head to the post/page where you’d like to add some columns. Once you’ve decided where you’d like to place the columns, click the + icon to add a new block.
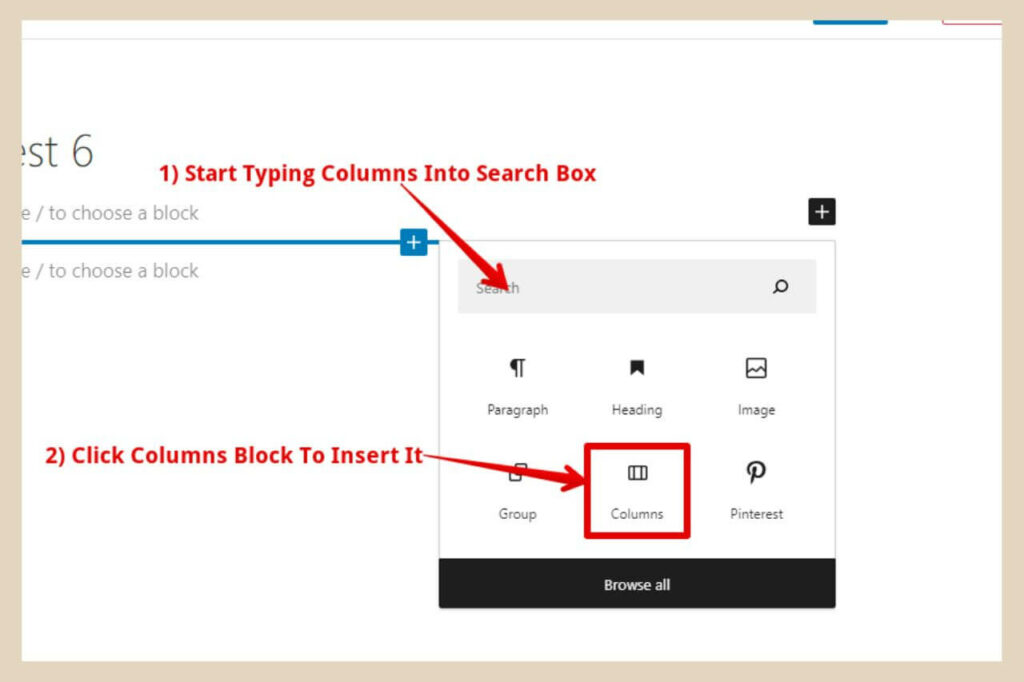
When the small window appears, start typing Columns into the search box and when the Columns block appears, click on it to add it to your post.
Choose A Columns Layout
Once you’ve clicked on the columns blocks, a window will appear that will give you several layout options for your columns as per the image below.
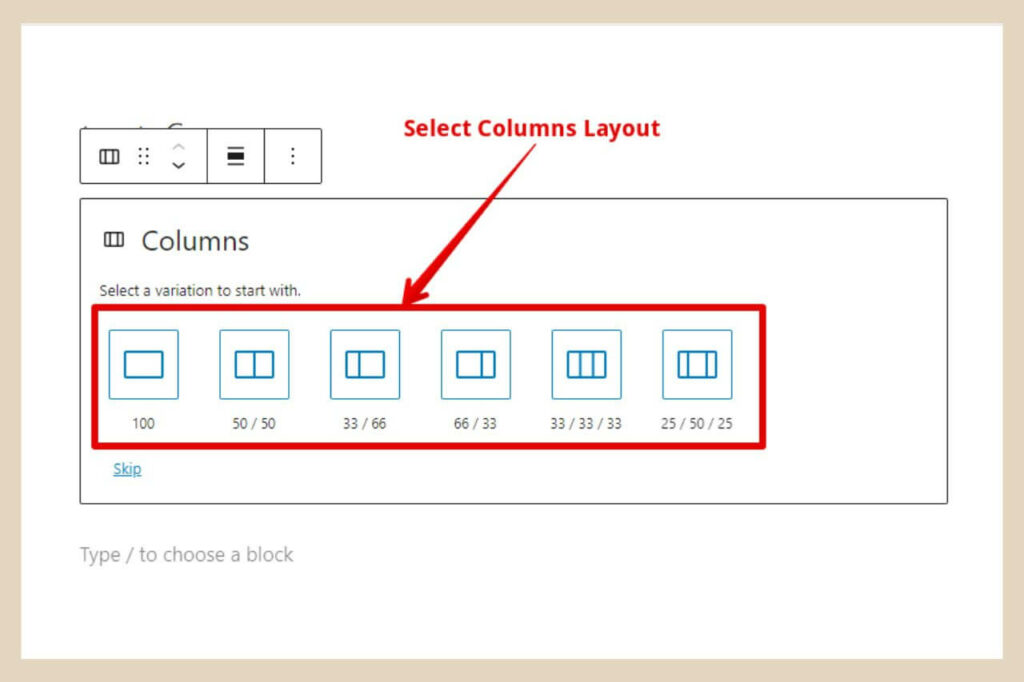
Choose a layout option that best suits your needs and some small blocks will be inserted across one line within your post to represent the layout style you’ve chosen.
In the below image, I’ve chosen three equal-sized columns (33/33/33) and as you can see, this has placed three equal-sized blocks across one line.
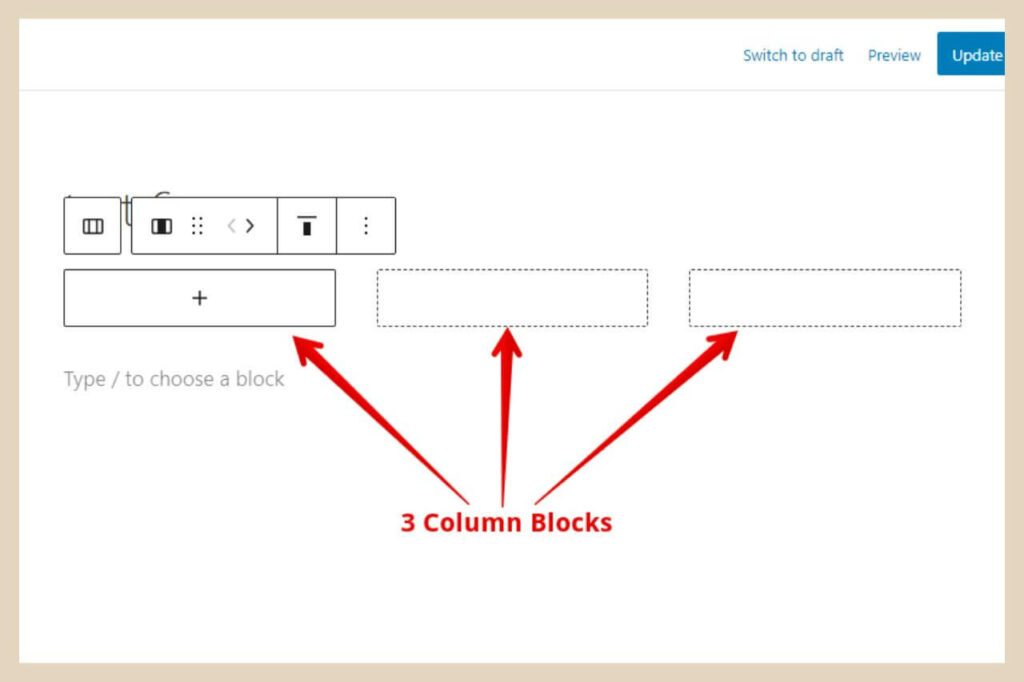
From here, you can now start adding any other blocks that you’d like into each of the columns.
Adding Other Blocks To Your Columns
To add other blocks to your columns, simply click on one of the column blocks and you’ll see the + icon which you can then click to add your block of choice.
You can actually add as many blocks as you like to the column and these blocks will be placed beneath each other within the column.
To do that simply hover your cursor just beneath the first block and another + icon should appear so you can add more blocks in the usual way.
Building Your Columns Design
In the below image, I’ve added an image block to the top of the column followed by a heading block, then a paragraph block and I’ve finished by adding a buttons block.
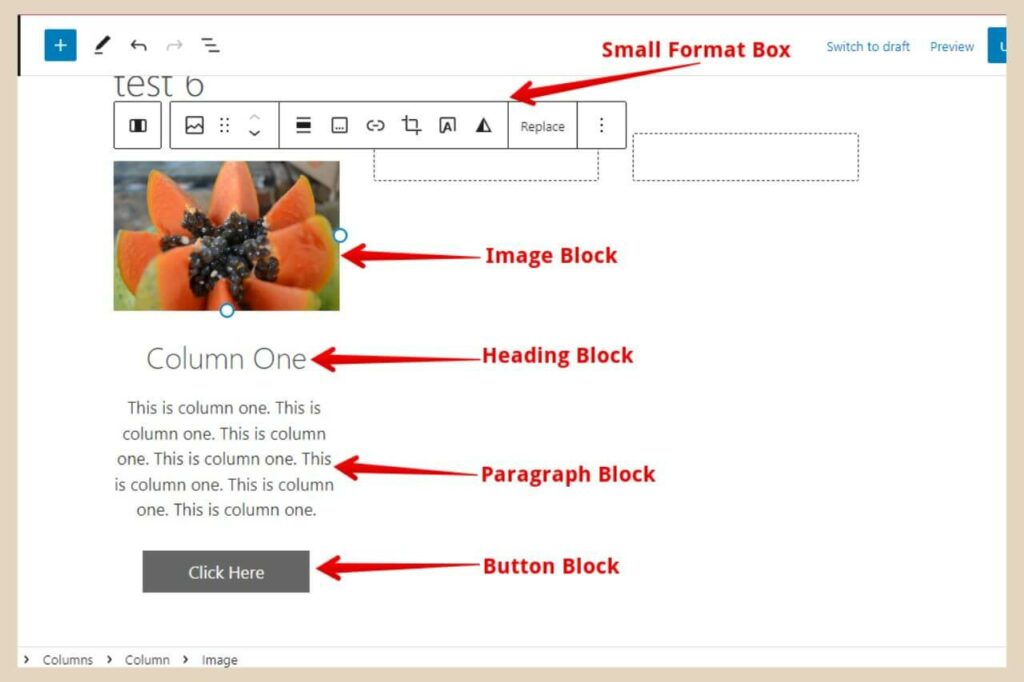
As with all blocks in WordPress, you can customise each block within the column individually by using the small format box that appears whenever a block a selected or by using the setting on the right of the page.
So if you want to centre the heading or paragraph text, make the heading bold or change the text colour for example, you can do that by clicking on the block you want to customise.
You can then use either the small format box or the settings on the right to make your changes.
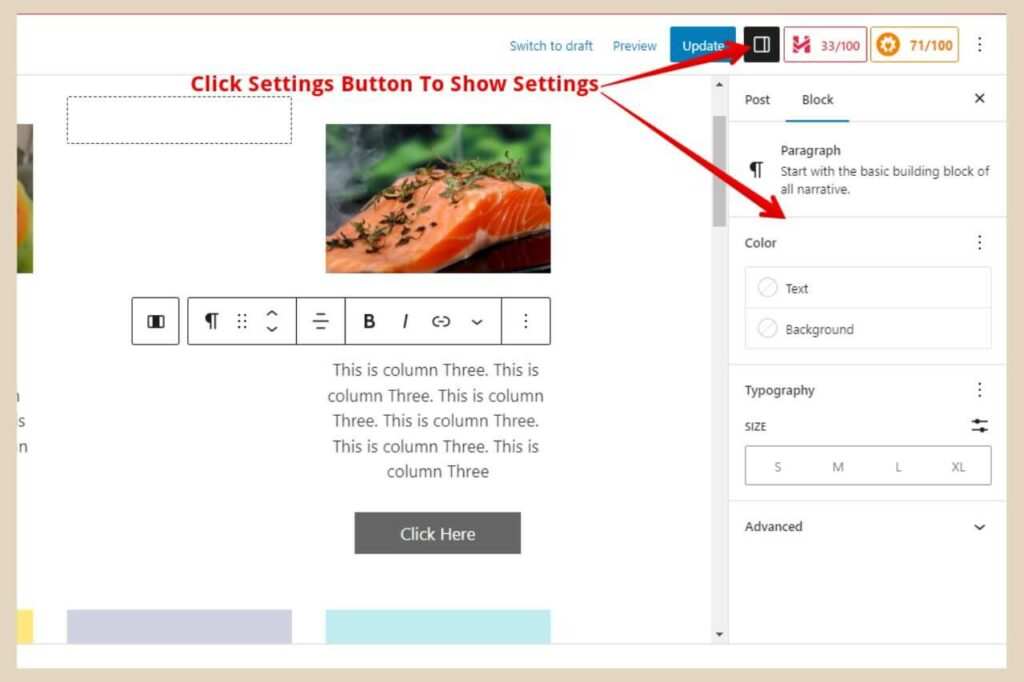
If you don’t see any settings on the right, click the settings button to the right of the Publish/Update on the top right of the page to show them and make sure Block is selected at the top of the settings.
You can also customise the individual columns or the entire columns block too by selecting them individually or as a whole.
How To Customise An Individual Column
To customise an individual column, you’ll first need to select it and to do that, you’ll need to click on the Columns icon which is on the far left of the small format box.
If you click it once, that will select the column you’re currently working in. If you click it twice, that will select the entire column block and all the columns within it.
As we only want the individual column here, just click it once to select the column you’re currently working in and a blue outline should surround the individual column to confirm your selection.
From here you can change the vertical alignment of the content within the column using the small format box and you can change the width of the individual column using the settings section on the right of the page.
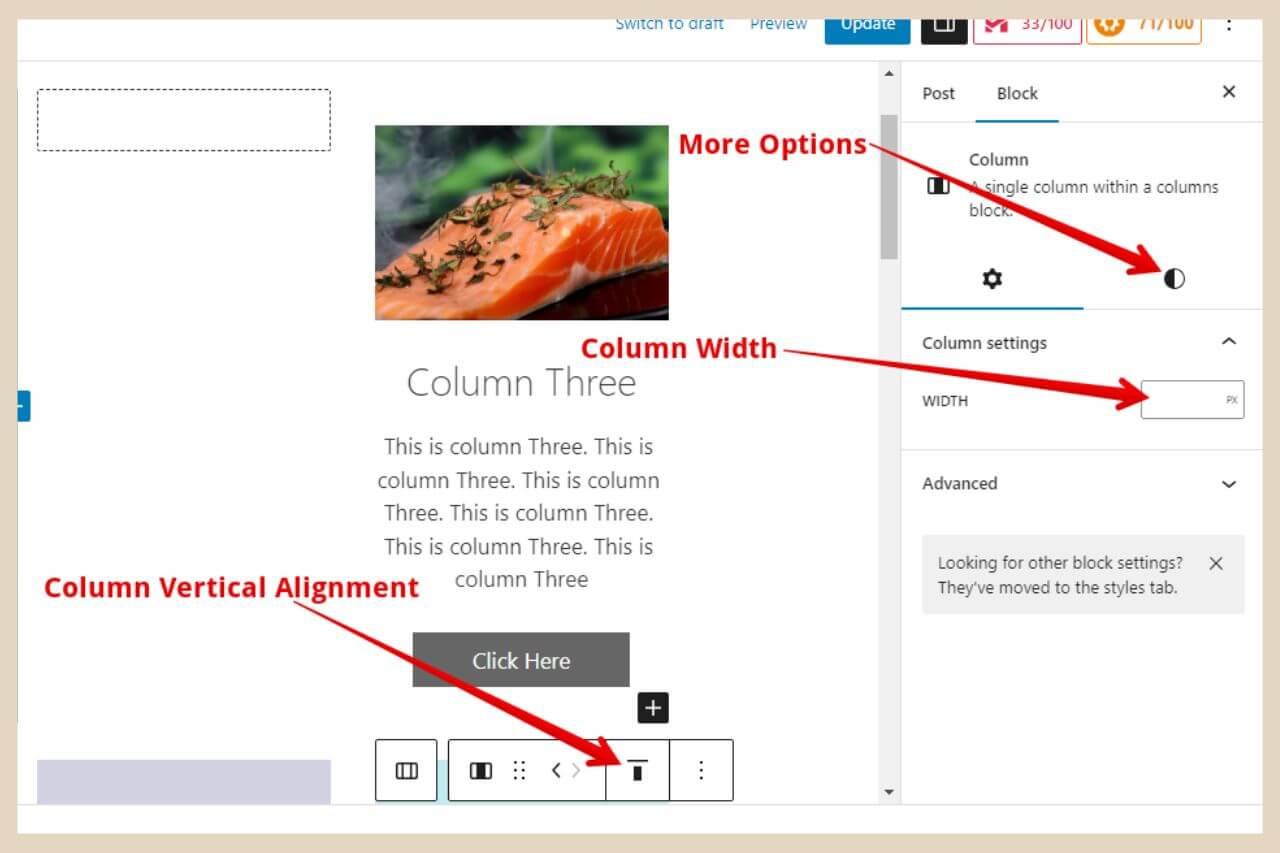
To change the width, simply enter a new width value into the width box in the settings area, although this will alter your column layout and your other columns will adjust in size to accommodate these changes.
Changing The Background Colour Of An Individual Column
If you’d like to add a background colour to your column, simply click the half-coloured circle (Styles Button) to the right of the cog wheel and this will open up more options where you can make more changes.
You’ll also notice some text options here too but if you have several different text blocks added to the column then the text section here will only make changes to whatever text block you had selected prior to selecting the whole column.
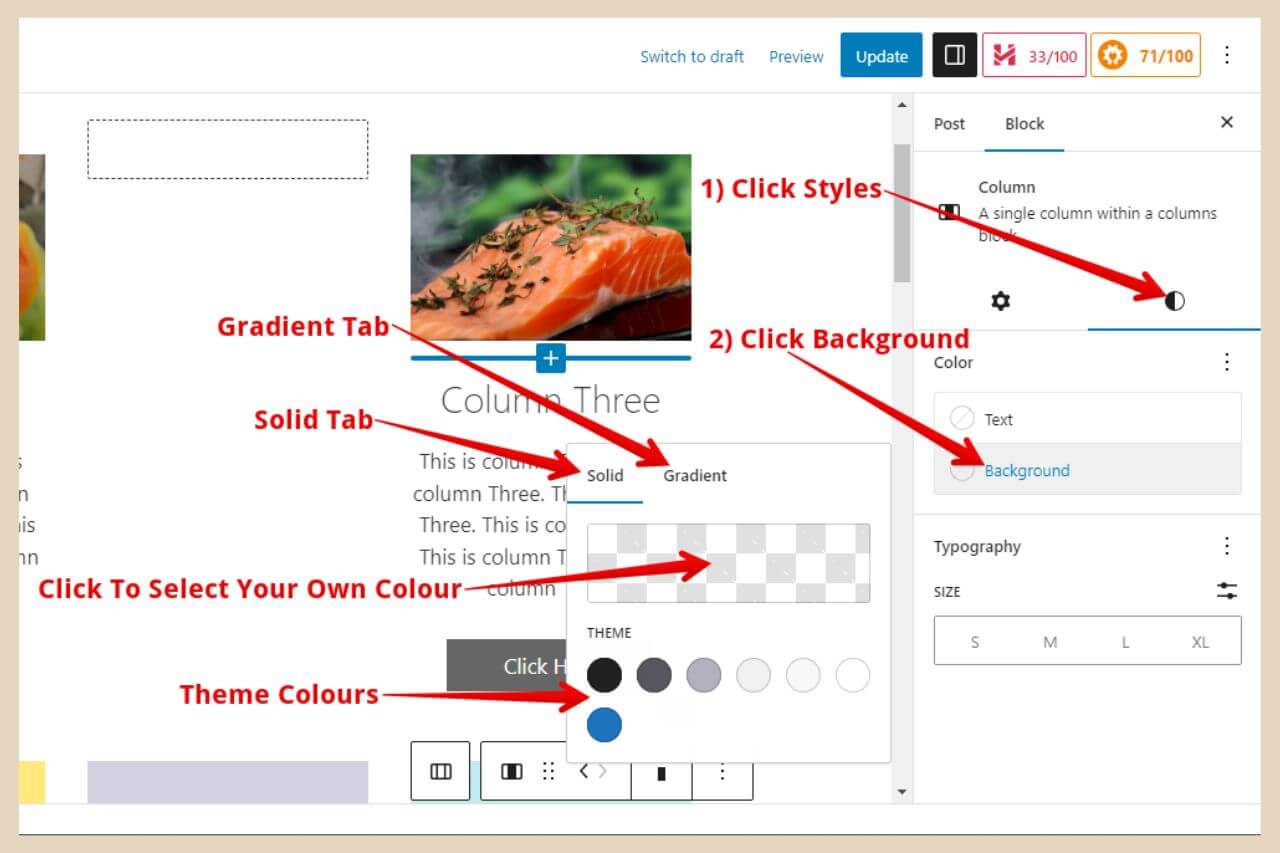
To change the background colour of the individual column, simply click background from the settings options and a small window will appear.
At the top of this window, you’ll notice two tabs, a solid tab and a gradient tab. The solid tab will be selected by default and this is where you can select a solid colour background.
You can either select one of the theme colours at the bottom of the window or you can click on the checkered box at the top which will open up another window where you can choose your own colour.
Using A Gradient Colour For Your Background
If you’d rather use a gradient (several colours that blend and change into one another), then click on the gradient tab and a different window will appear. In this window, you’ll be able to choose a selection of presets from the bottom of the window.
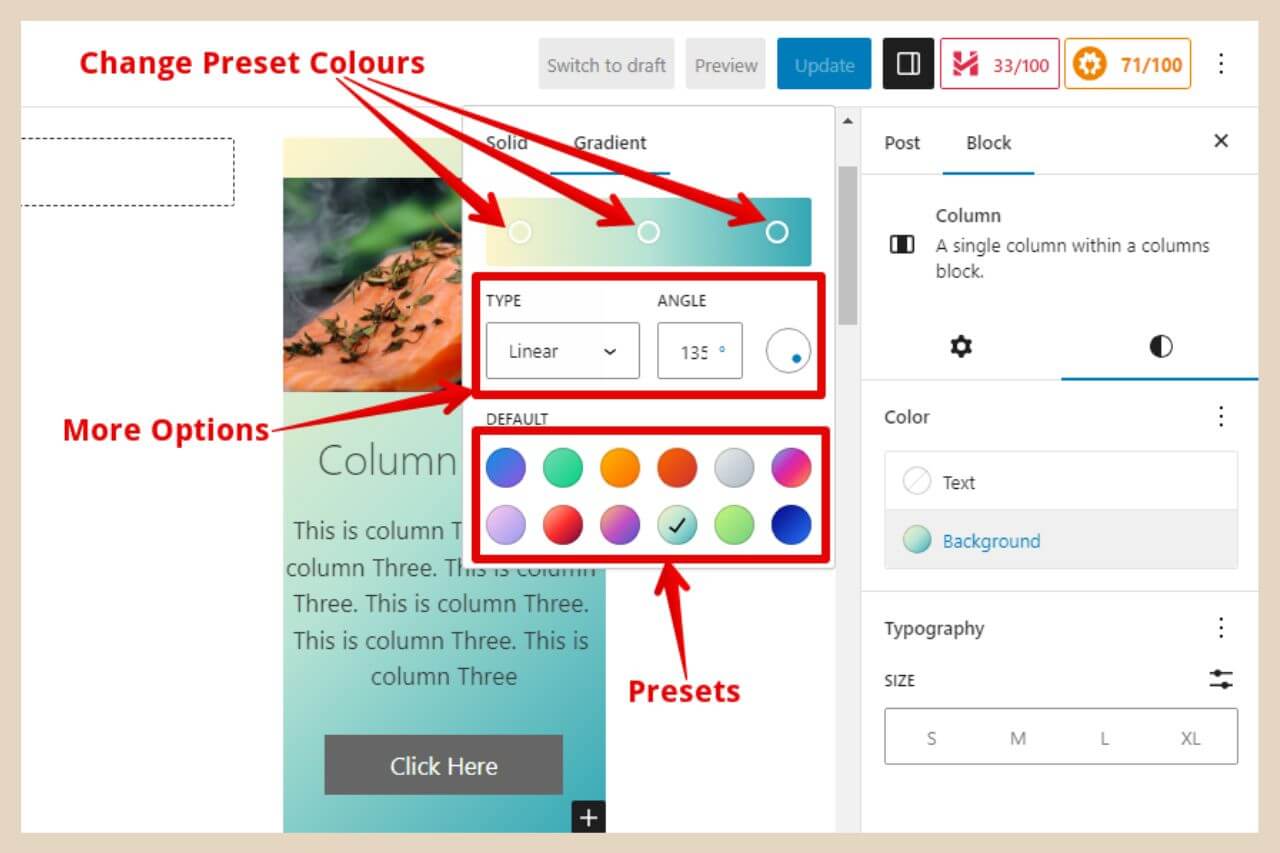
If you’d like to create your own gradient colours, simply click on any of the presets and the gradient will be displayed in the box at the top of the window.
From here, you can click on the circles in the colour box that represent each colour in the gradient to change one or all of the colours within that preset to create your very own unique gradient.
You can customise these gradients even more and I have a full tutorial on how to do that here if you’d like to check it out.
One thing you will notice, however, is that when you add a background colour to an individual column, this emphasises the fact that there’s no padding in the column.

advertisement
What I mean by that is that the text will sit right up against the edge of the column. Unfortunately, there are no settings to change this so your only options are to either add some custom CSS or to centre your text and hope that this creates some space from the edge.
However, WordPress does have some predesigned columns that you can use that do have padding within the column and I’ll show you where you can find those in a moment.
Making Changes To The Entire Column Block
If you’d like to make changes to the entire column block, then click the columns icon on the far left of the small format box twice. A blue outline should surround the entire column block to confirm your selection.
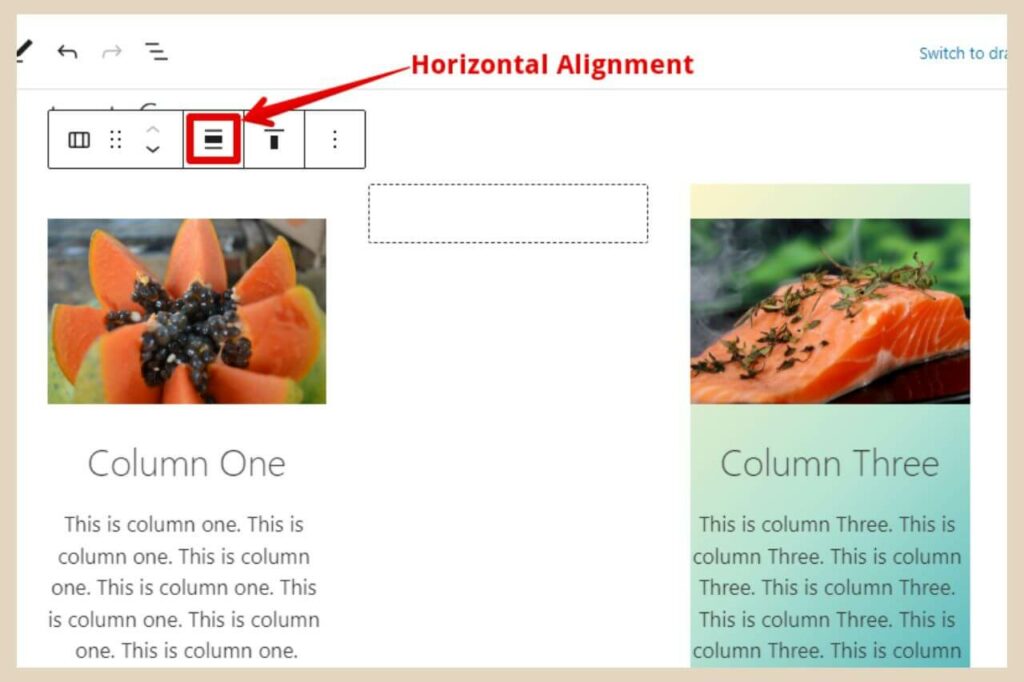
From here, you can use the small format box to change the columns block alignment which will change how far your columns block will stretch across the width of your content area.
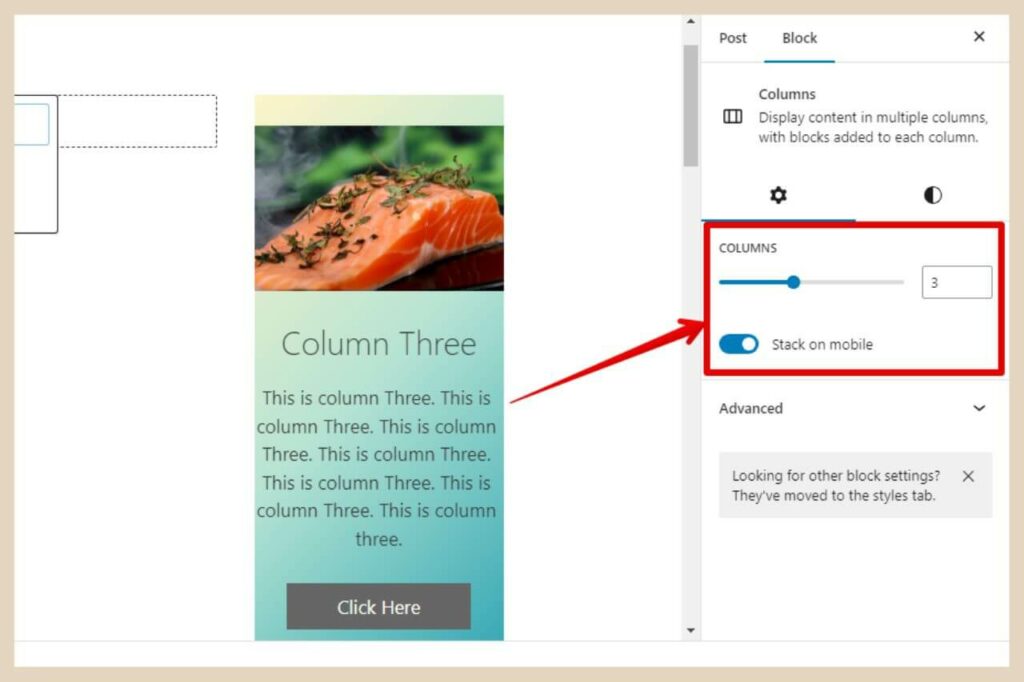
You can also use the settings area to make changes to the number of columns within the block. There’s also an option which you can turn on or off that will stack the columns on mobile screens and this is set to on by default.
If you click the half-coloured circle again (styles), this will take you to the area where you can add a background colour to the entire columns block and as before you’ll have the option to use a solid colour or gradient colour.
This can help you create banner styles as you can see from the image below. This is the same three-column block just with an image in columns one and three and some text and a button in column two.
I’ve vertically aligned column two to the centre which moves all the content to the centre rather than the default top and the entire column block has been given a background colour which gives it this banner effect.

Adding colour to the entire block may adjust the size of your columns depending on their layout and the blocks use within them (they may get narrower to accommodate the extra colour around them).
So you may want to change the horizontal alignment on the small format box if this does happen and you’re not happy with the new look.
Columns May Look Different Between The Editor And Your Live Site
Something worth mentioning here is that the way the columns look in the editor isn’t always identical to the way they look on your site live.
In the WordPress editor, the banner above has that colour all the way around it including around the entire outside of the images but on the site, it looks like the image above.
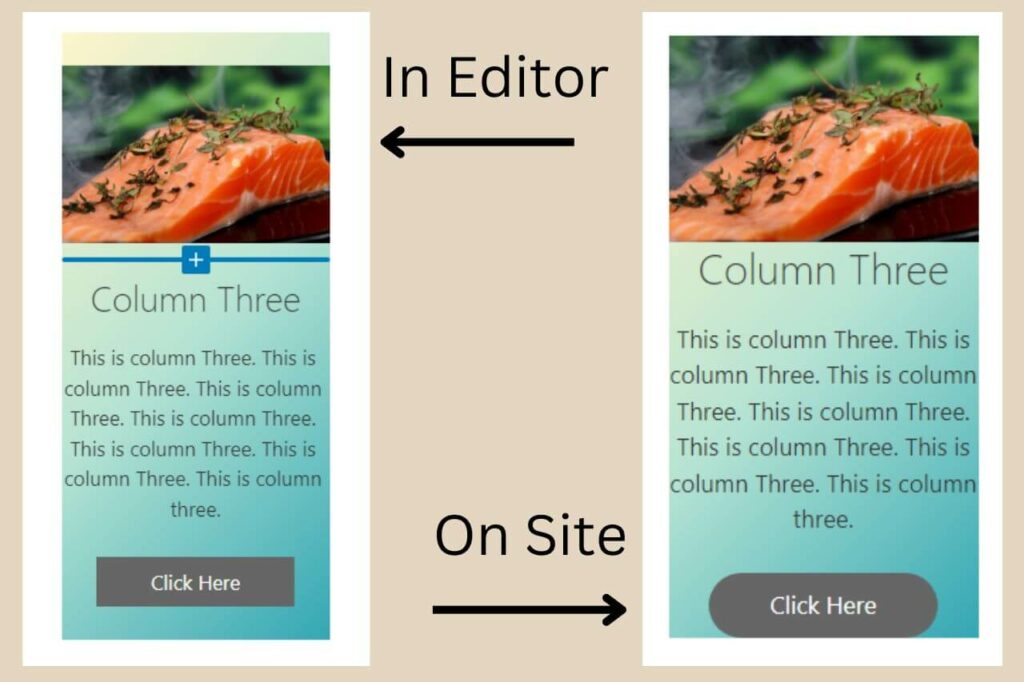
As you can see in the above image, there are quite a few more differences. The image on the site has no colour above it (which I actually like) like it does in the editor.
There’s also no space between the bottom of the image and the heading. The button is also a different shape and it sits right at the bottom edge of the column unlike in the editor where there’s colour below it.
All of these things are easily fixable though. For example, adding an empty block beneath the button will create space between it and the bottom edge of the column.
The same works for creating a space between the image and the heading or the image and the top of the column. The button shape can be changed in the button block settings on the right in the editor (Border/Radius Section at the very bottom).
So with that in mind, it’s worth using the Preview button at the top of the page whenever you make any adjustments just in case things don’t look the way you expected them to.
Using Predesigned Column Patterns
If you’d prefer to use a predesigned column, you can do that by heading to the Patterns area. To get there, simply click the + icon to add a new block and when the small window appears with the search box, click the Browse All button at the bottom of the window.
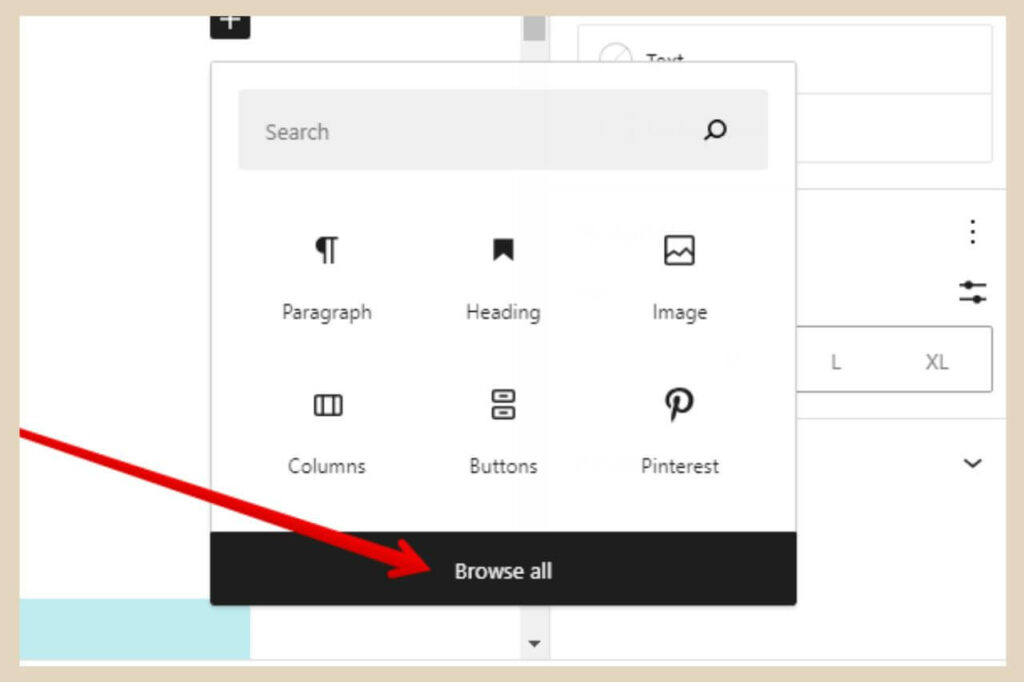
This will bring up a new section on the left of the page that shows all the blocks available for use.
At the very top of this section, there’ll be three tabs just below the search box and the middle one is Patterns and that’s the one you’ll need.
So click the Patterns tab and a list of more options will appear beneath it. If you’ve never seen or used this section before then it’s well worth looking around here as there are many predesigned patterns that you can use to jazz up the design of your site.
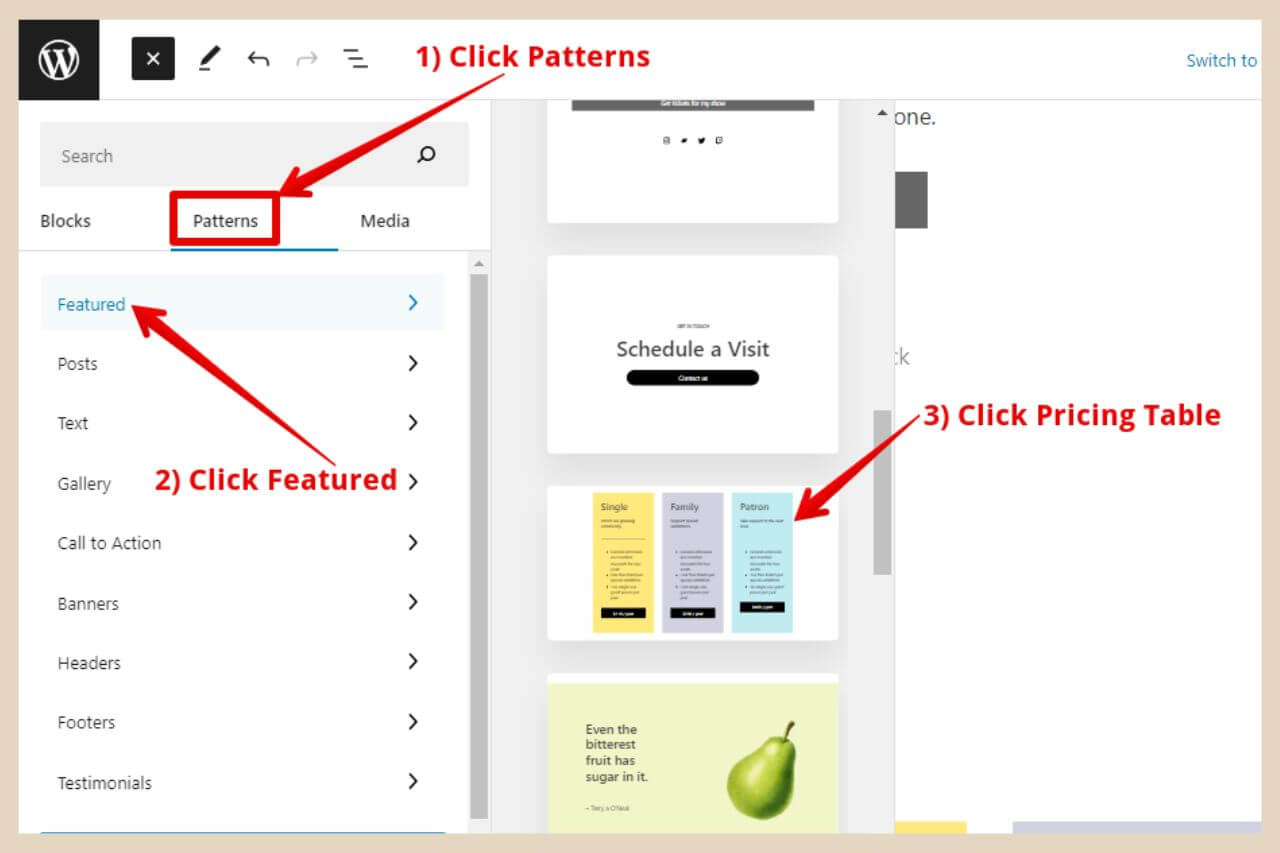
As it’s a particular column design we’re after, click the Featured section and another window will open up to the side with a selection of different patterns.
There are a few different column patterns here that you can choose from but for the sake of this tutorial, I’m going to use the Three Column Pricing Table which you’ll find if you scroll about halfway down the results.
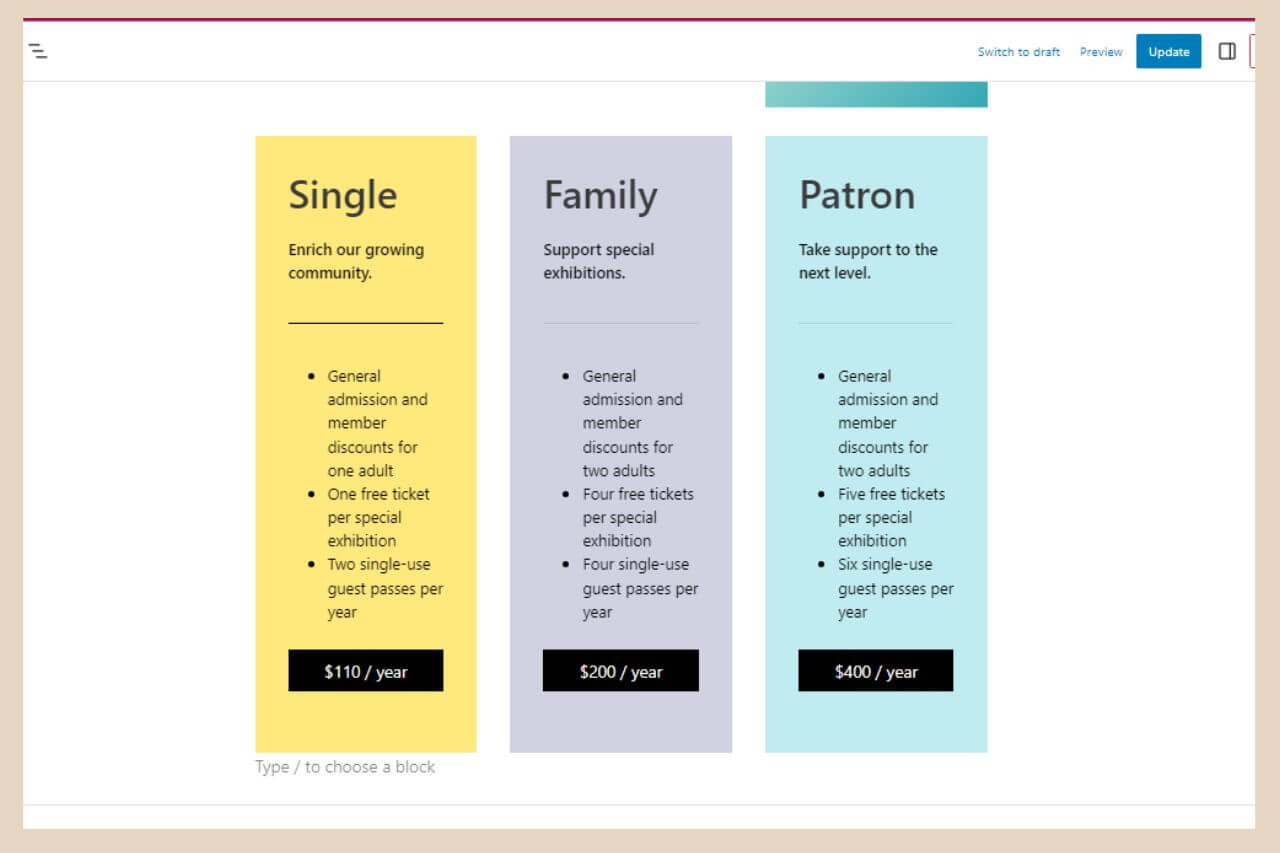
To add one of these patterns to your post, simply click on one to insert it. All of these patterns are completely customisable so you can delete the blocks that are currently there and then add your own blocks to create columns to your liking.
Some Things You Can’t Change With Certain Patterns
You can also change all the other aspects of these columns in the same way as we did earlier using the small format boxes or the settings area.
However, there is one slight difference between this particular predesigned columns block and the regular columns block that cannot be changed and that’s the fact that there’s padding added to these columns.
This means that you don’t have to worry about the text running right up to the edge of the column if you keep a coloured background.
The only downside to this is that if you’re adding an image and you like the effect of the image stretching to the edges of the column, you won’t get that with this pattern because of the padding.
Below is an example of how I customised the regular column block and the patterns column block that had padding in the exact same way and you can see how they differ.
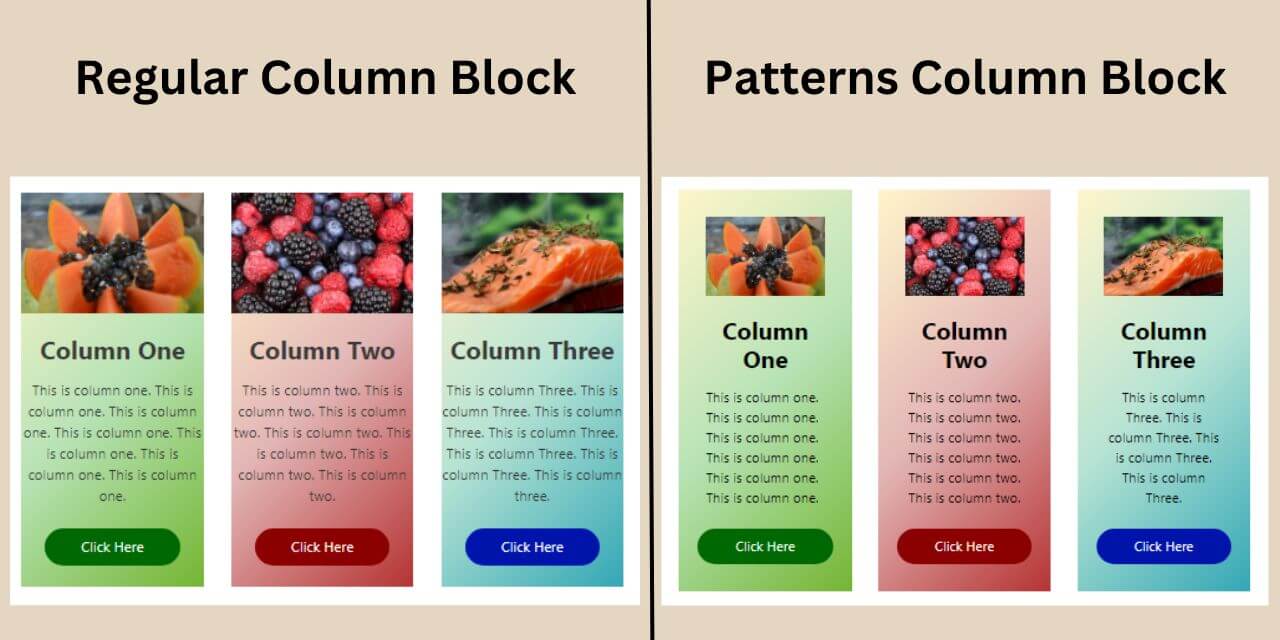
As you can see, you can create almost exactly the same style columns but the padding in this particular patterns column does change the final result.
Either way, these columns can be used to make important parts of your content stand out regardless of which style you decide to use.
Let’s Add Some Columns
Columns are a great way to organise your content and create different layout designs. They can help you emphasise sections of your content or even build your own banner-style designs and they’re really easy to use.
So why not have a go for yourself and see what kinds of column designs you can create? I hope you’ve found this tutorial helpful and as always, if you need any help, please let me know in the comments below and I’ll be happy to help out.
Happy Column Building!

You May Also Like
- How To Display Recent Posts With Thumbnails In WordPress

- How To Add An Affiliate Disclosure To Your Posts

- What Is Wealthy Affiliate – Everything You Need To Know